
Crea un servizio REST Jersey molto semplice e invia dati JSON dal client Java
Pubblicato: 2013-11-29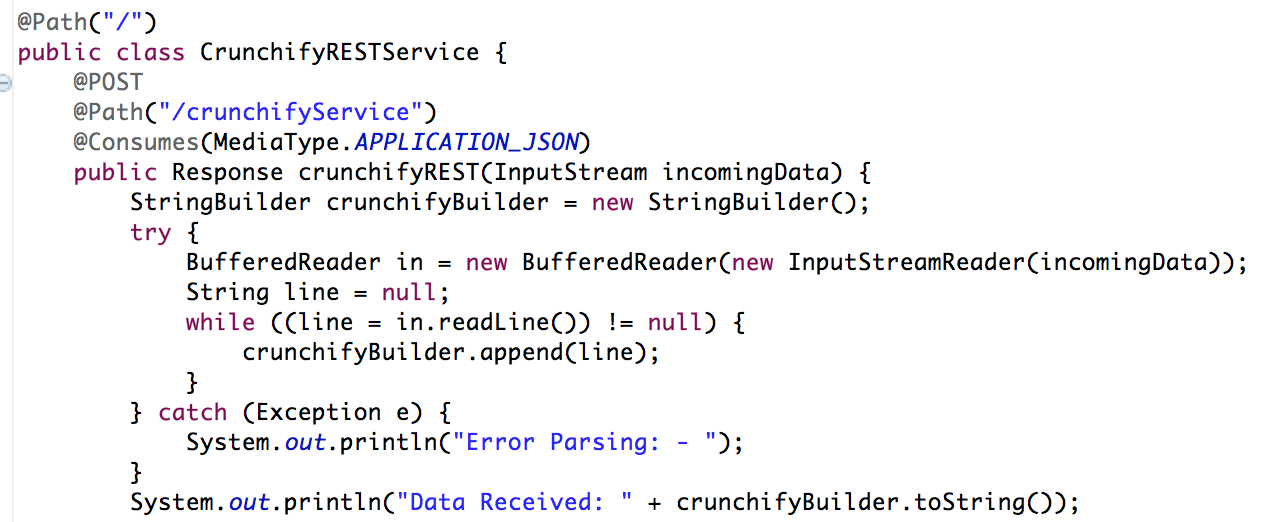
Di recente devo passare i dati JSON al servizio REST e non avevo alcun client semplice a portata di mano. Ma ha creato un programma Java molto semplice che legge i dati JSON dal file e lo invia al servizio REST.
Il Representational State Transfer (REST) ha ottenuto un'ampia accettazione in tutto il Web come alternativa più semplice ai servizi Web basati su SOAP e Web Services Description Language (WSDL). La prova chiave di questo cambiamento nella progettazione dell'interfaccia è l'adozione di REST da parte dei principali fornitori di servizi Web 2.0, inclusi Yahoo, Google e Facebook, che hanno deprecato o passato interfacce basate su SOAP e WSDL a favore di un più facile da usare, modello orientato alle risorse per esporre i propri servizi. In questo articolo, Alex Rodriguez ti introduce ai principi di base del REST.
Iniziamo a codificare questo:
- Crea un servizio Web RESTFull
- File Java: CrunchifyRESTService.java
- file web.xml
- Crea client RESTService
- File CrunchifyRESTServiceClient.java
Un altro deve leggere: Esempio/Tutorial Spring MVC: Hello World – Spring MVC 3.2.1
Passo 1
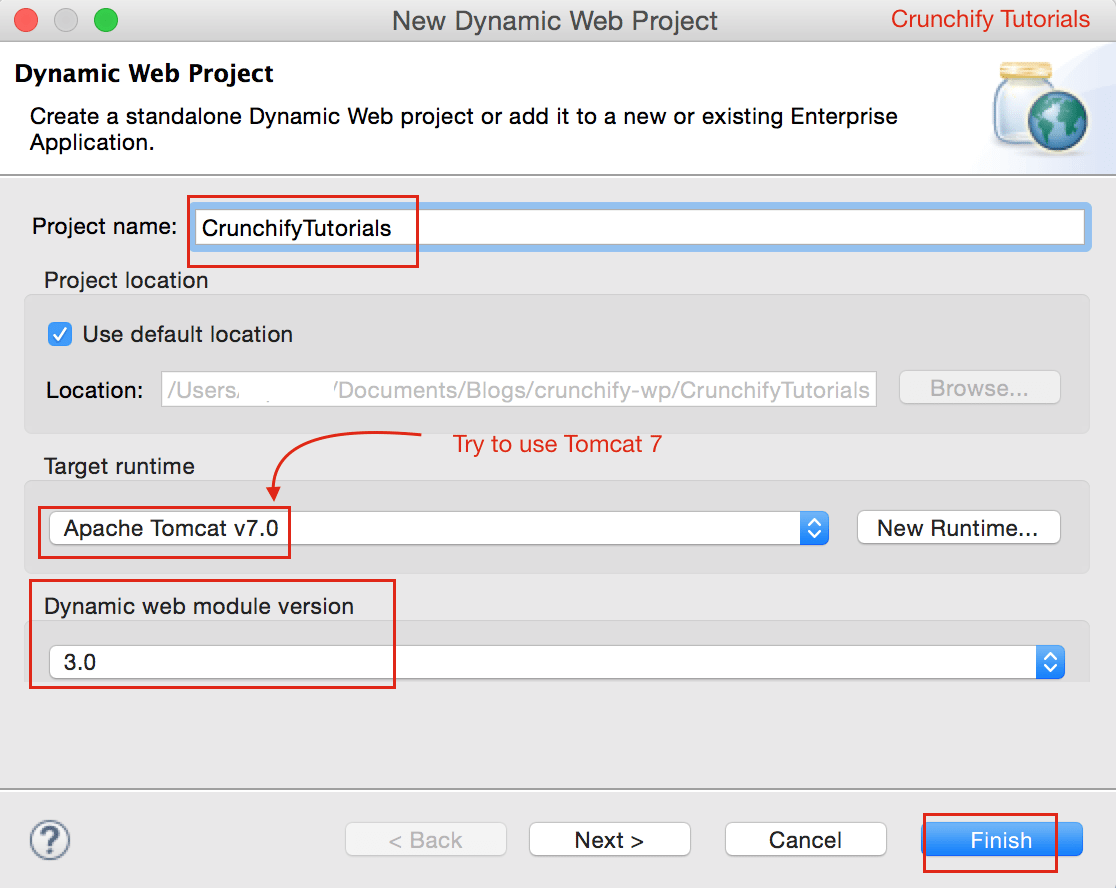
In Eclipse => File => New => Dynamic Web Project . Chiamalo come " CrunchifyTutorials ". Il tutorial di seguito funziona anche con Tomcat 8 .
Passaggio 2: creare un file descrittore di distribuzione
Se non vedi web.xml (descrittore di distribuzione) in WebContent\WEB-INF\ , segui questi passaggi.
Apri web.xml e sostituisci il contenuto con i seguenti contenuti:
|
1 2 3 4 5 6 7 8 9 10 11 12 13 14 15 16 17 18 19 20 21 22 23 24 25 |
<? xml version = "1.0" encoding = "UTF-8" ?> < web - app xmlns = "http://java.sun.com/xml/ns/javaee" xmlns : xsi = "http://www.w3.org/2001/XMLSchema-instance" xsi : schemaLocation = "http://java.sun.com/xml/ns/javaee http://java.sun.com/xml/ns/javaee/web-app_3_0.xsd" version = "3.0" > < display - name > CrunchifyRESTJerseyExample < / display - name > < welcome - file - list > < welcome - file > index . html < / welcome - file > < welcome - file > index . htm < / welcome - file > < welcome - file > index . jsp < / welcome - file > < welcome - file > default . html < / welcome - file > < welcome - file > default . htm < / welcome - file > < welcome - file > default . jsp < / welcome - file > < / welcome - file - list > < servlet > < servlet - name > Jersey Web Application < / servlet - name > < servlet - class > com . sun . jersey . spi . container . servlet . ServletContainer < / servlet - class > < load - on - startup > 1 < / load - on - startup > < / servlet > < servlet - mapping > < servlet - name > Jersey Web Application < / servlet - name > < url - pattern > / api /* < / url - pattern > < / servlet - mapping > < / web - app > |
Passaggio 3 Converti progetto in progetto Maven
Segui questo tutorial: https://crunchify.com/how-to-convert-existing-java-project-to-maven-in-eclipse/. Ecco il mio file pom.xml.
|
1 2 3 4 5 6 7 8 9 10 11 12 13 14 15 16 17 18 19 20 21 22 23 24 25 26 27 28 29 30 31 32 33 34 35 36 37 38 39 40 41 42 43 44 45 46 |
< project xmlns = "http://maven.apache.org/POM/4.0.0" xmlns : xsi = "http://www.w3.org/2001/XMLSchema-instance" xsi : schemaLocation = "http://maven.apache.org/POM/4.0.0 http://maven.apache.org/xsd/maven-4.0.0.xsd" > < modelVersion > 4.0.0 < / modelVersion > < groupId > CrunchifyTutorials < / groupId > < artifactId > CrunchifyTutorials < / artifactId > < version > 0.0.1 - SNAPSHOT < / version > < packaging > war < / packaging > < build > < sourceDirectory > src < / sourceDirectory > < plugins > < plugin > < artifactId > maven - compiler - plugin < / artifactId > < version > 3.1 < / version > < configuration > < source > 1.8 < / source > < target > 1.8 < / target > < / configuration > < / plugin > < plugin > < artifactId > maven - war - plugin < / artifactId > < version > 2.4 < / version > < configuration > < warSourceDirectory > WebContent < / warSourceDirectory > < failOnMissingWebXml > false < / failOnMissingWebXml > < / configuration > < / plugin > < / plugins > < / build > < dependencies > < dependency > < groupId > asm < / groupId > < artifactId > asm - all < / artifactId > < version > 3.3.1 < / version > < / dependency > < dependency > < groupId > com . sun . jersey < / groupId > < artifactId > jersey - bundle < / artifactId > < version > 1.14 < / version > < / dependency > < dependency > < groupId > org . json < / groupId > < artifactId > json < / artifactId > < version > 20090211 < / version > < / dependency > < / dependencies > < / project > |
Passaggio 4
Crea il servizio RESTFull: CrunchifyRESTService.java . Qui creeremo due servizi:
-
/api/crunchifyService– POST call – lo useremo con il nostro test -
/api/verify– OTTIENI chiamata – solo per assicurarsi che il servizio sia stato avviato correttamente
|
1 2 3 4 5 6 7 8 9 10 11 12 13 14 15 16 17 18 19 20 21 22 23 24 25 26 27 28 29 30 31 32 33 34 35 36 37 38 39 40 41 42 43 44 45 46 47 48 49 50 51 52 53 |
package com . crunchify . tutorials ; /** * @author Crunchify.com * */ import java . io . BufferedReader ; import java . io . InputStream ; import java . io . InputStreamReader ; import javax . print . attribute . standard . Media ; import javax . ws . rs . Consumes ; import javax . ws . rs . GET ; import javax . ws . rs . POST ; import javax . ws . rs . Path ; import javax . ws . rs . Produces ; import javax . ws . rs . core . MediaType ; import javax . ws . rs . core . Response ; @Path ( "/" ) public class CrunchifyRESTService { @POST @Path ( "/crunchifyService" ) @Consumes ( MediaType . APPLICATION_JSON ) public Response crunchifyREST ( InputStream incomingData ) { StringBuilder crunchifyBuilder = new StringBuilder ( ) ; try { BufferedReader in = new BufferedReader ( new InputStreamReader ( incomingData ) ) ; String line = null ; while ( ( line = in . readLine ( ) ) ! = null ) { crunchifyBuilder . append ( line ) ; } } catch ( Exception e ) { System . out . println ( "Error Parsing: - " ) ; } System . out . println ( "Data Received: " + crunchifyBuilder . toString ( ) ) ; // return HTTP response 200 in case of success return Response . status ( 200 ) . entity ( crunchifyBuilder . toString ( ) ) . build ( ) ; } @GET @Path ( "/verify" ) @Produces ( MediaType . TEXT_PLAIN ) public Response verifyRESTService ( InputStream incomingData ) { String result = "CrunchifyRESTService Successfully started.." ; // return HTTP response 200 in case of success return Response . status ( 200 ) . entity ( result ) . build ( ) ; } } |

Passaggio 5
Distribuisci il progetto CrunchifyTutorials su Tomcat. Il progetto Web deve essere distribuito senza alcuna eccezione.
- Fare clic con il pulsante destro del mouse sulla
Servers tabin Eclipse - Fare clic su
Add and Remove...Progetto - Aggiungi Project CrunchifyTutorials a destra
Configured:lato. - Fare clic su
Publish - Fare clic su
Start
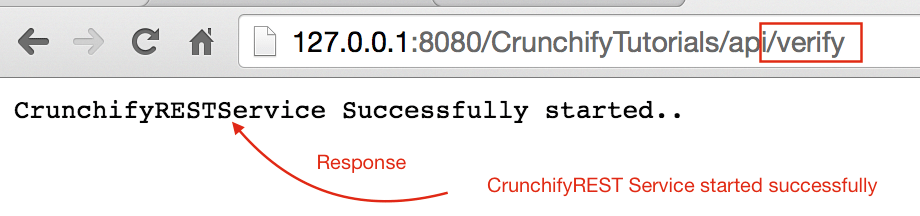
Passaggio 6: verifica del servizio REST
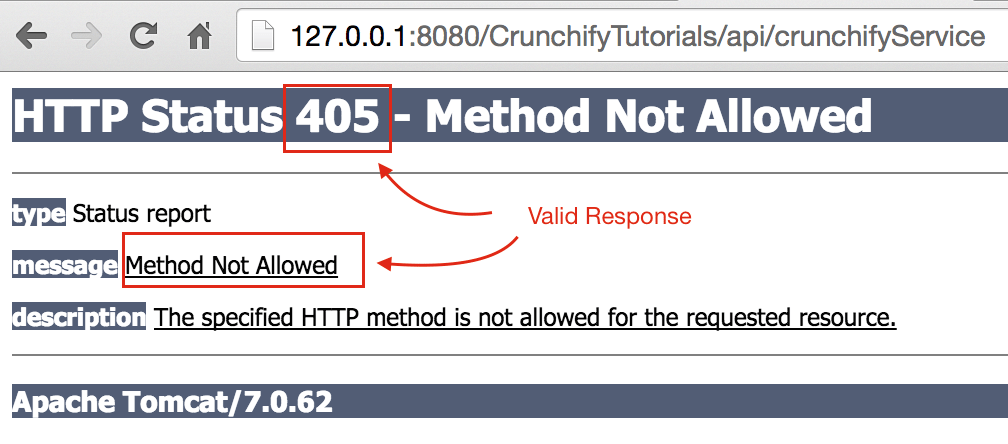
Il servizio di riposo dovrebbe essere accessibile utilizzando questo URL: http://127.0.0.1:8080/CrunchifyTutorials/api/verify
Se provi ad accedere a http://127.0.0.1:8080/CrunchifyTutorials/api/crunchifyService vedrai il codice di errore 405 - Method not allowed - che è una risposta valida. Come puoi vedere, è una chiamata POST e dovresti aspettarti alcuni dati con la richiesta.
Andiamo avanti.
Passaggio 7
Copia sotto il contenuto JSON e inseriscilo nel file C:\\CrunchifyJSON.txt /Users/<username>/Documents/CrunchifyJSON.txt Windows o nel file /Users/<nome utente>/Documents/CrunchifyJSON.txt se Macbook.
|
1 2 3 4 5 6 7 |
{ "tutorials" : { "id" : "Crunchify" , "topic" : "REST Service" , "description" : "This is REST Service Example by Crunchify." } } |
Passaggio 8
Crea client di chiamata REST: CrunchifyRESTServiceClient.java.
Si prega change path to CrunchifyJSON.txt nel programma sottostante.
|
1 2 3 4 5 6 7 8 9 10 11 12 13 14 15 16 17 18 19 20 21 22 23 24 25 26 27 28 29 30 31 32 33 34 35 36 37 38 39 40 41 42 43 44 45 46 47 48 49 50 51 52 53 54 55 56 57 58 59 60 61 62 63 64 |
package com . crunchify . tutorials ; import java . io . BufferedReader ; import java . io . FileInputStream ; import java . io . InputStream ; import java . io . InputStreamReader ; import java . io . OutputStreamWriter ; import java . net . URL ; import java . net . URLConnection ; import org . json . JSONObject ; /** * @author Crunchify.com * */ public class CrunchifyRESTServiceClient { public static void main ( String [ ] args ) { String string = "" ; try { // Step1: Let's 1st read file from fileSystem // Change CrunchifyJSON.txt path here InputStream crunchifyInputStream = new FileInputStream ( "/Users/<username>/Documents/CrunchifyJSON.txt" ) ; InputStreamReader crunchifyReader = new InputStreamReader ( crunchifyInputStream ) ; BufferedReader br = new BufferedReader ( crunchifyReader ) ; String line ; while ( ( line = br . readLine ( ) ) ! = null ) { string += line + "\n" ; } JSONObject jsonObject = new JSONObject ( string ) ; System . out . println ( jsonObject ) ; // Step2: Now pass JSON File Data to REST Service try { URL url = new URL ( "http://localhost:8080/CrunchifyTutorials/api/crunchifyService" ) ; URLConnection connection = url . openConnection ( ) ; connection . setDoOutput ( true ) ; connection . setRequestProperty ( "Content-Type" , "application/json" ) ; connection . setConnectTimeout ( 5000 ) ; connection . setReadTimeout ( 5000 ) ; OutputStreamWriter out = new OutputStreamWriter ( connection . getOutputStream ( ) ) ; out . write ( jsonObject . toString ( ) ) ; out . close ( ) ; BufferedReader in = new BufferedReader ( new InputStreamReader ( connection . getInputStream ( ) ) ) ; while ( in . readLine ( ) ! = null ) { } System . out . println ( "\nCrunchify REST Service Invoked Successfully.." ) ; in . close ( ) ; } catch ( Exception e ) { System . out . println ( "\nError while calling Crunchify REST Service" ) ; System . out . println ( e ) ; } br . close ( ) ; } catch ( Exception e ) { e . printStackTrace ( ) ; } } } |
Passaggio 9
Ora eseguiamo il programma client facendo clic con il pulsante destro del mouse su CrunchifyRESTServiceClient.java e dovresti vedere sotto due output
1) nella console Tomcat

2) nella console del client locale
