
Créer un service REST Jersey très simple et envoyer des données JSON à partir du client Java
Publié: 2013-11-29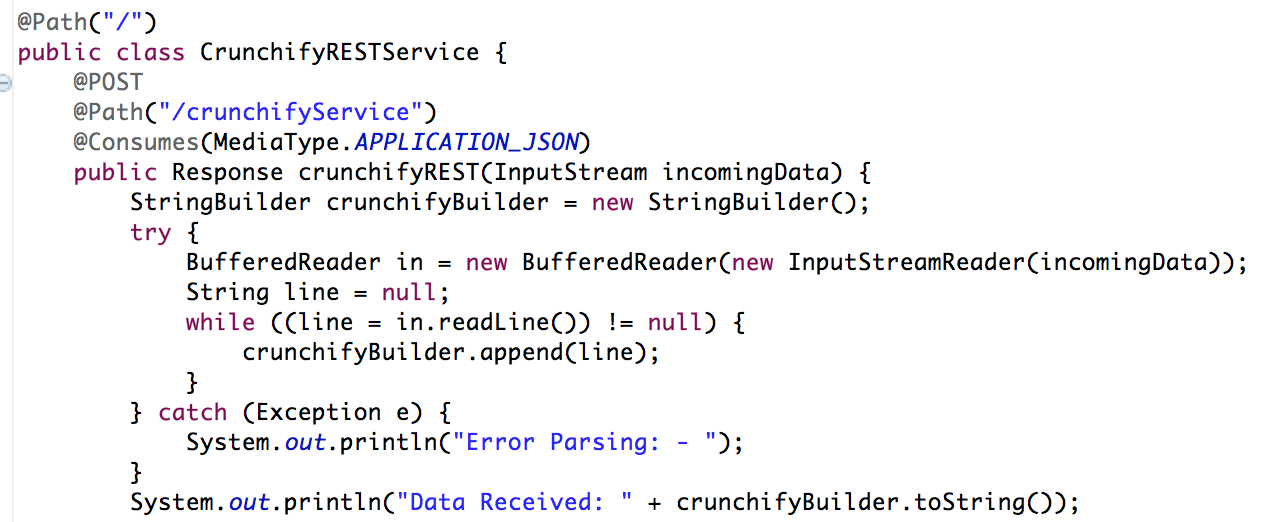
Récemment, je dois transmettre des données JSON au service REST et je n'avais aucun client simple à portée de main. Mais créé un programme Java très simple qui lit les données JSON du fichier et les envoie au service REST.
Le transfert d'état représentatif (REST) a été largement accepté sur le Web en tant qu'alternative plus simple aux services Web basés sur SOAP et WSDL (Web Services Description Language). La principale preuve de ce changement dans la conception de l'interface est l'adoption de REST par les principaux fournisseurs de services Web 2.0, notamment Yahoo, Google et Facebook, qui ont abandonné ou abandonné les interfaces basées sur SOAP et WSDL en faveur d'une interface plus facile à utiliser, modèle orienté ressources pour exposer leurs services. Dans cet article, Alex Rodriguez vous présente les principes de base de REST.
Commençons à coder ceci :
- Créer un service Web RESTFul
- Fichier Java : CrunchifyRESTService.java
- fichier web.xml
- Créer un client de service REST
- Fichier CrunchifyRESTServiceClient.java
Un autre doit lire : Spring MVC Exemple/Tutoriel : Hello World – Spring MVC 3.2.1
Étape 1
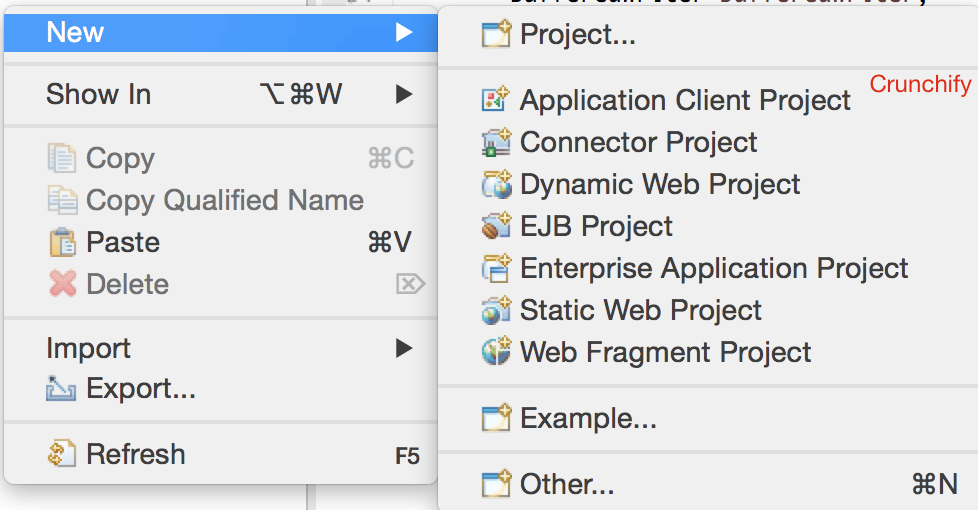
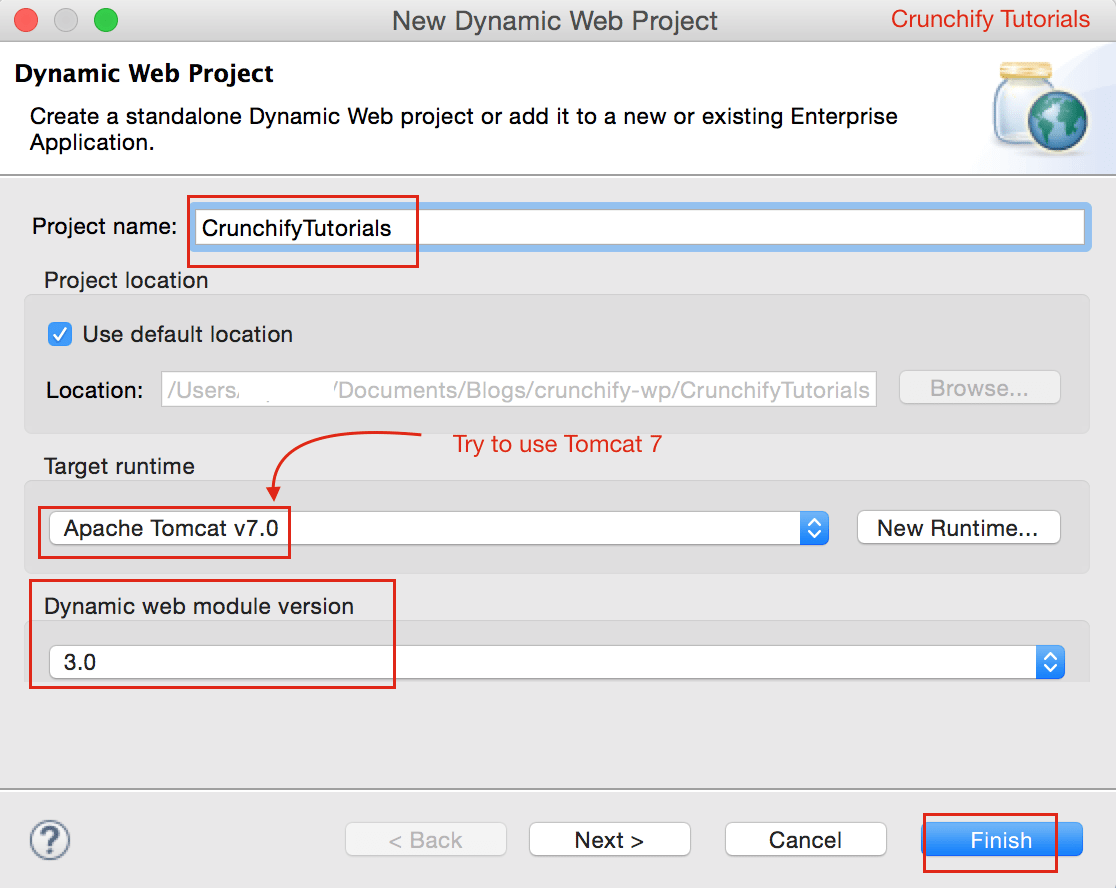
Dans Eclipse => File => New => Dynamic Web Project . Nommez-le comme " CrunchifyTutorials ". Le tutoriel ci-dessous fonctionne également avec Tomcat 8 .
Étape 2 Créer un fichier de descripteur de déploiement
Si vous ne voyez pas web.xml (descripteur de déploiement) sous WebContent\WEB-INF\ , suivez ces étapes.
Ouvrez web.xml et remplacez le contenu par le contenu ci-dessous :
|
1 2 3 4 5 6 7 8 9 10 11 12 13 14 15 16 17 18 19 20 21 22 23 24 25 |
<? xml version = "1.0" encoding = "UTF-8" ?> < web - app xmlns = "http://java.sun.com/xml/ns/javaee" xmlns : xsi = "http://www.w3.org/2001/XMLSchema-instance" xsi : schemaLocation = "http://java.sun.com/xml/ns/javaee http://java.sun.com/xml/ns/javaee/web-app_3_0.xsd" version = "3.0" > < display - name > CrunchifyRESTJerseyExample < / display - name > < welcome - file - list > < welcome - file > index . html < / welcome - file > < welcome - file > index . htm < / welcome - file > < welcome - file > index . jsp < / welcome - file > < welcome - file > default . html < / welcome - file > < welcome - file > default . htm < / welcome - file > < welcome - file > default . jsp < / welcome - file > < / welcome - file - list > < servlet > < servlet - name > Jersey Web Application < / servlet - name > < servlet - class > com . sun . jersey . spi . container . servlet . ServletContainer < / servlet - class > < load - on - startup > 1 < / load - on - startup > < / servlet > < servlet - mapping > < servlet - name > Jersey Web Application < / servlet - name > < url - pattern > / api /* < / url - pattern > < / servlet - mapping > < / web - app > |
Étape 3 Convertir le projet en projet Maven
Suivez ce tutoriel : https://crunchify.com/how-to-convert-existing-java-project-to-maven-in-eclipse/. Voici mon fichier pom.xml.
|
1 2 3 4 5 6 7 8 9 10 11 12 13 14 15 16 17 18 19 20 21 22 23 24 25 26 27 28 29 30 31 32 33 34 35 36 37 38 39 40 41 42 43 44 45 46 |
< project xmlns = "http://maven.apache.org/POM/4.0.0" xmlns : xsi = "http://www.w3.org/2001/XMLSchema-instance" xsi : schemaLocation = "http://maven.apache.org/POM/4.0.0 http://maven.apache.org/xsd/maven-4.0.0.xsd" > < modelVersion > 4.0.0 < / modelVersion > < groupId > CrunchifyTutorials < / groupId > < artifactId > CrunchifyTutorials < / artifactId > < version > 0.0.1 - SNAPSHOT < / version > < packaging > war < / packaging > < build > < sourceDirectory > src < / sourceDirectory > < plugins > < plugin > < artifactId > maven - compiler - plugin < / artifactId > < version > 3.1 < / version > < configuration > < source > 1.8 < / source > < target > 1.8 < / target > < / configuration > < / plugin > < plugin > < artifactId > maven - war - plugin < / artifactId > < version > 2.4 < / version > < configuration > < warSourceDirectory > WebContent < / warSourceDirectory > < failOnMissingWebXml > false < / failOnMissingWebXml > < / configuration > < / plugin > < / plugins > < / build > < dependencies > < dependency > < groupId > asm < / groupId > < artifactId > asm - all < / artifactId > < version > 3.3.1 < / version > < / dependency > < dependency > < groupId > com . sun . jersey < / groupId > < artifactId > jersey - bundle < / artifactId > < version > 1.14 < / version > < / dependency > < dependency > < groupId > org . json < / groupId > < artifactId > json < / artifactId > < version > 20090211 < / version > < / dependency > < / dependencies > < / project > |
Étape 4
Créez le service RESTFul : CrunchifyRESTService.java . Ici, nous allons créer deux services :
-
/api/crunchifyService- appel POST - nous l'utiliserons avec notre test -
/api/verify- appel GET - juste pour s'assurer que le service a démarré avec succès
|
1 2 3 4 5 6 7 8 9 10 11 12 13 14 15 16 17 18 19 20 21 22 23 24 25 26 27 28 29 30 31 32 33 34 35 36 37 38 39 40 41 42 43 44 45 46 47 48 49 50 51 52 53 |
package com . crunchify . tutorials ; /** * @author Crunchify.com * */ import java . io . BufferedReader ; import java . io . InputStream ; import java . io . InputStreamReader ; import javax . print . attribute . standard . Media ; import javax . ws . rs . Consumes ; import javax . ws . rs . GET ; import javax . ws . rs . POST ; import javax . ws . rs . Path ; import javax . ws . rs . Produces ; import javax . ws . rs . core . MediaType ; import javax . ws . rs . core . Response ; @Path ( "/" ) public class CrunchifyRESTService { @POST @Path ( "/crunchifyService" ) @Consumes ( MediaType . APPLICATION_JSON ) public Response crunchifyREST ( InputStream incomingData ) { StringBuilder crunchifyBuilder = new StringBuilder ( ) ; try { BufferedReader in = new BufferedReader ( new InputStreamReader ( incomingData ) ) ; String line = null ; while ( ( line = in . readLine ( ) ) ! = null ) { crunchifyBuilder . append ( line ) ; } } catch ( Exception e ) { System . out . println ( "Error Parsing: - " ) ; } System . out . println ( "Data Received: " + crunchifyBuilder . toString ( ) ) ; // return HTTP response 200 in case of success return Response . status ( 200 ) . entity ( crunchifyBuilder . toString ( ) ) . build ( ) ; } @GET @Path ( "/verify" ) @Produces ( MediaType . TEXT_PLAIN ) public Response verifyRESTService ( InputStream incomingData ) { String result = "CrunchifyRESTService Successfully started.." ; // return HTTP response 200 in case of success return Response . status ( 200 ) . entity ( result ) . build ( ) ; } } |

Étape-5
Déployez le projet CrunchifyTutorials sur Tomcat. Le projet Web doit être déployé sans aucune exception.
- Clic droit sur
Servers tabdans Eclipse - Cliquez sur
Add and Remove...Projet - Ajoutez Project CrunchifyTutorials à droite
Configured:côté. - Cliquez sur
Publish - Cliquez sur
Start
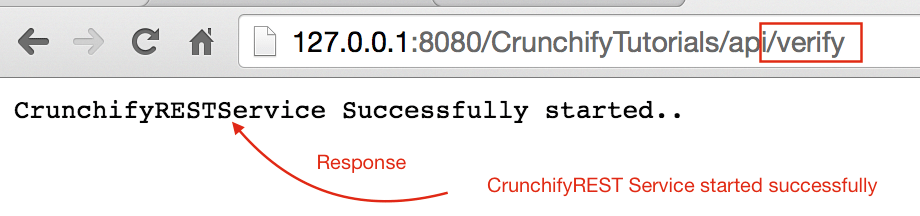
Étape 6 Vérifier le service REST
Le service Rest doit être accessible à l'aide de cette URL : http://127.0.0.1:8080/CrunchifyTutorials/api/verify
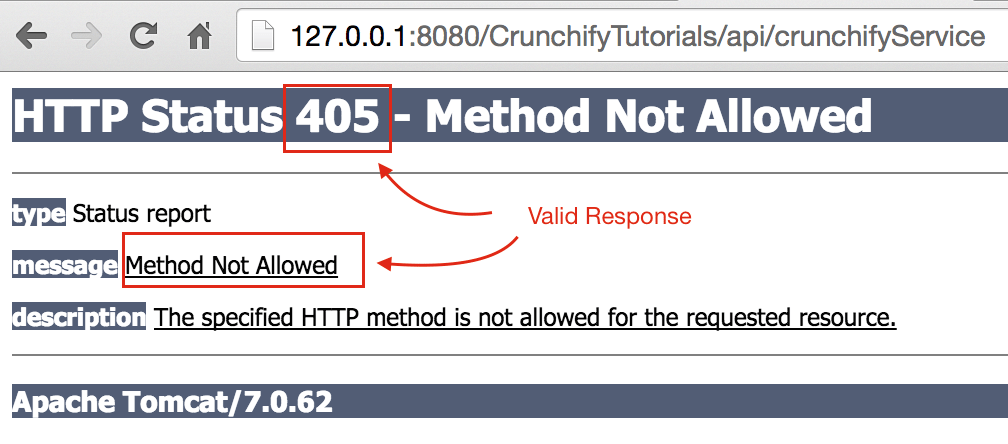
Si vous essayez d'accéder à http://127.0.0.1:8080/CrunchifyTutorials/api/crunchifyService, vous verrez le code d'erreur 405 - Method not allowed - qui est une réponse valide. Comme vous pouvez le voir, il s'agit d'un appel POST et vous devez vous attendre à des données avec la requête.
Allons-nous en.
Étape-7
Copiez le contenu JSON ci-dessous et placez-le sous le fichier C:\\CrunchifyJSON.txt pour Windows ou le fichier /Users/<username>/Documents/CrunchifyJSON.txt si Macbook.
|
1 2 3 4 5 6 7 |
{ "tutorials" : { "id" : "Crunchify" , "topic" : "REST Service" , "description" : "This is REST Service Example by Crunchify." } } |
Étape-8
Créez un client d'appel REST : CrunchifyRESTServiceClient.java.
Veuillez change path to CrunchifyJSON.txt dans le programme ci-dessous.
|
1 2 3 4 5 6 7 8 9 10 11 12 13 14 15 16 17 18 19 20 21 22 23 24 25 26 27 28 29 30 31 32 33 34 35 36 37 38 39 40 41 42 43 44 45 46 47 48 49 50 51 52 53 54 55 56 57 58 59 60 61 62 63 64 |
package com . crunchify . tutorials ; import java . io . BufferedReader ; import java . io . FileInputStream ; import java . io . InputStream ; import java . io . InputStreamReader ; import java . io . OutputStreamWriter ; import java . net . URL ; import java . net . URLConnection ; import org . json . JSONObject ; /** * @author Crunchify.com * */ public class CrunchifyRESTServiceClient { public static void main ( String [ ] args ) { String string = "" ; try { // Step1: Let's 1st read file from fileSystem // Change CrunchifyJSON.txt path here InputStream crunchifyInputStream = new FileInputStream ( "/Users/<username>/Documents/CrunchifyJSON.txt" ) ; InputStreamReader crunchifyReader = new InputStreamReader ( crunchifyInputStream ) ; BufferedReader br = new BufferedReader ( crunchifyReader ) ; String line ; while ( ( line = br . readLine ( ) ) ! = null ) { string += line + "\n" ; } JSONObject jsonObject = new JSONObject ( string ) ; System . out . println ( jsonObject ) ; // Step2: Now pass JSON File Data to REST Service try { URL url = new URL ( "http://localhost:8080/CrunchifyTutorials/api/crunchifyService" ) ; URLConnection connection = url . openConnection ( ) ; connection . setDoOutput ( true ) ; connection . setRequestProperty ( "Content-Type" , "application/json" ) ; connection . setConnectTimeout ( 5000 ) ; connection . setReadTimeout ( 5000 ) ; OutputStreamWriter out = new OutputStreamWriter ( connection . getOutputStream ( ) ) ; out . write ( jsonObject . toString ( ) ) ; out . close ( ) ; BufferedReader in = new BufferedReader ( new InputStreamReader ( connection . getInputStream ( ) ) ) ; while ( in . readLine ( ) ! = null ) { } System . out . println ( "\nCrunchify REST Service Invoked Successfully.." ) ; in . close ( ) ; } catch ( Exception e ) { System . out . println ( "\nError while calling Crunchify REST Service" ) ; System . out . println ( e ) ; } br . close ( ) ; } catch ( Exception e ) { e . printStackTrace ( ) ; } } } |
Étape-9
Exécutons maintenant le programme client en faisant un clic droit sur CrunchifyRESTServiceClient.java et vous devriez voir ci-dessous deux sorties
1) dans la console Tomcat

2) dans la console client locale
