
أنشئ خدمة Jersey REST بسيطة جدًا وأرسل بيانات JSON من عميل Java
نشرت: 2013-11-29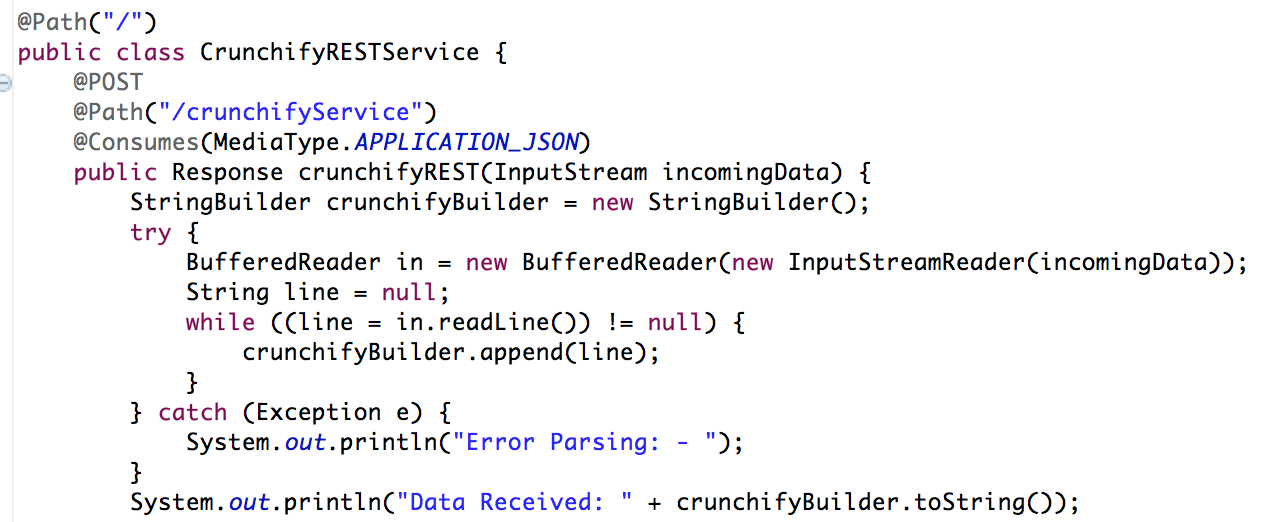
اضطررت مؤخرًا إلى تمرير بيانات JSON إلى خدمة REST ولم يكن لدي أي عميل بسيط في متناول يدي. ولكن تم إنشاء برنامج Java بسيط للغاية والذي يقرأ بيانات JSON من ملف ويرسلها إلى خدمة REST.
لقد حظي النقل التمثيلي للحالة (REST) بقبول واسع عبر الويب كبديل أبسط لخدمات الويب المستندة إلى SOAP ولغة وصف خدمات الويب (WSDL). الدليل الرئيسي على هذا التحول في تصميم الواجهة هو اعتماد REST من قبل مزودي خدمة Web 2.0 السائد - بما في ذلك Yahoo و Google و Facebook - الذين توقفوا عن استخدام الواجهات المستندة إلى SOAP و WSDL أو قاموا بتمريرها لصالح استخدام أسهل ، نموذج موجه نحو الموارد لفضح خدماتهم. في هذه المقالة ، يقدم لك Alex Rodriguez المبادئ الأساسية لـ REST.
لنبدأ في ترميز هذا:
- قم بإنشاء RESTFul Web Service
- ملف جافا: CrunchifyRESTService.java
- ملف web.xml
- إنشاء عميل RESTService
- ملف CrunchifyRESTServiceClient.java
يجب قراءة آخر: Spring MVC مثال / تعليمي: Hello World - Spring MVC 3.2.1
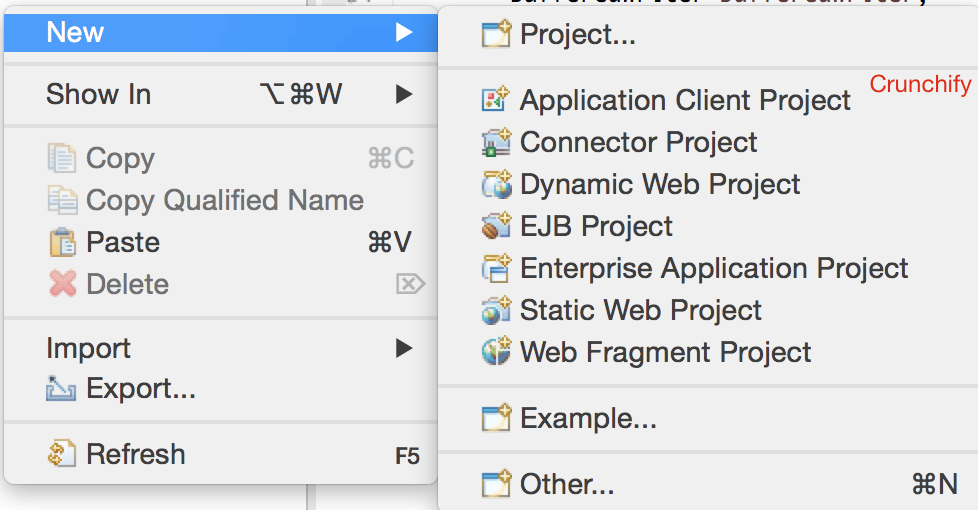
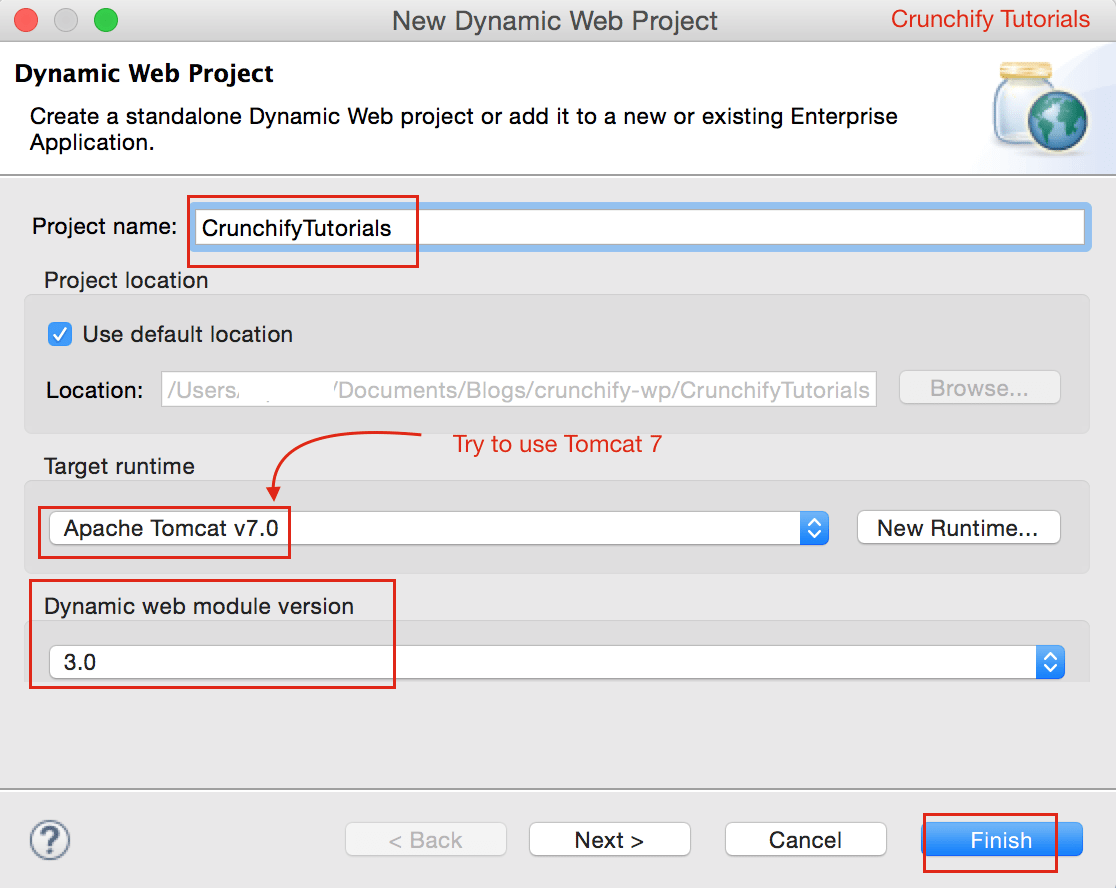
الخطوة 1
في Eclipse => File => New => Dynamic Web Project . سمها باسم " CrunchifyTutorials ". البرنامج التعليمي أدناه يعمل أيضًا مع Tomcat 8 .
الخطوة 2 إنشاء ملف واصف النشر
إذا كنت لا ترى web.xml (واصف النشر) ضمن WebContent\WEB-INF\ فاتبع هذه الخطوات.
افتح web.xml واستبدل المحتوى بالمحتويات أدناه:
|
1 2 3 4 5 6 7 8 9 10 11 12 13 14 15 16 17 18 19 20 21 22 23 24 25 |
<? xml version = "1.0" encoding = "UTF-8" ?> < web - app xmlns = "http://java.sun.com/xml/ns/javaee" xmlns : xsi = "http://www.w3.org/2001/XMLSchema-instance" xsi : schemaLocation = "http://java.sun.com/xml/ns/javaee http://java.sun.com/xml/ns/javaee/web-app_3_0.xsd" version = "3.0" > < display - name > CrunchifyRESTJerseyExample < / display - name > < welcome - file - list > < welcome - file > index . html < / welcome - file > < welcome - file > index . htm < / welcome - file > < welcome - file > index . jsp < / welcome - file > < welcome - file > default . html < / welcome - file > < welcome - file > default . htm < / welcome - file > < welcome - file > default . jsp < / welcome - file > < / welcome - file - list > < servlet > < servlet - name > Jersey Web Application < / servlet - name > < servlet - class > com . sun . jersey . spi . container . servlet . ServletContainer < / servlet - class > < load - on - startup > 1 < / load - on - startup > < / servlet > < servlet - mapping > < servlet - name > Jersey Web Application < / servlet - name > < url - pattern > / api /* < / url - pattern > < / servlet - mapping > < / web - app > |
الخطوة 3: تحويل المشروع إلى مشروع مخضرم
اتبع هذا البرنامج التعليمي: https://crunchify.com/how-to-convert-existing-java-project-to-maven-in-eclipse/. ها هو ملف pom.xml الخاص بي.
|
1 2 3 4 5 6 7 8 9 10 11 12 13 14 15 16 17 18 19 20 21 22 23 24 25 26 27 28 29 30 31 32 33 34 35 36 37 38 39 40 41 42 43 44 45 46 |
< project xmlns = "http://maven.apache.org/POM/4.0.0" xmlns : xsi = "http://www.w3.org/2001/XMLSchema-instance" xsi : schemaLocation = "http://maven.apache.org/POM/4.0.0 http://maven.apache.org/xsd/maven-4.0.0.xsd" > < modelVersion > 4.0.0 < / modelVersion > < groupId > CrunchifyTutorials < / groupId > < artifactId > CrunchifyTutorials < / artifactId > < version > 0.0.1 - SNAPSHOT < / version > < packaging > war < / packaging > < build > < sourceDirectory > src < / sourceDirectory > < plugins > < plugin > < artifactId > maven - compiler - plugin < / artifactId > < version > 3.1 < / version > < configuration > < source > 1.8 < / source > < target > 1.8 < / target > < / configuration > < / plugin > < plugin > < artifactId > maven - war - plugin < / artifactId > < version > 2.4 < / version > < configuration > < warSourceDirectory > WebContent < / warSourceDirectory > < failOnMissingWebXml > false < / failOnMissingWebXml > < / configuration > < / plugin > < / plugins > < / build > < dependencies > < dependency > < groupId > asm < / groupId > < artifactId > asm - all < / artifactId > < version > 3.3.1 < / version > < / dependency > < dependency > < groupId > com . sun . jersey < / groupId > < artifactId > jersey - bundle < / artifactId > < version > 1.14 < / version > < / dependency > < dependency > < groupId > org . json < / groupId > < artifactId > json < / artifactId > < version > 20090211 < / version > < / dependency > < / dependencies > < / project > |
الخطوة 4
قم بإنشاء خدمة RESTFul: CrunchifyRESTService.java . هنا سننشئ خدمتين:
-
/api/crunchifyService- مكالمة ما بعد - سنستخدم هذا مع اختبارنا -
/api/verify- GET call - فقط للتأكد من أن الخدمة بدأت بنجاح
|
1 2 3 4 5 6 7 8 9 10 11 12 13 14 15 16 17 18 19 20 21 22 23 24 25 26 27 28 29 30 31 32 33 34 35 36 37 38 39 40 41 42 43 44 45 46 47 48 49 50 51 52 53 |
package com . crunchify . tutorials ; /** * @author Crunchify.com * */ import java . io . BufferedReader ; import java . io . InputStream ; import java . io . InputStreamReader ; import javax . print . attribute . standard . Media ; import javax . ws . rs . Consumes ; import javax . ws . rs . GET ; import javax . ws . rs . POST ; import javax . ws . rs . Path ; import javax . ws . rs . Produces ; import javax . ws . rs . core . MediaType ; import javax . ws . rs . core . Response ; @Path ( "/" ) public class CrunchifyRESTService { @POST @Path ( "/crunchifyService" ) @Consumes ( MediaType . APPLICATION_JSON ) public Response crunchifyREST ( InputStream incomingData ) { StringBuilder crunchifyBuilder = new StringBuilder ( ) ; try { BufferedReader in = new BufferedReader ( new InputStreamReader ( incomingData ) ) ; String line = null ; while ( ( line = in . readLine ( ) ) ! = null ) { crunchifyBuilder . append ( line ) ; } } catch ( Exception e ) { System . out . println ( "Error Parsing: - " ) ; } System . out . println ( "Data Received: " + crunchifyBuilder . toString ( ) ) ; // return HTTP response 200 in case of success return Response . status ( 200 ) . entity ( crunchifyBuilder . toString ( ) ) . build ( ) ; } @GET @Path ( "/verify" ) @Produces ( MediaType . TEXT_PLAIN ) public Response verifyRESTService ( InputStream incomingData ) { String result = "CrunchifyRESTService Successfully started.." ; // return HTTP response 200 in case of success return Response . status ( 200 ) . entity ( result ) . build ( ) ; } } |

الخطوة 5
انشر دروس مشروع CrunchifyTutorials على Tomcat. يجب نشر مشروع الويب دون أي استثناء.
- انقر بزر الماوس الأيمن فوق
Servers tabفي Eclipse - انقر فوق
Add and Remove...مشروع - أضف Project CrunchifyTutorials إلى اليمين
Configured:الجانب. - انقر فوق
Publish - انقر فوق
Start
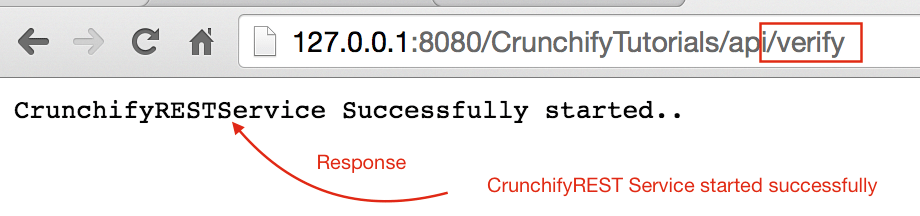
الخطوة 6 تحقق من خدمة REST
يجب أن تكون خدمة الراحة متاحة باستخدام عنوان URL هذا: http://127.0.0.1:8080/CrunchifyTutorials/api/verify
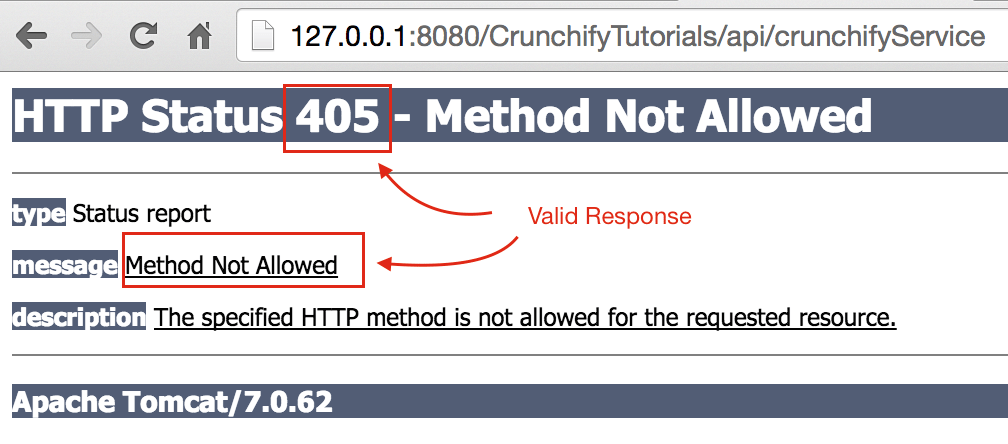
إذا حاولت الوصول إلى http://127.0.0.1:8080/CrunchifyTutorials/api/crunchifyService ، فسترى رمز الخطأ 405 - Method not allowed - وهي استجابة صالحة. كما ترى ، إنها مكالمة POST ويجب أن تتوقع بعض البيانات مع الطلب.
هيا لنذهب.
الخطوة 7
انسخ محتوى JSON أدناه وضعه ضمن ملف C:\\CrunchifyJSON.txt لنظام التشغيل windows أو ملف / المستخدمون / <اسم المستخدم> / المستندات / /Users/<username>/Documents/CrunchifyJSON.txt إذا كان جهاز Macbook.
|
1 2 3 4 5 6 7 |
{ "tutorials" : { "id" : "Crunchify" , "topic" : "REST Service" , "description" : "This is REST Service Example by Crunchify." } } |
الخطوة 8
قم بإنشاء REST Call Client: CrunchifyRESTServiceClient.java.
يرجى change path to CrunchifyJSON.txt في البرنامج أدناه.
|
1 2 3 4 5 6 7 8 9 10 11 12 13 14 15 16 17 18 19 20 21 22 23 24 25 26 27 28 29 30 31 32 33 34 35 36 37 38 39 40 41 42 43 44 45 46 47 48 49 50 51 52 53 54 55 56 57 58 59 60 61 62 63 64 |
package com . crunchify . tutorials ; import java . io . BufferedReader ; import java . io . FileInputStream ; import java . io . InputStream ; import java . io . InputStreamReader ; import java . io . OutputStreamWriter ; import java . net . URL ; import java . net . URLConnection ; import org . json . JSONObject ; /** * @author Crunchify.com * */ public class CrunchifyRESTServiceClient { public static void main ( String [ ] args ) { String string = "" ; try { // Step1: Let's 1st read file from fileSystem // Change CrunchifyJSON.txt path here InputStream crunchifyInputStream = new FileInputStream ( "/Users/<username>/Documents/CrunchifyJSON.txt" ) ; InputStreamReader crunchifyReader = new InputStreamReader ( crunchifyInputStream ) ; BufferedReader br = new BufferedReader ( crunchifyReader ) ; String line ; while ( ( line = br . readLine ( ) ) ! = null ) { string += line + "\n" ; } JSONObject jsonObject = new JSONObject ( string ) ; System . out . println ( jsonObject ) ; // Step2: Now pass JSON File Data to REST Service try { URL url = new URL ( "http://localhost:8080/CrunchifyTutorials/api/crunchifyService" ) ; URLConnection connection = url . openConnection ( ) ; connection . setDoOutput ( true ) ; connection . setRequestProperty ( "Content-Type" , "application/json" ) ; connection . setConnectTimeout ( 5000 ) ; connection . setReadTimeout ( 5000 ) ; OutputStreamWriter out = new OutputStreamWriter ( connection . getOutputStream ( ) ) ; out . write ( jsonObject . toString ( ) ) ; out . close ( ) ; BufferedReader in = new BufferedReader ( new InputStreamReader ( connection . getInputStream ( ) ) ) ; while ( in . readLine ( ) ! = null ) { } System . out . println ( "\nCrunchify REST Service Invoked Successfully.." ) ; in . close ( ) ; } catch ( Exception e ) { System . out . println ( "\nError while calling Crunchify REST Service" ) ; System . out . println ( e ) ; } br . close ( ) ; } catch ( Exception e ) { e . printStackTrace ( ) ; } } } |
الخطوة 9
لنقم الآن بتشغيل برنامج العميل بالنقر بزر الماوس الأيمن على CrunchifyRESTServiceClient.java وسترى أدناه ناتجين
1) في Tomcat Console

2) في Local Client Console
