
สร้างบริการ Jersey REST ที่ง่ายมากและส่งข้อมูล JSON จาก Java Client
เผยแพร่แล้ว: 2013-11-29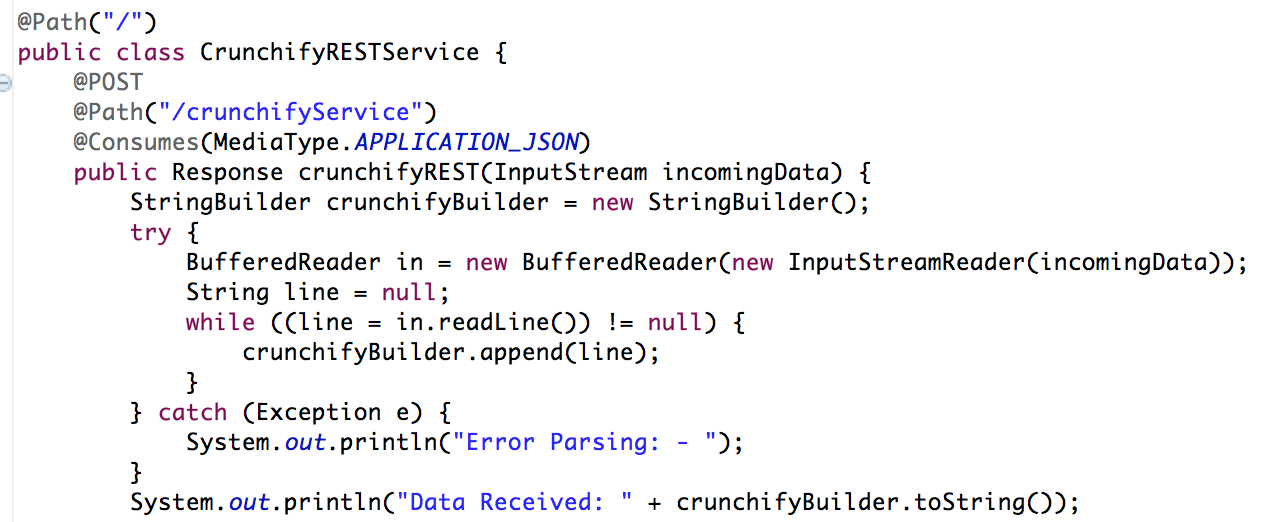
เมื่อเร็ว ๆ นี้ฉันต้องส่งข้อมูล JSON ไปยัง REST Service และไม่มีไคลเอนต์แบบง่าย ๆ ที่มีประโยชน์ แต่สร้างโปรแกรม Java ที่ง่ายมากซึ่งอ่านข้อมูล JSON จากไฟล์และส่งไปยังบริการ REST
Representational State Transfer (REST) ได้รับการยอมรับอย่างกว้างขวางทั่วทั้งเว็บว่าเป็นทางเลือกที่ง่ายกว่าสำหรับบริการบนเว็บที่ใช้ SOAP และ Web Services Description Language (WSDL) หลักฐานสำคัญของการเปลี่ยนแปลงในการออกแบบอินเทอร์เฟซนี้คือการนำ REST มาใช้โดยผู้ให้บริการ Web 2.0 กระแสหลัก ซึ่งรวมถึง Yahoo, Google และ Facebook ซึ่งเลิกใช้หรือส่งต่อบนอินเทอร์เฟซแบบ SOAP และ WSDL เพื่อให้ง่ายต่อการใช้งาน โมเดลเชิงทรัพยากรเพื่อแสดงบริการของพวกเขา ในบทความนี้ Alex Rodriguez จะแนะนำให้คุณรู้จักกับหลักการพื้นฐานของ REST
มาเริ่มเขียนโค้ดกันเลย:
- สร้าง RESTFul Web Service
- ไฟล์ Java: CrunchifyRESTService.java
- ไฟล์ web.xml
- สร้าง RESTService Client
- ไฟล์ CrunchifyRESTServiceClient.java
อีกเรื่องที่ต้องอ่าน: Spring MVC Example/Tutorial: Hello World – Spring MVC 3.2.1
ขั้นตอนที่ 1
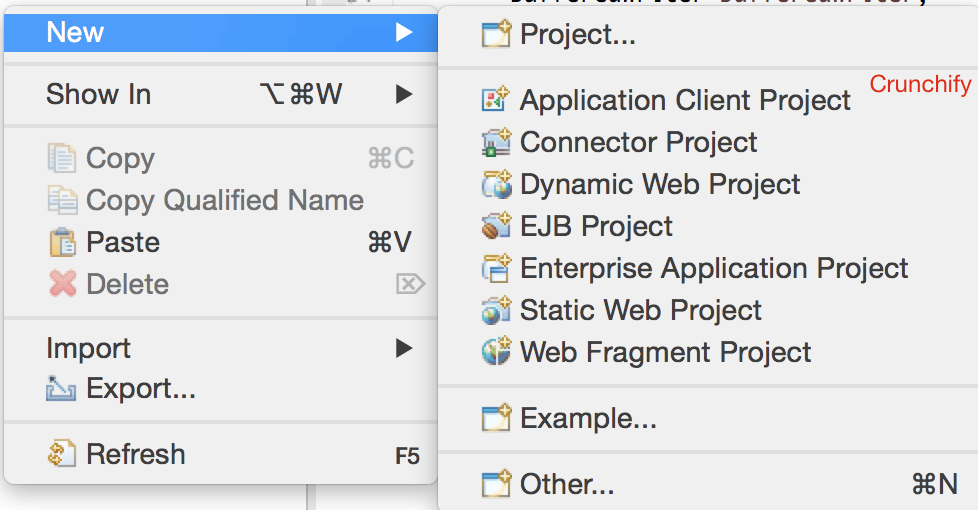
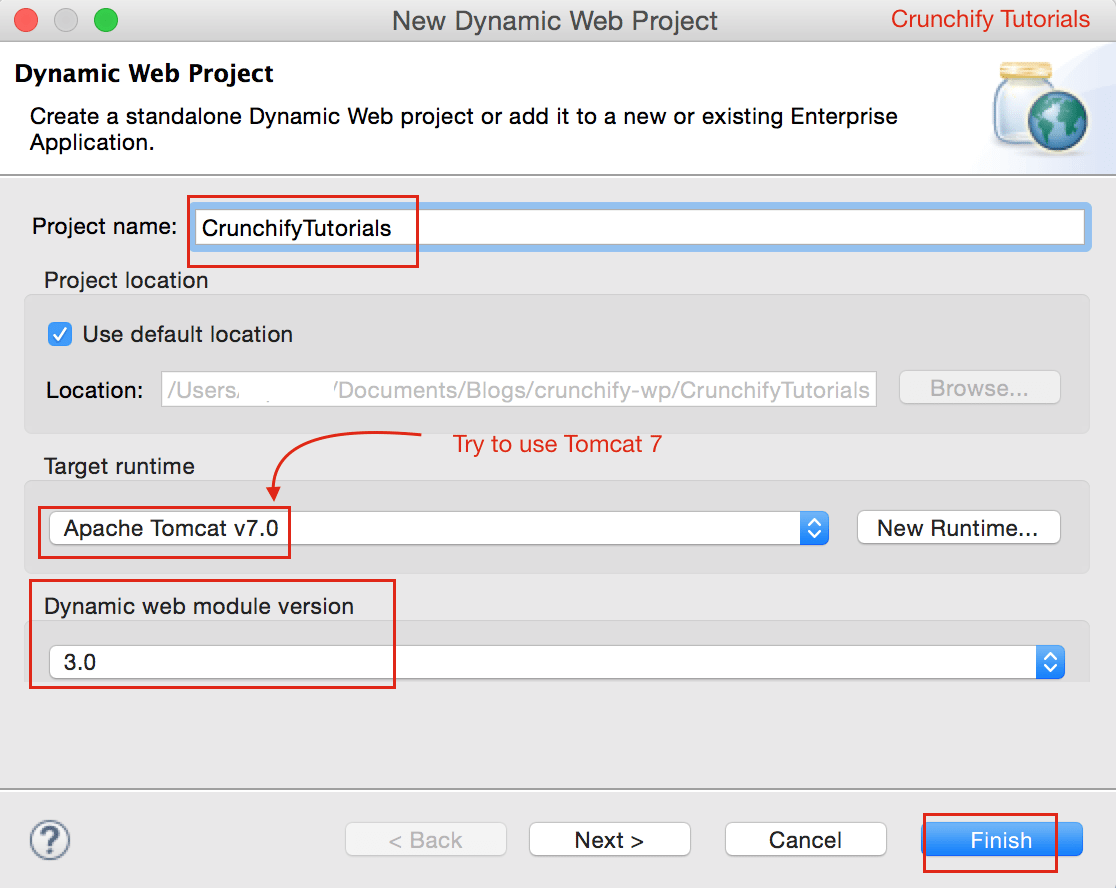
ใน Eclipse => File => New => Dynamic Web Project ตั้งชื่อเป็น “ CrunchifyTutorials ” บทช่วยสอนด้านล่างยังใช้งานได้กับ Tomcat 8
ขั้นตอนที่ 2 สร้างไฟล์ Deployment Descriptor File
หากคุณไม่เห็น web.xml (ตัวอธิบายการปรับใช้) ภายใต้ WebContent\WEB-INF\ ให้ทำตามขั้นตอนเหล่านี้
เปิด web.xml และแทนที่เนื้อหาด้วยเนื้อหาด้านล่าง:
|
1 2 3 4 5 6 7 8 9 10 11 12 13 14 15 16 17 18 19 20 21 22 23 24 25 |
<? xml version = "1.0" encoding = "UTF-8" ?> < web - app xmlns = "http://java.sun.com/xml/ns/javaee" xmlns : xsi = "http://www.w3.org/2001/XMLSchema-instance" xsi : schemaLocation = "http://java.sun.com/xml/ns/javaee http://java.sun.com/xml/ns/javaee/web-app_3_0.xsd" version = "3.0" > < display - name > CrunchifyRESTJerseyExample < / display - name > < welcome - file - list > < welcome - file > index . html < / welcome - file > < welcome - file > index . htm < / welcome - file > < welcome - file > index . jsp < / welcome - file > < welcome - file > default . html < / welcome - file > < welcome - file > default . htm < / welcome - file > < welcome - file > default . jsp < / welcome - file > < / welcome - file - list > < servlet > < servlet - name > Jersey Web Application < / servlet - name > < servlet - class > com . sun . jersey . spi . container . servlet . ServletContainer < / servlet - class > < load - on - startup > 1 < / load - on - startup > < / servlet > < servlet - mapping > < servlet - name > Jersey Web Application < / servlet - name > < url - pattern > / api /* < / url - pattern > < / servlet - mapping > < / web - app > |
ขั้นตอนที่ 3 แปลงโครงการเป็นโครงการ Maven
ทำตามบทช่วยสอนนี้: https://crunchify.com/how-to-convert-existing-java-project-to-maven-in-eclipse/ นี่คือไฟล์ pom.xml ของฉัน
|
1 2 3 4 5 6 7 8 9 10 11 12 13 14 15 16 17 18 19 20 21 22 23 24 25 26 27 28 29 30 31 32 33 34 35 36 37 38 39 40 41 42 43 44 45 46 |
< project xmlns = "http://maven.apache.org/POM/4.0.0" xmlns : xsi = "http://www.w3.org/2001/XMLSchema-instance" xsi : schemaLocation = "http://maven.apache.org/POM/4.0.0 http://maven.apache.org/xsd/maven-4.0.0.xsd" > < modelVersion > 4.0.0 < / modelVersion > < groupId > CrunchifyTutorials < / groupId > < artifactId > CrunchifyTutorials < / artifactId > < version > 0.0.1 - SNAPSHOT < / version > < packaging > war < / packaging > < build > < sourceDirectory > src < / sourceDirectory > < plugins > < plugin > < artifactId > maven - compiler - plugin < / artifactId > < version > 3.1 < / version > < configuration > < source > 1.8 < / source > < target > 1.8 < / target > < / configuration > < / plugin > < plugin > < artifactId > maven - war - plugin < / artifactId > < version > 2.4 < / version > < configuration > < warSourceDirectory > WebContent < / warSourceDirectory > < failOnMissingWebXml > false < / failOnMissingWebXml > < / configuration > < / plugin > < / plugins > < / build > < dependencies > < dependency > < groupId > asm < / groupId > < artifactId > asm - all < / artifactId > < version > 3.3.1 < / version > < / dependency > < dependency > < groupId > com . sun . jersey < / groupId > < artifactId > jersey - bundle < / artifactId > < version > 1.14 < / version > < / dependency > < dependency > < groupId > org . json < / groupId > < artifactId > json < / artifactId > < version > 20090211 < / version > < / dependency > < / dependencies > < / project > |
ขั้นตอนที่ 4
สร้างบริการ RESTFul: CrunchifyRESTService.java ที่นี่เราจะสร้างสองบริการ:
-
/api/crunchifyService– POST call – เราจะใช้สิ่งนี้กับการทดสอบของเรา -
/api/verify– รับสาย – เพียงเพื่อให้แน่ใจว่าบริการเริ่มต้นได้สำเร็จ
|
1 2 3 4 5 6 7 8 9 10 11 12 13 14 15 16 17 18 19 20 21 22 23 24 25 26 27 28 29 30 31 32 33 34 35 36 37 38 39 40 41 42 43 44 45 46 47 48 49 50 51 52 53 |
package com . crunchify . tutorials ; /** * @author Crunchify.com * */ import java . io . BufferedReader ; import java . io . InputStream ; import java . io . InputStreamReader ; import javax . print . attribute . standard . Media ; import javax . ws . rs . Consumes ; import javax . ws . rs . GET ; import javax . ws . rs . POST ; import javax . ws . rs . Path ; import javax . ws . rs . Produces ; import javax . ws . rs . core . MediaType ; import javax . ws . rs . core . Response ; @Path ( "/" ) public class CrunchifyRESTService { @POST @Path ( "/crunchifyService" ) @Consumes ( MediaType . APPLICATION_JSON ) public Response crunchifyREST ( InputStream incomingData ) { StringBuilder crunchifyBuilder = new StringBuilder ( ) ; try { BufferedReader in = new BufferedReader ( new InputStreamReader ( incomingData ) ) ; String line = null ; while ( ( line = in . readLine ( ) ) ! = null ) { crunchifyBuilder . append ( line ) ; } } catch ( Exception e ) { System . out . println ( "Error Parsing: - " ) ; } System . out . println ( "Data Received: " + crunchifyBuilder . toString ( ) ) ; // return HTTP response 200 in case of success return Response . status ( 200 ) . entity ( crunchifyBuilder . toString ( ) ) . build ( ) ; } @GET @Path ( "/verify" ) @Produces ( MediaType . TEXT_PLAIN ) public Response verifyRESTService ( InputStream incomingData ) { String result = "CrunchifyRESTService Successfully started.." ; // return HTTP response 200 in case of success return Response . status ( 200 ) . entity ( result ) . build ( ) ; } } |

ขั้นตอนที่ -5
ปรับใช้โครงการ CrunchifyTutorials บน Tomcat โครงการเว็บควรถูกปรับใช้โดยไม่มีข้อยกเว้น
- คลิกขวาที่
Servers tabใน Eclipse - คลิกที่
Add and Remove...Project - เพิ่ม Project CrunchifyTutorials ไปทางขวา
Configured:side - คลิกที่
Publish - คลิกที่
Start
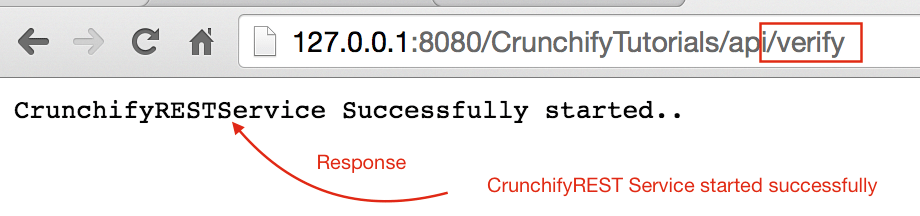
ขั้นตอนที่ 6 ตรวจสอบบริการ REST
บริการพักควรสามารถเข้าถึงได้โดยใช้ URL นี้: http://127.0.0.1:8080/CrunchifyTutorials/api/verify
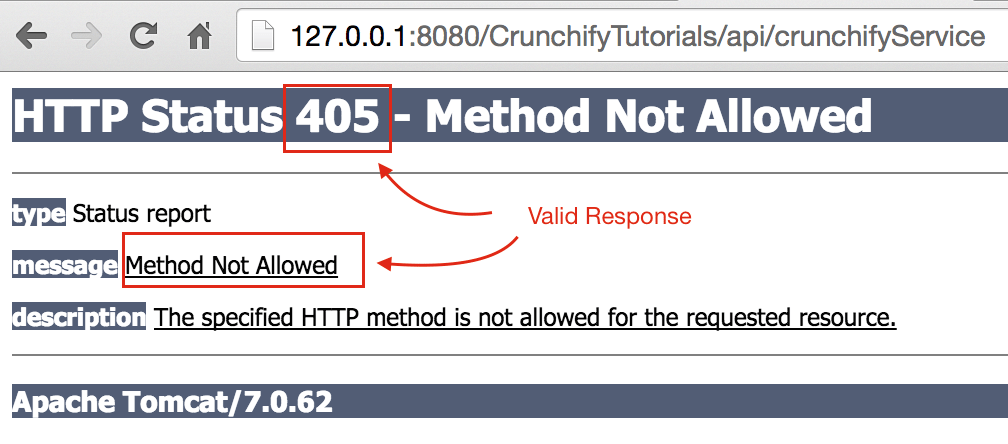
หากคุณพยายามเข้าถึง http://127.0.0.1:8080/CrunchifyTutorials/api/crunchifyService คุณจะเห็นรหัสข้อผิดพลาด 405 - Method not allowed นี้ ซึ่งเป็นการตอบสนองที่ถูกต้อง อย่างที่คุณเห็นว่าเป็นการโทรแบบ POST และควรคาดหวังข้อมูลบางอย่างกับคำขอ
ไปต่อกันเลย
ขั้นตอนที่ 7
คัดลอกเนื้อหา JSON ด้านล่างและวางไว้ใต้ไฟล์ C:\\CrunchifyJSON.txt สำหรับ windows หรือ /Users/<username>/Documents/CrunchifyJSON.txt file if Macbook
|
1 2 3 4 5 6 7 |
{ "tutorials" : { "id" : "Crunchify" , "topic" : "REST Service" , "description" : "This is REST Service Example by Crunchify." } } |
ขั้นตอนที่-8
สร้างไคลเอ็นต์การโทร REST: CrunchifyRESTServiceClient.java.
โปรด change path to CrunchifyJSON.txt ในโปรแกรมด้านล่าง
|
1 2 3 4 5 6 7 8 9 10 11 12 13 14 15 16 17 18 19 20 21 22 23 24 25 26 27 28 29 30 31 32 33 34 35 36 37 38 39 40 41 42 43 44 45 46 47 48 49 50 51 52 53 54 55 56 57 58 59 60 61 62 63 64 |
package com . crunchify . tutorials ; import java . io . BufferedReader ; import java . io . FileInputStream ; import java . io . InputStream ; import java . io . InputStreamReader ; import java . io . OutputStreamWriter ; import java . net . URL ; import java . net . URLConnection ; import org . json . JSONObject ; /** * @author Crunchify.com * */ public class CrunchifyRESTServiceClient { public static void main ( String [ ] args ) { String string = "" ; try { // Step1: Let's 1st read file from fileSystem // Change CrunchifyJSON.txt path here InputStream crunchifyInputStream = new FileInputStream ( "/Users/<username>/Documents/CrunchifyJSON.txt" ) ; InputStreamReader crunchifyReader = new InputStreamReader ( crunchifyInputStream ) ; BufferedReader br = new BufferedReader ( crunchifyReader ) ; String line ; while ( ( line = br . readLine ( ) ) ! = null ) { string += line + "\n" ; } JSONObject jsonObject = new JSONObject ( string ) ; System . out . println ( jsonObject ) ; // Step2: Now pass JSON File Data to REST Service try { URL url = new URL ( "http://localhost:8080/CrunchifyTutorials/api/crunchifyService" ) ; URLConnection connection = url . openConnection ( ) ; connection . setDoOutput ( true ) ; connection . setRequestProperty ( "Content-Type" , "application/json" ) ; connection . setConnectTimeout ( 5000 ) ; connection . setReadTimeout ( 5000 ) ; OutputStreamWriter out = new OutputStreamWriter ( connection . getOutputStream ( ) ) ; out . write ( jsonObject . toString ( ) ) ; out . close ( ) ; BufferedReader in = new BufferedReader ( new InputStreamReader ( connection . getInputStream ( ) ) ) ; while ( in . readLine ( ) ! = null ) { } System . out . println ( "\nCrunchify REST Service Invoked Successfully.." ) ; in . close ( ) ; } catch ( Exception e ) { System . out . println ( "\nError while calling Crunchify REST Service" ) ; System . out . println ( e ) ; } br . close ( ) ; } catch ( Exception e ) { e . printStackTrace ( ) ; } } } |
ขั้นตอนที่ 9
ตอนนี้ให้เรียกใช้โปรแกรมไคลเอนต์โดยคลิกขวาที่ CrunchifyRESTServiceClient.java และคุณควรเห็นสองผลลัพธ์ด้านล่าง
1) ใน Tomcat Console

2) ใน Local Client Console
