
创建非常简单的 Jersey REST 服务并从 Java 客户端发送 JSON 数据
已发表: 2013-11-29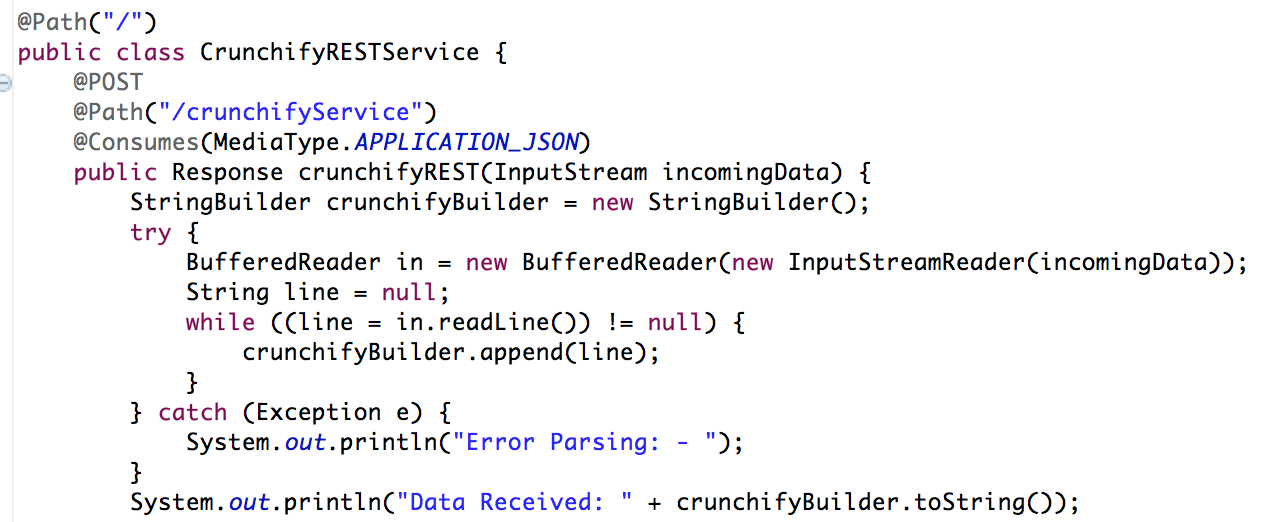
最近我必须将 JSON 数据传递给 REST 服务,并且手边没有任何简单的客户端。 但是创建了非常简单的 Java 程序,它从文件中读取 JSON 数据并将其发送到 REST 服务。
具象状态转移 (REST) 作为基于 SOAP 和 Web 服务描述语言 (WSDL) 的 Web 服务的更简单替代方案,已在 Web 上获得广泛认可。 界面设计这一转变的关键证据是主流 Web 2.0 服务提供商(包括 Yahoo、Google 和 Facebook)采用 REST,他们弃用或传递了基于 SOAP 和 WSDL 的界面,转而支持更易于使用、面向资源的模型来公开他们的服务。 在本文中,Alex Rodriguez 向您介绍了 REST 的基本原理。
让我们开始编写代码:
- 创建 RESTFul Web 服务
- Java 文件:CrunchifyRESTService.java
- web.xml 文件
- 创建 RESTService 客户端
- CrunchifyRESTServiceClient.java 文件
另一个必须阅读: Spring MVC 示例/教程:Hello World – Spring MVC 3.2.1
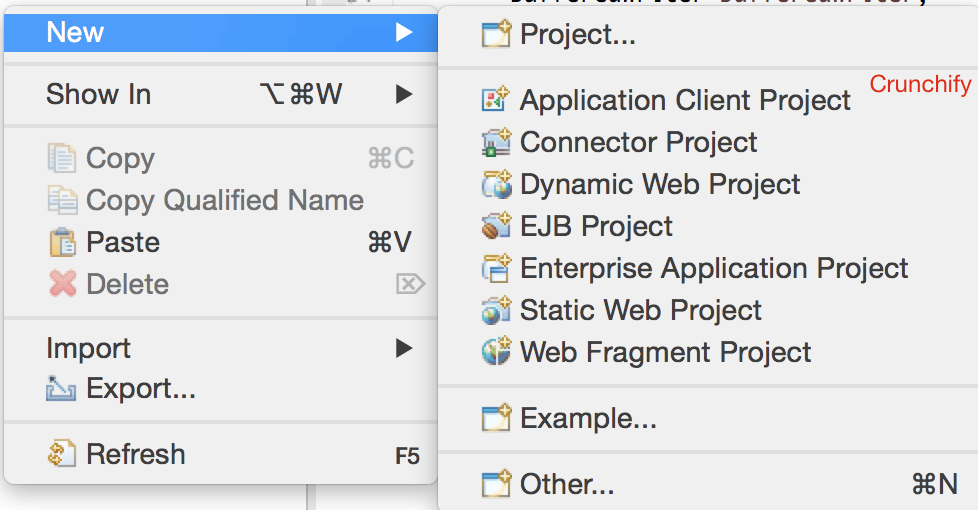
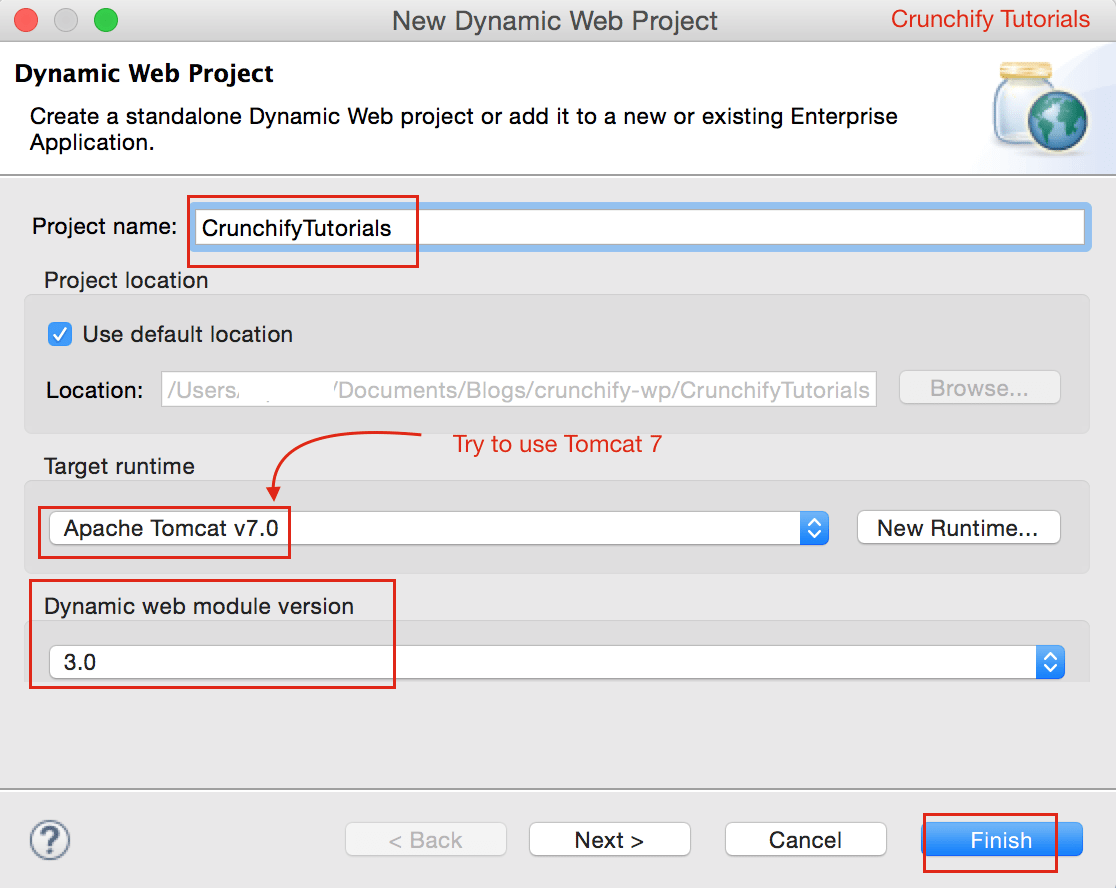
第1步
在Eclipse => File => New => Dynamic Web Project中。 将其命名为“ CrunchifyTutorials ”。 下面的教程也适用于Tomcat 8 。
步骤 2 创建部署描述符文件
如果您在WebContent\WEB-INF\下没有看到web.xml (部署描述符),请按照以下步骤操作。
打开web.xml并将内容替换为以下内容:
|
1 2 3 4 5 6 7 8 9 10 11 12 13 14 15 16 17 18 19 20 21 22 23 24 25 |
<? xml version = "1.0" encoding = "UTF-8" ?> < web - app xmlns = "http://java.sun.com/xml/ns/javaee" xmlns : xsi = "http://www.w3.org/2001/XMLSchema-instance" xsi : schemaLocation = "http://java.sun.com/xml/ns/javaee http://java.sun.com/xml/ns/javaee/web-app_3_0.xsd" version = "3.0" > < display - name > CrunchifyRESTJerseyExample < / display - name > < welcome - file - list > < welcome - file > index . html < / welcome - file > < welcome - file > index . htm < / welcome - file > < welcome - file > index . jsp < / welcome - file > < welcome - file > default . html < / welcome - file > < welcome - file > default . htm < / welcome - file > < welcome - file > default . jsp < / welcome - file > < / welcome - file - list > < servlet > < servlet - name > Jersey Web Application < / servlet - name > < servlet - class > com . sun . jersey . spi . container . servlet . ServletContainer < / servlet - class > < load - on - startup > 1 < / load - on - startup > < / servlet > < servlet - mapping > < servlet - name > Jersey Web Application < / servlet - name > < url - pattern > / api /* < / url - pattern > < / servlet - mapping > < / web - app > |
Step-3 将项目转换为 Maven 项目
遵循本教程:https://crunchify.com/how-to-convert-existing-java-project-to-maven-in-eclipse/。 这是我的 pom.xml 文件。
|
1 2 3 4 5 6 7 8 9 10 11 12 13 14 15 16 17 18 19 20 21 22 23 24 25 26 27 28 29 30 31 32 33 34 35 36 37 38 39 40 41 42 43 44 45 46 |
< project xmlns = "http://maven.apache.org/POM/4.0.0" xmlns : xsi = "http://www.w3.org/2001/XMLSchema-instance" xsi : schemaLocation = "http://maven.apache.org/POM/4.0.0 http://maven.apache.org/xsd/maven-4.0.0.xsd" > < modelVersion > 4.0.0 < / modelVersion > < groupId > CrunchifyTutorials < / groupId > < artifactId > CrunchifyTutorials < / artifactId > < version > 0.0.1 - SNAPSHOT < / version > < packaging > war < / packaging > < build > < sourceDirectory > src < / sourceDirectory > < plugins > < plugin > < artifactId > maven - compiler - plugin < / artifactId > < version > 3.1 < / version > < configuration > < source > 1.8 < / source > < target > 1.8 < / target > < / configuration > < / plugin > < plugin > < artifactId > maven - war - plugin < / artifactId > < version > 2.4 < / version > < configuration > < warSourceDirectory > WebContent < / warSourceDirectory > < failOnMissingWebXml > false < / failOnMissingWebXml > < / configuration > < / plugin > < / plugins > < / build > < dependencies > < dependency > < groupId > asm < / groupId > < artifactId > asm - all < / artifactId > < version > 3.3.1 < / version > < / dependency > < dependency > < groupId > com . sun . jersey < / groupId > < artifactId > jersey - bundle < / artifactId > < version > 1.14 < / version > < / dependency > < dependency > < groupId > org . json < / groupId > < artifactId > json < / artifactId > < version > 20090211 < / version > < / dependency > < / dependencies > < / project > |
第四步
创建 RESTFul 服务: CrunchifyRESTService.java 。 在这里,我们将创建两个服务:
-
/api/crunchifyService– POST 调用 – 我们将在测试中使用它 /api/verify- GET 调用 - 只是为了确保服务成功启动
|
1 2 3 4 5 6 7 8 9 10 11 12 13 14 15 16 17 18 19 20 21 22 23 24 25 26 27 28 29 30 31 32 33 34 35 36 37 38 39 40 41 42 43 44 45 46 47 48 49 50 51 52 53 |
package com . crunchify . tutorials ; /** * @author Crunchify.com * */ import java . io . BufferedReader ; import java . io . InputStream ; import java . io . InputStreamReader ; import javax . print . attribute . standard . Media ; import javax . ws . rs . Consumes ; import javax . ws . rs . GET ; import javax . ws . rs . POST ; import javax . ws . rs . Path ; import javax . ws . rs . Produces ; import javax . ws . rs . core . MediaType ; import javax . ws . rs . core . Response ; @Path ( "/" ) public class CrunchifyRESTService { @POST @Path ( "/crunchifyService" ) @Consumes ( MediaType . APPLICATION_JSON ) public Response crunchifyREST ( InputStream incomingData ) { StringBuilder crunchifyBuilder = new StringBuilder ( ) ; try { BufferedReader in = new BufferedReader ( new InputStreamReader ( incomingData ) ) ; String line = null ; while ( ( line = in . readLine ( ) ) ! = null ) { crunchifyBuilder . append ( line ) ; } } catch ( Exception e ) { System . out . println ( "Error Parsing: - " ) ; } System . out . println ( "Data Received: " + crunchifyBuilder . toString ( ) ) ; // return HTTP response 200 in case of success return Response . status ( 200 ) . entity ( crunchifyBuilder . toString ( ) ) . build ( ) ; } @GET @Path ( "/verify" ) @Produces ( MediaType . TEXT_PLAIN ) public Response verifyRESTService ( InputStream incomingData ) { String result = "CrunchifyRESTService Successfully started.." ; // return HTTP response 200 in case of success return Response . status ( 200 ) . entity ( result ) . build ( ) ; } } |

第 5 步
在 Tomcat 上部署项目CrunchifyTutorials 。 应毫无例外地部署 Web 项目。
- 在 Eclipse 中右键单击
Servers tab - 单击
Add and Remove...项目 - 将 Project CrunchifyTutorials 添加到右侧
Configured:侧。 - 点击
Publish - 点击
Start
Step-6 验证 REST 服务
应该可以使用以下 URL 访问休息服务:http://127.0.0.1:8080/CrunchifyTutorials/api/verify
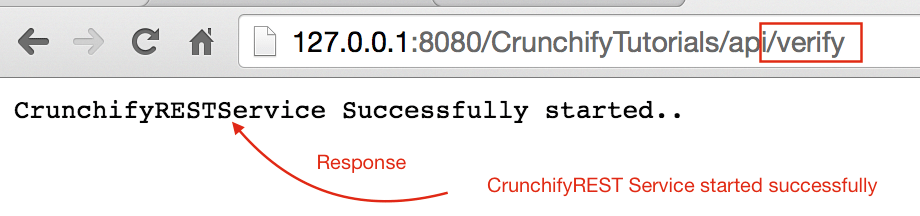
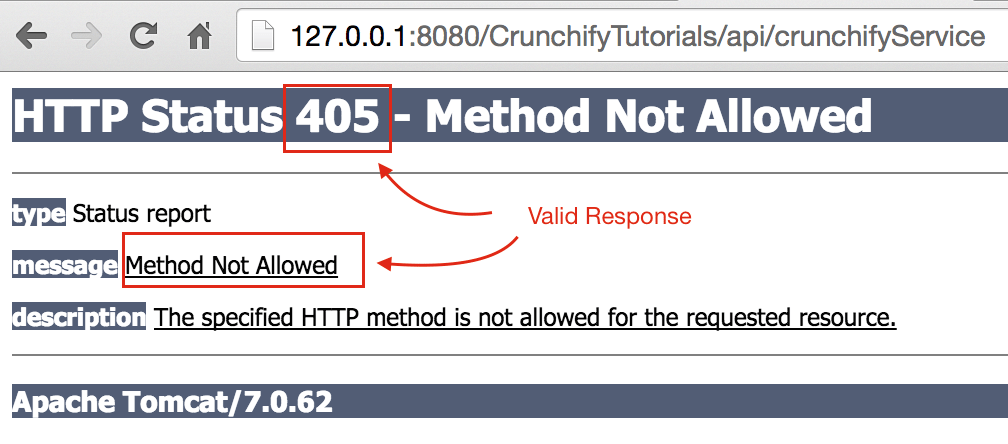
如果您尝试访问 http://127.0.0.1:8080/CrunchifyTutorials/api/crunchifyService 那么您将看到错误代码405 - Method not allowed - 这是有效的响应。 正如您所看到的,它是 POST 调用,并且应该期望请求中包含一些数据。
让我们继续前进。
第 7 步
复制下面的 JSON 内容并将其放在 Windows 的C:\\CrunchifyJSON.txt文件或 Macbook 的/Users/<username>/Documents/CrunchifyJSON.txt文件下。
|
1 2 3 4 5 6 7 |
{ "tutorials" : { "id" : "Crunchify" , "topic" : "REST Service" , "description" : "This is REST Service Example by Crunchify." } } |
步骤 8
创建 REST 调用客户端: CrunchifyRESTServiceClient.java.
请在下面的程序中change path to CrunchifyJSON.txt 。
|
1 2 3 4 5 6 7 8 9 10 11 12 13 14 15 16 17 18 19 20 21 22 23 24 25 26 27 28 29 30 31 32 33 34 35 36 37 38 39 40 41 42 43 44 45 46 47 48 49 50 51 52 53 54 55 56 57 58 59 60 61 62 63 64 |
package com . crunchify . tutorials ; import java . io . BufferedReader ; import java . io . FileInputStream ; import java . io . InputStream ; import java . io . InputStreamReader ; import java . io . OutputStreamWriter ; import java . net . URL ; import java . net . URLConnection ; import org . json . JSONObject ; /** * @author Crunchify.com * */ public class CrunchifyRESTServiceClient { public static void main ( String [ ] args ) { String string = "" ; try { // Step1: Let's 1st read file from fileSystem // Change CrunchifyJSON.txt path here InputStream crunchifyInputStream = new FileInputStream ( "/Users/<username>/Documents/CrunchifyJSON.txt" ) ; InputStreamReader crunchifyReader = new InputStreamReader ( crunchifyInputStream ) ; BufferedReader br = new BufferedReader ( crunchifyReader ) ; String line ; while ( ( line = br . readLine ( ) ) ! = null ) { string += line + "\n" ; } JSONObject jsonObject = new JSONObject ( string ) ; System . out . println ( jsonObject ) ; // Step2: Now pass JSON File Data to REST Service try { URL url = new URL ( "http://localhost:8080/CrunchifyTutorials/api/crunchifyService" ) ; URLConnection connection = url . openConnection ( ) ; connection . setDoOutput ( true ) ; connection . setRequestProperty ( "Content-Type" , "application/json" ) ; connection . setConnectTimeout ( 5000 ) ; connection . setReadTimeout ( 5000 ) ; OutputStreamWriter out = new OutputStreamWriter ( connection . getOutputStream ( ) ) ; out . write ( jsonObject . toString ( ) ) ; out . close ( ) ; BufferedReader in = new BufferedReader ( new InputStreamReader ( connection . getInputStream ( ) ) ) ; while ( in . readLine ( ) ! = null ) { } System . out . println ( "\nCrunchify REST Service Invoked Successfully.." ) ; in . close ( ) ; } catch ( Exception e ) { System . out . println ( "\nError while calling Crunchify REST Service" ) ; System . out . println ( e ) ; } br . close ( ) ; } catch ( Exception e ) { e . printStackTrace ( ) ; } } } |
第 9 步
现在让我们通过右键单击 CrunchifyRESTServiceClient.java 来运行客户端程序,您应该会看到以下两个输出
1) 在 Tomcat 控制台中

2) 在本地客户端控制台中
