
最簡單的 Spring MVC 框架教程 - 帶有 UI (JSP) 頁面的 Hello World 示例
已發表: 2019-02-23
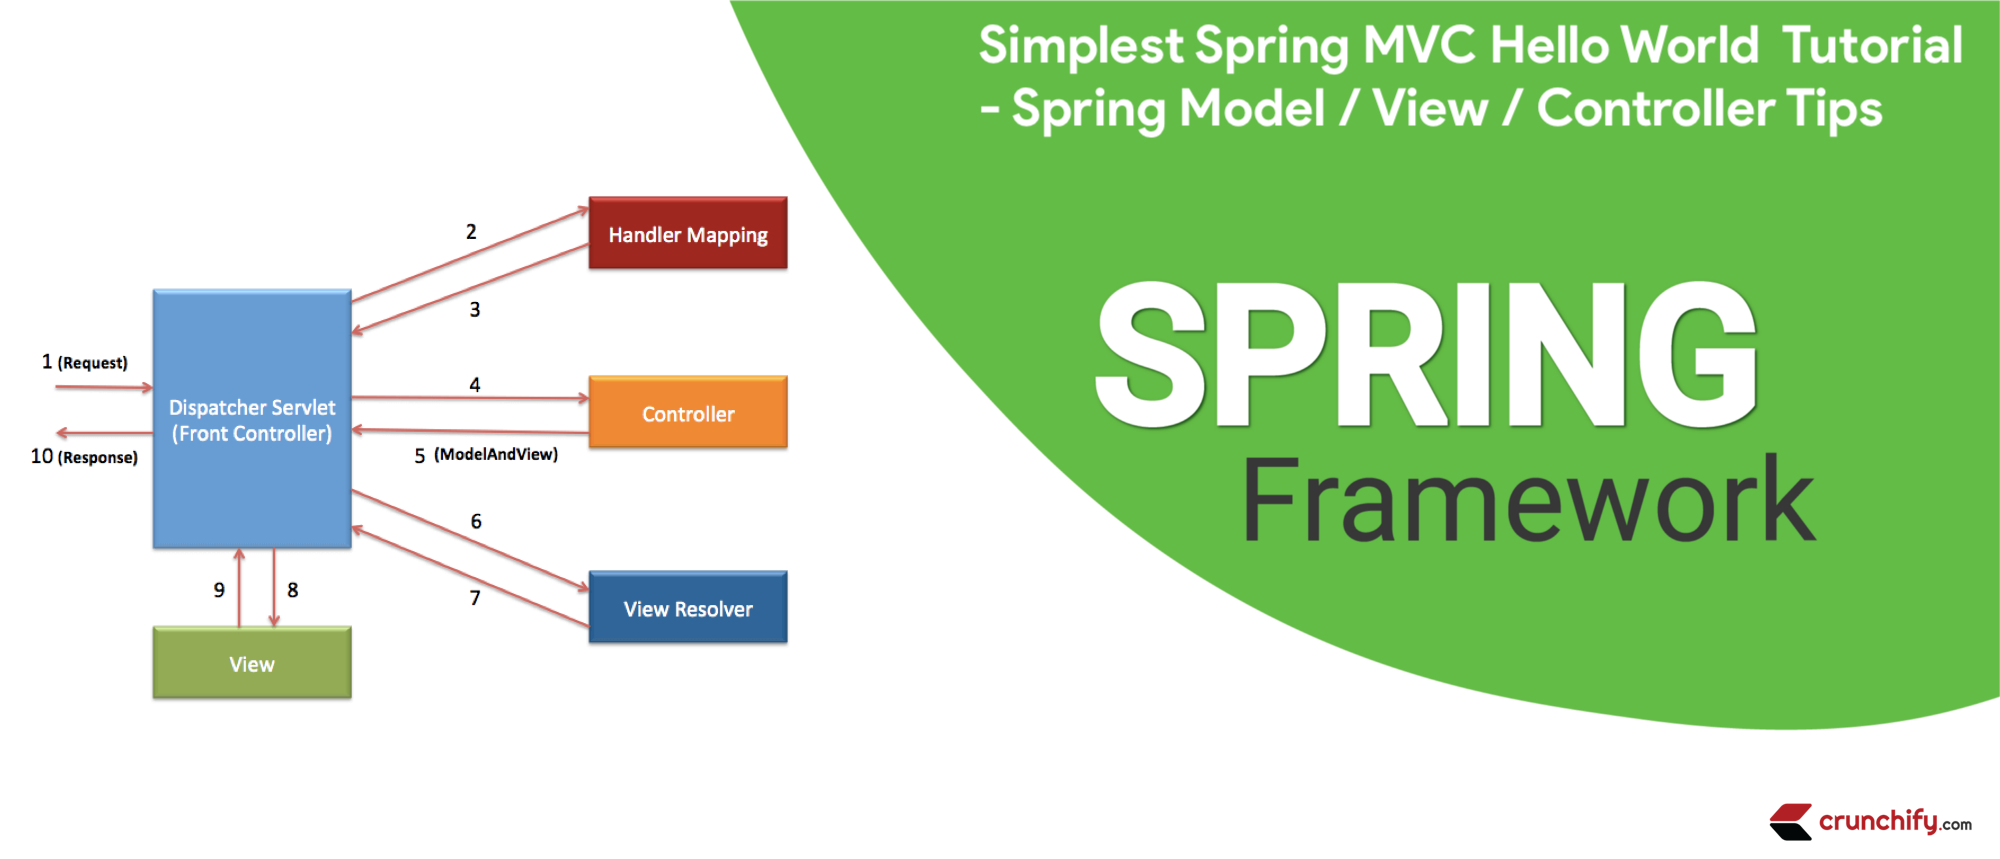
模型-視圖-控制器 (MVC) 架構提供了開發靈活且鬆散耦合的 Web 應用程序的最簡單方法。
在本教程中,我們將介紹如何通過非常詳細的步驟創建您的第一個 Spring MVC 應用程序。
您有以下任何問題嗎?
- Spring MVC 5.2.3 基礎
- 逐步開發 Spring Framework MVC 5 應用程序。
- java - 從零開始的 Spring MVC 教程
- Spring MVC 快速教程
- Spring MVC 框架教程
- 第一篇 Spring MVC 應用教程
- Spring 5.x MVC 教程、AJAX 演示、jQuery 演示、JavaScript 演示、提示和技巧 Spring 5 MVC
那麼你來對地方了。 在這裡,我將演示用於構建 Web 應用程序的簡單Spring MVC framework 。
第一件事——讓我們設置環境
教程最後更新和驗證時間:2020 年 9 月,工具版本如下。
我正在使用以下工具,如果您還沒有,您可能需要下載這些工具。
- Tomcat 9.0.38 – 從此鏈接下載最新的 Apache Tomcat。
- 確保下載 Eclipse IDE for
Java EEDevelopers (2020‑09 R) – 下載鏈接。 (下圖) -
Spring 5.2.9.RELEASE(無需下載)——我們將使用 Maven 依賴項。 - JDK 15 – 下載鏈接。
確保下載最新Java EE Developer Kit:

主要目標
本教程的主要目標是以最簡單的方式創建 Spring MVC 應用程序。
在我們開始之前,讓我們看看我們將在本教程結束時看到什麼
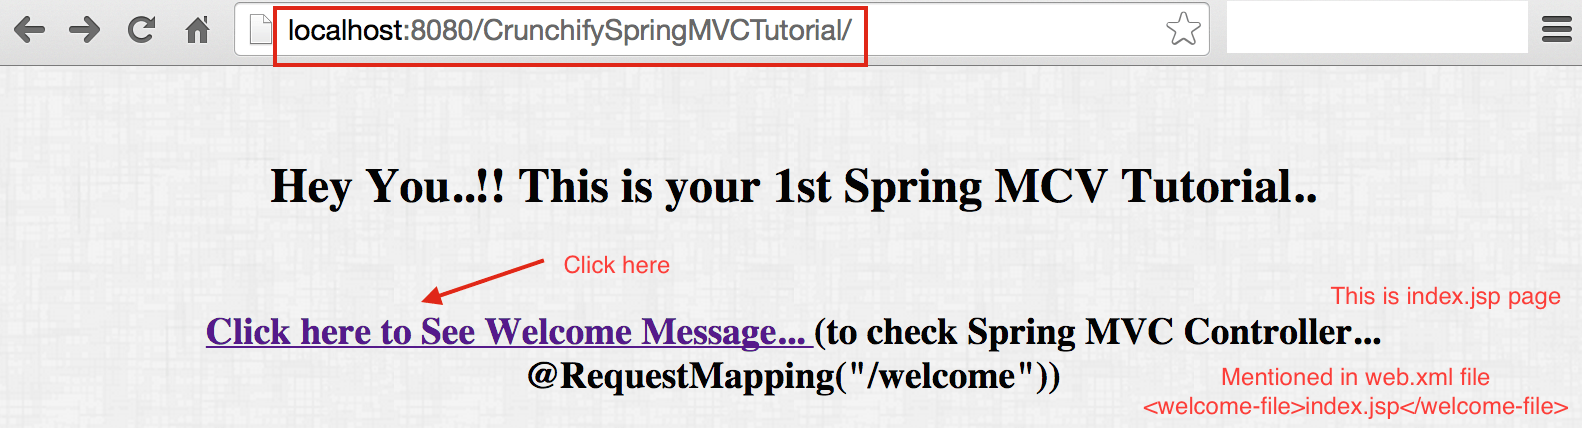
這就是我們的application result的樣子。 這是完成以下所有步驟後的最終結果。
這是最終結果:歡迎頁面 ==> index.jsp
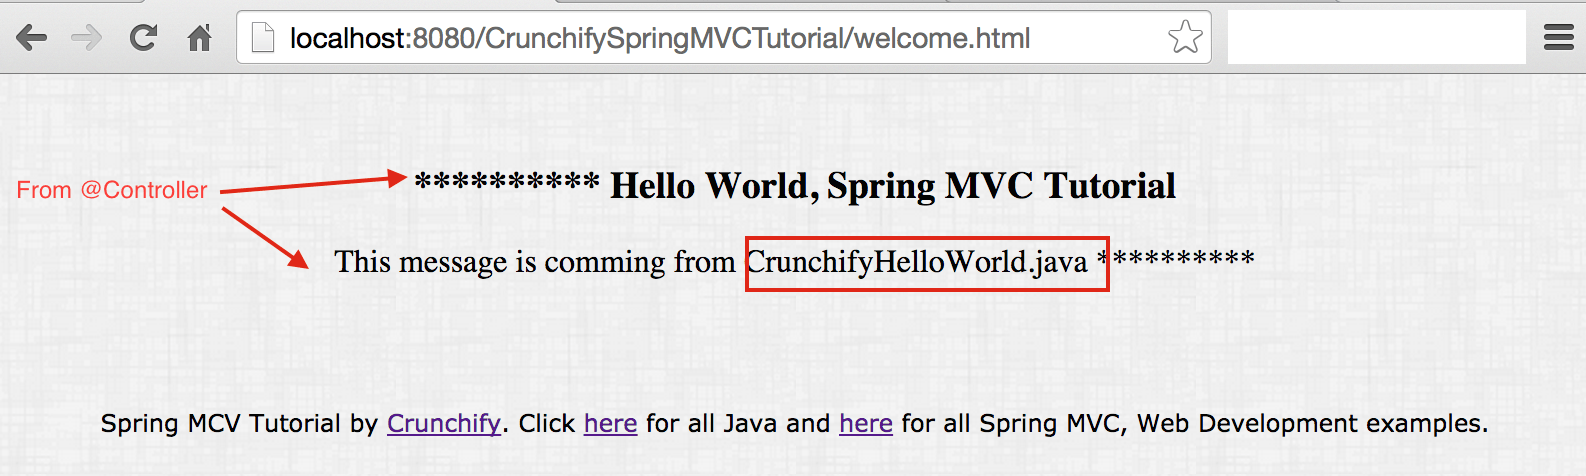
從控制器類返回結果
現在讓我們開始教程
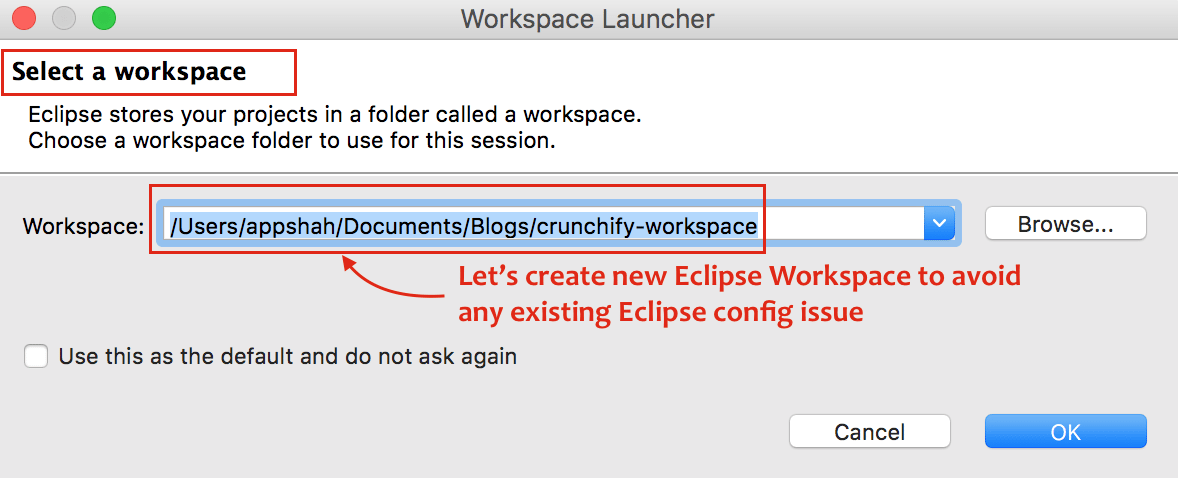
第1步
- 打開日食
- 創建
New Eclipse Workspace——這must避免任何現有的工作區配置問題。
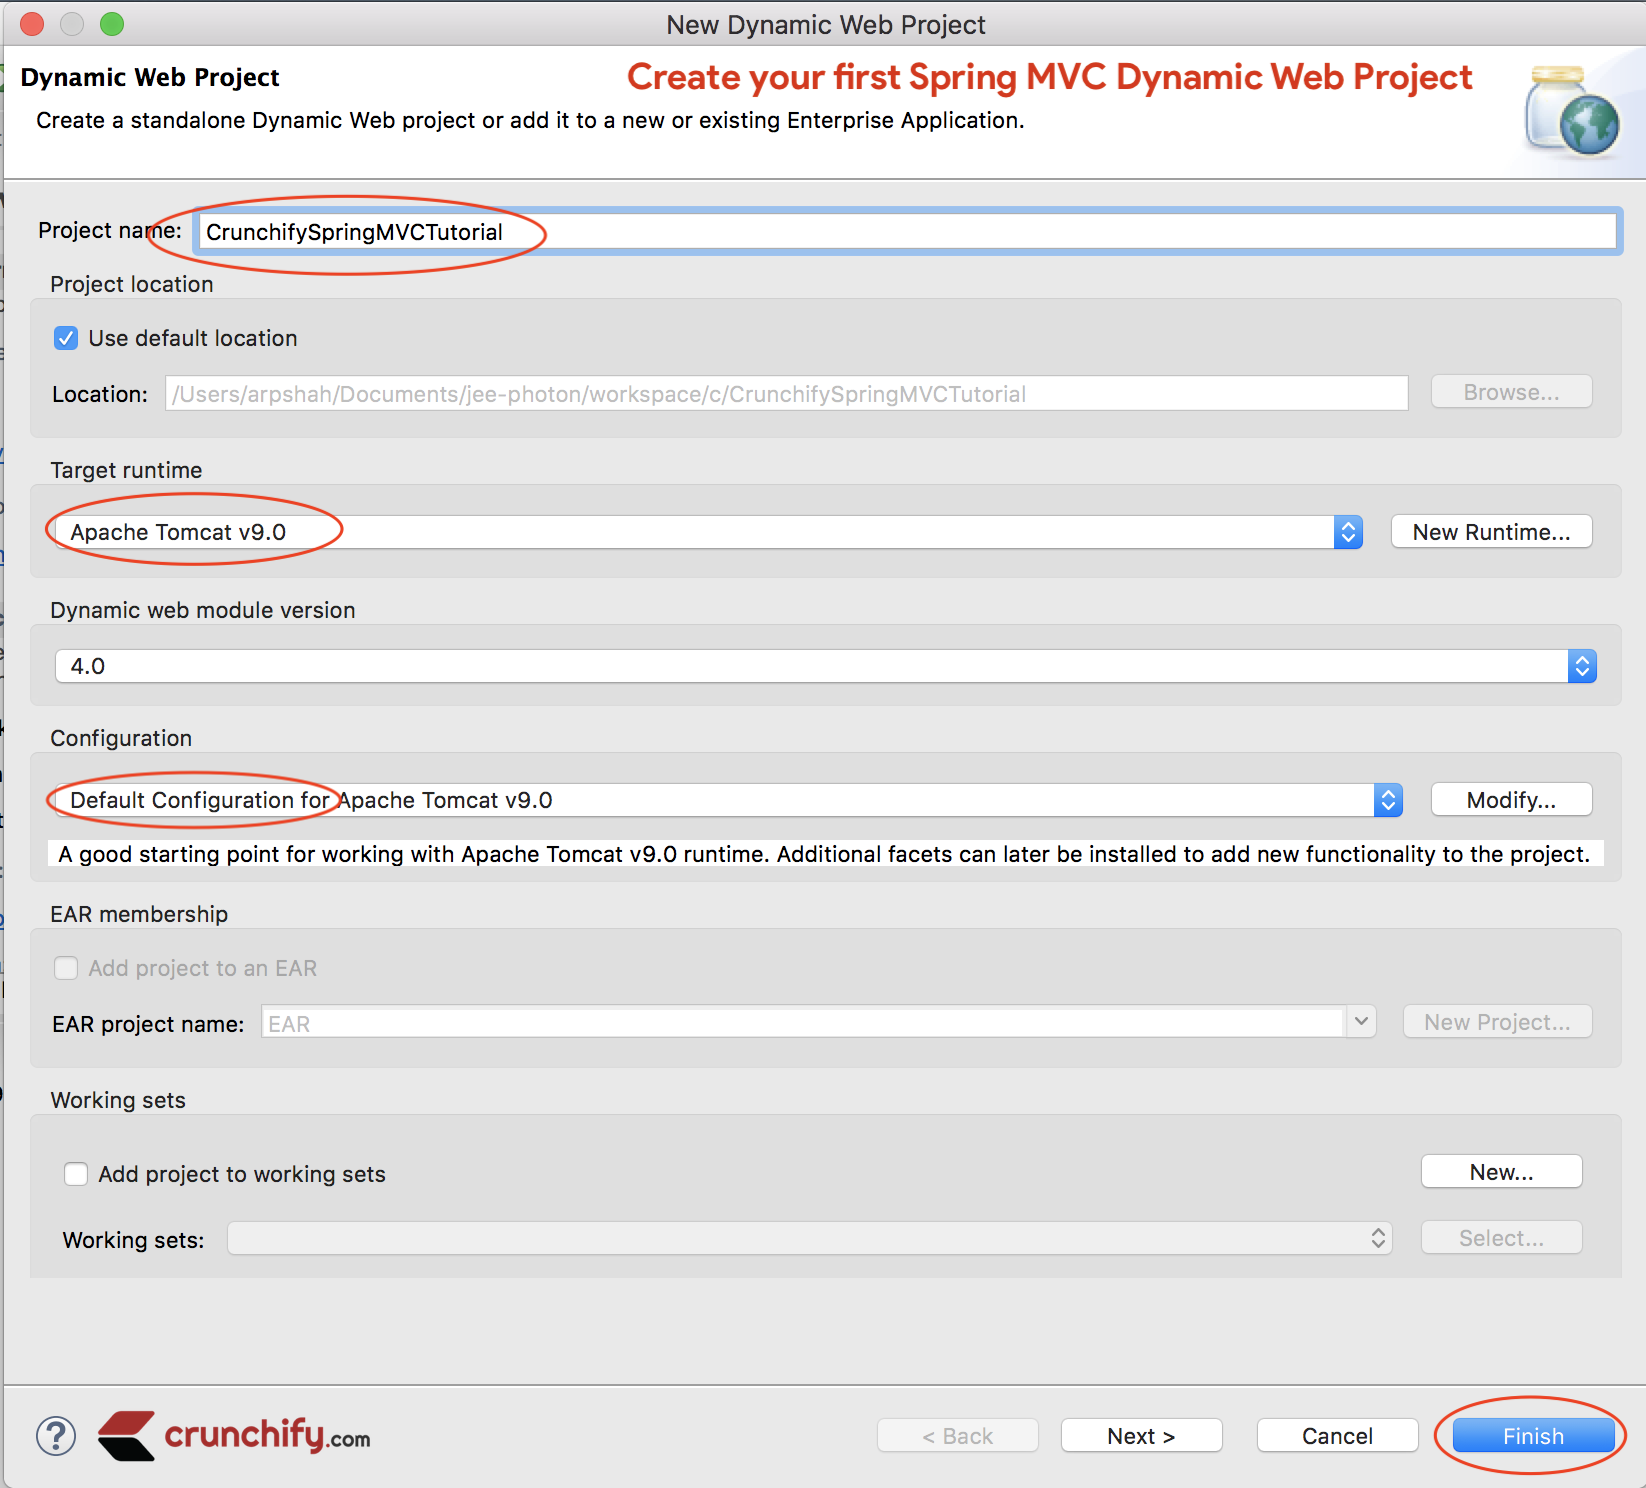
第2步
- 點擊
File - 點擊
New - 選擇
Dynamic Web Project - 一個彈出窗口,提供項目名稱:
CrunchifySpringMVCTutorial - 確保將
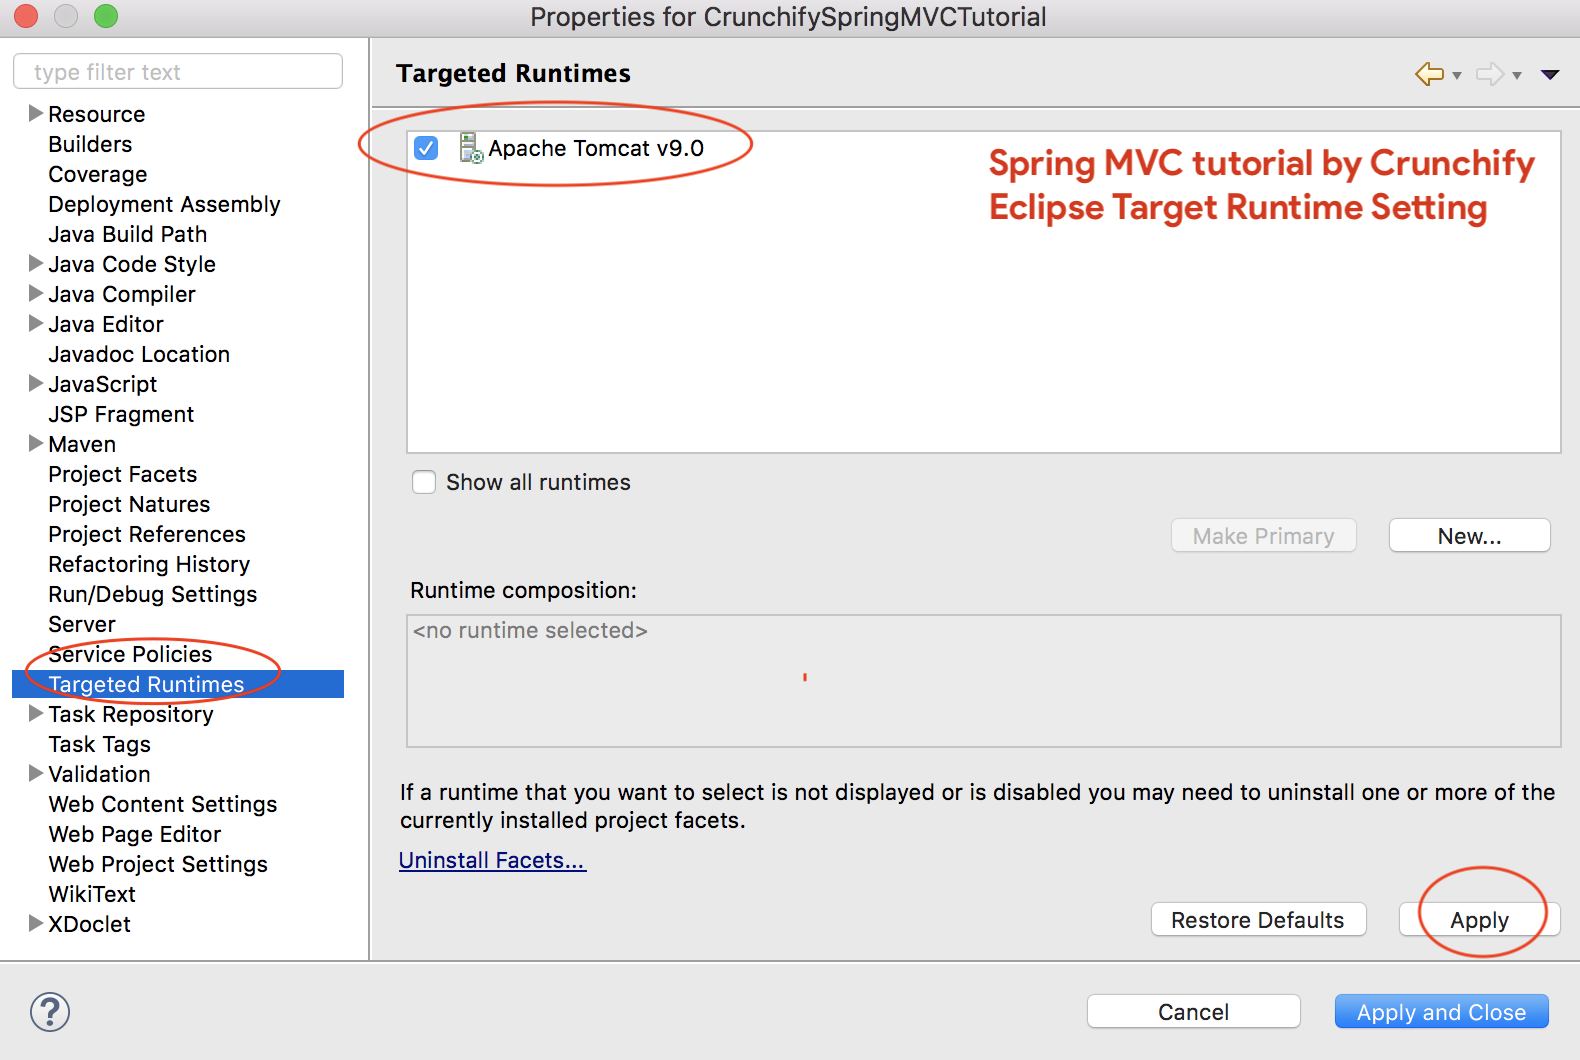
Target Runtime用作Apache Tomcat 9.0- 如果您沒有看到 Target Runtime,請按照以下步驟操作
- 選擇配置作為
Default Configuration
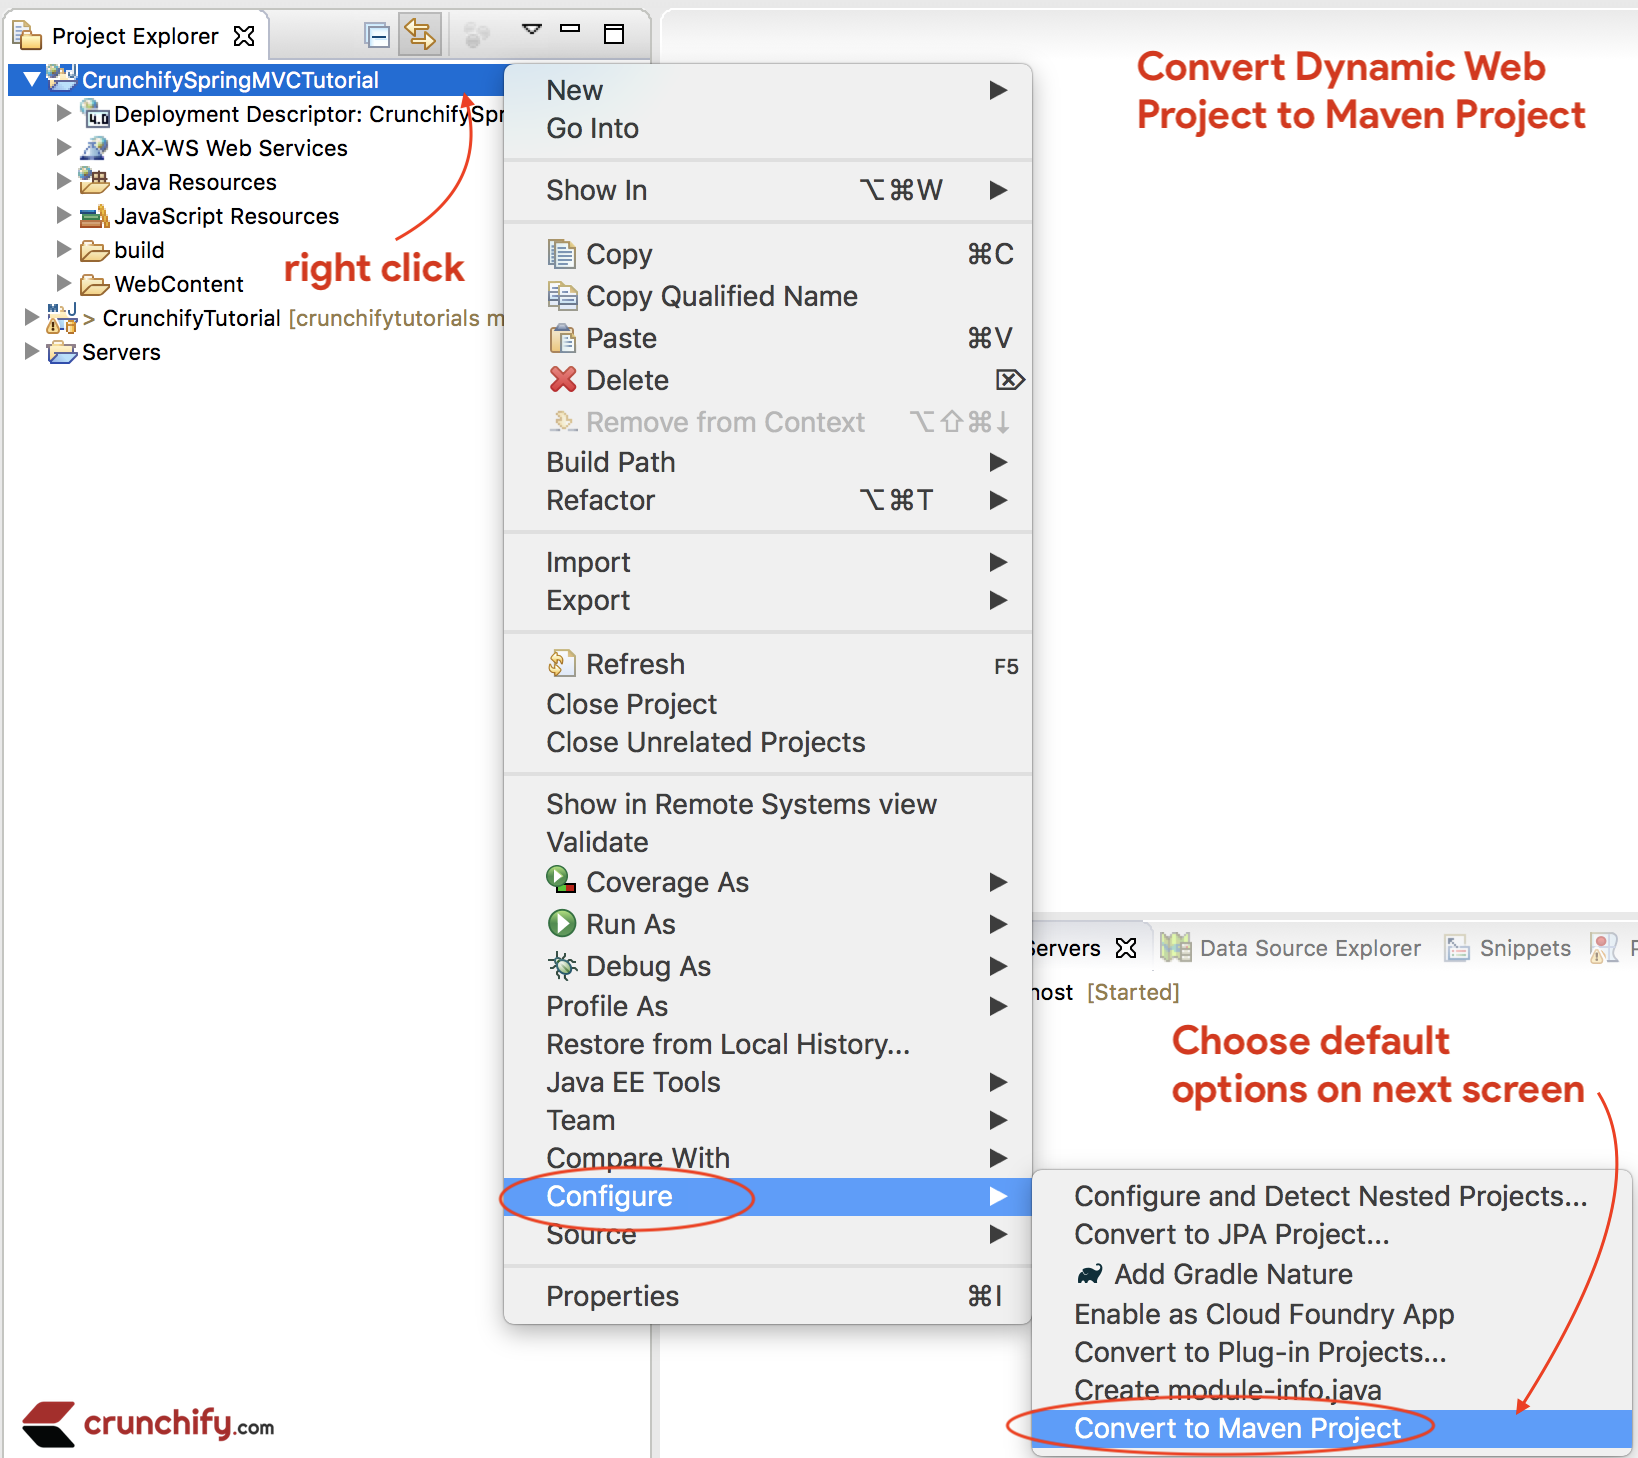
第三步
將項目轉換為 Maven 項目以將所有必需的 Spring MVC 依賴項添加到項目中。
腳步:
- 右鍵單擊項目
- 配置
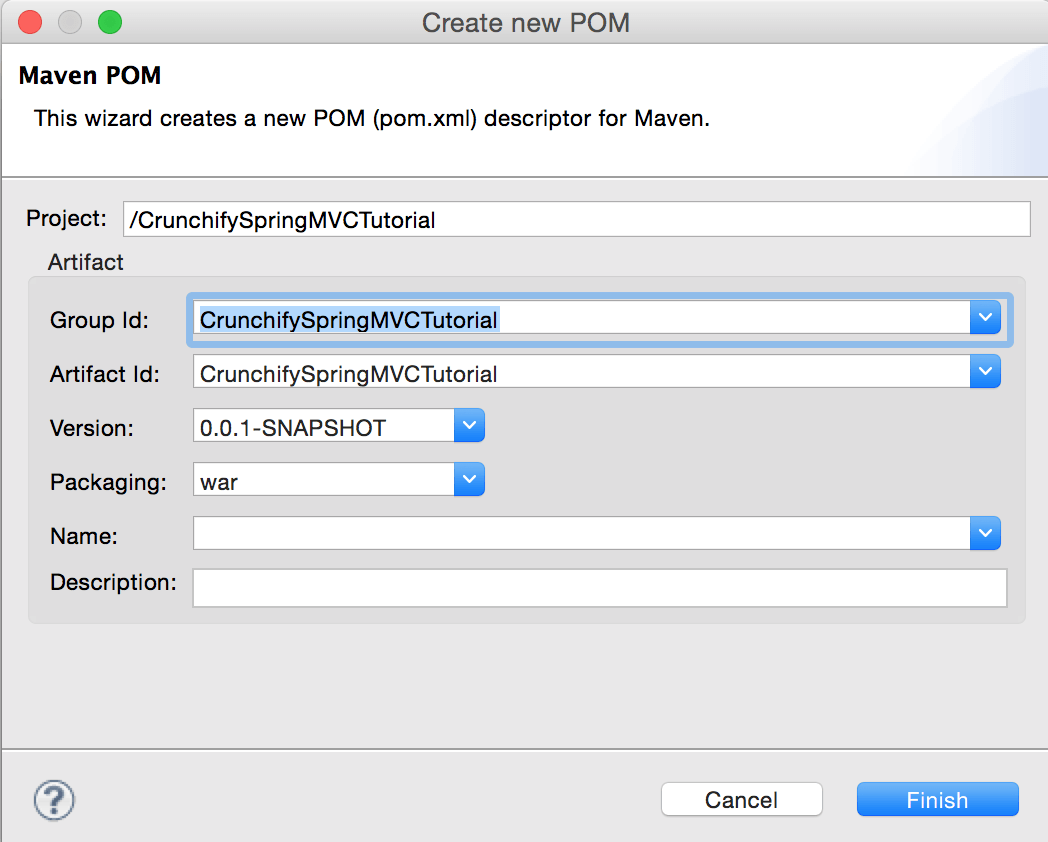
- 轉換為
Maven項目
第四步
打開pom.xml文件並將下面的jar dependencies項添加到項目中。
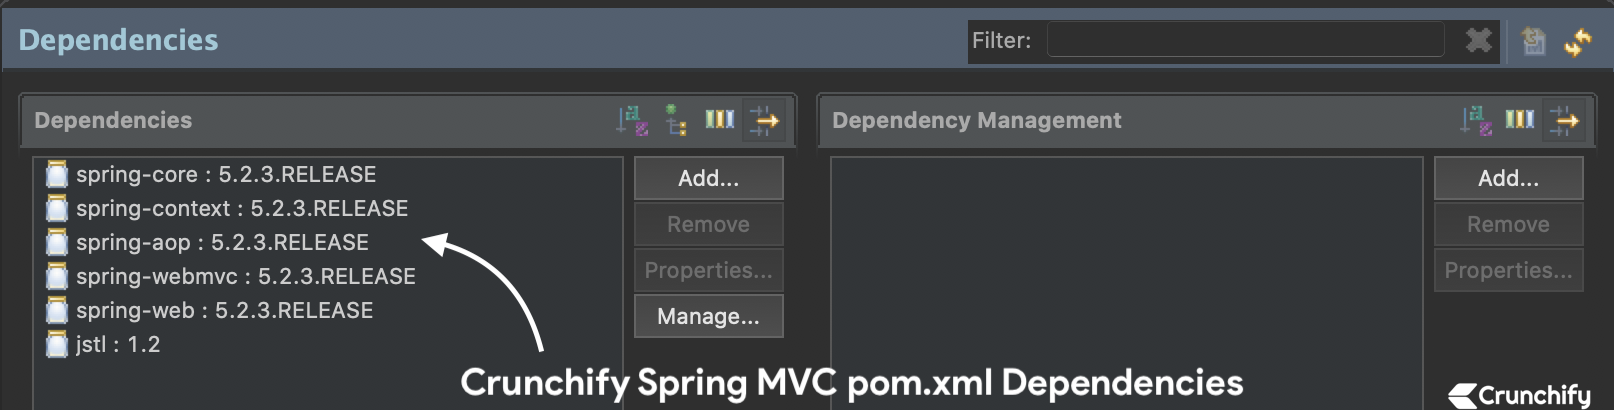
NOTE:這是我的pom.xml文件。 如果您尚未遷移到JDK 1313我們將不斷更新本教程到最新的 Spring MVC 版本。所以下面的 pom.xml 文件可能具有與上圖不同的(最新)版本的 Spring MVC 依賴項
|
1 2 3 4 5 6 7 8 9 10 11 12 13 14 15 16 17 18 19 20 21 22 23 24 25 26 27 28 29 30 31 32 33 34 35 36 37 38 39 40 41 42 43 44 45 46 47 48 49 50 51 52 53 54 55 56 57 58 59 60 61 |
< project xmlns = "http://maven.apache.org/POM/4.0.0" xmlns : xsi = "http://www.w3.org/2001/XMLSchema-instance" xsi : schemaLocation = "http://maven.apache.org/POM/4.0.0 http://maven.apache.org/xsd/maven-4.0.0.xsd" > < modelVersion > 4.0.0 < / modelVersion > < groupId > CrunchifySpringMVCTutorial < / groupId > < artifactId > CrunchifySpringMVCTutorial < / artifactId > < version > 0.0.1 - SNAPSHOT < / version > < packaging > war < / packaging > < build > < sourceDirectory > src < / sourceDirectory > < plugins > < plugin > < artifactId > maven - compiler - plugin < / artifactId > < version > 3.8.0 < / version > < configuration > < release > 13 < / release > < / configuration > < / plugin > < plugin > < artifactId > maven - war - plugin < / artifactId > < version > 3.2.1 < / version > < configuration > < warSourceDirectory > WebContent < / warSourceDirectory > < / configuration > < / plugin > < / plugins > < / build > < dependencies > < dependency > < groupId > org . springframework < / groupId > < artifactId > spring - core < / artifactId > < version > 5.2.3.RELEASE < / version > < / dependency > < dependency > < groupId > org . springframework < / groupId > < artifactId > spring - context < / artifactId > < version > 5.2.3.RELEASE < / version > < / dependency > < dependency > < groupId > org . springframework < / groupId > < artifactId > spring - aop < / artifactId > < version > 5.2.3.RELEASE < / version > < / dependency > < dependency > < groupId > org . springframework < / groupId > < artifactId > spring - webmvc < / artifactId > < version > 5.2.3.RELEASE < / version > < / dependency > < dependency > < groupId > org . springframework < / groupId > < artifactId > spring - web < / artifactId > < version > 5.2.3.RELEASE < / version > < / dependency > < dependency > < groupId > javax . servlet < / groupId > < artifactId > jstl < / artifactId > < version > 1.2 < / version > < / dependency > < / dependencies > < / project > |
第 5 步
創建新的 Spring 配置Bean文件: /WebContent/WEB-INF/crunchify-servlet.xml

crunchify-servlet.xml
|
1 2 3 4 5 6 7 8 9 10 11 12 13 14 15 16 17 18 19 20 21 22 23 24 25 26 27 |
<? xml version = "1.0" encoding = "UTF-8" ?> < beans xmlns = "http://www.springframework.org/schema/beans" xmlns : mvc = "http://www.springframework.org/schema/mvc" xmlns : context = "http://www.springframework.org/schema/context" xmlns : xsi = "http://www.w3.org/2001/XMLSchema-instance" xsi : schemaLocation = " http://www.springframework.org/schema/beans http://www.springframework.org/schema/beans/spring-beans.xsd http://www.springframework.org/schema/mvc http://www.springframework.org/schema/mvc/spring-mvc.xsd http://www.springframework.org/schema/context http://www.springframework.org/schema/context/spring-context.xsd" > < mvc : annotation - driven / > < context : component - scan base - package = "com.crunchify.controller" / > < mvc : default - servlet - handler / > < bean id = "viewResolver" class = "org.springframework.web.servlet.view.UrlBasedViewResolver" > < property name = "viewClass" value = "org.springframework.web.servlet.view.JstlView" / > < property name = "prefix" value = "/WEB-INF/jsp/" / > < property name = "suffix" value = ".jsp" / > < / bean > < / beans > |
在上面的crunchify-servlet.xml 在配置文件中,我們定義了一個標籤<context:component-scan> 。 這將允許 Spring 從包com.crunchify.controller及其所有子包中加載所有組件。
這將加載我們的CrunchifyHelloWorld.class 。 我們還定義了一個 bean viewResolver 。 此 bean 將解析視圖並將前綴字符串/WEB-INF/jsp/和後綴.jsp添加到 ModelAndView 中的視圖。
請注意,在我們的CrunchifyHelloWorld類中,我們返回了一個帶有視圖名稱 Welcome 的 ModelAndView 對象。
這將被解析為路徑/WEB-INF/jsp/welcome.jsp 。
第 6 步
如果新文件web.xml不存在,則創建它。 在/WebContent/WEB-INF/web.xml文件中映射 Spring MVC。
NOTE:如果您在“ dynamic web project ”中沒有看到 web.xml 文件,請按照以下步驟操作。
web.xml
|
1 2 3 4 5 6 7 8 9 10 11 12 13 14 15 16 17 18 19 20 21 22 23 24 25 26 27 28 |
<? xml version = "1.0" encoding = "UTF-8" ?> < web - app xmlns : xsi = "http://www.w3.org/2001/XMLSchema-instance" xmlns = "http://xmlns.jcp.org/xml/ns/javaee" xsi : schemaLocation = "http://xmlns.jcp.org/xml/ns/javaee http://xmlns.jcp.org/xml/ns/javaee/web-app_4_0.xsd" id = "WebApp_ID" version = "4.0" > < display - name > CrunchifySpringMVCTutorial < / display - name > < welcome - file - list > < welcome - file > index . html < / welcome - file > < welcome - file > index . htm < / welcome - file > < welcome - file > index . jsp < / welcome - file > < welcome - file > default . html < / welcome - file > < welcome - file > default . htm < / welcome - file > < welcome - file > default . jsp < / welcome - file > < / welcome - file - list > < servlet > < servlet - name > crunchify < / servlet - name > < servlet - class > org . springframework . web . servlet . DispatcherServlet < / servlet - class > < load - on - startup > 1 < / load - on - startup > < / servlet > < servlet - mapping > < servlet - name > crunchify < / servlet - name > < url - pattern > / welcome . jsp < / url - pattern > < url - pattern > / index . jsp < / url - pattern > < url - pattern > / welcome . html < / url - pattern > < url - pattern > * . html < / url - pattern > < / servlet - mapping > < / web - app > |
web.xml中的上述代碼將使用 url 模式/welcome.jsp映射 DispatcherServlet。 另請注意,我們已將index.jsp定義為歡迎文件。
這裡要注意的一件事是web.xml中<servlet-name>標記中的 servlet 名稱。 一旦 DispatcherServlet 被初始化,它將在 Web 應用程序的 WEB-INF 文件夾中查找文件名[servlet-name]-servlet.xml 。 在此示例中,框架將查找名為crunchify-servlet.xml 。
第 7 步
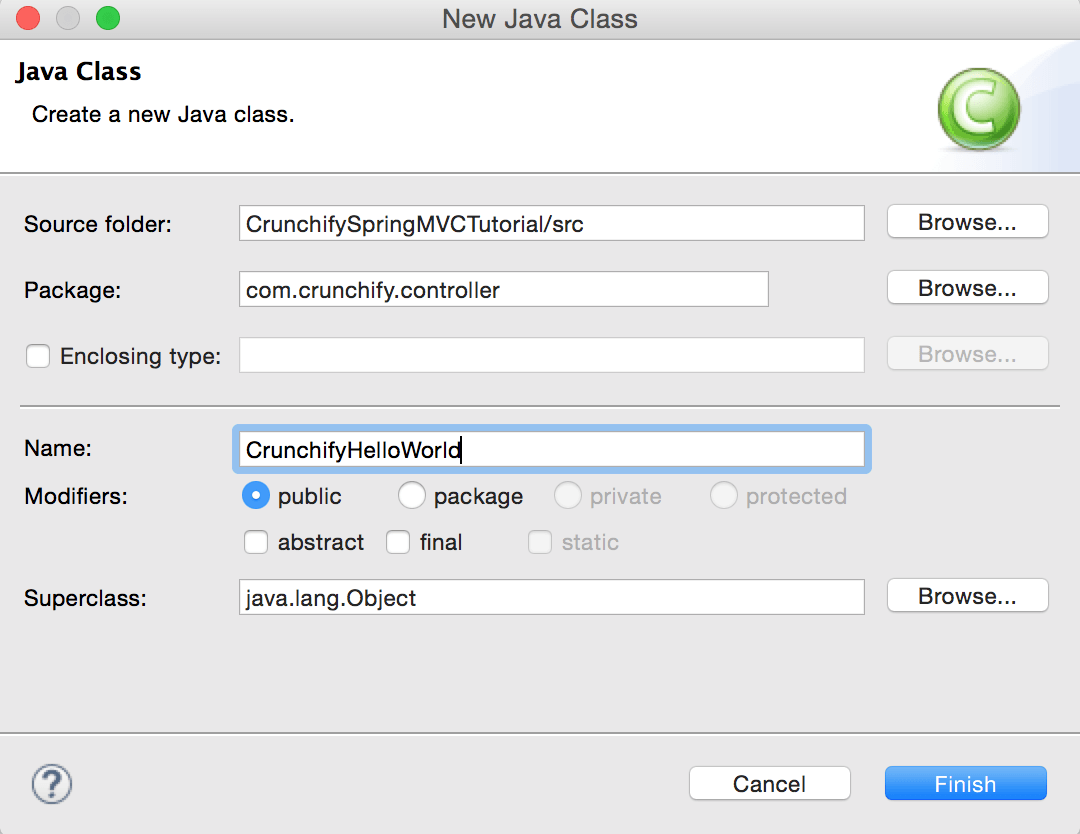
創建控制器類。
- 右鍵單擊
Java Resources->src - 單擊
New->Class - 包:
com.crunchify.controller - 文件名:
CrunchifyHelloWorld.java
CrunchifyHelloWorld.java
|
1 2 3 4 5 6 7 8 9 10 11 12 13 14 15 16 17 18 19 20 21 22 |
package com . crunchify . controller ; import org . springframework . stereotype . Controller ; import org . springframework . web . bind . annotation . RequestMapping ; import org . springframework . web . servlet . ModelAndView ; /* * author: Crunchify.com * */ @Controller public class CrunchifyHelloWorld { @RequestMapping ( "/welcome" ) public ModelAndView helloWorld ( ) { String message = "<br><div>" + "<h3>********** Hello World, Spring MVC Tutorial</h3>This message is coming from CrunchifyHelloWorld.java **********</div><br><br>" ; return new ModelAndView ( "welcome" , "message" , message ) ; } } |
請注意,我們已經使用@Controller和@RequestMapping("/welcome")註釋了CrunchifyHelloWorld類。 當 Spring 掃描我們的包時,它會將這個 bean 識別為用於處理請求的 Controller bean。 @RequestMapping註解告訴 Spring 這個 Controller 應該處理 URL 路徑中以 /welcome 開頭的所有請求。 這包括/welcome/*和/welcome.html 。

helloWorld() 方法返回ModelAndView對象。 ModelAndView 對象試圖解析一個名為“welcome”的視圖,並且數據模型被傳回瀏覽器,以便我們可以訪問 JSP 中的數據。 邏輯視圖名稱將解析為/WEB-INF/jsp/welcome.jsp 。 在 ModelAndView 對像中返回的邏輯名稱“welcome”映射到路徑 /WEB-INF/jsp/welcome.jsp。
ModelAndView 對像還包含一條帶有鍵“消息”和詳細值的消息。 這是我們傳遞給視圖的數據。 通常這將是一個 java bean 形式的值對象,它將包含要在我們的視圖上顯示的數據。 這裡我們只是傳遞一個字符串。
步驟 8
視圖 –創建新文件/WebContent/index.jsp 。
索引.jsp
|
1 2 3 4 5 6 7 8 9 10 11 12 13 14 15 16 17 18 19 20 21 22 |
< html > < head > < title > Spring MVC Tutorial Series by Crunchify . com < / title > <style type ="text/css"> body { background-image : url ( 'https://cdn.crunchify.com/bg.png' ) ; } </style> < / head > < body > < br > < div style = "text-align: center" > < h2 > Hey You . . ! ! This is your 1st Spring MCV Tutorial . . < br > < br > < / h2 > < h3 > < a href = "welcome.html" > Click here to See Welcome Message . . . < / a > ( to check Spring MVC Controller . . . @ RequestMapping ( "/welcome" ) ) < / h3 > < / div > < / body > < / html > |
創建另一個文件/WebContent/WEB-INF/jsp/welcome.jsp 。
NOTE:不要忘記創建jsp文件夾並將welcome.jsp放入其中
歡迎.jsp
|
1 2 3 4 5 6 7 8 9 10 11 12 13 14 15 16 17 18 19 20 21 22 23 24 25 |
< html > < head > < title > Spring MVC Tutorial by Crunchify - Hello World Spring MVC Example < / title > <style type ="text/css"> body { background-image : url ( 'https://cdn.crunchify.com/bg.png' ) ; } </style> < / head > < body > $ { message } < br > < br > < div style = "font-family: verdana; padding: 10px; border-radius: 10px; font-size: 12px; text-align: center;" > Spring MCV Tutorial by < a href = "https://crunchify.com" > Crunchify < / a > . Click < a href = "https://crunchify.com/category/java-tutorials/" target = "_blank" > here < / a > for all Java and < a href = 'https://crunchify.com/category/spring-mvc/' target = '_blank' > here < / a > for all Spring MVC , Web Development examples . < br > < / div > < / body > < / html > |
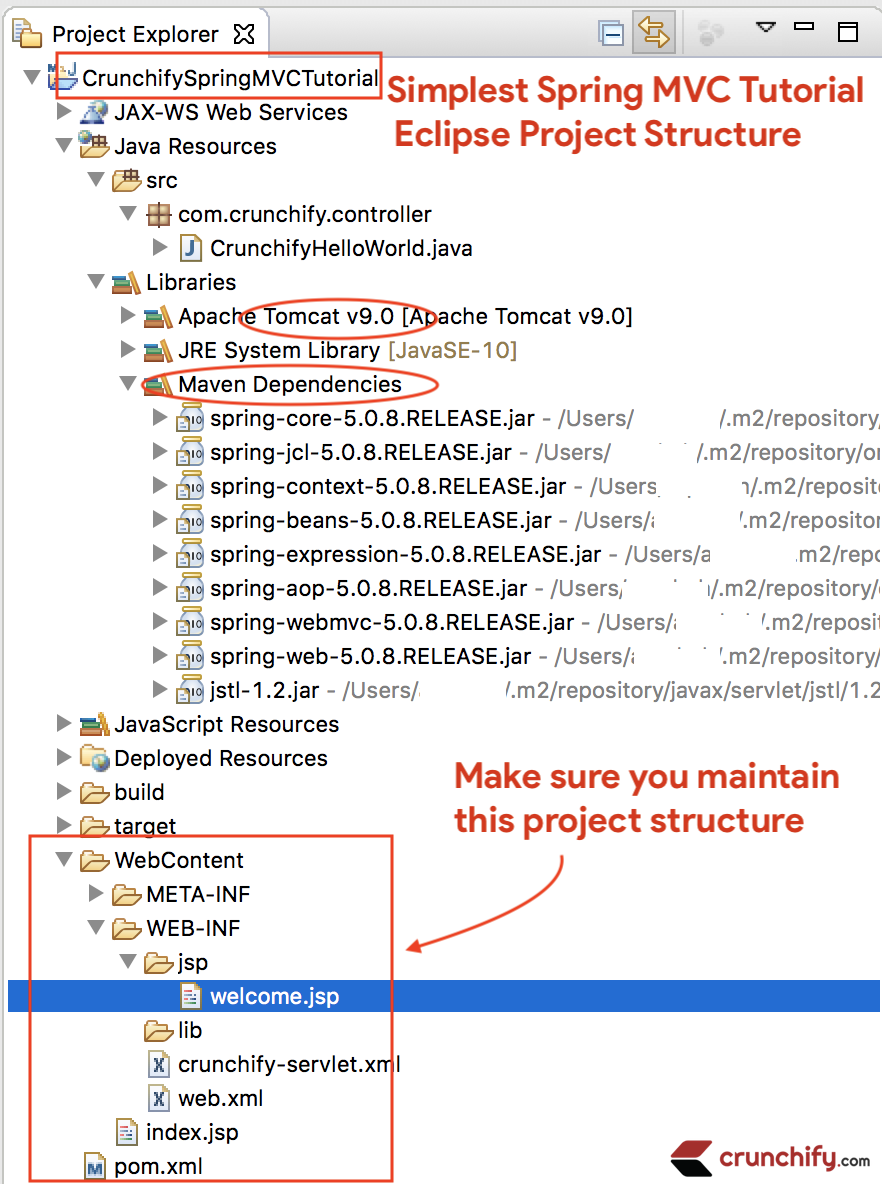
畢竟,這就是您的工作區應該是什麼樣子。
第 9 步
右鍵單擊Project -> Run As -> Maven Build...
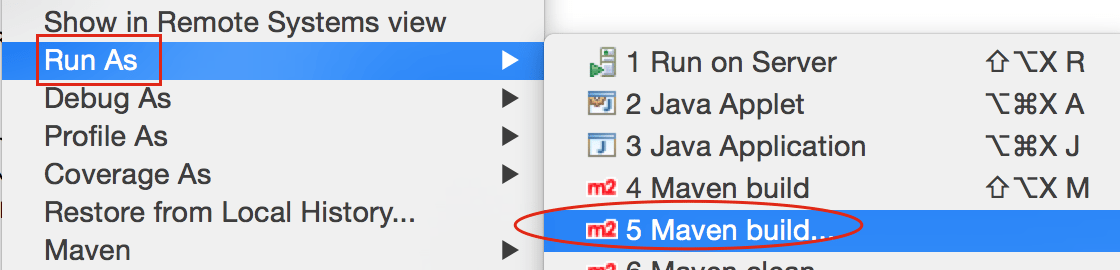
Add Goals : clean install 。 單擊Apply並Run 。
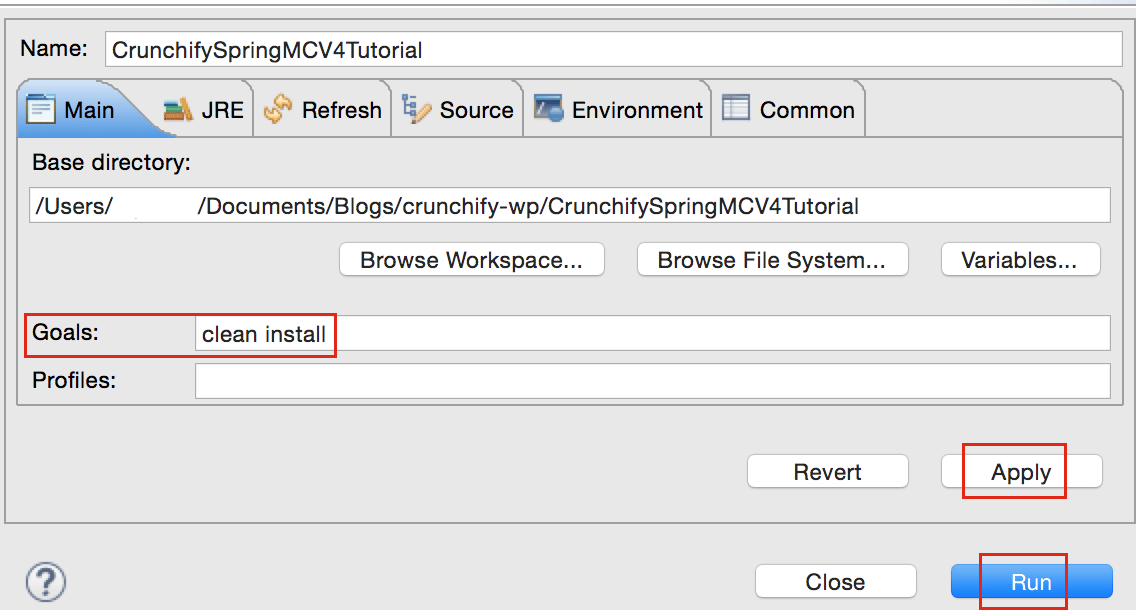
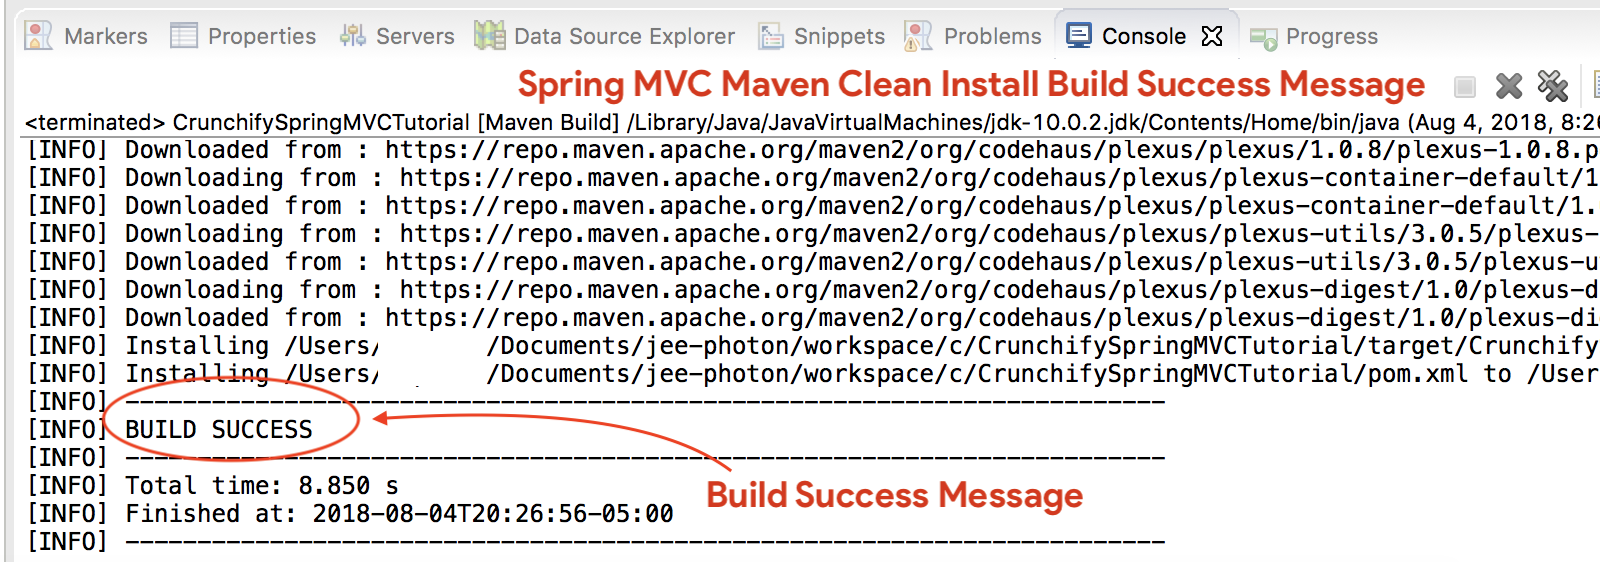
您應該看到構建success message :
我所有的 .jar 文件在哪裡?
您將在/target文件夾下看到所有 .jar 文件。 截屏。
第十步
- 如果您在
Servers選項卡中don't seeTomcat 服務器,請按照步驟將 Apache Tomcat 添加到 Eclipse。 - 將項目部署到
Apache Tomcat- 右鍵點擊
- 添加和刪除
- 將項目添加到服務器(右側部分)。
- 單擊開始。
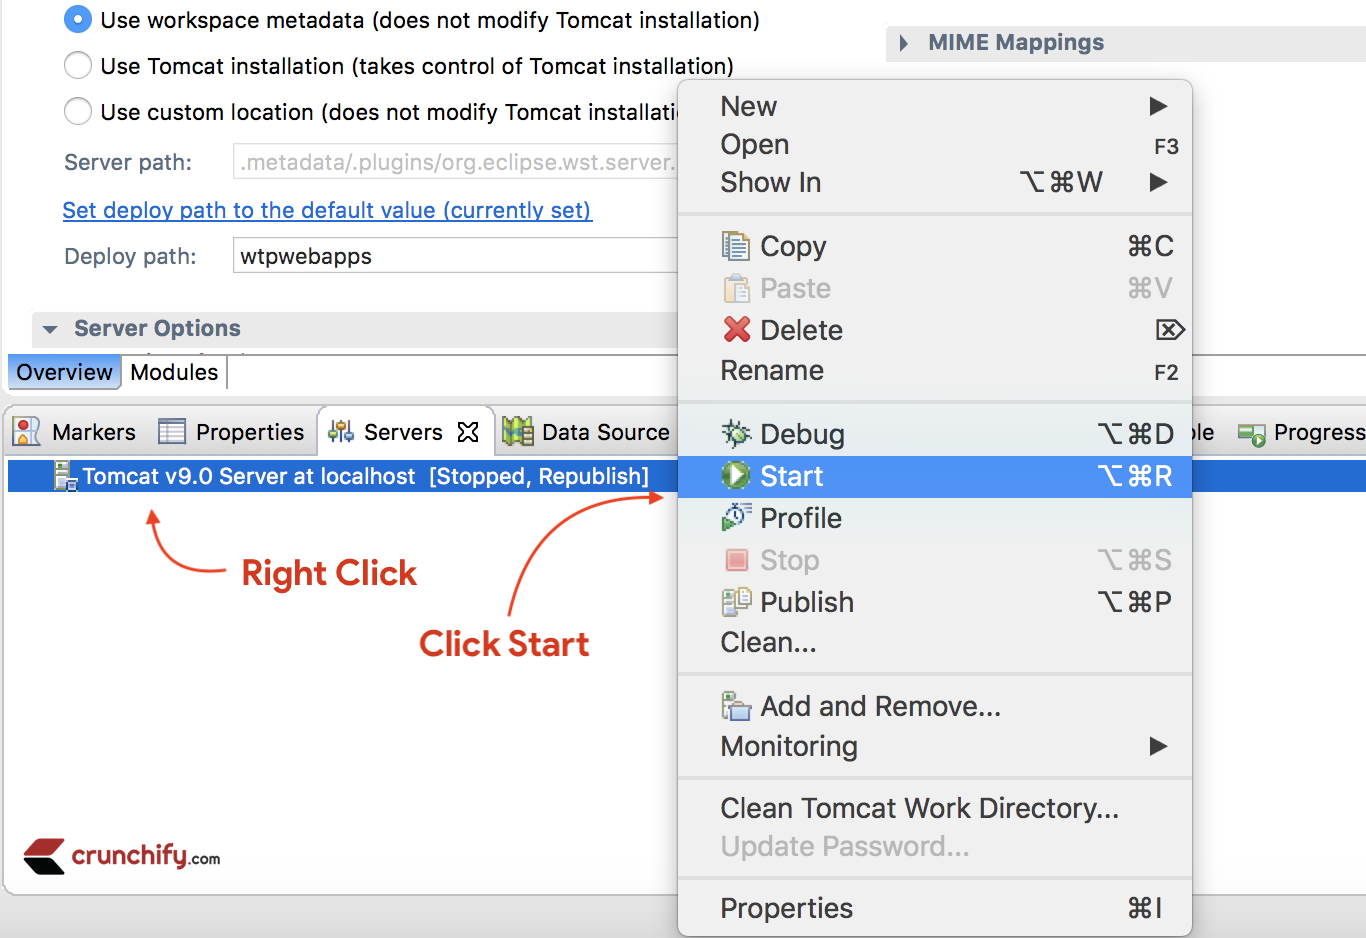
確保您看到以下日誌。 這意味著您的應用程序已成功部署在 Tomcat Web 服務器上。
|
1 2 3 4 5 6 7 8 9 10 11 12 13 14 15 16 17 18 19 20 21 22 23 24 25 26 27 28 29 30 31 32 33 34 35 36 37 38 39 40 |
Aug 04 , 2018 9 : 08 : 10 PM org . apache . tomcat . util . digester . SetPropertiesRule begin WARNING : [ SetPropertiesRule ] { Server / Service / Engine / Host / Context } Setting property 'source' to 'org.eclipse.jst.jee.server:CrunchifySpringMVCTutorial' did not find a matching property . INFO : Server version : Apache Tomcat / 9.0.10 INFO : Server built : Jun 20 2018 17 : 32 : 21 UTC INFO : Server number : 9.0.10.0 INFO : OS Name : Mac OS X INFO : OS Version : 10.13.6 INFO : Architecture : x86_64 INFO : Java Home : / Library / Java / JavaVirtualMachines / jdk - 10.0.2.jdk / Contents / Home INFO : JVM Version : 10.0.2 + 13 INFO : JVM Vendor : "Oracle Corporation" INFO : CATALINA_BASE : / Users / appshah / Documents / jee - photon / workspace / c / . metadata / . plugins / org . eclipse . wst . server . core / tmp0 INFO : CATALINA_HOME : / Users / appshah / Documents / jee - photon / apache - tomcat - 9.0.10 INFO : Command line argument : - Dcatalina . base =/ Users / appshah / Documents / jee - photon / workspace / c / . metadata / . plugins / org . eclipse . wst . server . core / tmp0 INFO : Command line argument : - Dcatalina . home =/ Users / appshah / Documents / jee - photon / apache - tomcat - 9.0.10 INFO : Command line argument : - Dwtp . deploy =/ Users / appshah / Documents / jee - photon / workspace / c / . metadata / . plugins / org . eclipse . wst . server . core / tmp0 / wtpwebapps INFO : Command line argument : - Dfile . encoding = UTF - 8 INFO : The APR based Apache Tomcat Native library which allows optimal performance in production environments was not found on the java . library . path : [ / Users / appshah / Library / Java / Extensions : / Library / Java / Extensions : / Network / Library / Java / Extensions : / System / Library / Java / Extensions : / usr / lib / java : . ] INFO : Initializing ProtocolHandler [ "http-nio-8080" ] INFO : Using a shared selector for servlet write / read INFO : Initializing ProtocolHandler [ "ajp-nio-8009" ] INFO : Using a shared selector for servlet write / read INFO : Initialization processed in 841 ms INFO : Starting service [ Catalina ] INFO : Starting Servlet Engine : Apache Tomcat / 9.0.10 INFO : At least one JAR was scanned for TLDs yet contained no TLDs . Enable debug logging for this logger for a complete list of JARs that were scanned but no TLDs were found in them . Skipping unneeded JARs during scanning can improve startup time and JSP compilation time . INFO : At least one JAR was scanned for TLDs yet contained no TLDs . Enable debug logging for this logger for a complete list of JARs that were scanned but no TLDs were found in them . Skipping unneeded JARs during scanning can improve startup time and JSP compilation time . INFO : No Spring WebApplicationInitializer types detected on classpath INFO : Initializing Spring FrameworkServlet 'crunchify' INFO : FrameworkServlet 'crunchify' : initialization started INFO : Refreshing WebApplicationContext for namespace 'crunchify-servlet' : startup date [ Sat Aug 04 21 : 08 : 13 CDT 2018 ] ; root of context hierarchy INFO : Loading XML bean definitions from ServletContext resource [ / WEB - INF / crunchify - servlet . xml ] INFO : Mapped "{[/welcome]}" onto public org . springframework . web . servlet . ModelAndView com . crunchify . controller . CrunchifyHelloWorld . helloWorld ( ) INFO : Looking for @ ControllerAdvice : WebApplicationContext for namespace 'crunchify-servlet' : startup date [ Sat Aug 04 21 : 08 : 13 CDT 2018 ] ; root of context hierarchy INFO : Looking for @ ControllerAdvice : WebApplicationContext for namespace 'crunchify-servlet' : startup date [ Sat Aug 04 21 : 08 : 13 CDT 2018 ] ; root of context hierarchy INFO : Mapped URL path [ /** ] onto handler 'org.springframework.web.servlet.resource.DefaultServletHttpRequestHandler#0' INFO : FrameworkServlet 'crunchify' : initialization completed in 1607 ms INFO : Starting ProtocolHandler [ "http-nio-8080" ] INFO : Starting ProtocolHandler [ "ajp-nio-8009" ] INFO : Server startup in 3579 ms |
步驟 11。 完畢。
訪問:http://localhost:8080/CrunchifySpringMVCTutorial/ 你應該已經準備好了。
萬歲.. 現在您知道Hello World Spring MVC 5 Example 。 如果您在運行此程序時遇到任何異常,請告訴我。 您可以在此處找到更多示例。
Do you want to include JS, CSS and images into JSP file? 遵循本教程:使用“mvc:resources mapping”將 JS、CSS 和圖像添加/集成到 JSP 文件中的最佳方法。
遇到麻煩? 有什麼問題嗎?
分類第 1 步 – 出現 HTTP 狀態 404 錯誤?
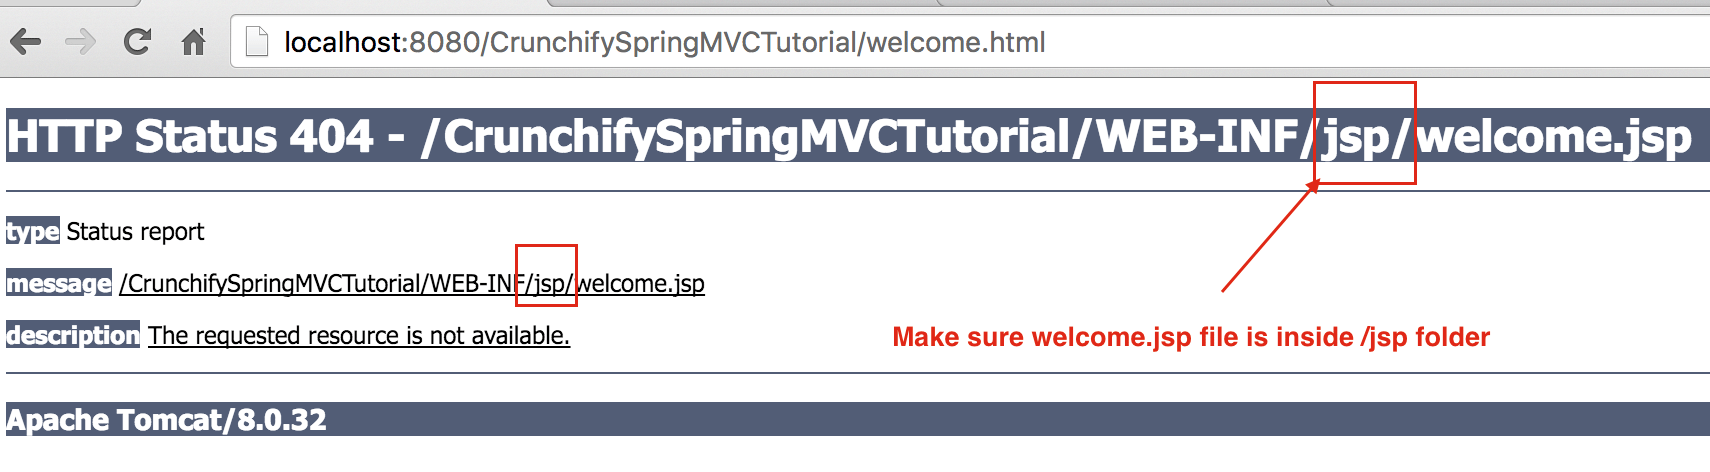
另外,請按照以下教程進行操作:
分類第 2 步 – URL 不起作用? Tomcat錯誤?
確保將 Apache Tomcat Server 添加到Targeted Runtime 。 您可能在Step-1中選擇了它。 Tomcat 7 或 8 any – 服務器應該可以工作。
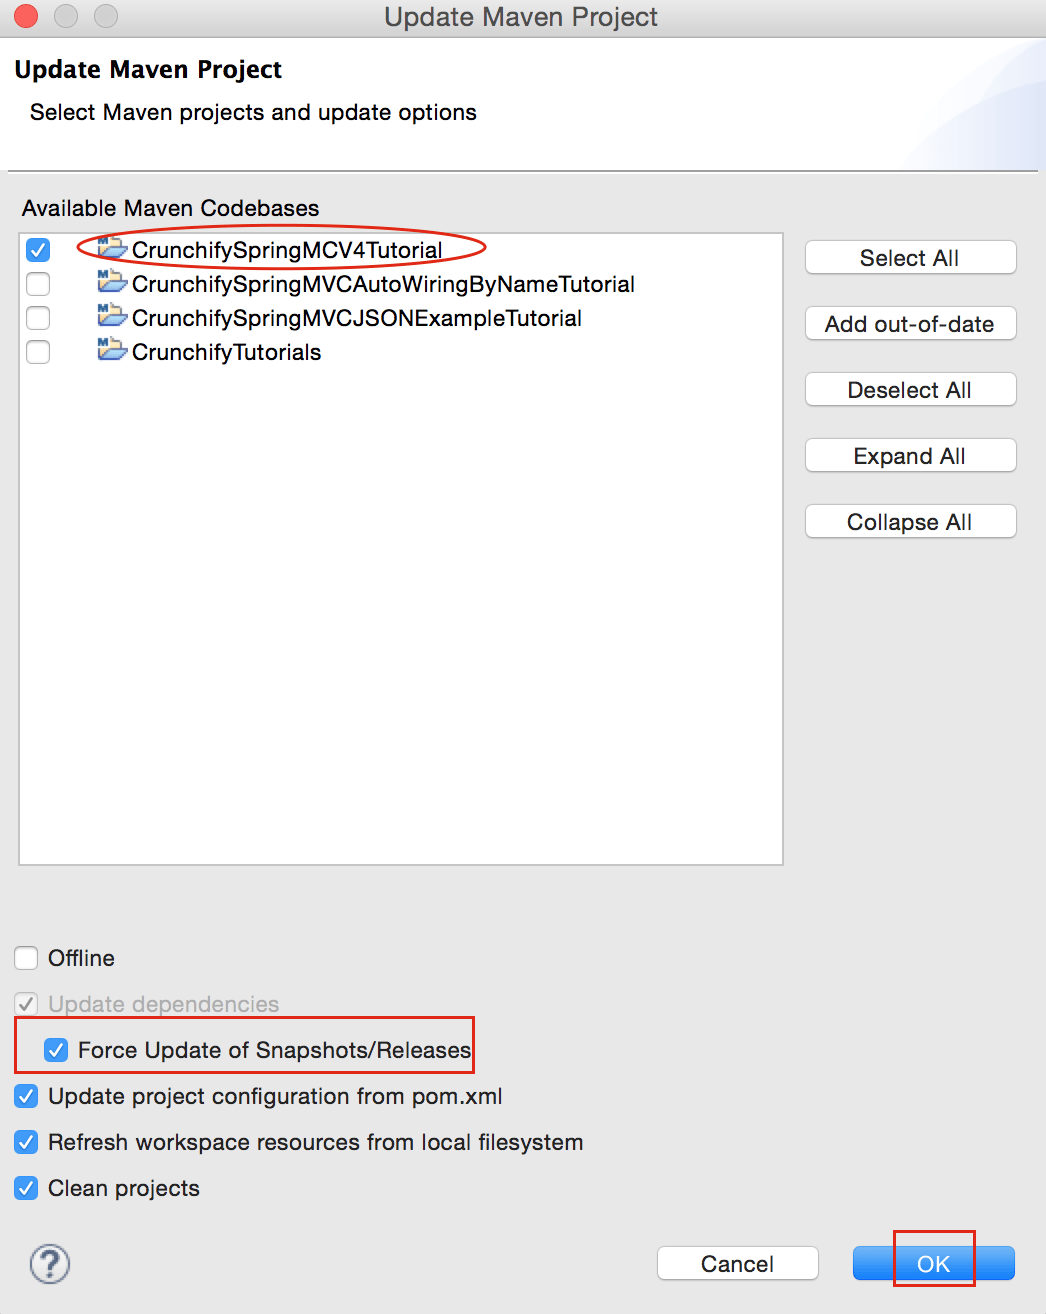
分類第 3 步 – maven 錯誤?
確保更新所有 Maven 依賴項。
如果您在運行以上教程時遇到任何問題,請隨時通過電子郵件發送或在下方發表評論。