
En Basit Spring MVC Framework Eğitimi – UI (JSP) Sayfası ile Merhaba Dünya Örneği
Yayınlanan: 2019-02-23
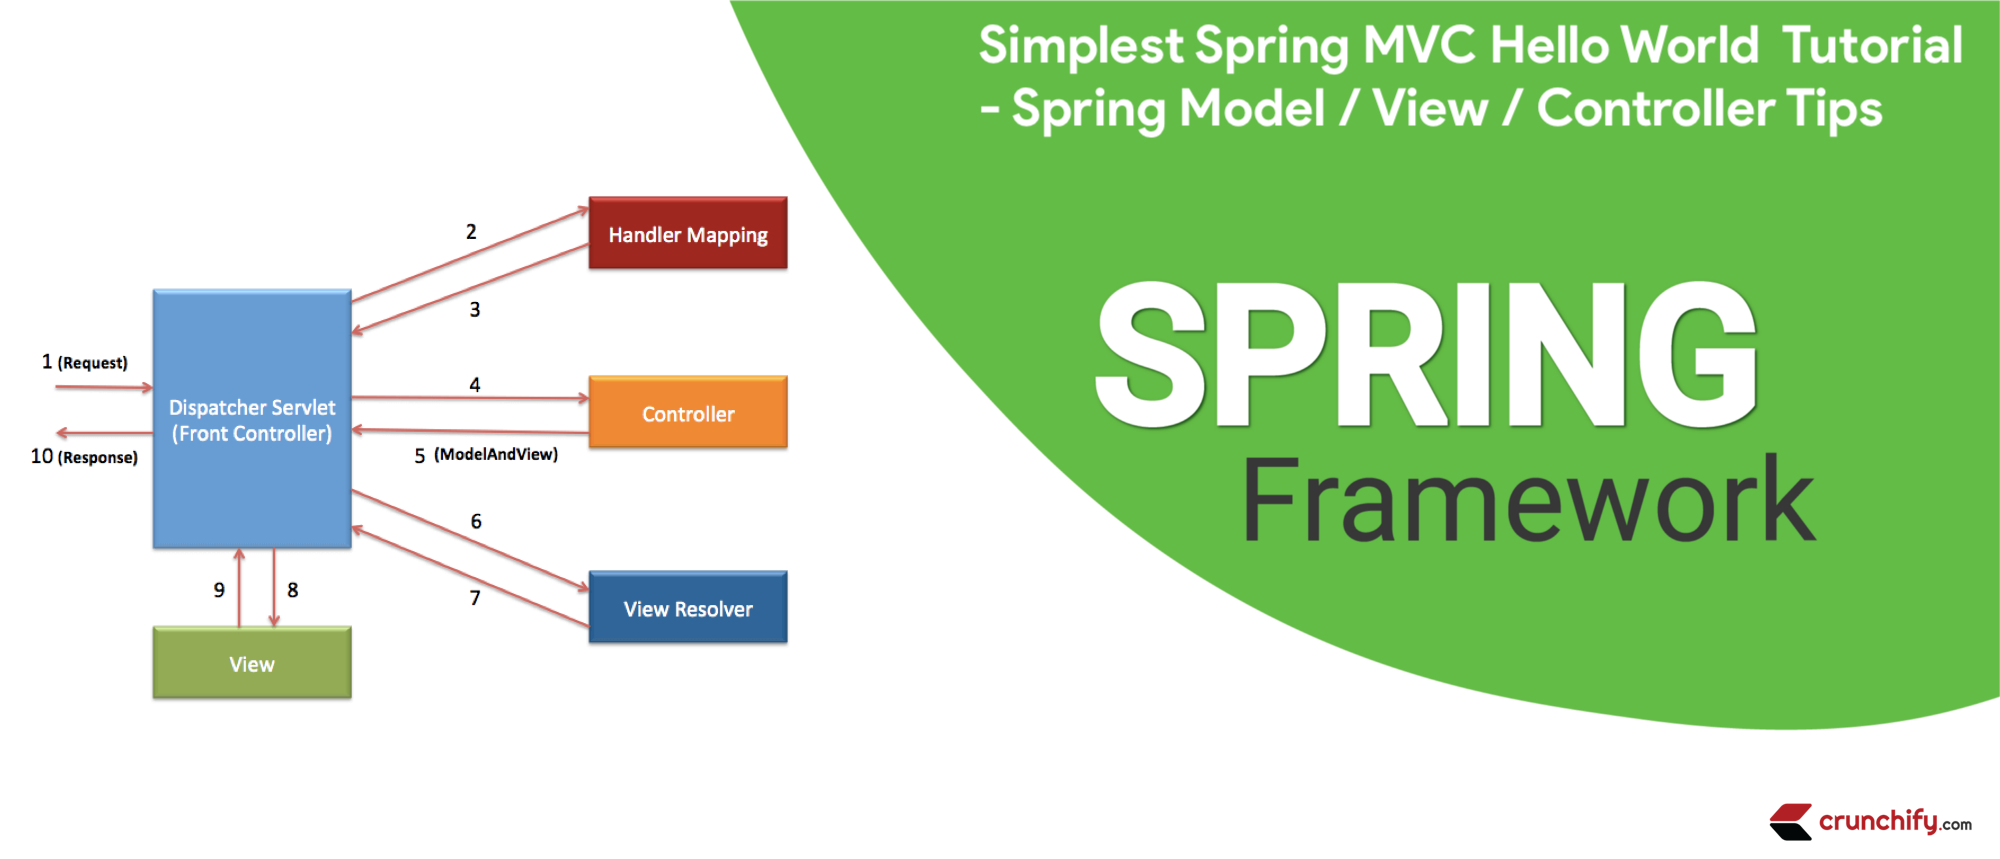
Model-View-Controller (MVC) mimarisi, esnek ve gevşek bağlı web uygulamaları geliştirmenin en basit yolunu sağlar.
Bu eğitimde, 1. Spring MVC uygulamanızı çok ayrıntılı adımlarla nasıl oluşturacağınızı ele alacağız.
Aşağıdaki sorulardan herhangi biri var mı?
- Spring MVC 5.2.3'ün Temelleri
- Adım adım Spring Framework MVC 5 uygulaması geliştirme..
- java – Sıfırdan Spring MVC eğitimi
- Bahar MVC Hızlı Eğitimi
- Bahar MVC Çerçevesi Eğitimi
- İlk Spring MVC uygulama eğitimi
- Spring 5.x MVC Eğitimleri, AJAX Demo, jQuery Demo, JavaScript Demo, İpuçları ve Püf Noktaları Spring 5 MVC
O halde doğru yerdesiniz. Burada web uygulamaları oluşturmak için basit Spring MVC framework göstereceğim.
İlk iş – Ortamı Kuralım
Eğitimin en son güncellendiği ve doğrulandığı tarih: Eylül 2020, aşağıdaki Araç sürümleriyle.
Henüz yapmadıysanız indirmeniz gerekebilecek aşağıdaki araçları kullanıyorum.
- Tomcat 9.0.38 – Bu bağlantıdan en son Apache Tomcat'i indirin.
-
Java EEDevelopers (2020‑09 R) için Eclipse IDE'yi indirdiğinizden emin olun – İndirme bağlantısı. (aşağıdaki şema) -
Spring 5.2.9.RELEASE(İndirme gerekmez) – Maven bağımlılığını kullanacağız. - JDK 15 – İndirme bağlantısı.
En son Java EE Developer Kit'i indirdiğinizden emin olun:

Esas amaç
Bu öğreticinin temel amacı, Spring MVC Uygulamasını en basit şekilde oluşturmaktır.
Başlamadan önce, bu eğitimin sonunda ne göreceğimize bir bakalım.
application result bu şekilde olacaktır. Aşağıdaki tüm adımları tamamladığınızda bu nihai sonuçtur.
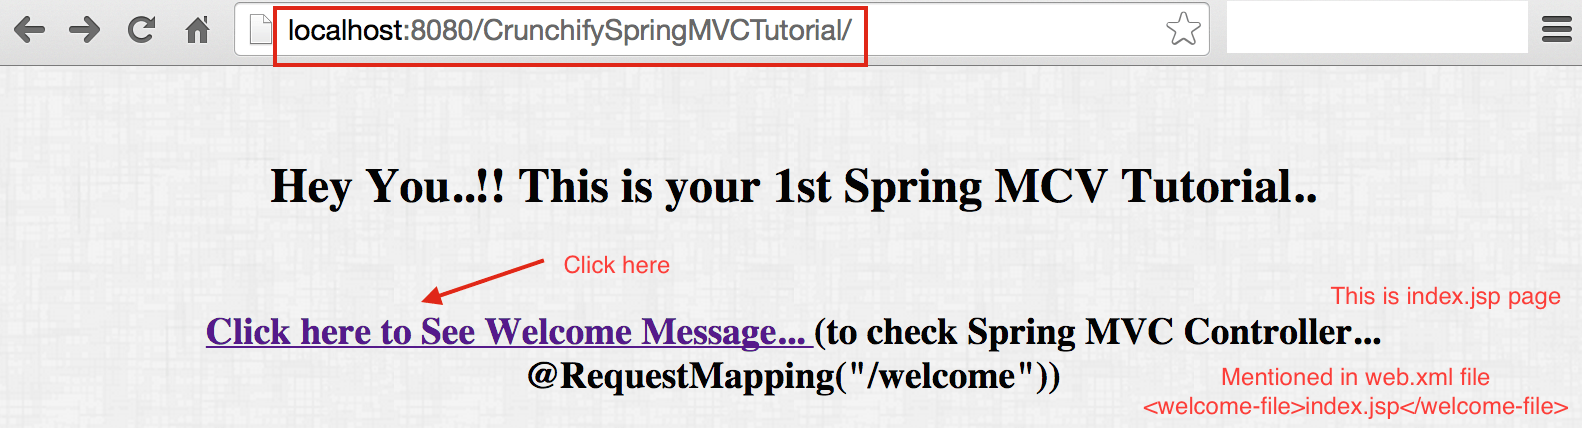
İşte nihai sonuç: Hoş geldiniz sayfası ==> index.jsp
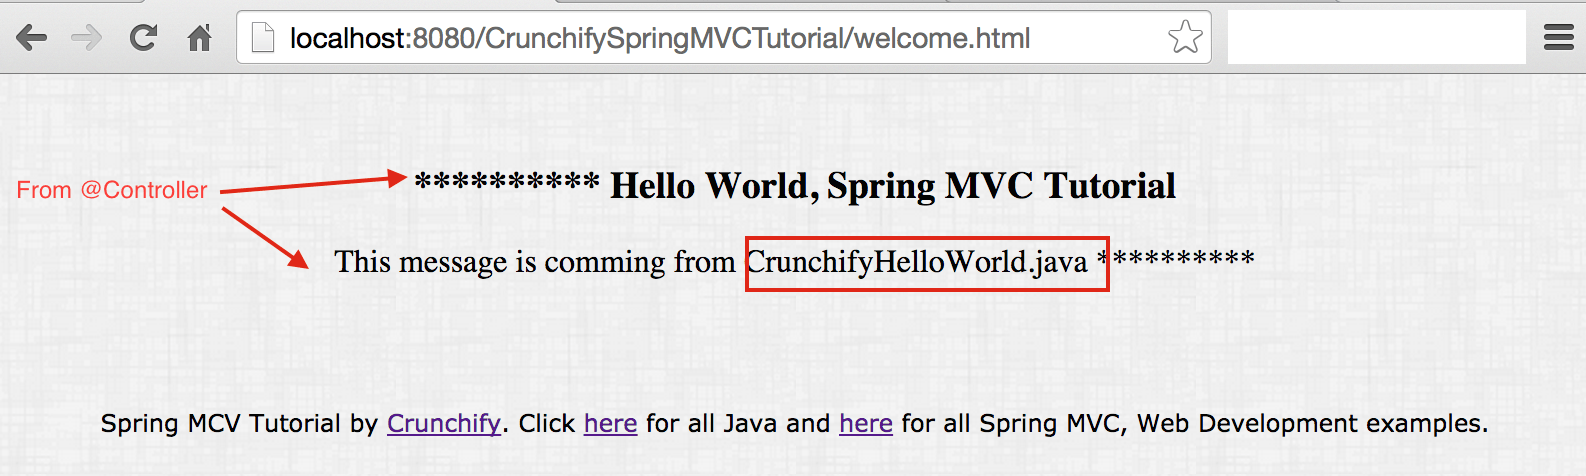
Denetleyici Sınıfından sonuç döndürür
Şimdi Eğitime başlayalım
Aşama 1
- Eclipse'i aç
-
New Eclipse WorkspaceOluştur - Bu, mevcut herhangi bir çalışma alanı yapılandırma sorununu önlemek içinmust.
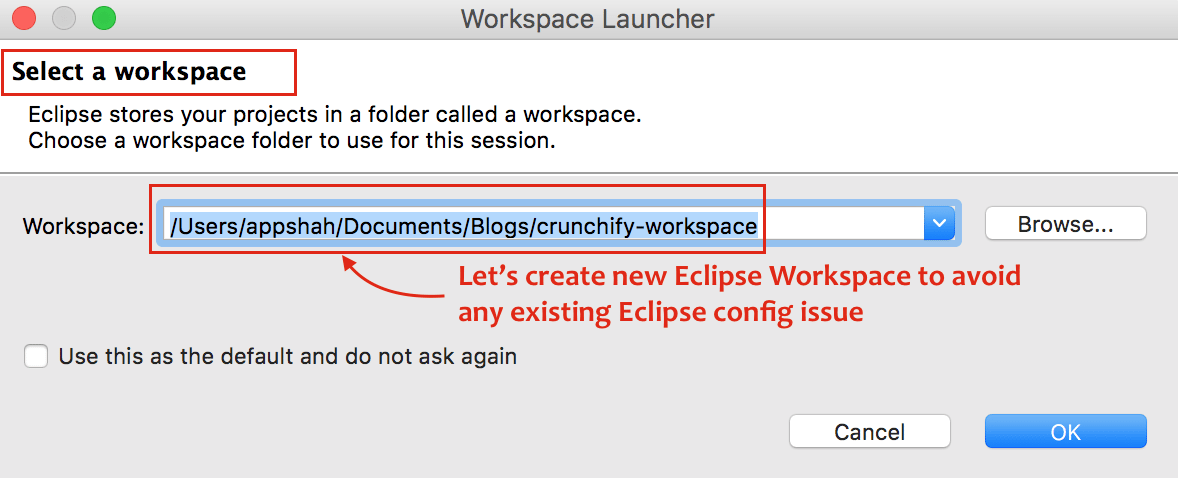
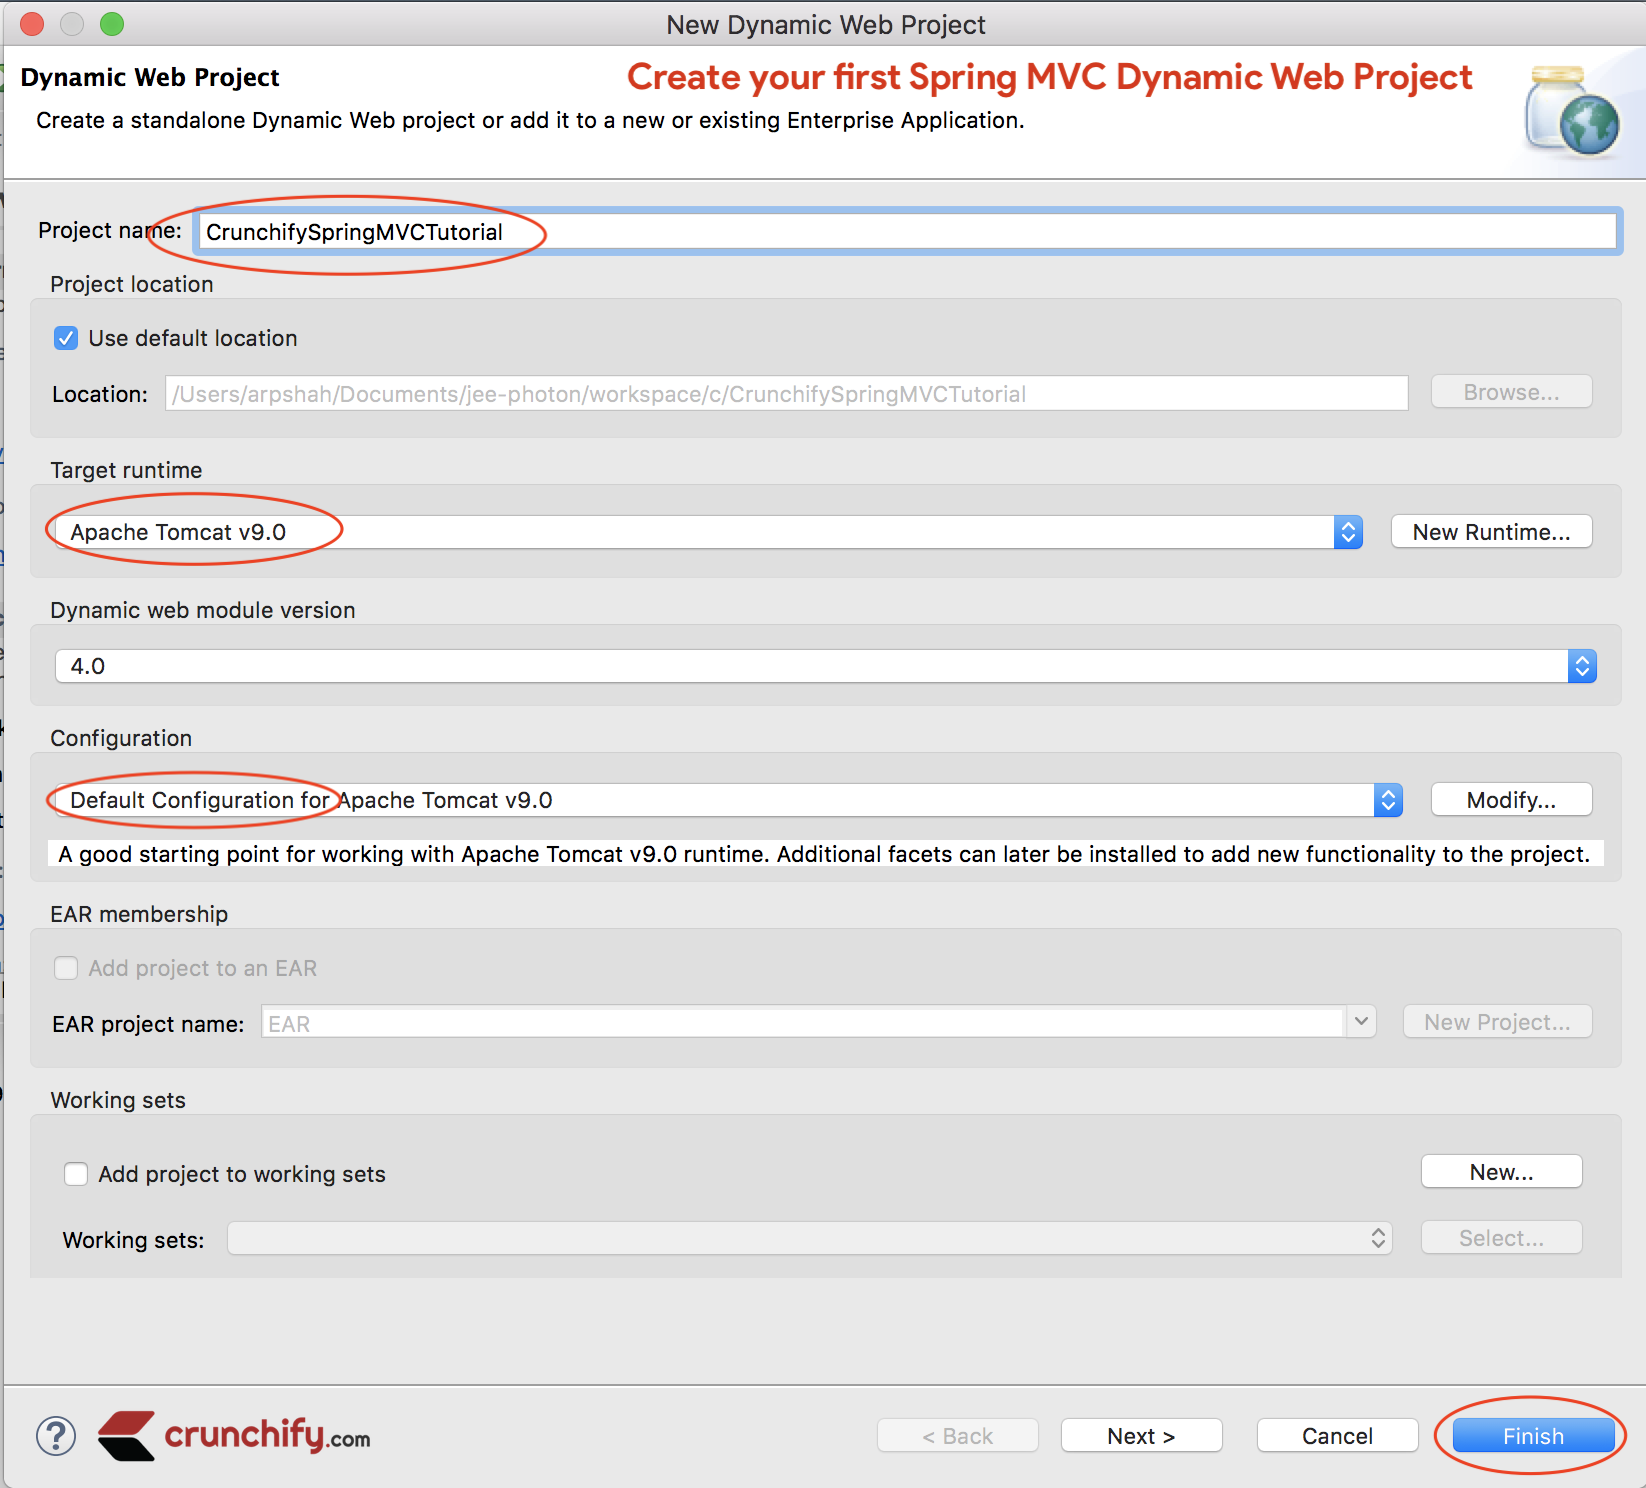
Adım 2
-
Filetıklayın -
Newtıklayın -
Dynamic Web Projectseçin - Bir açılır pencere, Proje Adını Sağlayın:
CrunchifySpringMVCTutorial -
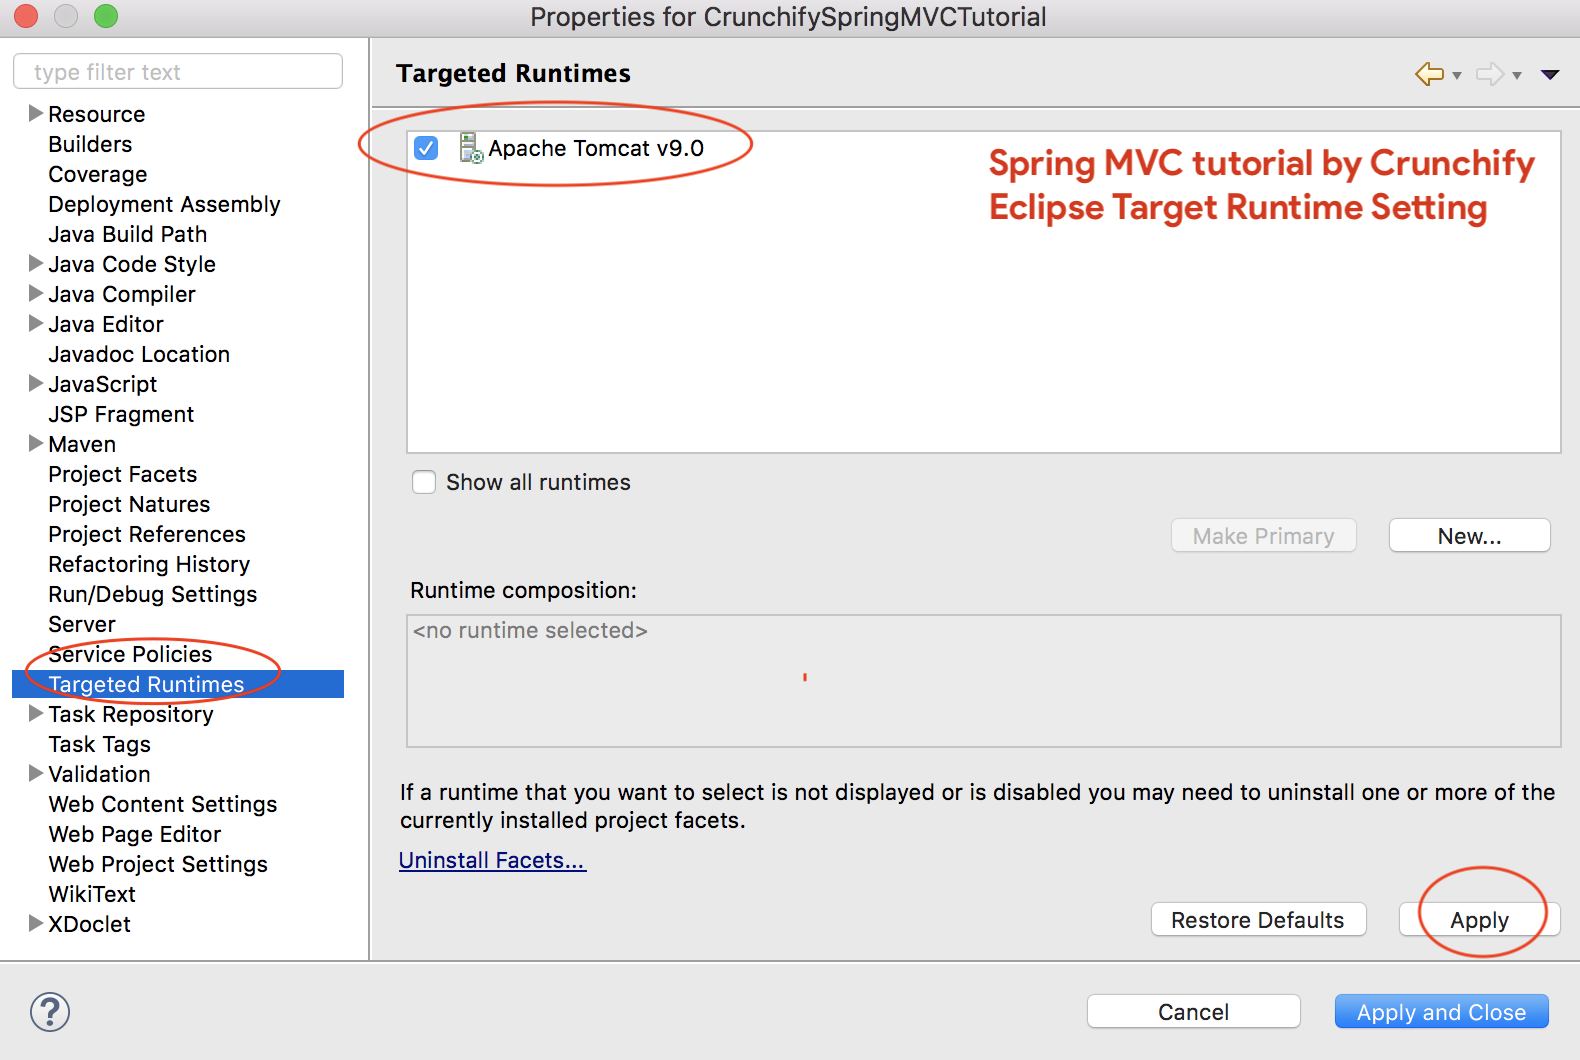
Target RuntimeApache Tomcat 9.0olarak kullandığınızdan emin olun.- Hedef Çalışma Zamanı'nı görmüyorsanız, aşağıdaki adımları izleyin
- Yapılandırmayı
Default ConfigurationOlarak Seçin
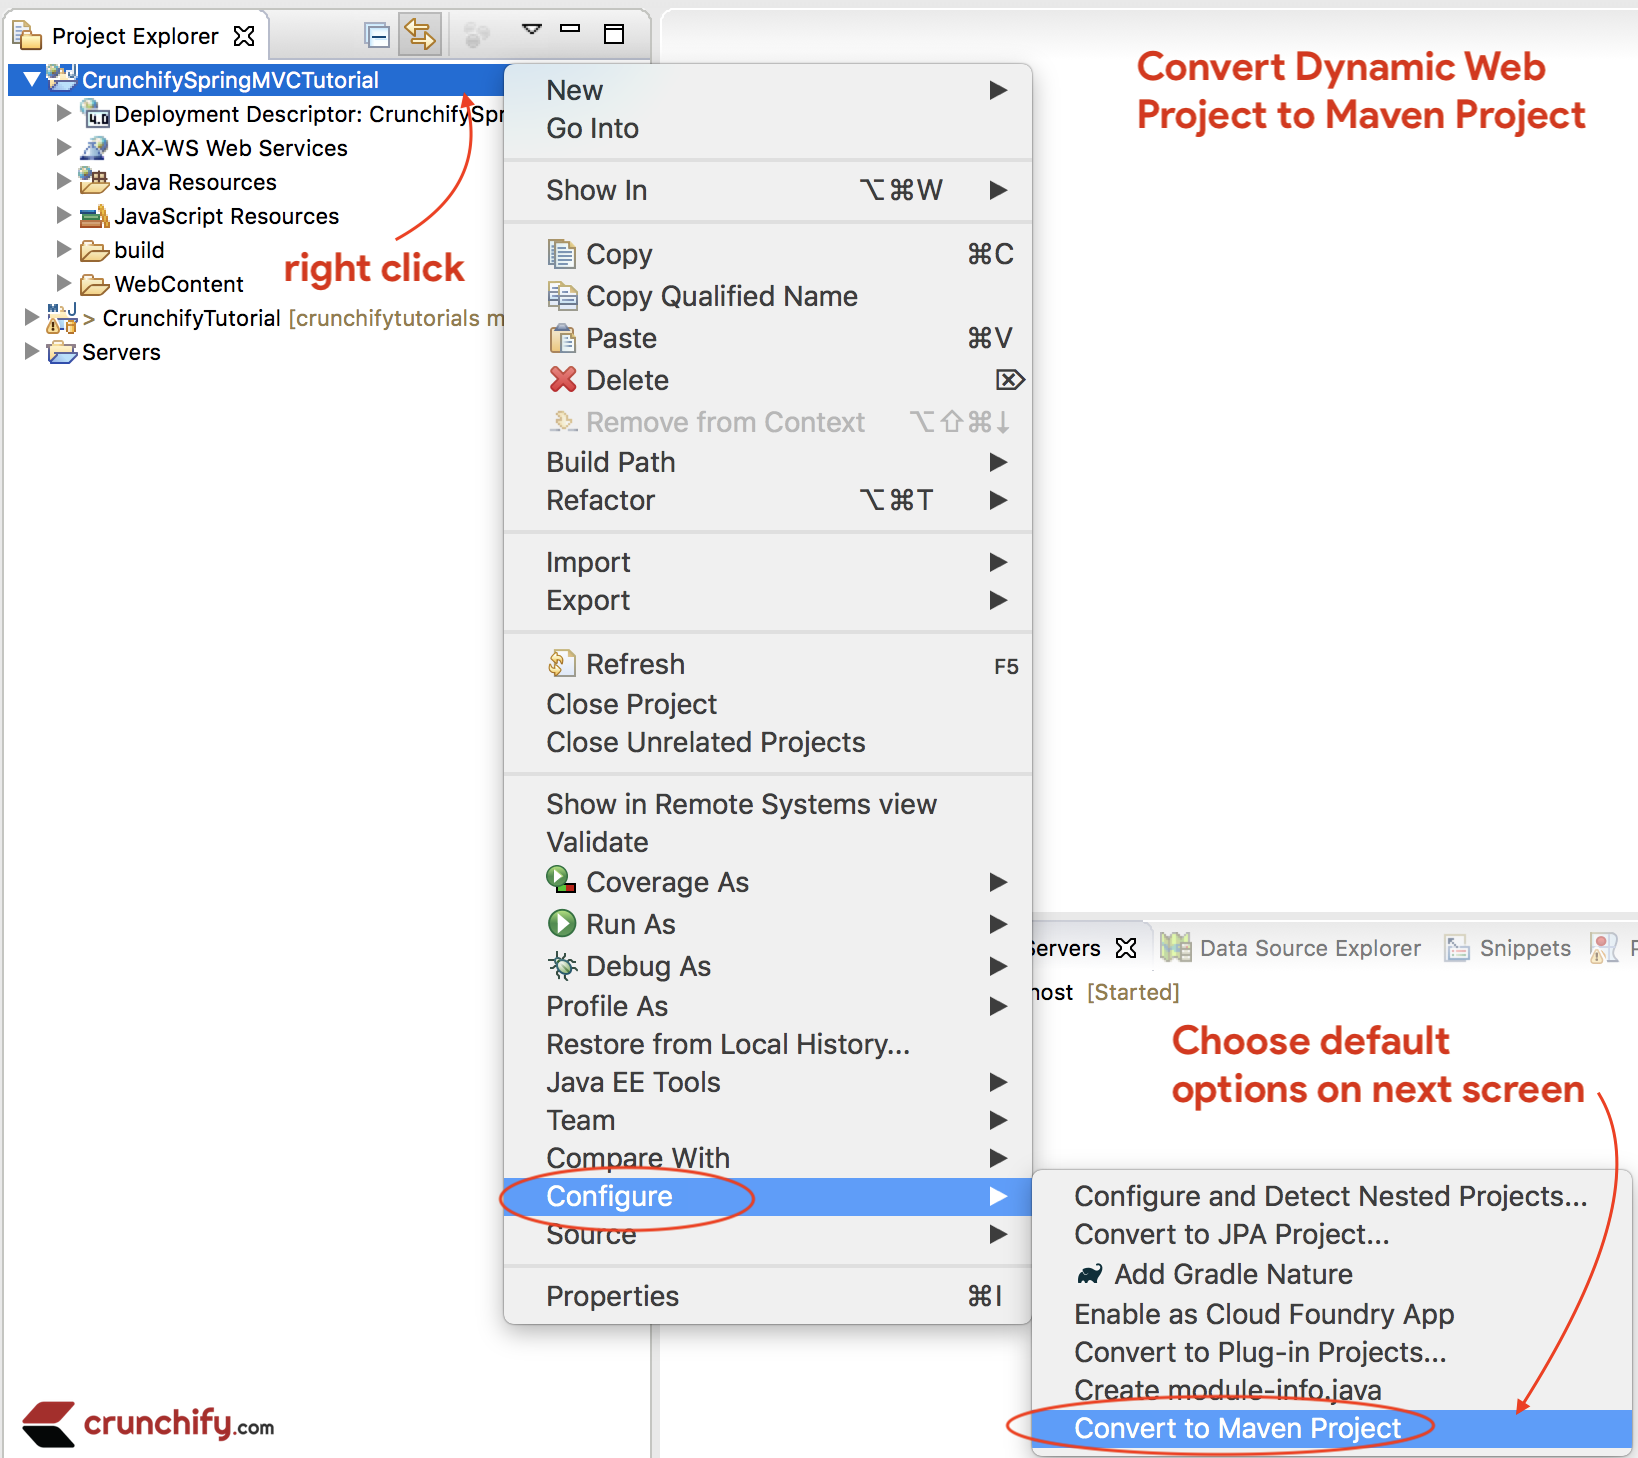
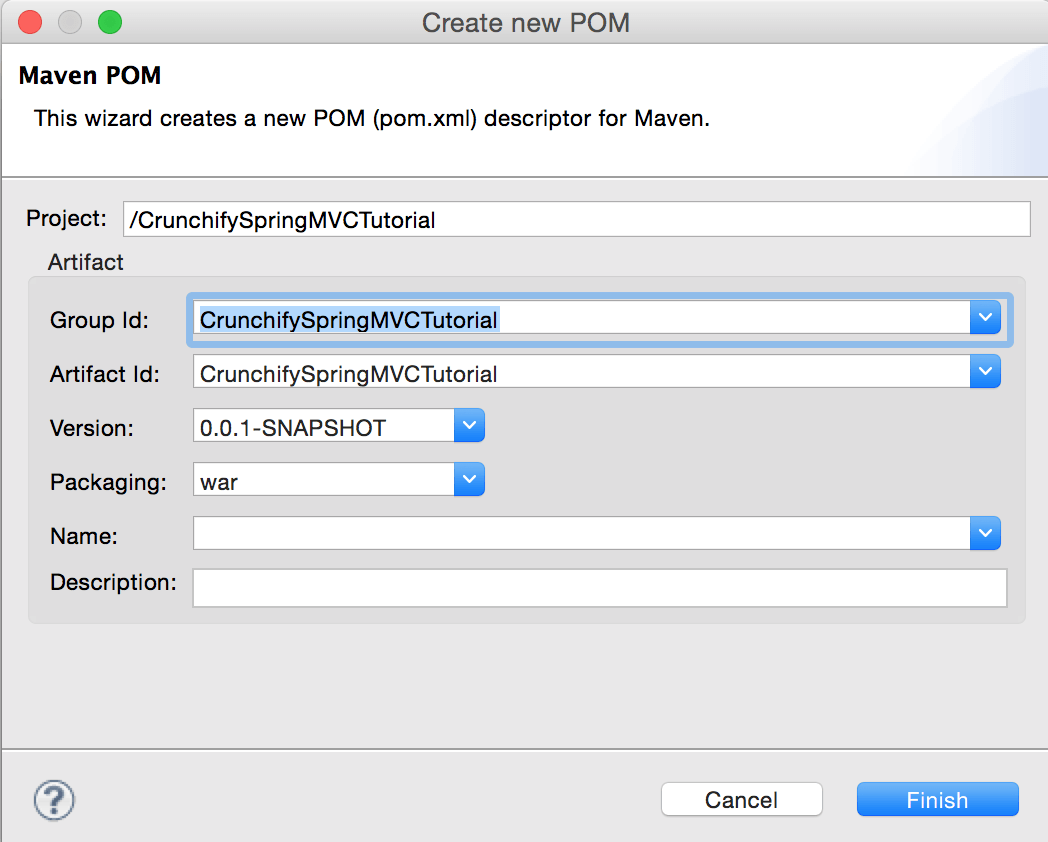
Aşama 3
Projeye gerekli tüm Spring MVC bağımlılıklarını eklemek için Projeyi Maven Projesine dönüştürün.
Adımlar:
- Projeye sağ tıklayın
- Yapılandır
-
Mavenprojesine dönüştür
4. Adım
pom.xml dosyasını açın ve projeye aşağıdaki jar dependencies ekleyin.
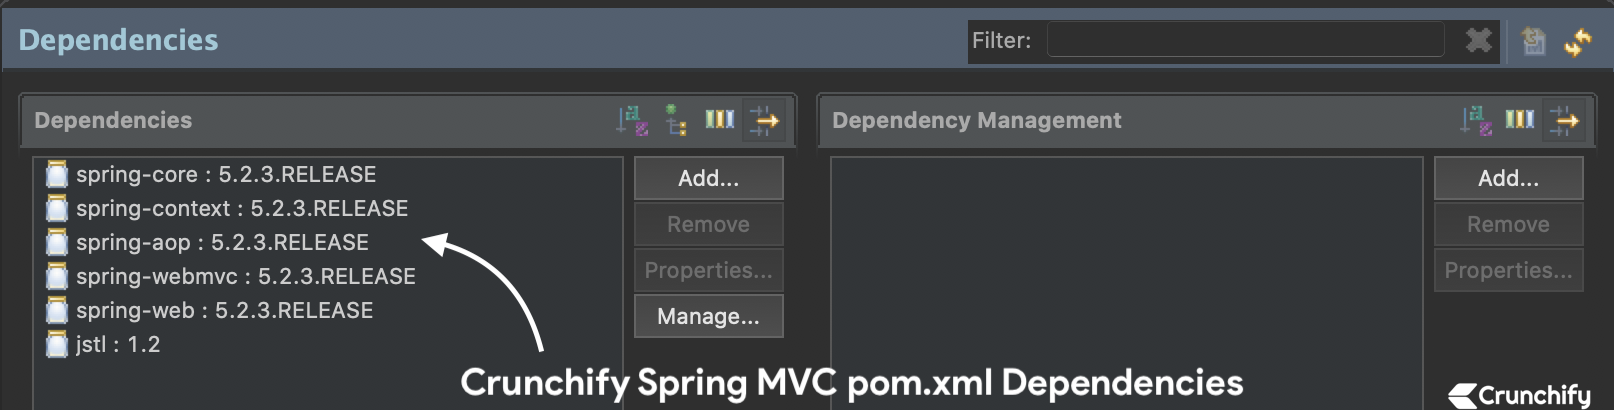
NOTE:İşte benimpom.xml. HenüzJDK 13Java sürümünü13güncellediğinizden emin olun. Bu öğreticiyi en son Spring MVC sürümüne güncellemeye devam edeceğiz.Bu nedenle, aşağıdaki pom.xml dosyasının Spring MVC bağımlılıklarının yukarıdaki resimden farklı (en son) sürümü olabilir.
|
1 2 3 4 5 6 7 8 9 10 11 12 13 14 15 16 17 18 19 20 21 22 23 24 25 26 27 28 29 30 31 32 33 34 35 36 37 38 39 40 41 42 43 44 45 46 47 48 49 50 51 52 53 54 55 56 57 58 59 60 61 |
< project xmlns = "http://maven.apache.org/POM/4.0.0" xmlns : xsi = "http://www.w3.org/2001/XMLSchema-instance" xsi : schemaLocation = "http://maven.apache.org/POM/4.0.0 http://maven.apache.org/xsd/maven-4.0.0.xsd" > < modelVersion > 4.0.0 < / modelVersion > < groupId > CrunchifySpringMVCTutorial < / groupId > < artifactId > CrunchifySpringMVCTutorial < / artifactId > < version > 0.0.1 - SNAPSHOT < / version > < packaging > war < / packaging > < build > < sourceDirectory > src < / sourceDirectory > < plugins > < plugin > < artifactId > maven - compiler - plugin < / artifactId > < version > 3.8.0 < / version > < configuration > < release > 13 < / release > < / configuration > < / plugin > < plugin > < artifactId > maven - war - plugin < / artifactId > < version > 3.2.1 < / version > < configuration > < warSourceDirectory > WebContent < / warSourceDirectory > < / configuration > < / plugin > < / plugins > < / build > < dependencies > < dependency > < groupId > org . springframework < / groupId > < artifactId > spring - core < / artifactId > < version > 5.2.3.RELEASE < / version > < / dependency > < dependency > < groupId > org . springframework < / groupId > < artifactId > spring - context < / artifactId > < version > 5.2.3.RELEASE < / version > < / dependency > < dependency > < groupId > org . springframework < / groupId > < artifactId > spring - aop < / artifactId > < version > 5.2.3.RELEASE < / version > < / dependency > < dependency > < groupId > org . springframework < / groupId > < artifactId > spring - webmvc < / artifactId > < version > 5.2.3.RELEASE < / version > < / dependency > < dependency > < groupId > org . springframework < / groupId > < artifactId > spring - web < / artifactId > < version > 5.2.3.RELEASE < / version > < / dependency > < dependency > < groupId > javax . servlet < / groupId > < artifactId > jstl < / artifactId > < version > 1.2 < / version > < / dependency > < / dependencies > < / project > |
Adım 5
Yeni Spring Configuration Bean dosyası oluşturun: /WebContent/WEB-INF/crunchify-servlet.xml

crunchify-servlet.xml
|
1 2 3 4 5 6 7 8 9 10 11 12 13 14 15 16 17 18 19 20 21 22 23 24 25 26 27 |
<? xml version = "1.0" encoding = "UTF-8" ?> < beans xmlns = "http://www.springframework.org/schema/beans" xmlns : mvc = "http://www.springframework.org/schema/mvc" xmlns : context = "http://www.springframework.org/schema/context" xmlns : xsi = "http://www.w3.org/2001/XMLSchema-instance" xsi : schemaLocation = " http://www.springframework.org/schema/beans http://www.springframework.org/schema/beans/spring-beans.xsd http://www.springframework.org/schema/mvc http://www.springframework.org/schema/mvc/spring-mvc.xsd http://www.springframework.org/schema/context http://www.springframework.org/schema/context/spring-context.xsd" > < mvc : annotation - driven / > < context : component - scan base - package = "com.crunchify.controller" / > < mvc : default - servlet - handler / > < bean id = "viewResolver" class = "org.springframework.web.servlet.view.UrlBasedViewResolver" > < property name = "viewClass" value = "org.springframework.web.servlet.view.JstlView" / > < property name = "prefix" value = "/WEB-INF/jsp/" / > < property name = "suffix" value = ".jsp" / > < / bean > < / beans > |
Yukarıdaki crunchify-servlet.xml yapılandırma dosyasında bir <context:component-scan> etiketi tanımladık. Bu, Spring'in tüm bileşenleri com.crunchify.controller paketinden ve tüm alt paketlerinden yüklemesine izin verecektir.
Bu, CrunchifyHelloWorld.class . Ayrıca bir bean viewResolver . Bu fasulye görünümü çözecek ve ModelAndView'daki görünüme /WEB-INF/jsp/ önek dizesini ve .jsp son ekini ekleyecektir.
CrunchifyHelloWorld sınıfımızda, hoş geldiniz görünüm adıyla bir ModelAndView nesnesi döndürdüğümüze dikkat edin.
Bu, /WEB-INF/jsp/welcome.jsp yoluna çözümlenecektir.
Adım-6
Zaten orada değilse, yeni web.xml dosyası oluşturun. Spring /WebContent/WEB-INF/web.xml dosyasında eşleyin.
NOTE: “ dynamic web project ” web.xml dosyasını göremiyorsanız, aşağıdaki adımları izleyin.
web.xml
|
1 2 3 4 5 6 7 8 9 10 11 12 13 14 15 16 17 18 19 20 21 22 23 24 25 26 27 28 |
<? xml version = "1.0" encoding = "UTF-8" ?> < web - app xmlns : xsi = "http://www.w3.org/2001/XMLSchema-instance" xmlns = "http://xmlns.jcp.org/xml/ns/javaee" xsi : schemaLocation = "http://xmlns.jcp.org/xml/ns/javaee http://xmlns.jcp.org/xml/ns/javaee/web-app_4_0.xsd" id = "WebApp_ID" version = "4.0" > < display - name > CrunchifySpringMVCTutorial < / display - name > < welcome - file - list > < welcome - file > index . html < / welcome - file > < welcome - file > index . htm < / welcome - file > < welcome - file > index . jsp < / welcome - file > < welcome - file > default . html < / welcome - file > < welcome - file > default . htm < / welcome - file > < welcome - file > default . jsp < / welcome - file > < / welcome - file - list > < servlet > < servlet - name > crunchify < / servlet - name > < servlet - class > org . springframework . web . servlet . DispatcherServlet < / servlet - class > < load - on - startup > 1 < / load - on - startup > < / servlet > < servlet - mapping > < servlet - name > crunchify < / servlet - name > < url - pattern > / welcome . jsp < / url - pattern > < url - pattern > / index . jsp < / url - pattern > < url - pattern > / welcome . html < / url - pattern > < url - pattern > * . html < / url - pattern > < / servlet - mapping > < / web - app > |
web.xml yukarıdaki kod, DispatcherServlet'i /welcome.jsp url modeliyle eşler. Ayrıca index.jsp karşılama dosyası olarak tanımladığımızı da unutmayın.
Burada dikkat edilmesi gereken nokta, web.xml içindeki <servlet-name> etiketindeki sunucu uygulamasının adıdır. DispatcherServlet başlatıldığında, web uygulamasının WEB-INF klasöründe [servlet-name]-servlet.xml dosya adını arayacaktır. Bu örnekte çerçeve, crunchify-servlet.xml adlı dosyayı arayacaktır.
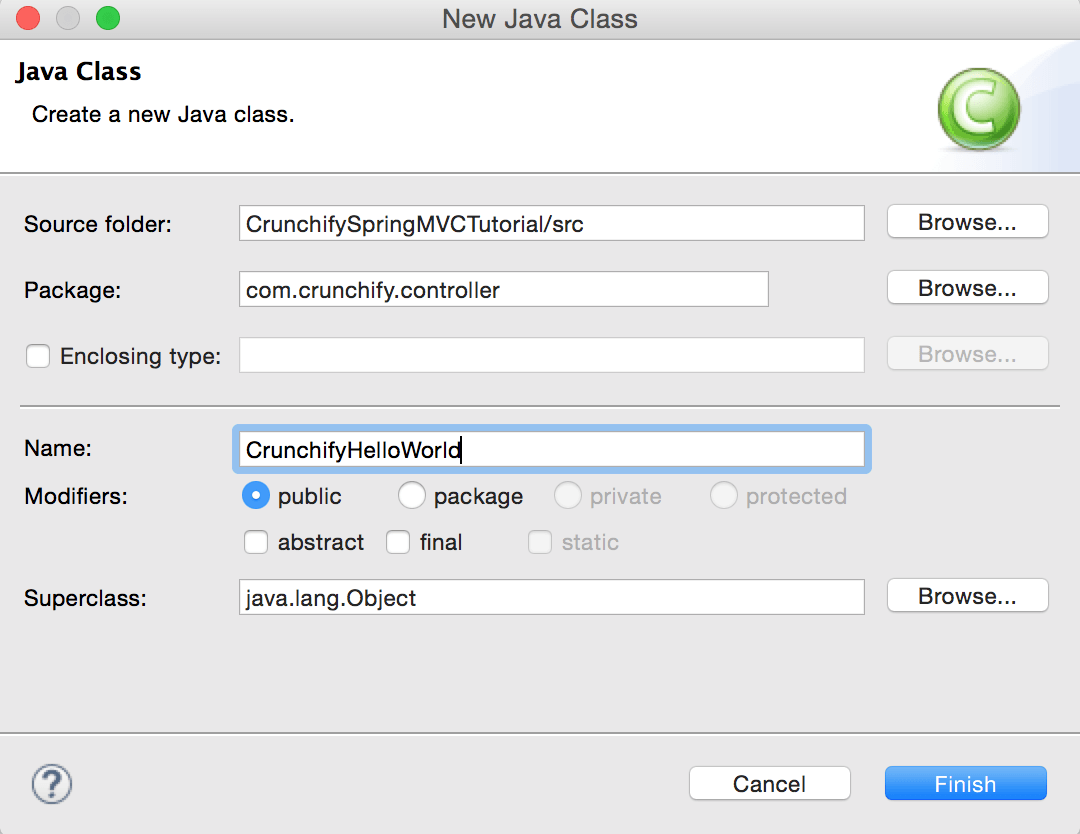
Adım-7
Denetleyici Sınıfı oluşturun.
-
Java Resources->srcsağ tıklayın -
New->Classtıklayın - Paket:
com.crunchify.controller - Dosya adı:
CrunchifyHelloWorld.java
CrunchifyHelloWorld.java
|
1 2 3 4 5 6 7 8 9 10 11 12 13 14 15 16 17 18 19 20 21 22 |
package com . crunchify . controller ; import org . springframework . stereotype . Controller ; import org . springframework . web . bind . annotation . RequestMapping ; import org . springframework . web . servlet . ModelAndView ; /* * author: Crunchify.com * */ @Controller public class CrunchifyHelloWorld { @RequestMapping ( "/welcome" ) public ModelAndView helloWorld ( ) { String message = "<br><div>" + "<h3>********** Hello World, Spring MVC Tutorial</h3>This message is coming from CrunchifyHelloWorld.java **********</div><br><br>" ; return new ModelAndView ( "welcome" , "message" , message ) ; } } |
CrunchifyHelloWorld sınıfına @Controller ve @RequestMapping("/welcome") ile açıklama eklediğimizi unutmayın. Spring paketimizi taradığında, bu bean'i istekleri işlemek için bir Controller bean olarak tanıyacaktır. @RequestMapping ek açıklaması, Spring'e bu Denetleyicinin URL yolunda /welcome ile başlayan tüm istekleri işlemesi gerektiğini söyler. Buna /welcome/* ve /welcome.html .

merhabaWorld() yöntemi, ModelAndView nesnesini döndürür. ModelAndView nesnesi, "hoş geldiniz" adlı bir görünüme çözümlemeye çalışır ve veri modeli, JSP içindeki verilere erişebilmemiz için tarayıcıya geri gönderilir. Mantıksal görünüm adı /WEB-INF/jsp/welcome.jsp olarak çözülecektir. ModelAndView nesnesinde döndürülen mantıksal ad “welcome” /WEB-INF/jsp/welcome.jsp yoluna eşlenir.
ModelAndView nesnesi ayrıca "mesaj" anahtarına ve Ayrıntılı değere sahip bir mesaj içerir. Bu, görüşümüze aktardığımız verilerdir. Normalde bu, görüşümüzde görüntülenecek verileri içerecek olan java bean biçiminde bir değer nesnesi olacaktır. Burada sadece bir dize geçiyoruz.
Adım-8
Görünüm – Yeni dosya oluşturun /WebContent/index.jsp .
index.jsp
|
1 2 3 4 5 6 7 8 9 10 11 12 13 14 15 16 17 18 19 20 21 22 |
< html > < head > < title > Spring MVC Tutorial Series by Crunchify . com < / title > <style type ="text/css"> body { background-image : url ( 'https://cdn.crunchify.com/bg.png' ) ; } </style> < / head > < body > < br > < div style = "text-align: center" > < h2 > Hey You . . ! ! This is your 1st Spring MCV Tutorial . . < br > < br > < / h2 > < h3 > < a href = "welcome.html" > Click here to See Welcome Message . . . < / a > ( to check Spring MVC Controller . . . @ RequestMapping ( "/welcome" ) ) < / h3 > < / div > < / body > < / html > |
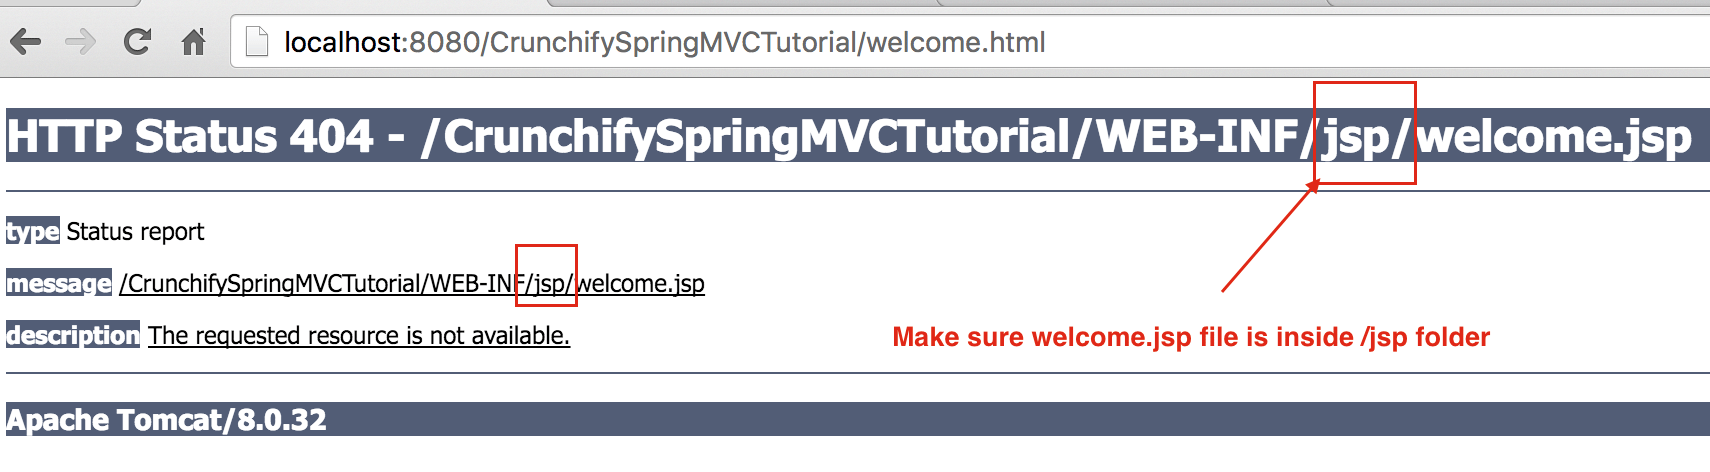
Başka bir dosya oluşturun /WebContent/WEB-INF/jsp/welcome.jsp .
NOTE: jsp klasörü oluşturmayı ve içine welcome.jsp koymayı unutmayın.
hoşgeldiniz.jsp
|
1 2 3 4 5 6 7 8 9 10 11 12 13 14 15 16 17 18 19 20 21 22 23 24 25 |
< html > < head > < title > Spring MVC Tutorial by Crunchify - Hello World Spring MVC Example < / title > <style type ="text/css"> body { background-image : url ( 'https://cdn.crunchify.com/bg.png' ) ; } </style> < / head > < body > $ { message } < br > < br > < div style = "font-family: verdana; padding: 10px; border-radius: 10px; font-size: 12px; text-align: center;" > Spring MCV Tutorial by < a href = "https://crunchify.com" > Crunchify < / a > . Click < a href = "https://crunchify.com/category/java-tutorials/" target = "_blank" > here < / a > for all Java and < a href = 'https://crunchify.com/category/spring-mvc/' target = '_blank' > here < / a > for all Spring MVC , Web Development examples . < br > < / div > < / body > < / html > |
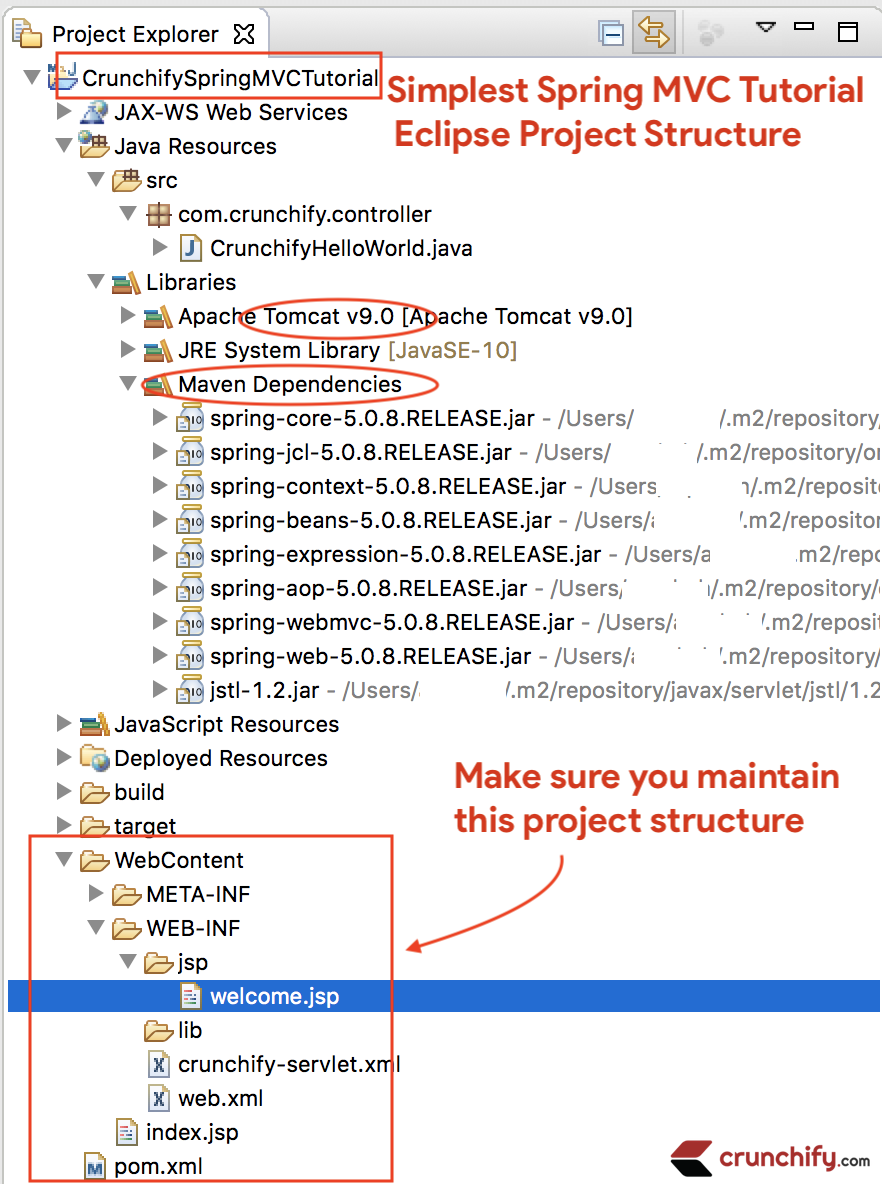
Her şeyden sonra, çalışma alanınız böyle görünmelidir.
Adım-9
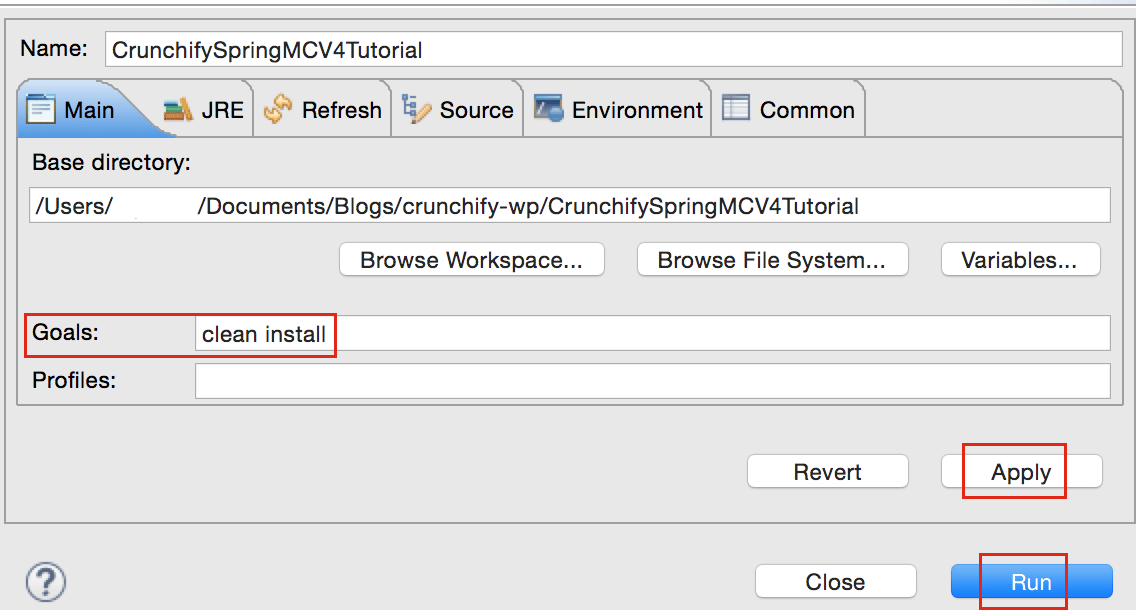
Project -> Run As -> Maven Build...
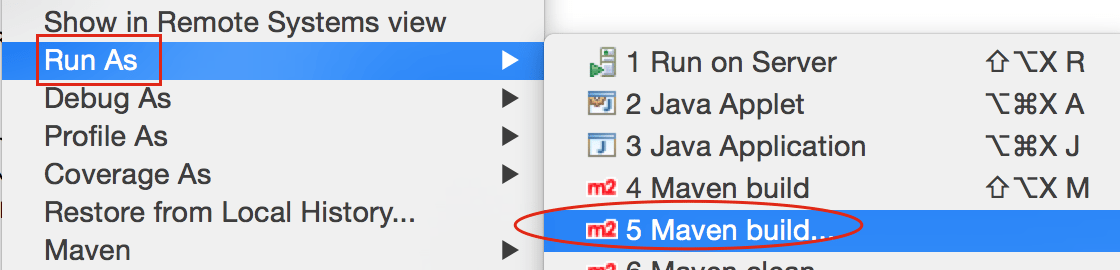
Add Goals : clean install . Apply ve Run tıklayın.
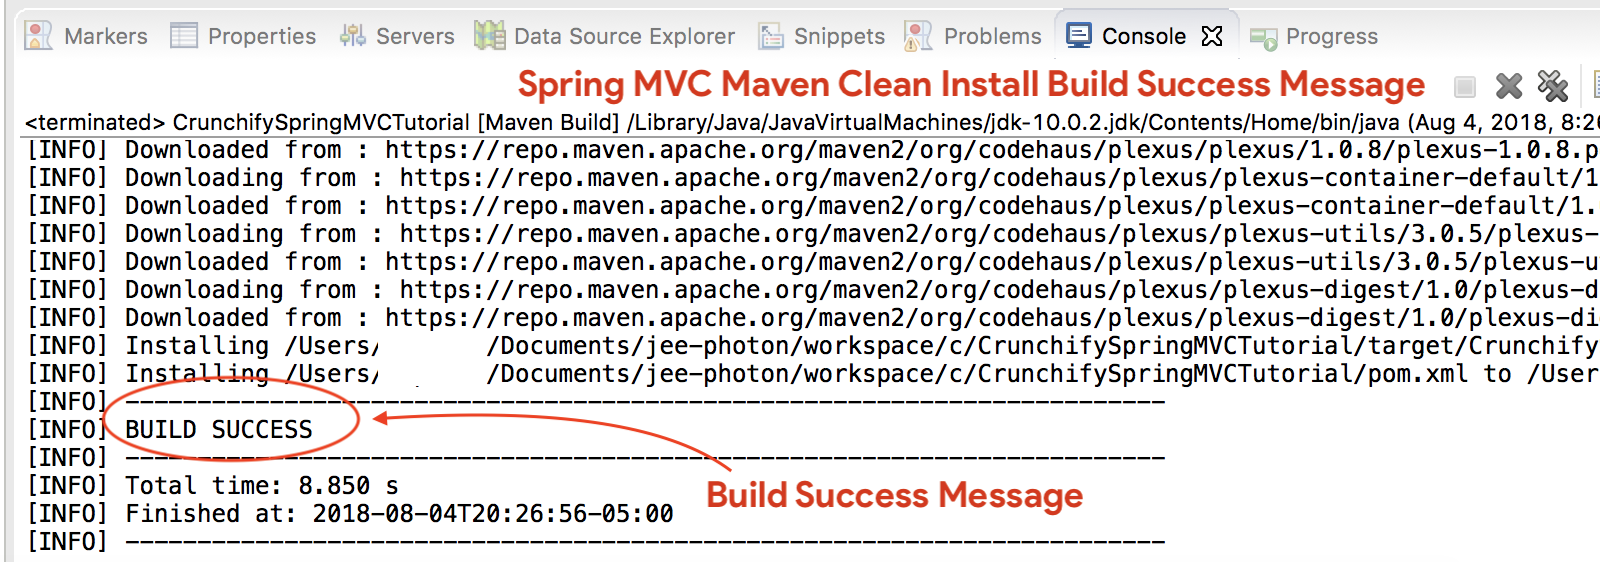
Derleme success message görmelisiniz:
Tüm .jar dosyalarım nerede?
Tüm .jar dosyalarını /target klasörü altında göreceksiniz. Ekran görüntüsü.
Adım-10
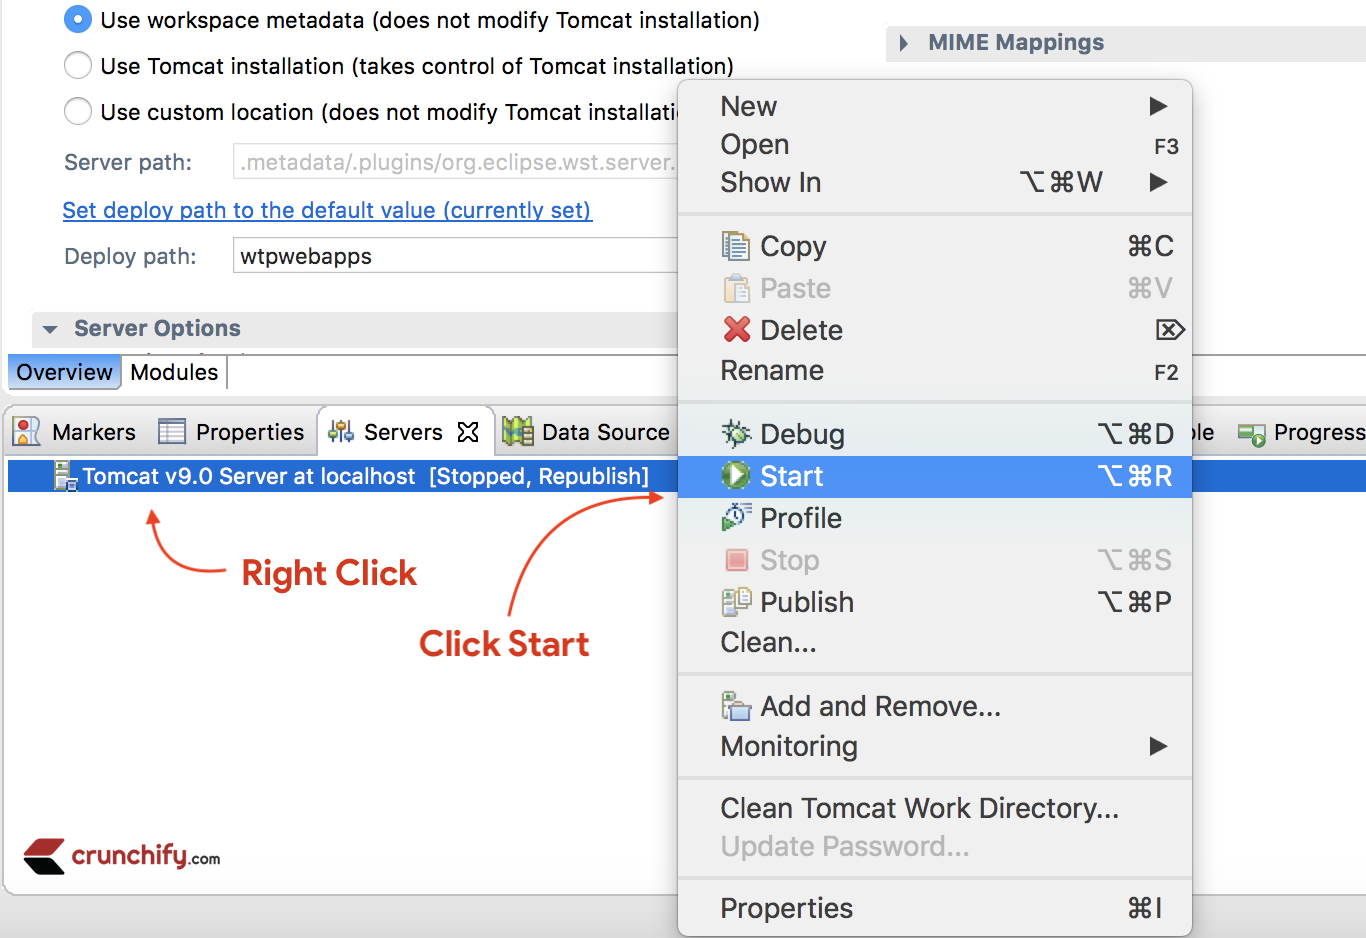
-
Serverssekmesinde Tomcat Sunucusunudon't see, Eclipse'e Apache Tomcat eklemek için adımları izleyin. - Projeyi
Apache Tomcat- Sağ tık
- Ekle ve Kaldır
- Sunucuya Proje ekle (sağ kısım).
- Başlat'a tıklayın.
Aşağıdaki günlükleri gördüğünüzden emin olun. Bu, uygulamanızın Tomcat Web Sunucusunda başarıyla dağıtıldığı anlamına gelir.
|
1 2 3 4 5 6 7 8 9 10 11 12 13 14 15 16 17 18 19 20 21 22 23 24 25 26 27 28 29 30 31 32 33 34 35 36 37 38 39 40 |
Aug 04 , 2018 9 : 08 : 10 PM org . apache . tomcat . util . digester . SetPropertiesRule begin WARNING : [ SetPropertiesRule ] { Server / Service / Engine / Host / Context } Setting property 'source' to 'org.eclipse.jst.jee.server:CrunchifySpringMVCTutorial' did not find a matching property . INFO : Server version : Apache Tomcat / 9.0.10 INFO : Server built : Jun 20 2018 17 : 32 : 21 UTC INFO : Server number : 9.0.10.0 INFO : OS Name : Mac OS X INFO : OS Version : 10.13.6 INFO : Architecture : x86_64 INFO : Java Home : / Library / Java / JavaVirtualMachines / jdk - 10.0.2.jdk / Contents / Home INFO : JVM Version : 10.0.2 + 13 INFO : JVM Vendor : "Oracle Corporation" INFO : CATALINA_BASE : / Users / appshah / Documents / jee - photon / workspace / c / . metadata / . plugins / org . eclipse . wst . server . core / tmp0 INFO : CATALINA_HOME : / Users / appshah / Documents / jee - photon / apache - tomcat - 9.0.10 INFO : Command line argument : - Dcatalina . base =/ Users / appshah / Documents / jee - photon / workspace / c / . metadata / . plugins / org . eclipse . wst . server . core / tmp0 INFO : Command line argument : - Dcatalina . home =/ Users / appshah / Documents / jee - photon / apache - tomcat - 9.0.10 INFO : Command line argument : - Dwtp . deploy =/ Users / appshah / Documents / jee - photon / workspace / c / . metadata / . plugins / org . eclipse . wst . server . core / tmp0 / wtpwebapps INFO : Command line argument : - Dfile . encoding = UTF - 8 INFO : The APR based Apache Tomcat Native library which allows optimal performance in production environments was not found on the java . library . path : [ / Users / appshah / Library / Java / Extensions : / Library / Java / Extensions : / Network / Library / Java / Extensions : / System / Library / Java / Extensions : / usr / lib / java : . ] INFO : Initializing ProtocolHandler [ "http-nio-8080" ] INFO : Using a shared selector for servlet write / read INFO : Initializing ProtocolHandler [ "ajp-nio-8009" ] INFO : Using a shared selector for servlet write / read INFO : Initialization processed in 841 ms INFO : Starting service [ Catalina ] INFO : Starting Servlet Engine : Apache Tomcat / 9.0.10 INFO : At least one JAR was scanned for TLDs yet contained no TLDs . Enable debug logging for this logger for a complete list of JARs that were scanned but no TLDs were found in them . Skipping unneeded JARs during scanning can improve startup time and JSP compilation time . INFO : At least one JAR was scanned for TLDs yet contained no TLDs . Enable debug logging for this logger for a complete list of JARs that were scanned but no TLDs were found in them . Skipping unneeded JARs during scanning can improve startup time and JSP compilation time . INFO : No Spring WebApplicationInitializer types detected on classpath INFO : Initializing Spring FrameworkServlet 'crunchify' INFO : FrameworkServlet 'crunchify' : initialization started INFO : Refreshing WebApplicationContext for namespace 'crunchify-servlet' : startup date [ Sat Aug 04 21 : 08 : 13 CDT 2018 ] ; root of context hierarchy INFO : Loading XML bean definitions from ServletContext resource [ / WEB - INF / crunchify - servlet . xml ] INFO : Mapped "{[/welcome]}" onto public org . springframework . web . servlet . ModelAndView com . crunchify . controller . CrunchifyHelloWorld . helloWorld ( ) INFO : Looking for @ ControllerAdvice : WebApplicationContext for namespace 'crunchify-servlet' : startup date [ Sat Aug 04 21 : 08 : 13 CDT 2018 ] ; root of context hierarchy INFO : Looking for @ ControllerAdvice : WebApplicationContext for namespace 'crunchify-servlet' : startup date [ Sat Aug 04 21 : 08 : 13 CDT 2018 ] ; root of context hierarchy INFO : Mapped URL path [ /** ] onto handler 'org.springframework.web.servlet.resource.DefaultServletHttpRequestHandler#0' INFO : FrameworkServlet 'crunchify' : initialization completed in 1607 ms INFO : Starting ProtocolHandler [ "http-nio-8080" ] INFO : Starting ProtocolHandler [ "ajp-nio-8009" ] INFO : Server startup in 3579 ms |
Adım-11. Tamamlandı.
Ziyaret edin: http://localhost:8080/CrunchifySpringMVCTutorial/ ve hazır olmalısınız.
Yaşasın.. Artık Hello World Spring MVC 5 Example biliyorsunuz. Bunu çalıştırırken herhangi bir istisna ile karşılaşırsanız bana bildirin. Burada bulabileceğiniz daha birçok örnek var.
Do you want to include JS, CSS and images into JSP file? Bu öğreticiyi izleyin: 'mvc:resources mapping' kullanarak JS, CSS ve görüntüleri JSP dosyasına Eklemenin/Bütünleştirmenin en iyi yolu.
Sorun yaşıyorsanız? Herhangi bir sorun?
Triaging Step-1 – HTTP Status 404 hatası mı alıyorsunuz?
Ayrıca, aşağıdaki öğreticiyi izleyin:
2. adımın tetiklenmesi – URL çalışmıyor mu? Tomcat hatası mı?
Apache Tomcat Sunucusunu Targeted Runtime eklediğinizden emin olun. Step-1 seçmiş olabileceğiniz. Tomcat 7 veya 8 herhangi biri - sunucu çalışmalıdır.
Triaging Step-3 – maven hataları?
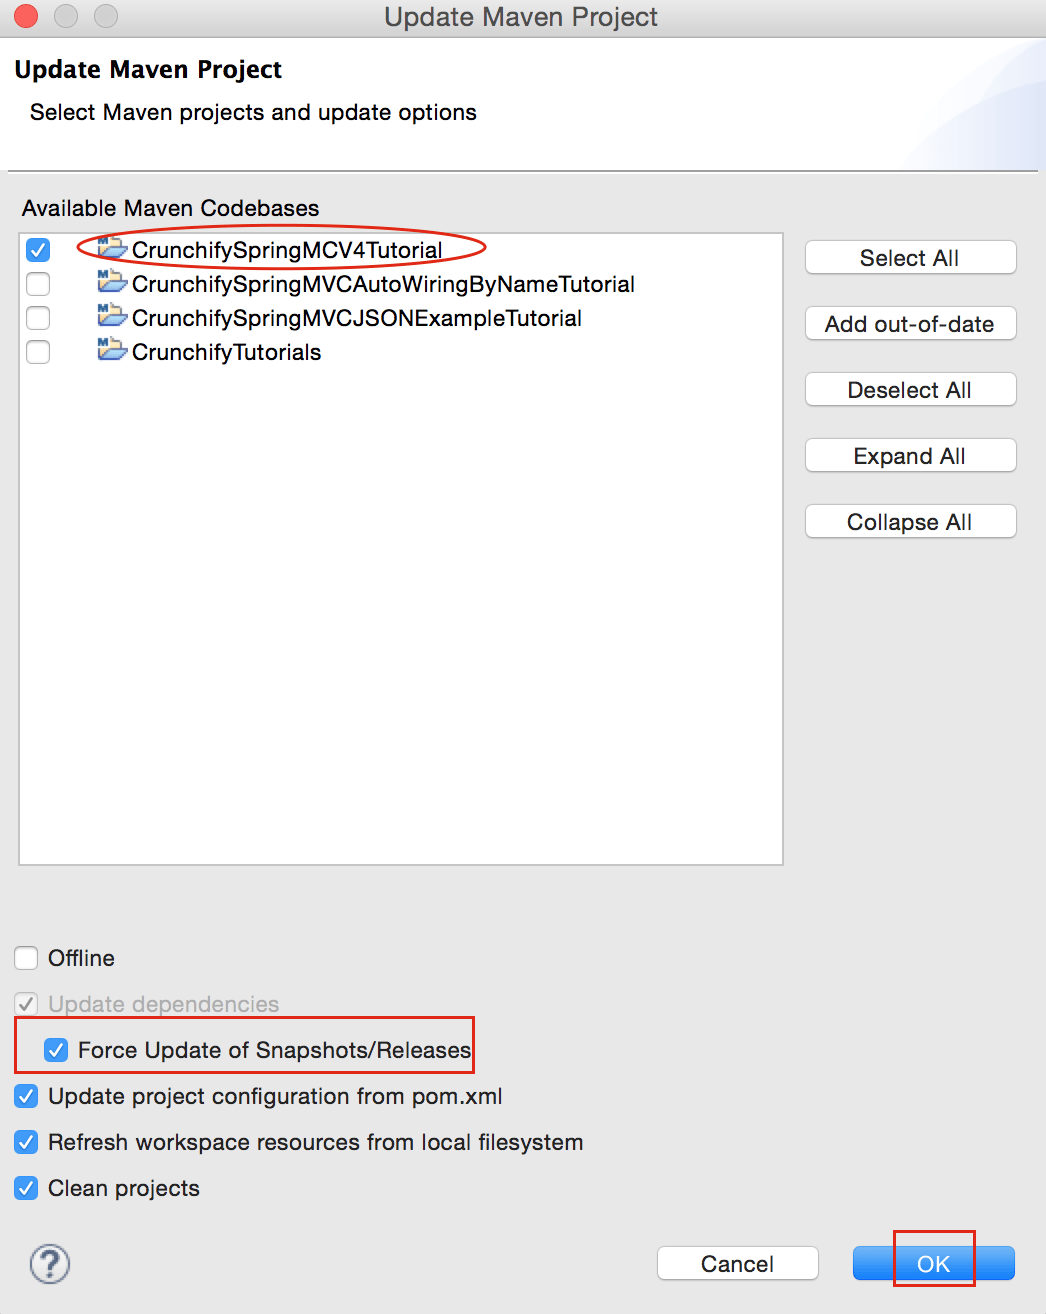
Tüm maven bağımlılıklarını güncellediğinizden emin olun.
Yukarıdaki öğreticiyi çalıştırırken herhangi bir sorun yaşarsanız, e-posta göndermekten veya aşağıya yorum yapmaktan çekinmeyin.