
Tutorial Kerangka MVC Musim Semi Paling Sederhana – Contoh Hello World dengan Halaman UI (JSP)
Diterbitkan: 2019-02-23
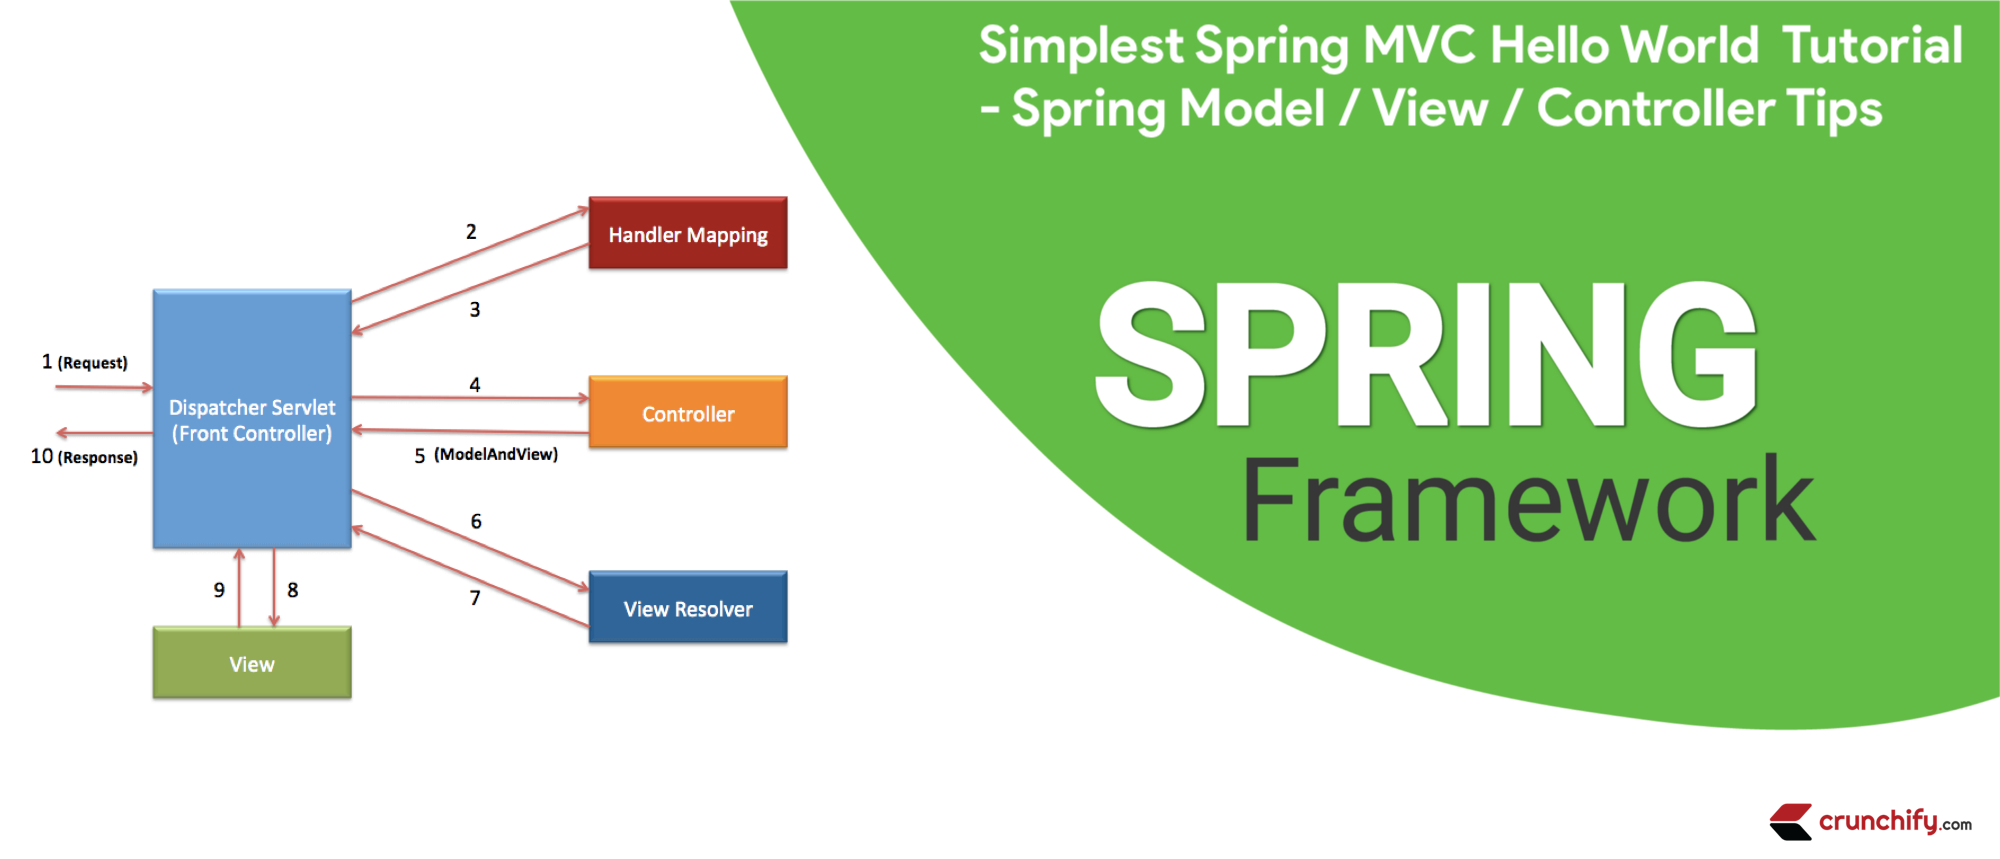
Arsitektur Model-View-Controller (MVC) menyediakan cara paling sederhana untuk mengembangkan aplikasi web yang fleksibel dan digabungkan secara longgar.
Dalam tutorial ini kita akan membahas cara membuat aplikasi Spring MVC pertama Anda dengan langkah-langkah yang sangat rinci.
Apakah Anda memiliki pertanyaan di bawah ini?
- Dasar-dasar Spring MVC 5.2.3
- Mengembangkan aplikasi Spring Framework MVC 5 langkah demi langkah..
- java – Tutorial Spring MVC dari awal
- Tutorial Cepat MVC Musim Semi
- Tutorial Kerangka MVC Musim Semi
- Tutorial aplikasi Spring MVC pertama
- Tutorial Spring 5.x MVC, Demo AJAX, Demo jQuery, Demo JavaScript, Tips & Trik Spring 5 MVC
Maka Anda berada di tempat yang tepat. Di sini saya akan mendemonstrasikan Spring MVC framework sederhana untuk membangun aplikasi web.
Hal pertama yang pertama – Mari kita Setup Environment
Tutorial terakhir diperbarui dan diverifikasi: September 2020 dengan versi Alat di bawah ini.
Saya menggunakan alat di bawah ini yang mungkin perlu Anda unduh jika Anda belum memilikinya.
- Tomcat 9.0.38 – Unduh Apache Tomcat terbaru dari tautan ini.
- Pastikan Anda mengunduh Eclipse IDE untuk
Java EEDevelopers (2020‑09 R) – Tautan unduhan. (diagram di bawah) -
Spring 5.2.9.RELEASE(Tidak perlu mengunduh) – kita akan menggunakan ketergantungan Maven. - JDK 15 – Tautan unduhan.
Pastikan Anda mengunduh Java EE Developer Kit terbaru:

Tujuan utama
Tujuan utama dari tutorial ini untuk membuat Aplikasi Spring MVC dengan cara yang paling sederhana.
Sebelum kita mulai mari kita lihat apa yang akan kita lihat di akhir tutorial ini
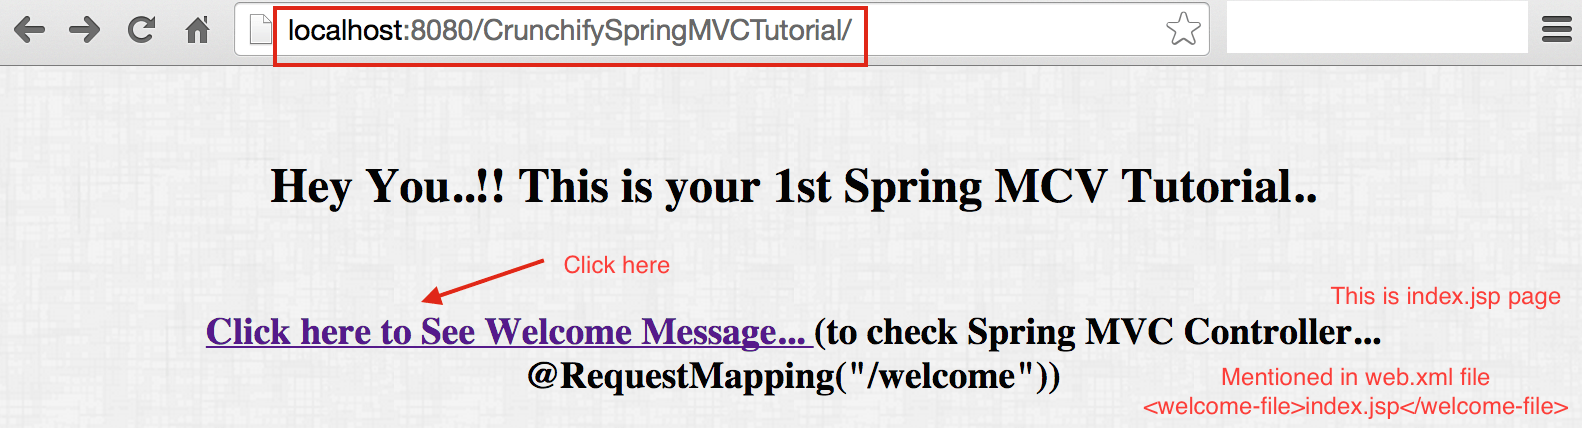
Ini adalah bagaimana application result kita akan terlihat seperti. Ini adalah hasil akhir setelah Anda menyelesaikan semua langkah di bawah ini.
Berikut adalah hasil akhirnya: Halaman selamat datang ==> index.jsp
Hasil kembali dari Kelas Pengendali
Sekarang Mari kita mulai Tutorial
Langkah 1
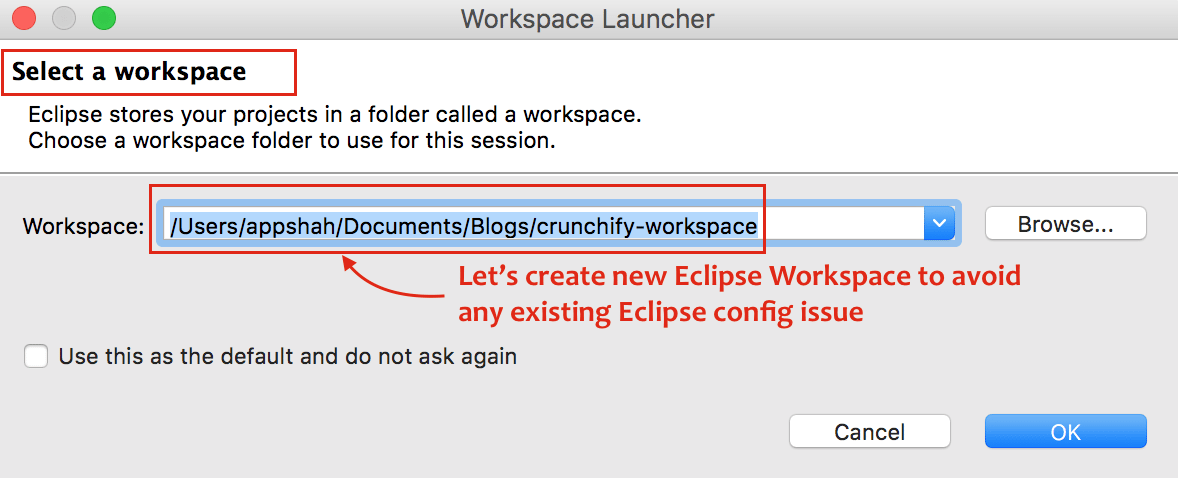
- Buka Eclipse
- Buat
New Eclipse Workspace- Inimustdilakukan untuk menghindari masalah konfigurasi ruang kerja yang ada.
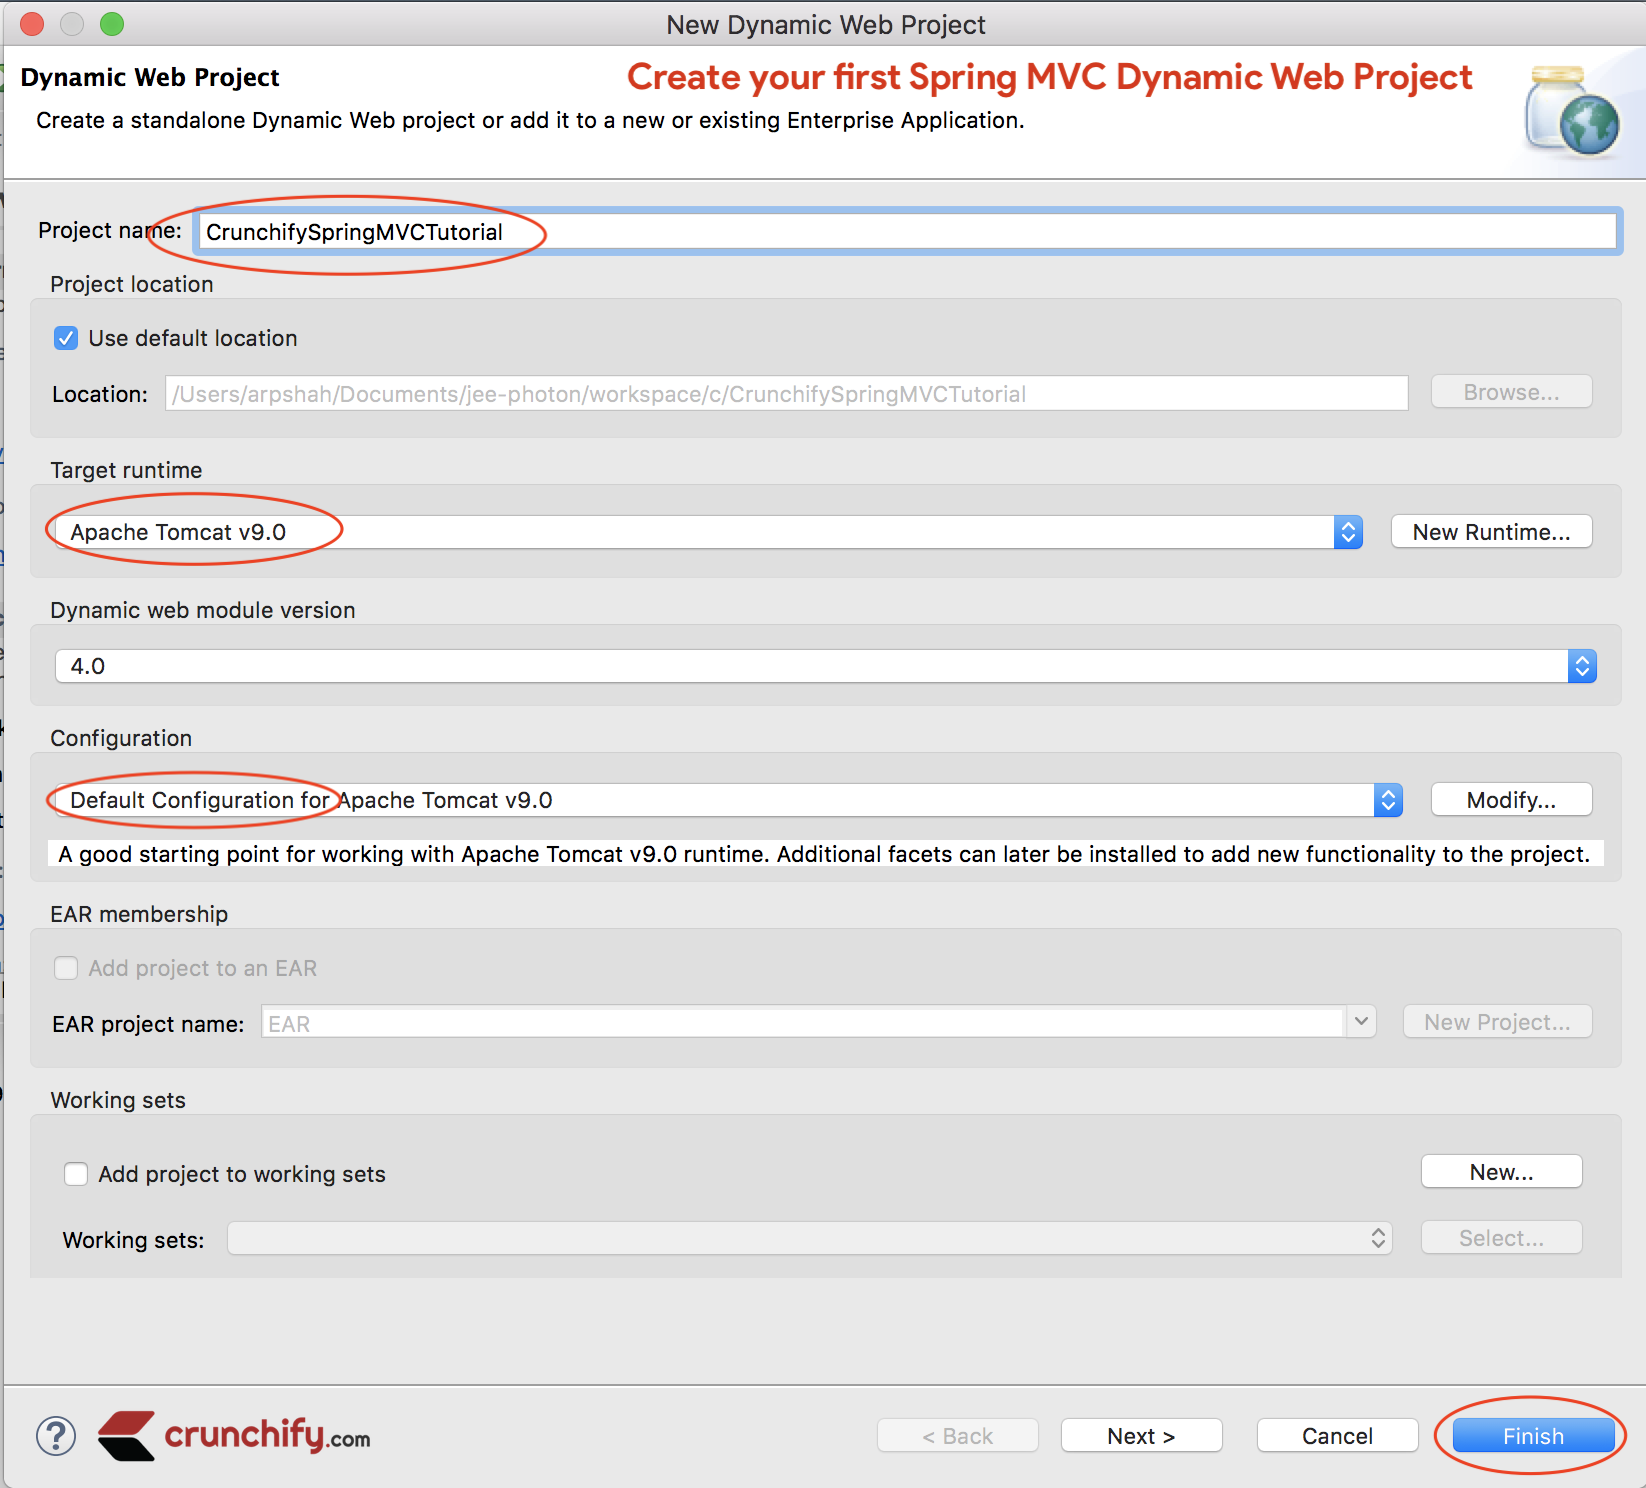
Langkah 2
- Klik
File - Klik
New - Pilih
Dynamic Web Project - Satu jendela sembulan, Berikan Nama Proyek:
CrunchifySpringMVCTutorial - Pastikan Anda menggunakan
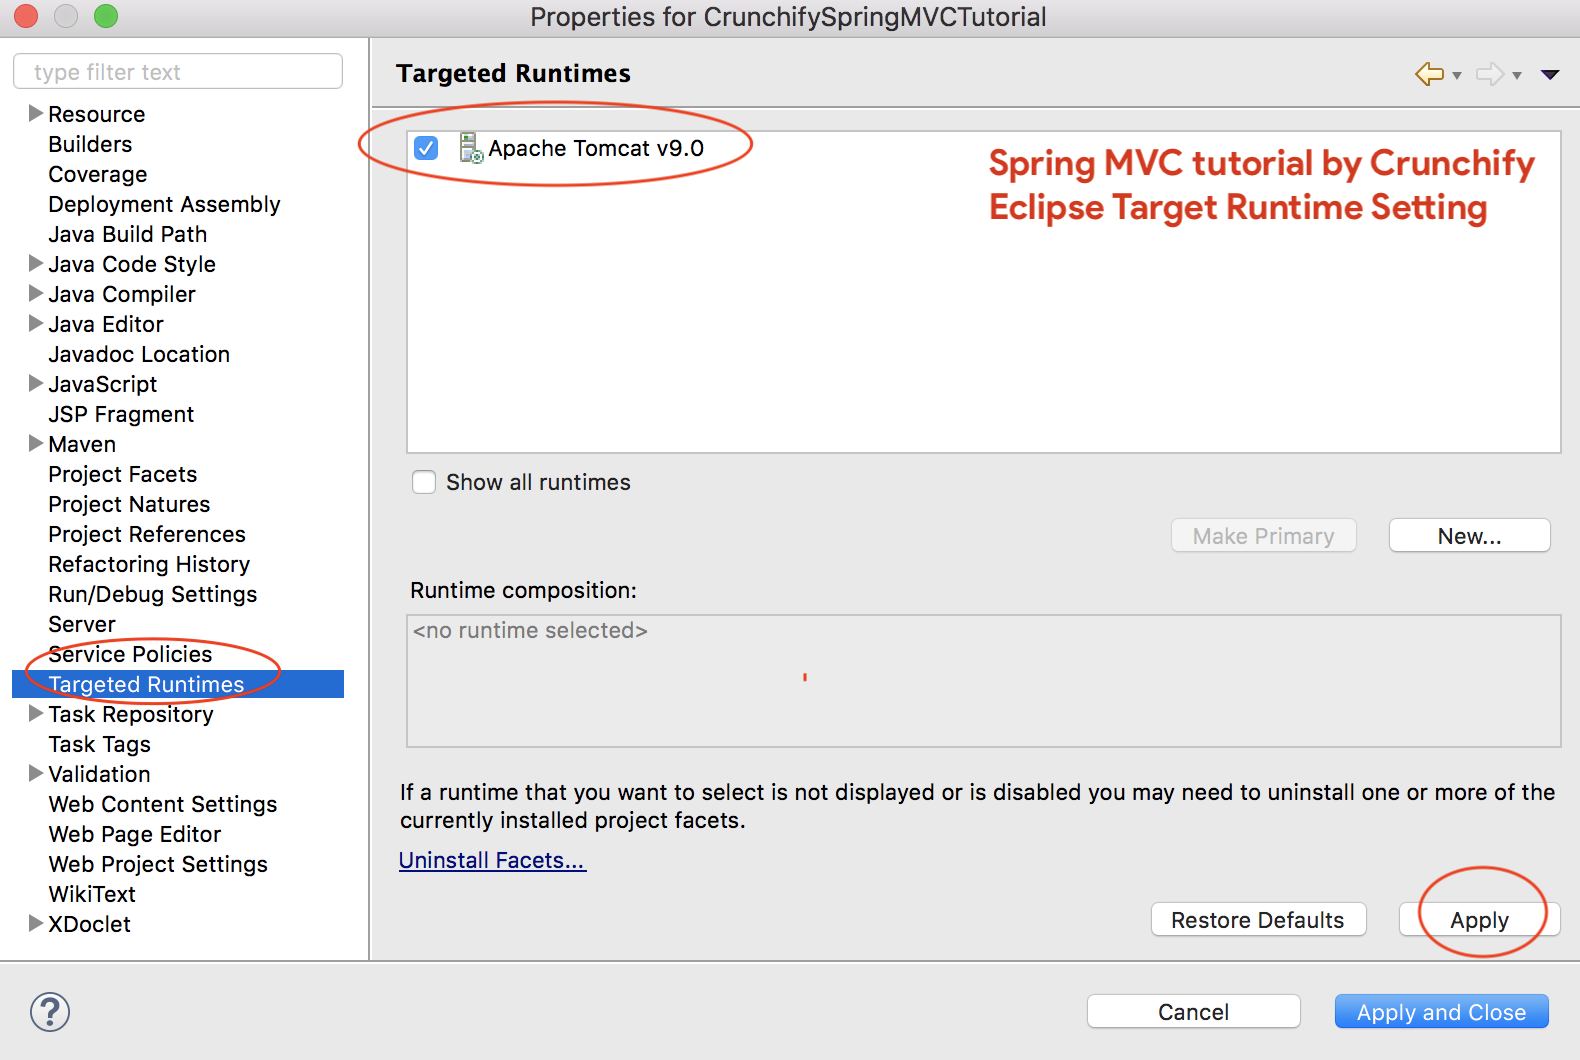
Target RuntimesebagaiApache Tomcat 9.0- Jika Anda tidak melihat Target Runtime, ikuti langkah-langkah ini
- Pilih Konfigurasi sebagai
Default Configuration
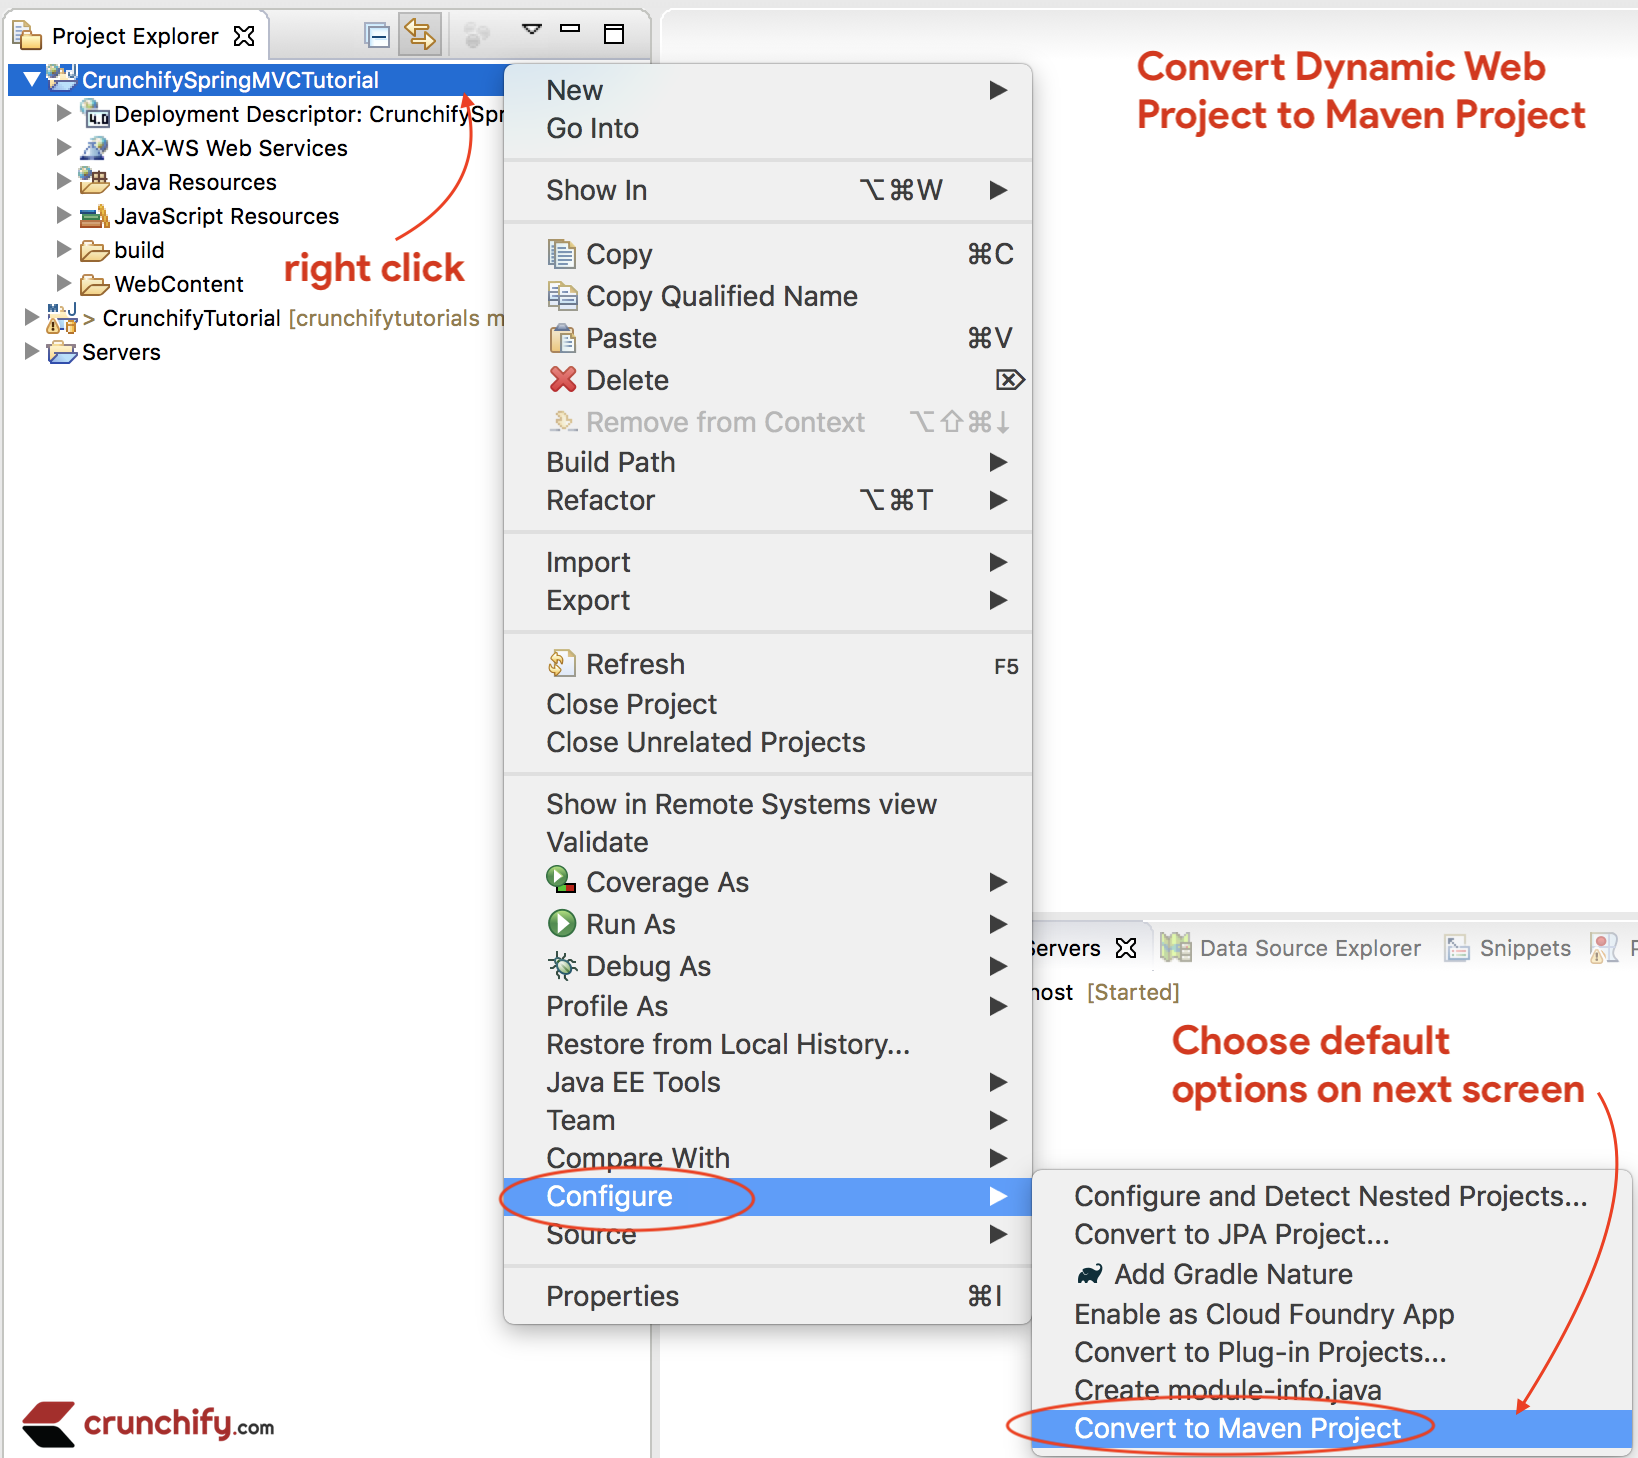
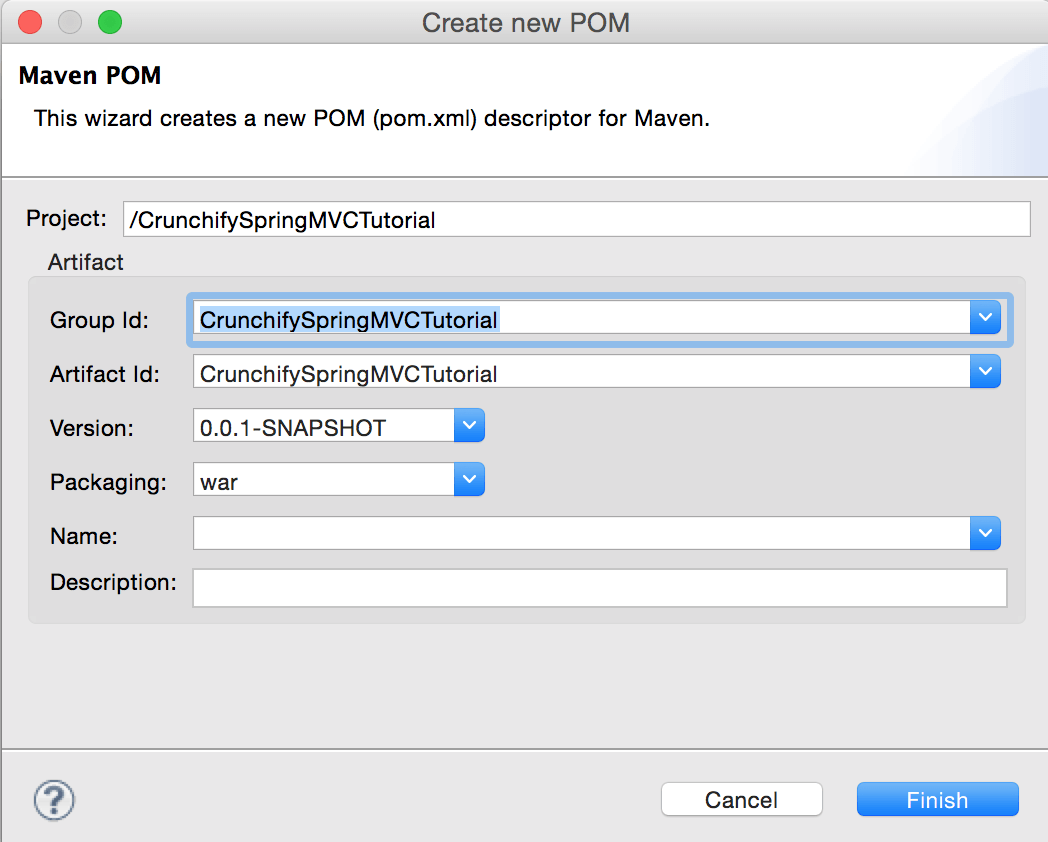
Langkah-3
Konversikan Proyek ke Proyek Maven untuk menambahkan semua dependensi Spring MVC yang diperlukan ke proyek.
Langkah:
- Klik kanan pada proyek
- Konfigurasikan
- Konversikan ke proyek
Maven
Langkah-4
Buka file pom.xml dan tambahkan jar dependencies di bawah ini ke proyek.
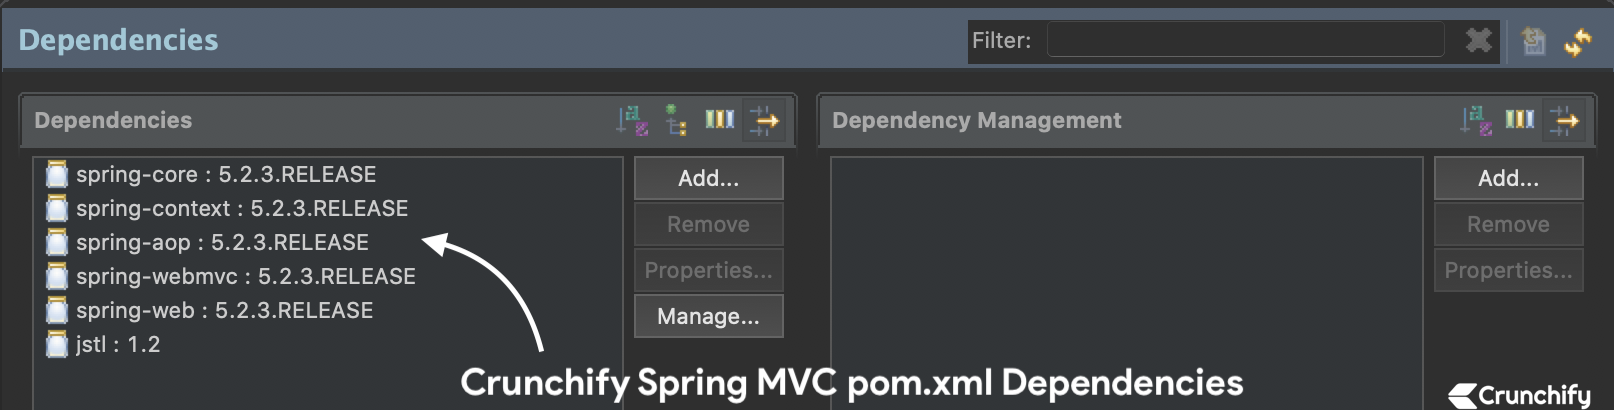
NOTE:Ini filepom.xmlsaya. Pastikan Anda memperbarui versi Java ke13jika Anda belum pindah keJDK 13. Kami akan terus memperbarui tutorial ini ke versi Spring MVC terbaru.Jadi file pom.xml di bawah ini mungkin memiliki versi dependensi Spring MVC (terbaru) yang berbeda dari gambar di atas
|
1 2 3 4 5 6 7 8 9 10 11 12 13 14 15 16 17 18 19 20 21 22 23 24 25 26 27 28 29 30 31 32 33 34 35 36 37 38 39 40 41 42 43 44 45 46 47 48 49 50 51 52 53 54 55 56 57 58 59 60 61 |
< project xmlns = "http://maven.apache.org/POM/4.0.0" xmlns : xsi = "http://www.w3.org/2001/XMLSchema-instance" xsi : schemaLocation = "http://maven.apache.org/POM/4.0.0 http://maven.apache.org/xsd/maven-4.0.0.xsd" > < modelVersion > 4.0.0 < / modelVersion > < groupId > CrunchifySpringMVCTutorial < / groupId > < artifactId > CrunchifySpringMVCTutorial < / artifactId > < version > 0.0.1 - SNAPSHOT < / version > < packaging > war < / packaging > < build > < sourceDirectory > src < / sourceDirectory > < plugins > < plugin > < artifactId > maven - compiler - plugin < / artifactId > < version > 3.8.0 < / version > < configuration > < release > 13 < / release > < / configuration > < / plugin > < plugin > < artifactId > maven - war - plugin < / artifactId > < version > 3.2.1 < / version > < configuration > < warSourceDirectory > WebContent < / warSourceDirectory > < / configuration > < / plugin > < / plugins > < / build > < dependencies > < dependency > < groupId > org . springframework < / groupId > < artifactId > spring - core < / artifactId > < version > 5.2.3.RELEASE < / version > < / dependency > < dependency > < groupId > org . springframework < / groupId > < artifactId > spring - context < / artifactId > < version > 5.2.3.RELEASE < / version > < / dependency > < dependency > < groupId > org . springframework < / groupId > < artifactId > spring - aop < / artifactId > < version > 5.2.3.RELEASE < / version > < / dependency > < dependency > < groupId > org . springframework < / groupId > < artifactId > spring - webmvc < / artifactId > < version > 5.2.3.RELEASE < / version > < / dependency > < dependency > < groupId > org . springframework < / groupId > < artifactId > spring - web < / artifactId > < version > 5.2.3.RELEASE < / version > < / dependency > < dependency > < groupId > javax . servlet < / groupId > < artifactId > jstl < / artifactId > < version > 1.2 < / version > < / dependency > < / dependencies > < / project > |
Langkah-5
Buat file Bean Konfigurasi Musim Semi baru: /WebContent/WEB-INF/crunchify-servlet.xml

crunchify-servlet.xml
|
1 2 3 4 5 6 7 8 9 10 11 12 13 14 15 16 17 18 19 20 21 22 23 24 25 26 27 |
<? xml version = "1.0" encoding = "UTF-8" ?> < beans xmlns = "http://www.springframework.org/schema/beans" xmlns : mvc = "http://www.springframework.org/schema/mvc" xmlns : context = "http://www.springframework.org/schema/context" xmlns : xsi = "http://www.w3.org/2001/XMLSchema-instance" xsi : schemaLocation = " http://www.springframework.org/schema/beans http://www.springframework.org/schema/beans/spring-beans.xsd http://www.springframework.org/schema/mvc http://www.springframework.org/schema/mvc/spring-mvc.xsd http://www.springframework.org/schema/context http://www.springframework.org/schema/context/spring-context.xsd" > < mvc : annotation - driven / > < context : component - scan base - package = "com.crunchify.controller" / > < mvc : default - servlet - handler / > < bean id = "viewResolver" class = "org.springframework.web.servlet.view.UrlBasedViewResolver" > < property name = "viewClass" value = "org.springframework.web.servlet.view.JstlView" / > < property name = "prefix" value = "/WEB-INF/jsp/" / > < property name = "suffix" value = ".jsp" / > < / bean > < / beans > |
Dalam crunchify-servlet.xml di atas file konfigurasi, kami telah menetapkan tag <context:component-scan> . Ini akan memungkinkan Spring memuat semua komponen dari paket com.crunchify.controller dan semua paket turunannya.
Ini akan memuat CrunchifyHelloWorld.class kami. Kami juga telah mendefinisikan bean viewResolver . Kacang ini akan menyelesaikan tampilan dan menambahkan string awalan /WEB-INF/jsp/ dan akhiran .jsp ke tampilan di ModelAndView.
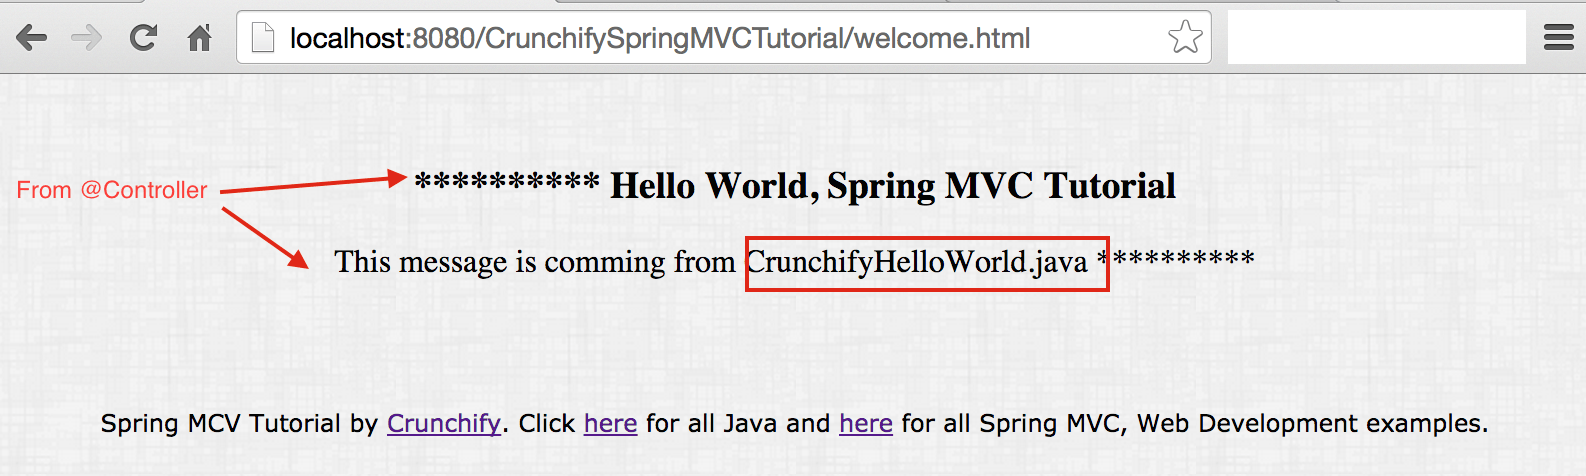
Perhatikan bahwa di kelas CrunchifyHelloWorld kami, kami telah mengembalikan objek ModelAndView dengan nama tampilan selamat datang.
Ini akan diselesaikan ke path /WEB-INF/jsp/welcome.jsp .
Langkah-6
Buat file baru web.xml jika belum ada. Petakan Spring MVC di file /WebContent/WEB-INF/web.xml .
NOTE: jika Anda tidak melihat file web.xml di " dynamic web project " Anda, ikuti langkah-langkah ini.
web.xml
|
1 2 3 4 5 6 7 8 9 10 11 12 13 14 15 16 17 18 19 20 21 22 23 24 25 26 27 28 |
<? xml version = "1.0" encoding = "UTF-8" ?> < web - app xmlns : xsi = "http://www.w3.org/2001/XMLSchema-instance" xmlns = "http://xmlns.jcp.org/xml/ns/javaee" xsi : schemaLocation = "http://xmlns.jcp.org/xml/ns/javaee http://xmlns.jcp.org/xml/ns/javaee/web-app_4_0.xsd" id = "WebApp_ID" version = "4.0" > < display - name > CrunchifySpringMVCTutorial < / display - name > < welcome - file - list > < welcome - file > index . html < / welcome - file > < welcome - file > index . htm < / welcome - file > < welcome - file > index . jsp < / welcome - file > < welcome - file > default . html < / welcome - file > < welcome - file > default . htm < / welcome - file > < welcome - file > default . jsp < / welcome - file > < / welcome - file - list > < servlet > < servlet - name > crunchify < / servlet - name > < servlet - class > org . springframework . web . servlet . DispatcherServlet < / servlet - class > < load - on - startup > 1 < / load - on - startup > < / servlet > < servlet - mapping > < servlet - name > crunchify < / servlet - name > < url - pattern > / welcome . jsp < / url - pattern > < url - pattern > / index . jsp < / url - pattern > < url - pattern > / welcome . html < / url - pattern > < url - pattern > * . html < / url - pattern > < / servlet - mapping > < / web - app > |
Kode di atas di web.xml akan memetakan DispatcherServlet dengan pola url /welcome.jsp . Perhatikan juga bahwa kami telah mendefinisikan index.jsp sebagai file selamat datang.
Satu hal yang perlu diperhatikan di sini adalah nama servlet pada <servlet-name> di web.xml . Setelah DispatcherServlet diinisialisasi, ia akan mencari nama file [servlet-name]-servlet.xml di folder WEB-INF aplikasi web. Dalam contoh ini, framework akan mencari file bernama crunchify-servlet.xml .
Langkah-7
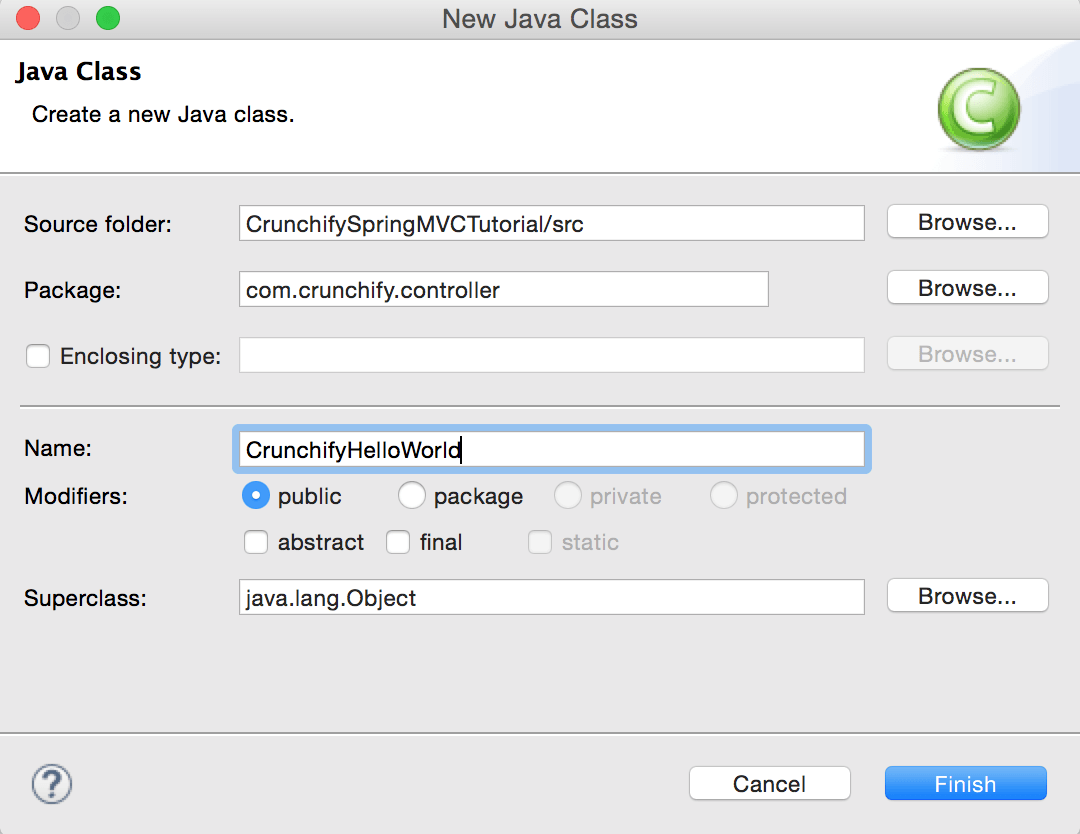
Buat Kelas Pengendali.
- Klik kanan pada
Java Resources->src - Klik
New->Class - Paket:
com.crunchify.controller - Nama file:
CrunchifyHelloWorld.java
CrunchifyHelloWorld.java
|
1 2 3 4 5 6 7 8 9 10 11 12 13 14 15 16 17 18 19 20 21 22 |
package com . crunchify . controller ; import org . springframework . stereotype . Controller ; import org . springframework . web . bind . annotation . RequestMapping ; import org . springframework . web . servlet . ModelAndView ; /* * author: Crunchify.com * */ @Controller public class CrunchifyHelloWorld { @RequestMapping ( "/welcome" ) public ModelAndView helloWorld ( ) { String message = "<br><div>" + "<h3>********** Hello World, Spring MVC Tutorial</h3>This message is coming from CrunchifyHelloWorld.java **********</div><br><br>" ; return new ModelAndView ( "welcome" , "message" , message ) ; } } |
Perhatikan bahwa kami telah memberi anotasi pada kelas CrunchifyHelloWorld dengan @Controller dan @RequestMapping("/welcome") . Ketika Spring memindai paket kami, ia akan mengenali kacang ini sebagai kacang Pengendali untuk memproses permintaan. Anotasi @RequestMapping memberi tahu Spring bahwa Pengontrol ini harus memproses semua permintaan yang dimulai dengan /welcome di jalur URL. Itu termasuk /welcome/* dan /welcome.html .

Metode helloWorld() mengembalikan objek ModelAndView . Objek ModelAndView mencoba menyelesaikan ke tampilan bernama "selamat datang" dan model data diteruskan kembali ke browser sehingga kami dapat mengakses data di dalam JSP. Nama tampilan logis akan berubah menjadi /WEB-INF/jsp/welcome.jsp . Nama logis "selamat datang" yang dikembalikan dalam objek ModelAndView dipetakan ke jalur /WEB-INF/jsp/welcome.jsp.
Objek ModelAndView juga berisi pesan dengan kunci "pesan" dan nilai Detail. Ini adalah data yang kami sampaikan ke pandangan kami. Biasanya ini akan menjadi objek nilai dalam bentuk kacang java yang akan berisi data yang akan ditampilkan pada tampilan kita. Di sini kita hanya melewatkan sebuah string.
Langkah-8
Tampilan – Buat file baru /WebContent/index.jsp .
index.jsp
|
1 2 3 4 5 6 7 8 9 10 11 12 13 14 15 16 17 18 19 20 21 22 |
< html > < head > < title > Spring MVC Tutorial Series by Crunchify . com < / title > <style type ="text/css"> body { background-image : url ( 'https://cdn.crunchify.com/bg.png' ) ; } </style> < / head > < body > < br > < div style = "text-align: center" > < h2 > Hey You . . ! ! This is your 1st Spring MCV Tutorial . . < br > < br > < / h2 > < h3 > < a href = "welcome.html" > Click here to See Welcome Message . . . < / a > ( to check Spring MVC Controller . . . @ RequestMapping ( "/welcome" ) ) < / h3 > < / div > < / body > < / html > |
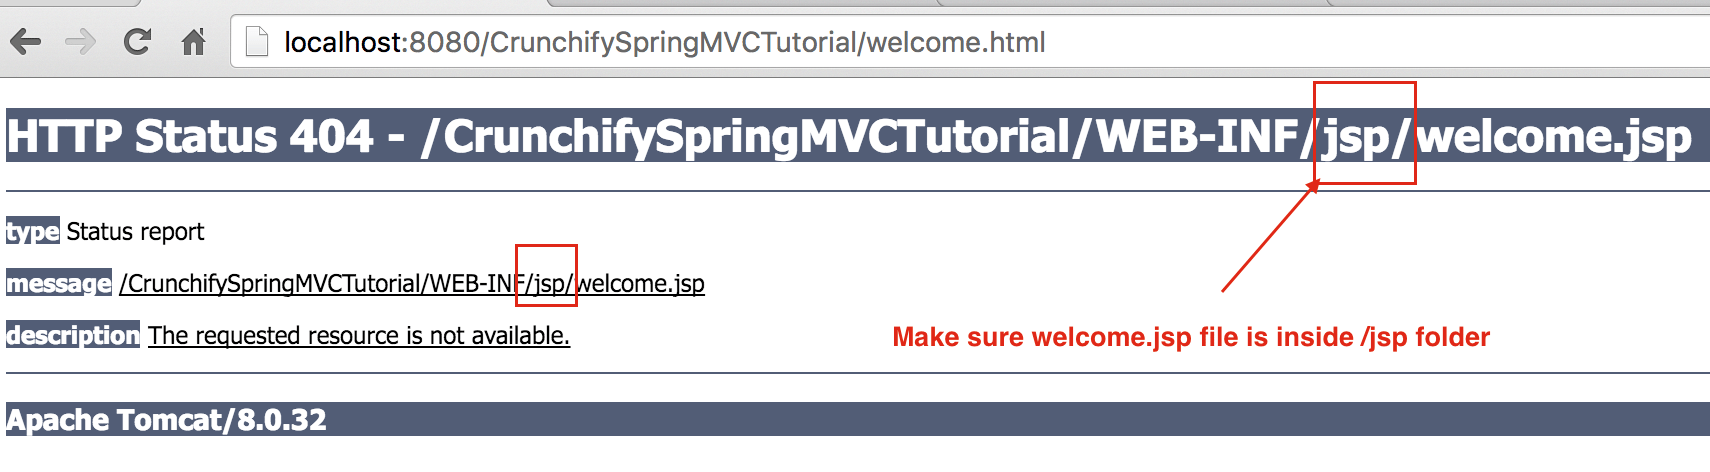
Buat file lain /WebContent/WEB-INF/jsp/welcome.jsp .
NOTE: Jangan lupa untuk membuat folder jsp dan masukkan welcome.jsp di dalamnya
selamat datang.jsp
|
1 2 3 4 5 6 7 8 9 10 11 12 13 14 15 16 17 18 19 20 21 22 23 24 25 |
< html > < head > < title > Spring MVC Tutorial by Crunchify - Hello World Spring MVC Example < / title > <style type ="text/css"> body { background-image : url ( 'https://cdn.crunchify.com/bg.png' ) ; } </style> < / head > < body > $ { message } < br > < br > < div style = "font-family: verdana; padding: 10px; border-radius: 10px; font-size: 12px; text-align: center;" > Spring MCV Tutorial by < a href = "https://crunchify.com" > Crunchify < / a > . Click < a href = "https://crunchify.com/category/java-tutorials/" target = "_blank" > here < / a > for all Java and < a href = 'https://crunchify.com/category/spring-mvc/' target = '_blank' > here < / a > for all Spring MVC , Web Development examples . < br > < / div > < / body > < / html > |
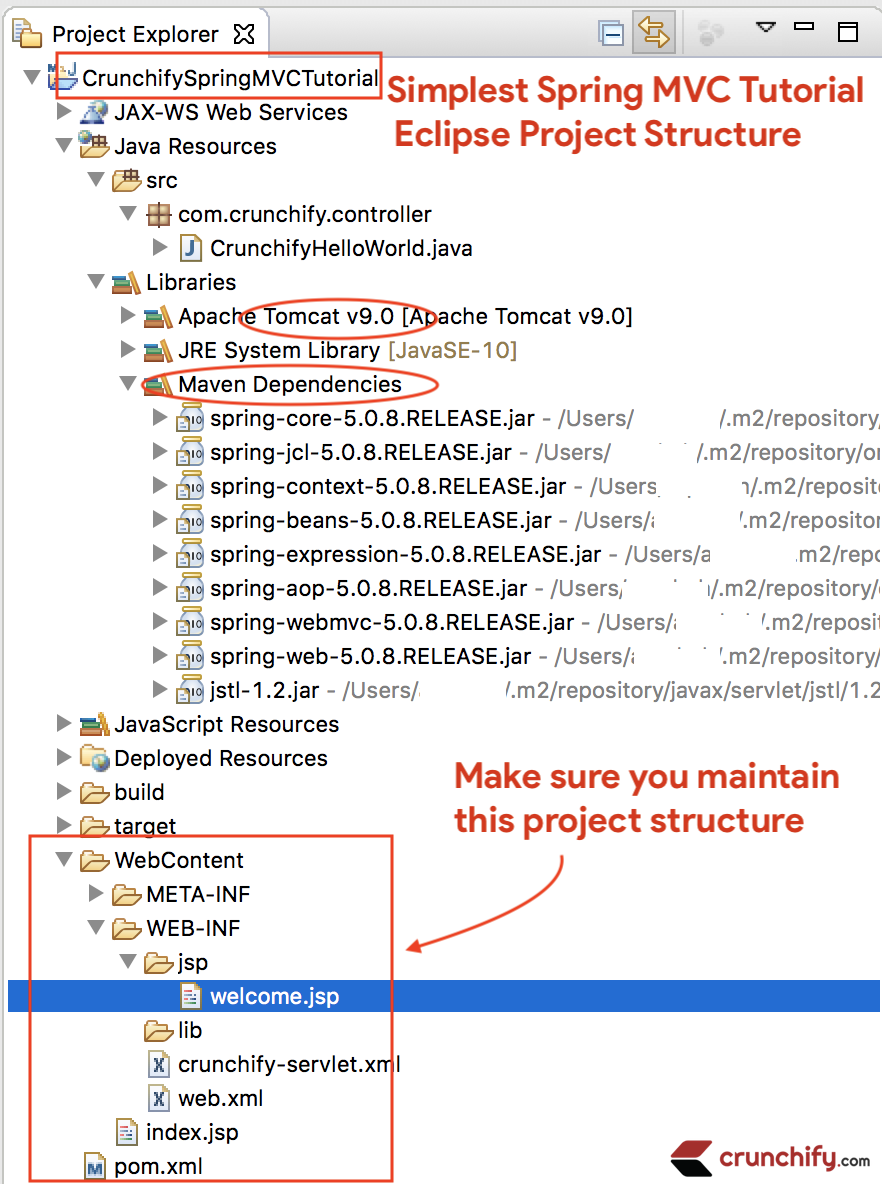
Setelah semuanya, inilah tampilan ruang kerja Anda.
Langkah-9
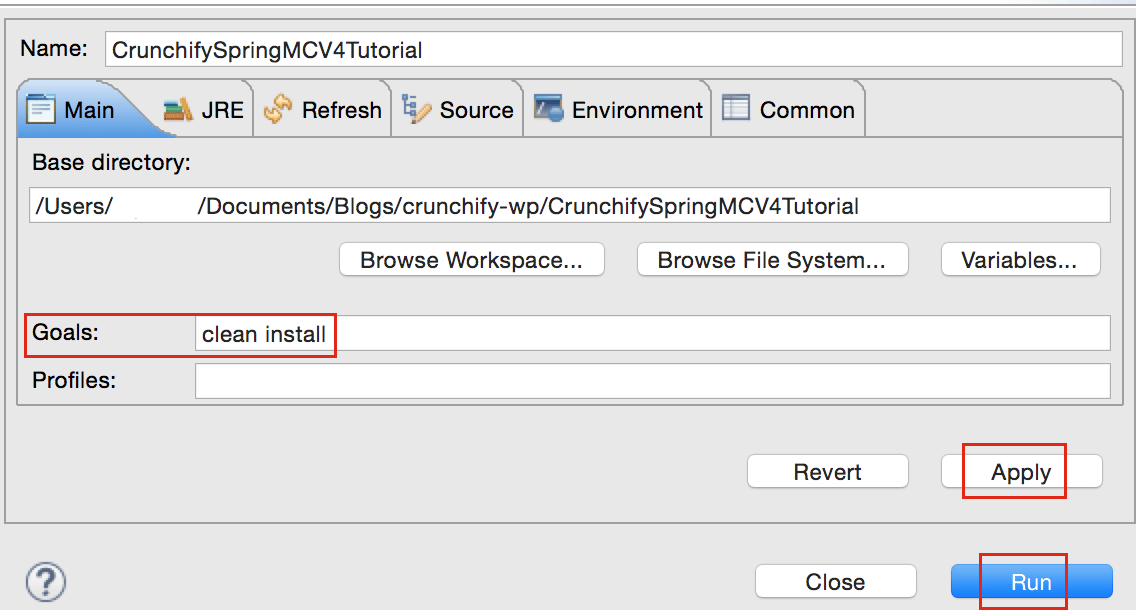
Klik Kanan pada Project -> Run As -> Maven Build...
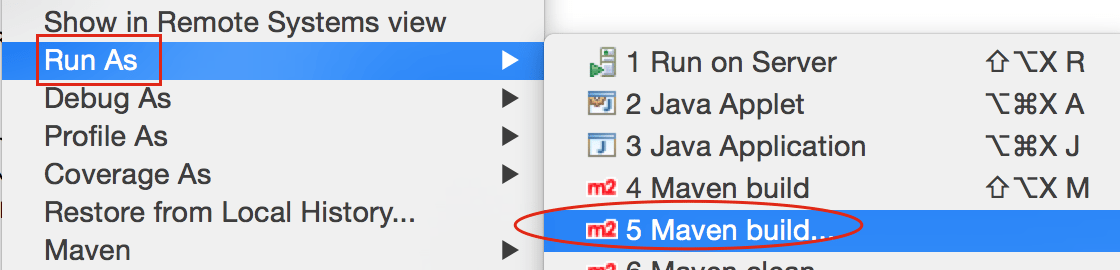
Add Goals : clean install . Klik Apply dan Run .
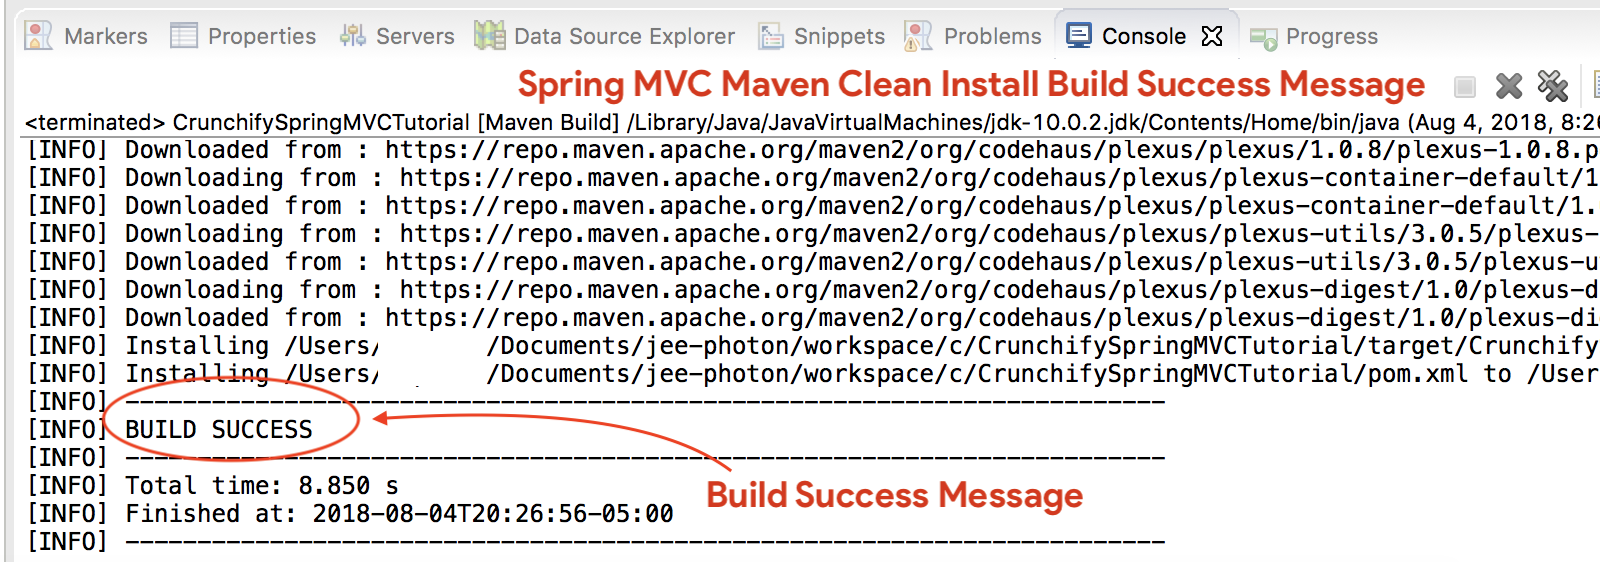
Anda akan melihat success message membangun:
Di mana semua file .jar saya?
Anda akan melihat semua file .jar di bawah folder /target . Tangkapan layar.
Langkah-10
- Jika Anda
don't seeServer Tomcat di tabServers, ikuti langkah-langkah untuk menambahkan Apache Tomcat ke Eclipse. - Terapkan proyek ke
Apache Tomcat- Klik kanan
- Tambahkan dan Hapus
- Tambahkan Proyek ke server (bagian sisi kanan).
- Klik Mulai.
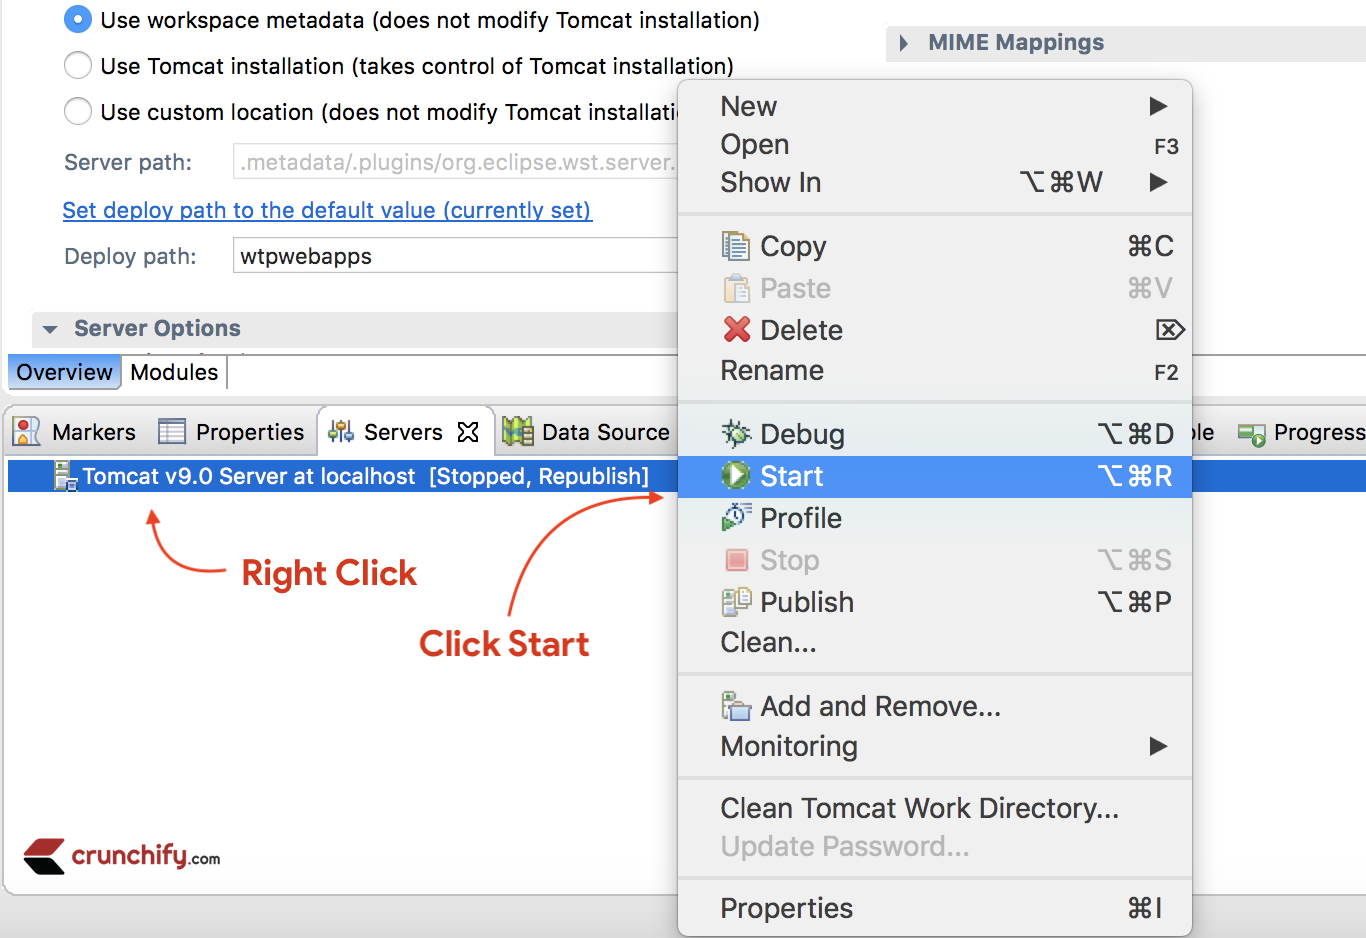
Pastikan Anda melihat log di bawah ini. Itu berarti aplikasi Anda berhasil di-deploy di Tomcat Web Server.
|
1 2 3 4 5 6 7 8 9 10 11 12 13 14 15 16 17 18 19 20 21 22 23 24 25 26 27 28 29 30 31 32 33 34 35 36 37 38 39 40 |
Aug 04 , 2018 9 : 08 : 10 PM org . apache . tomcat . util . digester . SetPropertiesRule begin WARNING : [ SetPropertiesRule ] { Server / Service / Engine / Host / Context } Setting property 'source' to 'org.eclipse.jst.jee.server:CrunchifySpringMVCTutorial' did not find a matching property . INFO : Server version : Apache Tomcat / 9.0.10 INFO : Server built : Jun 20 2018 17 : 32 : 21 UTC INFO : Server number : 9.0.10.0 INFO : OS Name : Mac OS X INFO : OS Version : 10.13.6 INFO : Architecture : x86_64 INFO : Java Home : / Library / Java / JavaVirtualMachines / jdk - 10.0.2.jdk / Contents / Home INFO : JVM Version : 10.0.2 + 13 INFO : JVM Vendor : "Oracle Corporation" INFO : CATALINA_BASE : / Users / appshah / Documents / jee - photon / workspace / c / . metadata / . plugins / org . eclipse . wst . server . core / tmp0 INFO : CATALINA_HOME : / Users / appshah / Documents / jee - photon / apache - tomcat - 9.0.10 INFO : Command line argument : - Dcatalina . base =/ Users / appshah / Documents / jee - photon / workspace / c / . metadata / . plugins / org . eclipse . wst . server . core / tmp0 INFO : Command line argument : - Dcatalina . home =/ Users / appshah / Documents / jee - photon / apache - tomcat - 9.0.10 INFO : Command line argument : - Dwtp . deploy =/ Users / appshah / Documents / jee - photon / workspace / c / . metadata / . plugins / org . eclipse . wst . server . core / tmp0 / wtpwebapps INFO : Command line argument : - Dfile . encoding = UTF - 8 INFO : The APR based Apache Tomcat Native library which allows optimal performance in production environments was not found on the java . library . path : [ / Users / appshah / Library / Java / Extensions : / Library / Java / Extensions : / Network / Library / Java / Extensions : / System / Library / Java / Extensions : / usr / lib / java : . ] INFO : Initializing ProtocolHandler [ "http-nio-8080" ] INFO : Using a shared selector for servlet write / read INFO : Initializing ProtocolHandler [ "ajp-nio-8009" ] INFO : Using a shared selector for servlet write / read INFO : Initialization processed in 841 ms INFO : Starting service [ Catalina ] INFO : Starting Servlet Engine : Apache Tomcat / 9.0.10 INFO : At least one JAR was scanned for TLDs yet contained no TLDs . Enable debug logging for this logger for a complete list of JARs that were scanned but no TLDs were found in them . Skipping unneeded JARs during scanning can improve startup time and JSP compilation time . INFO : At least one JAR was scanned for TLDs yet contained no TLDs . Enable debug logging for this logger for a complete list of JARs that were scanned but no TLDs were found in them . Skipping unneeded JARs during scanning can improve startup time and JSP compilation time . INFO : No Spring WebApplicationInitializer types detected on classpath INFO : Initializing Spring FrameworkServlet 'crunchify' INFO : FrameworkServlet 'crunchify' : initialization started INFO : Refreshing WebApplicationContext for namespace 'crunchify-servlet' : startup date [ Sat Aug 04 21 : 08 : 13 CDT 2018 ] ; root of context hierarchy INFO : Loading XML bean definitions from ServletContext resource [ / WEB - INF / crunchify - servlet . xml ] INFO : Mapped "{[/welcome]}" onto public org . springframework . web . servlet . ModelAndView com . crunchify . controller . CrunchifyHelloWorld . helloWorld ( ) INFO : Looking for @ ControllerAdvice : WebApplicationContext for namespace 'crunchify-servlet' : startup date [ Sat Aug 04 21 : 08 : 13 CDT 2018 ] ; root of context hierarchy INFO : Looking for @ ControllerAdvice : WebApplicationContext for namespace 'crunchify-servlet' : startup date [ Sat Aug 04 21 : 08 : 13 CDT 2018 ] ; root of context hierarchy INFO : Mapped URL path [ /** ] onto handler 'org.springframework.web.servlet.resource.DefaultServletHttpRequestHandler#0' INFO : FrameworkServlet 'crunchify' : initialization completed in 1607 ms INFO : Starting ProtocolHandler [ "http-nio-8080" ] INFO : Starting ProtocolHandler [ "ajp-nio-8009" ] INFO : Server startup in 3579 ms |
Langkah-11. Selesai.
Kunjungi: http://localhost:8080/CrunchifySpringMVCTutorial/ dan Anda harus siap.
Hore.. Sekarang Anda tahu Hello World Spring MVC 5 Example . Beri tahu saya jika Anda menemukan pengecualian saat menjalankan ini. Masih banyak lagi contoh yang bisa Anda temukan di sini.
Do you want to include JS, CSS and images into JSP file? Ikuti tutorial ini: Cara terbaik untuk Menambahkan/Mengintegrasikan JS, CSS, dan gambar ke dalam file JSP menggunakan 'mvc: pemetaan sumber daya'.
Mempunyai masalah? Ada masalah?
Triaging Langkah-1 – Mengalami kesalahan HTTP Status 404?
Juga, ikuti tutorial di bawah ini:
Triaging langkah-2 – URL tidak berfungsi? kesalahan kucing jantan?
Pastikan Anda menambahkan Apache Tomcat Server ke Targeted Runtime . Yang mungkin telah Anda pilih di Step-1 . Tomcat 7 atau 8 apa saja – server harus berfungsi.
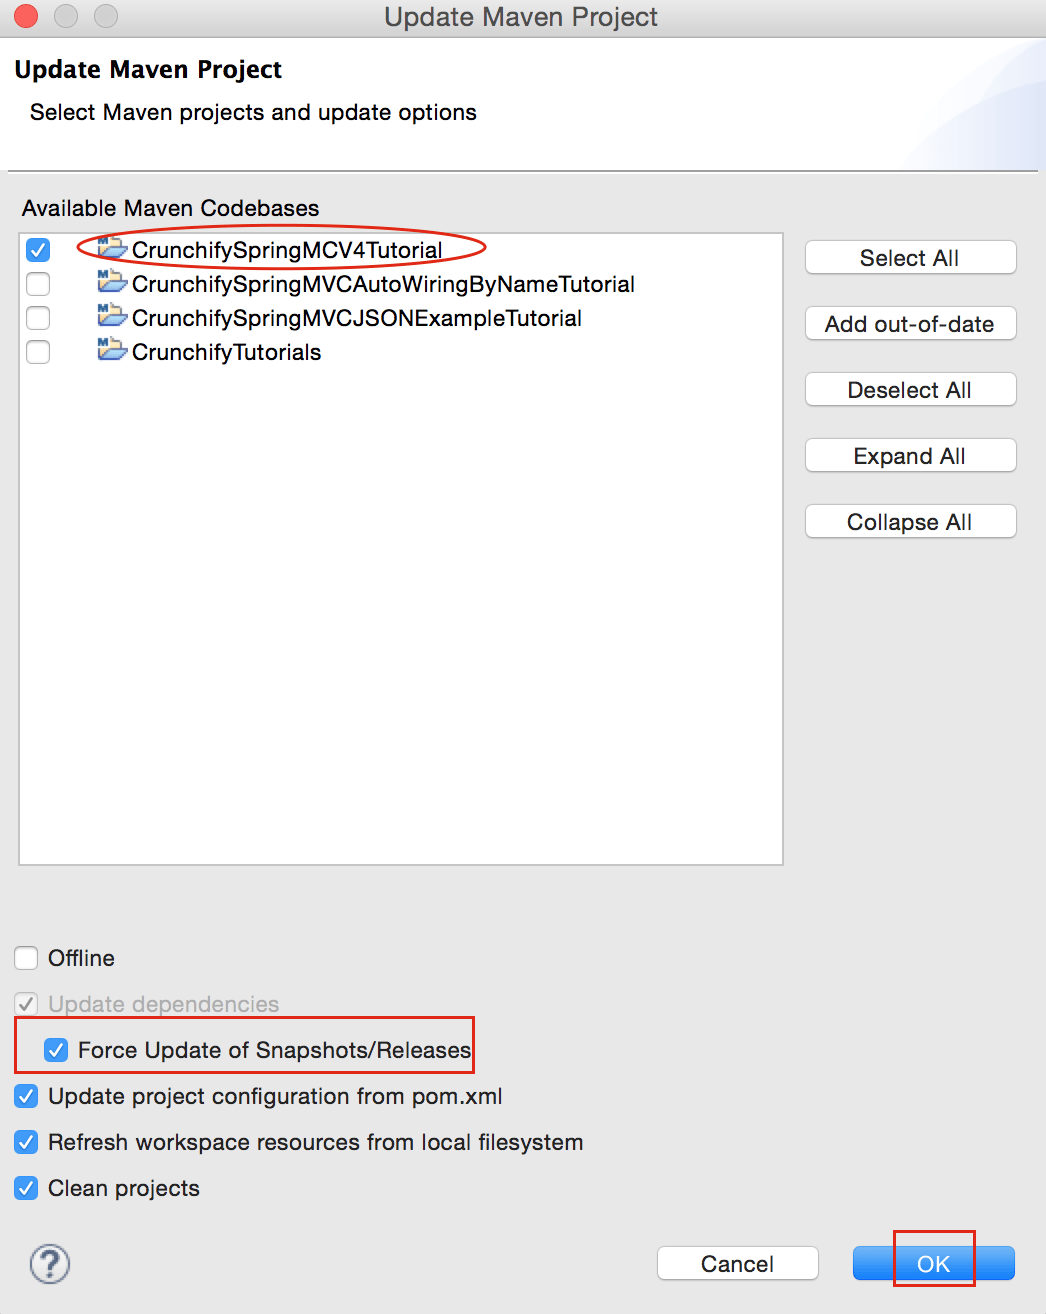
Triaging Langkah-3 – kesalahan pakar?
Pastikan untuk memperbarui semua dependensi pakar.
Jangan ragu untuk mengirim email atau komentar di bawah jika Anda memiliki masalah menjalankan tutorial di atas.