
Tutoriel du framework Spring MVC le plus simple - Exemple Hello World avec la page UI (JSP)
Publié: 2019-02-23
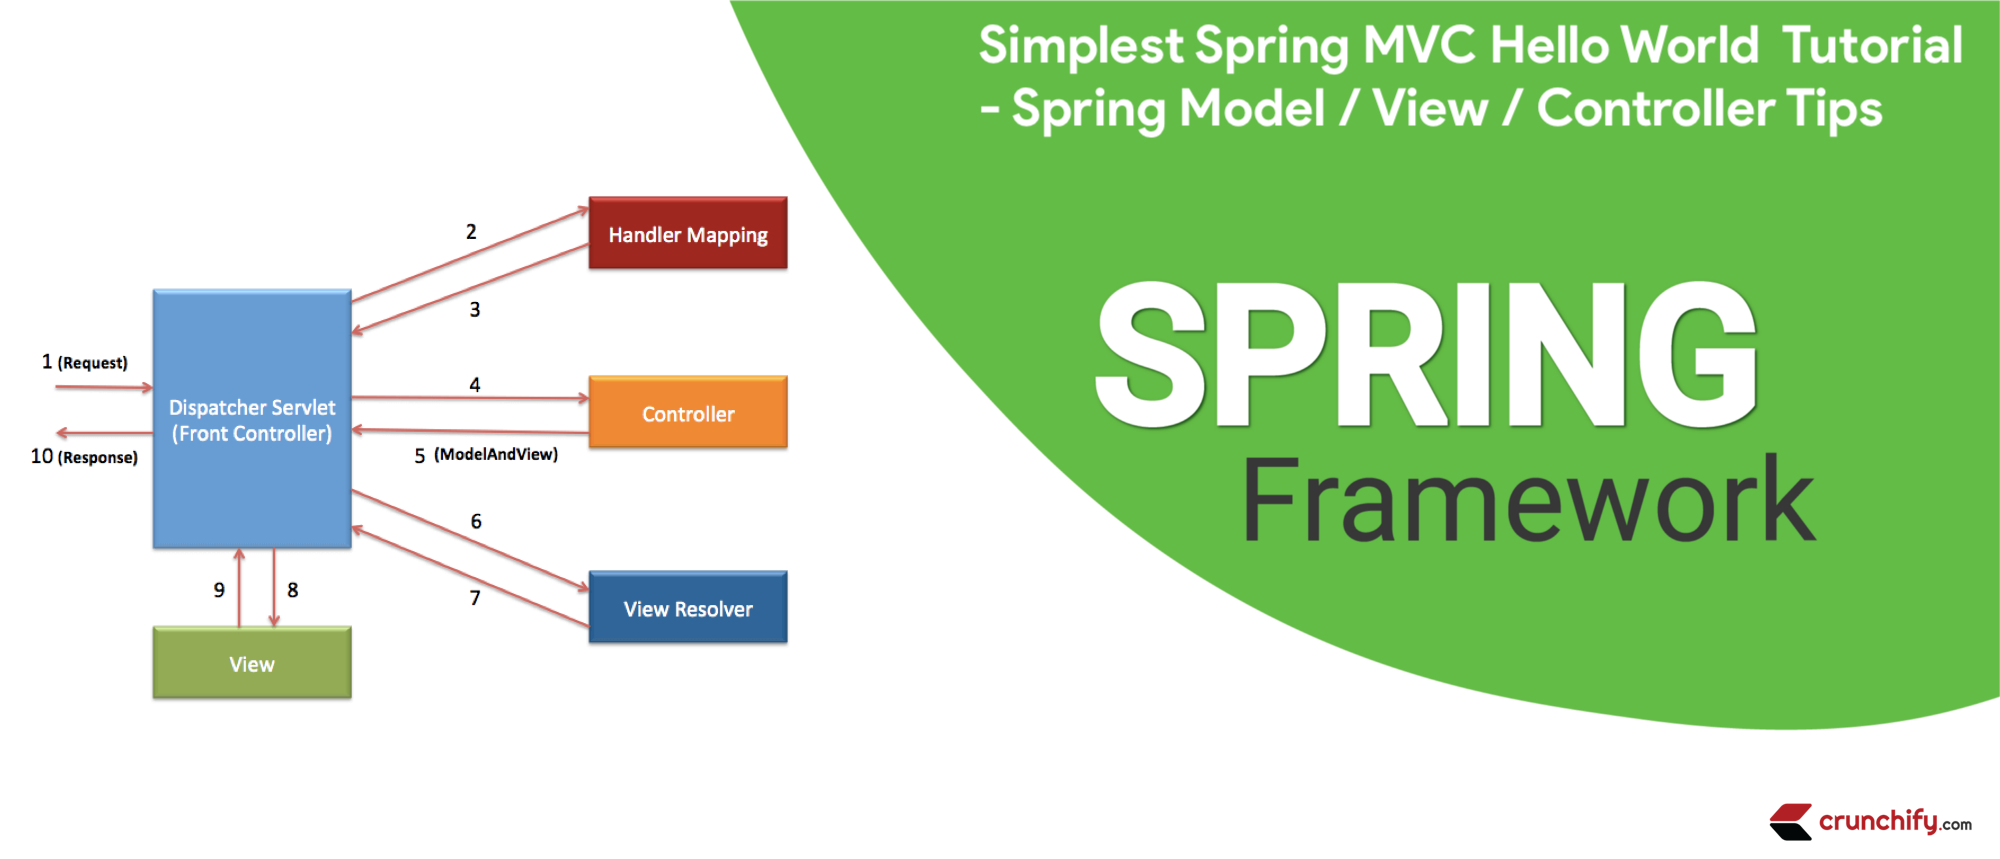
L'architecture Model-View-Controller (MVC) offre le moyen le plus simple de développer des applications Web flexibles et faiblement couplées.
Dans ce tutoriel, nous verrons comment créer votre 1ère application Spring MVC avec des étapes très détaillées.
Avez-vous l'une des questions ci-dessous ?
- Principes de base de Spring MVC 5.2.3
- Développement d'une application Spring Framework MVC 5 étape par étape.
- java - Tutoriel Spring MVC à partir de zéro
- Tutoriel rapide Spring MVC
- Tutoriel sur le framework Spring MVC
- Premier tutoriel d'application Spring MVC
- Tutoriels Spring 5.x MVC, Démo AJAX, Démo jQuery, Démo JavaScript, Trucs et astuces Spring 5 MVC
Alors vous êtes au bon endroit. Ici, je vais démontrer un Spring MVC framework simple pour créer des applications Web.
Tout d'abord - Configurons l'environnement
Dernière mise à jour et vérification du didacticiel : septembre 2020 avec les versions d'outils ci-dessous.
J'utilise les outils ci-dessous que vous devrez peut-être télécharger si vous ne les avez pas déjà.
- Tomcat 9.0.38 – Téléchargez la dernière version d'Apache Tomcat à partir de ce lien.
- Assurez-vous de télécharger Eclipse IDE for
Java EEDevelopers (2020‑09 R) – Lien de téléchargement. (schéma ci-dessous) -
Spring 5.2.9.RELEASE(Aucun téléchargement requis) - nous utiliserons la dépendance Maven. - JDK 15 – Lien de téléchargement.
Assurez-vous de télécharger le dernier kit de développement Java EE :

Objectif principal
L'objectif principal de ce tutoriel est de créer l'application Spring MVC de la manière la plus simple.
Avant de commencer voyons ce que nous verrons à la fin de ce tutoriel
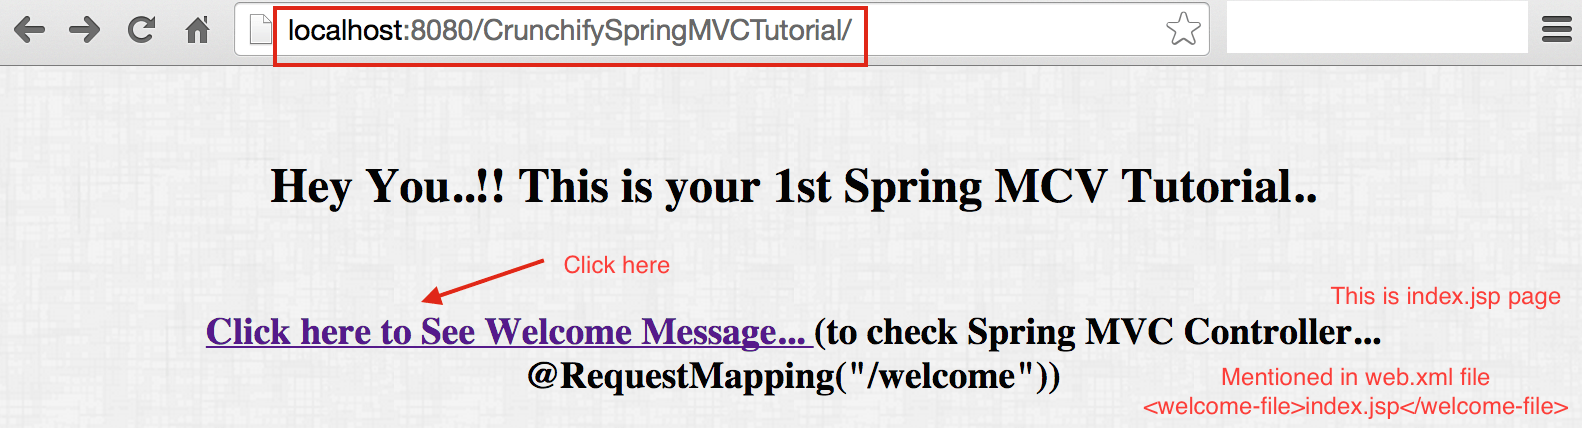
Voici à quoi ressemblera le application result . Ceci est un résultat final une fois que vous avez terminé toutes les étapes ci-dessous.
Voici un résultat final : Page d'accueil ==> index.jsp
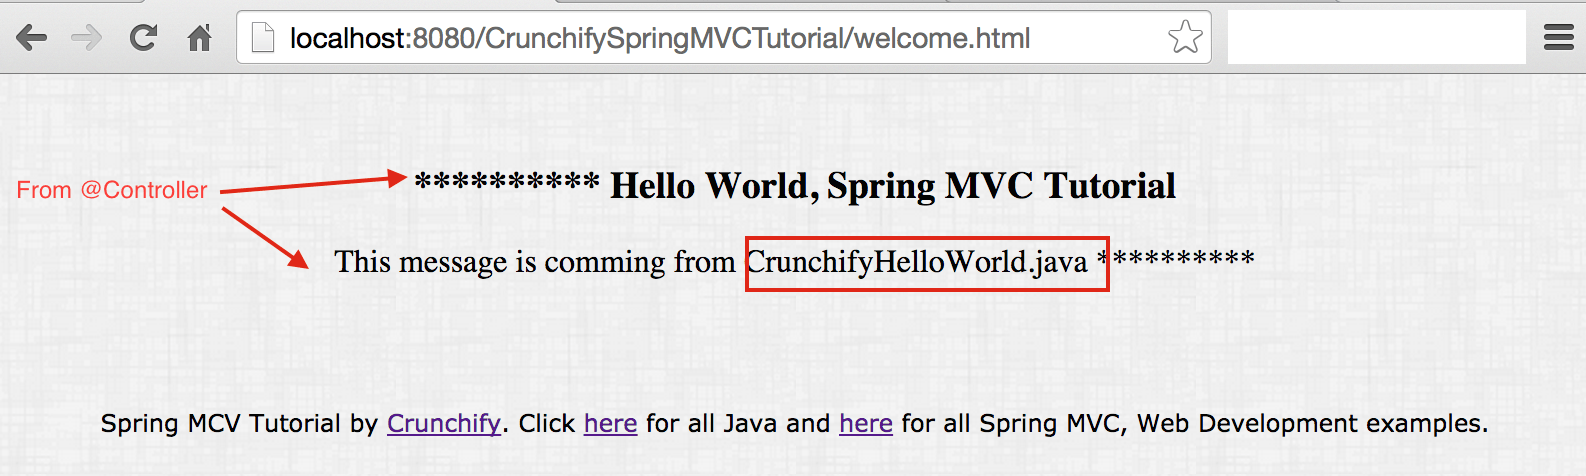
Le résultat revient de la classe contrôleur
Commençons maintenant le didacticiel
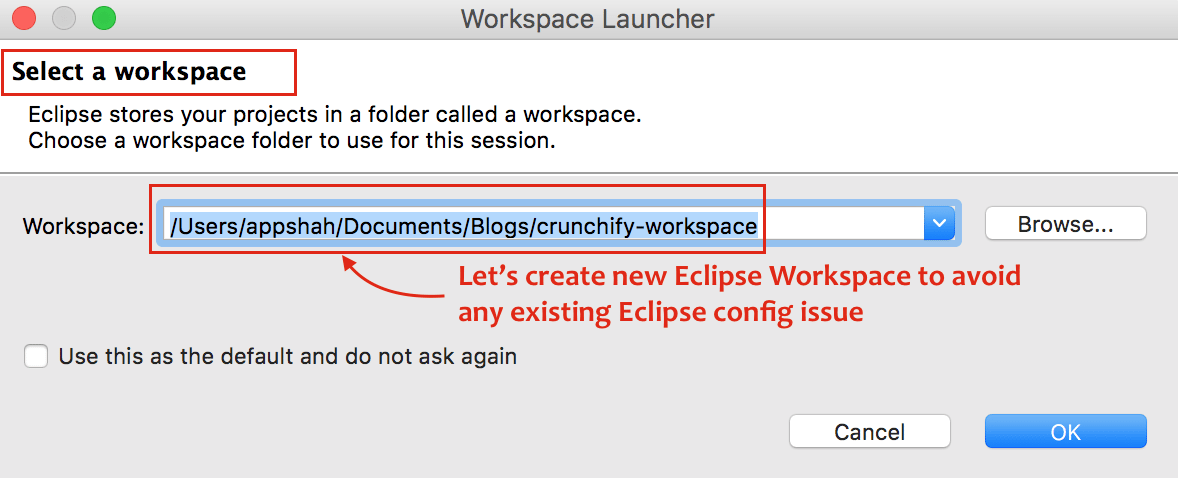
Étape 1
- Ouvrir l'éclipse
- Créer un
New Eclipse Workspace- Ceci estmustpour éviter tout problème de configuration d'espace de travail existant.
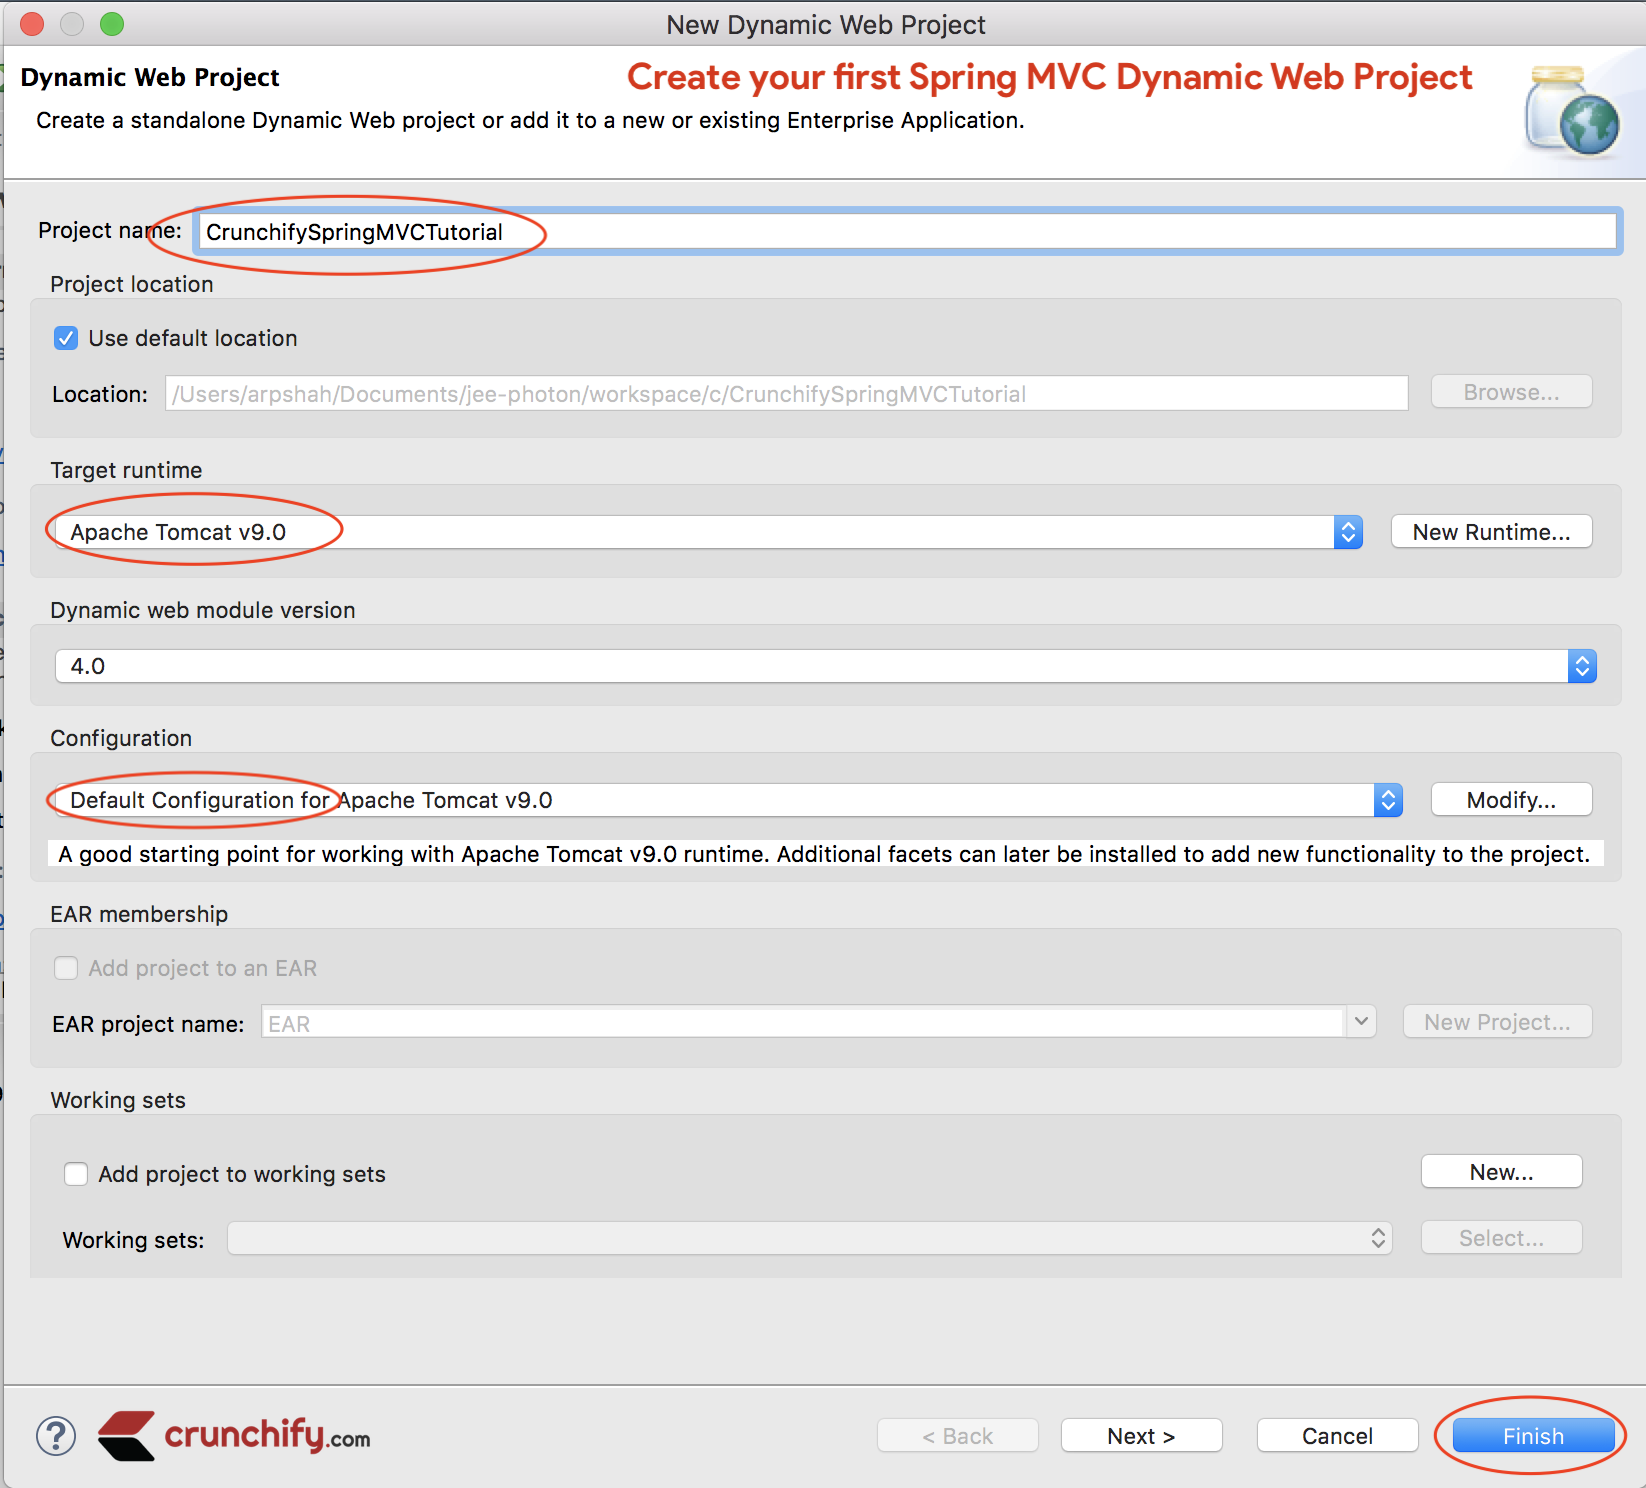
Étape 2
- Cliquez sur
File - Cliquez sur
New - Choisissez
Dynamic Web Project - Une fenêtre contextuelle, Indiquez le nom du projet :
CrunchifySpringMVCTutorial - Assurez-vous d'utiliser
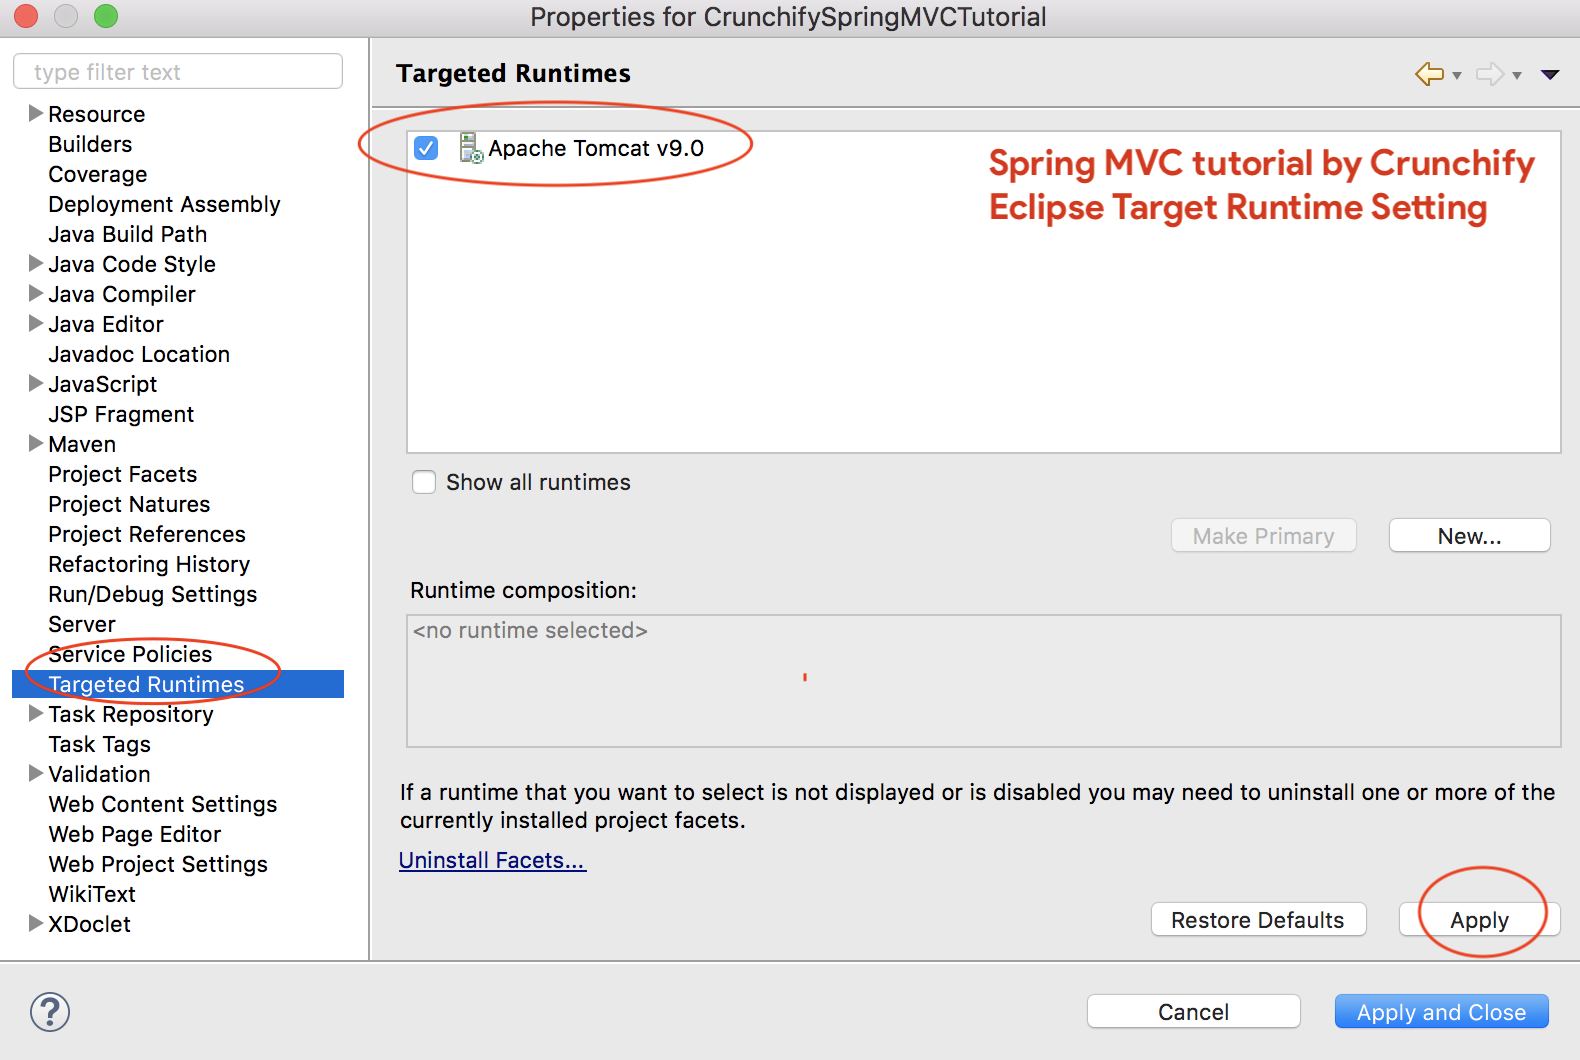
Target RuntimecommeApache Tomcat 9.0- Si vous ne voyez pas Target Runtime, suivez ces étapes
- Choisissez la configuration comme configuration par
Default Configuration
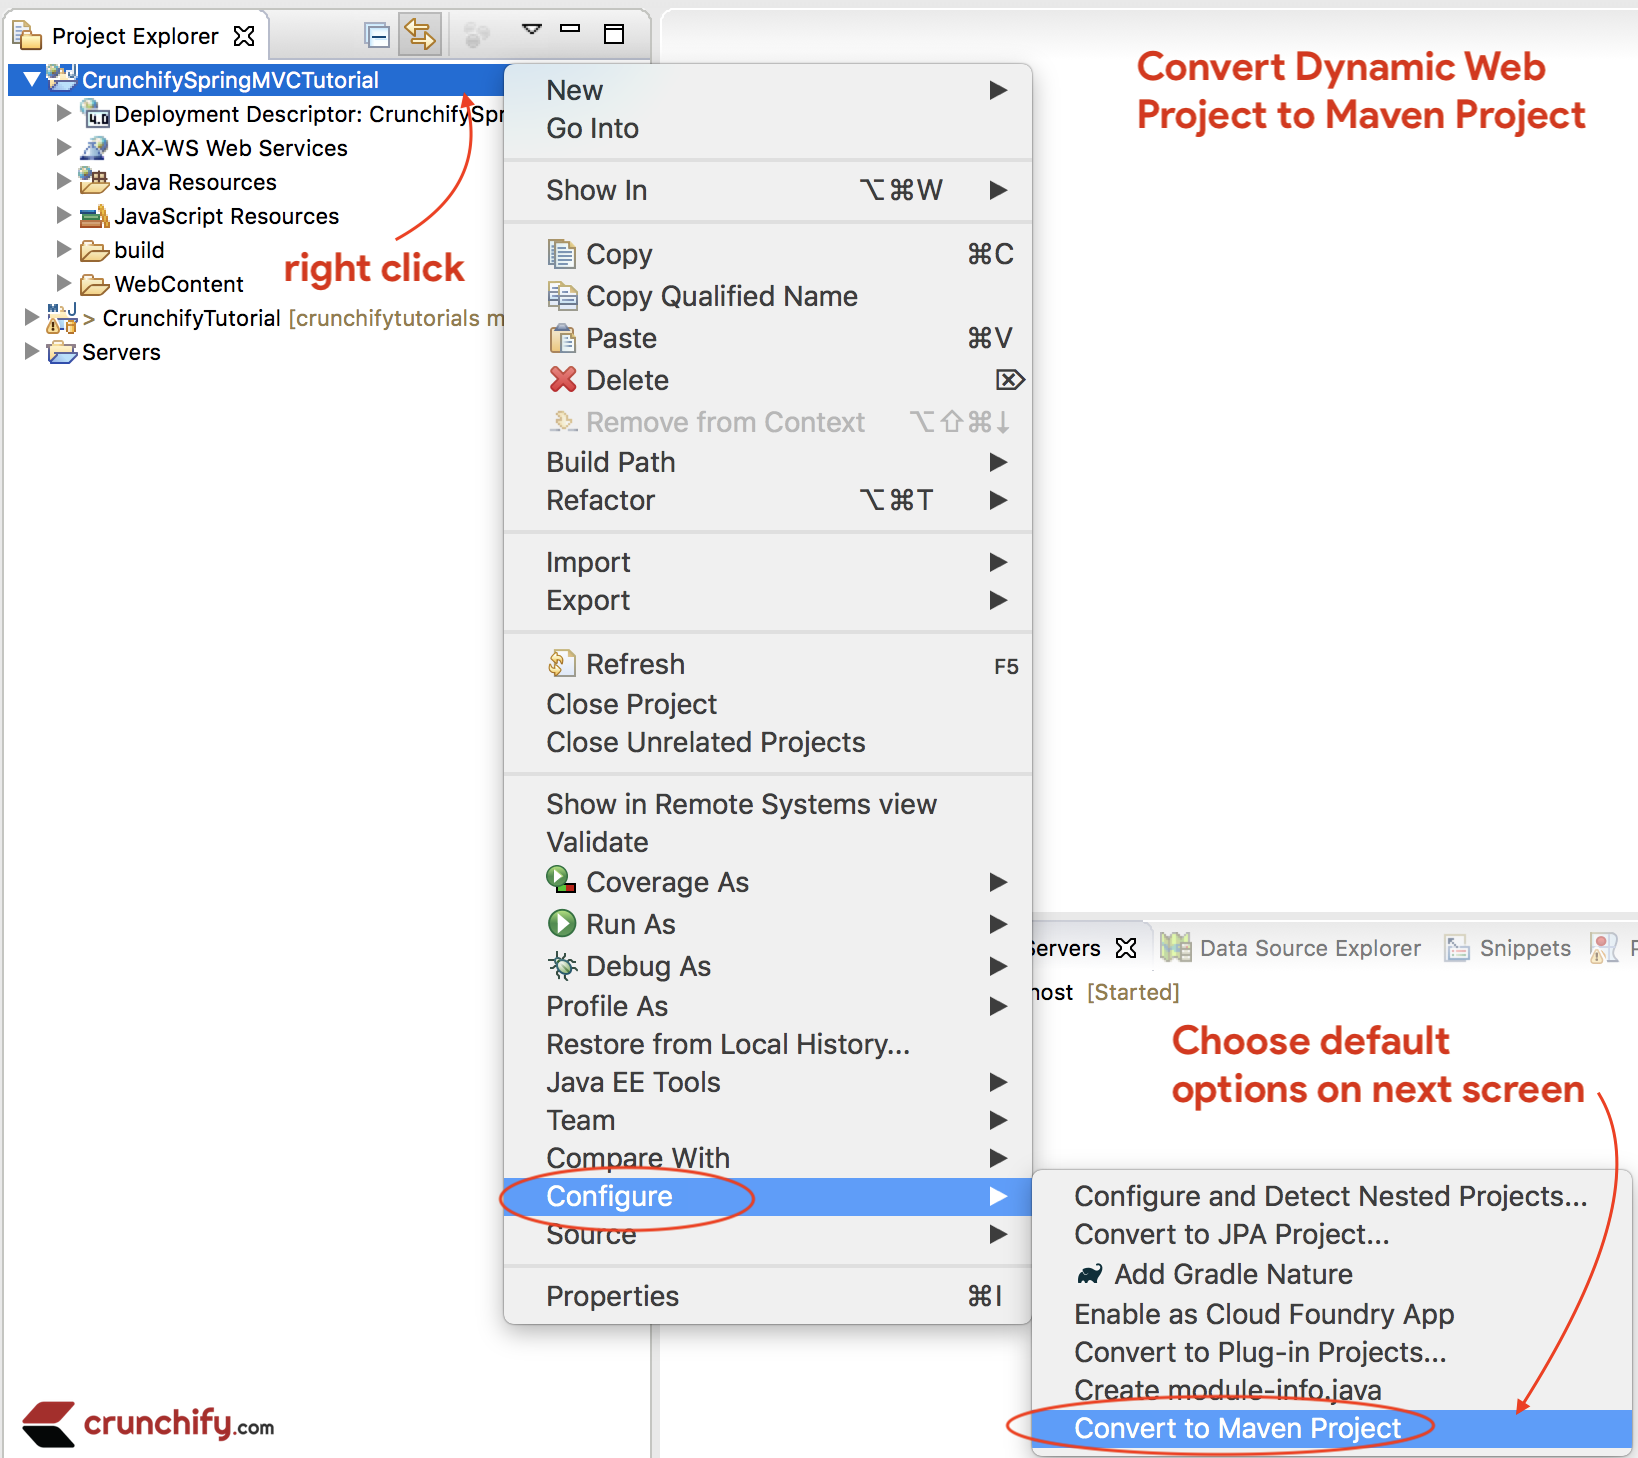
Étape 3
Convertissez le projet en projet Maven pour ajouter toutes les dépendances Spring MVC requises au projet.
Pas:
- Clic droit sur le projet
- Configurer
- Convertir en projet
Maven
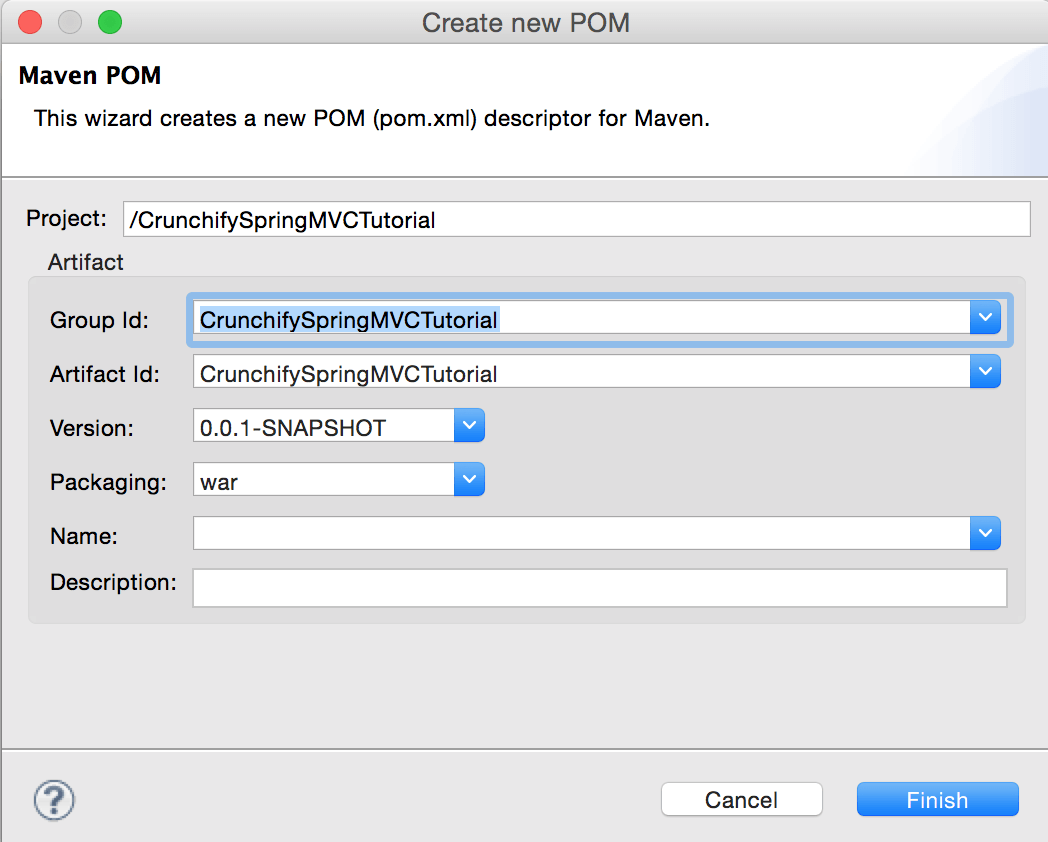
Étape 4
Ouvrez le fichier pom.xml et ajoutez jar dependencies ci-dessous au projet.
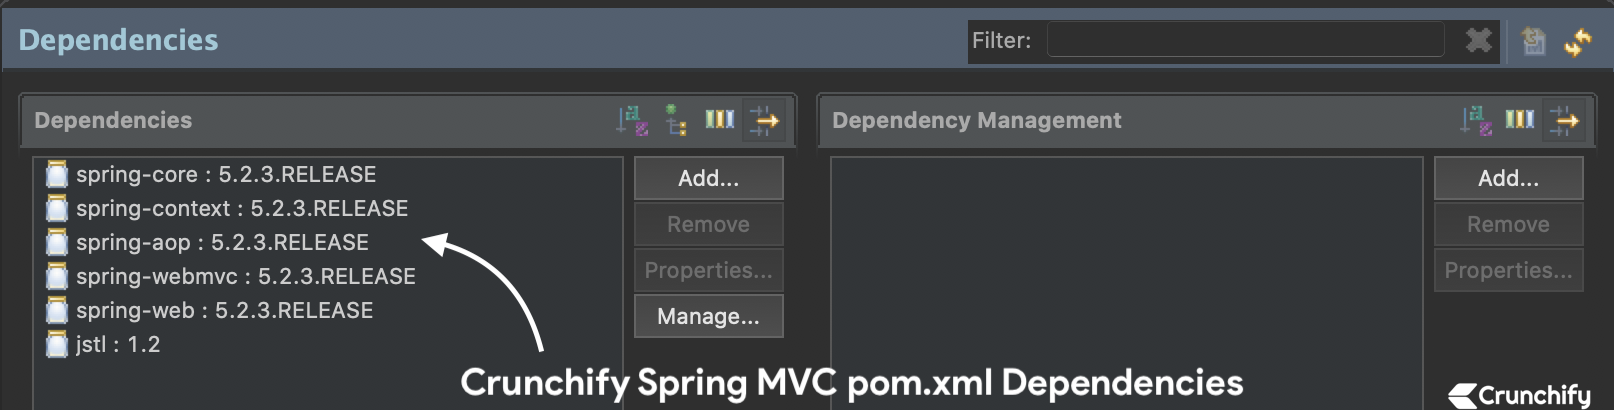
NOTE:Voici mon fichierpom.xml. Assurez-vous de mettre à jour la version Java vers13si vous n'êtes pas encore passé auJDK 13. Nous continuerons à mettre à jour ce didacticiel vers la dernière version de Spring MVC.Ainsi, le fichier pom.xml ci-dessous peut avoir une version différente (dernière) des dépendances Spring MVC que l'image ci-dessus
|
1 2 3 4 5 6 7 8 9 10 11 12 13 14 15 16 17 18 19 20 21 22 23 24 25 26 27 28 29 30 31 32 33 34 35 36 37 38 39 40 41 42 43 44 45 46 47 48 49 50 51 52 53 54 55 56 57 58 59 60 61 |
< project xmlns = "http://maven.apache.org/POM/4.0.0" xmlns : xsi = "http://www.w3.org/2001/XMLSchema-instance" xsi : schemaLocation = "http://maven.apache.org/POM/4.0.0 http://maven.apache.org/xsd/maven-4.0.0.xsd" > < modelVersion > 4.0.0 < / modelVersion > < groupId > CrunchifySpringMVCTutorial < / groupId > < artifactId > CrunchifySpringMVCTutorial < / artifactId > < version > 0.0.1 - SNAPSHOT < / version > < packaging > war < / packaging > < build > < sourceDirectory > src < / sourceDirectory > < plugins > < plugin > < artifactId > maven - compiler - plugin < / artifactId > < version > 3.8.0 < / version > < configuration > < release > 13 < / release > < / configuration > < / plugin > < plugin > < artifactId > maven - war - plugin < / artifactId > < version > 3.2.1 < / version > < configuration > < warSourceDirectory > WebContent < / warSourceDirectory > < / configuration > < / plugin > < / plugins > < / build > < dependencies > < dependency > < groupId > org . springframework < / groupId > < artifactId > spring - core < / artifactId > < version > 5.2.3.RELEASE < / version > < / dependency > < dependency > < groupId > org . springframework < / groupId > < artifactId > spring - context < / artifactId > < version > 5.2.3.RELEASE < / version > < / dependency > < dependency > < groupId > org . springframework < / groupId > < artifactId > spring - aop < / artifactId > < version > 5.2.3.RELEASE < / version > < / dependency > < dependency > < groupId > org . springframework < / groupId > < artifactId > spring - webmvc < / artifactId > < version > 5.2.3.RELEASE < / version > < / dependency > < dependency > < groupId > org . springframework < / groupId > < artifactId > spring - web < / artifactId > < version > 5.2.3.RELEASE < / version > < / dependency > < dependency > < groupId > javax . servlet < / groupId > < artifactId > jstl < / artifactId > < version > 1.2 < / version > < / dependency > < / dependencies > < / project > |
Étape-5
Créez un nouveau fichier Spring Configuration Bean : /WebContent/WEB-INF/crunchify-servlet.xml

crunchify-servlet.xml
|
1 2 3 4 5 6 7 8 9 10 11 12 13 14 15 16 17 18 19 20 21 22 23 24 25 26 27 |
<? xml version = "1.0" encoding = "UTF-8" ?> < beans xmlns = "http://www.springframework.org/schema/beans" xmlns : mvc = "http://www.springframework.org/schema/mvc" xmlns : context = "http://www.springframework.org/schema/context" xmlns : xsi = "http://www.w3.org/2001/XMLSchema-instance" xsi : schemaLocation = " http://www.springframework.org/schema/beans http://www.springframework.org/schema/beans/spring-beans.xsd http://www.springframework.org/schema/mvc http://www.springframework.org/schema/mvc/spring-mvc.xsd http://www.springframework.org/schema/context http://www.springframework.org/schema/context/spring-context.xsd" > < mvc : annotation - driven / > < context : component - scan base - package = "com.crunchify.controller" / > < mvc : default - servlet - handler / > < bean id = "viewResolver" class = "org.springframework.web.servlet.view.UrlBasedViewResolver" > < property name = "viewClass" value = "org.springframework.web.servlet.view.JstlView" / > < property name = "prefix" value = "/WEB-INF/jsp/" / > < property name = "suffix" value = ".jsp" / > < / bean > < / beans > |
Dans le crunchify-servlet.xml ci-dessus fichier de configuration, nous avons défini une balise <context:component-scan> . Cela permettra à Spring de charger tous les composants du package com.crunchify.controller et tous ses packages enfants.
Cela chargera notre CrunchifyHelloWorld.class . Nous avons également défini un bean viewResolver . Ce bean résoudra la vue et ajoutera la chaîne de préfixe /WEB-INF/jsp/ et le suffixe .jsp à la vue dans ModelAndView.
Notez que dans notre classe CrunchifyHelloWorld , nous avons retourné un objet ModelAndView avec le nom de vue welcome.
Cela sera résolu en chemin /WEB-INF/jsp/welcome.jsp .
Étape-6
Créez un nouveau fichier web.xml s'il n'y est pas déjà. Mappez Spring MVC dans le fichier /WebContent/WEB-INF/web.xml .
NOTE: si vous ne voyez pas le fichier web.xml dans votre « dynamic web project », suivez ces étapes.
web.xml
|
1 2 3 4 5 6 7 8 9 10 11 12 13 14 15 16 17 18 19 20 21 22 23 24 25 26 27 28 |
<? xml version = "1.0" encoding = "UTF-8" ?> < web - app xmlns : xsi = "http://www.w3.org/2001/XMLSchema-instance" xmlns = "http://xmlns.jcp.org/xml/ns/javaee" xsi : schemaLocation = "http://xmlns.jcp.org/xml/ns/javaee http://xmlns.jcp.org/xml/ns/javaee/web-app_4_0.xsd" id = "WebApp_ID" version = "4.0" > < display - name > CrunchifySpringMVCTutorial < / display - name > < welcome - file - list > < welcome - file > index . html < / welcome - file > < welcome - file > index . htm < / welcome - file > < welcome - file > index . jsp < / welcome - file > < welcome - file > default . html < / welcome - file > < welcome - file > default . htm < / welcome - file > < welcome - file > default . jsp < / welcome - file > < / welcome - file - list > < servlet > < servlet - name > crunchify < / servlet - name > < servlet - class > org . springframework . web . servlet . DispatcherServlet < / servlet - class > < load - on - startup > 1 < / load - on - startup > < / servlet > < servlet - mapping > < servlet - name > crunchify < / servlet - name > < url - pattern > / welcome . jsp < / url - pattern > < url - pattern > / index . jsp < / url - pattern > < url - pattern > / welcome . html < / url - pattern > < url - pattern > * . html < / url - pattern > < / servlet - mapping > < / web - app > |
Le code ci-dessus dans web.xml mappera DispatcherServlet avec le modèle d'url /welcome.jsp . Notez également que nous avons défini index.jsp comme fichier de bienvenue.
Une chose à noter ici est le nom du servlet dans la <servlet-name> dans web.xml . Une fois que le DispatcherServlet est initialisé, il recherche un nom de fichier [servlet-name]-servlet.xml dans le dossier WEB-INF de l'application Web. Dans cet exemple, le framework recherchera un fichier appelé crunchify-servlet.xml .
Étape-7
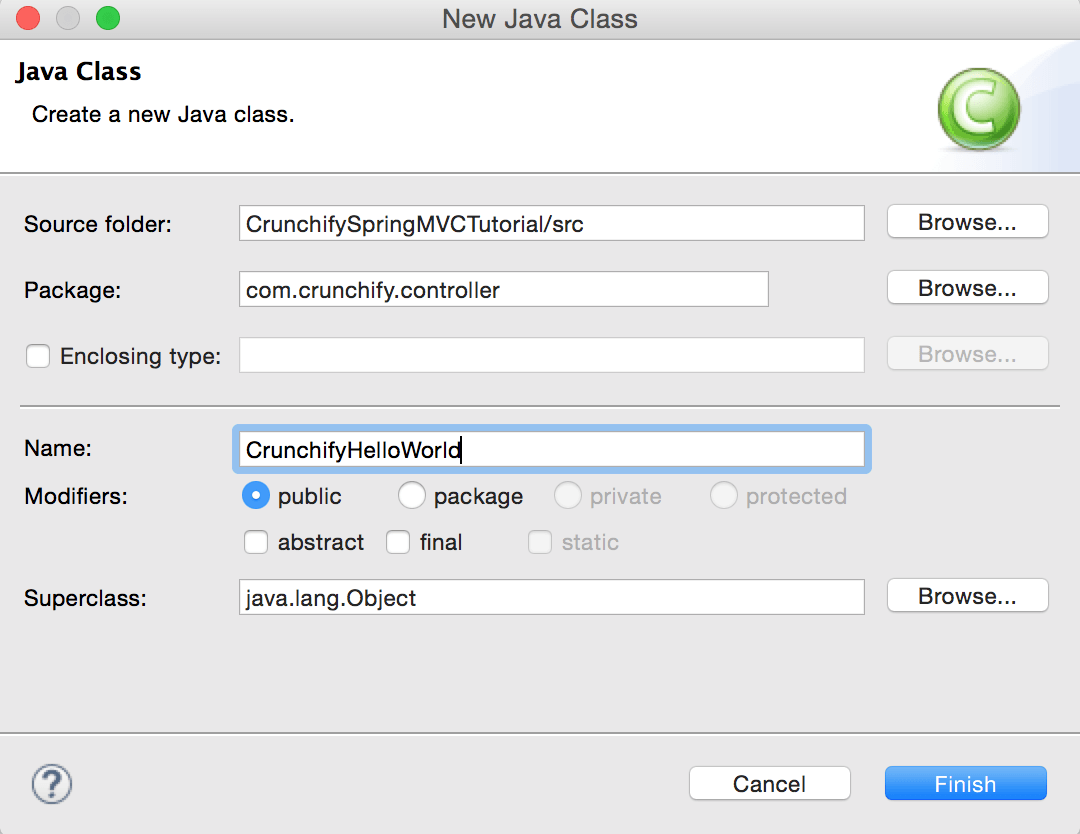
Créer une classe de contrôleur.
- Faites un clic droit sur
Java Resources->src - Cliquez sur
New->Class - Paquet :
com.crunchify.controller - Nom du fichier :
CrunchifyHelloWorld.java
CrunchifyHelloWorld.java
|
1 2 3 4 5 6 7 8 9 10 11 12 13 14 15 16 17 18 19 20 21 22 |
package com . crunchify . controller ; import org . springframework . stereotype . Controller ; import org . springframework . web . bind . annotation . RequestMapping ; import org . springframework . web . servlet . ModelAndView ; /* * author: Crunchify.com * */ @Controller public class CrunchifyHelloWorld { @RequestMapping ( "/welcome" ) public ModelAndView helloWorld ( ) { String message = "<br><div>" + "<h3>********** Hello World, Spring MVC Tutorial</h3>This message is coming from CrunchifyHelloWorld.java **********</div><br><br>" ; return new ModelAndView ( "welcome" , "message" , message ) ; } } |
Notez que nous avons annoté la classe CrunchifyHelloWorld avec @Controller et @RequestMapping("/welcome") . Lorsque Spring analyse notre package, il reconnaît ce bean comme étant un bean Controller pour le traitement des requêtes. L'annotation @RequestMapping indique à Spring que ce Controller doit traiter toutes les requêtes commençant par /welcome dans le chemin de l'URL. Cela inclut /welcome/* et /welcome.html .

La méthode helloWorld() renvoie l'objet ModelAndView . L'objet ModelAndView tente de se résoudre en une vue nommée "welcome" et le modèle de données est renvoyé au navigateur afin que nous puissions accéder aux données dans la JSP. Le nom de la vue logique sera résolu en /WEB-INF/jsp/welcome.jsp . Le nom logique "welcome" qui est renvoyé dans l'objet ModelAndView est mappé sur le chemin /WEB-INF/jsp/welcome.jsp.
L'objet ModelAndView contient également un message avec la clé « message » et la valeur détaillée. Ce sont les données que nous transmettons à notre point de vue. Normalement, ce sera un objet de valeur sous forme de bean java qui contiendra les données à afficher sur notre vue. Ici, nous passons simplement une chaîne.
Étape-8
La vue – Créer un nouveau fichier /WebContent/index.jsp .
index.jsp
|
1 2 3 4 5 6 7 8 9 10 11 12 13 14 15 16 17 18 19 20 21 22 |
< html > < head > < title > Spring MVC Tutorial Series by Crunchify . com < / title > <style type ="text/css"> body { background-image : url ( 'https://cdn.crunchify.com/bg.png' ) ; } </style> < / head > < body > < br > < div style = "text-align: center" > < h2 > Hey You . . ! ! This is your 1st Spring MCV Tutorial . . < br > < br > < / h2 > < h3 > < a href = "welcome.html" > Click here to See Welcome Message . . . < / a > ( to check Spring MVC Controller . . . @ RequestMapping ( "/welcome" ) ) < / h3 > < / div > < / body > < / html > |
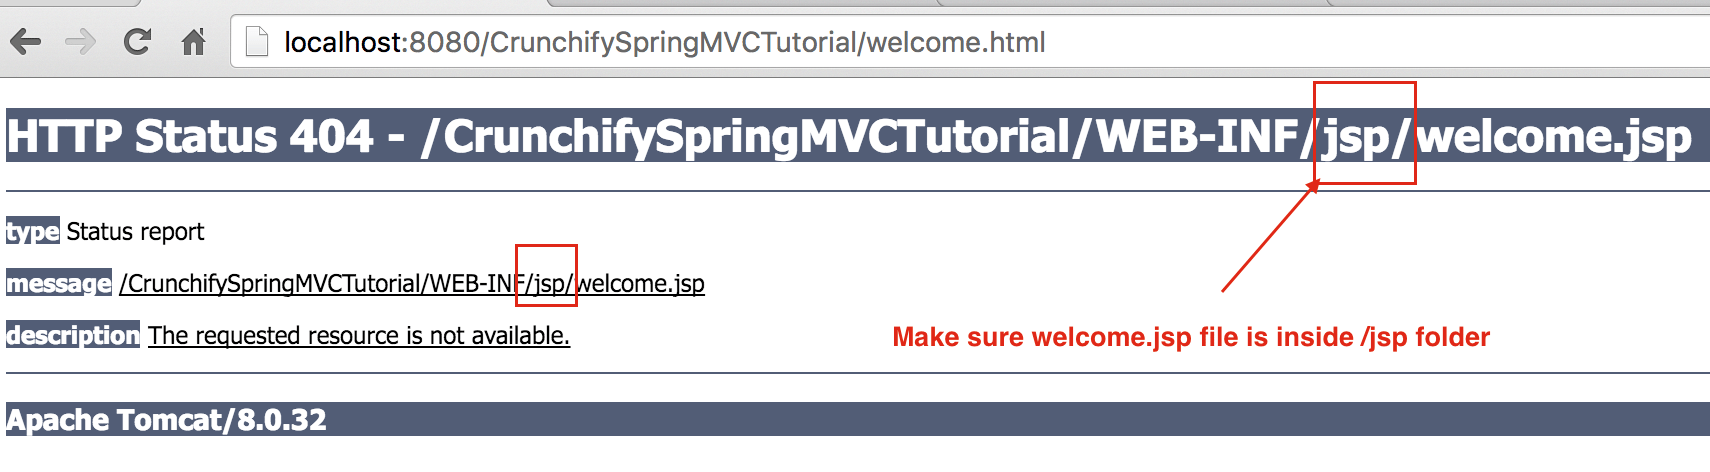
Créez un autre fichier /WebContent/WEB-INF/jsp/welcome.jsp .
NOTE: N'oubliez pas de créer un dossier jsp et de mettre welcome.jsp à l'intérieur
bienvenue.jsp
|
1 2 3 4 5 6 7 8 9 10 11 12 13 14 15 16 17 18 19 20 21 22 23 24 25 |
< html > < head > < title > Spring MVC Tutorial by Crunchify - Hello World Spring MVC Example < / title > <style type ="text/css"> body { background-image : url ( 'https://cdn.crunchify.com/bg.png' ) ; } </style> < / head > < body > $ { message } < br > < br > < div style = "font-family: verdana; padding: 10px; border-radius: 10px; font-size: 12px; text-align: center;" > Spring MCV Tutorial by < a href = "https://crunchify.com" > Crunchify < / a > . Click < a href = "https://crunchify.com/category/java-tutorials/" target = "_blank" > here < / a > for all Java and < a href = 'https://crunchify.com/category/spring-mvc/' target = '_blank' > here < / a > for all Spring MVC , Web Development examples . < br > < / div > < / body > < / html > |
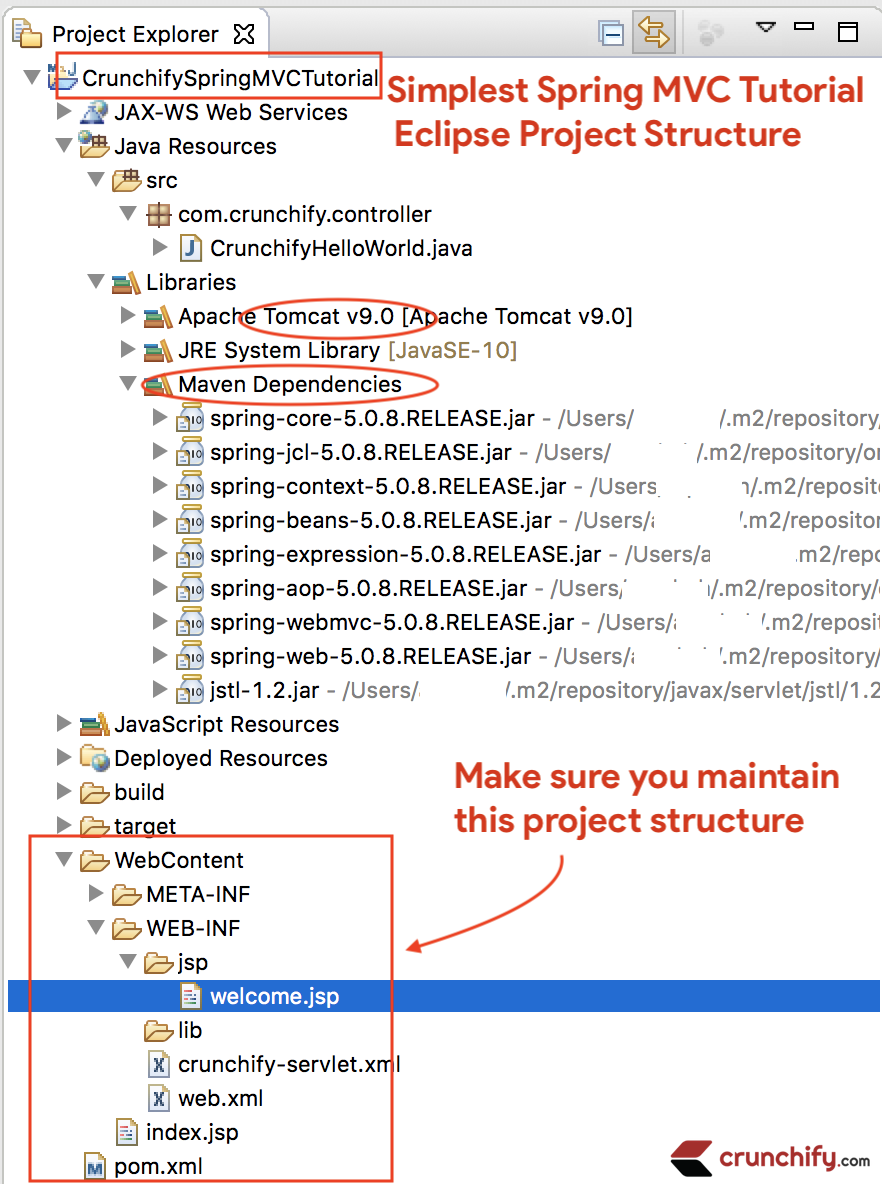
Après tout, voici à quoi devrait ressembler votre espace de travail.
Étape-9
Clic droit sur Project -> Run As -> Maven Build...
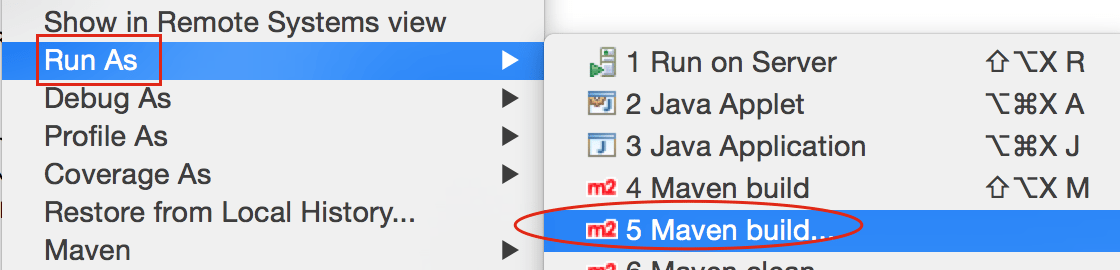
Add Goals : clean install . Cliquez sur Apply et Run .
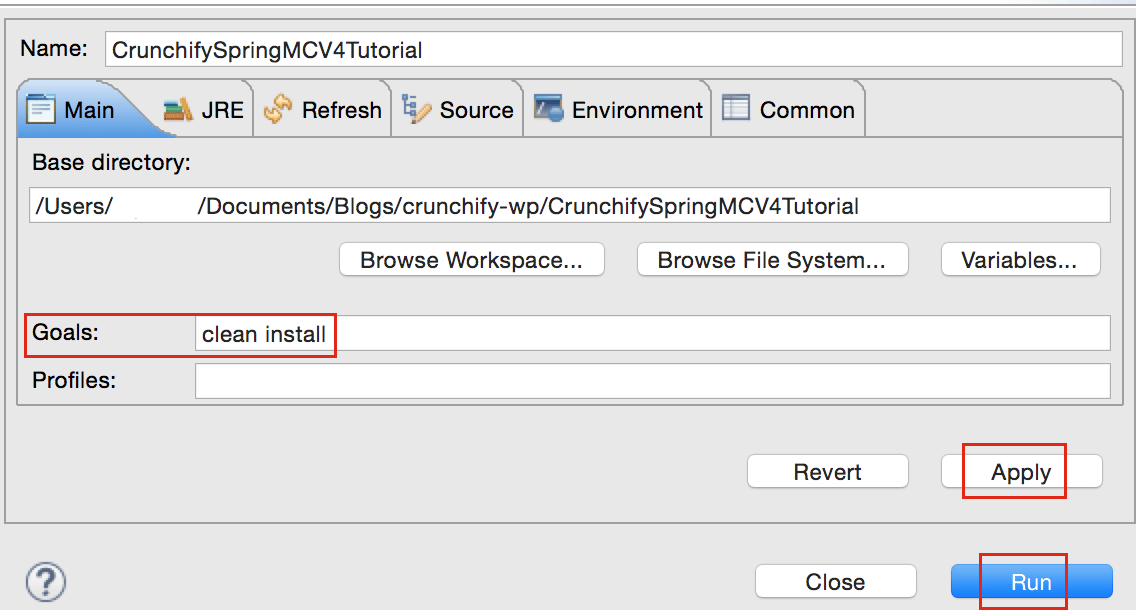
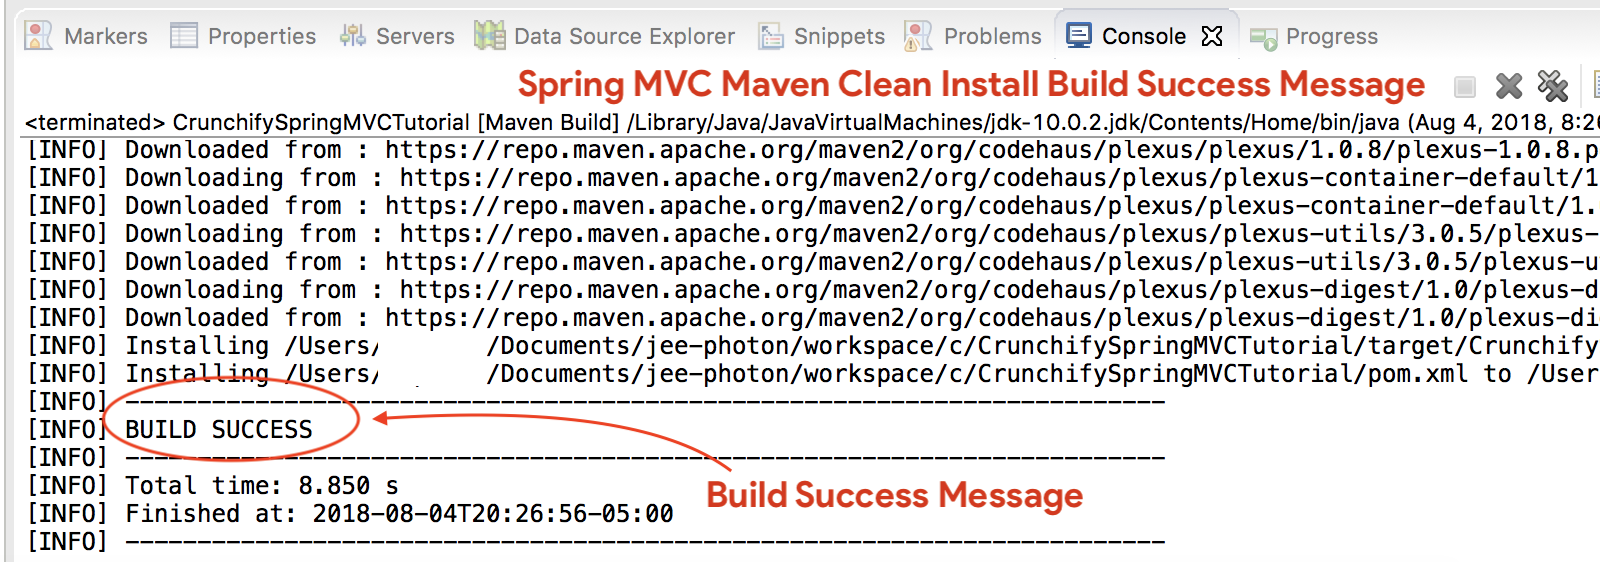
Vous devriez voir success message compilation :
Où sont tous mes fichiers .jar ?
Vous verrez tous les fichiers .jar sous le dossier /target . Capture d'écran.
Étape-10
- Si vous
don't seeserveur Tomcat dans l'ongletServers, suivez les étapes pour ajouter Apache Tomcat à Eclipse. - Déployer le projet sur
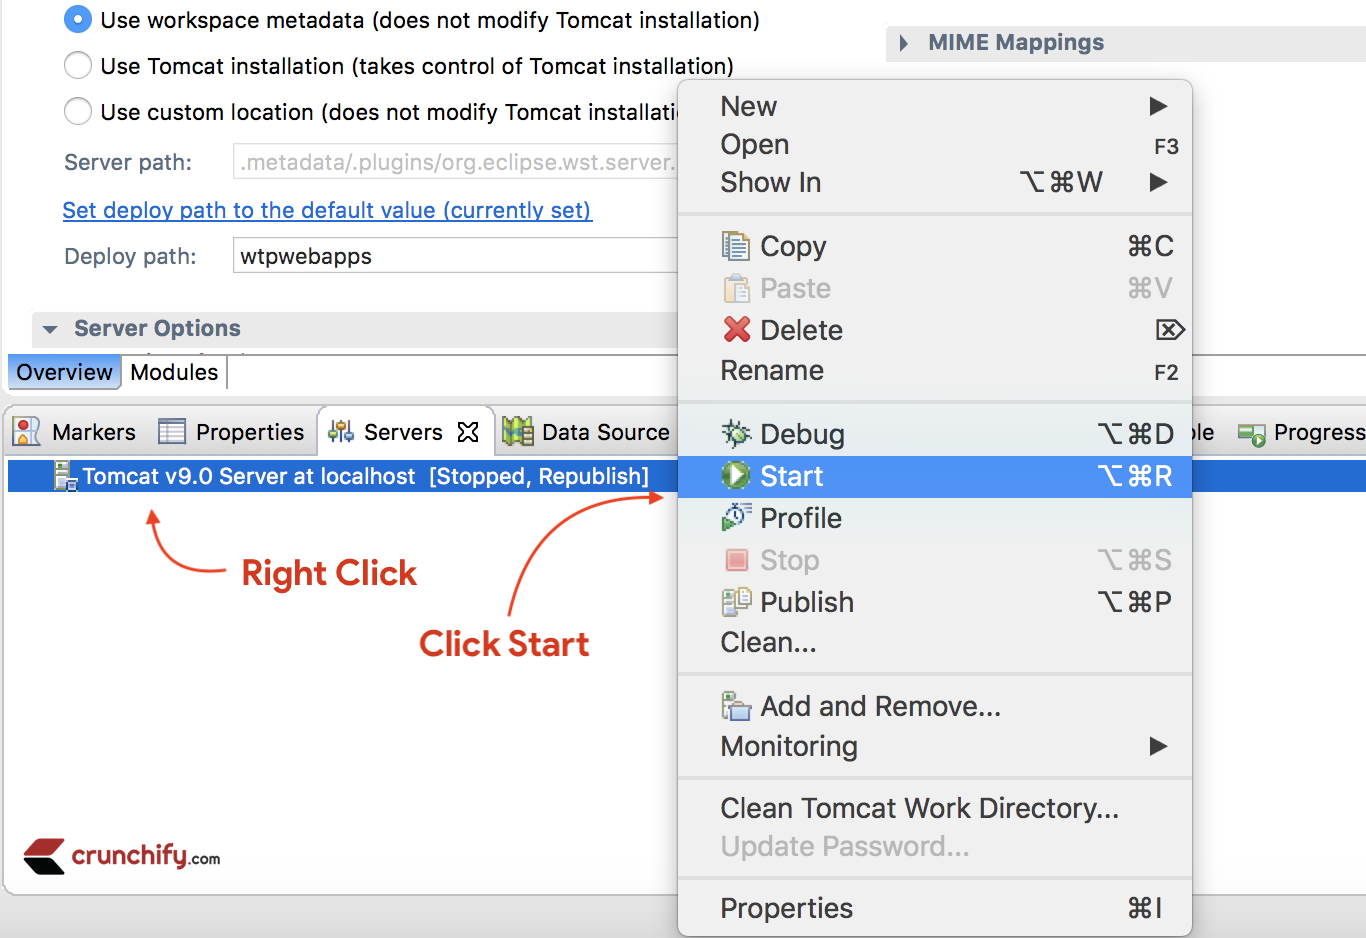
Apache Tomcat- Clic-droit
- Ajouter et supprimer
- Ajouter le projet au serveur (section de droite).
- Cliquez sur Démarrer.
Assurez-vous de voir les journaux ci-dessous. Cela signifie que votre application est déployée avec succès sur le serveur Web Tomcat.
|
1 2 3 4 5 6 7 8 9 10 11 12 13 14 15 16 17 18 19 20 21 22 23 24 25 26 27 28 29 30 31 32 33 34 35 36 37 38 39 40 |
Aug 04 , 2018 9 : 08 : 10 PM org . apache . tomcat . util . digester . SetPropertiesRule begin WARNING : [ SetPropertiesRule ] { Server / Service / Engine / Host / Context } Setting property 'source' to 'org.eclipse.jst.jee.server:CrunchifySpringMVCTutorial' did not find a matching property . INFO : Server version : Apache Tomcat / 9.0.10 INFO : Server built : Jun 20 2018 17 : 32 : 21 UTC INFO : Server number : 9.0.10.0 INFO : OS Name : Mac OS X INFO : OS Version : 10.13.6 INFO : Architecture : x86_64 INFO : Java Home : / Library / Java / JavaVirtualMachines / jdk - 10.0.2.jdk / Contents / Home INFO : JVM Version : 10.0.2 + 13 INFO : JVM Vendor : "Oracle Corporation" INFO : CATALINA_BASE : / Users / appshah / Documents / jee - photon / workspace / c / . metadata / . plugins / org . eclipse . wst . server . core / tmp0 INFO : CATALINA_HOME : / Users / appshah / Documents / jee - photon / apache - tomcat - 9.0.10 INFO : Command line argument : - Dcatalina . base =/ Users / appshah / Documents / jee - photon / workspace / c / . metadata / . plugins / org . eclipse . wst . server . core / tmp0 INFO : Command line argument : - Dcatalina . home =/ Users / appshah / Documents / jee - photon / apache - tomcat - 9.0.10 INFO : Command line argument : - Dwtp . deploy =/ Users / appshah / Documents / jee - photon / workspace / c / . metadata / . plugins / org . eclipse . wst . server . core / tmp0 / wtpwebapps INFO : Command line argument : - Dfile . encoding = UTF - 8 INFO : The APR based Apache Tomcat Native library which allows optimal performance in production environments was not found on the java . library . path : [ / Users / appshah / Library / Java / Extensions : / Library / Java / Extensions : / Network / Library / Java / Extensions : / System / Library / Java / Extensions : / usr / lib / java : . ] INFO : Initializing ProtocolHandler [ "http-nio-8080" ] INFO : Using a shared selector for servlet write / read INFO : Initializing ProtocolHandler [ "ajp-nio-8009" ] INFO : Using a shared selector for servlet write / read INFO : Initialization processed in 841 ms INFO : Starting service [ Catalina ] INFO : Starting Servlet Engine : Apache Tomcat / 9.0.10 INFO : At least one JAR was scanned for TLDs yet contained no TLDs . Enable debug logging for this logger for a complete list of JARs that were scanned but no TLDs were found in them . Skipping unneeded JARs during scanning can improve startup time and JSP compilation time . INFO : At least one JAR was scanned for TLDs yet contained no TLDs . Enable debug logging for this logger for a complete list of JARs that were scanned but no TLDs were found in them . Skipping unneeded JARs during scanning can improve startup time and JSP compilation time . INFO : No Spring WebApplicationInitializer types detected on classpath INFO : Initializing Spring FrameworkServlet 'crunchify' INFO : FrameworkServlet 'crunchify' : initialization started INFO : Refreshing WebApplicationContext for namespace 'crunchify-servlet' : startup date [ Sat Aug 04 21 : 08 : 13 CDT 2018 ] ; root of context hierarchy INFO : Loading XML bean definitions from ServletContext resource [ / WEB - INF / crunchify - servlet . xml ] INFO : Mapped "{[/welcome]}" onto public org . springframework . web . servlet . ModelAndView com . crunchify . controller . CrunchifyHelloWorld . helloWorld ( ) INFO : Looking for @ ControllerAdvice : WebApplicationContext for namespace 'crunchify-servlet' : startup date [ Sat Aug 04 21 : 08 : 13 CDT 2018 ] ; root of context hierarchy INFO : Looking for @ ControllerAdvice : WebApplicationContext for namespace 'crunchify-servlet' : startup date [ Sat Aug 04 21 : 08 : 13 CDT 2018 ] ; root of context hierarchy INFO : Mapped URL path [ /** ] onto handler 'org.springframework.web.servlet.resource.DefaultServletHttpRequestHandler#0' INFO : FrameworkServlet 'crunchify' : initialization completed in 1607 ms INFO : Starting ProtocolHandler [ "http-nio-8080" ] INFO : Starting ProtocolHandler [ "ajp-nio-8009" ] INFO : Server startup in 3579 ms |
Étape-11. Terminé.
Visitez : http://localhost:8080/CrunchifySpringMVCTutorial/ et vous devriez être prêt.
Hourra .. Vous savez maintenant Hello World Spring MVC 5 Example . Faites-moi savoir si vous rencontrez une exception lors de l'exécution de ceci. Il y a beaucoup plus d'exemples que vous pouvez trouver ici.
Do you want to include JS, CSS and images into JSP file? Suivez ce didacticiel : Meilleure façon d'ajouter/d'intégrer JS, CSS et des images dans un fichier JSP à l'aide de 'mvc:resources mapping'.
Avoir des problèmes? Aucun problème?
Étape de triage 1 - Vous avez une erreur HTTP Status 404 ?
Suivez également le tutoriel ci-dessous :
Triage étape-2 - L'URL ne fonctionne pas ? Erreur Tomcat ?
Assurez-vous d'ajouter Apache Tomcat Server à Targeted Runtime . Que vous avez peut-être sélectionné à Step-1 . Tomcat 7 ou 8 tout - le serveur devrait fonctionner.
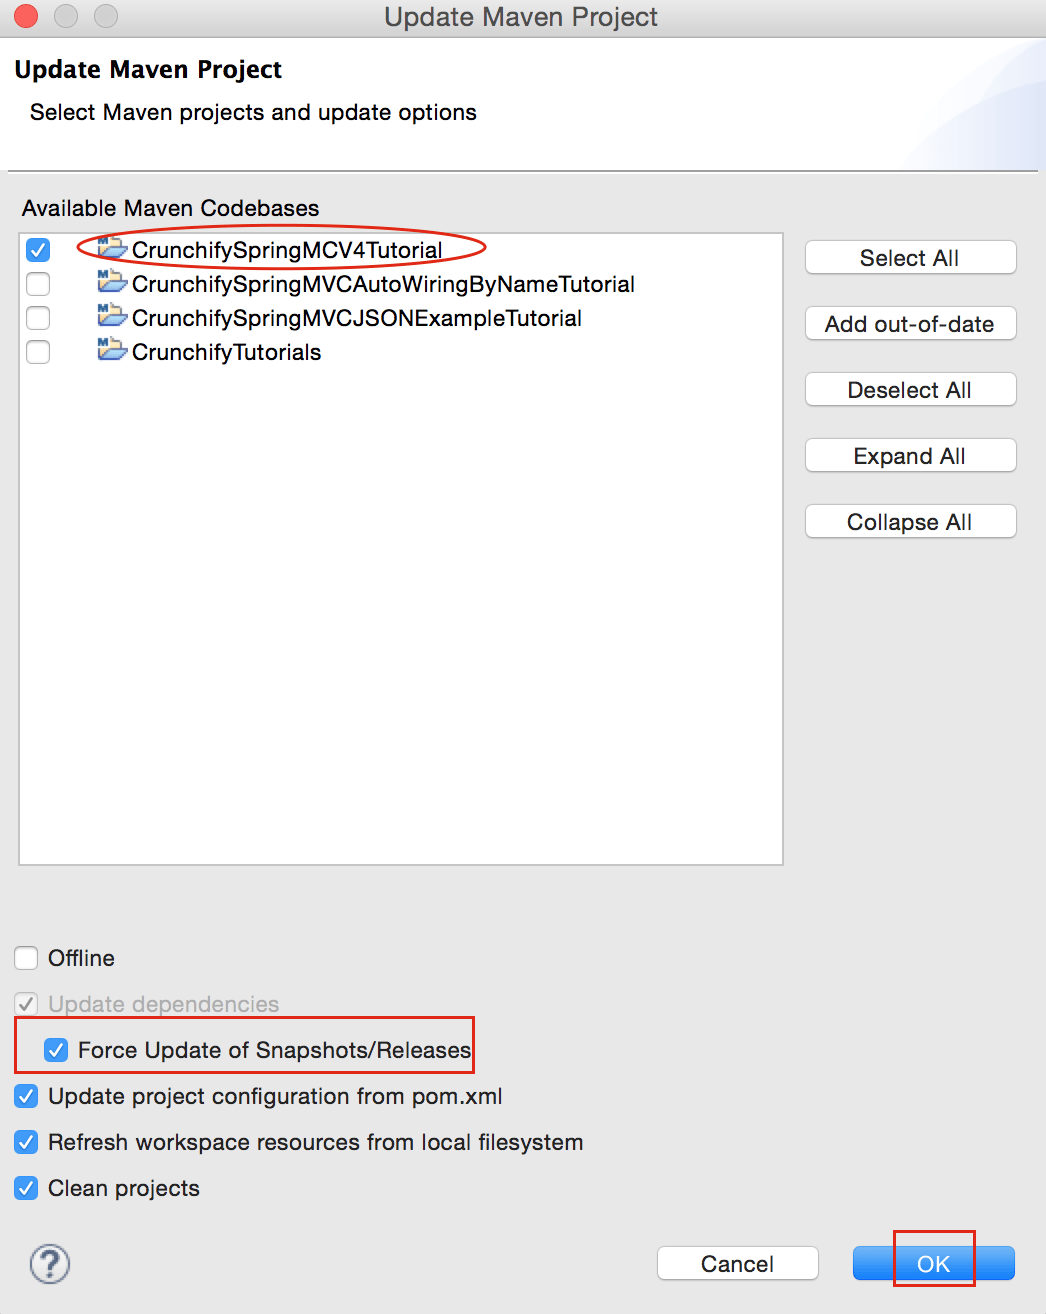
Triage Étape-3 - erreurs maven?
Assurez-vous de mettre à jour toutes les dépendances maven.
N'hésitez pas à envoyer un e-mail ou à commenter ci-dessous si vous rencontrez un problème lors de l'exécution du didacticiel ci-dessus.