
กวดวิชา Spring MVC Framework ที่ง่ายที่สุด – ตัวอย่าง Hello World พร้อม UI (JSP) Page
เผยแพร่แล้ว: 2019-02-23
สถาปัตยกรรม Model-View-Controller (MVC) เป็นวิธีที่ง่ายที่สุดในการพัฒนาเว็บแอปพลิเคชันที่เชื่อมต่อกันอย่างอิสระและยืดหยุ่น
ในบทช่วยสอนนี้ เราจะอธิบายวิธีสร้างแอปพลิเคชัน Spring MVC ครั้งที่ 1 ของคุณด้วยขั้นตอนที่ละเอียดมาก
คุณมีคำถามด้านล่างหรือไม่?
- พื้นฐานของ Spring MVC 5.2.3
- การพัฒนาแอปพลิเคชัน Spring Framework MVC 5 ทีละขั้นตอน..
- java – บทช่วยสอน Spring MVC ตั้งแต่เริ่มต้น
- บทช่วยสอนที่รวดเร็วของ Spring MVC
- บทช่วยสอน Spring MVC Framework
- บทช่วยสอนการใช้งาน Spring MVC ครั้งแรก
- บทช่วยสอน Spring 5.x MVC, การสาธิต AJAX, การสาธิต jQuery, การสาธิต JavaScript, เคล็ดลับและเทคนิค Spring 5 MVC
ถ้าอย่างนั้นคุณก็มาถูกที่แล้ว ฉันจะสาธิต Spring MVC framework อย่างง่ายสำหรับการสร้างเว็บแอปพลิเคชัน
อย่างแรกเลย – มาตั้งค่าสภาพแวดล้อมกันเถอะ
บทช่วยสอนอัปเดตและยืนยันล่าสุด: กันยายน 2020 พร้อมเวอร์ชันเครื่องมือด้านล่าง
ฉันใช้เครื่องมือด้านล่างซึ่งคุณอาจต้องดาวน์โหลดหากคุณยังไม่มี
- Tomcat 9.0.38 – ดาวน์โหลด Apache Tomcat ล่าสุดจากลิงค์นี้
- ตรวจสอบให้แน่ใจว่าคุณดาวน์โหลด Eclipse IDE สำหรับ
Java EEDevelopers (2020‑09 R) – ลิงก์ดาวน์โหลด (แผนภาพด้านล่าง) -
Spring 5.2.9.RELEASE(ไม่ต้องดาวน์โหลด) – เราจะใช้การพึ่งพา Maven - JDK 15 – ลิงค์ดาวน์โหลด
ตรวจสอบให้แน่ใจว่าคุณดาวน์โหลด Java EE Developer Kit ล่าสุด:

เป้าหมายหลัก
เป้าหมายหลักสำหรับบทช่วยสอนนี้เพื่อสร้าง Spring MVC Application ด้วยวิธีที่ง่ายที่สุด
ก่อนที่เราจะเริ่มต้น เรามาดูกันว่าเราจะได้เห็นอะไรในตอนท้ายของบทช่วยสอนนี้
นี่คือลักษณะที่ application result ของเราจะมีลักษณะเช่นนี้ นี่เป็นผลลัพธ์สุดท้ายเมื่อคุณทำตามขั้นตอนด้านล่างทั้งหมดแล้ว
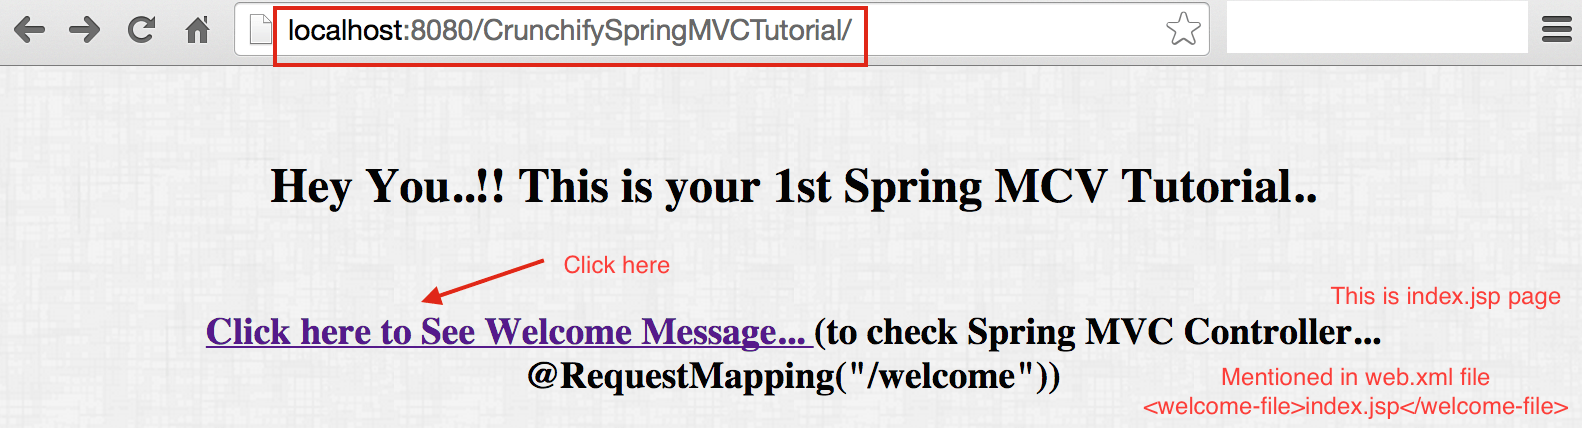
นี่คือผลลัพธ์สุดท้าย: หน้าต้อนรับ ==> index.jsp
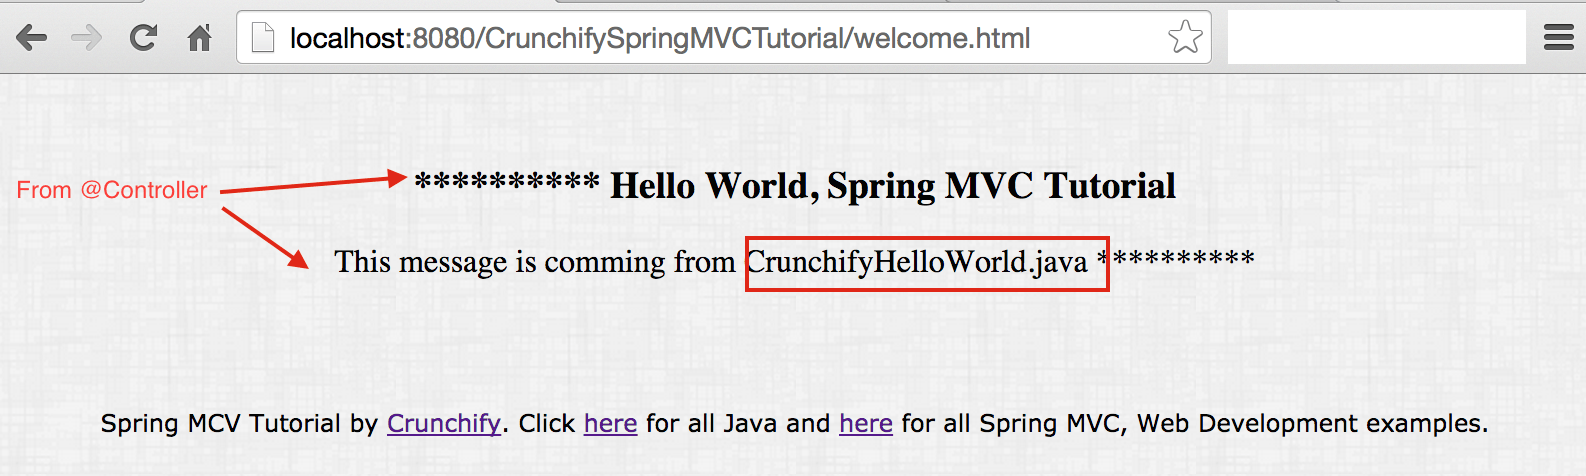
ผลลัพธ์ที่ได้มาจาก Controller Class
มาเริ่มกันเลยกับบทช่วยสอน
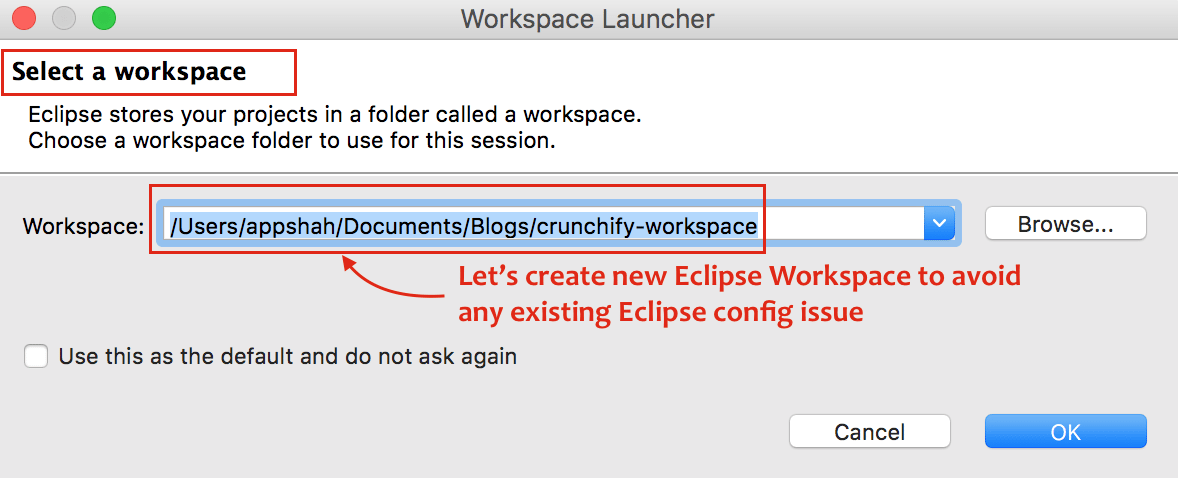
ขั้นตอนที่ 1
- เปิด Eclipse
- สร้าง
New Eclipse Workspace– สิ่งนี้จะmustหลีกเลี่ยงปัญหาการกำหนดค่าพื้นที่ทำงานที่มีอยู่
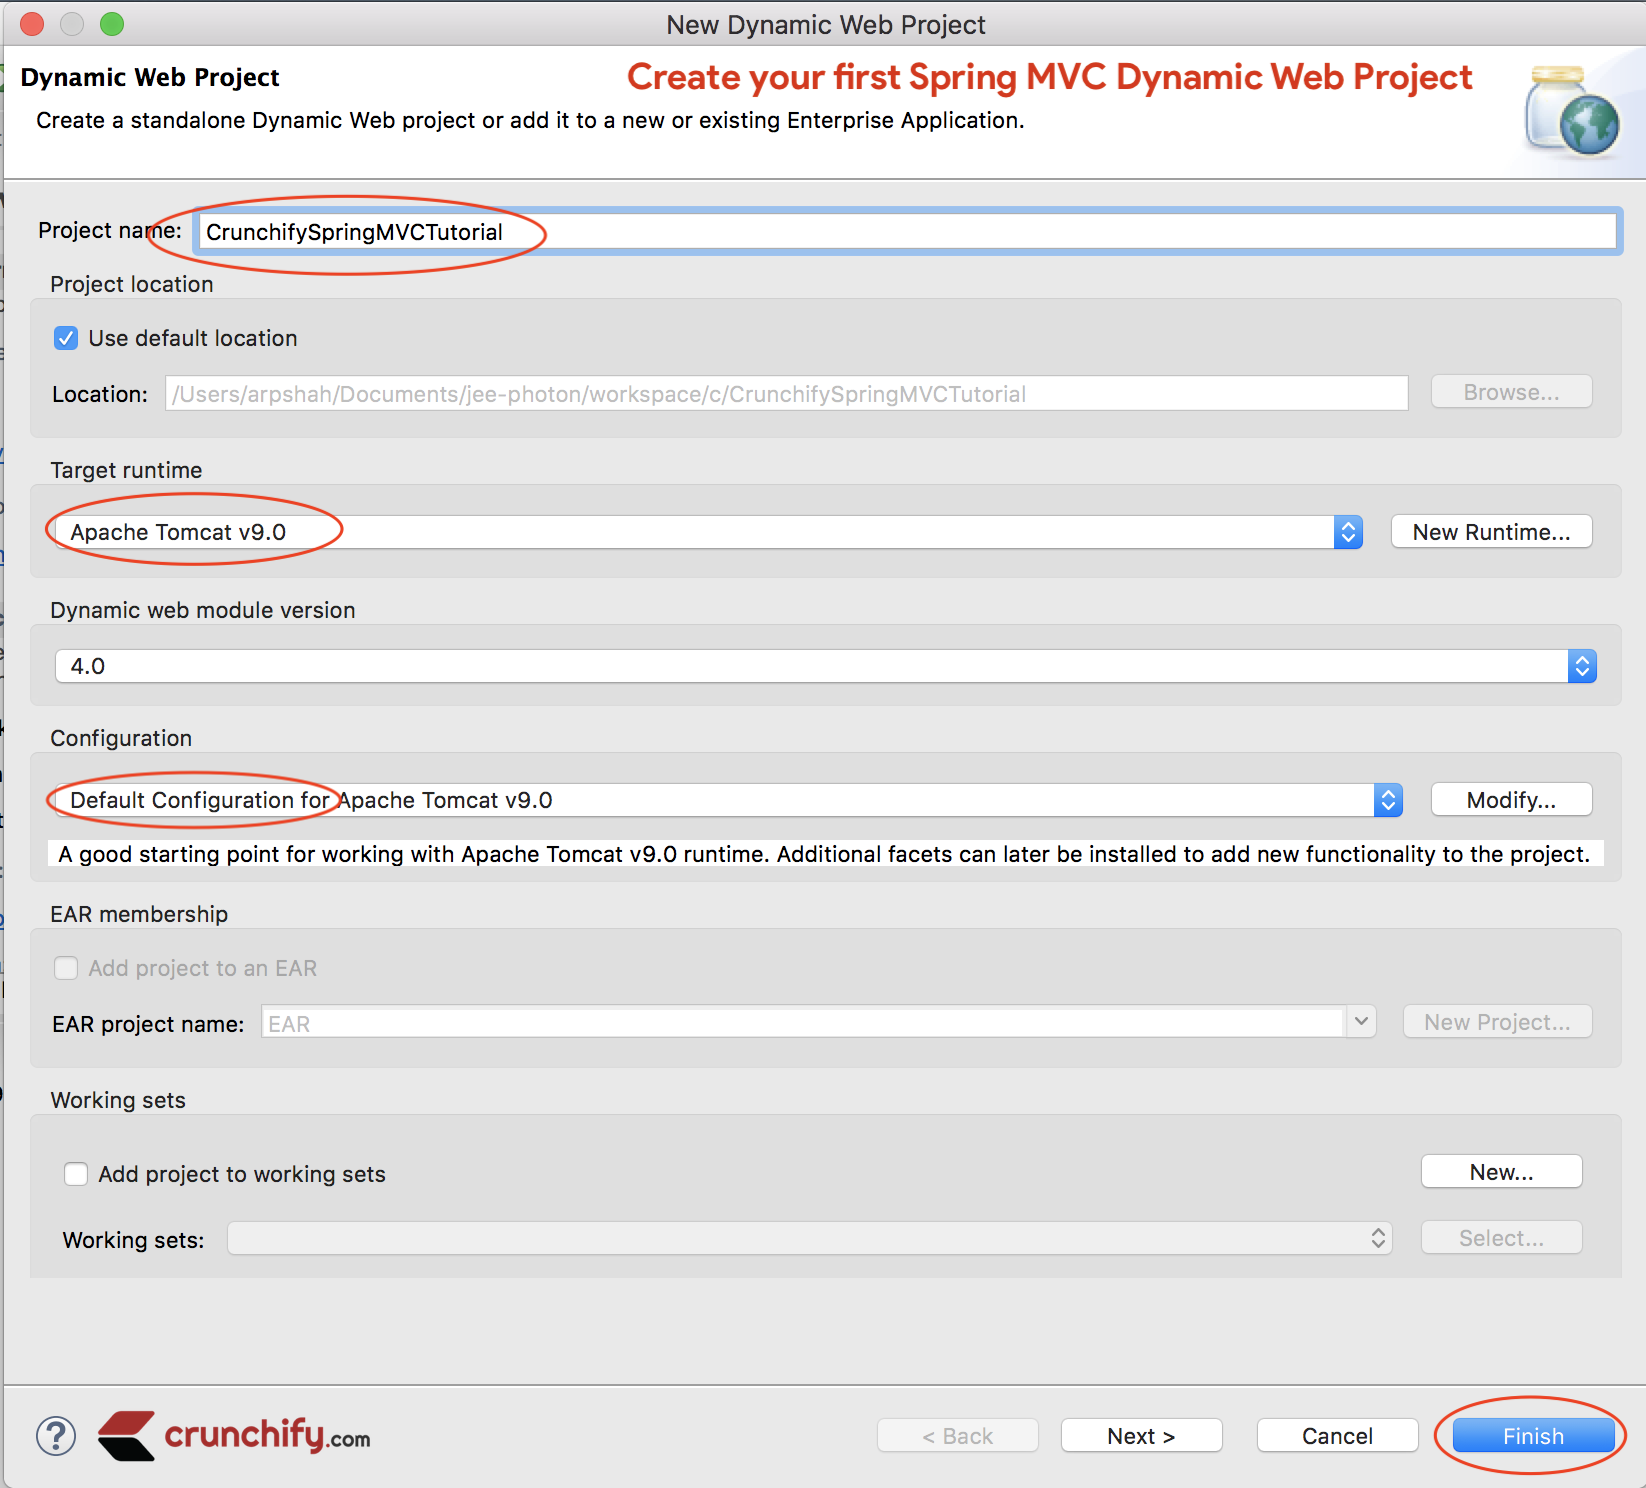
ขั้นตอนที่ 2
- คลิกที่
File - คลิกที่
New - เลือก
Dynamic Web Project - หน้าต่างป๊อปอัปหนึ่งหน้าต่าง ระบุชื่อโปรเจ็กต์:
CrunchifySpringMVCTutorial - ตรวจสอบให้แน่ใจว่าคุณใช้
Target Runtimeเป็นApache Tomcat 9.0- หากคุณไม่เห็น Target Runtime ให้ทำตามขั้นตอนเหล่านี้
- เลือกการกำหนดค่าเป็นการ
Default Configuration
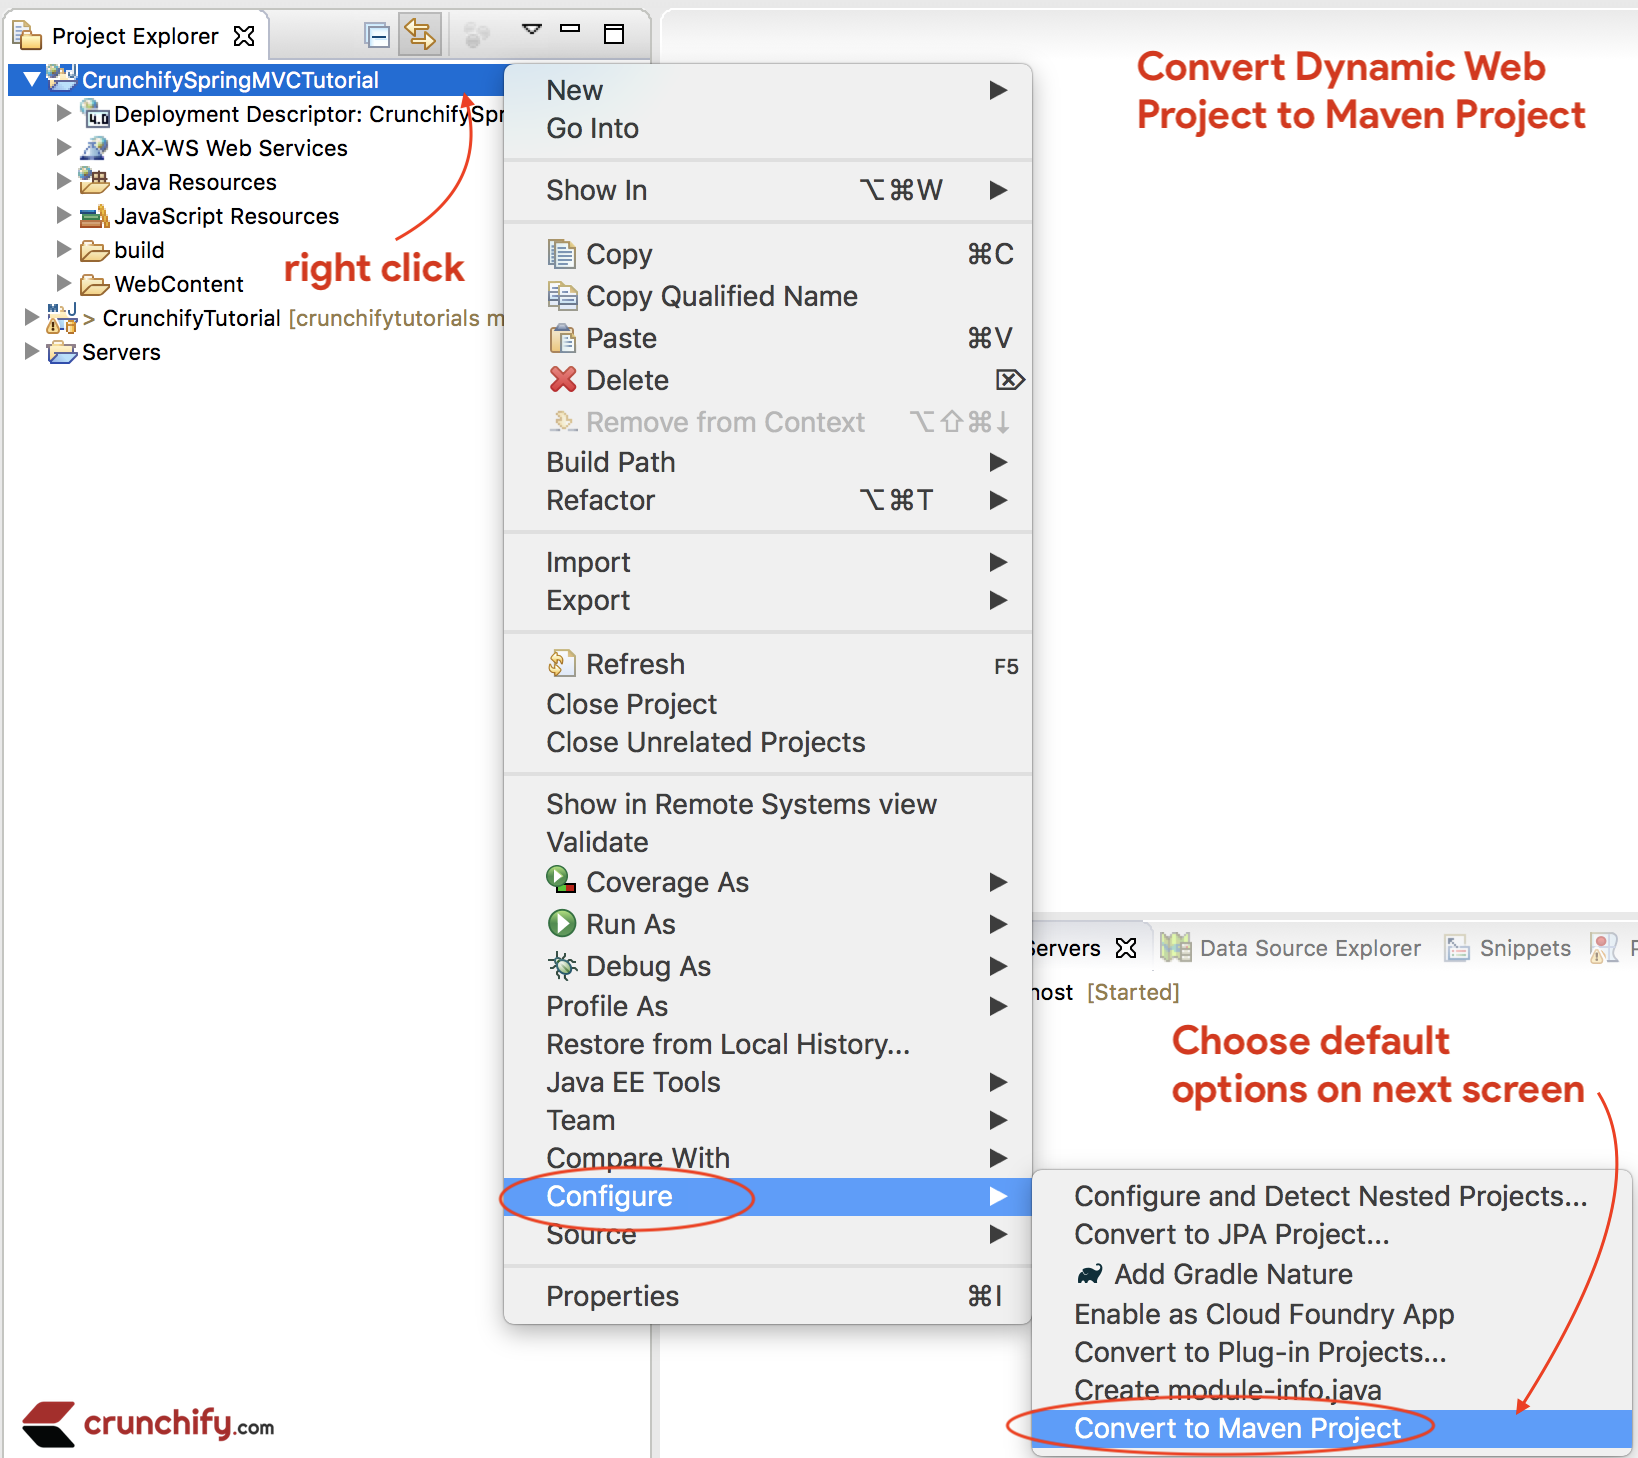
ขั้นตอนที่ 3
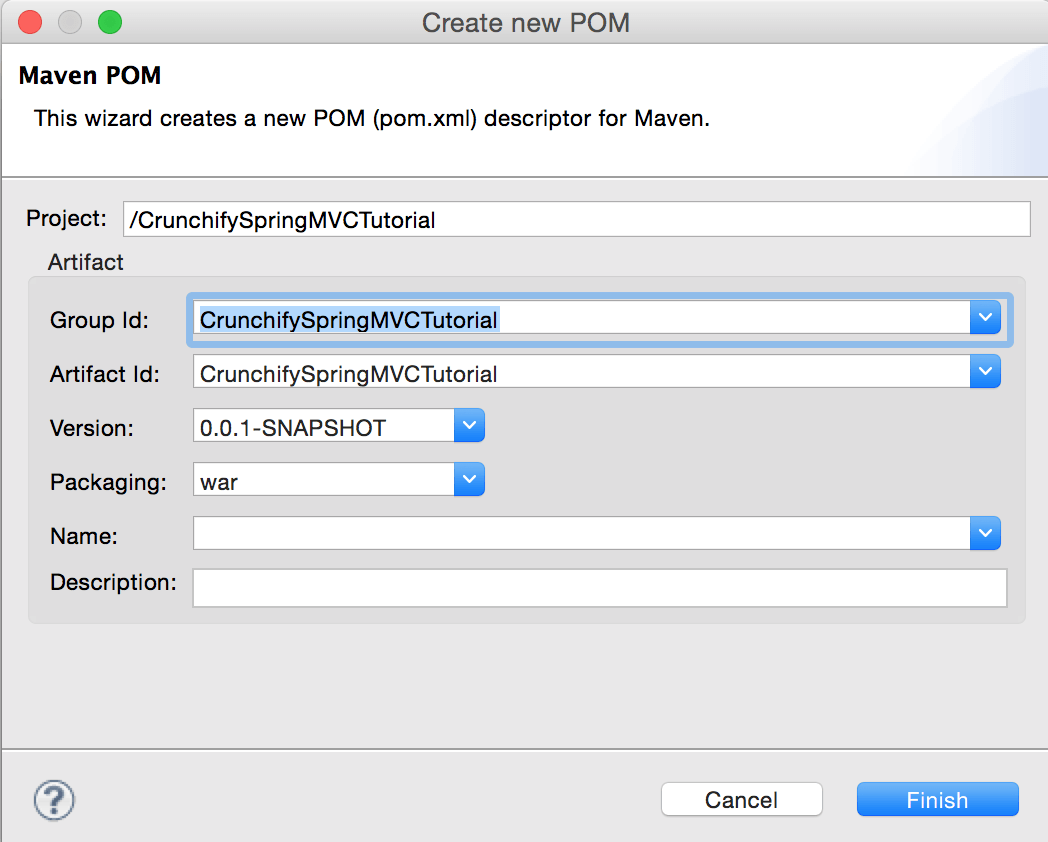
แปลง Project เป็น Maven Project เพื่อเพิ่มการพึ่งพา Spring MVC ที่จำเป็นทั้งหมดให้กับโปรเจ็กต์
ขั้นตอน:
- คลิกขวาที่โครงการ
- กำหนดค่า
- แปลงเป็นโครงการ
Maven
ขั้นตอนที่ 4
เปิดไฟล์ pom.xml และเพิ่ม jar dependencies ด้านล่างให้กับโครงการ
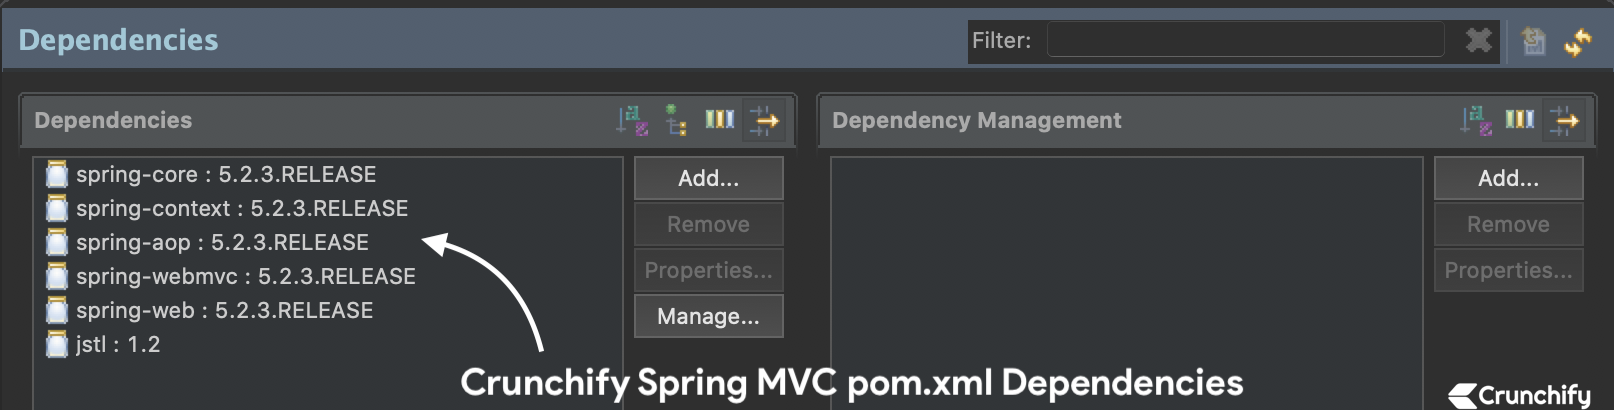
NOTE:นี่คือไฟล์pom.xmlของฉัน ตรวจสอบให้แน่ใจว่าคุณได้อัปเดต Java เวอร์ชันเป็น13หากคุณยังไม่ได้ย้ายไปยังJDK 13เราจะอัปเดตบทช่วยสอนนี้เป็นเวอร์ชัน Spring MVC ล่าสุดดังนั้นด้านล่างไฟล์ pom.xml อาจมีการพึ่งพา Spring MVC (ล่าสุด) เวอร์ชันที่แตกต่างจากภาพด้านบน
|
1 2 3 4 5 6 7 8 9 10 11 12 13 14 15 16 17 18 19 20 21 22 23 24 25 26 27 28 29 30 31 32 33 34 35 36 37 38 39 40 41 42 43 44 45 46 47 48 49 50 51 52 53 54 55 56 57 58 59 60 61 |
< project xmlns = "http://maven.apache.org/POM/4.0.0" xmlns : xsi = "http://www.w3.org/2001/XMLSchema-instance" xsi : schemaLocation = "http://maven.apache.org/POM/4.0.0 http://maven.apache.org/xsd/maven-4.0.0.xsd" > < modelVersion > 4.0.0 < / modelVersion > < groupId > CrunchifySpringMVCTutorial < / groupId > < artifactId > CrunchifySpringMVCTutorial < / artifactId > < version > 0.0.1 - SNAPSHOT < / version > < packaging > war < / packaging > < build > < sourceDirectory > src < / sourceDirectory > < plugins > < plugin > < artifactId > maven - compiler - plugin < / artifactId > < version > 3.8.0 < / version > < configuration > < release > 13 < / release > < / configuration > < / plugin > < plugin > < artifactId > maven - war - plugin < / artifactId > < version > 3.2.1 < / version > < configuration > < warSourceDirectory > WebContent < / warSourceDirectory > < / configuration > < / plugin > < / plugins > < / build > < dependencies > < dependency > < groupId > org . springframework < / groupId > < artifactId > spring - core < / artifactId > < version > 5.2.3.RELEASE < / version > < / dependency > < dependency > < groupId > org . springframework < / groupId > < artifactId > spring - context < / artifactId > < version > 5.2.3.RELEASE < / version > < / dependency > < dependency > < groupId > org . springframework < / groupId > < artifactId > spring - aop < / artifactId > < version > 5.2.3.RELEASE < / version > < / dependency > < dependency > < groupId > org . springframework < / groupId > < artifactId > spring - webmvc < / artifactId > < version > 5.2.3.RELEASE < / version > < / dependency > < dependency > < groupId > org . springframework < / groupId > < artifactId > spring - web < / artifactId > < version > 5.2.3.RELEASE < / version > < / dependency > < dependency > < groupId > javax . servlet < / groupId > < artifactId > jstl < / artifactId > < version > 1.2 < / version > < / dependency > < / dependencies > < / project > |
ขั้นตอนที่ -5
สร้างไฟล์ Spring Configuration Bean ใหม่: /WebContent/WEB-INF/crunchify-servlet.xml

crunchify-servlet.xml
|
1 2 3 4 5 6 7 8 9 10 11 12 13 14 15 16 17 18 19 20 21 22 23 24 25 26 27 |
<? xml version = "1.0" encoding = "UTF-8" ?> < beans xmlns = "http://www.springframework.org/schema/beans" xmlns : mvc = "http://www.springframework.org/schema/mvc" xmlns : context = "http://www.springframework.org/schema/context" xmlns : xsi = "http://www.w3.org/2001/XMLSchema-instance" xsi : schemaLocation = " http://www.springframework.org/schema/beans http://www.springframework.org/schema/beans/spring-beans.xsd http://www.springframework.org/schema/mvc http://www.springframework.org/schema/mvc/spring-mvc.xsd http://www.springframework.org/schema/context http://www.springframework.org/schema/context/spring-context.xsd" > < mvc : annotation - driven / > < context : component - scan base - package = "com.crunchify.controller" / > < mvc : default - servlet - handler / > < bean id = "viewResolver" class = "org.springframework.web.servlet.view.UrlBasedViewResolver" > < property name = "viewClass" value = "org.springframework.web.servlet.view.JstlView" / > < property name = "prefix" value = "/WEB-INF/jsp/" / > < property name = "suffix" value = ".jsp" / > < / bean > < / beans > |
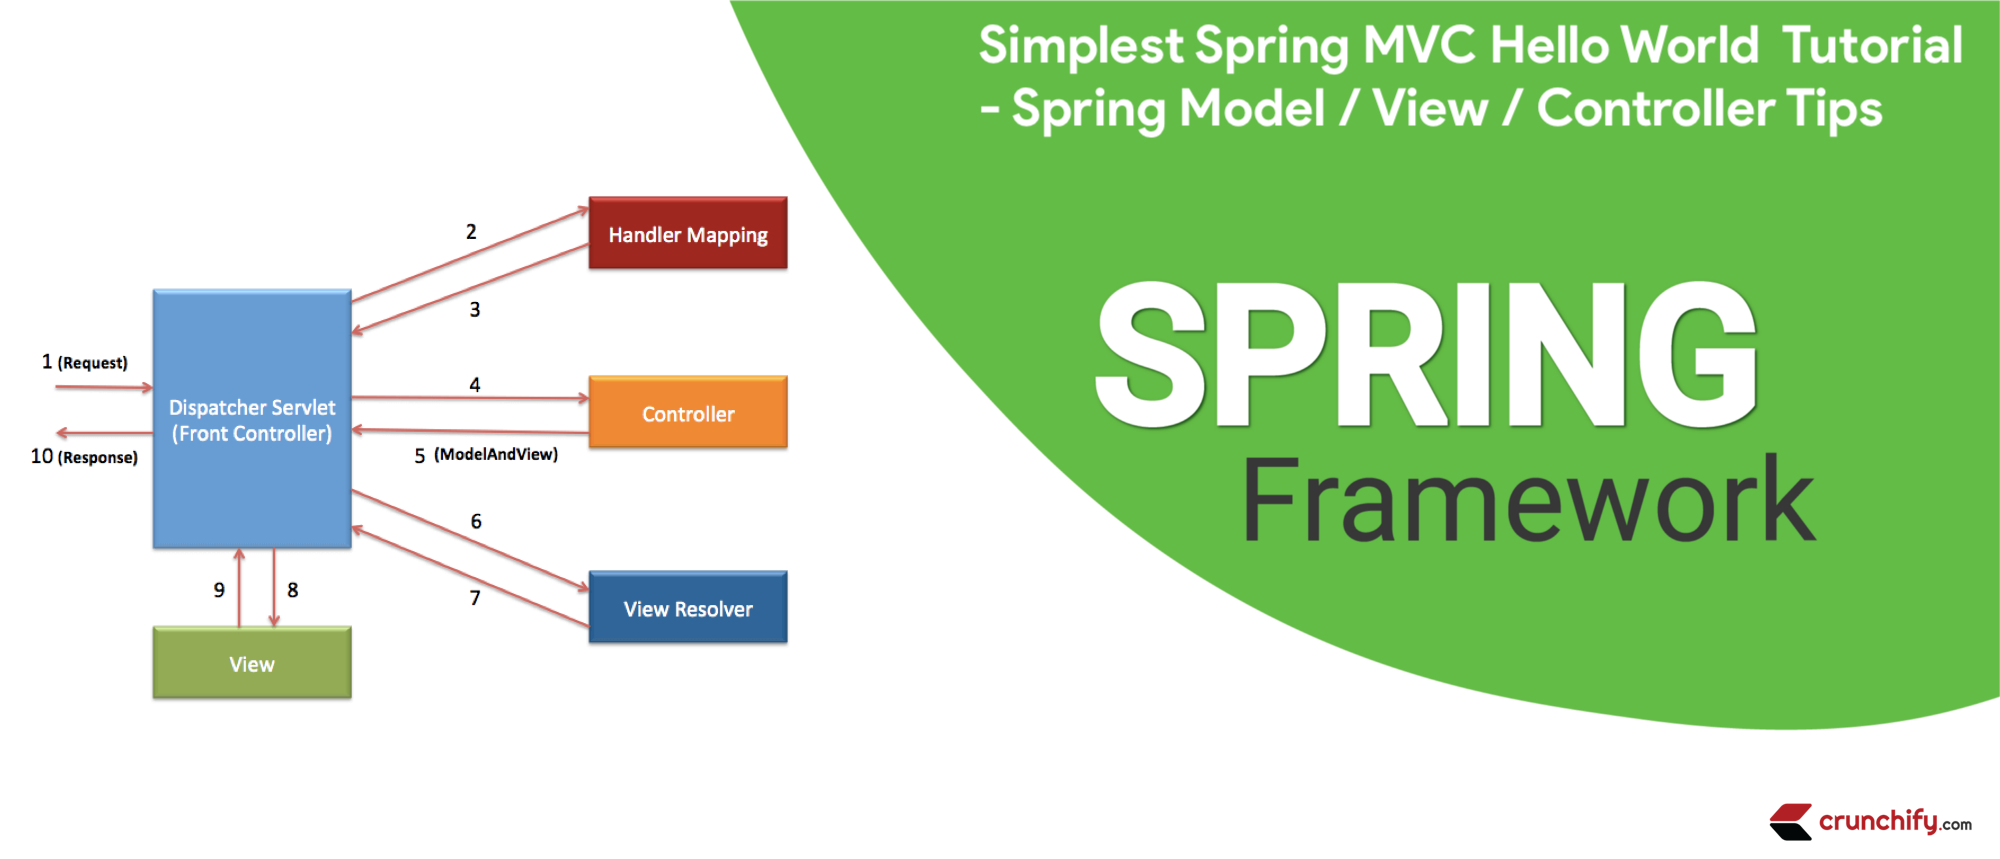
ใน crunchify-servlet.xml . ด้านบน ไฟล์การกำหนดค่า เราได้กำหนดแท็ก <context:component-scan> ซึ่งจะทำให้ Spring สามารถโหลดส่วนประกอบทั้งหมดจากแพ็คเกจ com.crunchify.controller และแพ็คเกจย่อยทั้งหมดได้
สิ่งนี้จะโหลด CrunchifyHelloWorld.class ของเรา นอกจากนี้เรายังได้กำหนด bean viewResolver bean นี้จะแก้ไขมุมมองและเพิ่มสตริงคำนำหน้า /WEB-INF/jsp/ และส่วนต่อท้าย .jsp ให้กับมุมมองใน ModelAndView
โปรดทราบว่าในคลาส CrunchifyHelloWorld ของเรา เราได้ส่งคืนวัตถุ ModelAndView พร้อมชื่อมุมมองที่ยินดีต้อนรับ
สิ่งนี้จะได้รับการแก้ไขเป็น path /WEB-INF/jsp/welcome.jsp
ขั้นตอนที่ 6
สร้างไฟล์ใหม่ web.xml หากยังไม่มี แม็พ Spring MVC ในไฟล์ /WebContent/WEB-INF/web.xml
NOTE: หากคุณไม่เห็นไฟล์ web.xml ใน “ dynamic web project ” ให้ทำตามขั้นตอนเหล่านี้
web.xml
|
1 2 3 4 5 6 7 8 9 10 11 12 13 14 15 16 17 18 19 20 21 22 23 24 25 26 27 28 |
<? xml version = "1.0" encoding = "UTF-8" ?> < web - app xmlns : xsi = "http://www.w3.org/2001/XMLSchema-instance" xmlns = "http://xmlns.jcp.org/xml/ns/javaee" xsi : schemaLocation = "http://xmlns.jcp.org/xml/ns/javaee http://xmlns.jcp.org/xml/ns/javaee/web-app_4_0.xsd" id = "WebApp_ID" version = "4.0" > < display - name > CrunchifySpringMVCTutorial < / display - name > < welcome - file - list > < welcome - file > index . html < / welcome - file > < welcome - file > index . htm < / welcome - file > < welcome - file > index . jsp < / welcome - file > < welcome - file > default . html < / welcome - file > < welcome - file > default . htm < / welcome - file > < welcome - file > default . jsp < / welcome - file > < / welcome - file - list > < servlet > < servlet - name > crunchify < / servlet - name > < servlet - class > org . springframework . web . servlet . DispatcherServlet < / servlet - class > < load - on - startup > 1 < / load - on - startup > < / servlet > < servlet - mapping > < servlet - name > crunchify < / servlet - name > < url - pattern > / welcome . jsp < / url - pattern > < url - pattern > / index . jsp < / url - pattern > < url - pattern > / welcome . html < / url - pattern > < url - pattern > * . html < / url - pattern > < / servlet - mapping > < / web - app > |
โค้ดด้านบนใน web.xml จะจับคู่ DispatcherServlet กับ url pattern /welcome.jsp โปรดทราบว่าเราได้กำหนด index.jsp เป็นไฟล์ต้อนรับ
สิ่งหนึ่งที่ควรทราบที่นี่คือชื่อของ servlet ในแท็ก <servlet-name> ใน web.xml เมื่อเริ่มต้น DispatcherServlet มันจะค้นหาชื่อไฟล์ [servlet-name]-servlet.xml ในโฟลเดอร์ WEB-INF ของเว็บแอปพลิเคชัน ในตัวอย่างนี้ เฟรมเวิร์กจะค้นหาไฟล์ชื่อ crunchify-servlet.xml
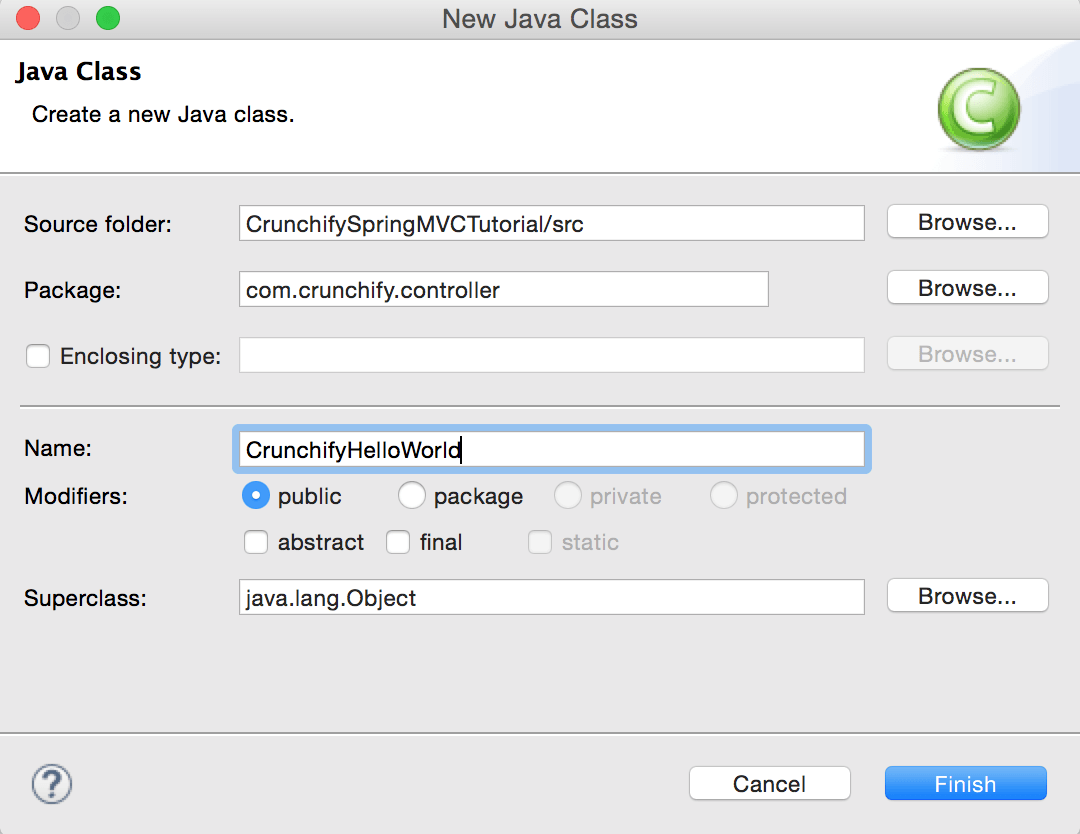
ขั้นตอนที่ 7
สร้างคลาสคอนโทรลเลอร์
- คลิกขวาที่
Java Resources->src - คลิก
New->Class - แพ็คเกจ:
com.crunchify.controller - ชื่อไฟล์:
CrunchifyHelloWorld.java
CrunchifyHelloWorld.java
|
1 2 3 4 5 6 7 8 9 10 11 12 13 14 15 16 17 18 19 20 21 22 |
package com . crunchify . controller ; import org . springframework . stereotype . Controller ; import org . springframework . web . bind . annotation . RequestMapping ; import org . springframework . web . servlet . ModelAndView ; /* * author: Crunchify.com * */ @Controller public class CrunchifyHelloWorld { @RequestMapping ( "/welcome" ) public ModelAndView helloWorld ( ) { String message = "<br><div>" + "<h3>********** Hello World, Spring MVC Tutorial</h3>This message is coming from CrunchifyHelloWorld.java **********</div><br><br>" ; return new ModelAndView ( "welcome" , "message" , message ) ; } } |
โปรดทราบว่าเราได้ใส่คำอธิบายประกอบคลาส CrunchifyHelloWorld ด้วย @Controller และ @RequestMapping("/welcome") เมื่อ Spring สแกนแพ็คเกจของเรา มันจะรับรู้ว่า bean นี้เป็น Controller bean สำหรับการประมวลผลคำขอ คำอธิบายประกอบ @RequestMapping บอก Spring ว่าคอนโทรลเลอร์นี้ควรประมวลผลคำขอทั้งหมดที่ขึ้นต้นด้วย /welcome ในเส้นทาง URL ซึ่งรวมถึง /welcome/* และ /welcome.html

วิธี helloWorld() ส่งกลับวัตถุ ModelAndView ออบเจ็กต์ ModelAndView พยายามแก้ไขมุมมองที่ชื่อว่า "ยินดีต้อนรับ" และโมเดลข้อมูลกำลังถูกส่งกลับไปยังเบราว์เซอร์ เพื่อให้เราสามารถเข้าถึงข้อมูลภายใน JSP ได้ ชื่อมุมมองแบบลอจิคัลจะแก้ไขเป็น /WEB-INF/jsp/welcome.jsp ชื่อตรรกะ “ยินดีต้อนรับ” ซึ่งส่งคืนในวัตถุ ModelAndView ถูกแมปกับเส้นทาง /WEB-INF/jsp/welcome.jsp
วัตถุ ModelAndView ยังมีข้อความที่มีคีย์ "ข้อความ" และค่ารายละเอียด นี่คือข้อมูลที่เรากำลังส่งต่อไปยังมุมมองของเรา โดยปกตินี่จะเป็นออบเจ็กต์ค่าในรูปแบบของ java bean ซึ่งจะมีข้อมูลที่จะแสดงในมุมมองของเรา ที่นี่เราเพียงแค่ส่งสตริง
ขั้นตอนที่-8
มุมมอง – สร้างไฟล์ใหม่ /WebContent/index.jsp
index.jsp
|
1 2 3 4 5 6 7 8 9 10 11 12 13 14 15 16 17 18 19 20 21 22 |
< html > < head > < title > Spring MVC Tutorial Series by Crunchify . com < / title > <style type ="text/css"> body { background-image : url ( 'https://cdn.crunchify.com/bg.png' ) ; } </style> < / head > < body > < br > < div style = "text-align: center" > < h2 > Hey You . . ! ! This is your 1st Spring MCV Tutorial . . < br > < br > < / h2 > < h3 > < a href = "welcome.html" > Click here to See Welcome Message . . . < / a > ( to check Spring MVC Controller . . . @ RequestMapping ( "/welcome" ) ) < / h3 > < / div > < / body > < / html > |
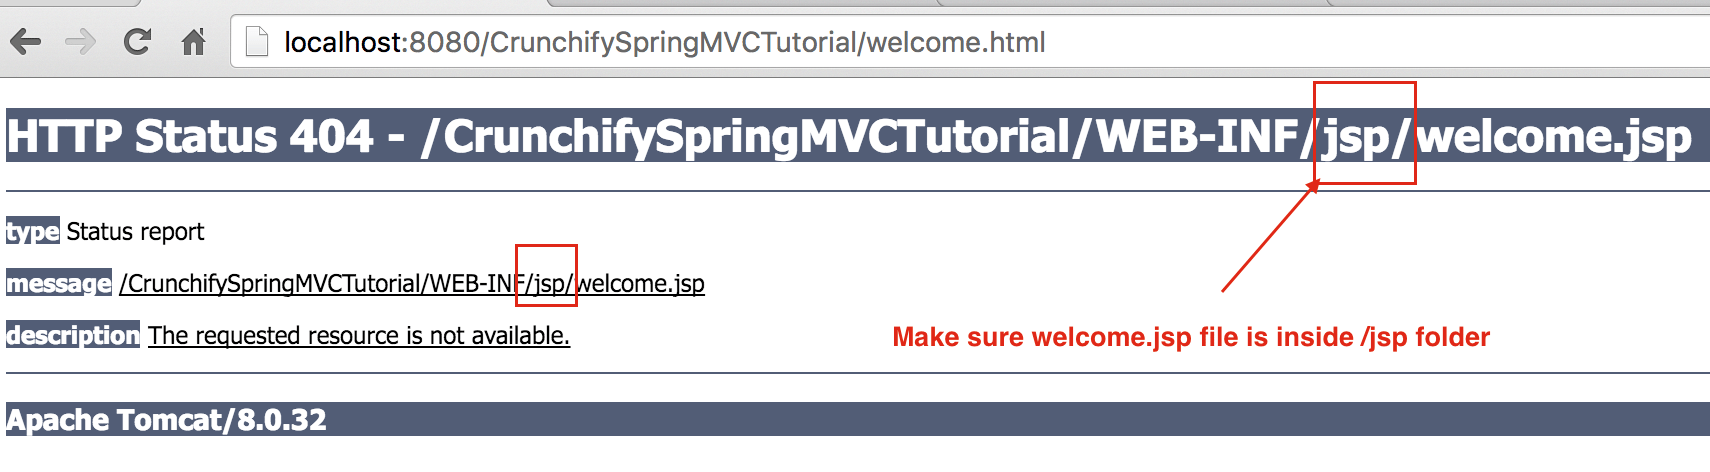
สร้างไฟล์อื่น /WebContent/WEB-INF/jsp/welcome.jsp
NOTE: อย่าลืมสร้างโฟลเดอร์ jsp และใส่ welcome.jsp ไว้ข้างใน
ยินดีต้อนรับ.jsp
|
1 2 3 4 5 6 7 8 9 10 11 12 13 14 15 16 17 18 19 20 21 22 23 24 25 |
< html > < head > < title > Spring MVC Tutorial by Crunchify - Hello World Spring MVC Example < / title > <style type ="text/css"> body { background-image : url ( 'https://cdn.crunchify.com/bg.png' ) ; } </style> < / head > < body > $ { message } < br > < br > < div style = "font-family: verdana; padding: 10px; border-radius: 10px; font-size: 12px; text-align: center;" > Spring MCV Tutorial by < a href = "https://crunchify.com" > Crunchify < / a > . Click < a href = "https://crunchify.com/category/java-tutorials/" target = "_blank" > here < / a > for all Java and < a href = 'https://crunchify.com/category/spring-mvc/' target = '_blank' > here < / a > for all Spring MVC , Web Development examples . < br > < / div > < / body > < / html > |
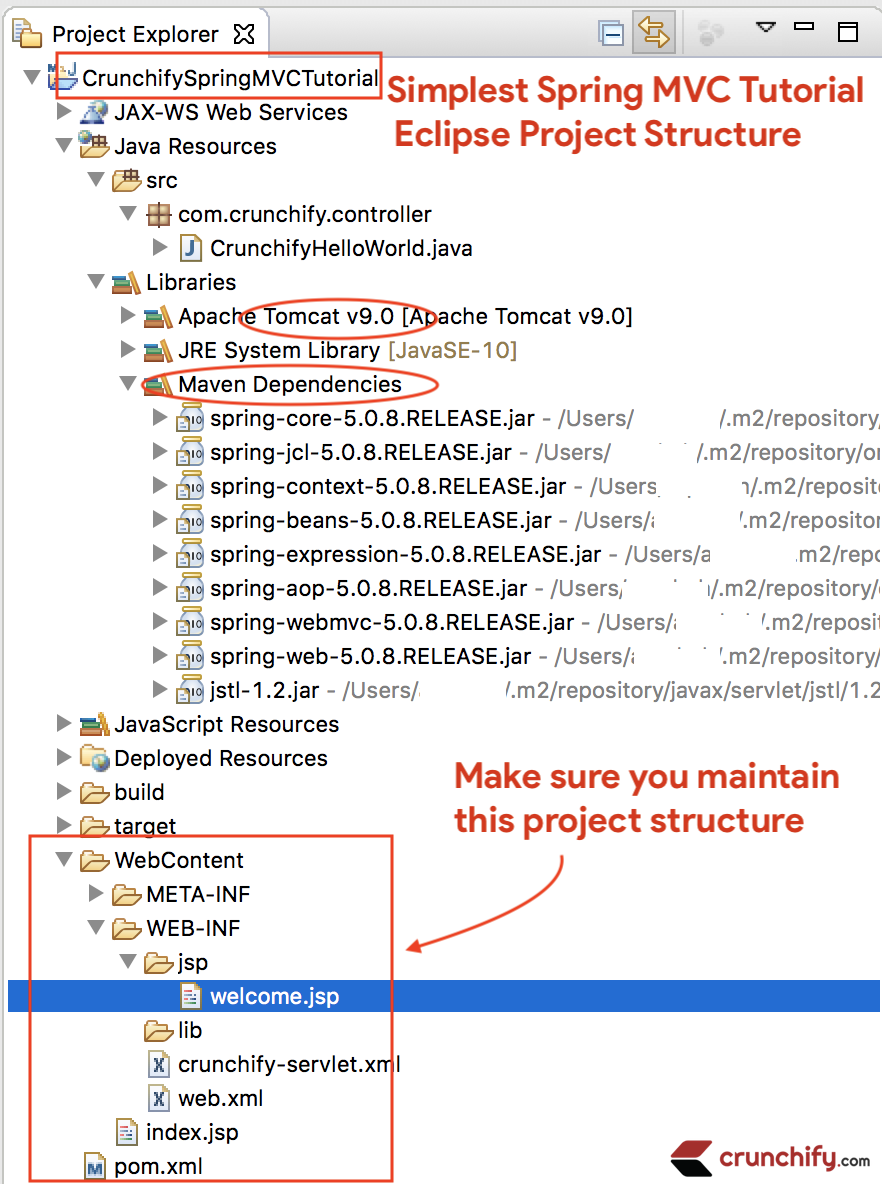
หลังจากทุกอย่างเป็นลักษณะพื้นที่ทำงานของคุณควรมีลักษณะเช่นนี้
ขั้นตอนที่ 9
คลิกขวาที่ Project -> Run As -> Maven Build...
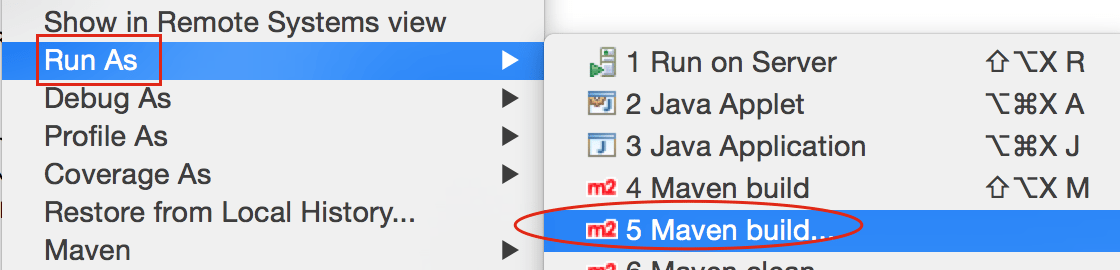
Add Goals : clean install ใหม่ทั้งหมด คลิก Apply ไปใช้และ Run
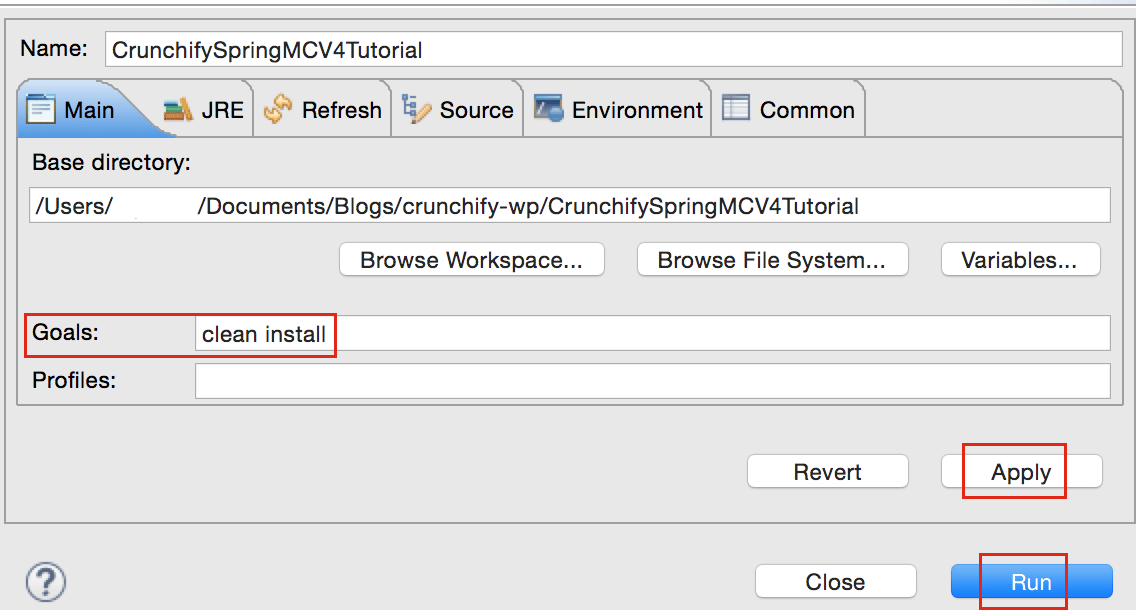
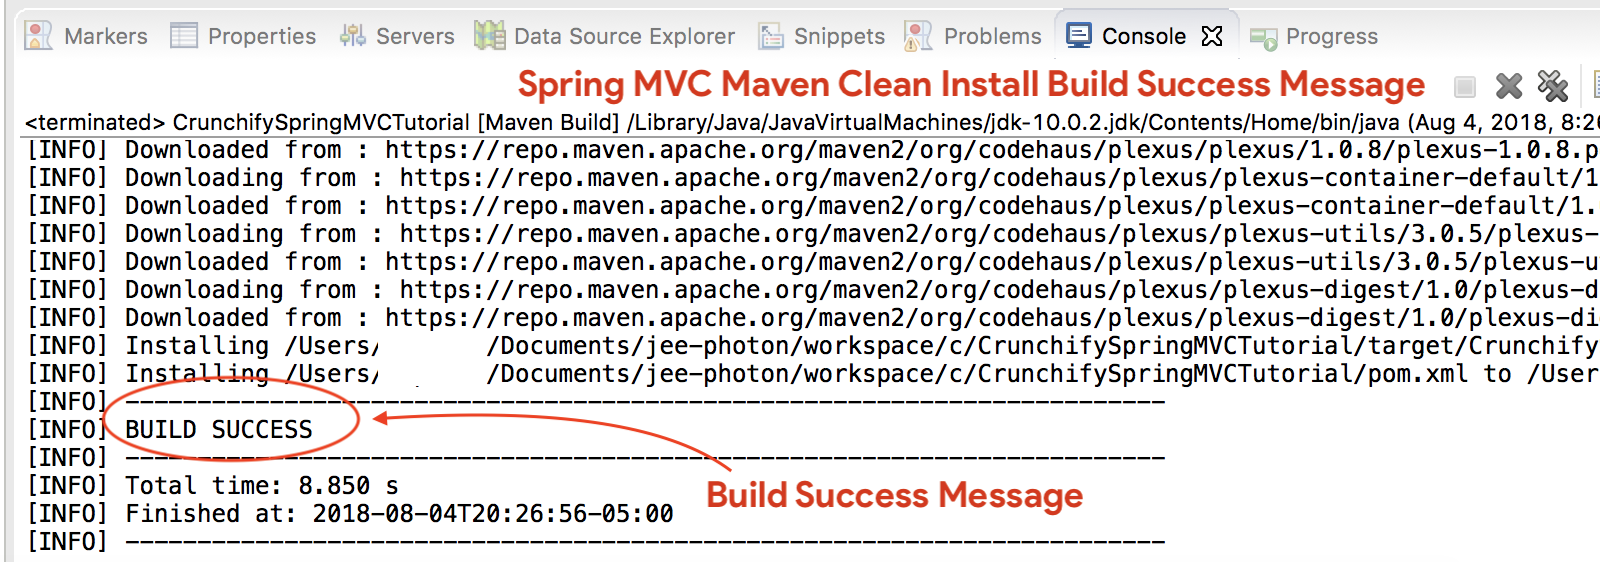
คุณควรเห็น success message :
ไฟล์ .jar ทั้งหมดของฉันอยู่ที่ไหน
คุณจะเห็นไฟล์ .jar ทั้งหมดภายใต้โฟลเดอร์ /target ภาพหน้าจอ
ขั้นตอนที่ -10
- หากคุณ
don't seeTomcat Server ในแท็บServersให้ทำตามขั้นตอนเพื่อเพิ่ม Apache Tomcat ไปยัง Eclipse - ปรับใช้โปรเจ็กต์กับ
Apache Tomcat- คลิกขวา
- เพิ่มและลบ
- เพิ่มโครงการไปยังเซิร์ฟเวอร์ (ส่วนด้านขวา)
- คลิกที่เริ่ม
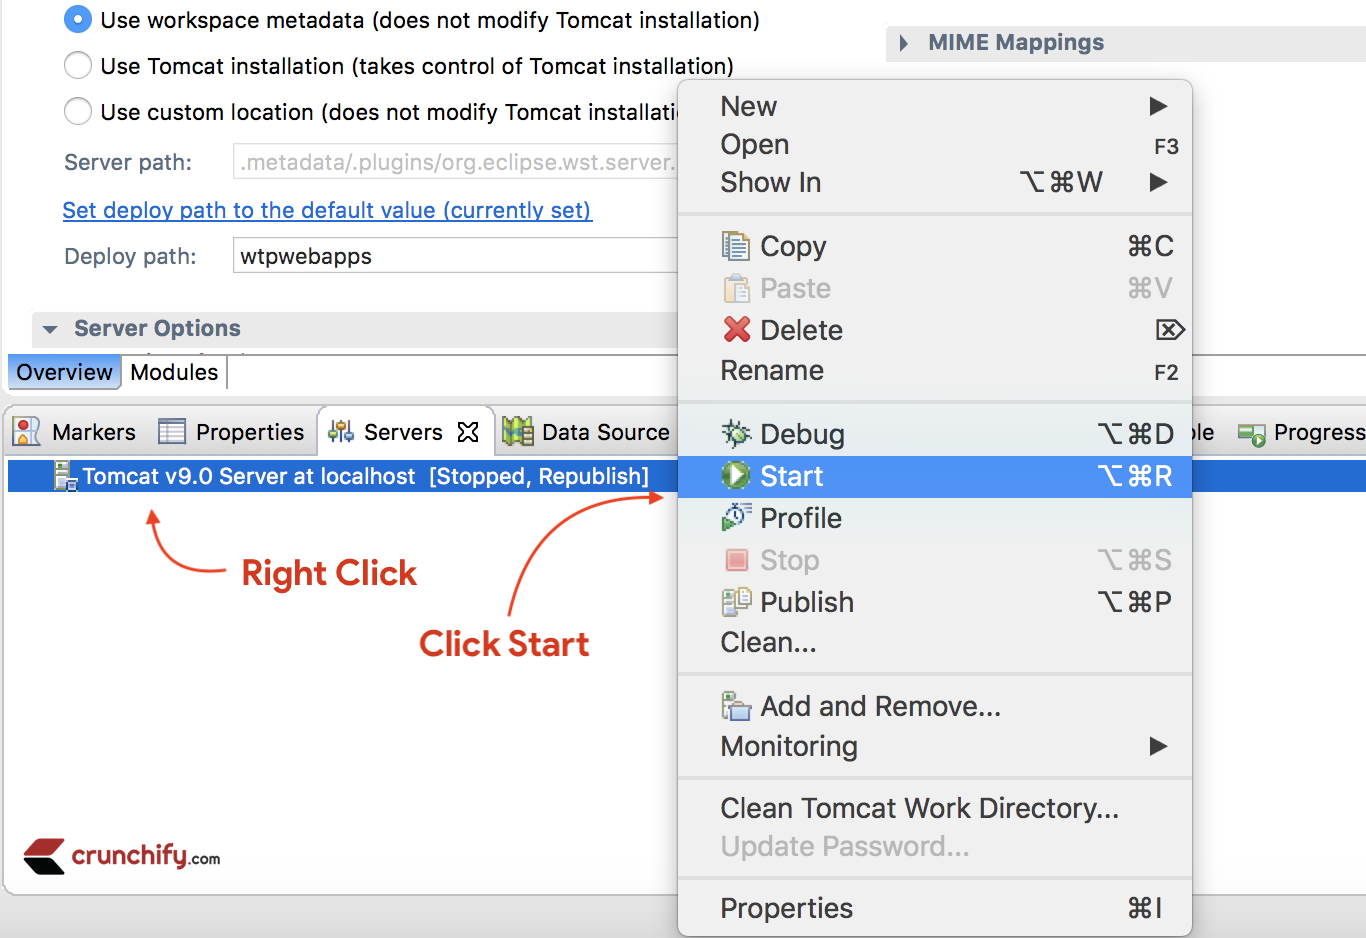
ตรวจสอบให้แน่ใจว่าคุณเห็นบันทึกด้านล่าง นั่นหมายความว่าแอปพลิเคชันของคุณปรับใช้ได้สำเร็จบน Tomcat Web Server
|
1 2 3 4 5 6 7 8 9 10 11 12 13 14 15 16 17 18 19 20 21 22 23 24 25 26 27 28 29 30 31 32 33 34 35 36 37 38 39 40 |
Aug 04 , 2018 9 : 08 : 10 PM org . apache . tomcat . util . digester . SetPropertiesRule begin WARNING : [ SetPropertiesRule ] { Server / Service / Engine / Host / Context } Setting property 'source' to 'org.eclipse.jst.jee.server:CrunchifySpringMVCTutorial' did not find a matching property . INFO : Server version : Apache Tomcat / 9.0.10 INFO : Server built : Jun 20 2018 17 : 32 : 21 UTC INFO : Server number : 9.0.10.0 INFO : OS Name : Mac OS X INFO : OS Version : 10.13.6 INFO : Architecture : x86_64 INFO : Java Home : / Library / Java / JavaVirtualMachines / jdk - 10.0.2.jdk / Contents / Home INFO : JVM Version : 10.0.2 + 13 INFO : JVM Vendor : "Oracle Corporation" INFO : CATALINA_BASE : / Users / appshah / Documents / jee - photon / workspace / c / . metadata / . plugins / org . eclipse . wst . server . core / tmp0 INFO : CATALINA_HOME : / Users / appshah / Documents / jee - photon / apache - tomcat - 9.0.10 INFO : Command line argument : - Dcatalina . base =/ Users / appshah / Documents / jee - photon / workspace / c / . metadata / . plugins / org . eclipse . wst . server . core / tmp0 INFO : Command line argument : - Dcatalina . home =/ Users / appshah / Documents / jee - photon / apache - tomcat - 9.0.10 INFO : Command line argument : - Dwtp . deploy =/ Users / appshah / Documents / jee - photon / workspace / c / . metadata / . plugins / org . eclipse . wst . server . core / tmp0 / wtpwebapps INFO : Command line argument : - Dfile . encoding = UTF - 8 INFO : The APR based Apache Tomcat Native library which allows optimal performance in production environments was not found on the java . library . path : [ / Users / appshah / Library / Java / Extensions : / Library / Java / Extensions : / Network / Library / Java / Extensions : / System / Library / Java / Extensions : / usr / lib / java : . ] INFO : Initializing ProtocolHandler [ "http-nio-8080" ] INFO : Using a shared selector for servlet write / read INFO : Initializing ProtocolHandler [ "ajp-nio-8009" ] INFO : Using a shared selector for servlet write / read INFO : Initialization processed in 841 ms INFO : Starting service [ Catalina ] INFO : Starting Servlet Engine : Apache Tomcat / 9.0.10 INFO : At least one JAR was scanned for TLDs yet contained no TLDs . Enable debug logging for this logger for a complete list of JARs that were scanned but no TLDs were found in them . Skipping unneeded JARs during scanning can improve startup time and JSP compilation time . INFO : At least one JAR was scanned for TLDs yet contained no TLDs . Enable debug logging for this logger for a complete list of JARs that were scanned but no TLDs were found in them . Skipping unneeded JARs during scanning can improve startup time and JSP compilation time . INFO : No Spring WebApplicationInitializer types detected on classpath INFO : Initializing Spring FrameworkServlet 'crunchify' INFO : FrameworkServlet 'crunchify' : initialization started INFO : Refreshing WebApplicationContext for namespace 'crunchify-servlet' : startup date [ Sat Aug 04 21 : 08 : 13 CDT 2018 ] ; root of context hierarchy INFO : Loading XML bean definitions from ServletContext resource [ / WEB - INF / crunchify - servlet . xml ] INFO : Mapped "{[/welcome]}" onto public org . springframework . web . servlet . ModelAndView com . crunchify . controller . CrunchifyHelloWorld . helloWorld ( ) INFO : Looking for @ ControllerAdvice : WebApplicationContext for namespace 'crunchify-servlet' : startup date [ Sat Aug 04 21 : 08 : 13 CDT 2018 ] ; root of context hierarchy INFO : Looking for @ ControllerAdvice : WebApplicationContext for namespace 'crunchify-servlet' : startup date [ Sat Aug 04 21 : 08 : 13 CDT 2018 ] ; root of context hierarchy INFO : Mapped URL path [ /** ] onto handler 'org.springframework.web.servlet.resource.DefaultServletHttpRequestHandler#0' INFO : FrameworkServlet 'crunchify' : initialization completed in 1607 ms INFO : Starting ProtocolHandler [ "http-nio-8080" ] INFO : Starting ProtocolHandler [ "ajp-nio-8009" ] INFO : Server startup in 3579 ms |
ขั้นตอนที่ 11 เสร็จแล้ว.
เยี่ยมชม: http://localhost:8080/CrunchifySpringMVCTutorial/ และคุณควรพร้อม
ไชโย.. ตอนนี้คุณรู้แล้ว Hello World Spring MVC 5 Example แจ้งให้เราทราบหากคุณพบข้อยกเว้นใด ๆ ขณะเรียกใช้สิ่งนี้ มีตัวอย่างอีกมากมายที่คุณสามารถหาได้ที่นี่
Do you want to include JS, CSS and images into JSP file? ทำตามบทช่วยสอนนี้: วิธีที่ดีที่สุดในการเพิ่ม/รวม JS, CSS และรูปภาพลงในไฟล์ JSP โดยใช้ 'mvc:resources mapping'
มีปัญหา? มีปัญหาอะไรไหม
Triaging Step-1 – มีข้อผิดพลาดสถานะ HTTP 404 หรือไม่
นอกจากนี้ ทำตามกวดวิชาด้านล่าง:
ทดลองขั้นตอนที่ 2 – URL ใช้งานไม่ได้? ข้อผิดพลาดของทอมแคท?
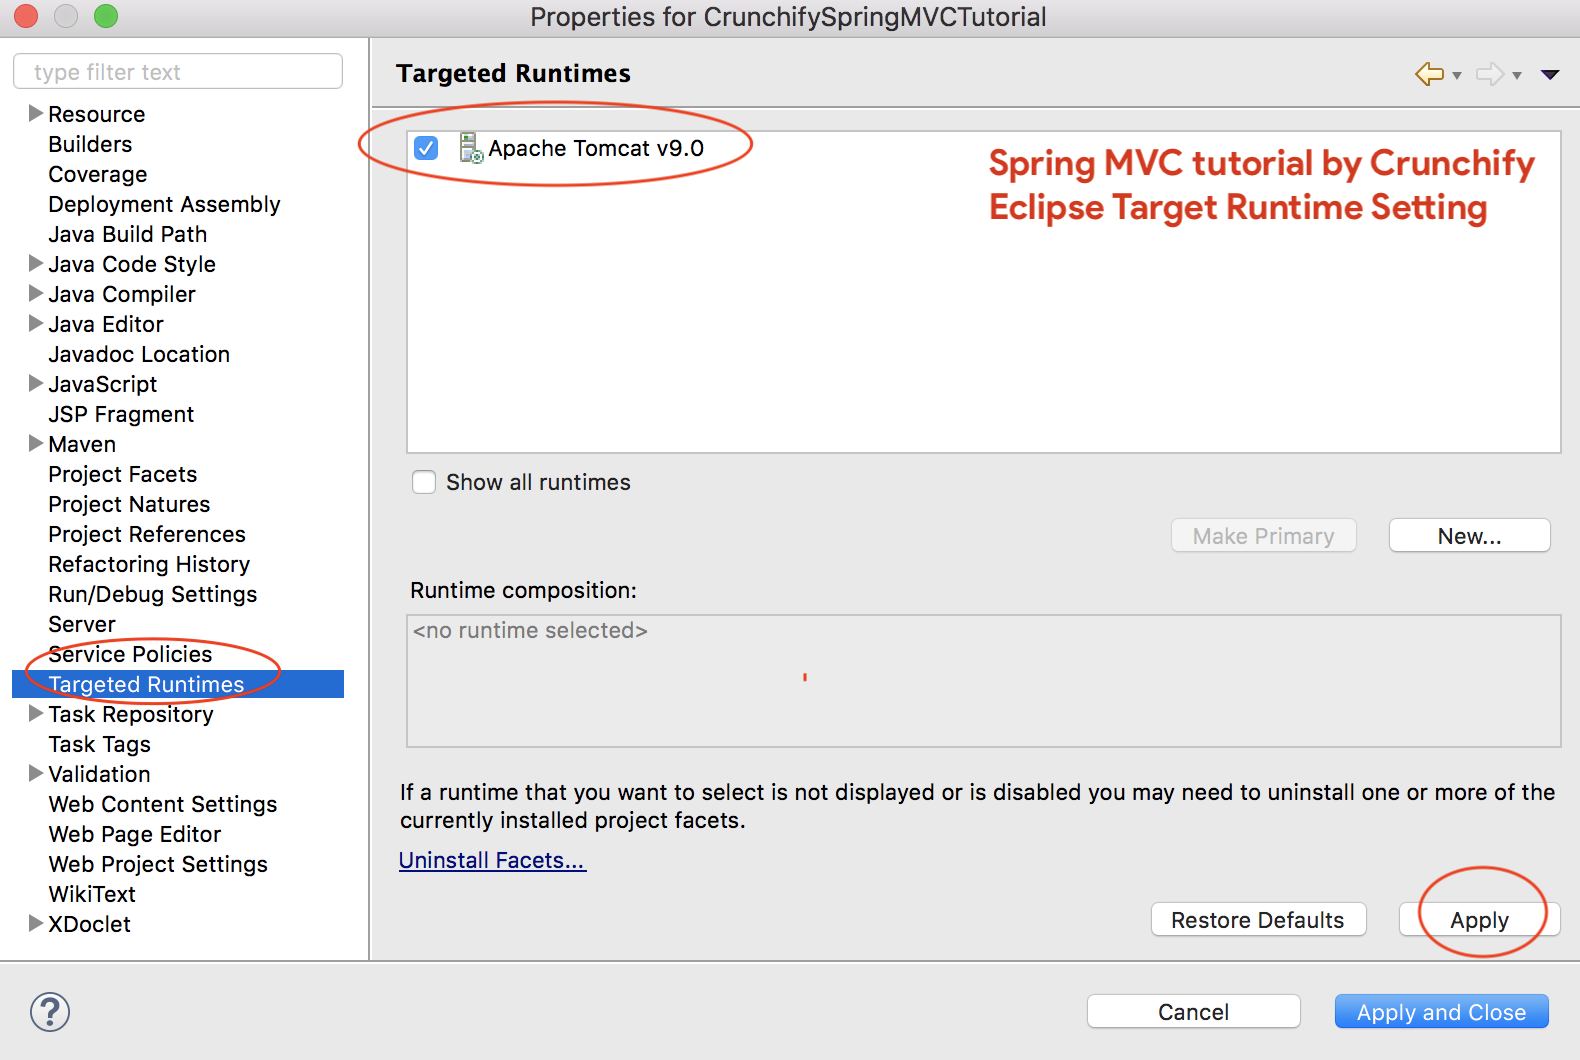
ตรวจสอบให้แน่ใจว่าคุณเพิ่ม Apache Tomcat Server ไปยัง Targeted Runtime ซึ่งคุณอาจเลือกไว้ใน Step-1 Tomcat 7 หรือ 8 ใด ๆ – เซิร์ฟเวอร์ควรใช้งานได้
Triaging Step-3 – เกิดข้อผิดพลาด?
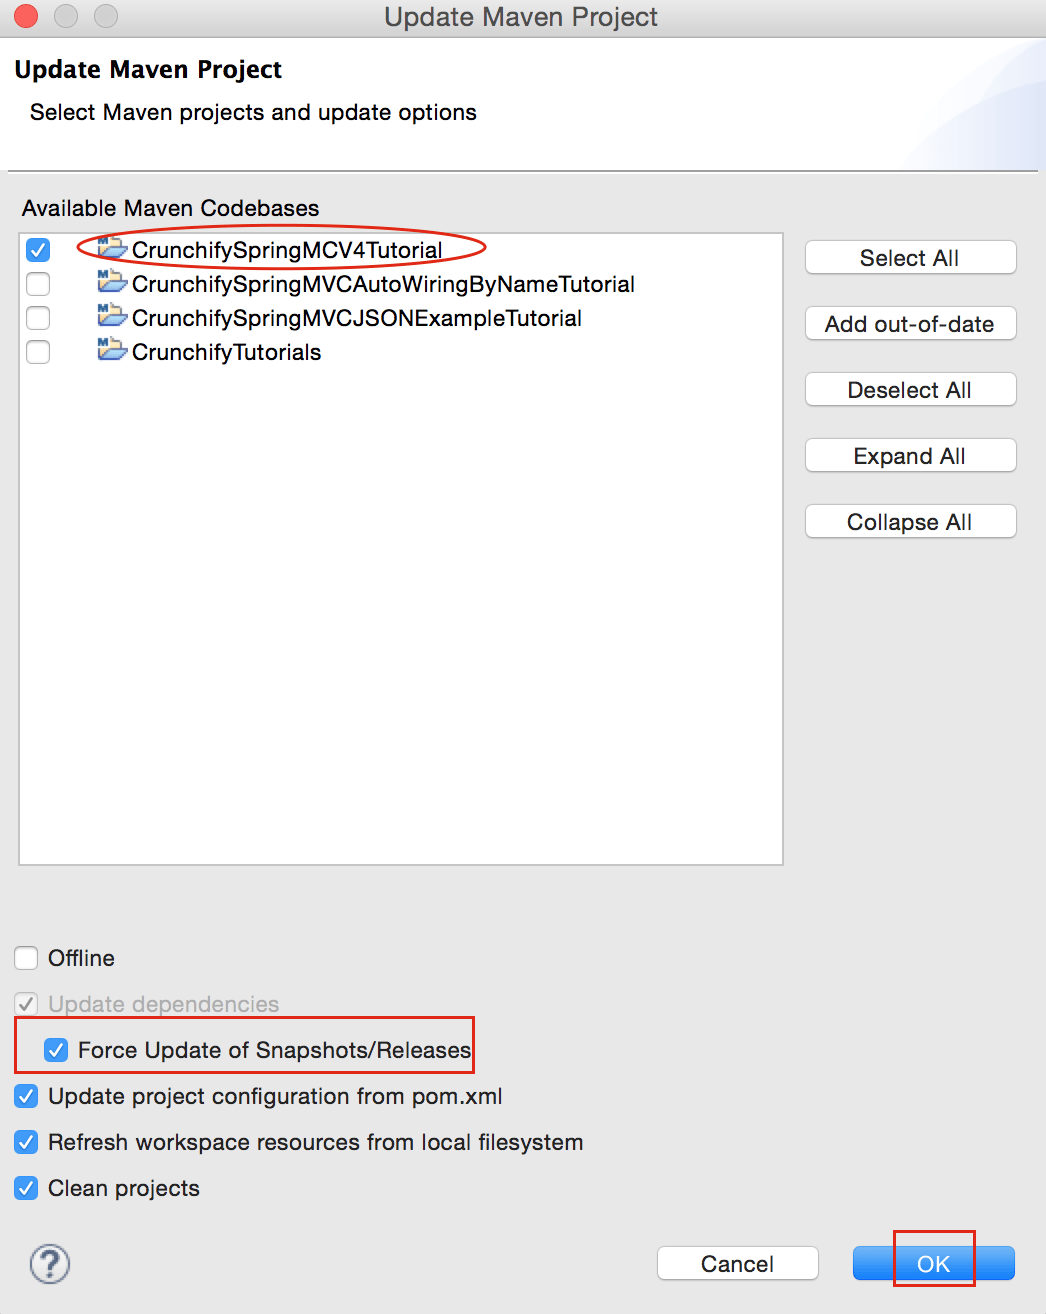
ตรวจสอบให้แน่ใจว่าได้อัปเดตการพึ่งพา maven ทั้งหมด
โปรดส่งอีเมลหรือแสดงความคิดเห็นด้านล่างหากคุณมีปัญหาในการใช้งานบทช่วยสอนด้านบน