
最も単純なSpringMVCフレームワークチュートリアル– UIを使用したHelloWorldの例(JSP)ページ
公開: 2019-02-23
Model-View-Controller(MVC)アーキテクチャーは、柔軟で疎結合のWebアプリケーションを開発するための最も簡単な方法を提供します。
このチュートリアルでは、非常に詳細な手順で最初のSpringMVCアプリケーションを作成する方法について説明します。
以下の質問はありますか?
- Spring MVC5.2.3の基礎
- Spring Framework MVC5アプリケーションの段階的な開発。
- java –SpringMVCチュートリアルを最初から
- SpringMVC高速チュートリアル
- SpringMVCフレームワークチュートリアル
- 最初のSpringMVCアプリケーションチュートリアル
- Spring 5.x MVCチュートリアル、AJAXデモ、jQueryデモ、JavaScriptデモ、ヒントとコツSpring 5 MVC
その後、あなたは正しい場所にいます。 ここでは、Webアプリケーションを構築するための単純なSpring MVC frameworkを示します。
まず最初に–環境をセットアップしましょう
チュートリアルの最終更新と検証:2020年9月、以下のツールバージョン。
以下のツールを使用していますが、まだダウンロードしていない場合はダウンロードする必要があります。
- Tomcat 9.0.38 –このリンクから最新のApacheTomcatをダウンロードします。
- Eclipse IDE for
Java EEDevelopers(2020‑09 R)–ダウンロードリンクを必ずダウンロードしてください。 (下の図) -
Spring 5.2.9.RELEASE(ダウンロードは不要)–Maven依存関係を使用します。 - JDK 15 –ダウンロードリンク。
最新のJava EE DeveloperKitをダウンロードしてください。

主な目標
このチュートリアルの主な目標は、最も簡単な方法でSpringMVCアプリケーションを作成することです。
始める前に、このチュートリアルの最後に何が表示されるかを見てみましょう。
これは、 application resultがどのようになるかを示しています。 以下のすべての手順を完了すると、これが最終結果になります。
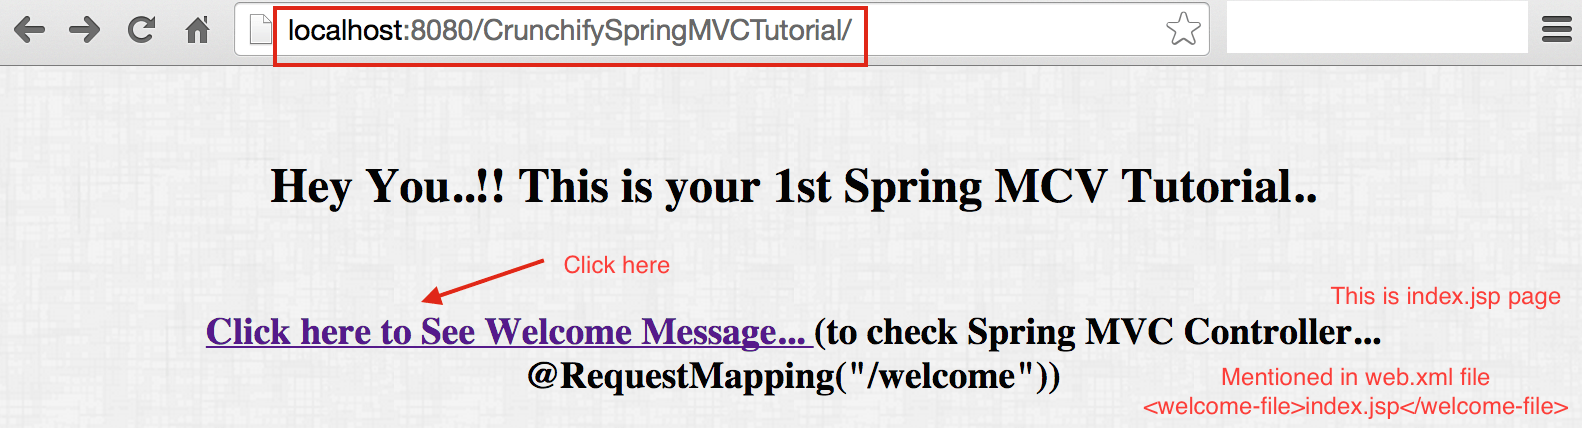
最終結果は次のとおりです。ウェルカムページ==> index.jsp
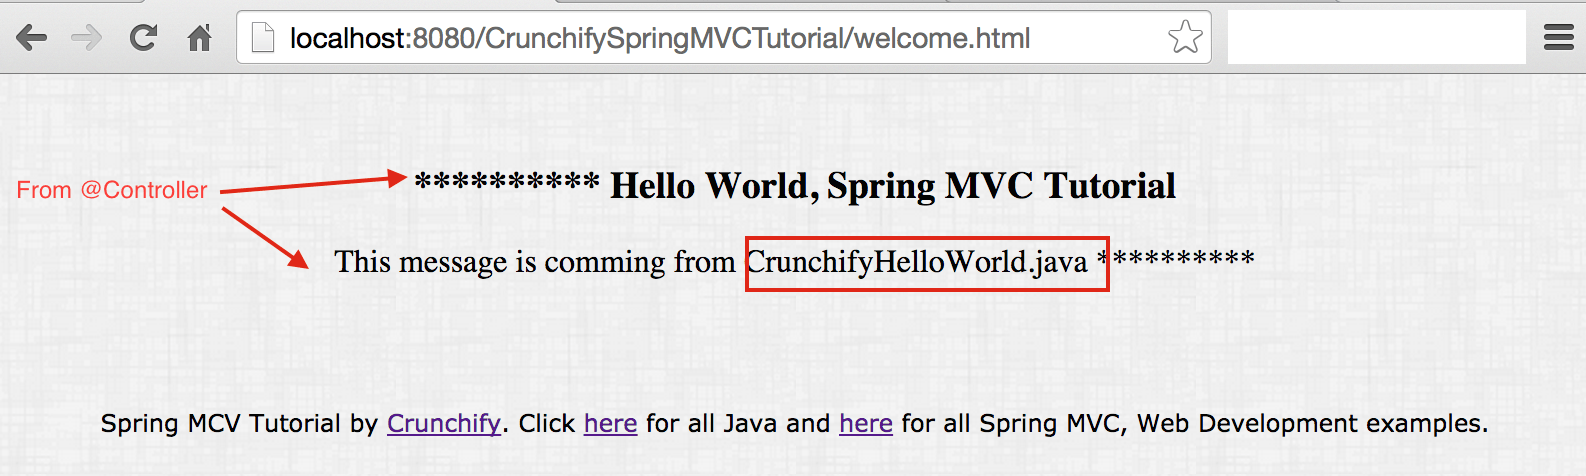
コントローラクラスから結果が返されます
それでは、チュートリアルを始めましょう
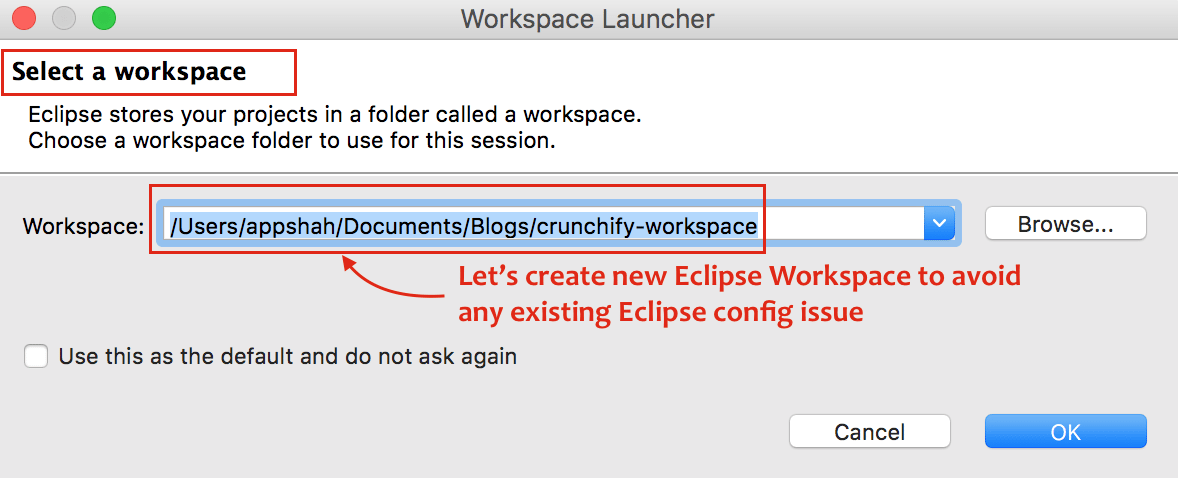
ステップ1
- Eclipseを開く
New Eclipse Workspace作成–これは、既存のワークスペース構成の問題を回避するためにmustです。
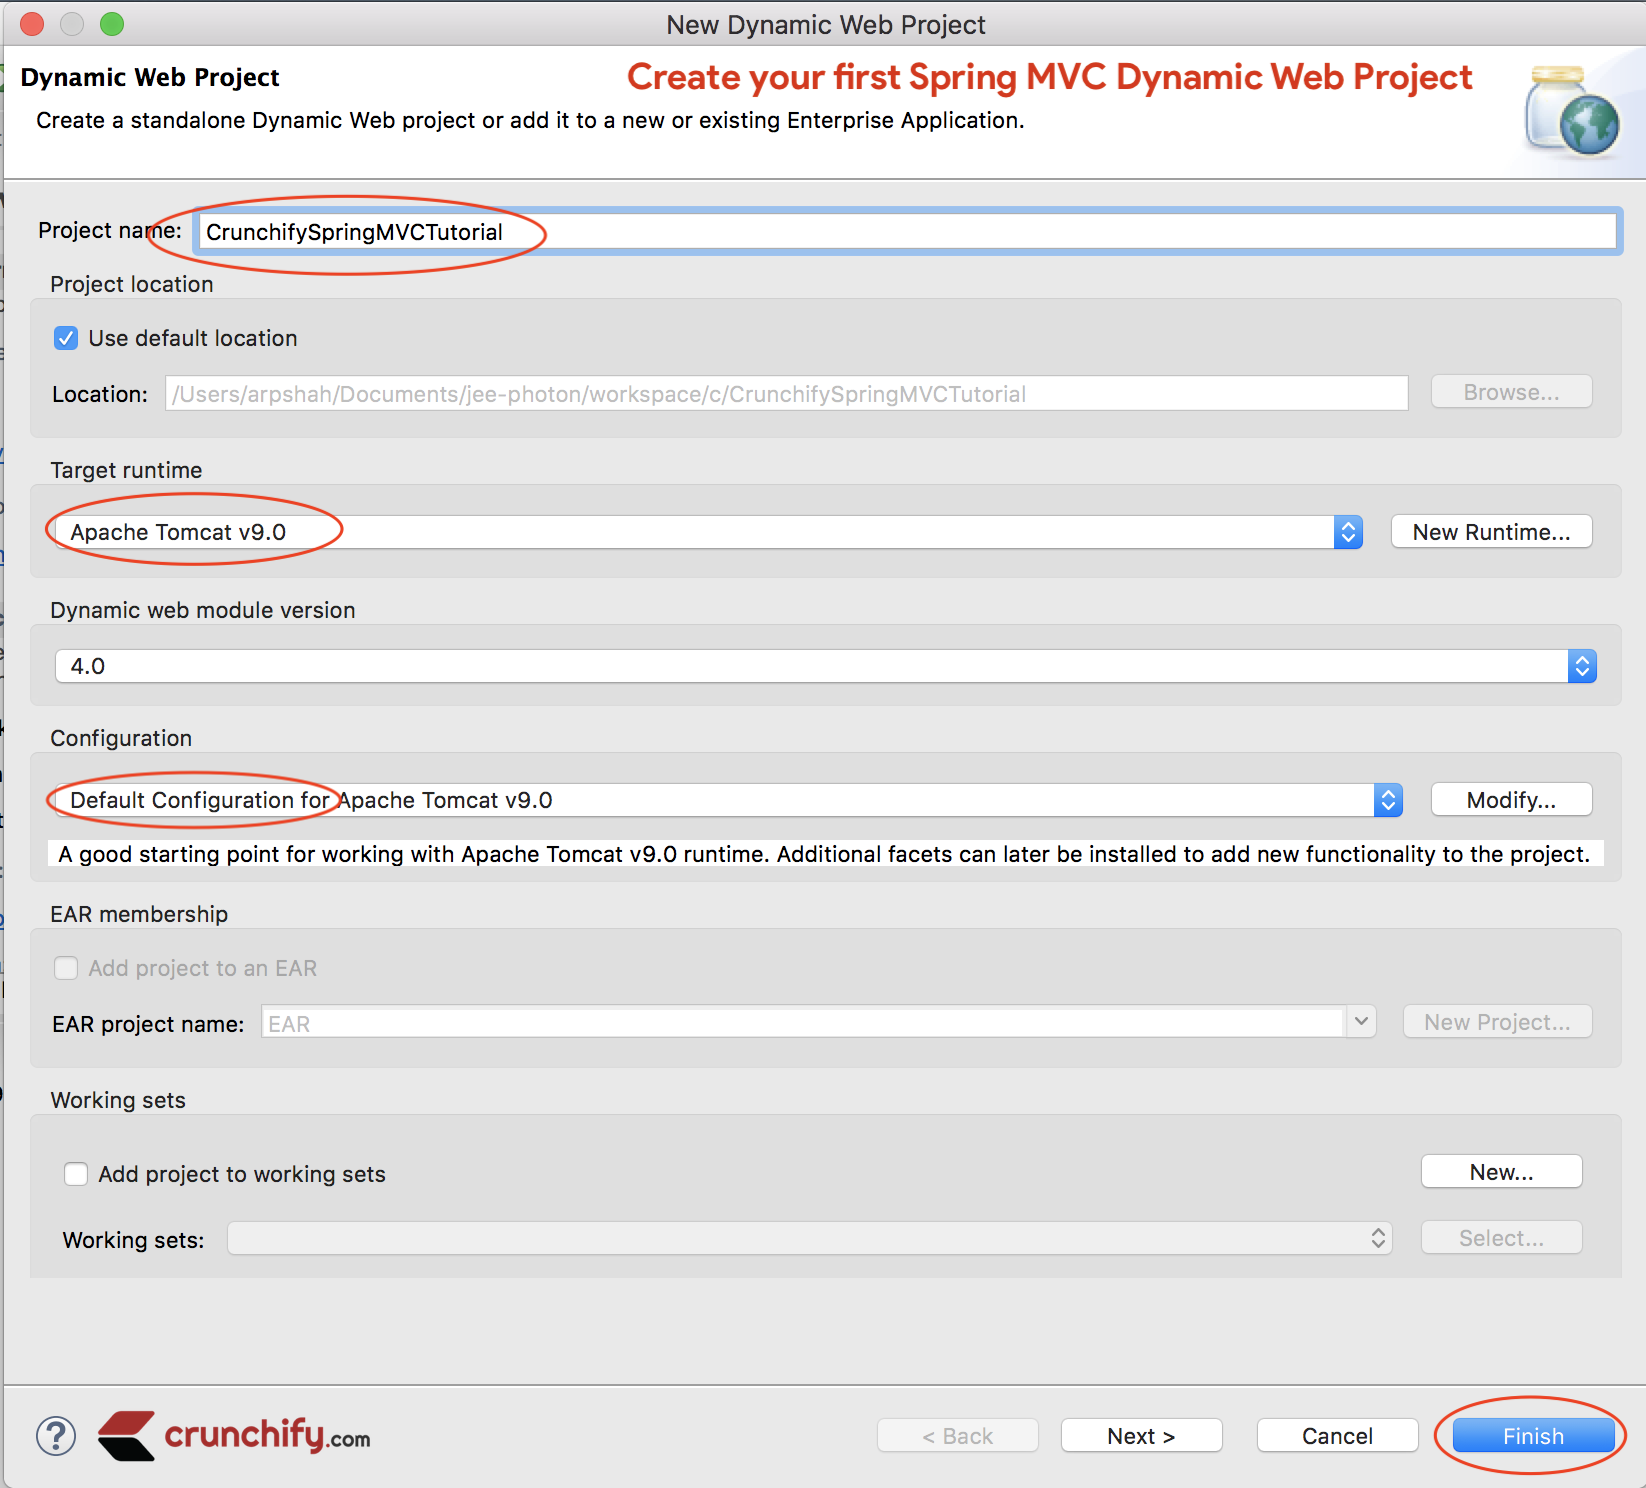
ステップ2
-
Fileをクリックします NewをクリックしますDynamic Web Projectを選択します- 1つのポップアップウィンドウ、プロジェクト名の提供:
CrunchifySpringMVCTutorial -
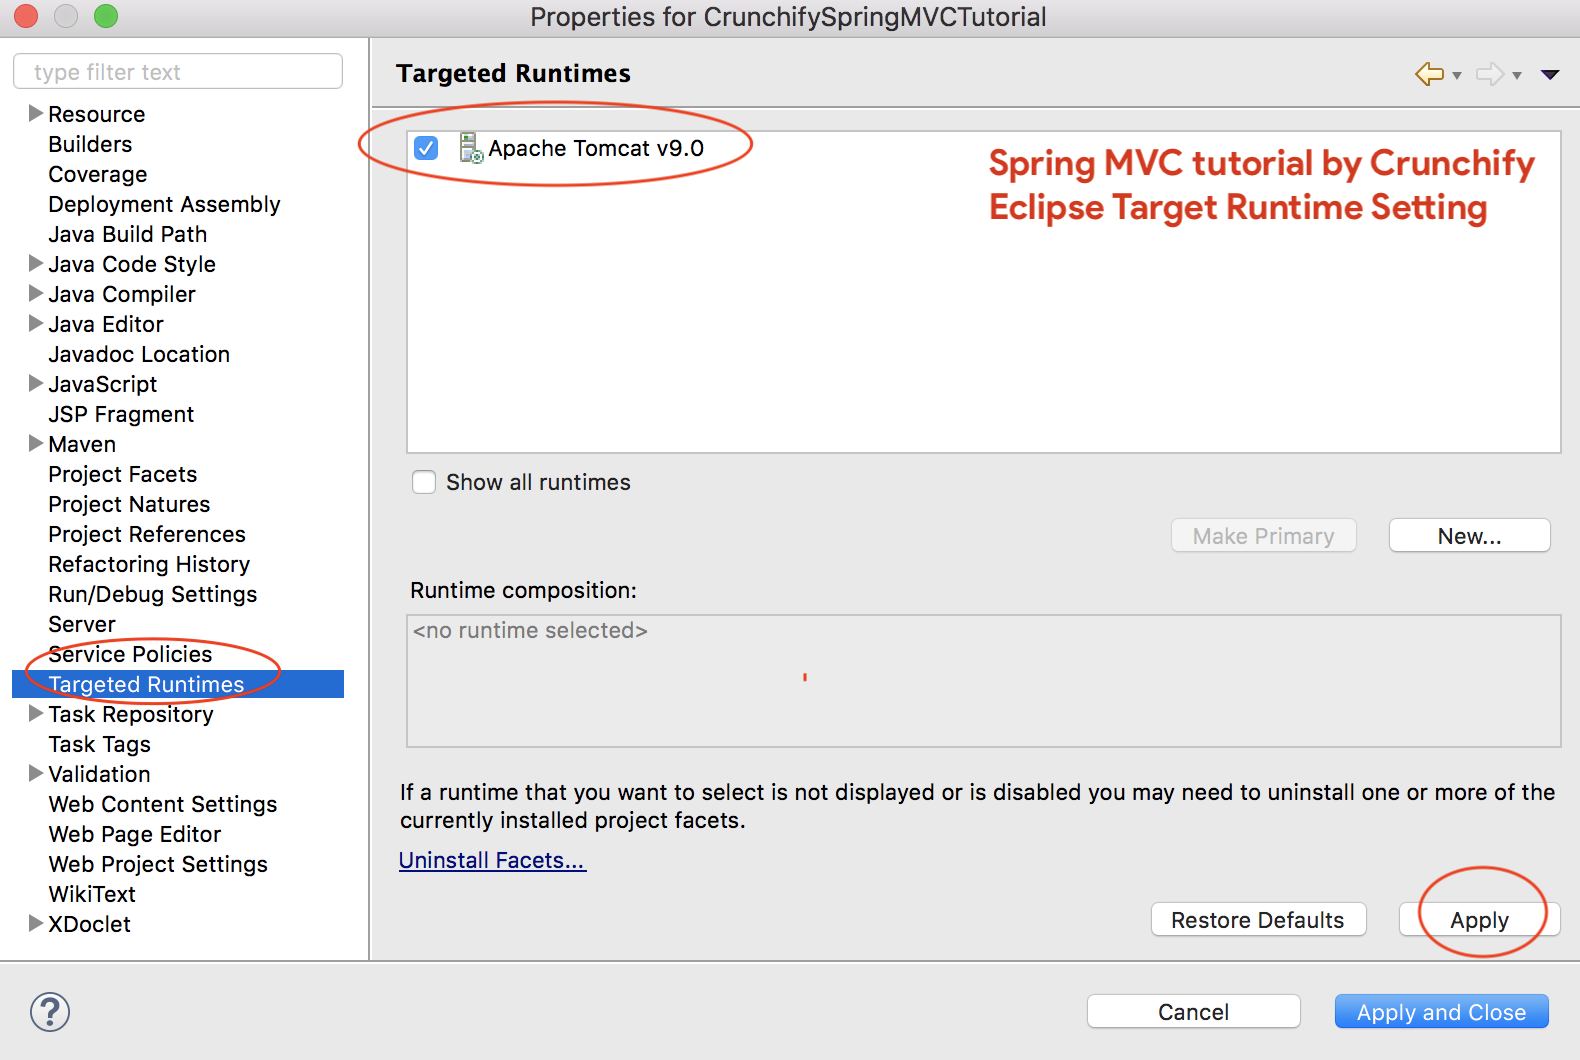
Target RuntimeをApache Tomcat 9.0として使用していることを確認してください- ターゲットランタイムが表示されない場合は、次の手順に従ってください
Default Configurationとして構成を選択
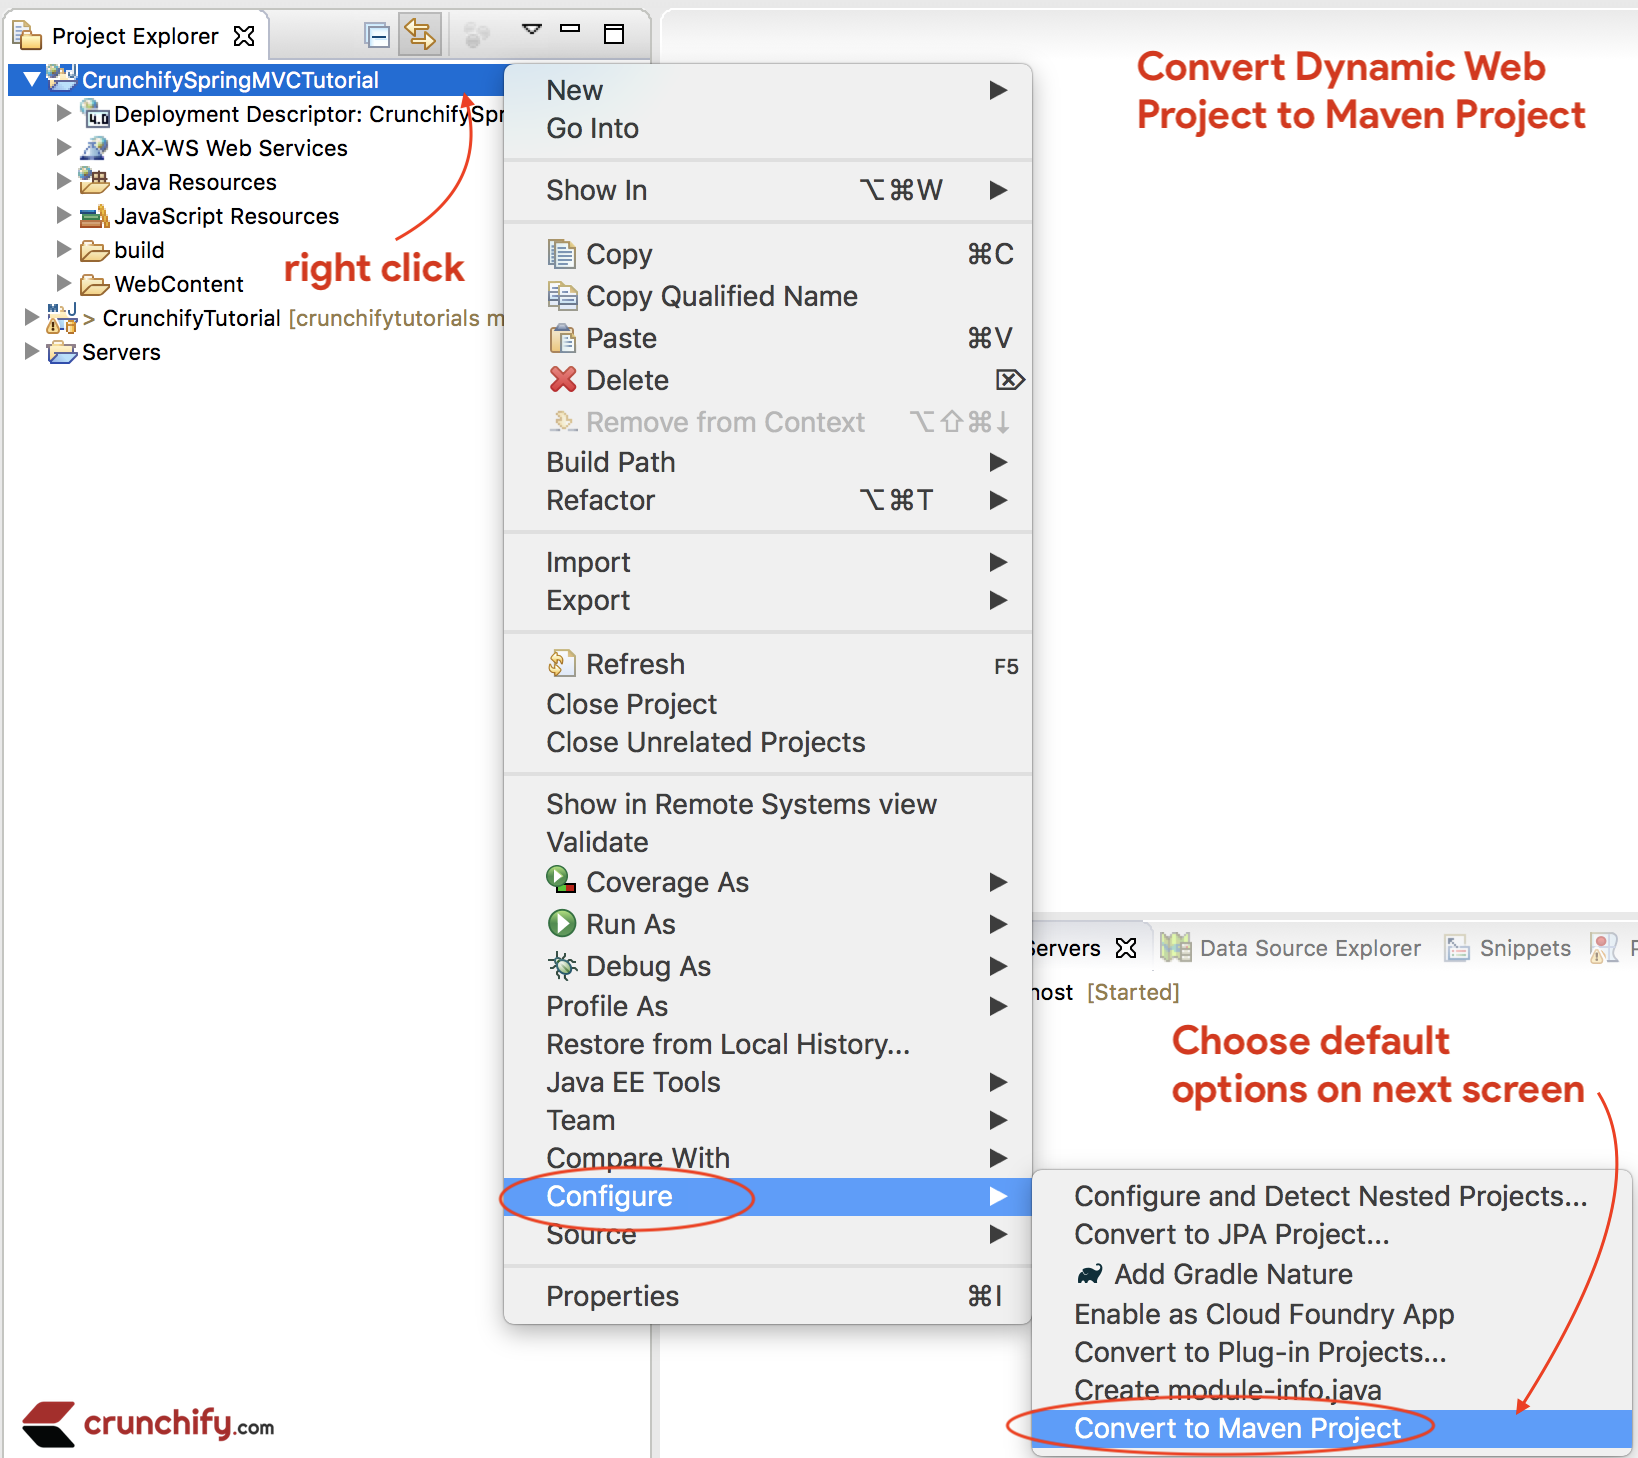
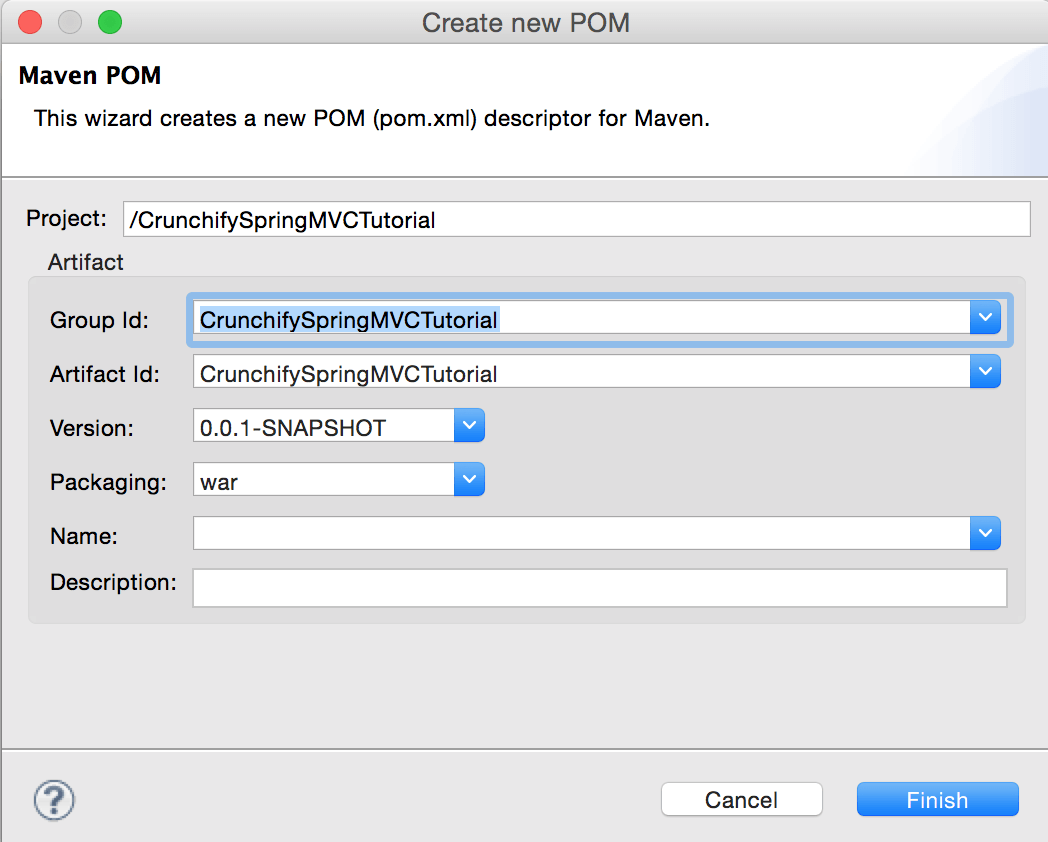
ステップ-3
ProjectをMavenProjectに変換して、必要なすべてのSpringMVC依存関係をプロジェクトに追加します。
手順:
- プロジェクトを右クリック
- 構成、設定
Mavenプロジェクトに変換する
ステップ-4
pom.xmlファイルを開き、以下のjar dependenciesをプロジェクトに追加します。
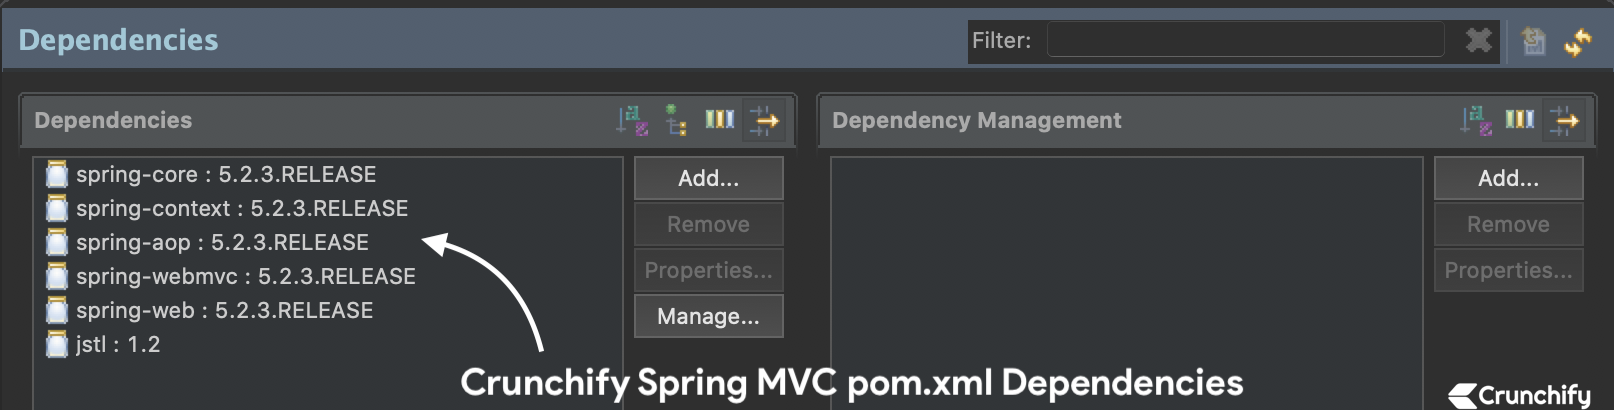
NOTE:これが私のpom.xmlファイルです。JDK 13にまだ移行していない場合は、Javaバージョンを13に更新してください。 このチュートリアルは、最新のSpringMVCバージョンに更新され続けます。したがって、以下のpom.xmlファイルには、上記の画像とは異なる(最新の)バージョンのSpringMVC依存関係が含まれている可能性があります。
|
1 2 3 4 5 6 7 8 9 10 11 12 13 14 15 16 17 18 19 20 21 22 23 24 25 26 27 28 29 30 31 32 33 34 35 36 37 38 39 40 41 42 43 44 45 46 47 48 49 50 51 52 53 54 55 56 57 58 59 60 61 |
< project xmlns = "http://maven.apache.org/POM/4.0.0" xmlns : xsi = "http://www.w3.org/2001/XMLSchema-instance" xsi : schemaLocation = "http://maven.apache.org/POM/4.0.0 http://maven.apache.org/xsd/maven-4.0.0.xsd" > < modelVersion > 4.0.0 < / modelVersion > < groupId > CrunchifySpringMVCTutorial < / groupId > < artifactId > CrunchifySpringMVCTutorial < / artifactId > < version > 0.0.1 - SNAPSHOT < / version > < packaging > war < / packaging > < build > < sourceDirectory > src < / sourceDirectory > < plugins > < plugin > < artifactId > maven - compiler - plugin < / artifactId > < version > 3.8.0 < / version > < configuration > < release > 13 < / release > < / configuration > < / plugin > < plugin > < artifactId > maven - war - plugin < / artifactId > < version > 3.2.1 < / version > < configuration > < warSourceDirectory > WebContent < / warSourceDirectory > < / configuration > < / plugin > < / plugins > < / build > < dependencies > < dependency > < groupId > org . springframework < / groupId > < artifactId > spring - core < / artifactId > < version > 5.2.3.RELEASE < / version > < / dependency > < dependency > < groupId > org . springframework < / groupId > < artifactId > spring - context < / artifactId > < version > 5.2.3.RELEASE < / version > < / dependency > < dependency > < groupId > org . springframework < / groupId > < artifactId > spring - aop < / artifactId > < version > 5.2.3.RELEASE < / version > < / dependency > < dependency > < groupId > org . springframework < / groupId > < artifactId > spring - webmvc < / artifactId > < version > 5.2.3.RELEASE < / version > < / dependency > < dependency > < groupId > org . springframework < / groupId > < artifactId > spring - web < / artifactId > < version > 5.2.3.RELEASE < / version > < / dependency > < dependency > < groupId > javax . servlet < / groupId > < artifactId > jstl < / artifactId > < version > 1.2 < / version > < / dependency > < / dependencies > < / project > |
ステップ-5
新しいSpring構成Beanファイルを作成します: /WebContent/WEB-INF/crunchify-servlet.xml

crunchify-servlet.xml
|
1 2 3 4 5 6 7 8 9 10 11 12 13 14 15 16 17 18 19 20 21 22 23 24 25 26 27 |
<? xml version = "1.0" encoding = "UTF-8" ?> < beans xmlns = "http://www.springframework.org/schema/beans" xmlns : mvc = "http://www.springframework.org/schema/mvc" xmlns : context = "http://www.springframework.org/schema/context" xmlns : xsi = "http://www.w3.org/2001/XMLSchema-instance" xsi : schemaLocation = " http://www.springframework.org/schema/beans http://www.springframework.org/schema/beans/spring-beans.xsd http://www.springframework.org/schema/mvc http://www.springframework.org/schema/mvc/spring-mvc.xsd http://www.springframework.org/schema/context http://www.springframework.org/schema/context/spring-context.xsd" > < mvc : annotation - driven / > < context : component - scan base - package = "com.crunchify.controller" / > < mvc : default - servlet - handler / > < bean id = "viewResolver" class = "org.springframework.web.servlet.view.UrlBasedViewResolver" > < property name = "viewClass" value = "org.springframework.web.servlet.view.JstlView" / > < property name = "prefix" value = "/WEB-INF/jsp/" / > < property name = "suffix" value = ".jsp" / > < / bean > < / beans > |
上記のcrunchify-servlet.xml 構成ファイルには、タグ<context:component-scan>を定義しました。 これにより、Springはパッケージcom.crunchify.controllerとそのすべての子パッケージからすべてのコンポーネントをロードできるようになります。
これにより、 CrunchifyHelloWorld.classがロードされます。 また、 viewResolverを定義しました。 このBeanはビューを解決し、ModelAndViewのビューにプレフィックス文字列/WEB-INF/jsp/とサフィックス.jspを追加します。
CrunchifyHelloWorldクラスでは、ビュー名welcomeのModelAndViewオブジェクトが返されることに注意してください。
これは、パス/WEB-INF/jsp/welcome.jspに解決されます。
ステップ-6
まだ存在しない場合は、新しいファイルweb.xmlを作成します。 SpringMVCを/WebContent/WEB-INF/web.xmlファイルにマップします。
NOTE: 「 dynamic web project 」にweb.xmlファイルが表示されない場合は、次の手順に従ってください。
web.xml
|
1 2 3 4 5 6 7 8 9 10 11 12 13 14 15 16 17 18 19 20 21 22 23 24 25 26 27 28 |
<? xml version = "1.0" encoding = "UTF-8" ?> < web - app xmlns : xsi = "http://www.w3.org/2001/XMLSchema-instance" xmlns = "http://xmlns.jcp.org/xml/ns/javaee" xsi : schemaLocation = "http://xmlns.jcp.org/xml/ns/javaee http://xmlns.jcp.org/xml/ns/javaee/web-app_4_0.xsd" id = "WebApp_ID" version = "4.0" > < display - name > CrunchifySpringMVCTutorial < / display - name > < welcome - file - list > < welcome - file > index . html < / welcome - file > < welcome - file > index . htm < / welcome - file > < welcome - file > index . jsp < / welcome - file > < welcome - file > default . html < / welcome - file > < welcome - file > default . htm < / welcome - file > < welcome - file > default . jsp < / welcome - file > < / welcome - file - list > < servlet > < servlet - name > crunchify < / servlet - name > < servlet - class > org . springframework . web . servlet . DispatcherServlet < / servlet - class > < load - on - startup > 1 < / load - on - startup > < / servlet > < servlet - mapping > < servlet - name > crunchify < / servlet - name > < url - pattern > / welcome . jsp < / url - pattern > < url - pattern > / index . jsp < / url - pattern > < url - pattern > / welcome . html < / url - pattern > < url - pattern > * . html < / url - pattern > < / servlet - mapping > < / web - app > |
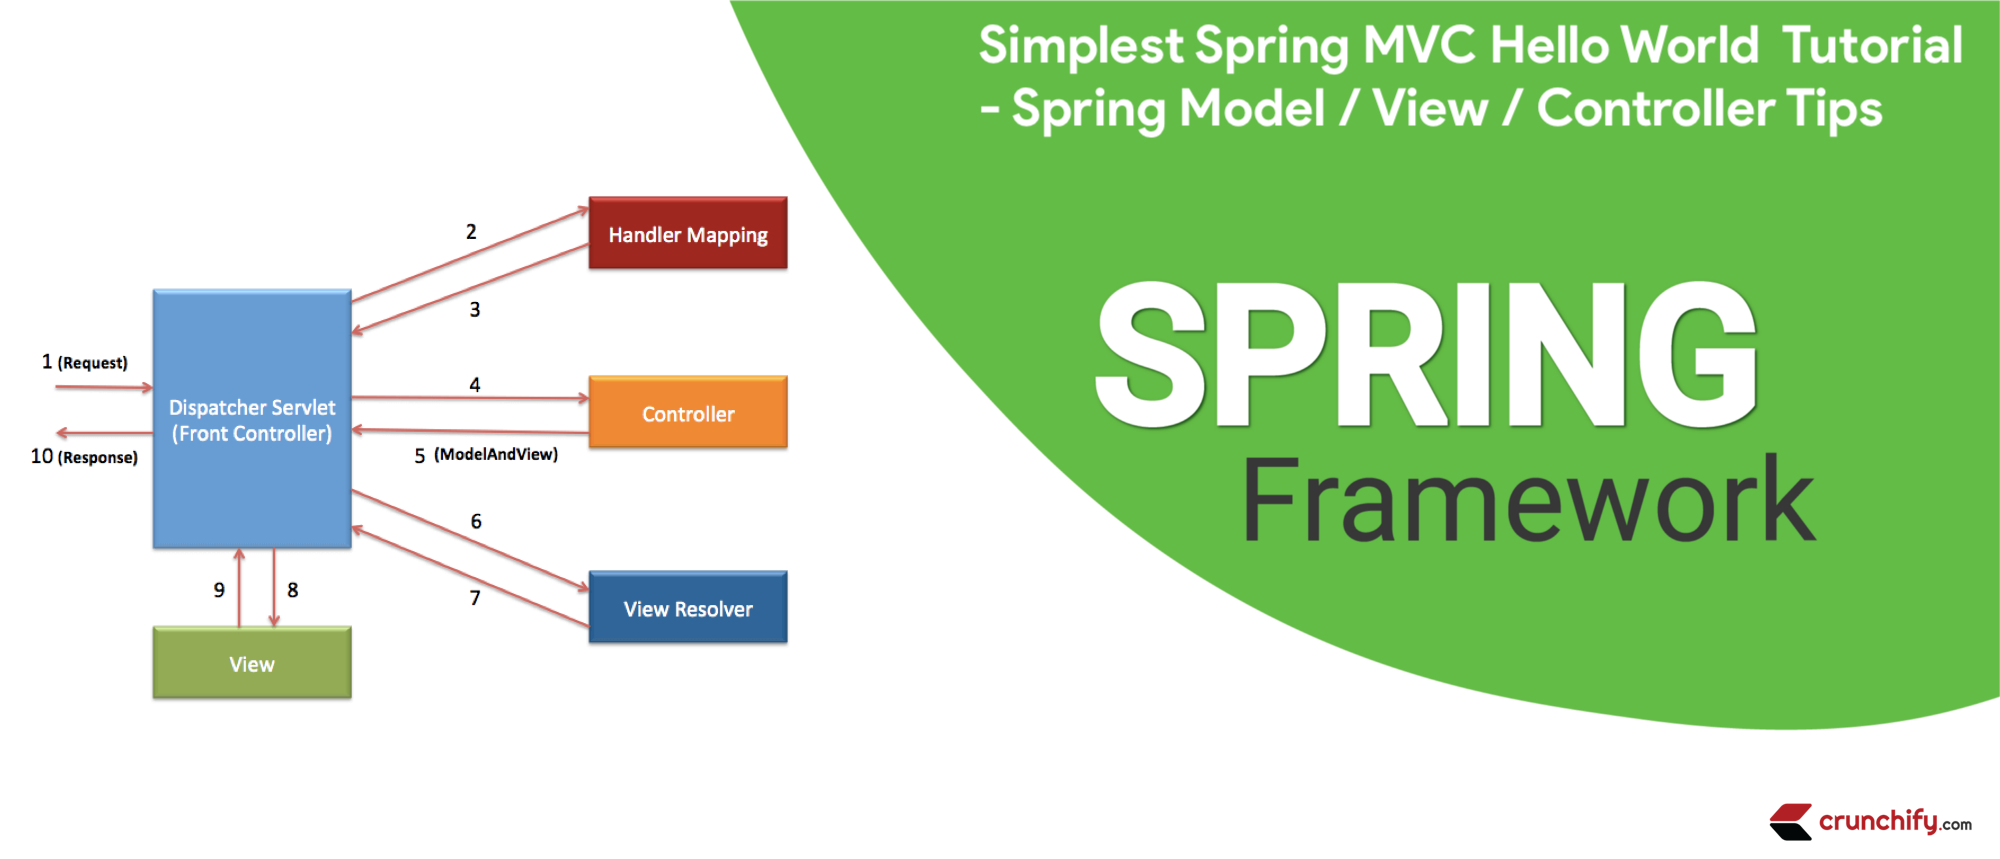
上記のweb.xmlのコードは、DispatcherServletをURLパターン/welcome.jspにマップします。 また、 index.jspをウェルカムファイルとして定義していることにも注意してください。
ここで注意すべきことの1つは、 web.xml <servlet-name>タグ内のサーブレットの名前です。 DispatcherServletが初期化されると、WebアプリケーションのWEB-INFフォルダでファイル名[servlet-name]-servlet.xmlが検索されます。 この例では、フレームワークはcrunchify-servlet.xmlファイルを探します。
ステップ-7
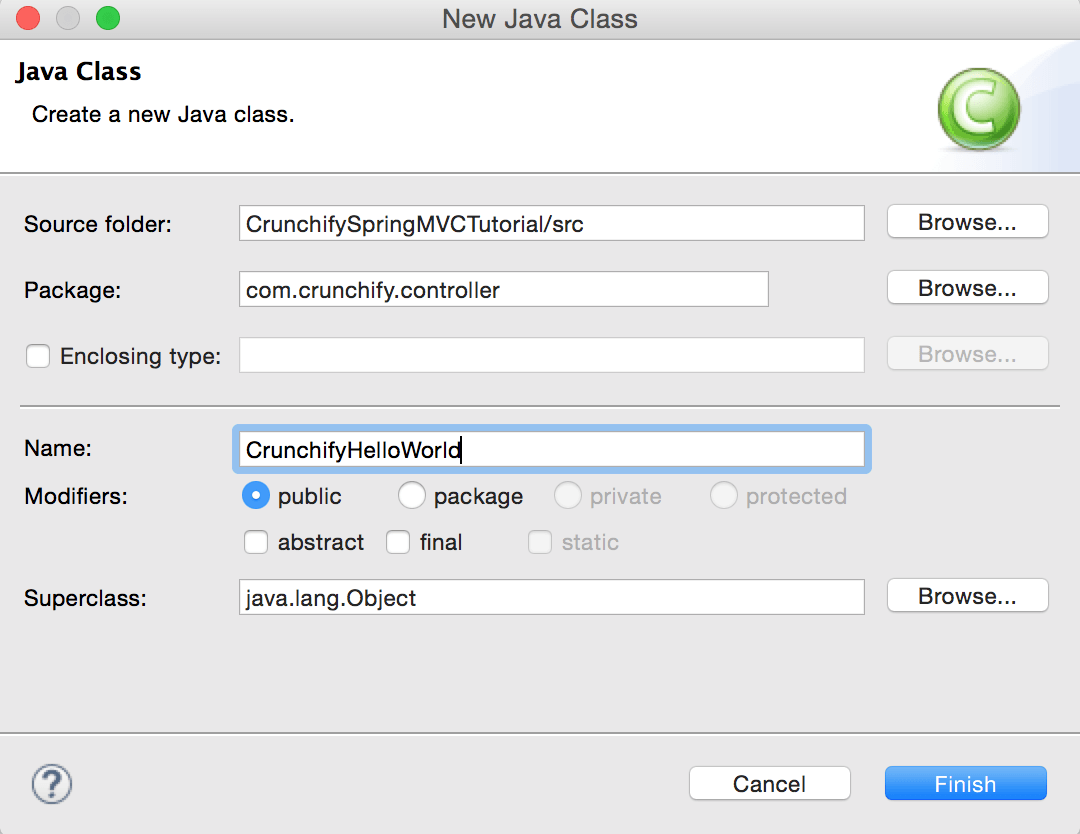
コントローラクラスを作成します。
-
Java Resources->srcを右クリックします - [
New-> [Classクリックします - パッケージ:
com.crunchify.controller - ファイル名:
CrunchifyHelloWorld.java
CrunchifyHelloWorld.java
|
1 2 3 4 5 6 7 8 9 10 11 12 13 14 15 16 17 18 19 20 21 22 |
package com . crunchify . controller ; import org . springframework . stereotype . Controller ; import org . springframework . web . bind . annotation . RequestMapping ; import org . springframework . web . servlet . ModelAndView ; /* * author: Crunchify.com * */ @Controller public class CrunchifyHelloWorld { @RequestMapping ( "/welcome" ) public ModelAndView helloWorld ( ) { String message = "<br><div>" + "<h3>********** Hello World, Spring MVC Tutorial</h3>This message is coming from CrunchifyHelloWorld.java **********</div><br><br>" ; return new ModelAndView ( "welcome" , "message" , message ) ; } } |
CrunchifyHelloWorldクラスに@Controllerと@RequestMapping("/welcome")のアノテーションを付けていることに注意してください。 Springがパッケージをスキャンすると、このBeanがリクエストを処理するためのコントローラーBeanであると認識します。 @RequestMappingアノテーションは、このコントローラーがURLパスの/ welcomeで始まるすべてのリクエストを処理する必要があることをSpringに通知します。 これには/welcome/*と/welcome.htmlが含まれます。

helloWorld()メソッドはModelAndViewオブジェクトを返します。 ModelAndViewオブジェクトは、「welcome」という名前のビューに解決しようとします。データモデルはブラウザに戻されるため、JSP内のデータにアクセスできます。 論理ビュー名は/WEB-INF/jsp/welcome.jspに解決されます。 ModelAndViewオブジェクトに返される論理名「welcome」はパス/WEB-INF/jsp/welcome.jspにマップされます。
ModelAndViewオブジェクトには、キー「message」とDetailed値を持つメッセージも含まれています。 これは、ビューに渡すデータです。 通常、これは、ビューに表示されるデータを含むJavaBeanの形式の値オブジェクトになります。 ここでは、単に文字列を渡します。
ステップ-8
ビュー–新しいファイル/WebContent/index.jspを作成します。
index.jsp
|
1 2 3 4 5 6 7 8 9 10 11 12 13 14 15 16 17 18 19 20 21 22 |
< html > < head > < title > Spring MVC Tutorial Series by Crunchify . com < / title > <style type ="text/css"> body { background-image : url ( 'https://cdn.crunchify.com/bg.png' ) ; } </style> < / head > < body > < br > < div style = "text-align: center" > < h2 > Hey You . . ! ! This is your 1st Spring MCV Tutorial . . < br > < br > < / h2 > < h3 > < a href = "welcome.html" > Click here to See Welcome Message . . . < / a > ( to check Spring MVC Controller . . . @ RequestMapping ( "/welcome" ) ) < / h3 > < / div > < / body > < / html > |
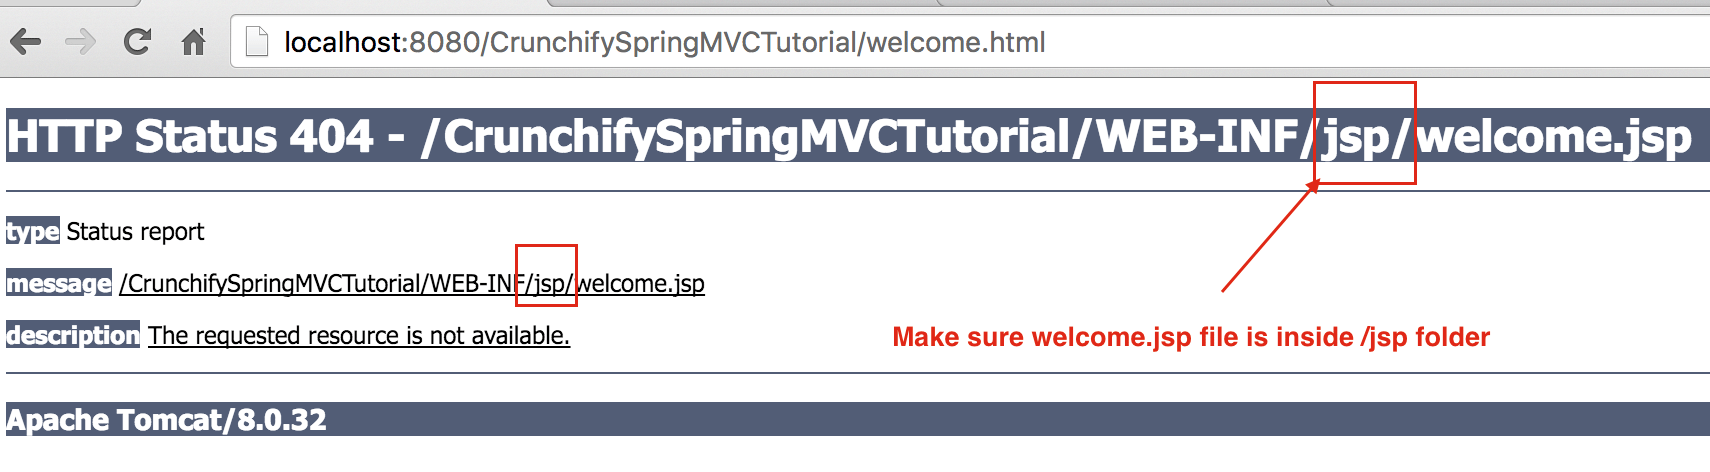
別のファイル/WebContent/WEB-INF/jsp/welcome.jspを作成します。
NOTE: jspフォルダーを作成し、その中にwelcome.jspを配置することを忘れないでください
welcome.jsp
|
1 2 3 4 5 6 7 8 9 10 11 12 13 14 15 16 17 18 19 20 21 22 23 24 25 |
< html > < head > < title > Spring MVC Tutorial by Crunchify - Hello World Spring MVC Example < / title > <style type ="text/css"> body { background-image : url ( 'https://cdn.crunchify.com/bg.png' ) ; } </style> < / head > < body > $ { message } < br > < br > < div style = "font-family: verdana; padding: 10px; border-radius: 10px; font-size: 12px; text-align: center;" > Spring MCV Tutorial by < a href = "https://crunchify.com" > Crunchify < / a > . Click < a href = "https://crunchify.com/category/java-tutorials/" target = "_blank" > here < / a > for all Java and < a href = 'https://crunchify.com/category/spring-mvc/' target = '_blank' > here < / a > for all Spring MVC , Web Development examples . < br > < / div > < / body > < / html > |
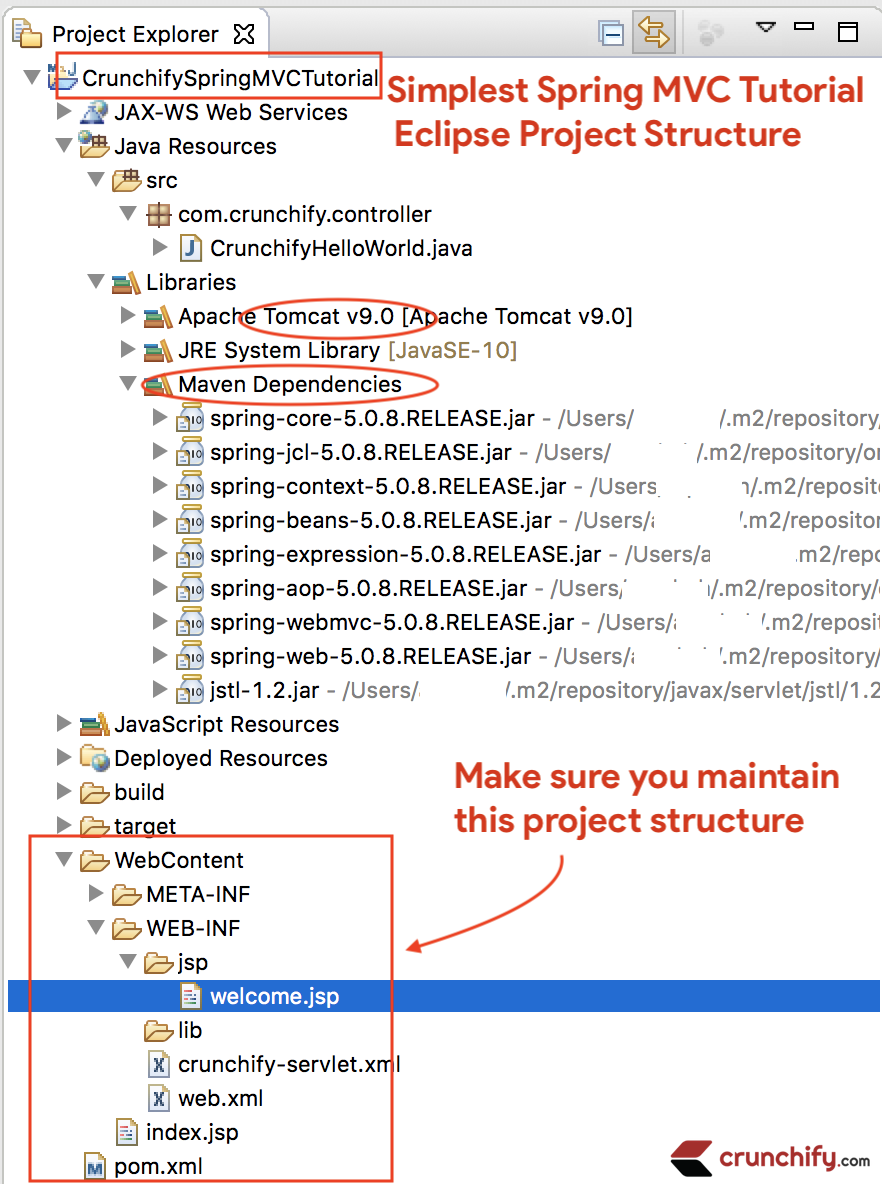
結局のところ、これはあなたのワークスペースがどのように見えるべきかです。
ステップ-9
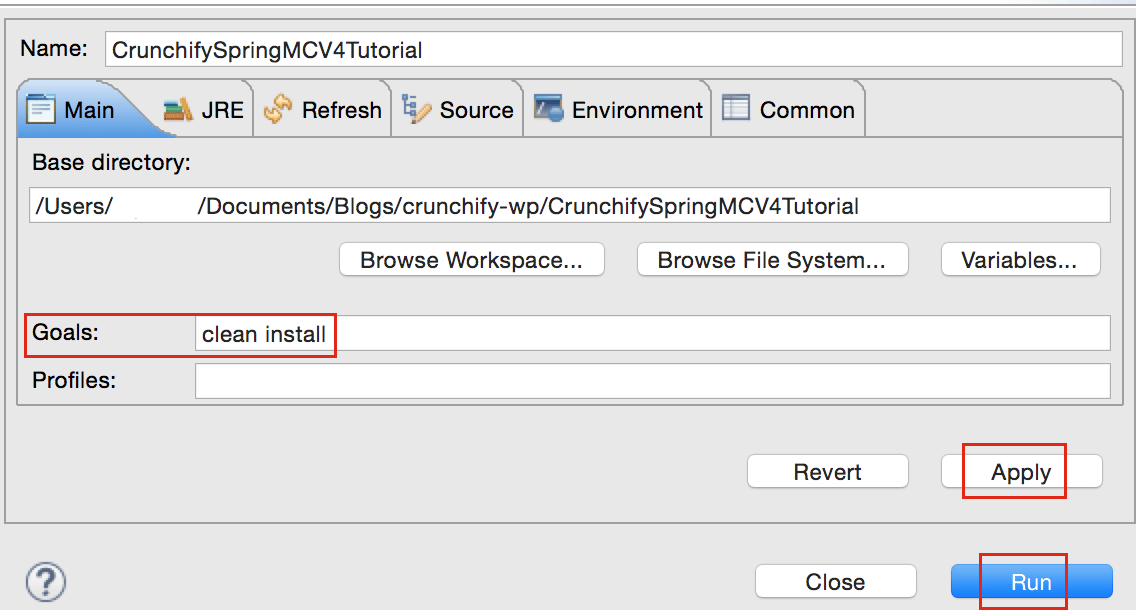
Project -> Run As -> Maven Build...を右クリックします。
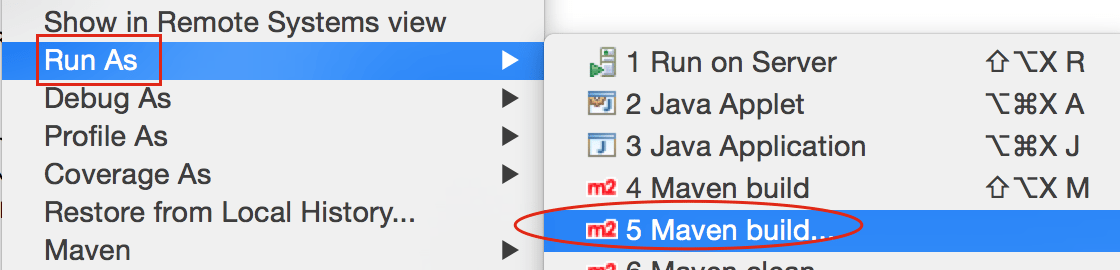
Add Goals : clean install 。 [ ApplyしてRun ]をクリックします。
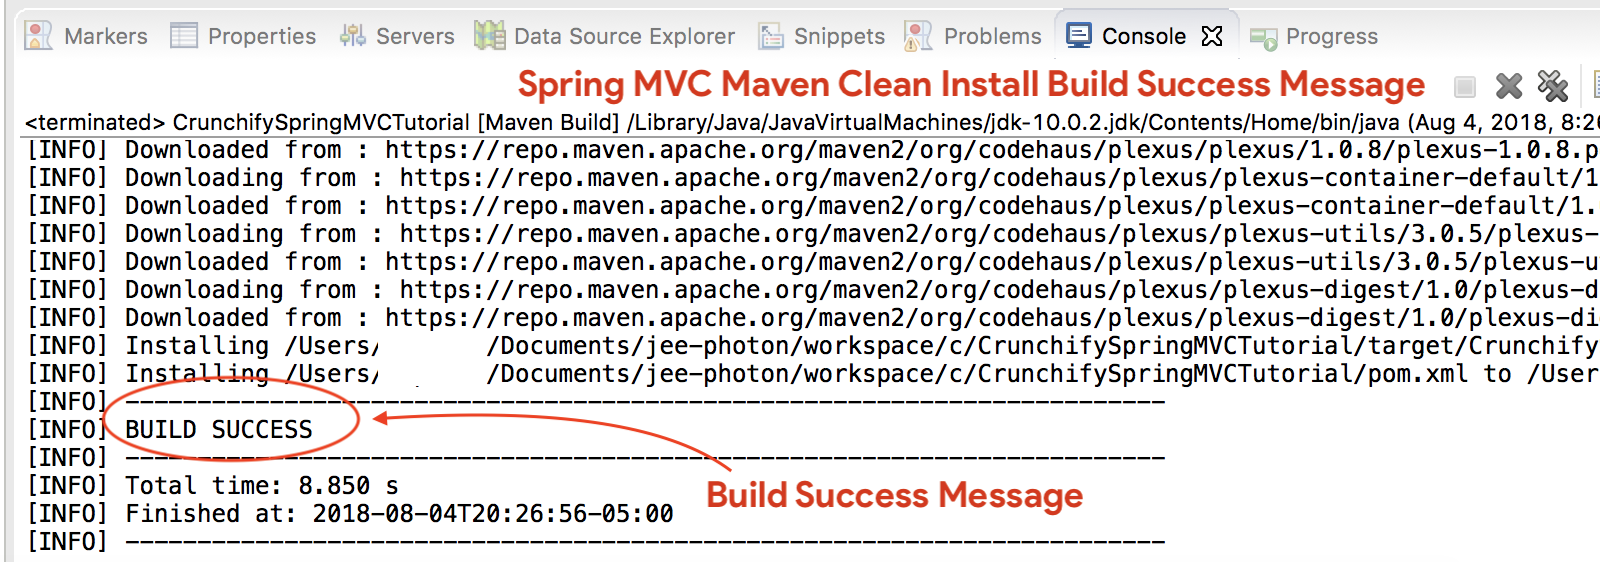
ビルドsuccess messageが表示されるはずです:
すべての.jarファイルはどこにありますか?
/targetフォルダーの下にすべての.jarファイルが表示されます。 スクリーンショット。
ステップ-10
- [
Servers]タブにTomcatServerが表示されdon't see場合は、手順に従ってApacheTomcatをEclipseに追加します。 - プロジェクトを
Apache Tomcatにデプロイします- 右クリック
- 追加と削除
- プロジェクトをサーバーに追加します(右側のセクション)。
- [開始]をクリックします。
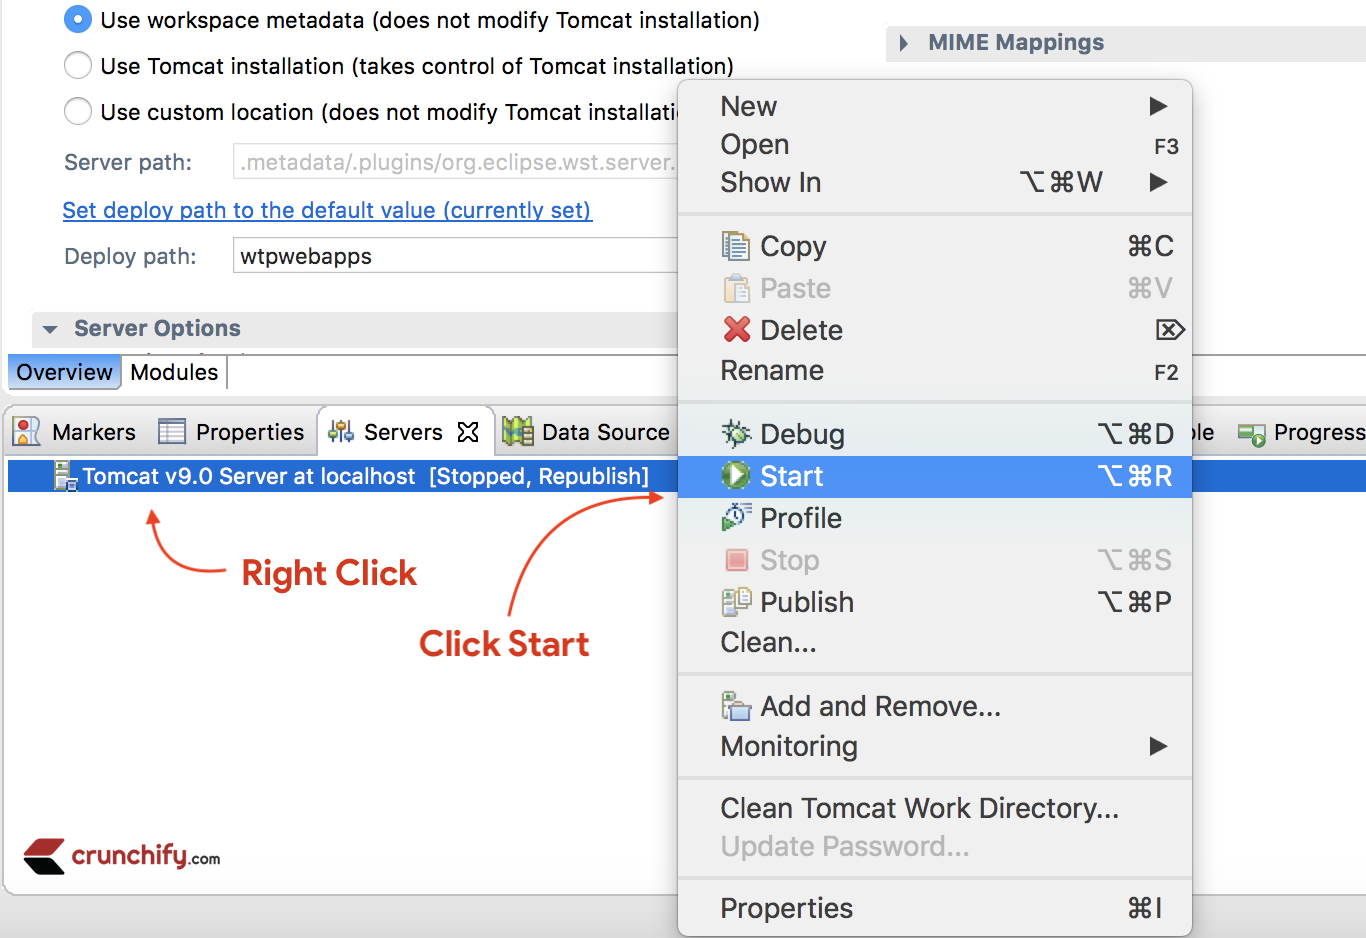
以下のログが表示されていることを確認してください。 これは、アプリケーションがTomcatWebサーバーに正常にデプロイされていることを意味します。
|
1 2 3 4 5 6 7 8 9 10 11 12 13 14 15 16 17 18 19 20 21 22 23 24 25 26 27 28 29 30 31 32 33 34 35 36 37 38 39 40 |
Aug 04 , 2018 9 : 08 : 10 PM org . apache . tomcat . util . digester . SetPropertiesRule begin WARNING : [ SetPropertiesRule ] { Server / Service / Engine / Host / Context } Setting property 'source' to 'org.eclipse.jst.jee.server:CrunchifySpringMVCTutorial' did not find a matching property . INFO : Server version : Apache Tomcat / 9.0.10 INFO : Server built : Jun 20 2018 17 : 32 : 21 UTC INFO : Server number : 9.0.10.0 INFO : OS Name : Mac OS X INFO : OS Version : 10.13.6 INFO : Architecture : x86_64 INFO : Java Home : / Library / Java / JavaVirtualMachines / jdk - 10.0.2.jdk / Contents / Home INFO : JVM Version : 10.0.2 + 13 INFO : JVM Vendor : "Oracle Corporation" INFO : CATALINA_BASE : / Users / appshah / Documents / jee - photon / workspace / c / . metadata / . plugins / org . eclipse . wst . server . core / tmp0 INFO : CATALINA_HOME : / Users / appshah / Documents / jee - photon / apache - tomcat - 9.0.10 INFO : Command line argument : - Dcatalina . base =/ Users / appshah / Documents / jee - photon / workspace / c / . metadata / . plugins / org . eclipse . wst . server . core / tmp0 INFO : Command line argument : - Dcatalina . home =/ Users / appshah / Documents / jee - photon / apache - tomcat - 9.0.10 INFO : Command line argument : - Dwtp . deploy =/ Users / appshah / Documents / jee - photon / workspace / c / . metadata / . plugins / org . eclipse . wst . server . core / tmp0 / wtpwebapps INFO : Command line argument : - Dfile . encoding = UTF - 8 INFO : The APR based Apache Tomcat Native library which allows optimal performance in production environments was not found on the java . library . path : [ / Users / appshah / Library / Java / Extensions : / Library / Java / Extensions : / Network / Library / Java / Extensions : / System / Library / Java / Extensions : / usr / lib / java : . ] INFO : Initializing ProtocolHandler [ "http-nio-8080" ] INFO : Using a shared selector for servlet write / read INFO : Initializing ProtocolHandler [ "ajp-nio-8009" ] INFO : Using a shared selector for servlet write / read INFO : Initialization processed in 841 ms INFO : Starting service [ Catalina ] INFO : Starting Servlet Engine : Apache Tomcat / 9.0.10 INFO : At least one JAR was scanned for TLDs yet contained no TLDs . Enable debug logging for this logger for a complete list of JARs that were scanned but no TLDs were found in them . Skipping unneeded JARs during scanning can improve startup time and JSP compilation time . INFO : At least one JAR was scanned for TLDs yet contained no TLDs . Enable debug logging for this logger for a complete list of JARs that were scanned but no TLDs were found in them . Skipping unneeded JARs during scanning can improve startup time and JSP compilation time . INFO : No Spring WebApplicationInitializer types detected on classpath INFO : Initializing Spring FrameworkServlet 'crunchify' INFO : FrameworkServlet 'crunchify' : initialization started INFO : Refreshing WebApplicationContext for namespace 'crunchify-servlet' : startup date [ Sat Aug 04 21 : 08 : 13 CDT 2018 ] ; root of context hierarchy INFO : Loading XML bean definitions from ServletContext resource [ / WEB - INF / crunchify - servlet . xml ] INFO : Mapped "{[/welcome]}" onto public org . springframework . web . servlet . ModelAndView com . crunchify . controller . CrunchifyHelloWorld . helloWorld ( ) INFO : Looking for @ ControllerAdvice : WebApplicationContext for namespace 'crunchify-servlet' : startup date [ Sat Aug 04 21 : 08 : 13 CDT 2018 ] ; root of context hierarchy INFO : Looking for @ ControllerAdvice : WebApplicationContext for namespace 'crunchify-servlet' : startup date [ Sat Aug 04 21 : 08 : 13 CDT 2018 ] ; root of context hierarchy INFO : Mapped URL path [ /** ] onto handler 'org.springframework.web.servlet.resource.DefaultServletHttpRequestHandler#0' INFO : FrameworkServlet 'crunchify' : initialization completed in 1607 ms INFO : Starting ProtocolHandler [ "http-nio-8080" ] INFO : Starting ProtocolHandler [ "ajp-nio-8009" ] INFO : Server startup in 3579 ms |
ステップ-11。 終わり。
http:// localhost:8080 / CrunchifySpringMVCTutorial /にアクセスすると、すべて設定されているはずです。
Hurray ..これでHelloWorld Hello World Spring MVC 5 Exampleがわかりました。 これを実行中に例外が発生した場合はお知らせください。 ここで見つけることができる他の多くの例があります。
Do you want to include JS, CSS and images into JSP file? このチュートリアルに従ってください:「mvc:resourcesmapping」を使用してJS、CSS、および画像をJSPファイルに追加/統合するための最良の方法。
問題がありますか? 何か問題はありますか?
ステップ1のトリアージ– HTTPステータス404エラーが発生しましたか?
また、以下のチュートリアルに従ってください。
ステップ2のトリアージ– URLが機能しませんか? Tomcatエラー?
必ずApacheTomcatサーバーをTargeted Runtimeに追加してください。 Step-1で選択した可能性があります。 Tomcat7または8any –サーバーが機能するはずです。
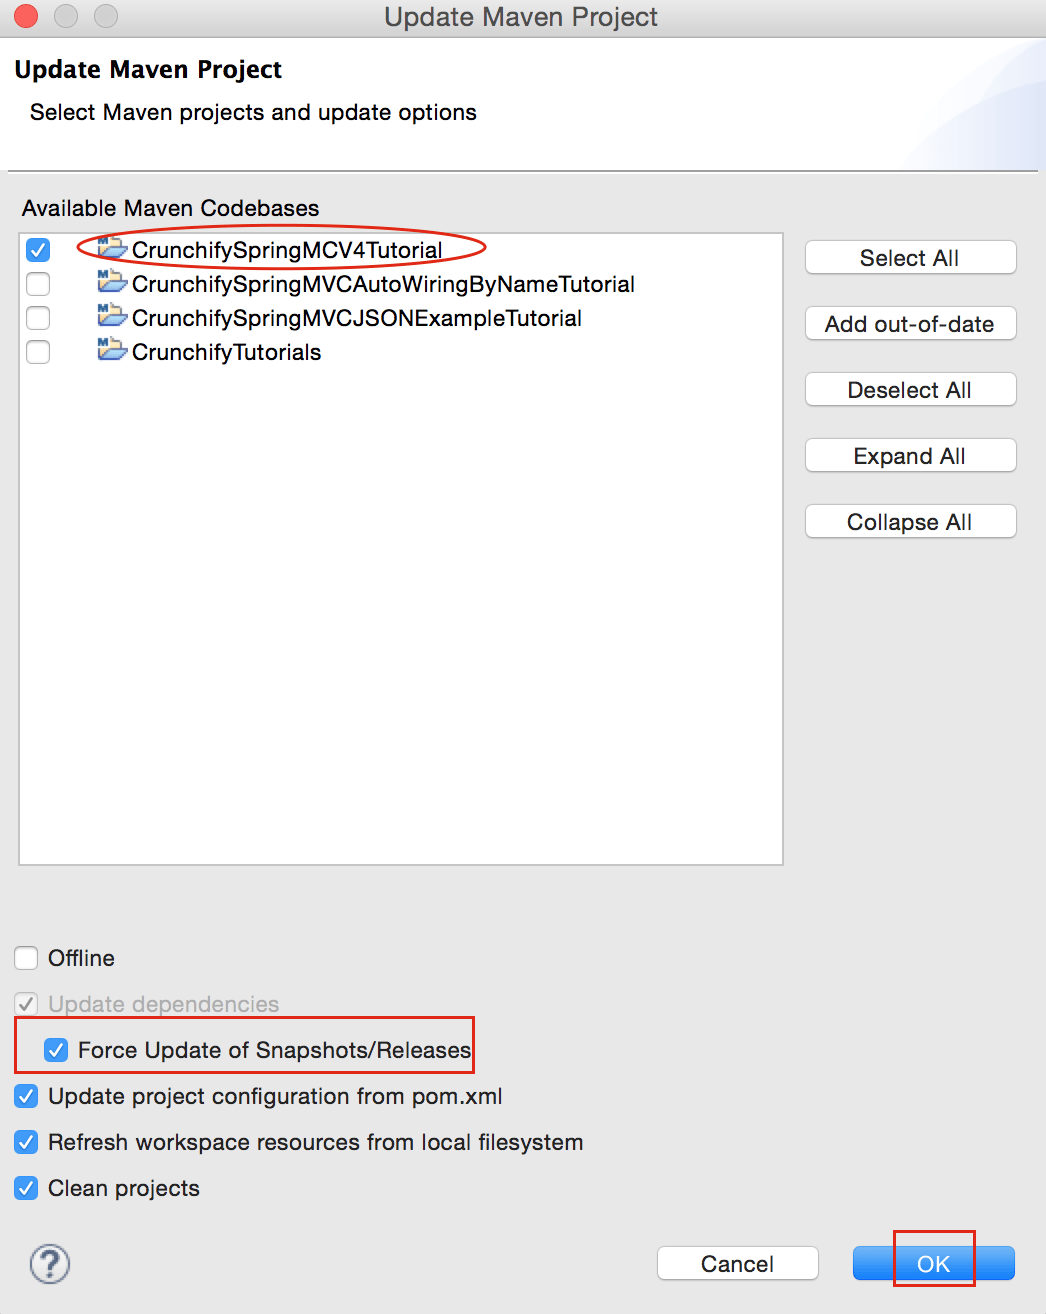
ステップ3のトリアージ– Mavenエラー?
必ずすべてのMaven依存関係を更新してください。
上記のチュートリアルの実行で問題が発生した場合は、以下にメールまたはコメントでお問い合わせください。