
Tutorial más simple de Spring MVC Framework: ejemplo de Hello World con la página UI (JSP)
Publicado: 2019-02-23
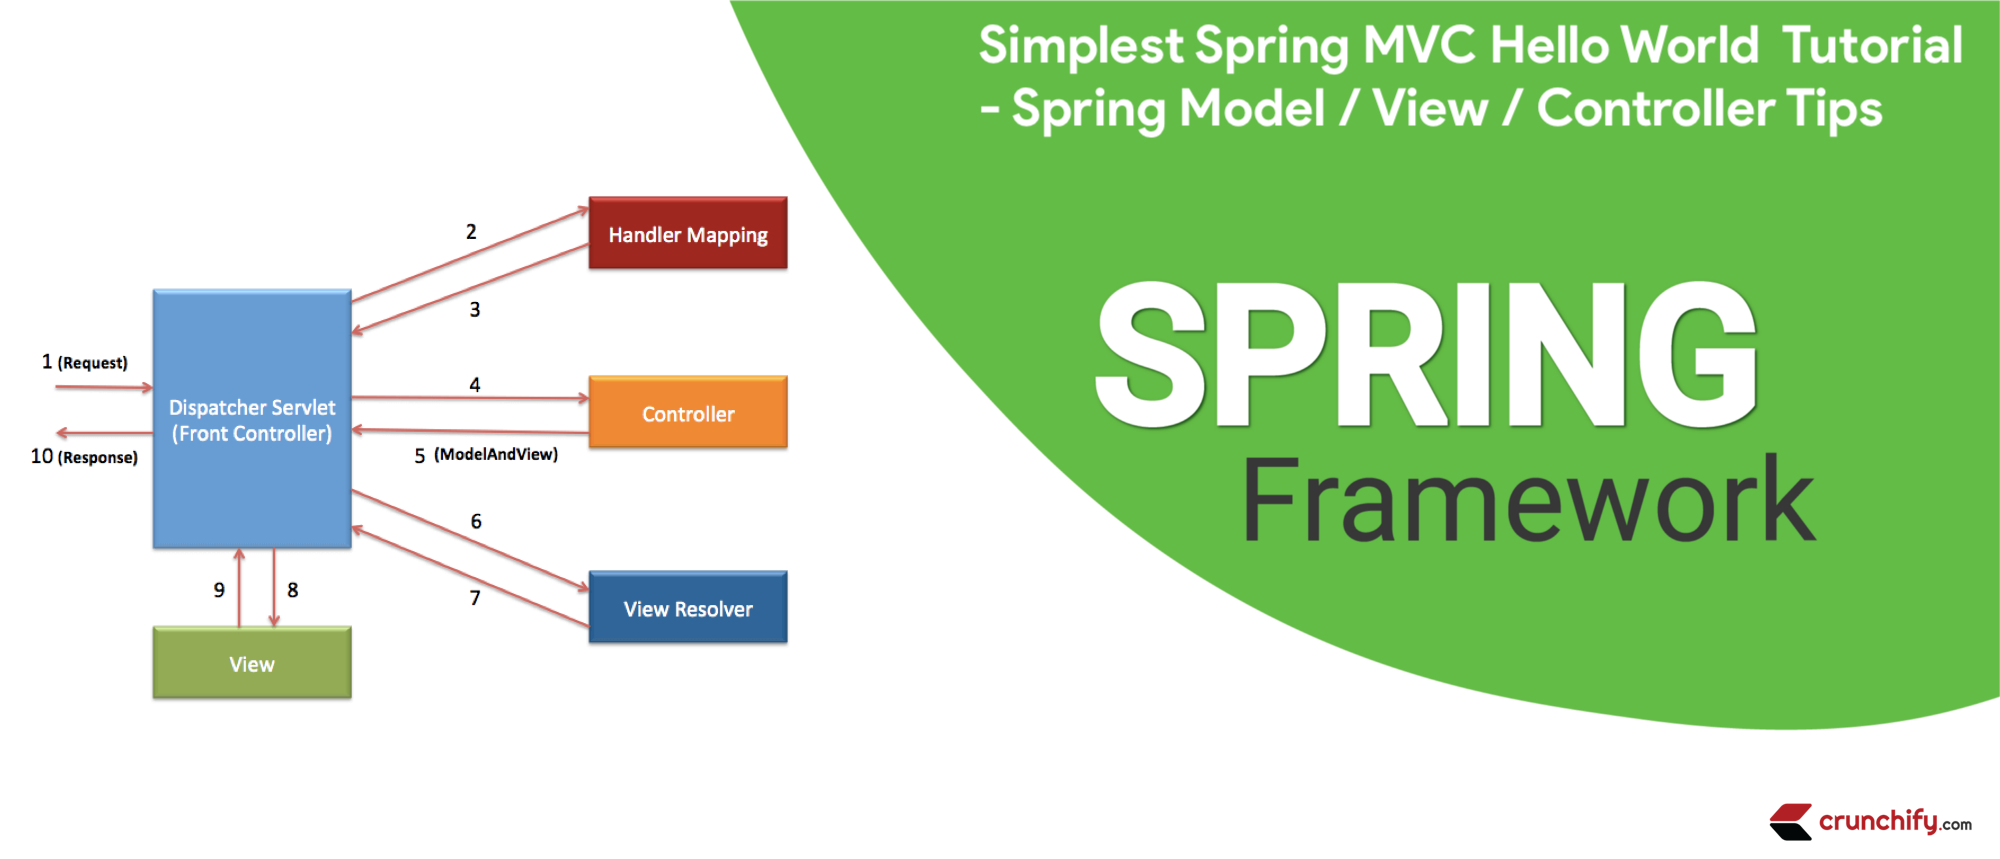
La arquitectura Model-View-Controller (MVC) proporciona la forma más sencilla de desarrollar aplicaciones web flexibles y poco acopladas.
En este tutorial, repasaremos cómo crear su aplicación 1st Spring MVC con pasos muy detallados.
¿Tiene alguna de las siguientes preguntas?
- Fundamentos de Spring MVC 5.2.3
- Desarrollo de una aplicación Spring Framework MVC 5 paso a paso.
- Java – Tutorial de Spring MVC desde cero
- Tutorial rápido de Spring MVC
- Tutorial del marco Spring MVC
- Primer tutorial de la aplicación Spring MVC
- Tutoriales de Spring 5.x MVC, demostración de AJAX, demostración de jQuery, demostración de JavaScript, consejos y trucos Spring 5 MVC
Entonces estás en el lugar correcto. Aquí demostraré Spring MVC framework simple para crear aplicaciones web.
Lo primero es lo primero: configuremos el entorno
Tutorial actualizado y verificado por última vez: septiembre de 2020 con las siguientes versiones de la herramienta.
Estoy usando las siguientes herramientas que es posible que deba descargar si aún no lo ha hecho.
- Tomcat 9.0.38: descargue la última versión de Apache Tomcat desde este enlace.
- Asegúrese de descargar Eclipse IDE para desarrolladores de
Java EE(2020‑09 R): enlace de descarga. (diagrama a continuación) -
Spring 5.2.9.RELEASE(No se requiere descarga): usaremos la dependencia de Maven. - JDK 15 – Enlace de descarga.
Asegúrese de descargar el kit de desarrollo Java EE más reciente:

Objetivo principal
El objetivo principal de este tutorial es crear la aplicación Spring MVC de la forma más sencilla.
Antes de comenzar, veamos qué veremos al final de este tutorial.
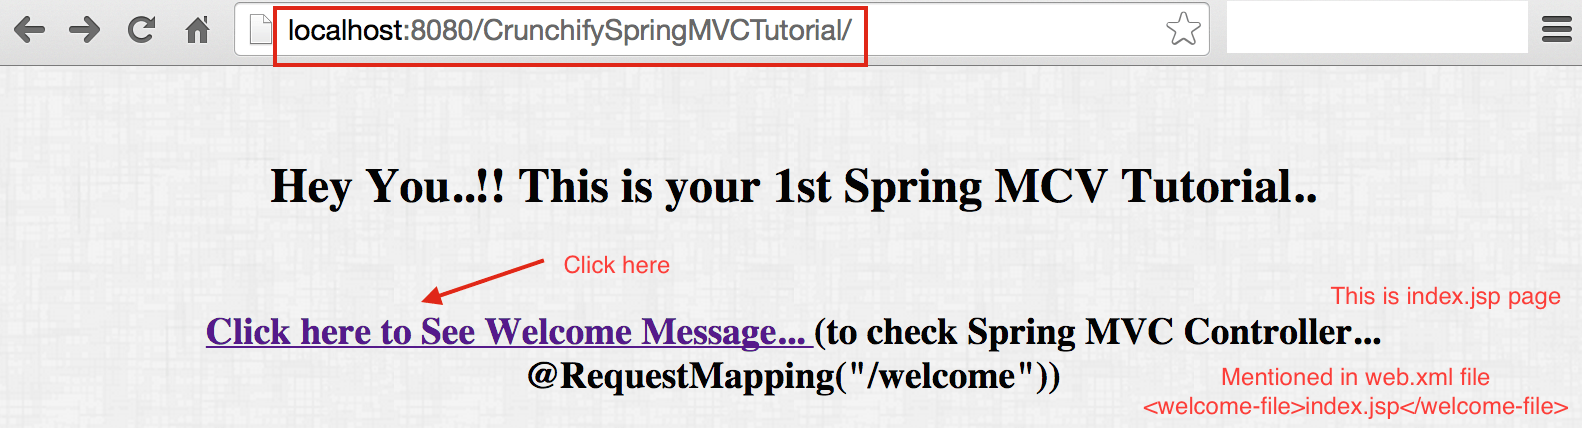
Así es como se verá el application result . Este es un resultado final una vez que complete todos los pasos a continuación.
Aquí hay un resultado final: Página de bienvenida ==> index.jsp
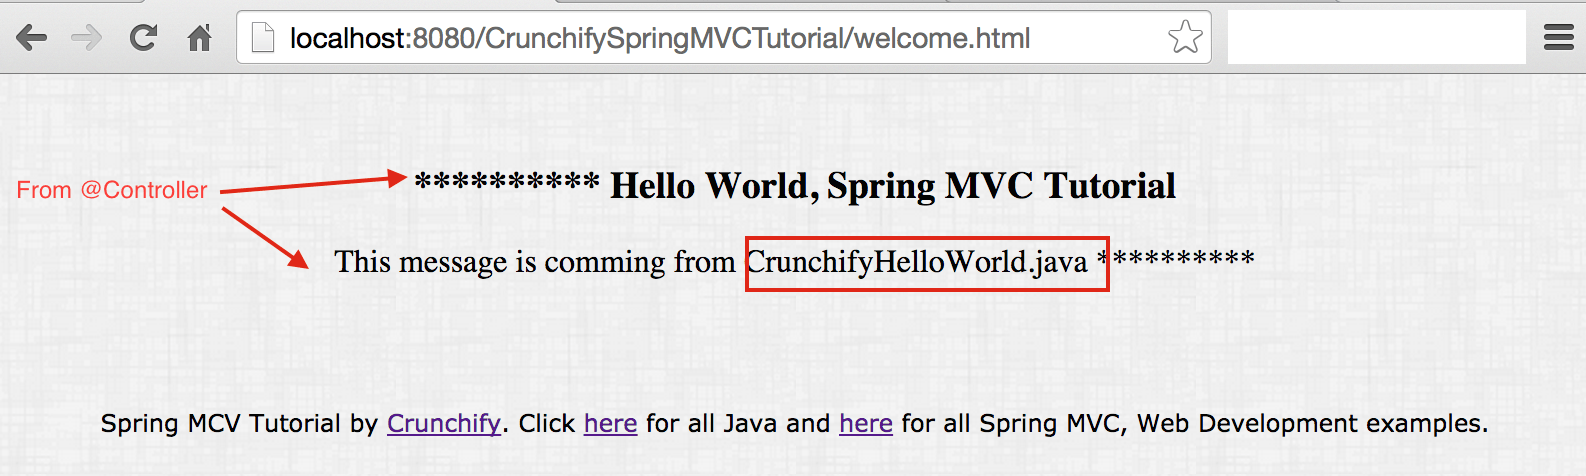
Devoluciones de resultados de la clase de controlador
Ahora comencemos con el Tutorial
Paso 1
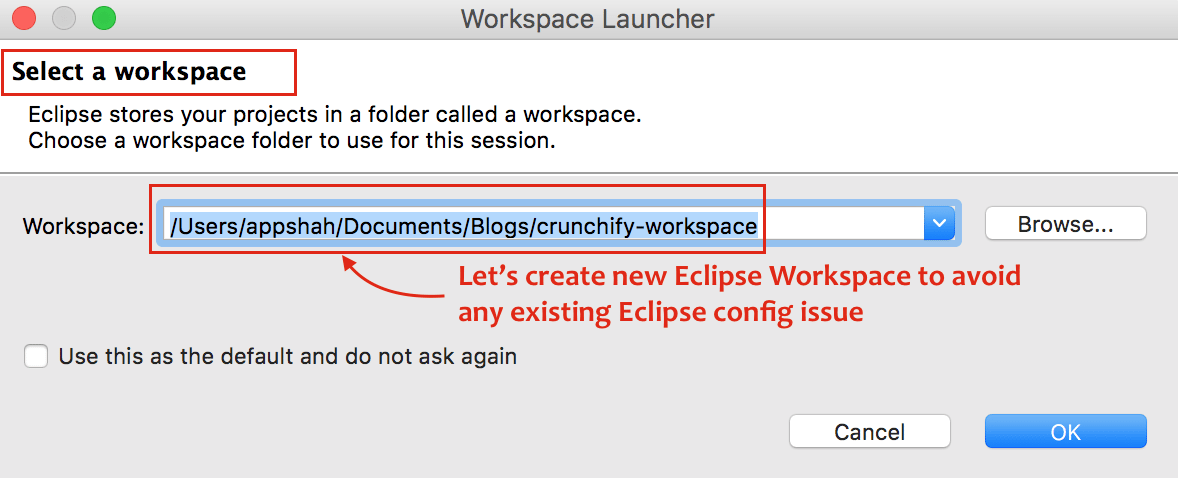
- Eclipse abierto
- Crear un
New Eclipse Workspace: esto esmustpara evitar cualquier problema de configuración del espacio de trabajo existente.
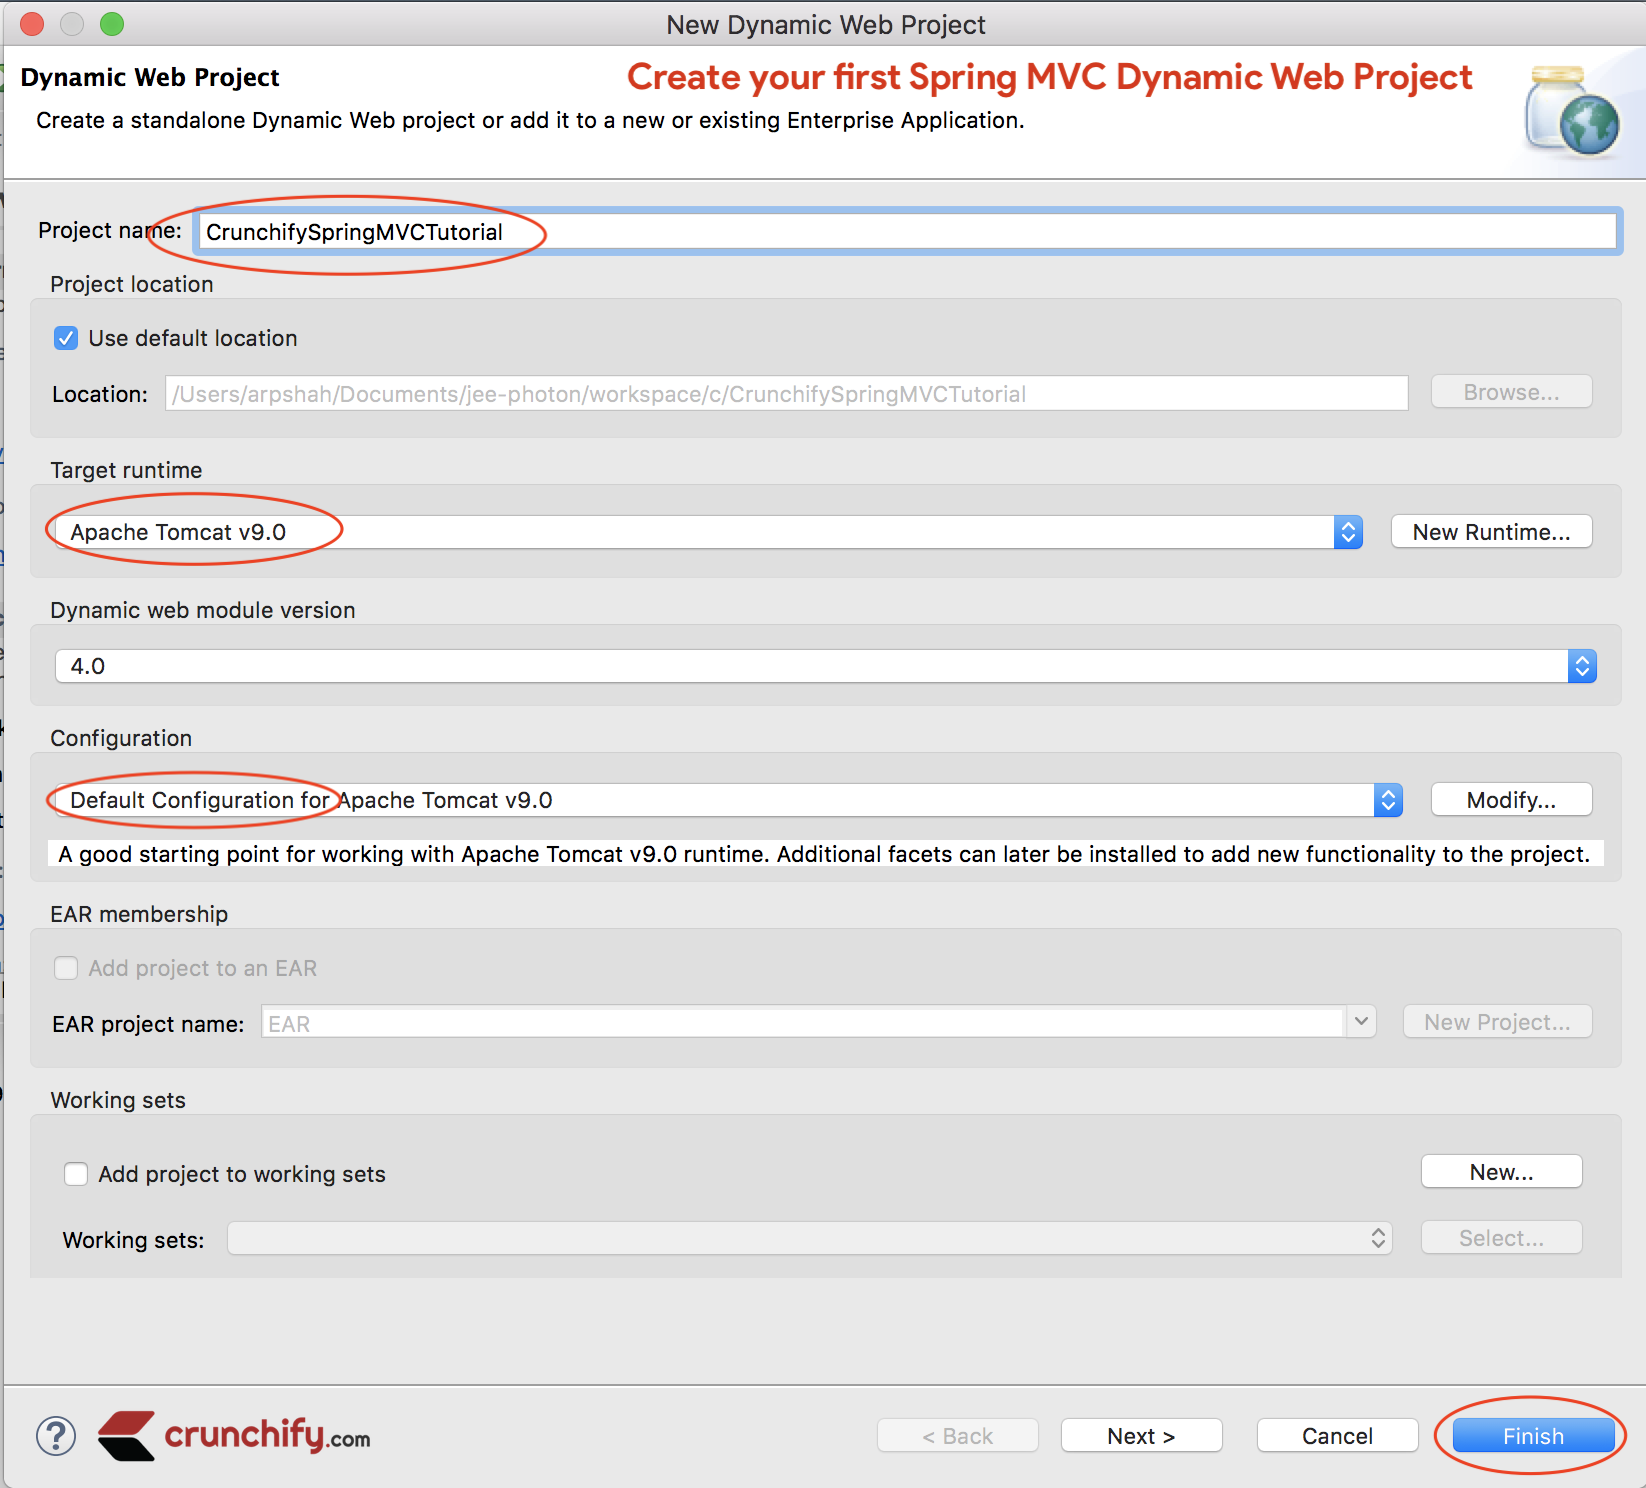
Paso 2
- Haga clic en
File - Haga clic en
New - Elija
Dynamic Web Project - Una ventana emergente, proporcione el nombre del proyecto:
CrunchifySpringMVCTutorial - Asegúrese de usar
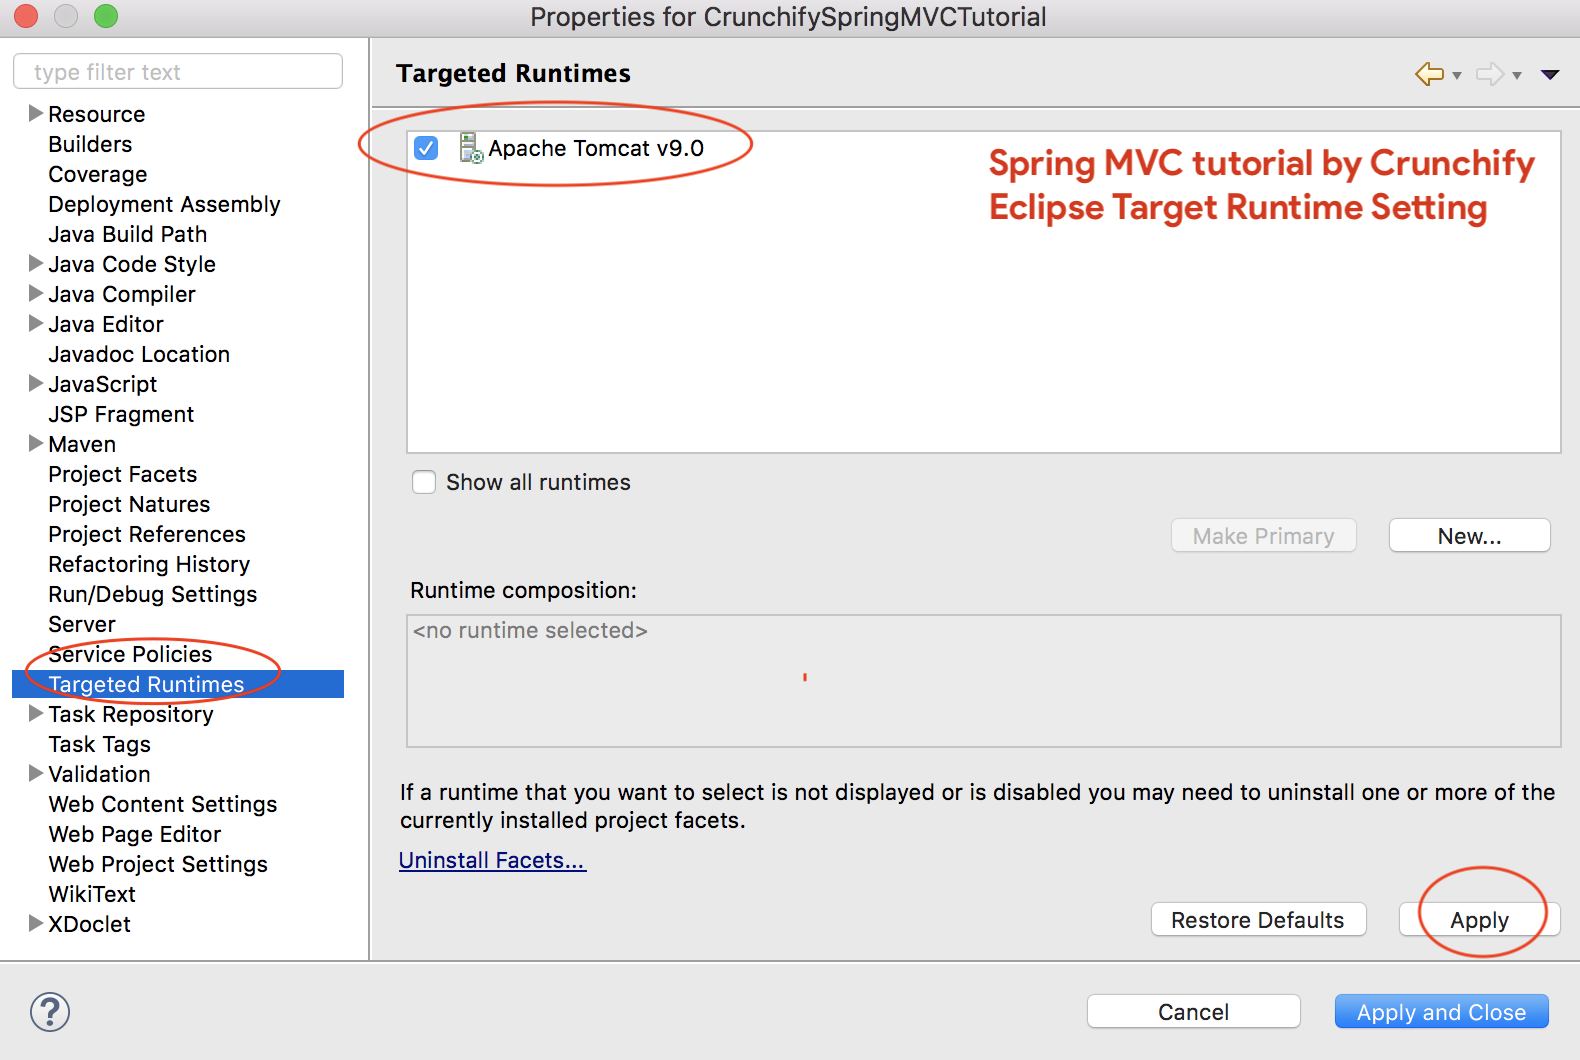
Target RuntimecomoApache Tomcat 9.0- Si no ve Target Runtime, siga estos pasos
- Elija la configuración como
Default Configuration
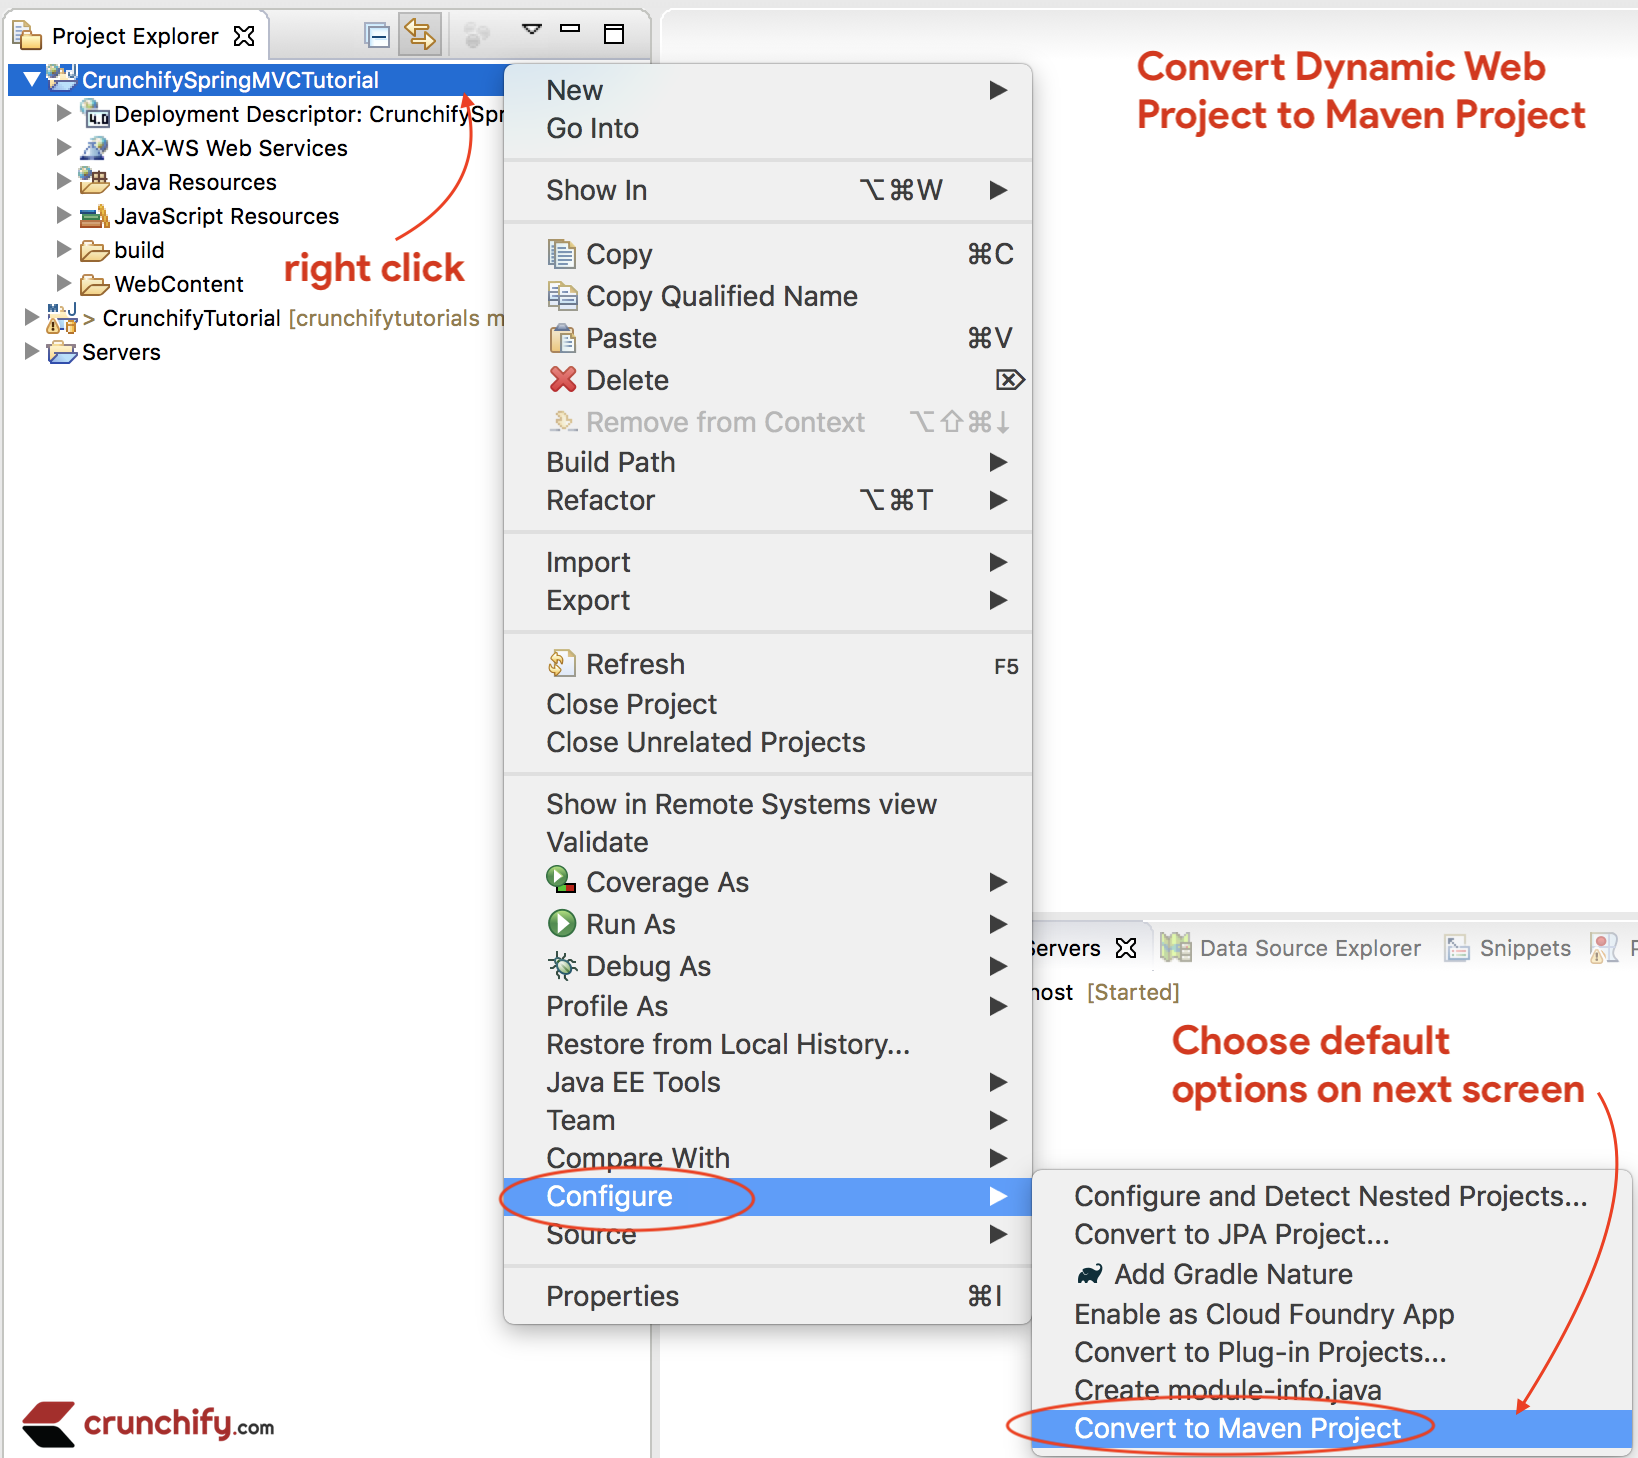
Paso 3
Convierta Project a Maven Project para agregar todas las dependencias Spring MVC requeridas al proyecto.
Pasos:
- Haga clic derecho en el proyecto
- Configurar
- Convertir a proyecto
Maven
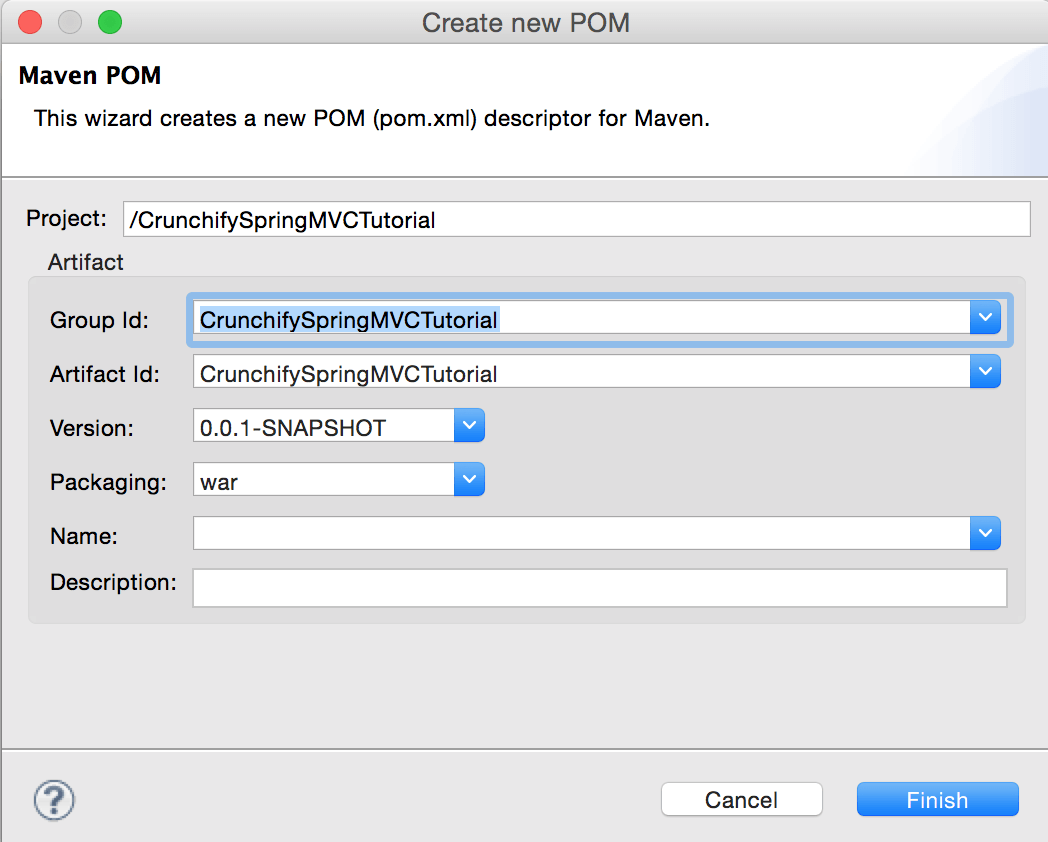
Etapa 4
Abra el archivo pom.xml y agregue jar dependencies a continuación al proyecto.
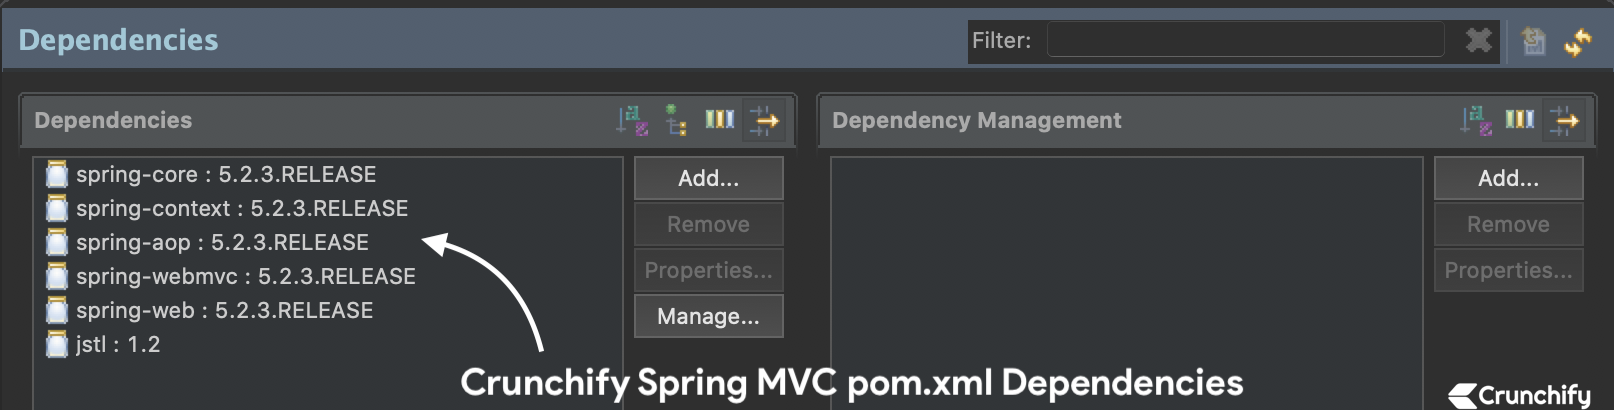
NOTE:Aquí está mi archivopom.xml. Asegúrese de actualizar la versión de Java a13si aún no ha pasado aJDK 13. Seguiremos actualizando este tutorial a la última versión de Spring MVC.Entonces, el archivo pom.xml a continuación puede tener una versión diferente (más reciente) de las dependencias de Spring MVC que la imagen de arriba
|
1 2 3 4 5 6 7 8 9 10 11 12 13 14 15 16 17 18 19 20 21 22 23 24 25 26 27 28 29 30 31 32 33 34 35 36 37 38 39 40 41 42 43 44 45 46 47 48 49 50 51 52 53 54 55 56 57 58 59 60 61 |
< project xmlns = "http://maven.apache.org/POM/4.0.0" xmlns : xsi = "http://www.w3.org/2001/XMLSchema-instance" xsi : schemaLocation = "http://maven.apache.org/POM/4.0.0 http://maven.apache.org/xsd/maven-4.0.0.xsd" > < modelVersion > 4.0.0 < / modelVersion > < groupId > CrunchifySpringMVCTutorial < / groupId > < artifactId > CrunchifySpringMVCTutorial < / artifactId > < version > 0.0.1 - SNAPSHOT < / version > < packaging > war < / packaging > < build > < sourceDirectory > src < / sourceDirectory > < plugins > < plugin > < artifactId > maven - compiler - plugin < / artifactId > < version > 3.8.0 < / version > < configuration > < release > 13 < / release > < / configuration > < / plugin > < plugin > < artifactId > maven - war - plugin < / artifactId > < version > 3.2.1 < / version > < configuration > < warSourceDirectory > WebContent < / warSourceDirectory > < / configuration > < / plugin > < / plugins > < / build > < dependencies > < dependency > < groupId > org . springframework < / groupId > < artifactId > spring - core < / artifactId > < version > 5.2.3.RELEASE < / version > < / dependency > < dependency > < groupId > org . springframework < / groupId > < artifactId > spring - context < / artifactId > < version > 5.2.3.RELEASE < / version > < / dependency > < dependency > < groupId > org . springframework < / groupId > < artifactId > spring - aop < / artifactId > < version > 5.2.3.RELEASE < / version > < / dependency > < dependency > < groupId > org . springframework < / groupId > < artifactId > spring - webmvc < / artifactId > < version > 5.2.3.RELEASE < / version > < / dependency > < dependency > < groupId > org . springframework < / groupId > < artifactId > spring - web < / artifactId > < version > 5.2.3.RELEASE < / version > < / dependency > < dependency > < groupId > javax . servlet < / groupId > < artifactId > jstl < / artifactId > < version > 1.2 < / version > < / dependency > < / dependencies > < / project > |
Paso-5
Cree un nuevo archivo Spring Configuration Bean : /WebContent/WEB-INF/crunchify-servlet.xml

crunchify-servlet.xml
|
1 2 3 4 5 6 7 8 9 10 11 12 13 14 15 16 17 18 19 20 21 22 23 24 25 26 27 |
<? xml version = "1.0" encoding = "UTF-8" ?> < beans xmlns = "http://www.springframework.org/schema/beans" xmlns : mvc = "http://www.springframework.org/schema/mvc" xmlns : context = "http://www.springframework.org/schema/context" xmlns : xsi = "http://www.w3.org/2001/XMLSchema-instance" xsi : schemaLocation = " http://www.springframework.org/schema/beans http://www.springframework.org/schema/beans/spring-beans.xsd http://www.springframework.org/schema/mvc http://www.springframework.org/schema/mvc/spring-mvc.xsd http://www.springframework.org/schema/context http://www.springframework.org/schema/context/spring-context.xsd" > < mvc : annotation - driven / > < context : component - scan base - package = "com.crunchify.controller" / > < mvc : default - servlet - handler / > < bean id = "viewResolver" class = "org.springframework.web.servlet.view.UrlBasedViewResolver" > < property name = "viewClass" value = "org.springframework.web.servlet.view.JstlView" / > < property name = "prefix" value = "/WEB-INF/jsp/" / > < property name = "suffix" value = ".jsp" / > < / bean > < / beans > |
En el anterior crunchify-servlet.xml archivo de configuración, hemos definido una etiqueta <context:component-scan> . Esto permitirá que Spring cargue todos los componentes del paquete com.crunchify.controller y todos sus paquetes secundarios.
Esto cargará nuestra CrunchifyHelloWorld.class . También hemos definido un bean viewResolver . Este bean resolverá la vista y agregará la cadena de prefijo /WEB-INF/jsp/ y el sufijo .jsp a la vista en ModelAndView.
Tenga en cuenta que en nuestra clase CrunchifyHelloWorld , hemos devuelto un objeto ModelAndView con el nombre de vista de bienvenida.
Esto se resolverá en la ruta /WEB-INF/jsp/welcome.jsp .
Paso-6
Cree un nuevo archivo web.xml si aún no está allí. Asigne Spring MVC en el archivo /WebContent/WEB-INF/web.xml .
NOTE: si no ve el archivo web.xml en su " dynamic web project ", siga estos pasos.
web.xml
|
1 2 3 4 5 6 7 8 9 10 11 12 13 14 15 16 17 18 19 20 21 22 23 24 25 26 27 28 |
<? xml version = "1.0" encoding = "UTF-8" ?> < web - app xmlns : xsi = "http://www.w3.org/2001/XMLSchema-instance" xmlns = "http://xmlns.jcp.org/xml/ns/javaee" xsi : schemaLocation = "http://xmlns.jcp.org/xml/ns/javaee http://xmlns.jcp.org/xml/ns/javaee/web-app_4_0.xsd" id = "WebApp_ID" version = "4.0" > < display - name > CrunchifySpringMVCTutorial < / display - name > < welcome - file - list > < welcome - file > index . html < / welcome - file > < welcome - file > index . htm < / welcome - file > < welcome - file > index . jsp < / welcome - file > < welcome - file > default . html < / welcome - file > < welcome - file > default . htm < / welcome - file > < welcome - file > default . jsp < / welcome - file > < / welcome - file - list > < servlet > < servlet - name > crunchify < / servlet - name > < servlet - class > org . springframework . web . servlet . DispatcherServlet < / servlet - class > < load - on - startup > 1 < / load - on - startup > < / servlet > < servlet - mapping > < servlet - name > crunchify < / servlet - name > < url - pattern > / welcome . jsp < / url - pattern > < url - pattern > / index . jsp < / url - pattern > < url - pattern > / welcome . html < / url - pattern > < url - pattern > * . html < / url - pattern > < / servlet - mapping > < / web - app > |
El código anterior en web.xml mapeará DispatcherServlet con el patrón de url /welcome.jsp . También tenga en cuenta que hemos definido index.jsp como archivo de bienvenida.
Una cosa a tener en cuenta aquí es el nombre del servlet en la etiqueta <servlet-name> en web.xml . Una vez que se inicializa DispatcherServlet, buscará un nombre de archivo [servlet-name]-servlet.xml en la carpeta WEB-INF de la aplicación web. En este ejemplo, el marco buscará un archivo llamado crunchify-servlet.xml .
Paso-7
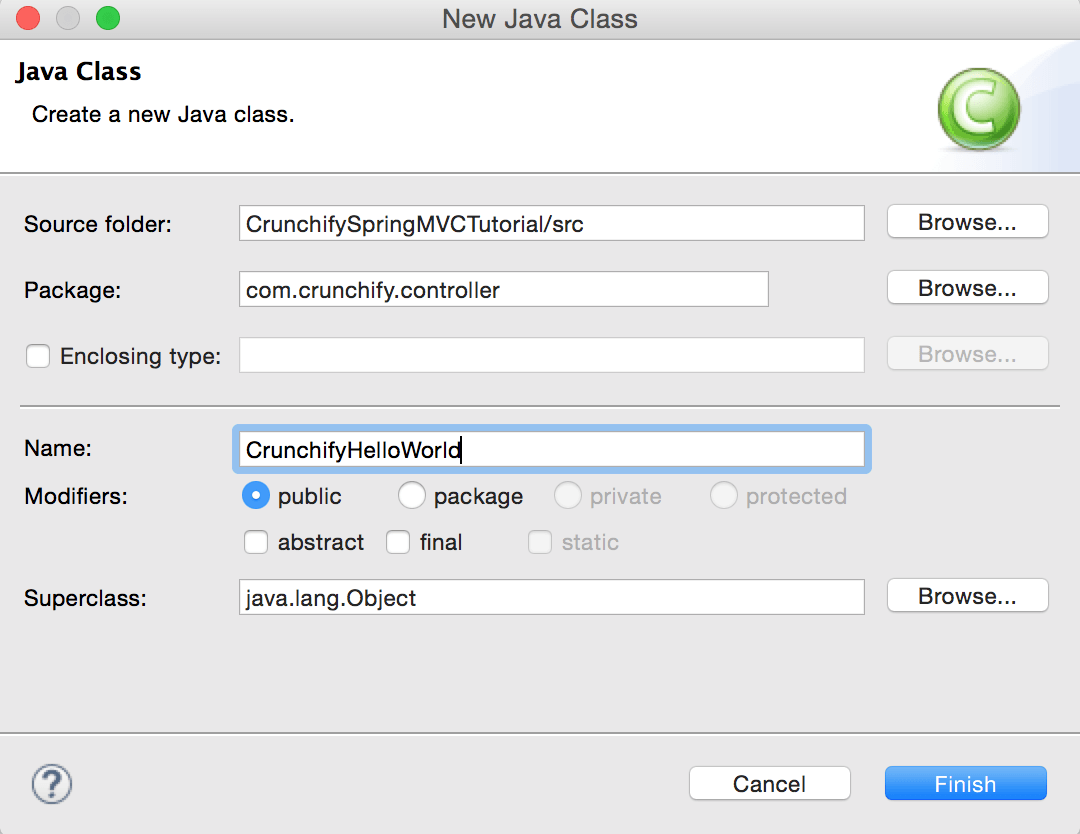
Crear clase de controlador.
- Haga clic derecho en
Java Resources->src - Haga clic en
New->Class - Paquete:
com.crunchify.controller - Nombre de archivo:
CrunchifyHelloWorld.java
CrunchifyHelloWorld.java
|
1 2 3 4 5 6 7 8 9 10 11 12 13 14 15 16 17 18 19 20 21 22 |
package com . crunchify . controller ; import org . springframework . stereotype . Controller ; import org . springframework . web . bind . annotation . RequestMapping ; import org . springframework . web . servlet . ModelAndView ; /* * author: Crunchify.com * */ @Controller public class CrunchifyHelloWorld { @RequestMapping ( "/welcome" ) public ModelAndView helloWorld ( ) { String message = "<br><div>" + "<h3>********** Hello World, Spring MVC Tutorial</h3>This message is coming from CrunchifyHelloWorld.java **********</div><br><br>" ; return new ModelAndView ( "welcome" , "message" , message ) ; } } |
Tenga en cuenta que hemos anotado la clase CrunchifyHelloWorld con @Controller y @RequestMapping("/welcome") . Cuando Spring escanee nuestro paquete, reconocerá este bean como un bean controlador para procesar las solicitudes. La anotación @RequestMapping le dice a Spring que este controlador debe procesar todas las solicitudes que comiencen con /welcome en la ruta de la URL. Eso incluye /welcome/* y /welcome.html .

El método helloWorld() devuelve el objeto ModelAndView . El objeto ModelAndView intenta resolverse en una vista llamada "bienvenida" y el modelo de datos se devuelve al navegador para que podamos acceder a los datos dentro del JSP. El nombre de la vista lógica se resolverá en /WEB-INF/jsp/welcome.jsp . El nombre lógico "bienvenido" que se devuelve en el objeto ModelAndView se asigna a la ruta /WEB-INF/jsp/welcome.jsp.
El objeto ModelAndView también contiene un mensaje con la clave "mensaje" y un valor detallado. Estos son los datos que estamos pasando a nuestra vista. Normalmente, este será un objeto de valor en forma de bean Java que contendrá los datos que se mostrarán en nuestra vista. Aquí simplemente estamos pasando una cadena.
Paso-8
La vista: crear un nuevo archivo /WebContent/index.jsp .
índice.jsp
|
1 2 3 4 5 6 7 8 9 10 11 12 13 14 15 16 17 18 19 20 21 22 |
< html > < head > < title > Spring MVC Tutorial Series by Crunchify . com < / title > <style type ="text/css"> body { background-image : url ( 'https://cdn.crunchify.com/bg.png' ) ; } </style> < / head > < body > < br > < div style = "text-align: center" > < h2 > Hey You . . ! ! This is your 1st Spring MCV Tutorial . . < br > < br > < / h2 > < h3 > < a href = "welcome.html" > Click here to See Welcome Message . . . < / a > ( to check Spring MVC Controller . . . @ RequestMapping ( "/welcome" ) ) < / h3 > < / div > < / body > < / html > |
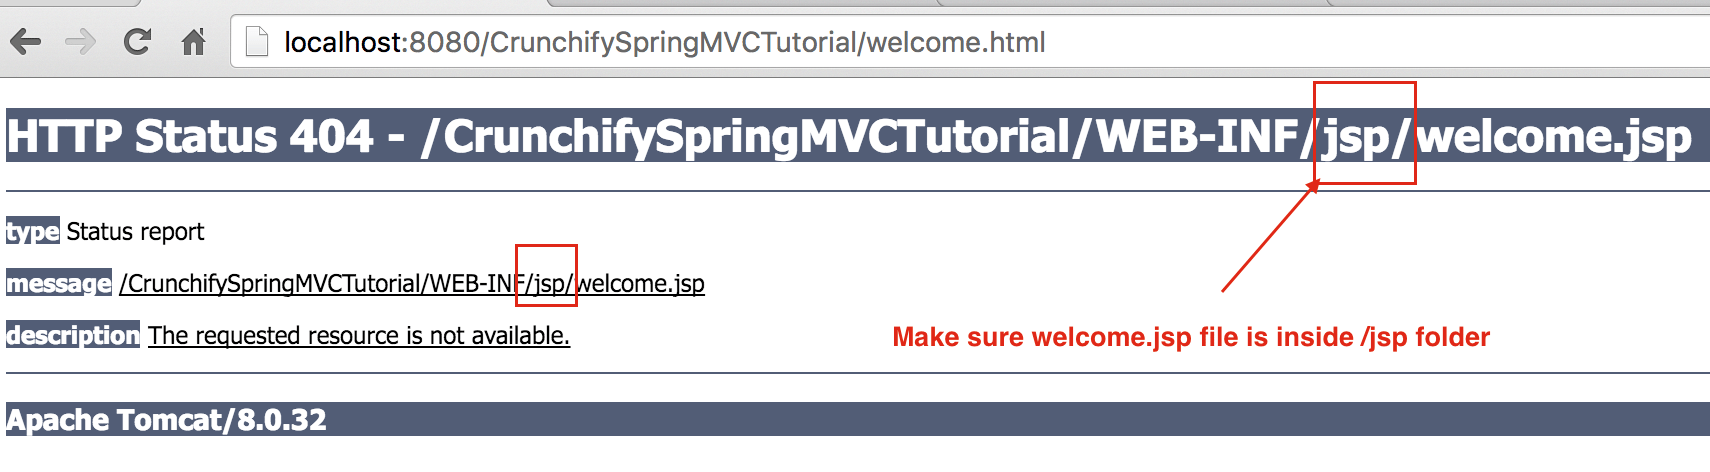
Cree otro archivo /WebContent/WEB-INF/jsp/welcome.jsp .
NOTE: No olvide crear la carpeta jsp y poner welcome.jsp dentro de ella
bienvenido.jsp
|
1 2 3 4 5 6 7 8 9 10 11 12 13 14 15 16 17 18 19 20 21 22 23 24 25 |
< html > < head > < title > Spring MVC Tutorial by Crunchify - Hello World Spring MVC Example < / title > <style type ="text/css"> body { background-image : url ( 'https://cdn.crunchify.com/bg.png' ) ; } </style> < / head > < body > $ { message } < br > < br > < div style = "font-family: verdana; padding: 10px; border-radius: 10px; font-size: 12px; text-align: center;" > Spring MCV Tutorial by < a href = "https://crunchify.com" > Crunchify < / a > . Click < a href = "https://crunchify.com/category/java-tutorials/" target = "_blank" > here < / a > for all Java and < a href = 'https://crunchify.com/category/spring-mvc/' target = '_blank' > here < / a > for all Spring MVC , Web Development examples . < br > < / div > < / body > < / html > |
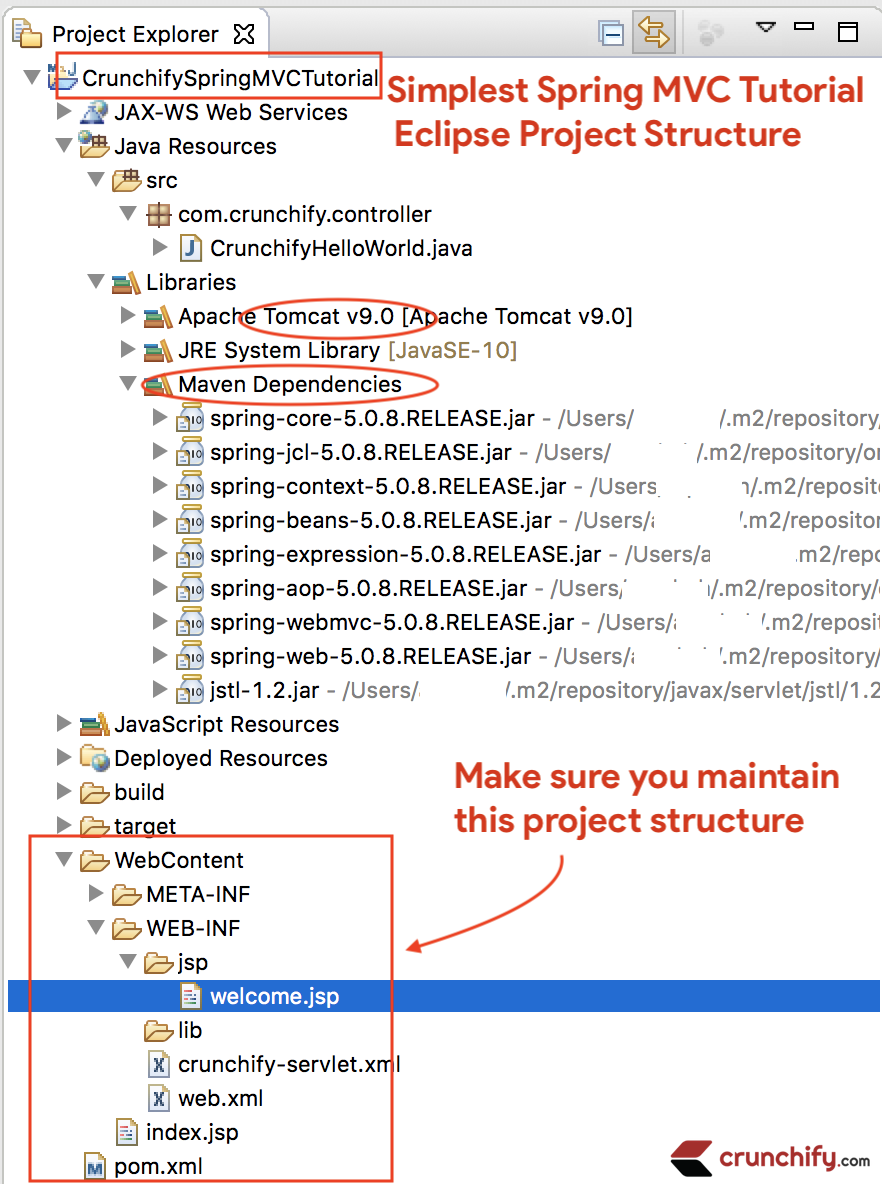
Después de todo, así es como debería verse tu espacio de trabajo.
Paso-9
Haga clic con el botón derecho en Project -> Run As -> Maven Build...
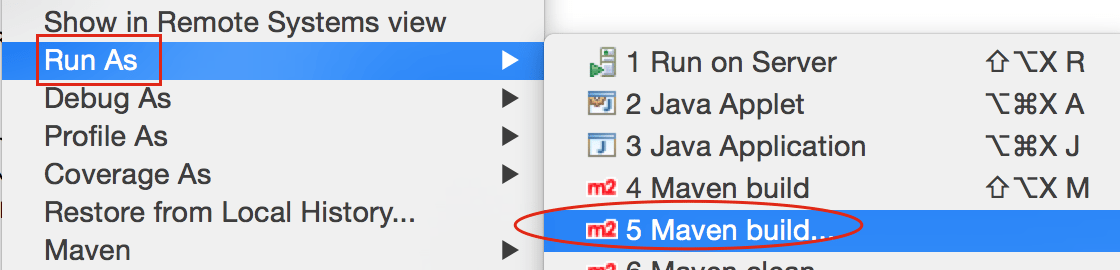
Add Goals : clean install . Haga clic Apply y Run .
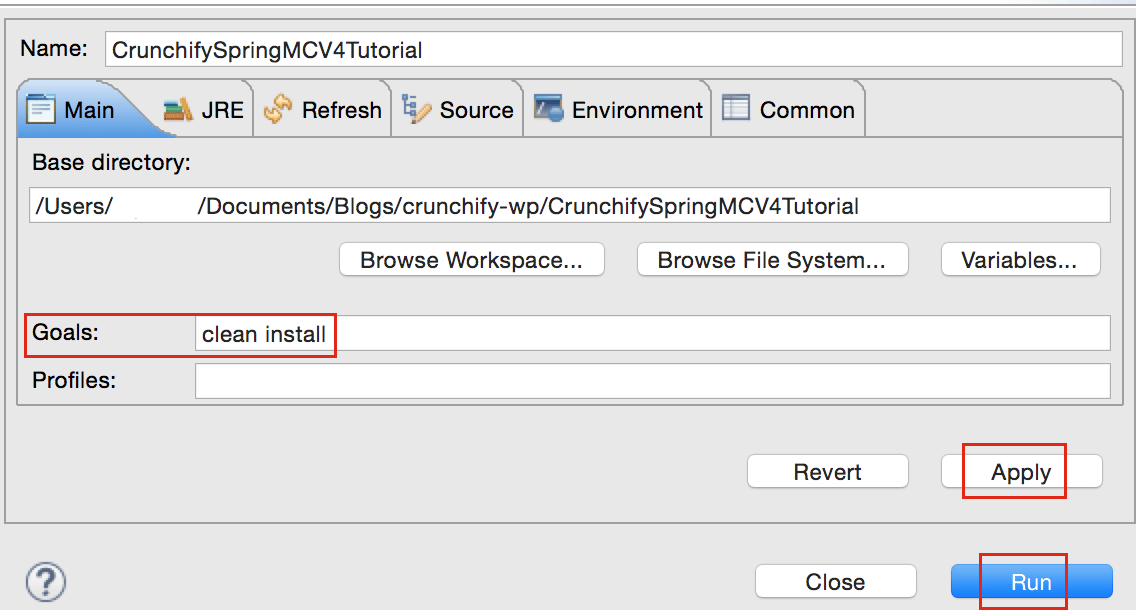
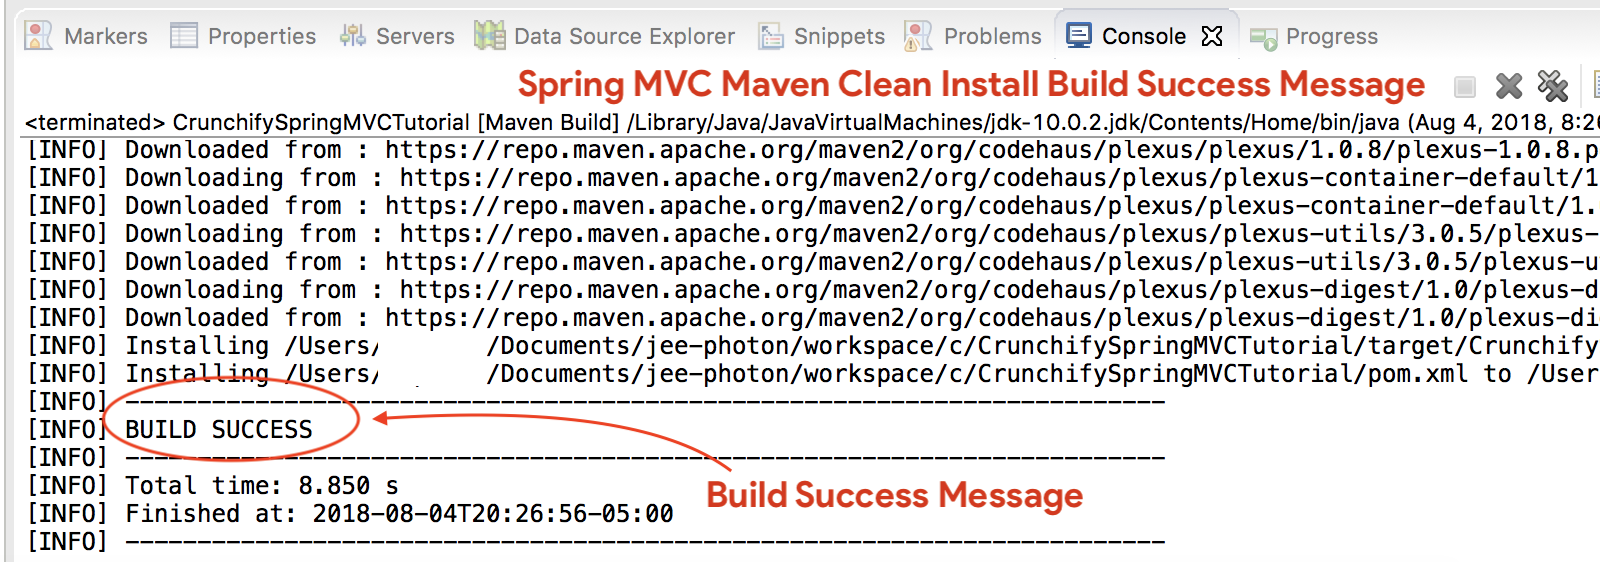
Debería ver success message compilación:
¿Dónde están todos mis archivos .jar?
Verá todos los archivos .jar en la carpeta /target . Captura de pantalla.
Paso-10
- Si
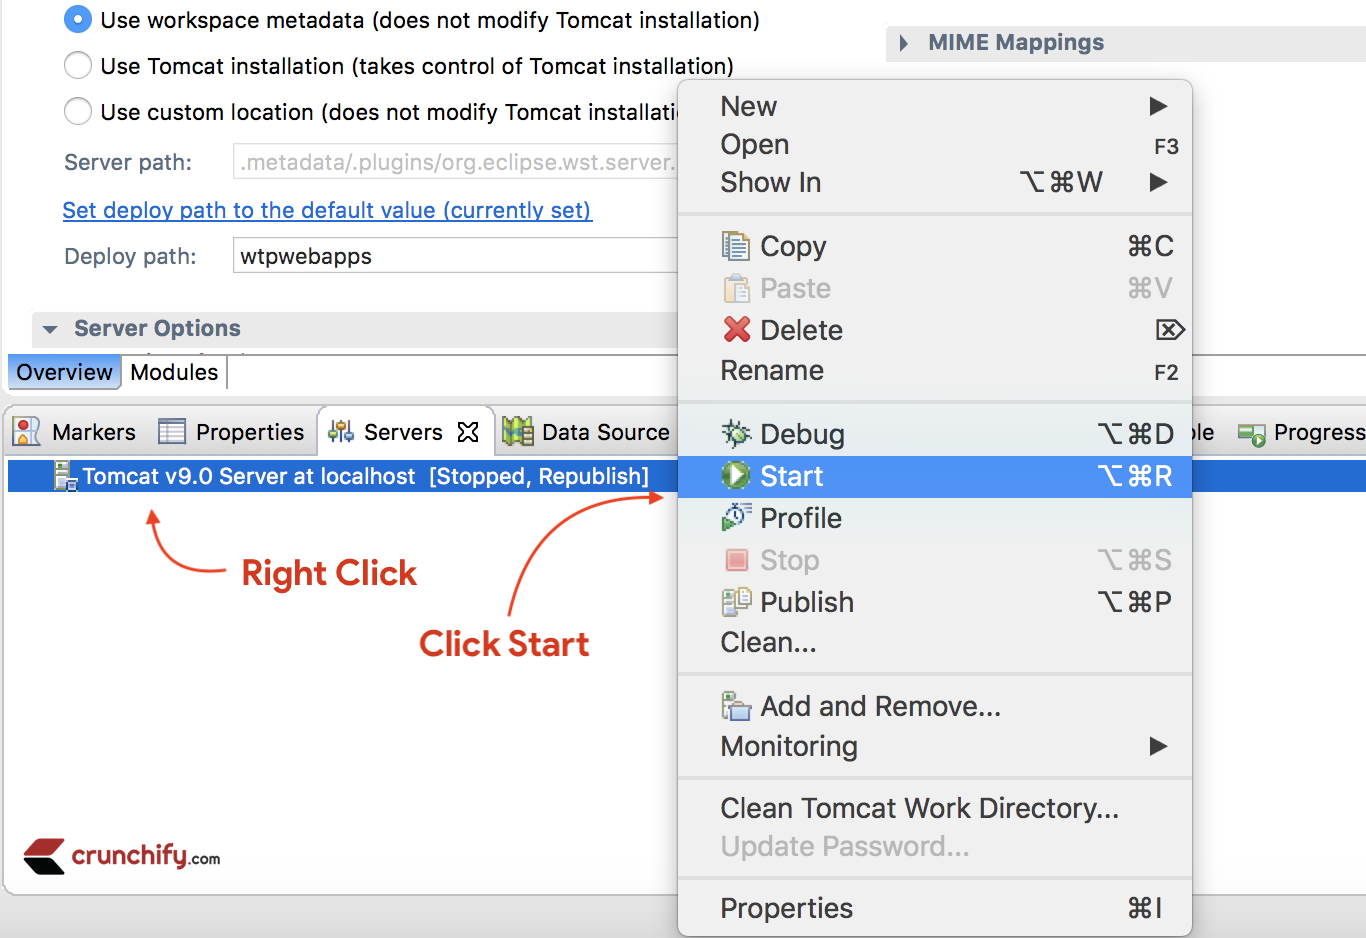
don't seeel Servidor Tomcat en la pestañaServers, siga los pasos para agregar Apache Tomcat a Eclipse. - Implementar proyecto en
Apache Tomcat- Botón derecho del ratón
- Agregar y quitar
- Agregar proyecto al servidor (sección lateral derecha).
- Haga clic en Inicio.
Asegúrese de ver los registros a continuación. Eso significa que su aplicación se implementó con éxito en el servidor web Tomcat.
|
1 2 3 4 5 6 7 8 9 10 11 12 13 14 15 16 17 18 19 20 21 22 23 24 25 26 27 28 29 30 31 32 33 34 35 36 37 38 39 40 |
Aug 04 , 2018 9 : 08 : 10 PM org . apache . tomcat . util . digester . SetPropertiesRule begin WARNING : [ SetPropertiesRule ] { Server / Service / Engine / Host / Context } Setting property 'source' to 'org.eclipse.jst.jee.server:CrunchifySpringMVCTutorial' did not find a matching property . INFO : Server version : Apache Tomcat / 9.0.10 INFO : Server built : Jun 20 2018 17 : 32 : 21 UTC INFO : Server number : 9.0.10.0 INFO : OS Name : Mac OS X INFO : OS Version : 10.13.6 INFO : Architecture : x86_64 INFO : Java Home : / Library / Java / JavaVirtualMachines / jdk - 10.0.2.jdk / Contents / Home INFO : JVM Version : 10.0.2 + 13 INFO : JVM Vendor : "Oracle Corporation" INFO : CATALINA_BASE : / Users / appshah / Documents / jee - photon / workspace / c / . metadata / . plugins / org . eclipse . wst . server . core / tmp0 INFO : CATALINA_HOME : / Users / appshah / Documents / jee - photon / apache - tomcat - 9.0.10 INFO : Command line argument : - Dcatalina . base =/ Users / appshah / Documents / jee - photon / workspace / c / . metadata / . plugins / org . eclipse . wst . server . core / tmp0 INFO : Command line argument : - Dcatalina . home =/ Users / appshah / Documents / jee - photon / apache - tomcat - 9.0.10 INFO : Command line argument : - Dwtp . deploy =/ Users / appshah / Documents / jee - photon / workspace / c / . metadata / . plugins / org . eclipse . wst . server . core / tmp0 / wtpwebapps INFO : Command line argument : - Dfile . encoding = UTF - 8 INFO : The APR based Apache Tomcat Native library which allows optimal performance in production environments was not found on the java . library . path : [ / Users / appshah / Library / Java / Extensions : / Library / Java / Extensions : / Network / Library / Java / Extensions : / System / Library / Java / Extensions : / usr / lib / java : . ] INFO : Initializing ProtocolHandler [ "http-nio-8080" ] INFO : Using a shared selector for servlet write / read INFO : Initializing ProtocolHandler [ "ajp-nio-8009" ] INFO : Using a shared selector for servlet write / read INFO : Initialization processed in 841 ms INFO : Starting service [ Catalina ] INFO : Starting Servlet Engine : Apache Tomcat / 9.0.10 INFO : At least one JAR was scanned for TLDs yet contained no TLDs . Enable debug logging for this logger for a complete list of JARs that were scanned but no TLDs were found in them . Skipping unneeded JARs during scanning can improve startup time and JSP compilation time . INFO : At least one JAR was scanned for TLDs yet contained no TLDs . Enable debug logging for this logger for a complete list of JARs that were scanned but no TLDs were found in them . Skipping unneeded JARs during scanning can improve startup time and JSP compilation time . INFO : No Spring WebApplicationInitializer types detected on classpath INFO : Initializing Spring FrameworkServlet 'crunchify' INFO : FrameworkServlet 'crunchify' : initialization started INFO : Refreshing WebApplicationContext for namespace 'crunchify-servlet' : startup date [ Sat Aug 04 21 : 08 : 13 CDT 2018 ] ; root of context hierarchy INFO : Loading XML bean definitions from ServletContext resource [ / WEB - INF / crunchify - servlet . xml ] INFO : Mapped "{[/welcome]}" onto public org . springframework . web . servlet . ModelAndView com . crunchify . controller . CrunchifyHelloWorld . helloWorld ( ) INFO : Looking for @ ControllerAdvice : WebApplicationContext for namespace 'crunchify-servlet' : startup date [ Sat Aug 04 21 : 08 : 13 CDT 2018 ] ; root of context hierarchy INFO : Looking for @ ControllerAdvice : WebApplicationContext for namespace 'crunchify-servlet' : startup date [ Sat Aug 04 21 : 08 : 13 CDT 2018 ] ; root of context hierarchy INFO : Mapped URL path [ /** ] onto handler 'org.springframework.web.servlet.resource.DefaultServletHttpRequestHandler#0' INFO : FrameworkServlet 'crunchify' : initialization completed in 1607 ms INFO : Starting ProtocolHandler [ "http-nio-8080" ] INFO : Starting ProtocolHandler [ "ajp-nio-8009" ] INFO : Server startup in 3579 ms |
Paso-11. Hecho.
Visite: http://localhost:8080/CrunchifySpringMVCTutorial/ y debería estar listo.
Hurra... Ahora ya conoces Hello World Spring MVC 5 Example . Avíseme si encuentra alguna excepción mientras ejecuta esto. Hay muchos más ejemplos que puedes encontrar aquí.
Do you want to include JS, CSS and images into JSP file? Siga este tutorial: La mejor manera de Agregar/Integrar JS, CSS e imágenes en un archivo JSP usando 'mvc:resources mapping'.
¿Teniendo problemas? ¿Cualquier problema?
Paso 1 de clasificación: ¿tiene un error de estado HTTP 404?
Además, siga el siguiente tutorial:
Paso 2 de clasificación: ¿la URL no funciona? ¿Error de tomcat?
Asegúrese de agregar Apache Tomcat Server a Targeted Runtime . Que puede haber seleccionado en Step-1 . Tomcat 7 u 8 cualquiera: el servidor debería funcionar.
Paso 3 de triaje: ¿errores expertos?
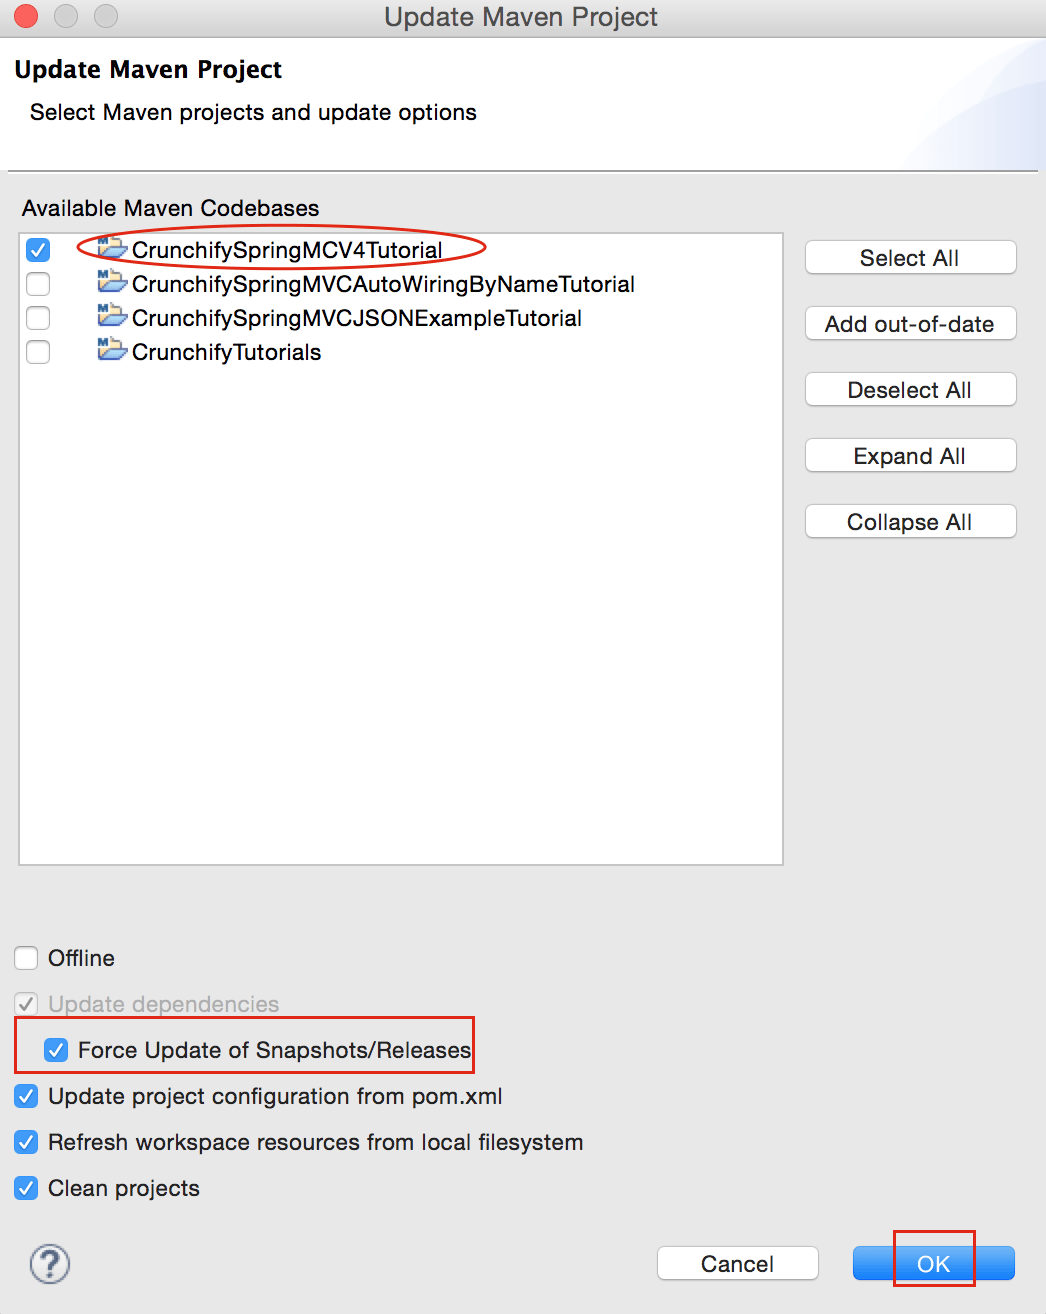
Asegúrese de actualizar todas las dependencias de Maven.
No dude en enviar un correo electrónico o comentar a continuación si tiene algún problema al ejecutar el tutorial anterior.