
Tutorial mais simples do Spring MVC Framework – Exemplo Hello World com página de UI (JSP)
Publicados: 2019-02-23
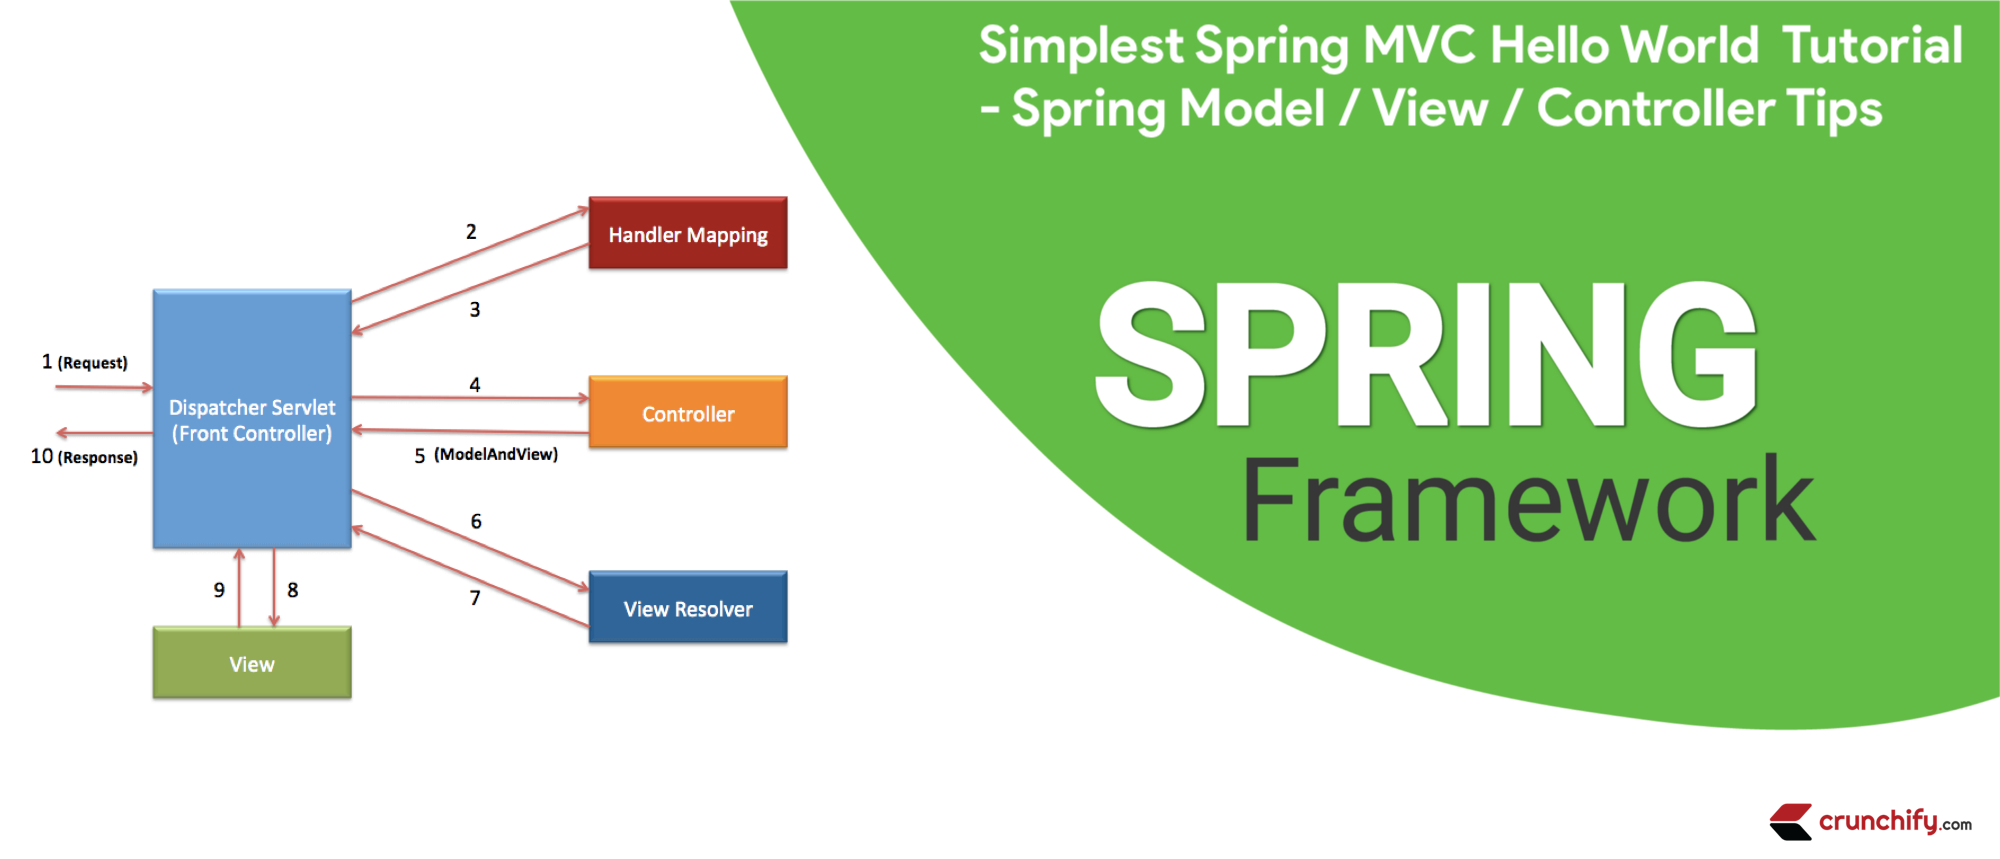
A arquitetura Model-View-Controller (MVC) fornece a maneira mais simples de desenvolver aplicativos da Web flexíveis e fracamente acoplados.
Neste tutorial, veremos como criar seu aplicativo 1st Spring MVC com etapas muito detalhadas.
Você tem alguma das perguntas abaixo?
- Fundamentos do Spring MVC 5.2.3
- Desenvolvendo um aplicativo Spring Framework MVC 5 passo a passo.
- java – tutorial Spring MVC do zero
- Tutorial rápido do Spring MVC
- Tutorial do Spring MVC Framework
- Primeiro tutorial do aplicativo Spring MVC
- Spring 5.x MVC Tutoriais, AJAX Demo, jQuery Demo, JavaScript Demo, dicas e truques Spring 5 MVC
Então você está no lugar certo. Aqui vou demonstrar Spring MVC framework simples para construir aplicações web.
Primeira coisa primeiro - Vamos configurar o ambiente
Tutorial atualizado e verificado pela última vez: setembro de 2020 com as versões de ferramentas abaixo.
Estou usando as ferramentas abaixo que você pode precisar baixar, se ainda não tiver.
- Tomcat 9.0.38 – Baixe o Apache Tomcat mais recente neste link.
- Certifique-se de fazer o download do Eclipse IDE para desenvolvedores
Java EE(2020-09 R) – Link de download. (esquema abaixo) -
Spring 5.2.9.RELEASE(Não é necessário fazer download) – usaremos a dependência do Maven. - JDK 15 – Link para download.
Certifique-se de baixar o Java EE Developer Kit mais recente:

Objetivo principal
O objetivo principal deste tutorial é criar o aplicativo Spring MVC da maneira mais simples.
Antes de começarmos vamos ver o que veremos no final deste tutorial
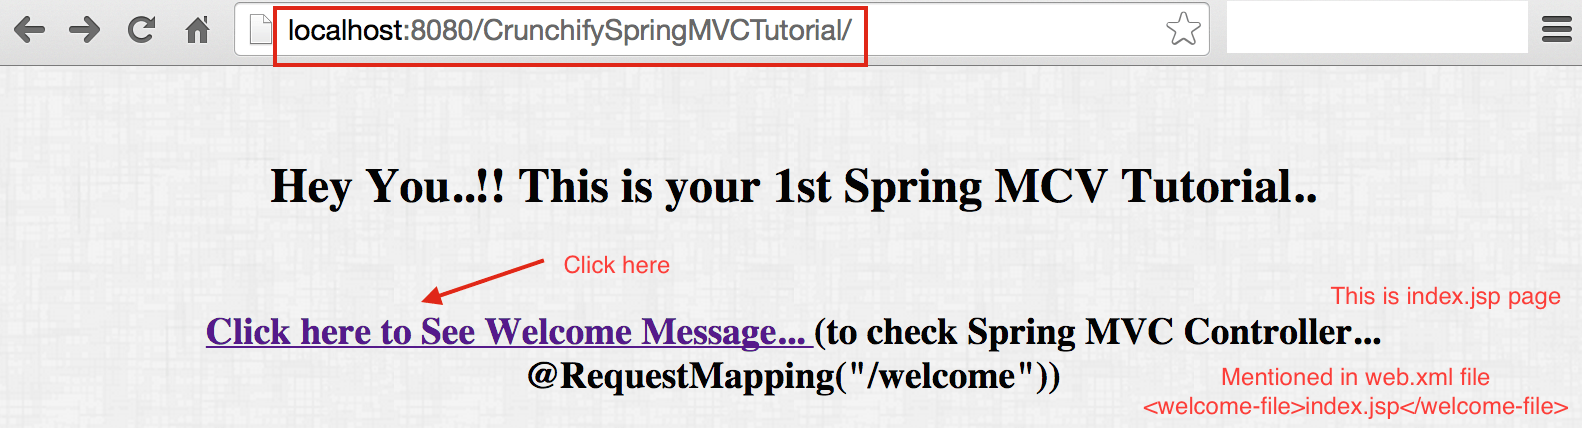
É assim que o application result ficará. Este é um resultado final depois de concluir todas as etapas abaixo.
Aqui está um resultado final: Página de boas-vindas ==> index.jsp
O resultado retorna da classe do controlador
Agora vamos começar no Tutorial
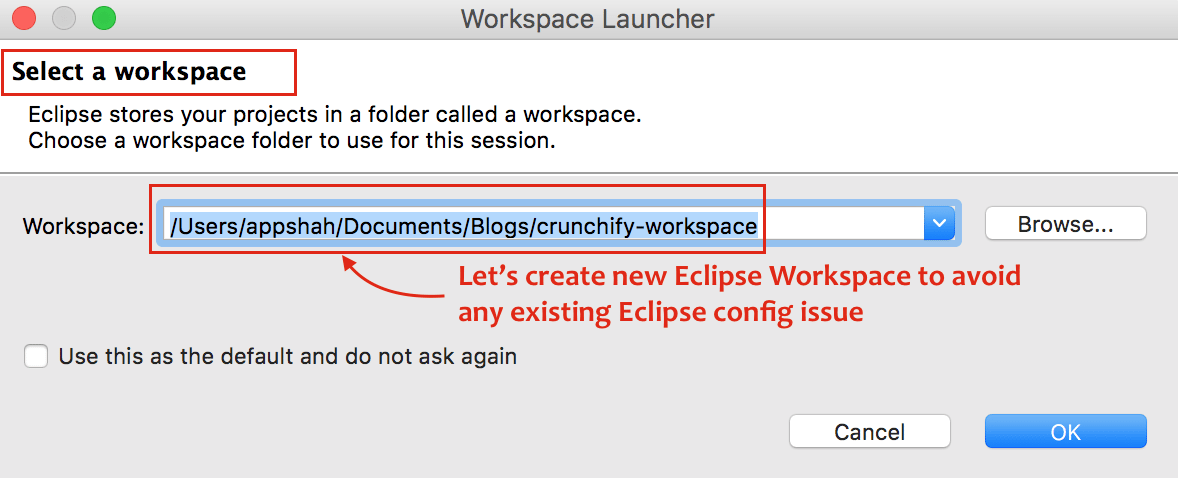
Passo 1
- Abrir Eclipse
- Criar
New Eclipse Workspace– Isso émustpara evitar qualquer problema de configuração do espaço de trabalho existente.
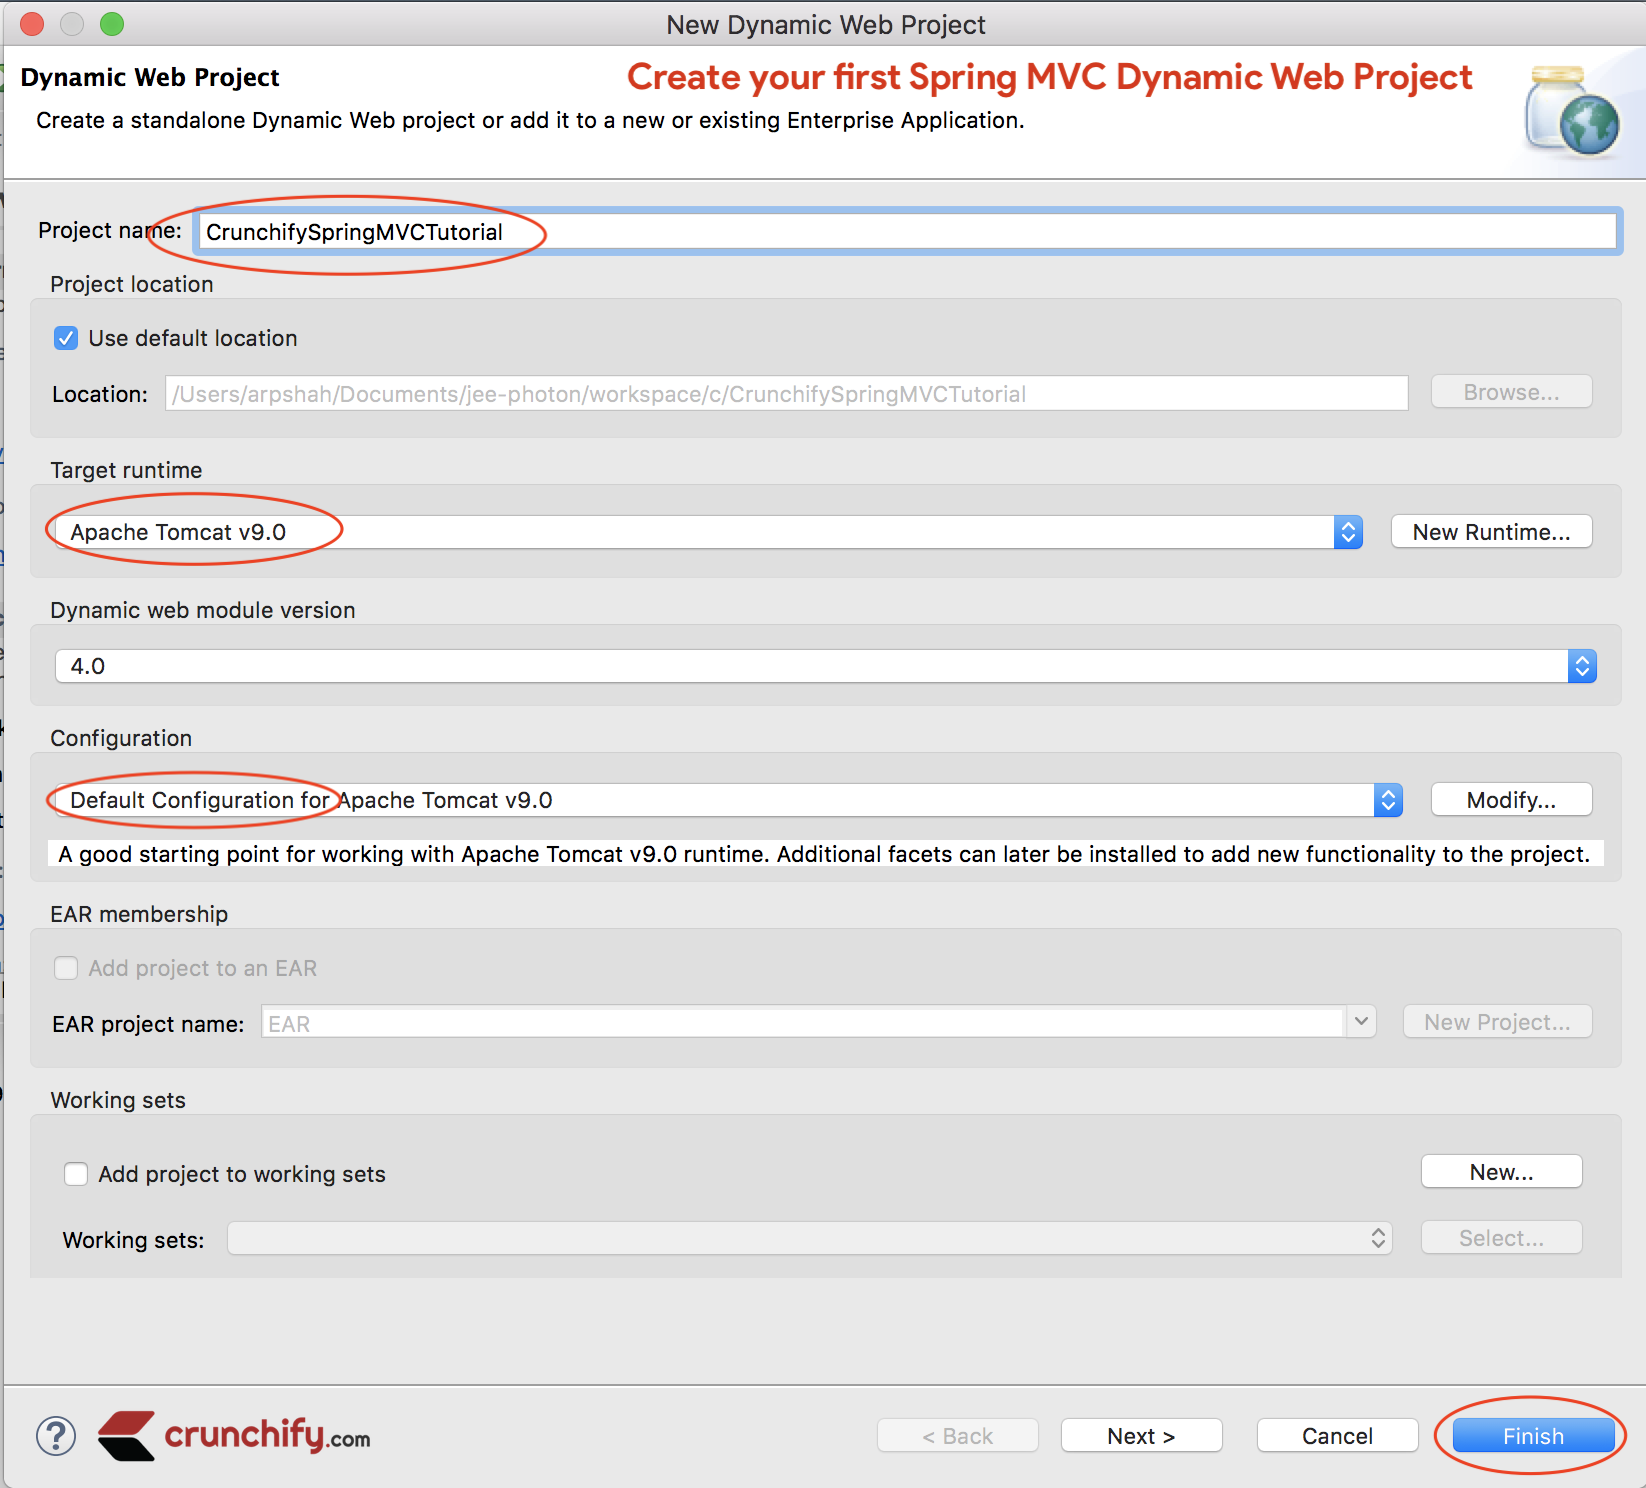
Passo 2
- Clique em
File - Clique em
New - Escolher
Dynamic Web Project - Uma janela pop-up, forneça o nome do projeto:
CrunchifySpringMVCTutorial - Certifique-se de usar o
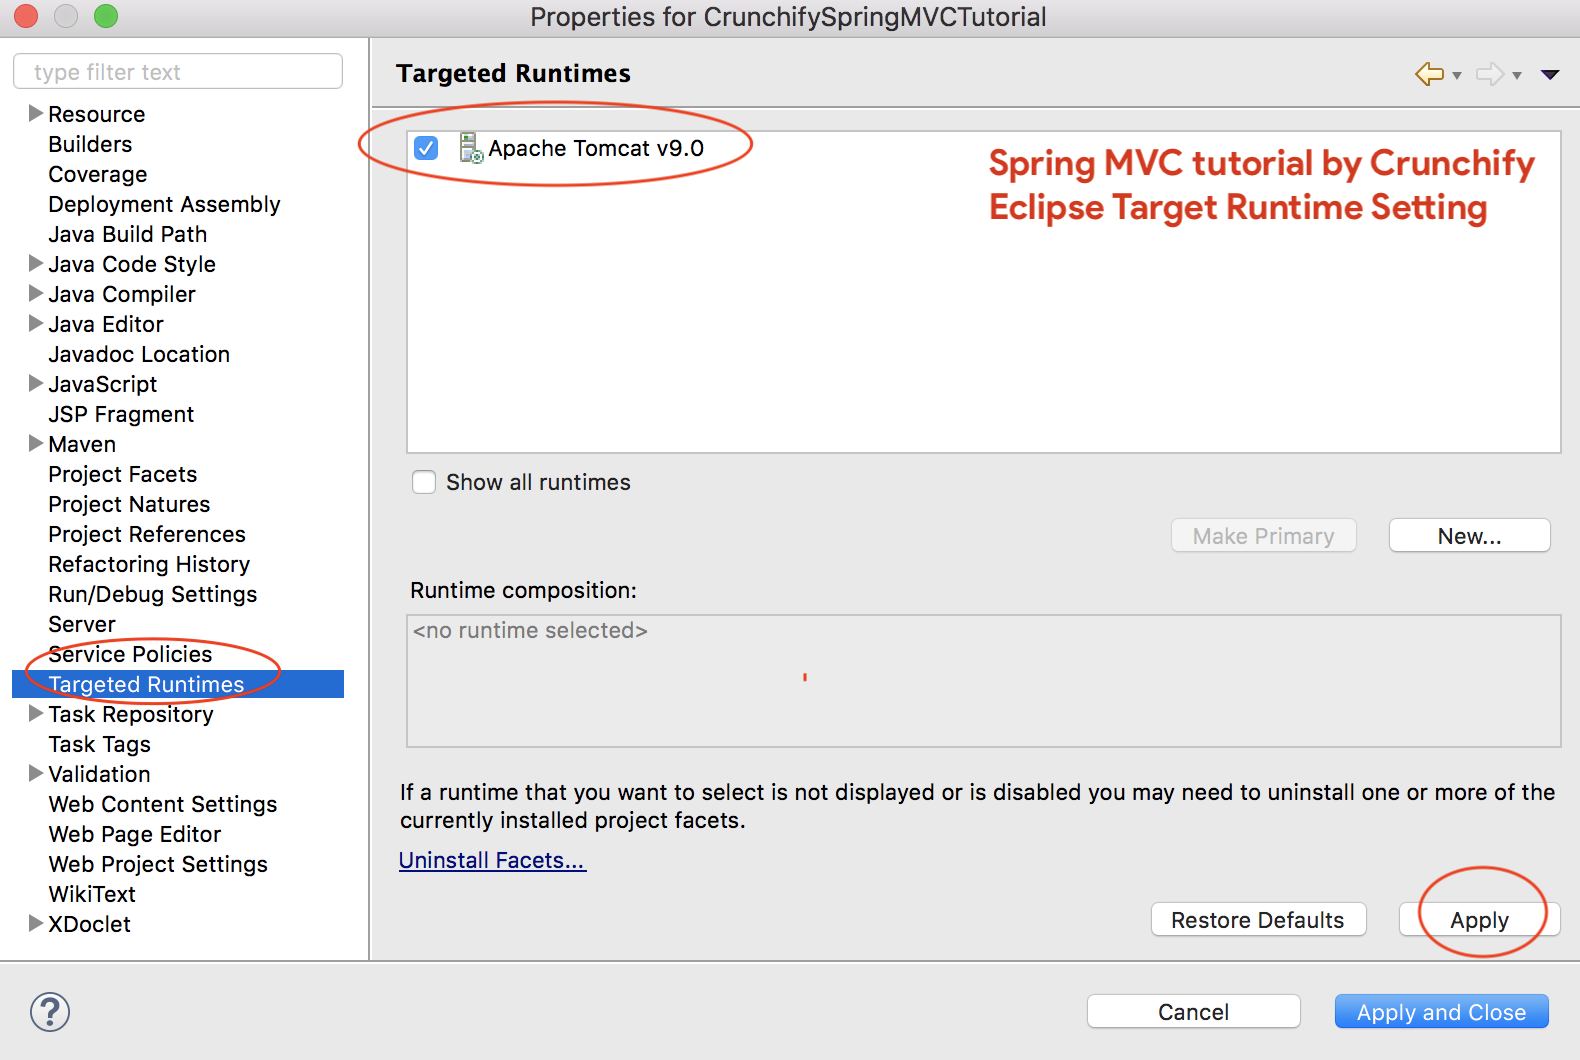
Target RuntimecomoApache Tomcat 9.0- Se você não vir o Target Runtime, siga estas etapas
- Escolha a configuração como
Default Configuration
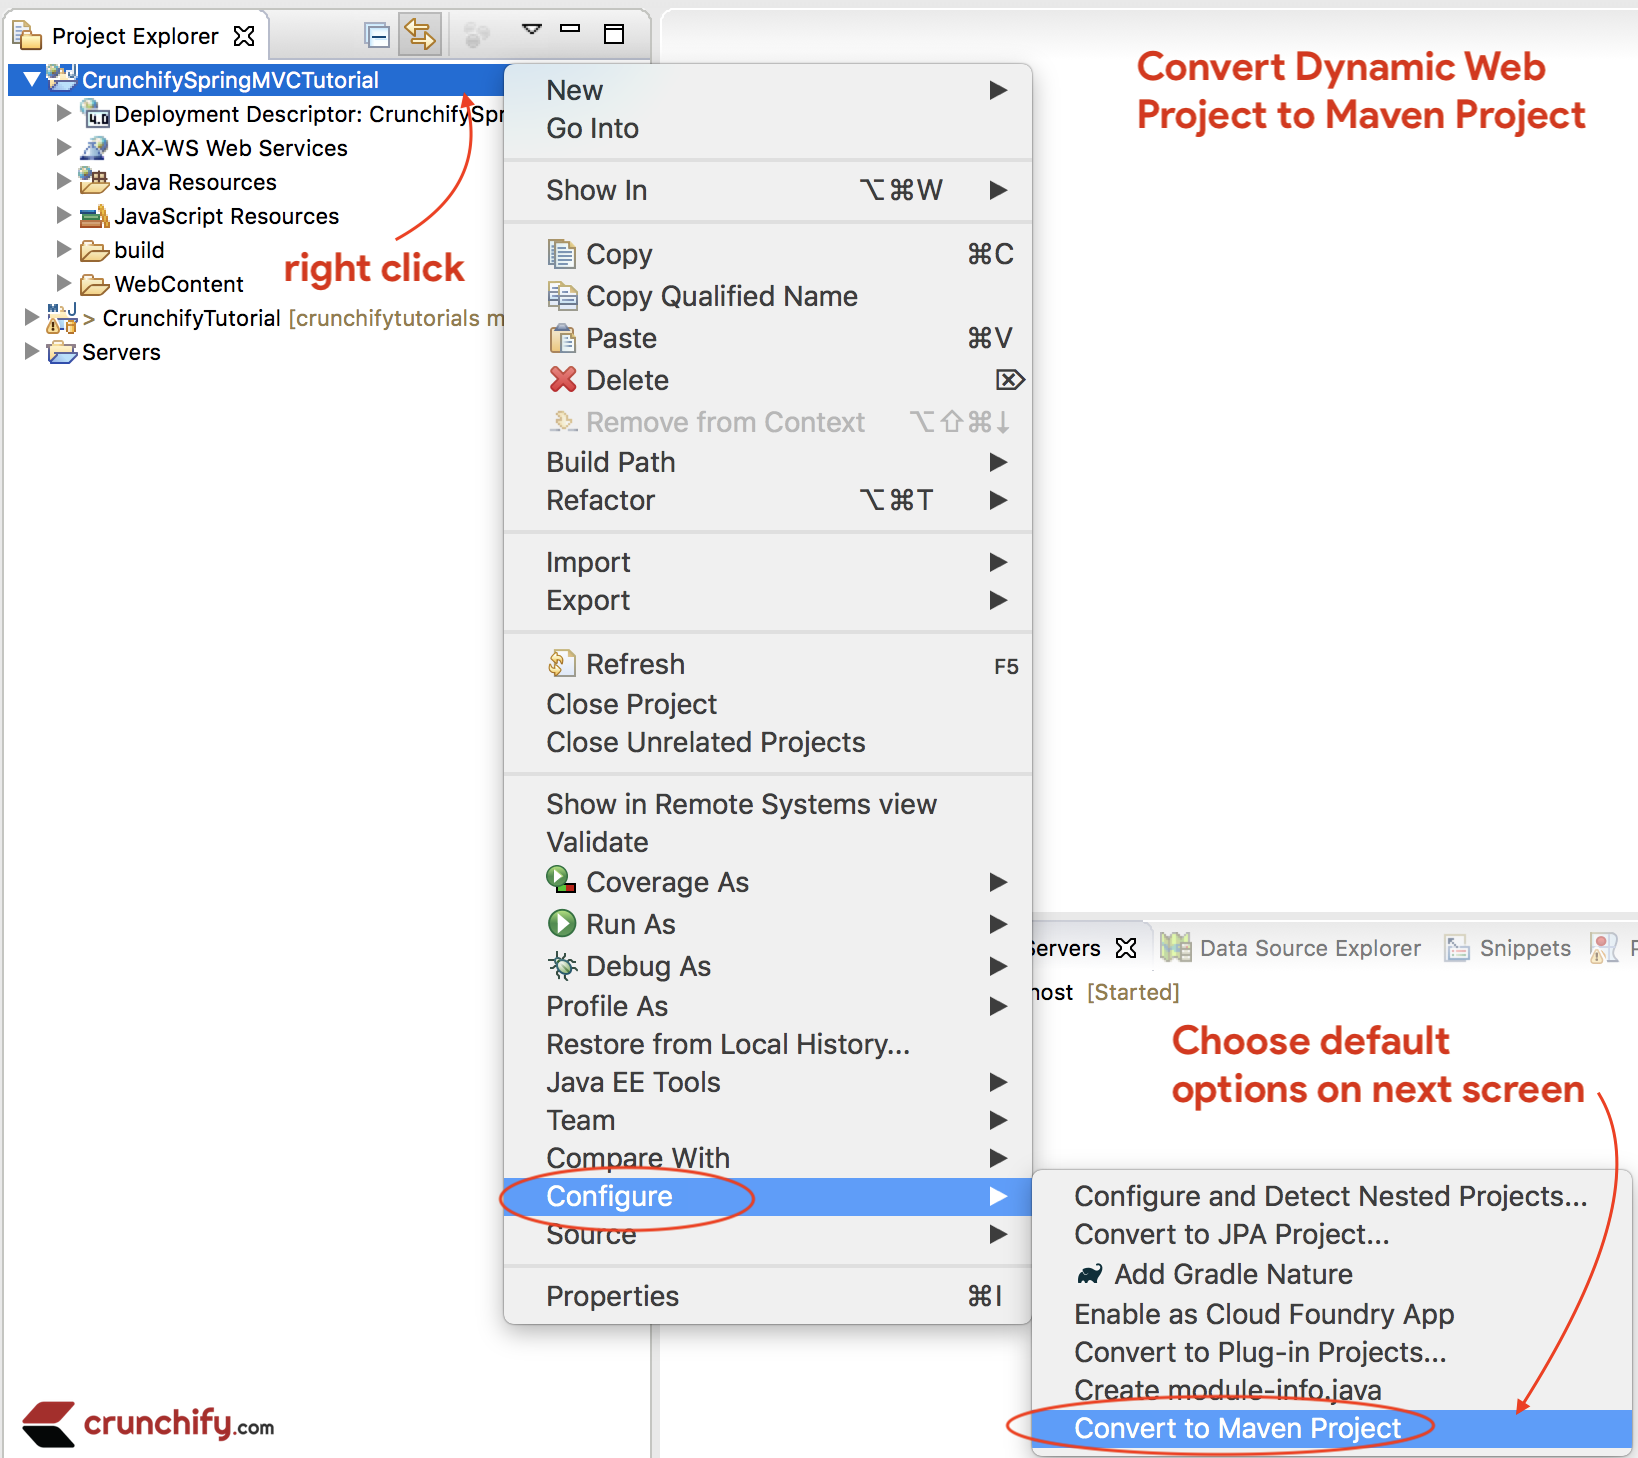
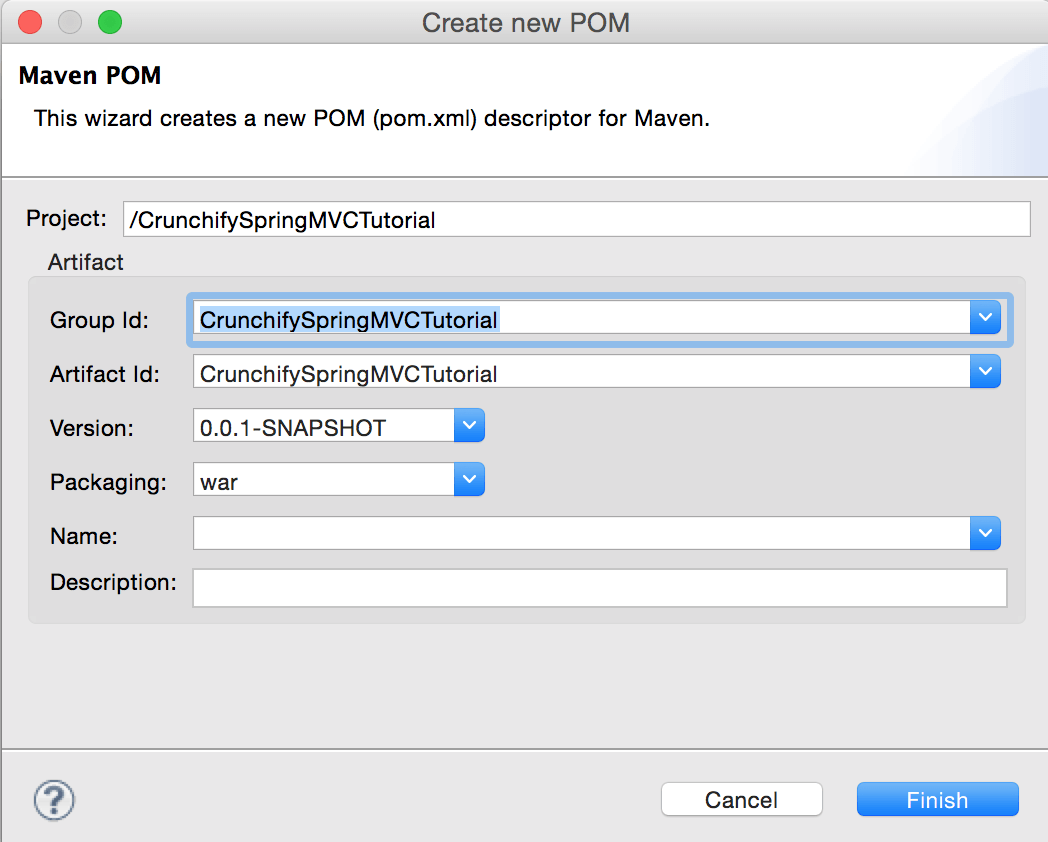
Etapa 3
Converta Project para Maven Project para adicionar todas as dependências necessárias do Spring MVC ao projeto.
Degraus:
- Clique com o botão direito no projeto
- Configurar
- Converter para projeto
Maven
Passo 4
Abra o arquivo pom.xml e adicione jar dependencies abaixo ao projeto.
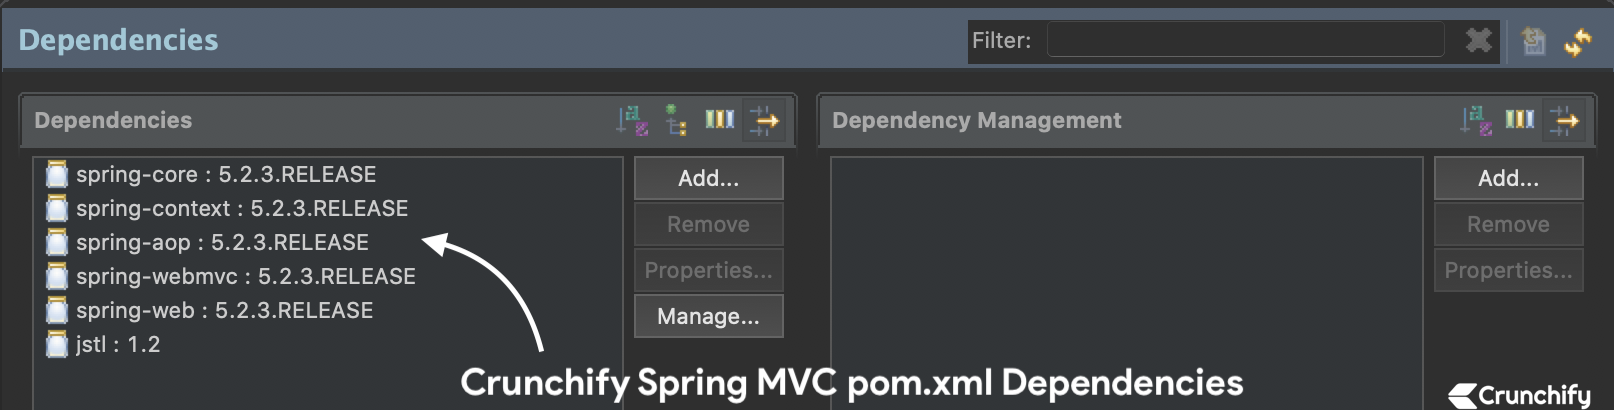
NOTE:Aqui está meu arquivopom.xml. Certifique-se de atualizar a versão do Java para13se você ainda não mudou para oJDK 13. Continuaremos atualizando este tutorial para a versão mais recente do Spring MVC.Portanto, o arquivo pom.xml abaixo pode ter uma versão diferente (mais recente) das dependências do Spring MVC da imagem acima
|
1 2 3 4 5 6 7 8 9 10 11 12 13 14 15 16 17 18 19 20 21 22 23 24 25 26 27 28 29 30 31 32 33 34 35 36 37 38 39 40 41 42 43 44 45 46 47 48 49 50 51 52 53 54 55 56 57 58 59 60 61 |
< project xmlns = "http://maven.apache.org/POM/4.0.0" xmlns : xsi = "http://www.w3.org/2001/XMLSchema-instance" xsi : schemaLocation = "http://maven.apache.org/POM/4.0.0 http://maven.apache.org/xsd/maven-4.0.0.xsd" > < modelVersion > 4.0.0 < / modelVersion > < groupId > CrunchifySpringMVCTutorial < / groupId > < artifactId > CrunchifySpringMVCTutorial < / artifactId > < version > 0.0.1 - SNAPSHOT < / version > < packaging > war < / packaging > < build > < sourceDirectory > src < / sourceDirectory > < plugins > < plugin > < artifactId > maven - compiler - plugin < / artifactId > < version > 3.8.0 < / version > < configuration > < release > 13 < / release > < / configuration > < / plugin > < plugin > < artifactId > maven - war - plugin < / artifactId > < version > 3.2.1 < / version > < configuration > < warSourceDirectory > WebContent < / warSourceDirectory > < / configuration > < / plugin > < / plugins > < / build > < dependencies > < dependency > < groupId > org . springframework < / groupId > < artifactId > spring - core < / artifactId > < version > 5.2.3.RELEASE < / version > < / dependency > < dependency > < groupId > org . springframework < / groupId > < artifactId > spring - context < / artifactId > < version > 5.2.3.RELEASE < / version > < / dependency > < dependency > < groupId > org . springframework < / groupId > < artifactId > spring - aop < / artifactId > < version > 5.2.3.RELEASE < / version > < / dependency > < dependency > < groupId > org . springframework < / groupId > < artifactId > spring - webmvc < / artifactId > < version > 5.2.3.RELEASE < / version > < / dependency > < dependency > < groupId > org . springframework < / groupId > < artifactId > spring - web < / artifactId > < version > 5.2.3.RELEASE < / version > < / dependency > < dependency > < groupId > javax . servlet < / groupId > < artifactId > jstl < / artifactId > < version > 1.2 < / version > < / dependency > < / dependencies > < / project > |
Passo-5
Crie um novo arquivo do Bean de configuração do Spring: /WebContent/WEB-INF/crunchify-servlet.xml

crunchify-servlet.xml
|
1 2 3 4 5 6 7 8 9 10 11 12 13 14 15 16 17 18 19 20 21 22 23 24 25 26 27 |
<? xml version = "1.0" encoding = "UTF-8" ?> < beans xmlns = "http://www.springframework.org/schema/beans" xmlns : mvc = "http://www.springframework.org/schema/mvc" xmlns : context = "http://www.springframework.org/schema/context" xmlns : xsi = "http://www.w3.org/2001/XMLSchema-instance" xsi : schemaLocation = " http://www.springframework.org/schema/beans http://www.springframework.org/schema/beans/spring-beans.xsd http://www.springframework.org/schema/mvc http://www.springframework.org/schema/mvc/spring-mvc.xsd http://www.springframework.org/schema/context http://www.springframework.org/schema/context/spring-context.xsd" > < mvc : annotation - driven / > < context : component - scan base - package = "com.crunchify.controller" / > < mvc : default - servlet - handler / > < bean id = "viewResolver" class = "org.springframework.web.servlet.view.UrlBasedViewResolver" > < property name = "viewClass" value = "org.springframework.web.servlet.view.JstlView" / > < property name = "prefix" value = "/WEB-INF/jsp/" / > < property name = "suffix" value = ".jsp" / > < / bean > < / beans > |
No crunchify-servlet.xml acima arquivo de configuração, definimos uma tag <context:component-scan> . Isso permitirá que o Spring carregue todos os componentes do pacote com.crunchify.controller e todos os seus pacotes filhos.
Isso carregará nosso CrunchifyHelloWorld.class . Também definimos um bean viewResolver . Este bean resolverá a visualização e adicionará a string de prefixo /WEB-INF/jsp/ e o sufixo .jsp à visualização em ModelAndView.
Observe que em nossa classe CrunchifyHelloWorld , retornamos um objeto ModelAndView com o nome de exibição welcome.
Isso será resolvido para o caminho /WEB-INF/jsp/welcome.jsp .
Passo-6
Crie um novo arquivo web.xml se ele ainda não estiver lá. Mapeie o Spring MVC no arquivo /WebContent/WEB-INF/web.xml .
NOTE: se você não vir o arquivo web.xml em seu “ dynamic web project ”, siga estas etapas.
web.xml
|
1 2 3 4 5 6 7 8 9 10 11 12 13 14 15 16 17 18 19 20 21 22 23 24 25 26 27 28 |
<? xml version = "1.0" encoding = "UTF-8" ?> < web - app xmlns : xsi = "http://www.w3.org/2001/XMLSchema-instance" xmlns = "http://xmlns.jcp.org/xml/ns/javaee" xsi : schemaLocation = "http://xmlns.jcp.org/xml/ns/javaee http://xmlns.jcp.org/xml/ns/javaee/web-app_4_0.xsd" id = "WebApp_ID" version = "4.0" > < display - name > CrunchifySpringMVCTutorial < / display - name > < welcome - file - list > < welcome - file > index . html < / welcome - file > < welcome - file > index . htm < / welcome - file > < welcome - file > index . jsp < / welcome - file > < welcome - file > default . html < / welcome - file > < welcome - file > default . htm < / welcome - file > < welcome - file > default . jsp < / welcome - file > < / welcome - file - list > < servlet > < servlet - name > crunchify < / servlet - name > < servlet - class > org . springframework . web . servlet . DispatcherServlet < / servlet - class > < load - on - startup > 1 < / load - on - startup > < / servlet > < servlet - mapping > < servlet - name > crunchify < / servlet - name > < url - pattern > / welcome . jsp < / url - pattern > < url - pattern > / index . jsp < / url - pattern > < url - pattern > / welcome . html < / url - pattern > < url - pattern > * . html < / url - pattern > < / servlet - mapping > < / web - app > |
O código acima em web.xml mapeará DispatcherServlet com o padrão de url /welcome.jsp . Observe também que definimos index.jsp como arquivo de boas-vindas.
Uma coisa a notar aqui é o nome do servlet na tag <servlet-name> em web.xml . Uma vez inicializado o DispatcherServlet, ele procurará um nome de arquivo [servlet-name]-servlet.xml na pasta WEB-INF da aplicação web. Neste exemplo, a estrutura procurará o arquivo chamado crunchify-servlet.xml .
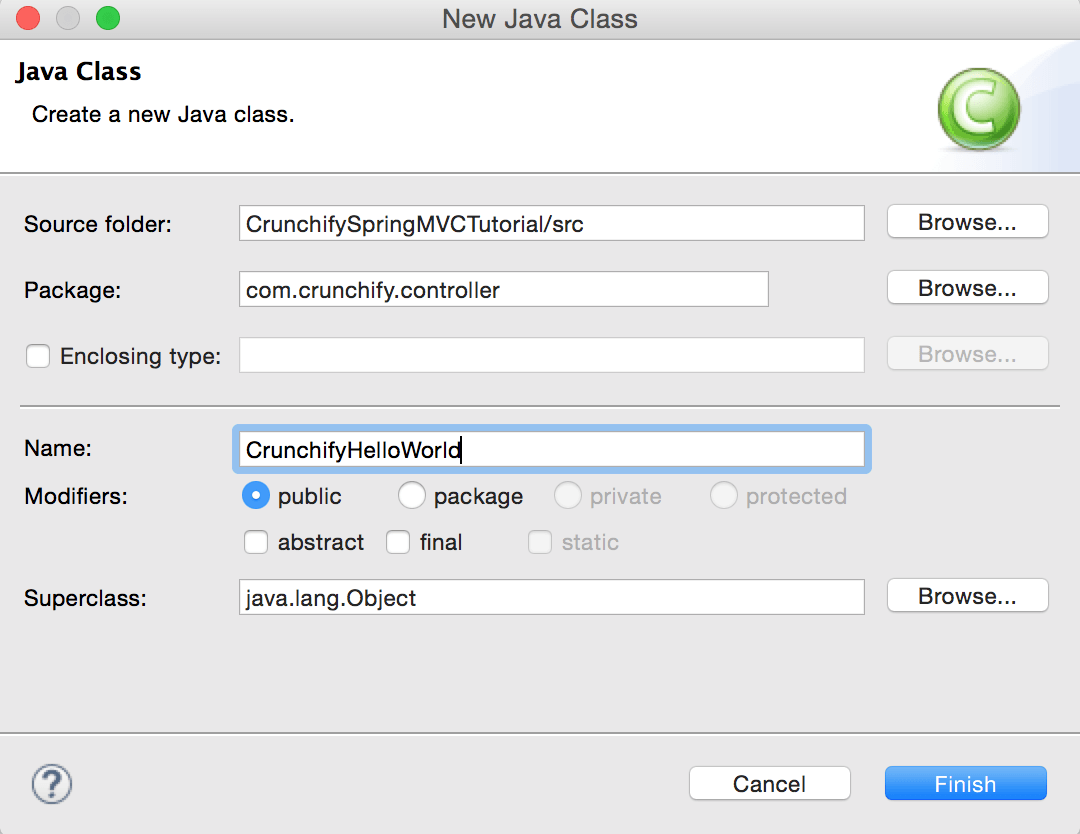
Passo-7
Criar classe de controlador.
- Clique com o botão direito do mouse em
Java Resources->src - Clique em
New->Class - Pacote:
com.crunchify.controller - Nome do arquivo:
CrunchifyHelloWorld.java
CrunchifyHelloWorld.java
|
1 2 3 4 5 6 7 8 9 10 11 12 13 14 15 16 17 18 19 20 21 22 |
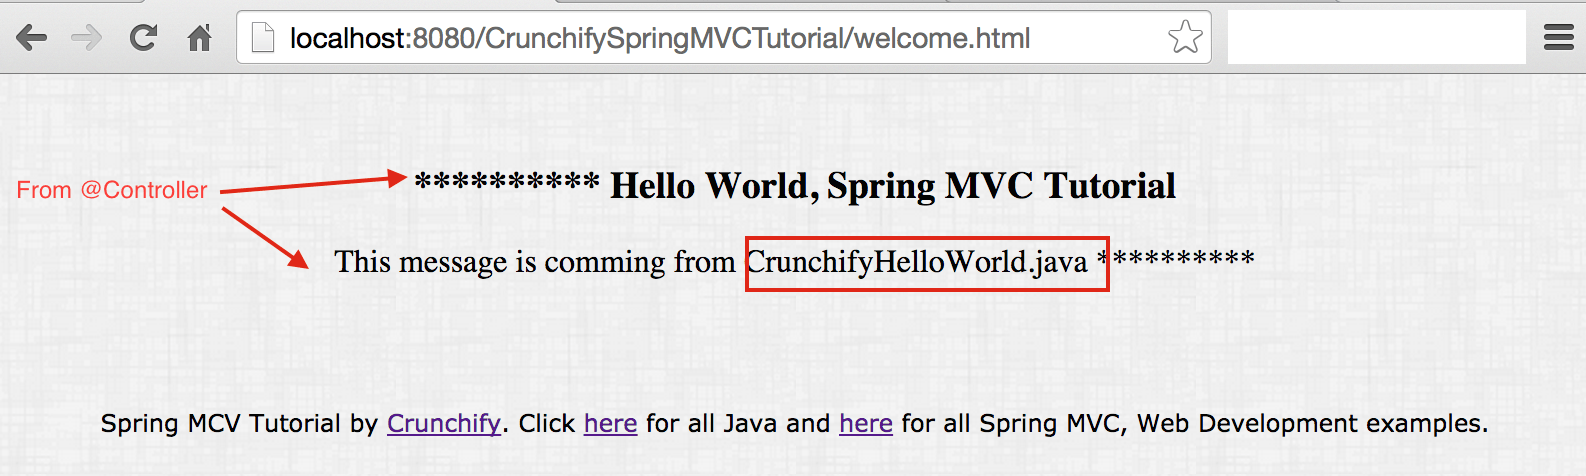
package com . crunchify . controller ; import org . springframework . stereotype . Controller ; import org . springframework . web . bind . annotation . RequestMapping ; import org . springframework . web . servlet . ModelAndView ; /* * author: Crunchify.com * */ @Controller public class CrunchifyHelloWorld { @RequestMapping ( "/welcome" ) public ModelAndView helloWorld ( ) { String message = "<br><div>" + "<h3>********** Hello World, Spring MVC Tutorial</h3>This message is coming from CrunchifyHelloWorld.java **********</div><br><br>" ; return new ModelAndView ( "welcome" , "message" , message ) ; } } |
Observe que anotamos a classe CrunchifyHelloWorld com @Controller e @RequestMapping("/welcome") . Quando o Spring varrer nosso pacote, ele reconhecerá esse bean como sendo um bean Controller para processar solicitações. A anotação @RequestMapping informa ao Spring que este Controller deve processar todas as solicitações começando com /welcome no caminho da URL. Isso inclui /welcome/* e /welcome.html .

O método helloWorld() retorna o objeto ModelAndView . O objeto ModelAndView tenta resolver para uma visão chamada “welcome” e o modelo de dados está sendo passado de volta ao navegador para que possamos acessar os dados dentro do JSP. O nome da visualização lógica será resolvido para /WEB-INF/jsp/welcome.jsp . O nome lógico “welcome” que é retornado no objeto ModelAndView é mapeado para o caminho /WEB-INF/jsp/welcome.jsp.
O objeto ModelAndView também contém uma mensagem com a chave “message” e o valor Detailed. Esses são os dados que estamos passando para nossa view. Normalmente este será um objeto de valor em forma de java bean que conterá os dados a serem exibidos em nossa visão. Aqui estamos simplesmente passando uma string.
Passo-8
A Visualização – Criar novo arquivo /WebContent/index.jsp .
index.jsp
|
1 2 3 4 5 6 7 8 9 10 11 12 13 14 15 16 17 18 19 20 21 22 |
< html > < head > < title > Spring MVC Tutorial Series by Crunchify . com < / title > <style type ="text/css"> body { background-image : url ( 'https://cdn.crunchify.com/bg.png' ) ; } </style> < / head > < body > < br > < div style = "text-align: center" > < h2 > Hey You . . ! ! This is your 1st Spring MCV Tutorial . . < br > < br > < / h2 > < h3 > < a href = "welcome.html" > Click here to See Welcome Message . . . < / a > ( to check Spring MVC Controller . . . @ RequestMapping ( "/welcome" ) ) < / h3 > < / div > < / body > < / html > |
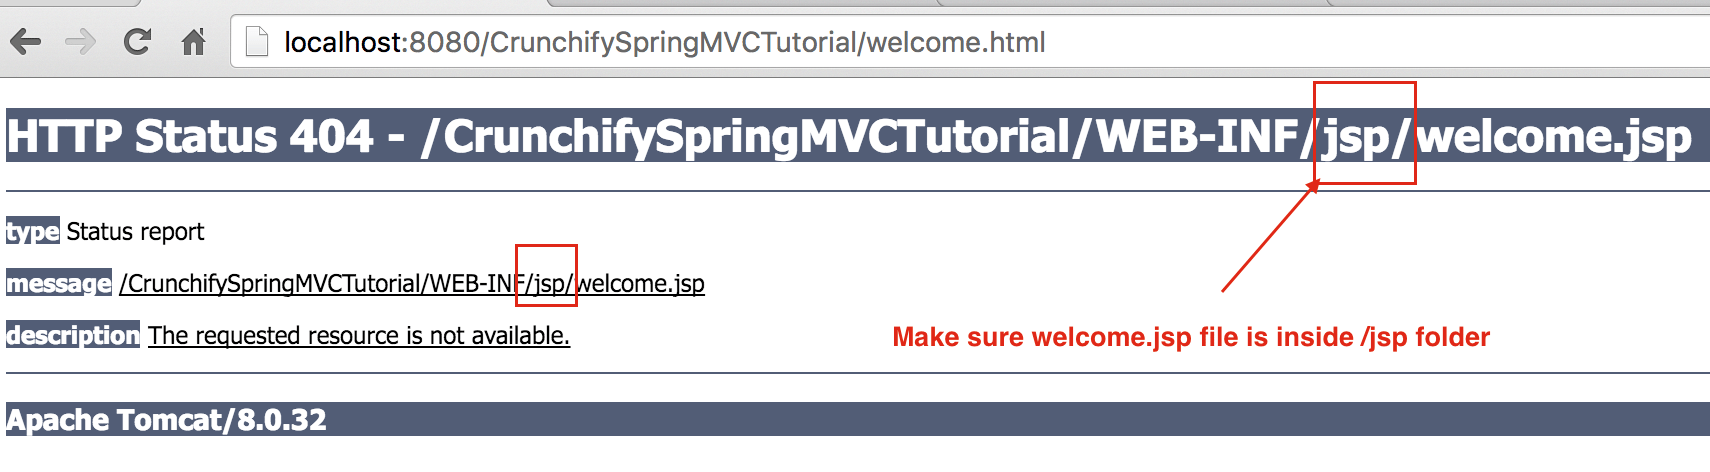
Crie outro arquivo /WebContent/WEB-INF/jsp/welcome.jsp .
NOTE: Não se esqueça de criar a pasta jsp e colocar welcome.jsp dentro dela
bem-vindo.jsp
|
1 2 3 4 5 6 7 8 9 10 11 12 13 14 15 16 17 18 19 20 21 22 23 24 25 |
< html > < head > < title > Spring MVC Tutorial by Crunchify - Hello World Spring MVC Example < / title > <style type ="text/css"> body { background-image : url ( 'https://cdn.crunchify.com/bg.png' ) ; } </style> < / head > < body > $ { message } < br > < br > < div style = "font-family: verdana; padding: 10px; border-radius: 10px; font-size: 12px; text-align: center;" > Spring MCV Tutorial by < a href = "https://crunchify.com" > Crunchify < / a > . Click < a href = "https://crunchify.com/category/java-tutorials/" target = "_blank" > here < / a > for all Java and < a href = 'https://crunchify.com/category/spring-mvc/' target = '_blank' > here < / a > for all Spring MVC , Web Development examples . < br > < / div > < / body > < / html > |
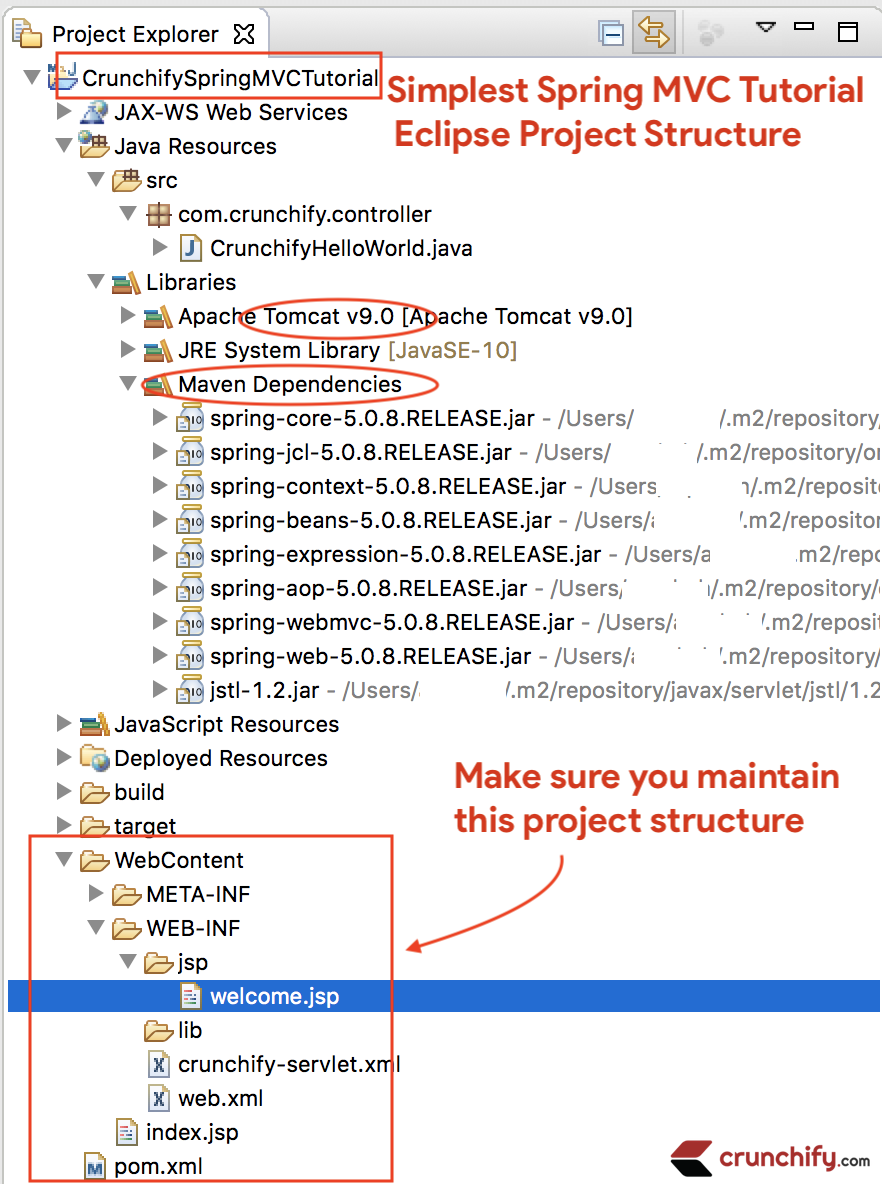
Depois de tudo, é assim que seu espaço de trabalho deve ficar.
Passo-9
Clique com o botão direito do mouse em Project -> Run As -> Maven Build...
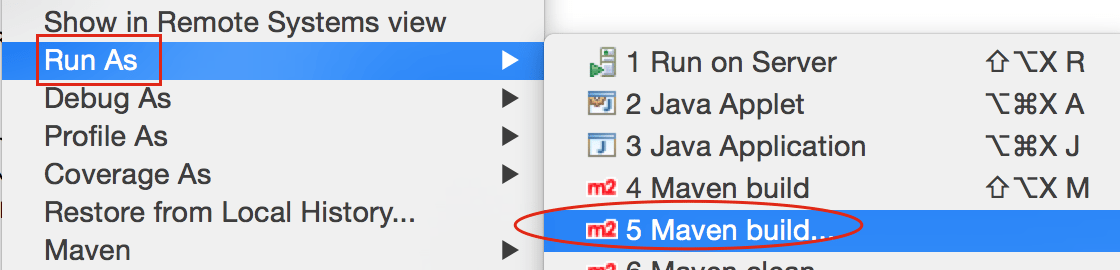
Add Goals : clean install . Clique Apply e Run .
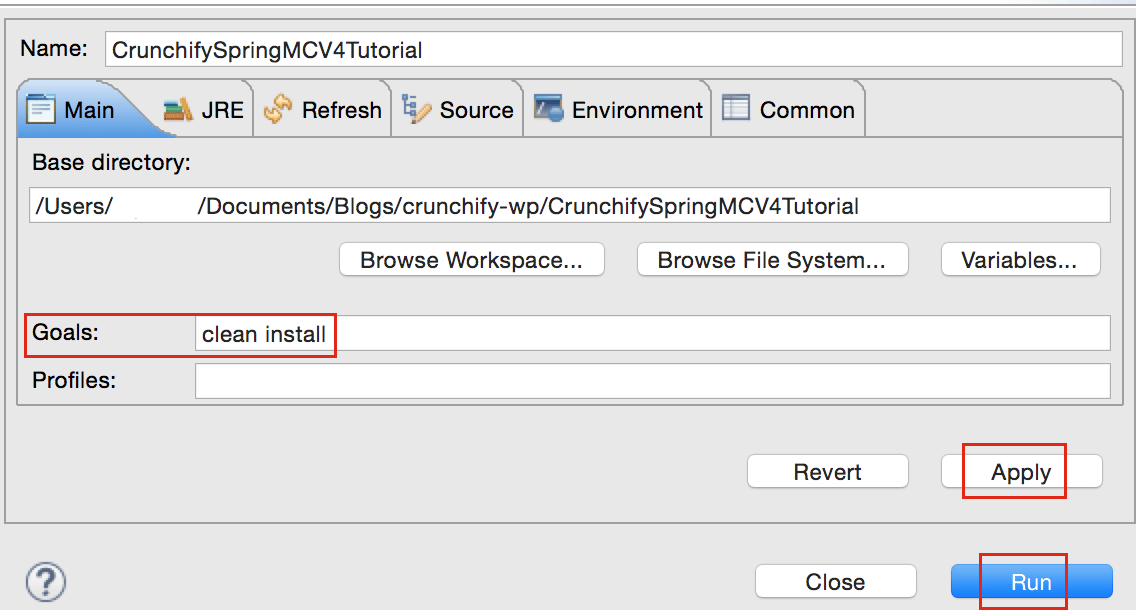
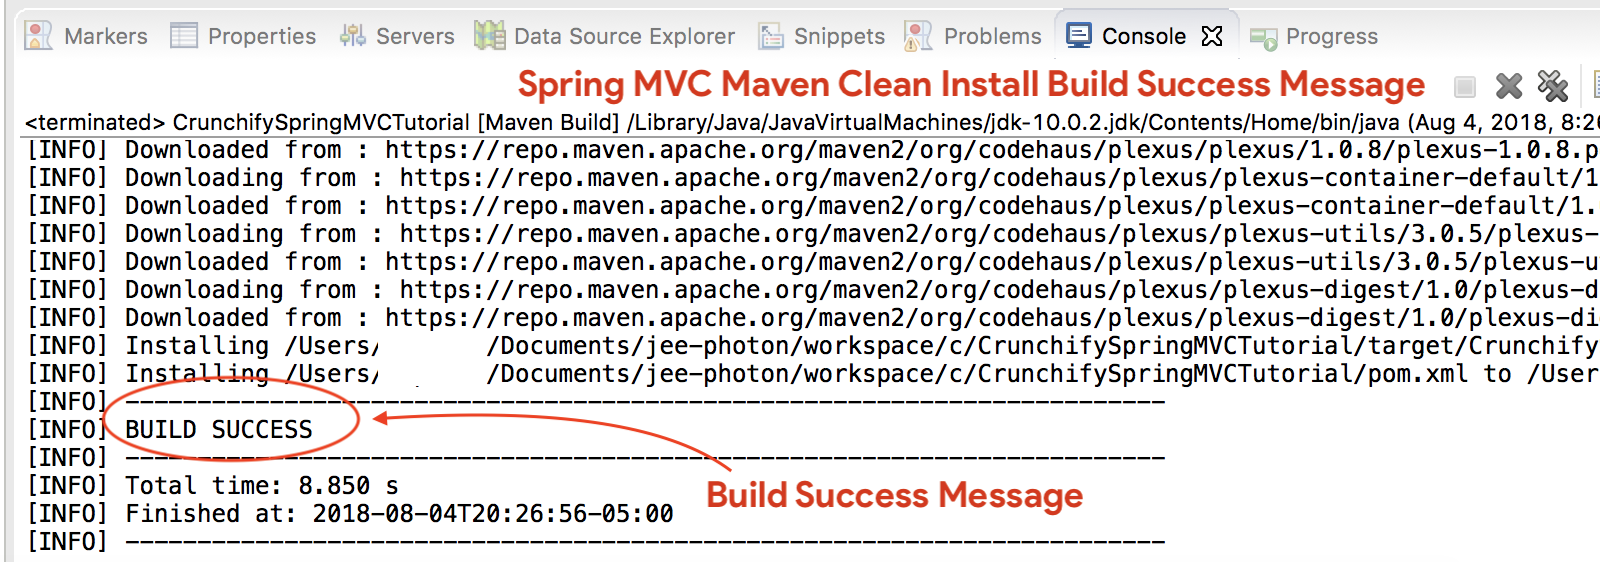
Você deve ver a success message compilação:
Onde estão todos os meus arquivos .jar?
Você verá todos os arquivos .jar na pasta /target . Captura de tela.
Passo-10
- Se você
don't seevir o Tomcat Server na guiaServers, siga as etapas para adicionar o Apache Tomcat ao Eclipse. - Implantar projeto no
Apache Tomcat- Clique com o botão direito
- Adicionar e remover
- Adicione o projeto ao servidor (seção do lado direito).
- Clique em Iniciar.
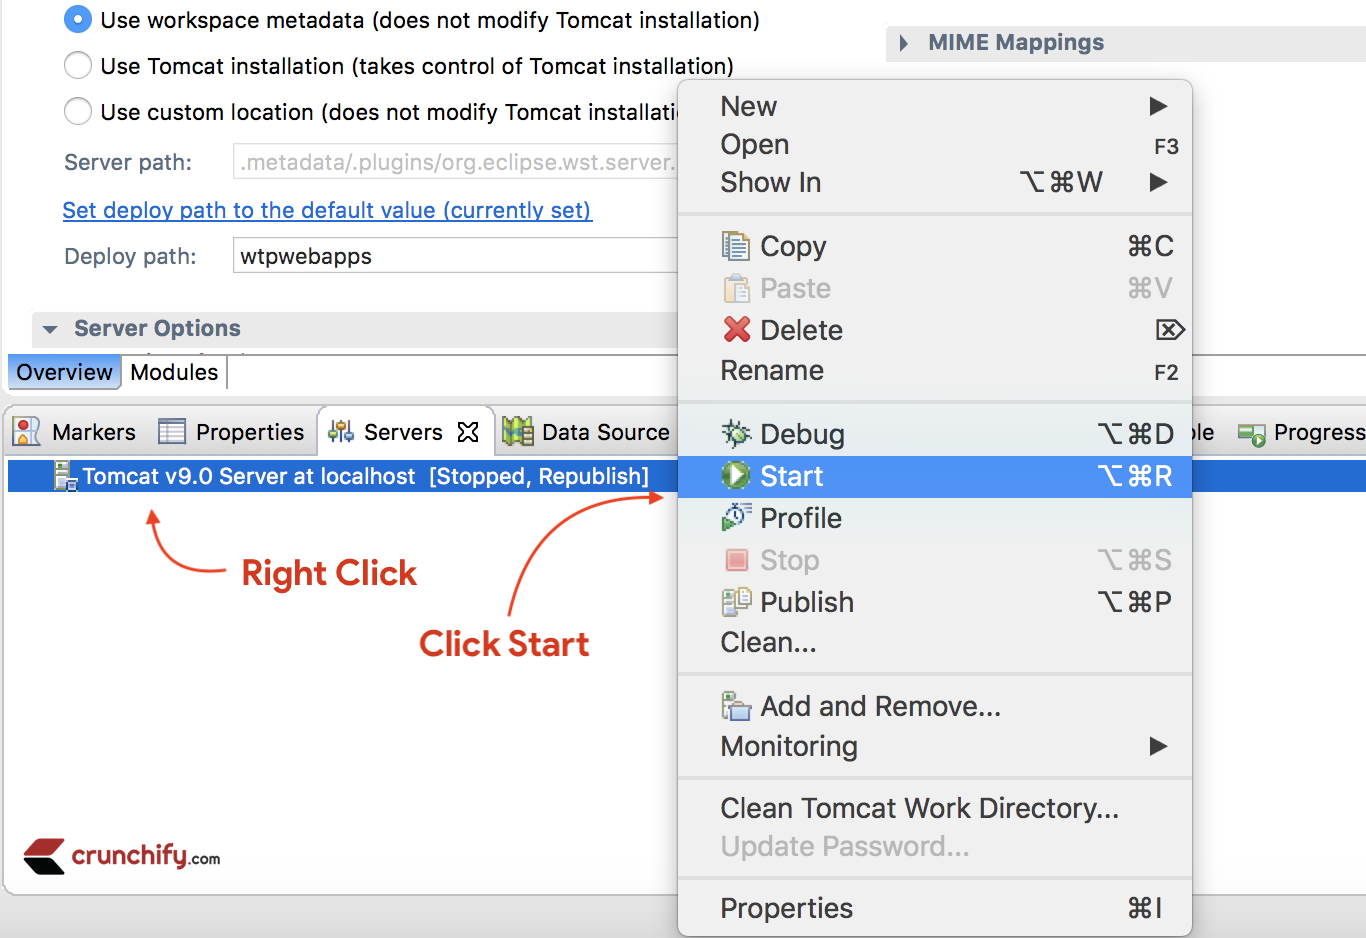
Certifique-se de ver os logs abaixo. Isso significa que seu aplicativo foi implementado com sucesso no Tomcat Web Server.
|
1 2 3 4 5 6 7 8 9 10 11 12 13 14 15 16 17 18 19 20 21 22 23 24 25 26 27 28 29 30 31 32 33 34 35 36 37 38 39 40 |
Aug 04 , 2018 9 : 08 : 10 PM org . apache . tomcat . util . digester . SetPropertiesRule begin WARNING : [ SetPropertiesRule ] { Server / Service / Engine / Host / Context } Setting property 'source' to 'org.eclipse.jst.jee.server:CrunchifySpringMVCTutorial' did not find a matching property . INFO : Server version : Apache Tomcat / 9.0.10 INFO : Server built : Jun 20 2018 17 : 32 : 21 UTC INFO : Server number : 9.0.10.0 INFO : OS Name : Mac OS X INFO : OS Version : 10.13.6 INFO : Architecture : x86_64 INFO : Java Home : / Library / Java / JavaVirtualMachines / jdk - 10.0.2.jdk / Contents / Home INFO : JVM Version : 10.0.2 + 13 INFO : JVM Vendor : "Oracle Corporation" INFO : CATALINA_BASE : / Users / appshah / Documents / jee - photon / workspace / c / . metadata / . plugins / org . eclipse . wst . server . core / tmp0 INFO : CATALINA_HOME : / Users / appshah / Documents / jee - photon / apache - tomcat - 9.0.10 INFO : Command line argument : - Dcatalina . base =/ Users / appshah / Documents / jee - photon / workspace / c / . metadata / . plugins / org . eclipse . wst . server . core / tmp0 INFO : Command line argument : - Dcatalina . home =/ Users / appshah / Documents / jee - photon / apache - tomcat - 9.0.10 INFO : Command line argument : - Dwtp . deploy =/ Users / appshah / Documents / jee - photon / workspace / c / . metadata / . plugins / org . eclipse . wst . server . core / tmp0 / wtpwebapps INFO : Command line argument : - Dfile . encoding = UTF - 8 INFO : The APR based Apache Tomcat Native library which allows optimal performance in production environments was not found on the java . library . path : [ / Users / appshah / Library / Java / Extensions : / Library / Java / Extensions : / Network / Library / Java / Extensions : / System / Library / Java / Extensions : / usr / lib / java : . ] INFO : Initializing ProtocolHandler [ "http-nio-8080" ] INFO : Using a shared selector for servlet write / read INFO : Initializing ProtocolHandler [ "ajp-nio-8009" ] INFO : Using a shared selector for servlet write / read INFO : Initialization processed in 841 ms INFO : Starting service [ Catalina ] INFO : Starting Servlet Engine : Apache Tomcat / 9.0.10 INFO : At least one JAR was scanned for TLDs yet contained no TLDs . Enable debug logging for this logger for a complete list of JARs that were scanned but no TLDs were found in them . Skipping unneeded JARs during scanning can improve startup time and JSP compilation time . INFO : At least one JAR was scanned for TLDs yet contained no TLDs . Enable debug logging for this logger for a complete list of JARs that were scanned but no TLDs were found in them . Skipping unneeded JARs during scanning can improve startup time and JSP compilation time . INFO : No Spring WebApplicationInitializer types detected on classpath INFO : Initializing Spring FrameworkServlet 'crunchify' INFO : FrameworkServlet 'crunchify' : initialization started INFO : Refreshing WebApplicationContext for namespace 'crunchify-servlet' : startup date [ Sat Aug 04 21 : 08 : 13 CDT 2018 ] ; root of context hierarchy INFO : Loading XML bean definitions from ServletContext resource [ / WEB - INF / crunchify - servlet . xml ] INFO : Mapped "{[/welcome]}" onto public org . springframework . web . servlet . ModelAndView com . crunchify . controller . CrunchifyHelloWorld . helloWorld ( ) INFO : Looking for @ ControllerAdvice : WebApplicationContext for namespace 'crunchify-servlet' : startup date [ Sat Aug 04 21 : 08 : 13 CDT 2018 ] ; root of context hierarchy INFO : Looking for @ ControllerAdvice : WebApplicationContext for namespace 'crunchify-servlet' : startup date [ Sat Aug 04 21 : 08 : 13 CDT 2018 ] ; root of context hierarchy INFO : Mapped URL path [ /** ] onto handler 'org.springframework.web.servlet.resource.DefaultServletHttpRequestHandler#0' INFO : FrameworkServlet 'crunchify' : initialization completed in 1607 ms INFO : Starting ProtocolHandler [ "http-nio-8080" ] INFO : Starting ProtocolHandler [ "ajp-nio-8009" ] INFO : Server startup in 3579 ms |
Passo-11. Feito.
Visite: http://localhost:8080/CrunchifySpringMVCTutorial/ e você deve estar tudo pronto.
Hurray.. Agora você sabe Hello World Spring MVC 5 Example . Deixe-me saber se você encontrar alguma exceção ao executar isso. Há muito mais exemplos que você pode encontrar aqui.
Do you want to include JS, CSS and images into JSP file? Siga este tutorial: Melhor maneira de adicionar/integrar JS, CSS e imagens no arquivo JSP usando 'mvc: mapeamento de recursos'.
Tendo problemas? Qualquer problema?
Triaging Step-1 – Erro de status HTTP 404?
Além disso, siga o tutorial abaixo:
Triagem etapa 2 – URL não funciona? Erro do Tomcat?
Certifique-se de adicionar o Apache Tomcat Server ao Targeted Runtime . Que você pode ter selecionado na Step-1 . Tomcat 7 ou 8 qualquer - o servidor deve funcionar.
Triagem Etapa 3 – erros do maven?
Certifique-se de atualizar todas as dependências do maven.
Sinta-se à vontade para enviar um e-mail ou comentar abaixo se tiver algum problema ao executar o tutorial acima.