
가장 간단한 Spring MVC 프레임워크 자습서 – UI(JSP) 페이지가 있는 Hello World 예제
게시 됨: 2019-02-23
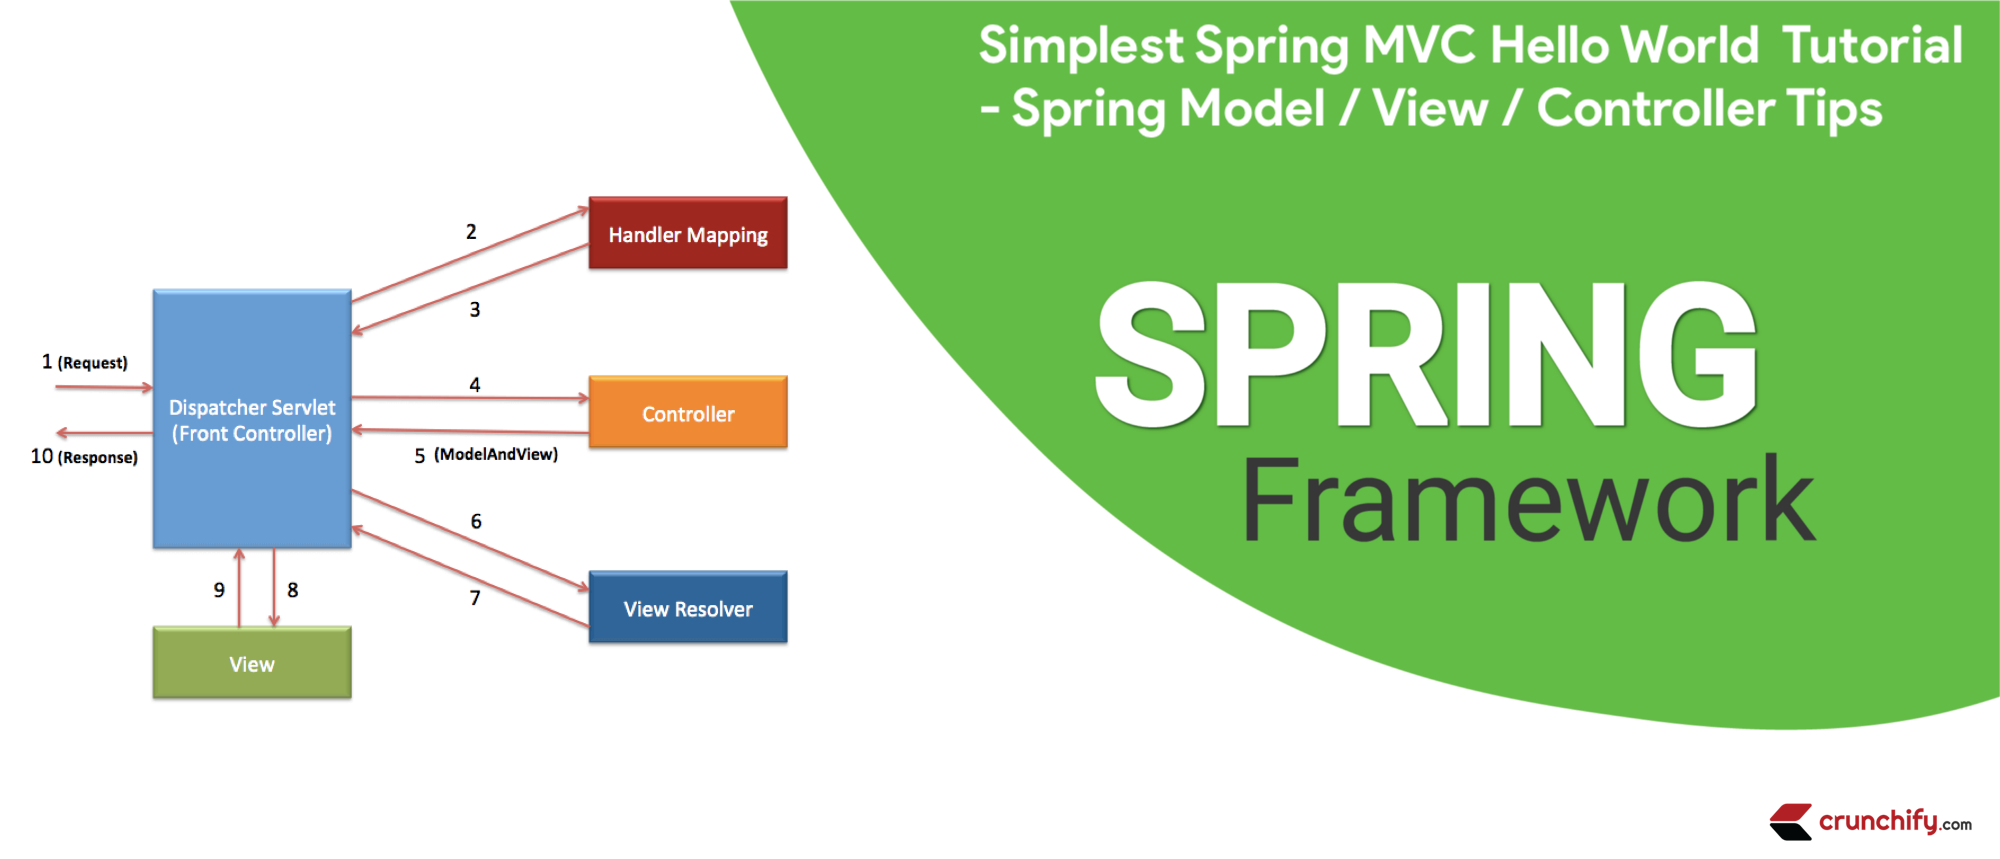
MVC(Model-View-Controller) 아키텍처는 유연하고 느슨하게 결합된 웹 애플리케이션을 개발하는 가장 간단한 방법을 제공합니다.
이 튜토리얼에서는 매우 상세한 단계를 통해 첫 번째 Spring MVC 애플리케이션을 생성하는 방법을 살펴볼 것입니다.
아래 질문이 있습니까?
- 스프링 MVC 5.2.3의 기초
- Spring Framework MVC 5 애플리케이션을 단계별로..
- java – 처음부터 Spring MVC 튜토리얼
- Spring MVC 빠른 튜토리얼
- 스프링 MVC 프레임워크 튜토리얼
- 첫 번째 Spring MVC 애플리케이션 튜토리얼
- Spring 5.x MVC 자습서, AJAX 데모, jQuery 데모, JavaScript 데모, 팁 및 요령 Spring 5 MVC
그럼 당신은 바로 이곳에 있습니다. 여기에서는 웹 애플리케이션을 빌드하기 위한 간단한 Spring MVC framework 를 시연할 것입니다.
가장 먼저 - 환경을 설정하자
튜토리얼 마지막 업데이트 및 확인: 2020년 9월 아래 도구 버전 포함.
아직 다운로드하지 않은 경우 다운로드해야 할 수 있는 아래 도구를 사용하고 있습니다.
- Tomcat 9.0.38 – 이 링크에서 최신 Apache Tomcat을 다운로드합니다.
-
Java EE개발자용 Eclipse IDE(2020‑09 R) – 다운로드 링크를 다운로드해야 합니다. (아래 도표) -
Spring 5.2.9.RELEASE(다운로드 필요 없음) – Maven 종속성을 사용합니다. - JDK 15 – 다운로드 링크.
최신 Java EE 개발자 키트를 다운로드했는지 확인하십시오.

주요 목표
이 튜토리얼의 주요 목표는 가장 간단한 방법으로 Spring MVC 애플리케이션을 생성하는 것입니다.
시작하기 전에 이 튜토리얼의 끝에서 보게 될 내용을 살펴보겠습니다.
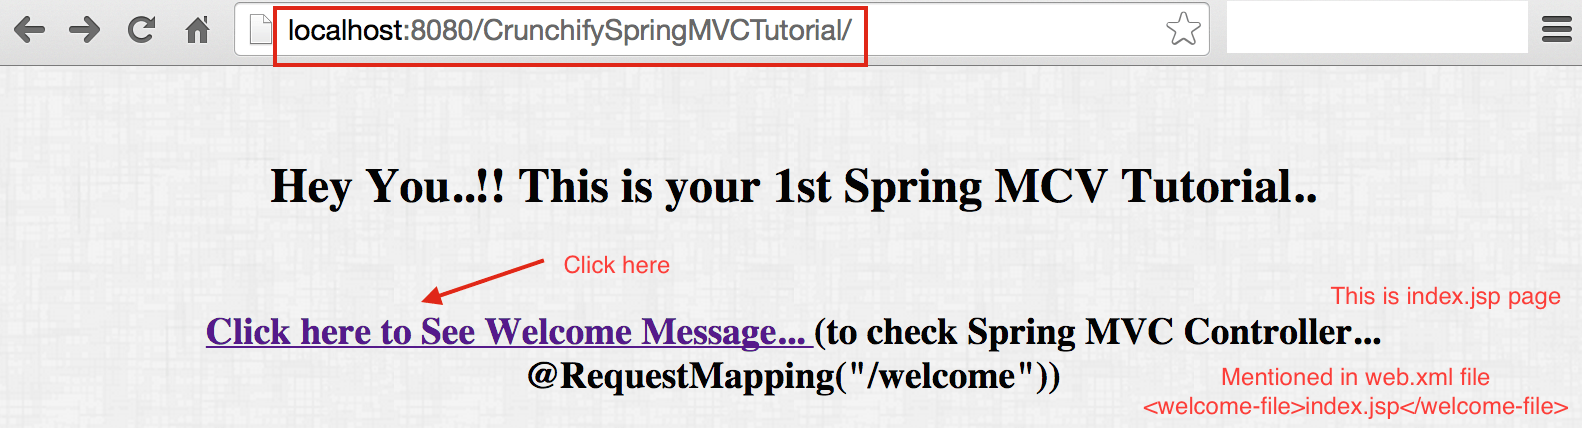
이것이 우리의 application result 가 어떻게 보일 것입니다. 아래 단계를 모두 완료하면 최종 결과입니다.
최종 결과는 다음과 같습니다. Welcome page ==> index.jsp
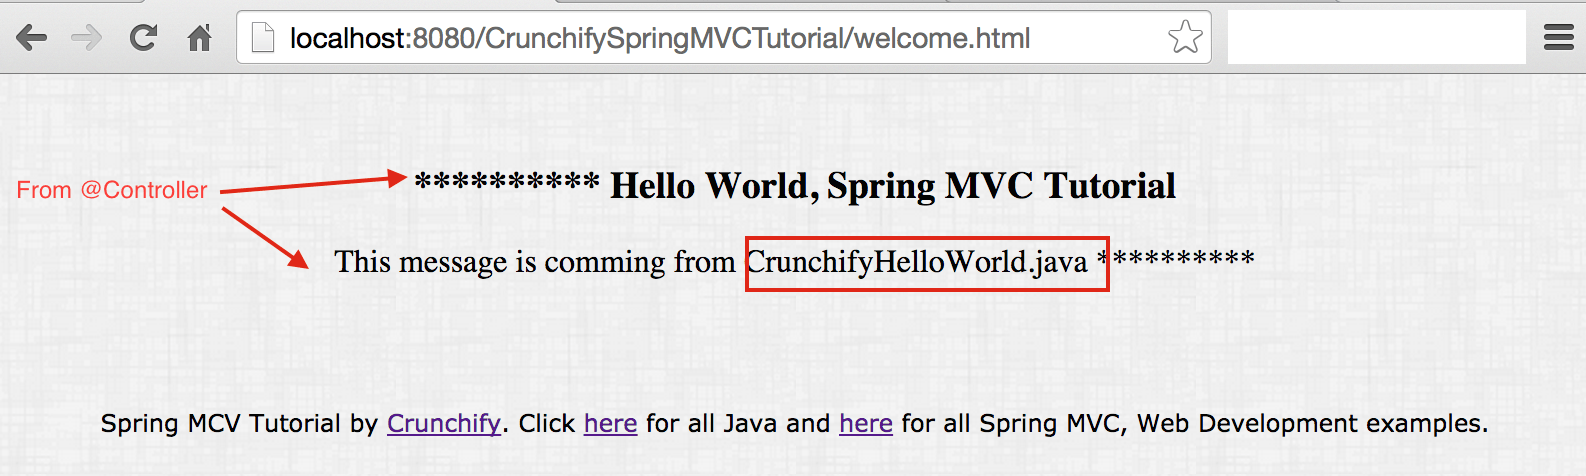
컨트롤러 클래스에서 결과 반환
이제 튜토리얼을 시작하겠습니다.
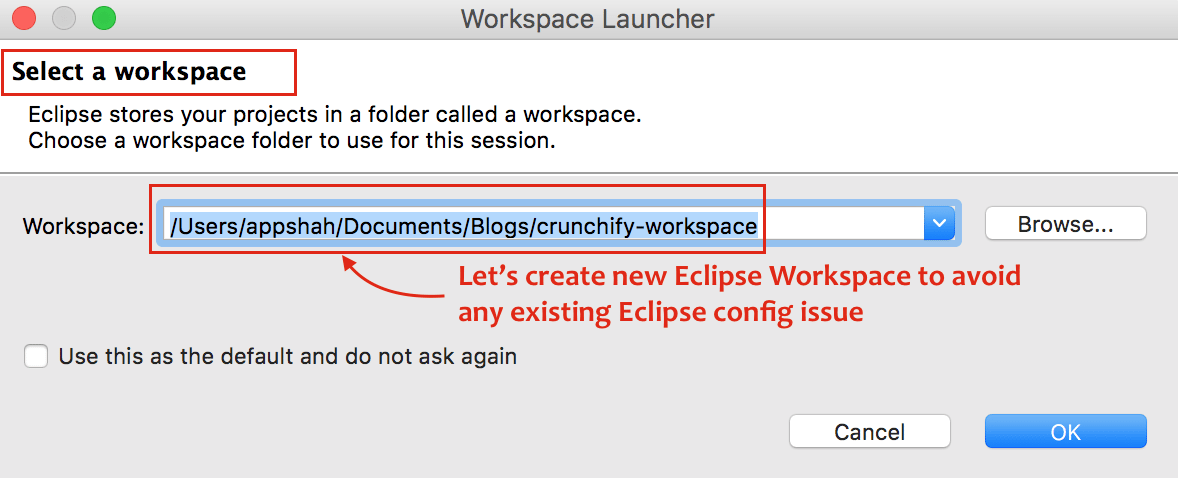
1 단계
- 이클립스 열기
-
New Eclipse Workspace만들기 – 기존 작업 공간 구성 문제를 방지하기 위해must.
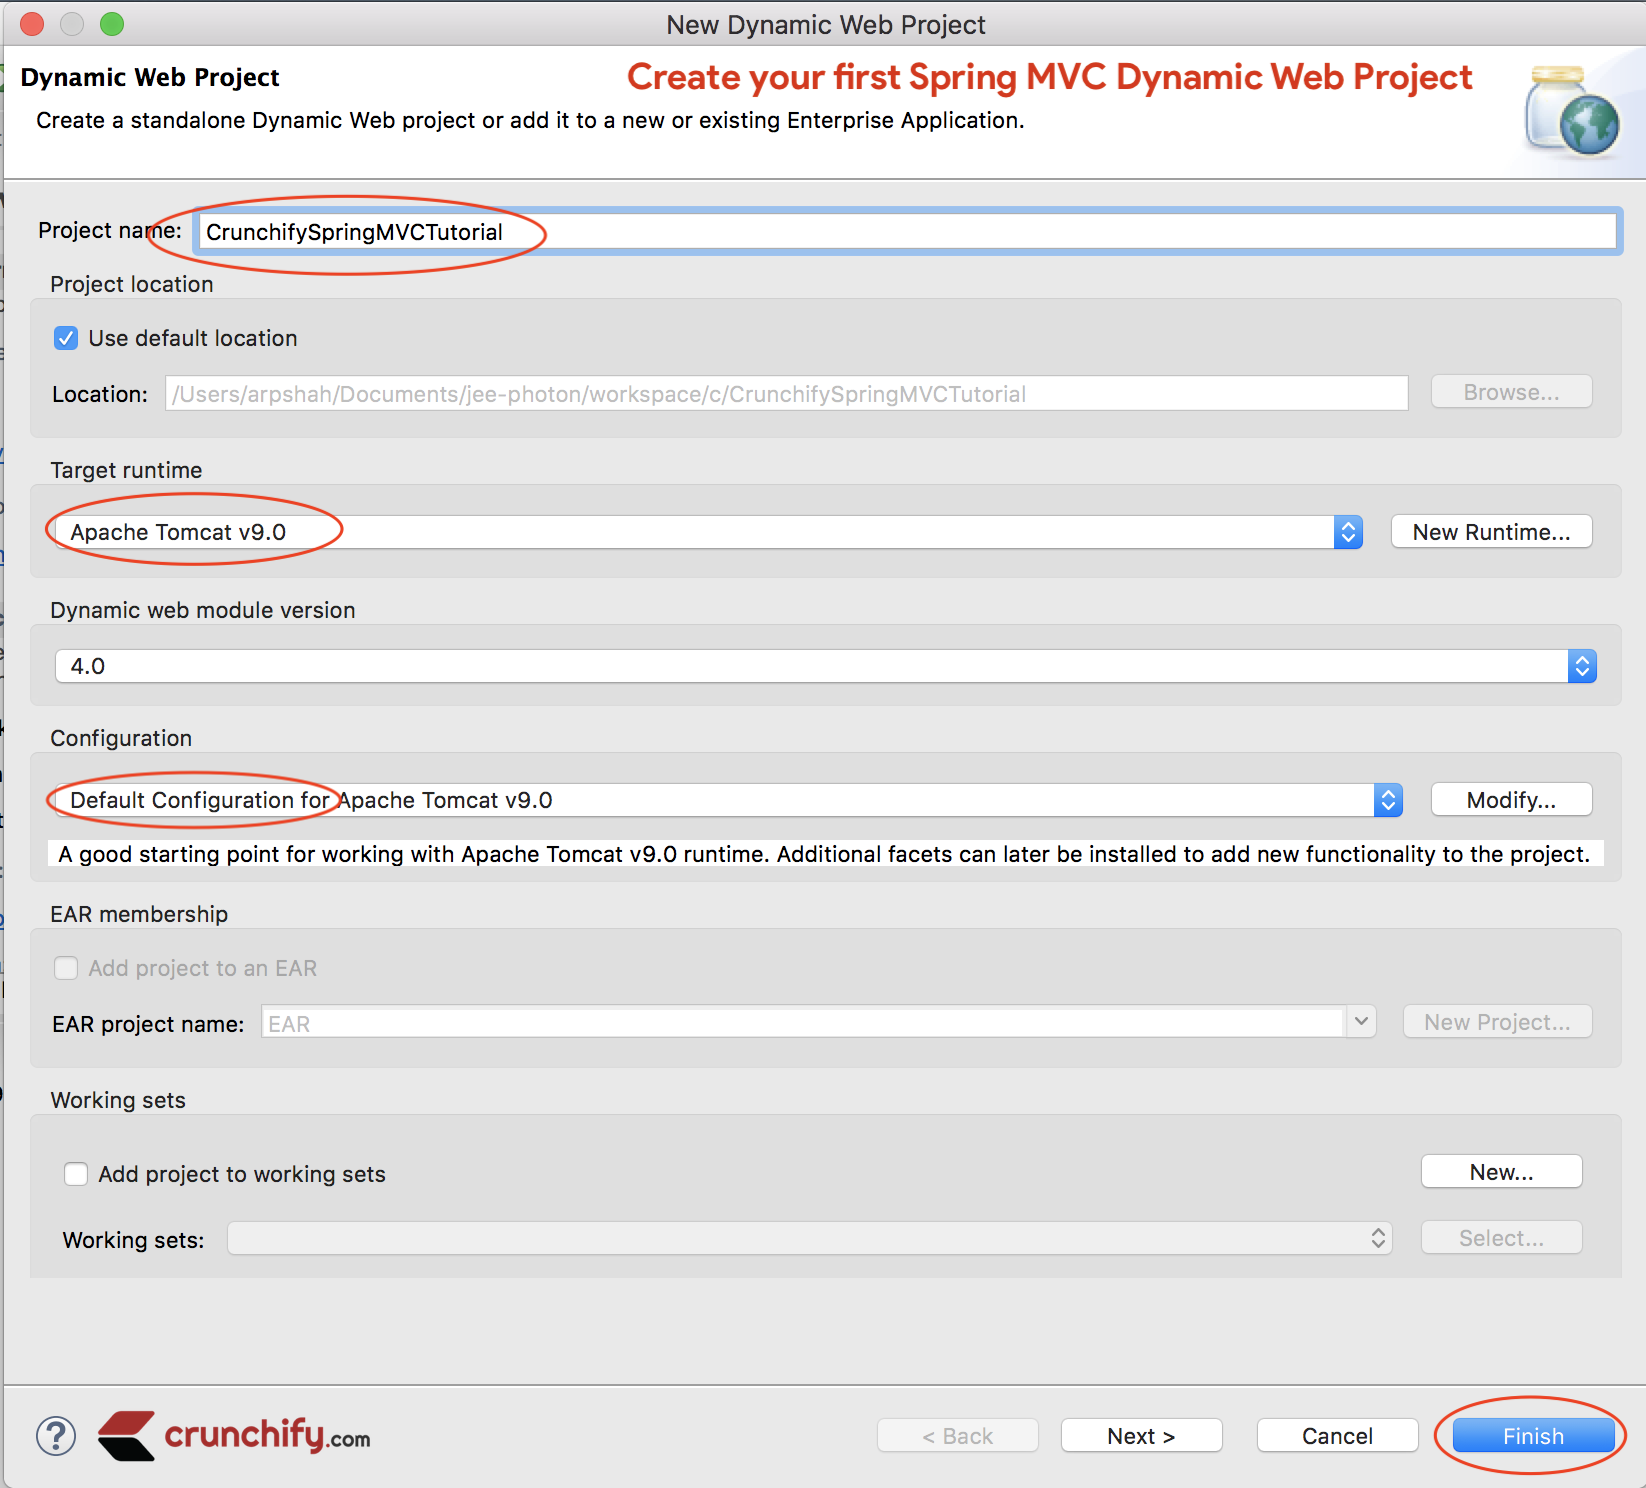
2 단계
-
File클릭 -
New만들기를 클릭하십시오 -
Dynamic Web Project선택 - 하나의 팝업 창, 프로젝트 이름 제공:
CrunchifySpringMVCTutorial -
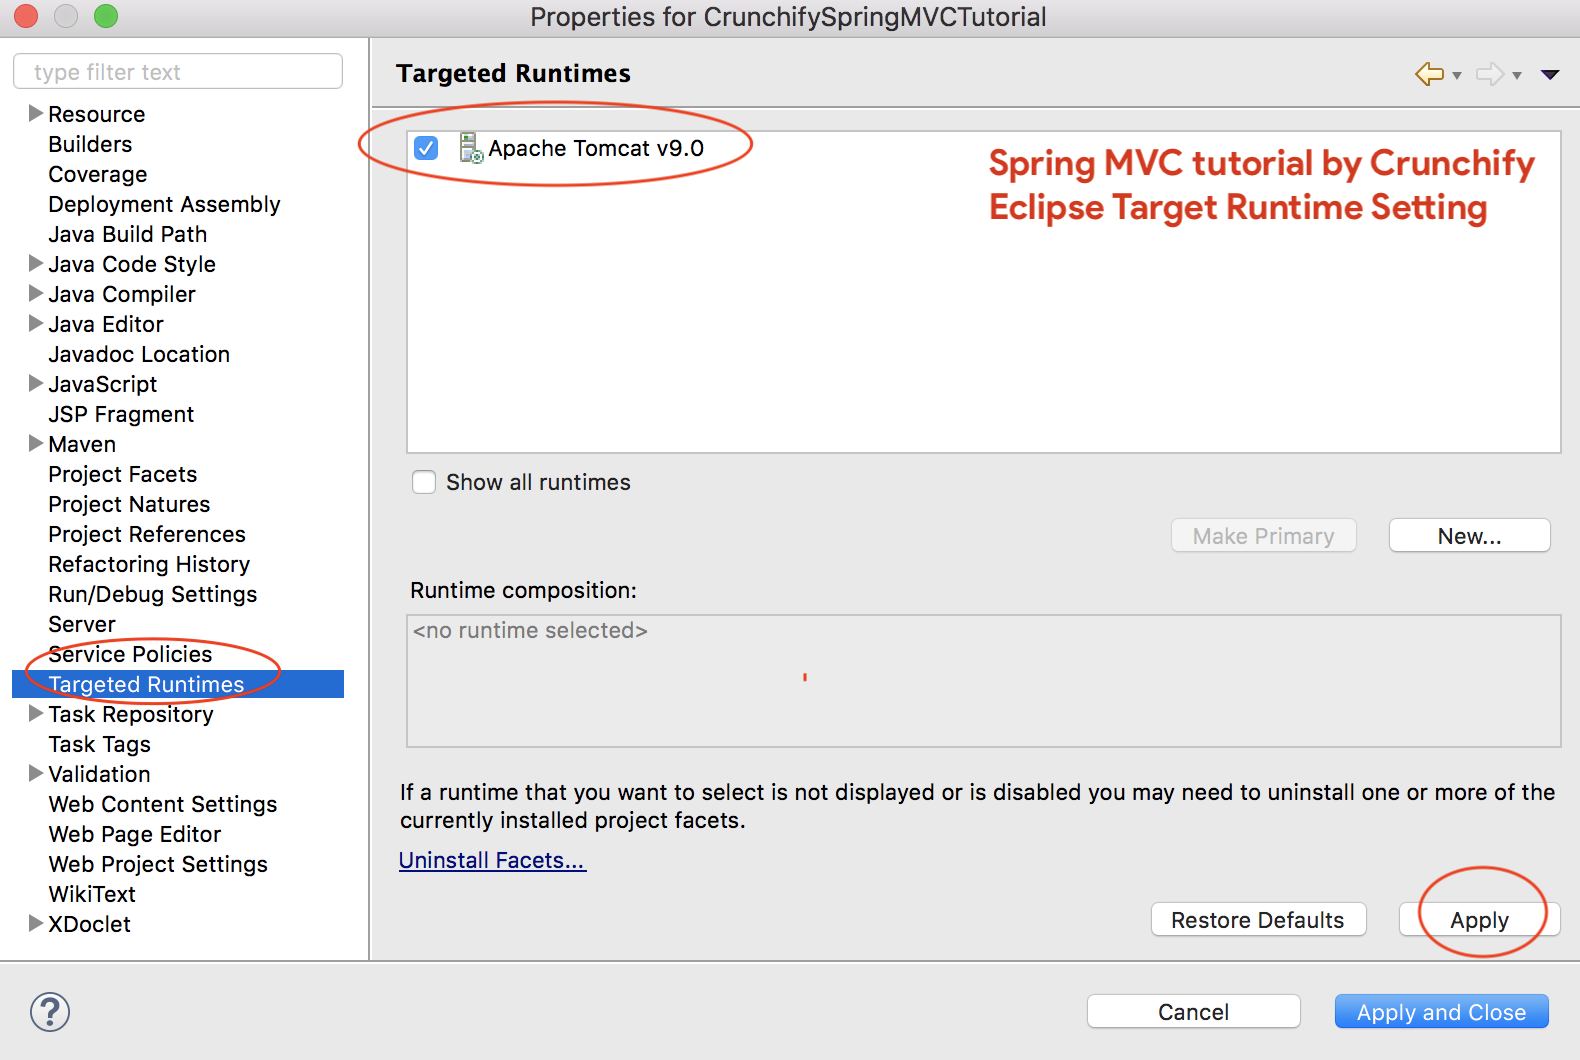
Target Runtime을Apache Tomcat 9.0으로 사용하는지 확인하십시오.- 대상 런타임이 표시되지 않으면 다음 단계를 따르세요.
-
Default Configuration으로 구성 선택
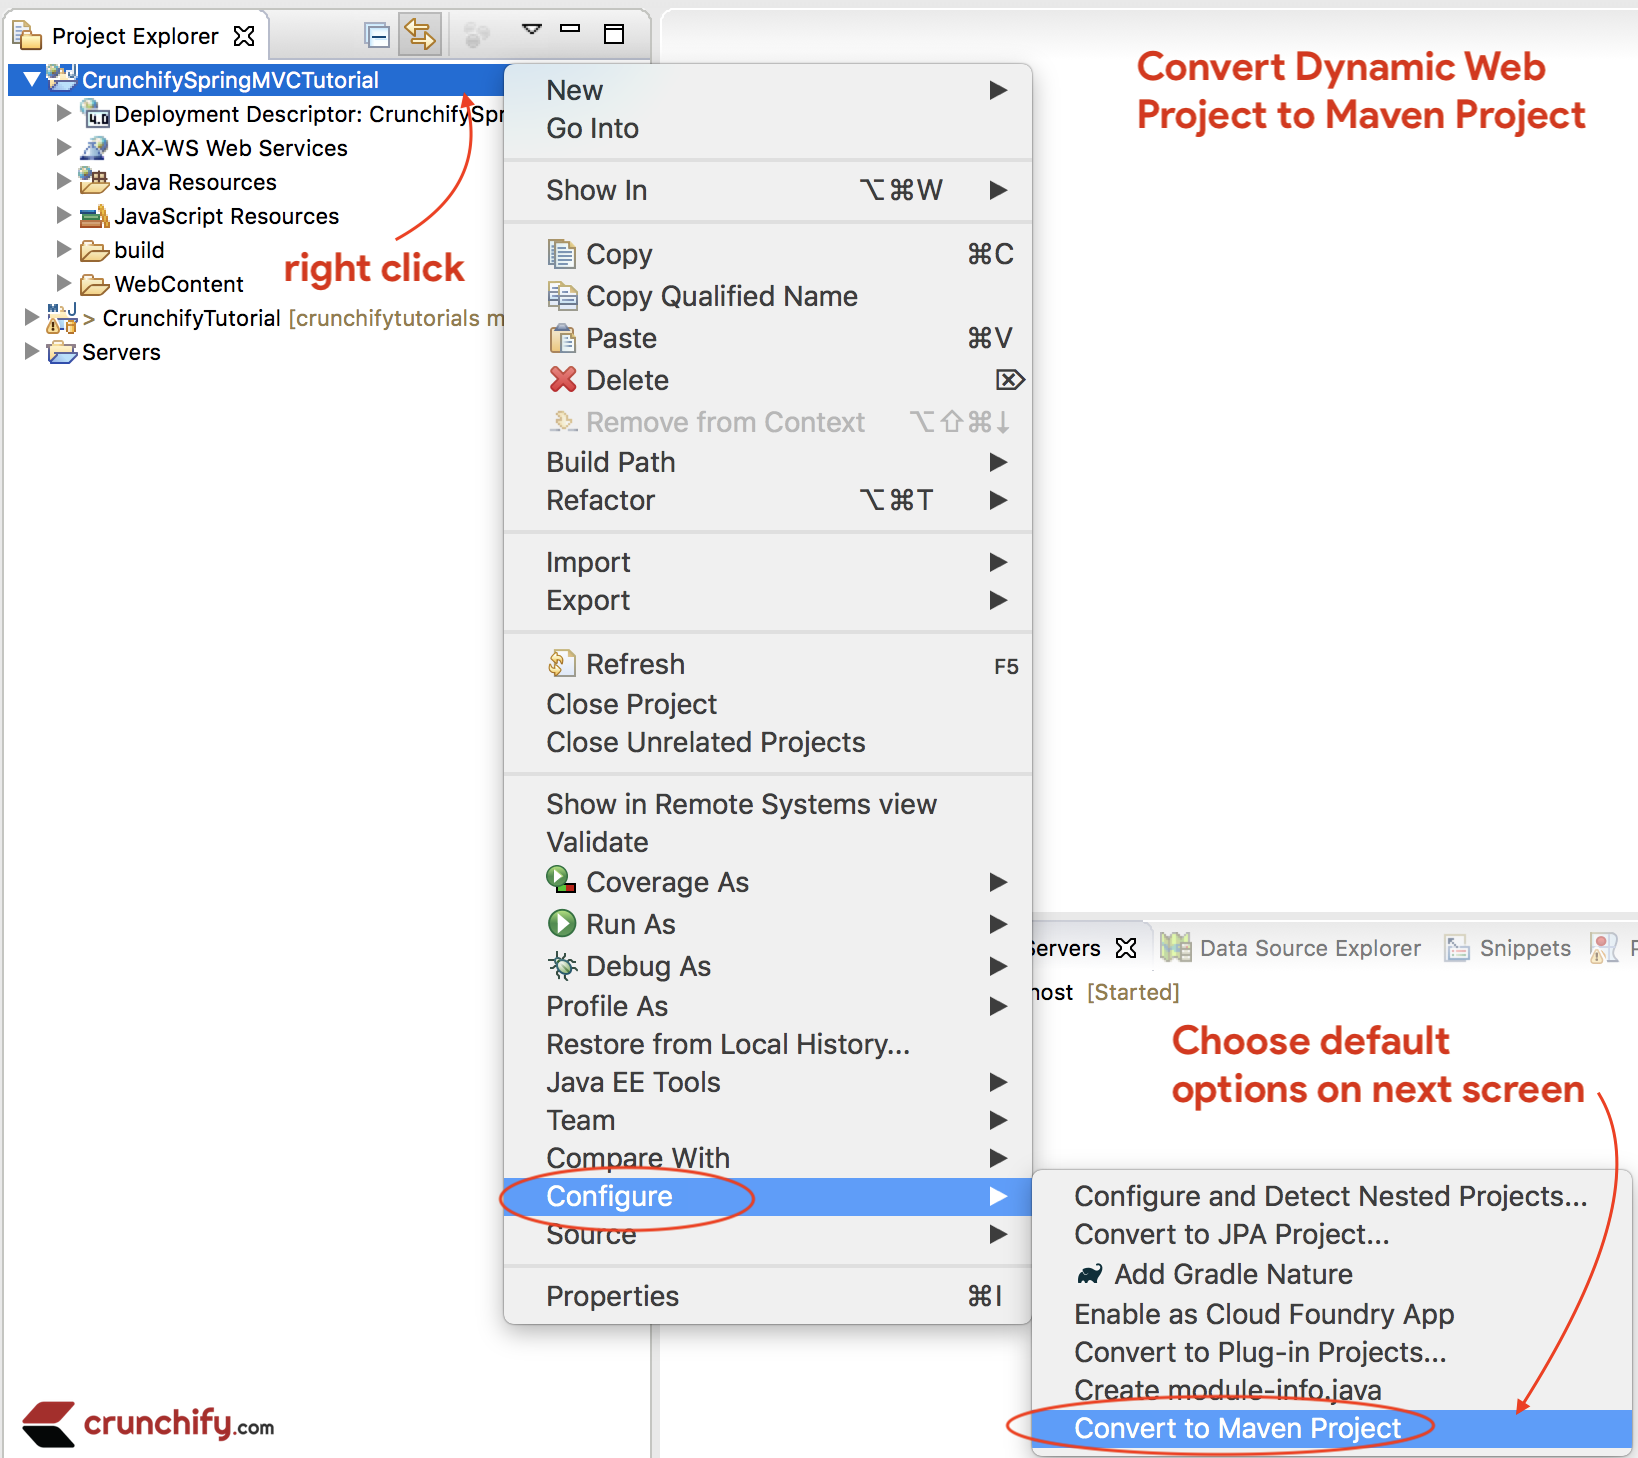
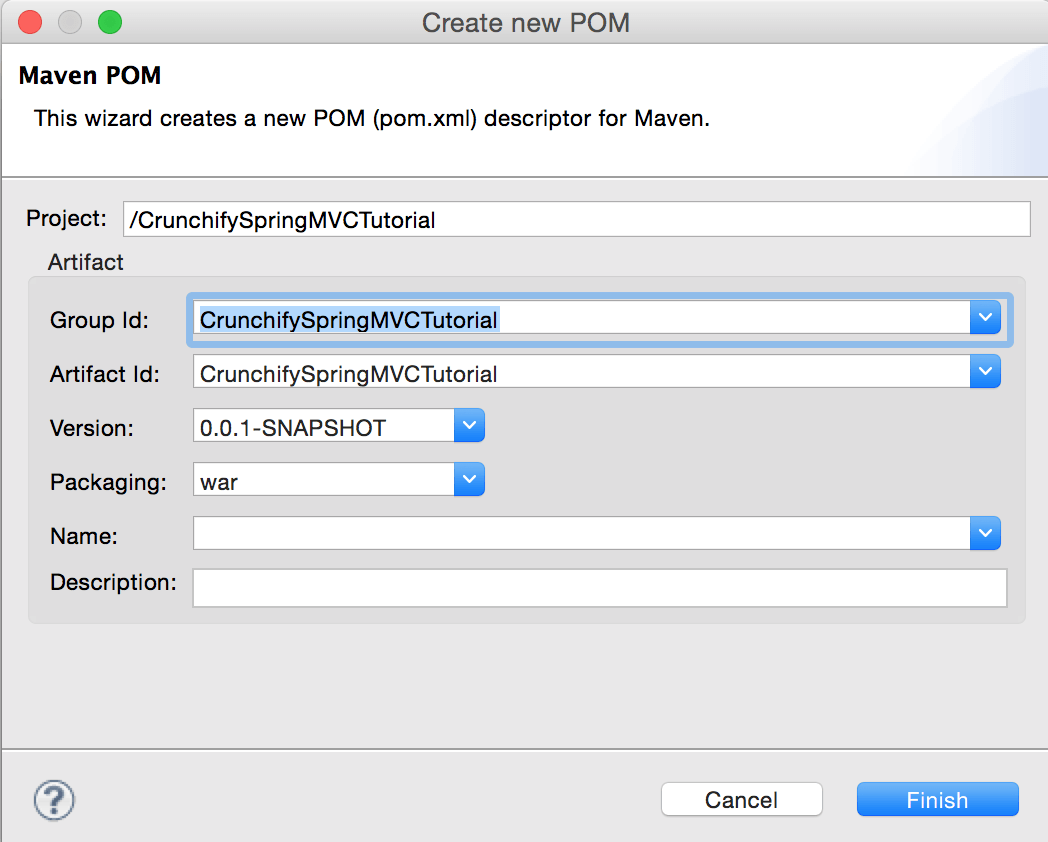
3단계
프로젝트에 필요한 모든 Spring MVC 종속성을 프로젝트에 추가하려면 프로젝트를 Maven 프로젝트로 변환하십시오.
단계:
- 프로젝트를 마우스 오른쪽 버튼으로 클릭
- 구성
-
Maven프로젝트로 변환
4단계
pom.xml 파일을 열고 아래 jar dependencies 을 프로젝트에 추가합니다.
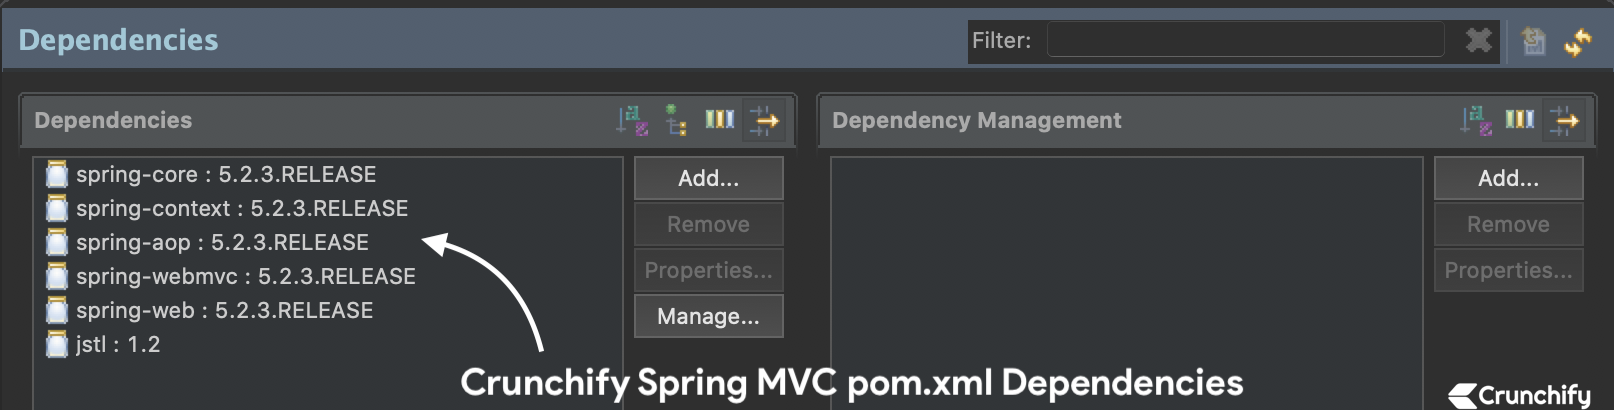
NOTE:여기 내pom.xml파일이 있습니다. 아직JDK 13으로 이동하지 않은 경우 Java 버전을13으로 업데이트해야 합니다. 우리는 이 튜토리얼을 최신 Spring MVC 버전으로 계속 업데이트할 것입니다.따라서 아래의 pom.xml 파일에는 위의 이미지와 다른(최신) 버전의 Spring MVC 종속성이 있을 수 있습니다.
|
1 2 3 4 5 6 7 8 9 10 11 12 13 14 15 16 17 18 19 20 21 22 23 24 25 26 27 28 29 30 31 32 33 34 35 36 37 38 39 40 41 42 43 44 45 46 47 48 49 50 51 52 53 54 55 56 57 58 59 60 61 |
< project xmlns = "http://maven.apache.org/POM/4.0.0" xmlns : xsi = "http://www.w3.org/2001/XMLSchema-instance" xsi : schemaLocation = "http://maven.apache.org/POM/4.0.0 http://maven.apache.org/xsd/maven-4.0.0.xsd" > < modelVersion > 4.0.0 < / modelVersion > < groupId > CrunchifySpringMVCTutorial < / groupId > < artifactId > CrunchifySpringMVCTutorial < / artifactId > < version > 0.0.1 - SNAPSHOT < / version > < packaging > war < / packaging > < build > < sourceDirectory > src < / sourceDirectory > < plugins > < plugin > < artifactId > maven - compiler - plugin < / artifactId > < version > 3.8.0 < / version > < configuration > < release > 13 < / release > < / configuration > < / plugin > < plugin > < artifactId > maven - war - plugin < / artifactId > < version > 3.2.1 < / version > < configuration > < warSourceDirectory > WebContent < / warSourceDirectory > < / configuration > < / plugin > < / plugins > < / build > < dependencies > < dependency > < groupId > org . springframework < / groupId > < artifactId > spring - core < / artifactId > < version > 5.2.3.RELEASE < / version > < / dependency > < dependency > < groupId > org . springframework < / groupId > < artifactId > spring - context < / artifactId > < version > 5.2.3.RELEASE < / version > < / dependency > < dependency > < groupId > org . springframework < / groupId > < artifactId > spring - aop < / artifactId > < version > 5.2.3.RELEASE < / version > < / dependency > < dependency > < groupId > org . springframework < / groupId > < artifactId > spring - webmvc < / artifactId > < version > 5.2.3.RELEASE < / version > < / dependency > < dependency > < groupId > org . springframework < / groupId > < artifactId > spring - web < / artifactId > < version > 5.2.3.RELEASE < / version > < / dependency > < dependency > < groupId > javax . servlet < / groupId > < artifactId > jstl < / artifactId > < version > 1.2 < / version > < / dependency > < / dependencies > < / project > |
5단계
새 Spring 구성 Bean 파일 생성: /WebContent/WEB-INF/crunchify-servlet.xml

crunchify-servlet.xml
|
1 2 3 4 5 6 7 8 9 10 11 12 13 14 15 16 17 18 19 20 21 22 23 24 25 26 27 |
<? xml version = "1.0" encoding = "UTF-8" ?> < beans xmlns = "http://www.springframework.org/schema/beans" xmlns : mvc = "http://www.springframework.org/schema/mvc" xmlns : context = "http://www.springframework.org/schema/context" xmlns : xsi = "http://www.w3.org/2001/XMLSchema-instance" xsi : schemaLocation = " http://www.springframework.org/schema/beans http://www.springframework.org/schema/beans/spring-beans.xsd http://www.springframework.org/schema/mvc http://www.springframework.org/schema/mvc/spring-mvc.xsd http://www.springframework.org/schema/context http://www.springframework.org/schema/context/spring-context.xsd" > < mvc : annotation - driven / > < context : component - scan base - package = "com.crunchify.controller" / > < mvc : default - servlet - handler / > < bean id = "viewResolver" class = "org.springframework.web.servlet.view.UrlBasedViewResolver" > < property name = "viewClass" value = "org.springframework.web.servlet.view.JstlView" / > < property name = "prefix" value = "/WEB-INF/jsp/" / > < property name = "suffix" value = ".jsp" / > < / bean > < / beans > |
위의 crunchify-servlet.xml 구성 파일에서 <context:component-scan> 태그를 정의했습니다. 이렇게 하면 Spring이 com.crunchify.controller 패키지와 모든 하위 패키지에서 모든 구성 요소를 로드할 수 있습니다.
이것은 우리의 CrunchifyHelloWorld.class 를 로드할 것입니다. 또한 우리는 bean viewResolver 를 정의했습니다. 이 빈은 뷰를 해결하고 ModelAndView의 뷰에 접두사 문자열 /WEB-INF/jsp/ 및 접미사 .jsp 를 추가합니다.
CrunchifyHelloWorld 클래스에서 보기 이름이 welcome인 ModelAndView 개체를 반환했습니다.
이것은 /WEB-INF/jsp/welcome.jsp 경로로 해결됩니다.
6단계
새 파일 web.xml 이 아직 없는 경우 새로 만듭니다. /WebContent/WEB-INF/web.xml 파일에 Spring MVC를 매핑합니다.
NOTE: " dynamic web project "에 web.xml 파일이 표시되지 않으면 다음 단계를 따르십시오.
웹.xml
|
1 2 3 4 5 6 7 8 9 10 11 12 13 14 15 16 17 18 19 20 21 22 23 24 25 26 27 28 |
<? xml version = "1.0" encoding = "UTF-8" ?> < web - app xmlns : xsi = "http://www.w3.org/2001/XMLSchema-instance" xmlns = "http://xmlns.jcp.org/xml/ns/javaee" xsi : schemaLocation = "http://xmlns.jcp.org/xml/ns/javaee http://xmlns.jcp.org/xml/ns/javaee/web-app_4_0.xsd" id = "WebApp_ID" version = "4.0" > < display - name > CrunchifySpringMVCTutorial < / display - name > < welcome - file - list > < welcome - file > index . html < / welcome - file > < welcome - file > index . htm < / welcome - file > < welcome - file > index . jsp < / welcome - file > < welcome - file > default . html < / welcome - file > < welcome - file > default . htm < / welcome - file > < welcome - file > default . jsp < / welcome - file > < / welcome - file - list > < servlet > < servlet - name > crunchify < / servlet - name > < servlet - class > org . springframework . web . servlet . DispatcherServlet < / servlet - class > < load - on - startup > 1 < / load - on - startup > < / servlet > < servlet - mapping > < servlet - name > crunchify < / servlet - name > < url - pattern > / welcome . jsp < / url - pattern > < url - pattern > / index . jsp < / url - pattern > < url - pattern > / welcome . html < / url - pattern > < url - pattern > * . html < / url - pattern > < / servlet - mapping > < / web - app > |
web.xml 의 위 코드는 DispatcherServlet을 url 패턴 /welcome.jsp 로 매핑합니다. 또한 index.jsp 를 시작 파일로 정의했습니다.
여기서 주목해야 할 것은 web.xml 의 <servlet-name> 태그에 있는 서블릿의 이름입니다. DispatcherServlet이 초기화되면 웹 애플리케이션의 WEB-INF 폴더에서 [servlet-name]-servlet.xml 파일 이름을 찾습니다. 이 예에서 프레임워크는 crunchify-servlet.xml 이라는 파일을 찾습니다.
7단계
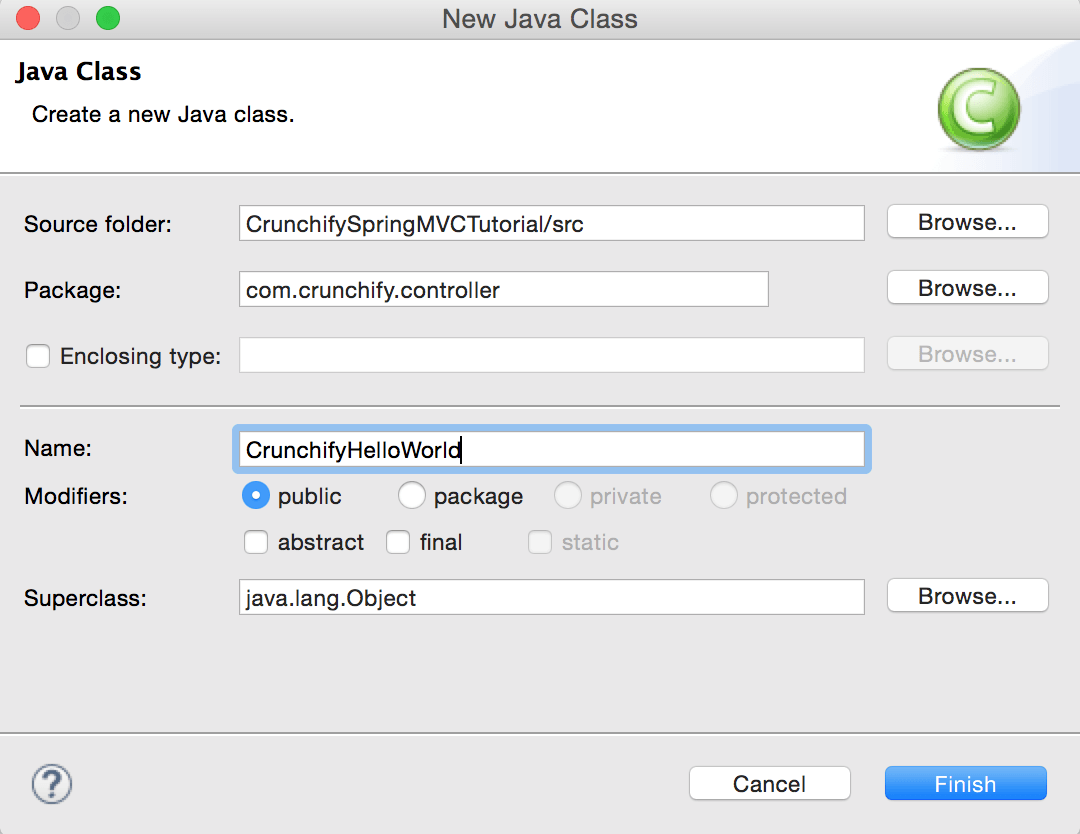
컨트롤러 클래스를 생성합니다.
-
Java Resources->src를 마우스 오른쪽 버튼으로 클릭하십시오. -
New->Class클릭합니다. - 패키지:
com.crunchify.controller - 파일명 :
CrunchifyHelloWorld.java
CrunchifyHelloWorld.java
|
1 2 3 4 5 6 7 8 9 10 11 12 13 14 15 16 17 18 19 20 21 22 |
package com . crunchify . controller ; import org . springframework . stereotype . Controller ; import org . springframework . web . bind . annotation . RequestMapping ; import org . springframework . web . servlet . ModelAndView ; /* * author: Crunchify.com * */ @Controller public class CrunchifyHelloWorld { @RequestMapping ( "/welcome" ) public ModelAndView helloWorld ( ) { String message = "<br><div>" + "<h3>********** Hello World, Spring MVC Tutorial</h3>This message is coming from CrunchifyHelloWorld.java **********</div><br><br>" ; return new ModelAndView ( "welcome" , "message" , message ) ; } } |
@Controller 및 @RequestMapping("/welcome") 으로 CrunchifyHelloWorld 클래스에 주석을 추가했습니다. Spring이 패키지를 스캔할 때 이 빈을 요청 처리를 위한 컨트롤러 빈으로 인식합니다. @RequestMapping 주석은 이 컨트롤러가 URL 경로에서 /welcome로 시작하는 모든 요청을 처리해야 한다고 Spring에 알려줍니다. 여기에는 /welcome/* 및 /welcome.html 이 포함됩니다.

helloWorld() 메서드는 ModelAndView 개체를 반환합니다. ModelAndView 객체는 "welcome"이라는 뷰로 해석하려고 시도하고 데이터 모델은 JSP 내의 데이터에 액세스할 수 있도록 브라우저로 다시 전달됩니다. 논리적 뷰 이름은 /WEB-INF/jsp/welcome.jsp 로 해석됩니다. ModelAndView 객체에서 반환되는 논리적 이름 "welcome"은 /WEB-INF/jsp/welcome.jsp 경로에 매핑됩니다.
ModelAndView 개체에는 "message" 키와 상세 값이 있는 메시지도 포함되어 있습니다. 이것은 우리가 보기에 전달하는 데이터입니다. 일반적으로 이것은 뷰에 표시될 데이터를 포함하는 자바 빈 형태의 값 객체가 될 것입니다. 여기서는 단순히 문자열을 전달합니다.
8단계
보기 – 새 파일 생성 /WebContent/index.jsp .
index.jsp
|
1 2 3 4 5 6 7 8 9 10 11 12 13 14 15 16 17 18 19 20 21 22 |
< html > < head > < title > Spring MVC Tutorial Series by Crunchify . com < / title > <style type ="text/css"> body { background-image : url ( 'https://cdn.crunchify.com/bg.png' ) ; } </style> < / head > < body > < br > < div style = "text-align: center" > < h2 > Hey You . . ! ! This is your 1st Spring MCV Tutorial . . < br > < br > < / h2 > < h3 > < a href = "welcome.html" > Click here to See Welcome Message . . . < / a > ( to check Spring MVC Controller . . . @ RequestMapping ( "/welcome" ) ) < / h3 > < / div > < / body > < / html > |
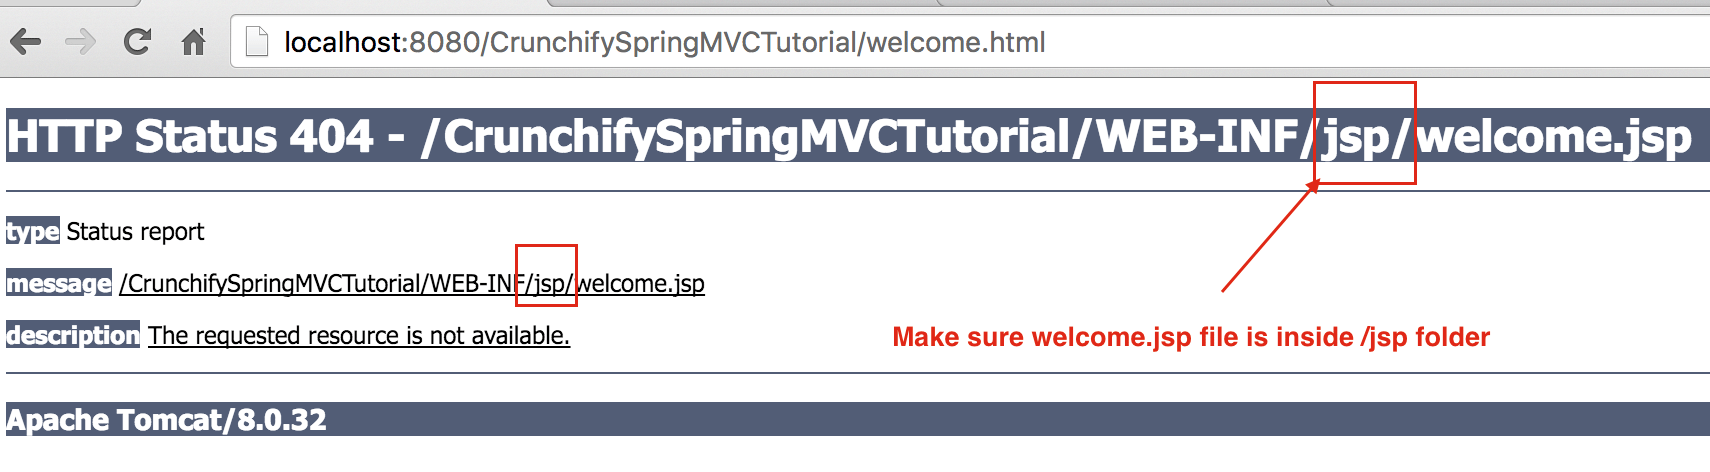
다른 파일 /WebContent/WEB-INF/jsp/welcome.jsp 를 작성하십시오.
NOTE: jsp 폴더를 만들고 그 안에 welcome.jsp 를 넣는 것을 잊지 마십시오.
Welcome.jsp
|
1 2 3 4 5 6 7 8 9 10 11 12 13 14 15 16 17 18 19 20 21 22 23 24 25 |
< html > < head > < title > Spring MVC Tutorial by Crunchify - Hello World Spring MVC Example < / title > <style type ="text/css"> body { background-image : url ( 'https://cdn.crunchify.com/bg.png' ) ; } </style> < / head > < body > $ { message } < br > < br > < div style = "font-family: verdana; padding: 10px; border-radius: 10px; font-size: 12px; text-align: center;" > Spring MCV Tutorial by < a href = "https://crunchify.com" > Crunchify < / a > . Click < a href = "https://crunchify.com/category/java-tutorials/" target = "_blank" > here < / a > for all Java and < a href = 'https://crunchify.com/category/spring-mvc/' target = '_blank' > here < / a > for all Spring MVC , Web Development examples . < br > < / div > < / body > < / html > |
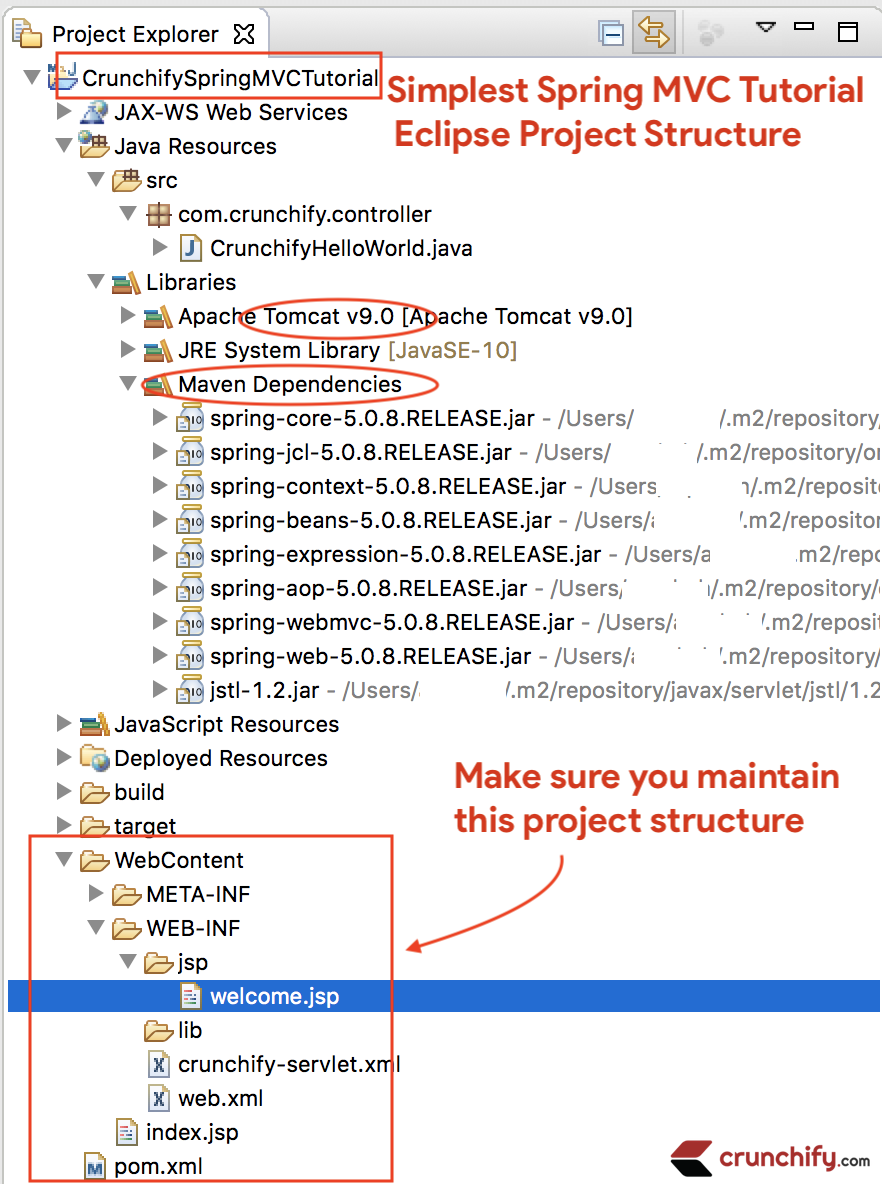
모든 작업을 마친 후 작업 공간은 다음과 같아야 합니다.
9단계
Project -> Run As -> Maven Build... 를 마우스 오른쪽 버튼으로 클릭합니다.
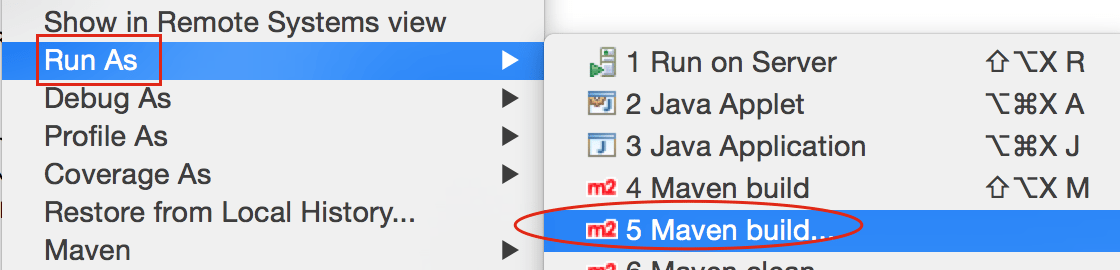
Add Goals : clean install 합니다. Apply 및 Run 을 클릭합니다.
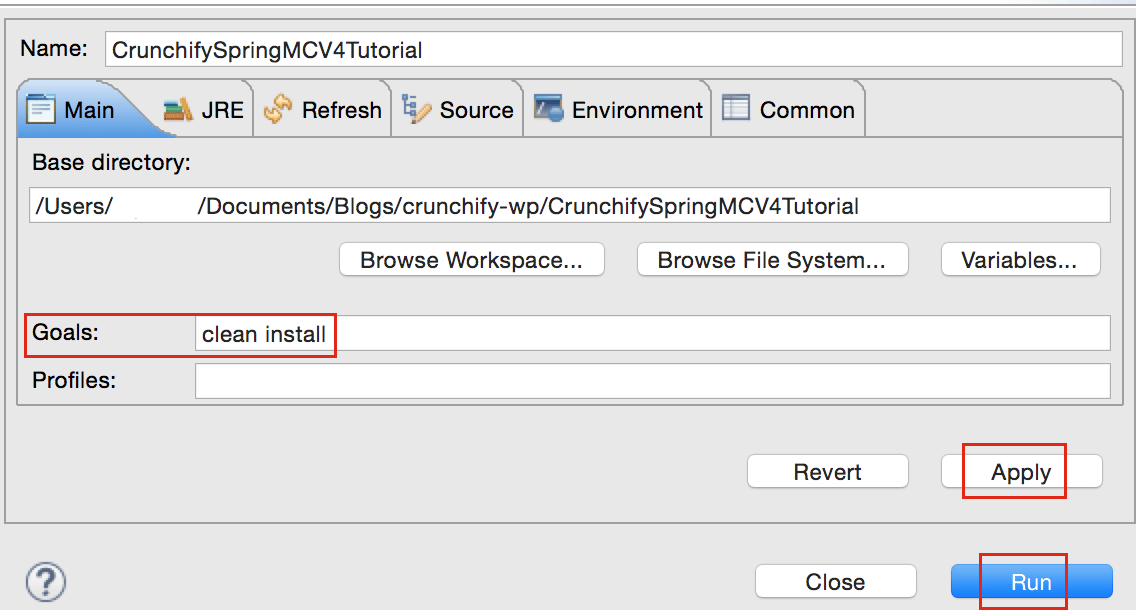
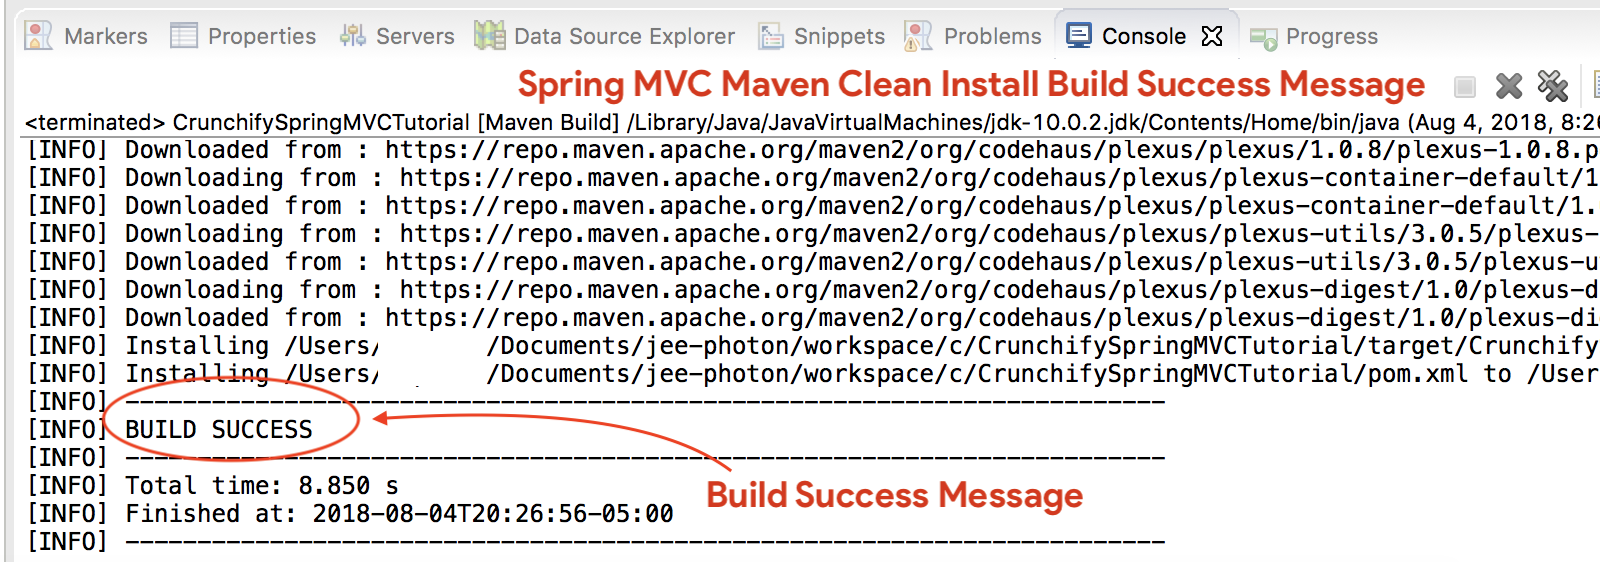
빌드 success message 가 표시되어야 합니다.
내 .jar 파일은 모두 어디에 있습니까?
/target 폴더 아래에 모든 .jar 파일이 표시됩니다. 스크린샷.
10단계
-
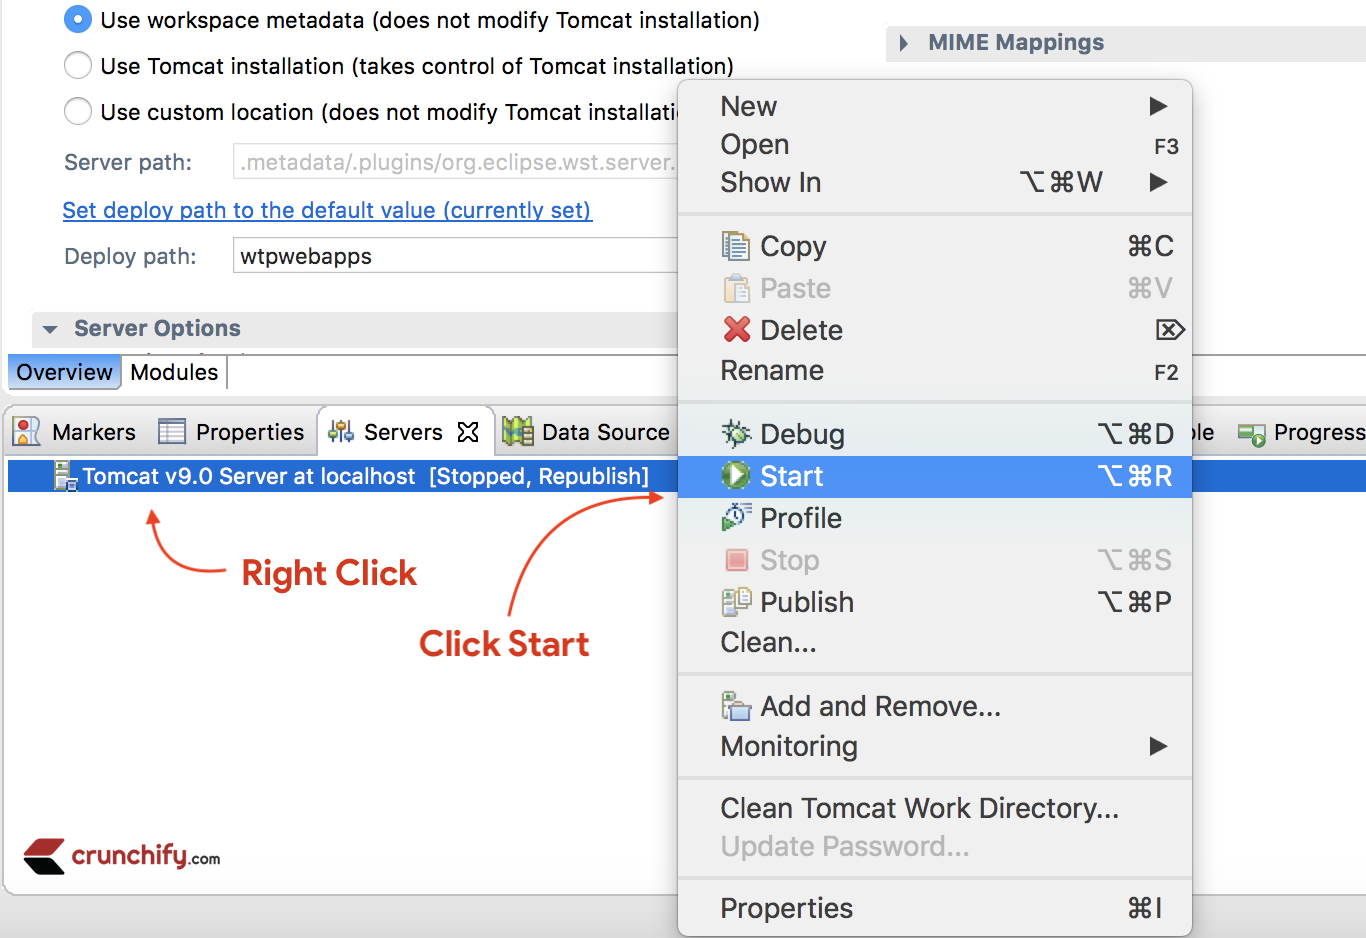
Servers탭에 Tomcat 서버don't see단계에 따라 Apache Tomcat을 Eclipse에 추가하십시오. -
Apache Tomcat에 프로젝트 배포- 마우스 오른쪽 버튼으로 클릭
- 추가 및 제거
- 서버에 프로젝트 추가(오른쪽 섹션).
- 시작을 클릭합니다.
아래 로그를 확인하십시오. 이는 애플리케이션이 Tomcat 웹 서버에 성공적으로 배포되었음을 의미합니다.
|
1 2 3 4 5 6 7 8 9 10 11 12 13 14 15 16 17 18 19 20 21 22 23 24 25 26 27 28 29 30 31 32 33 34 35 36 37 38 39 40 |
Aug 04 , 2018 9 : 08 : 10 PM org . apache . tomcat . util . digester . SetPropertiesRule begin WARNING : [ SetPropertiesRule ] { Server / Service / Engine / Host / Context } Setting property 'source' to 'org.eclipse.jst.jee.server:CrunchifySpringMVCTutorial' did not find a matching property . INFO : Server version : Apache Tomcat / 9.0.10 INFO : Server built : Jun 20 2018 17 : 32 : 21 UTC INFO : Server number : 9.0.10.0 INFO : OS Name : Mac OS X INFO : OS Version : 10.13.6 INFO : Architecture : x86_64 INFO : Java Home : / Library / Java / JavaVirtualMachines / jdk - 10.0.2.jdk / Contents / Home INFO : JVM Version : 10.0.2 + 13 INFO : JVM Vendor : "Oracle Corporation" INFO : CATALINA_BASE : / Users / appshah / Documents / jee - photon / workspace / c / . metadata / . plugins / org . eclipse . wst . server . core / tmp0 INFO : CATALINA_HOME : / Users / appshah / Documents / jee - photon / apache - tomcat - 9.0.10 INFO : Command line argument : - Dcatalina . base =/ Users / appshah / Documents / jee - photon / workspace / c / . metadata / . plugins / org . eclipse . wst . server . core / tmp0 INFO : Command line argument : - Dcatalina . home =/ Users / appshah / Documents / jee - photon / apache - tomcat - 9.0.10 INFO : Command line argument : - Dwtp . deploy =/ Users / appshah / Documents / jee - photon / workspace / c / . metadata / . plugins / org . eclipse . wst . server . core / tmp0 / wtpwebapps INFO : Command line argument : - Dfile . encoding = UTF - 8 INFO : The APR based Apache Tomcat Native library which allows optimal performance in production environments was not found on the java . library . path : [ / Users / appshah / Library / Java / Extensions : / Library / Java / Extensions : / Network / Library / Java / Extensions : / System / Library / Java / Extensions : / usr / lib / java : . ] INFO : Initializing ProtocolHandler [ "http-nio-8080" ] INFO : Using a shared selector for servlet write / read INFO : Initializing ProtocolHandler [ "ajp-nio-8009" ] INFO : Using a shared selector for servlet write / read INFO : Initialization processed in 841 ms INFO : Starting service [ Catalina ] INFO : Starting Servlet Engine : Apache Tomcat / 9.0.10 INFO : At least one JAR was scanned for TLDs yet contained no TLDs . Enable debug logging for this logger for a complete list of JARs that were scanned but no TLDs were found in them . Skipping unneeded JARs during scanning can improve startup time and JSP compilation time . INFO : At least one JAR was scanned for TLDs yet contained no TLDs . Enable debug logging for this logger for a complete list of JARs that were scanned but no TLDs were found in them . Skipping unneeded JARs during scanning can improve startup time and JSP compilation time . INFO : No Spring WebApplicationInitializer types detected on classpath INFO : Initializing Spring FrameworkServlet 'crunchify' INFO : FrameworkServlet 'crunchify' : initialization started INFO : Refreshing WebApplicationContext for namespace 'crunchify-servlet' : startup date [ Sat Aug 04 21 : 08 : 13 CDT 2018 ] ; root of context hierarchy INFO : Loading XML bean definitions from ServletContext resource [ / WEB - INF / crunchify - servlet . xml ] INFO : Mapped "{[/welcome]}" onto public org . springframework . web . servlet . ModelAndView com . crunchify . controller . CrunchifyHelloWorld . helloWorld ( ) INFO : Looking for @ ControllerAdvice : WebApplicationContext for namespace 'crunchify-servlet' : startup date [ Sat Aug 04 21 : 08 : 13 CDT 2018 ] ; root of context hierarchy INFO : Looking for @ ControllerAdvice : WebApplicationContext for namespace 'crunchify-servlet' : startup date [ Sat Aug 04 21 : 08 : 13 CDT 2018 ] ; root of context hierarchy INFO : Mapped URL path [ /** ] onto handler 'org.springframework.web.servlet.resource.DefaultServletHttpRequestHandler#0' INFO : FrameworkServlet 'crunchify' : initialization completed in 1607 ms INFO : Starting ProtocolHandler [ "http-nio-8080" ] INFO : Starting ProtocolHandler [ "ajp-nio-8009" ] INFO : Server startup in 3579 ms |
11단계. 완료.
방문: http://localhost:8080/CrunchifySpringMVCTutorial/ 그러면 모든 설정이 완료됩니다.
만세.. 이제 Hello World Spring MVC 5 Example 를 알았습니다. 이것을 실행하는 동안 예외가 발생하면 알려주십시오. 여기에서 더 많은 예를 찾을 수 있습니다.
Do you want to include JS, CSS and images into JSP file? 이 튜토리얼을 따르십시오: 'mvc:resources mapping'을 사용하여 JS, CSS 및 이미지를 JSP 파일에 추가/통합하는 가장 좋은 방법.
문제가있다? 문제가 있습니까?
1단계 – HTTP 상태 404 오류가 있습니까?
또한 아래 자습서를 따르십시오.
2단계 분류 – URL이 작동하지 않습니까? 톰캣 오류?
Targeted Runtime 에 Apache Tomcat 서버를 추가했는지 확인하십시오. Step-1 에서 선택했을 수 있습니다. Tomcat 7 또는 8 any – 서버가 작동해야 합니다.
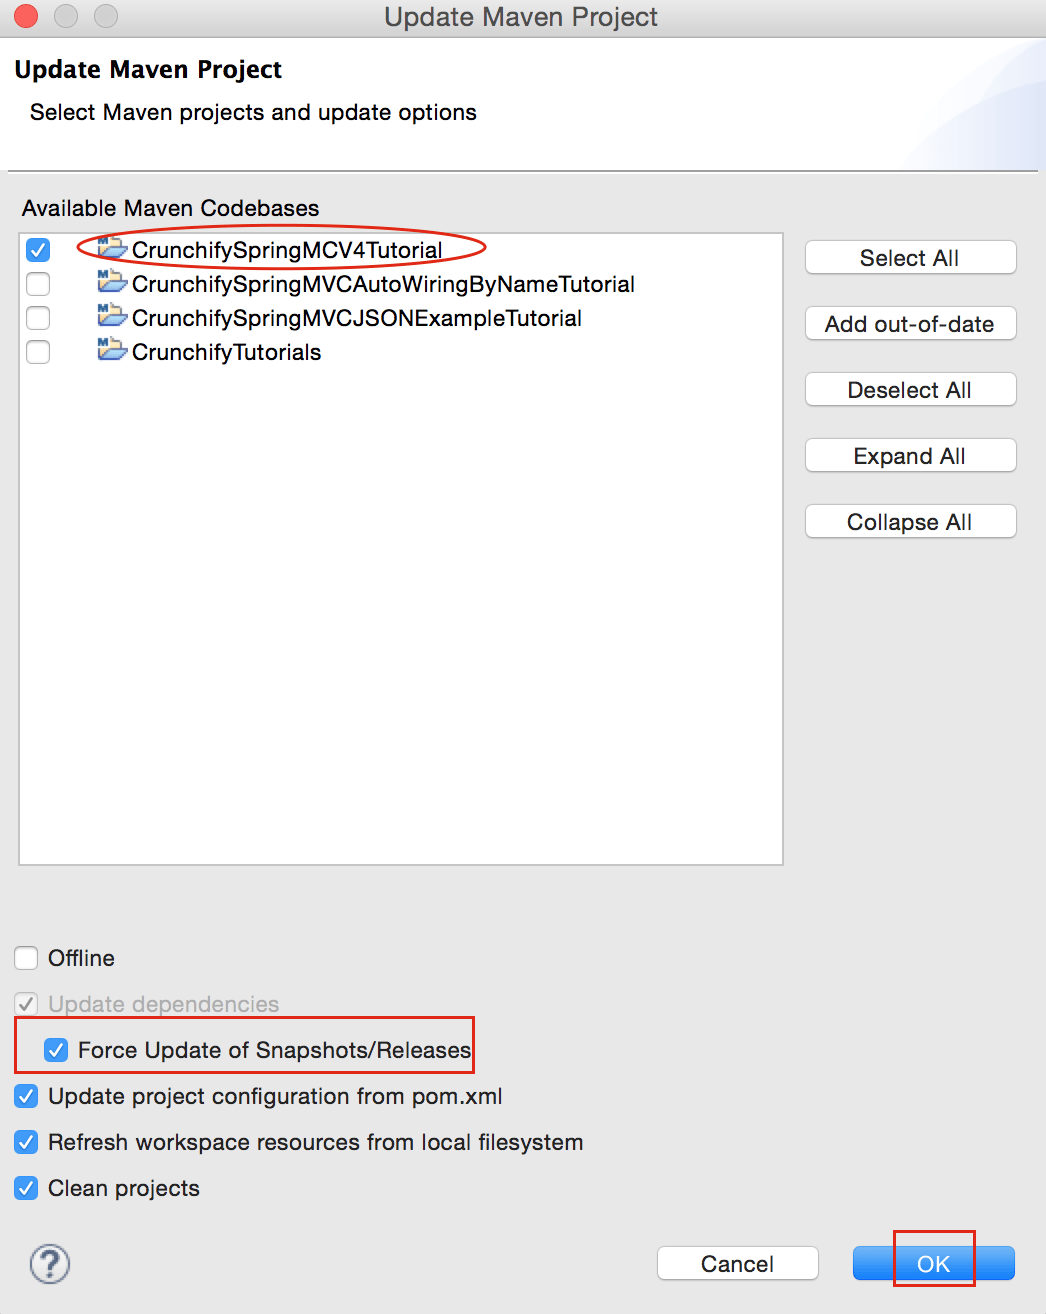
3단계 - maven 오류 선별?
모든 maven 종속성을 업데이트해야 합니다.
위의 튜토리얼을 실행하는 데 문제가 있는 경우 아래에 이메일을 보내거나 댓글을 남겨주세요.