
Tutorial del framework MVC Spring più semplice - Esempio Hello World con pagina UI (JSP).
Pubblicato: 2019-02-23
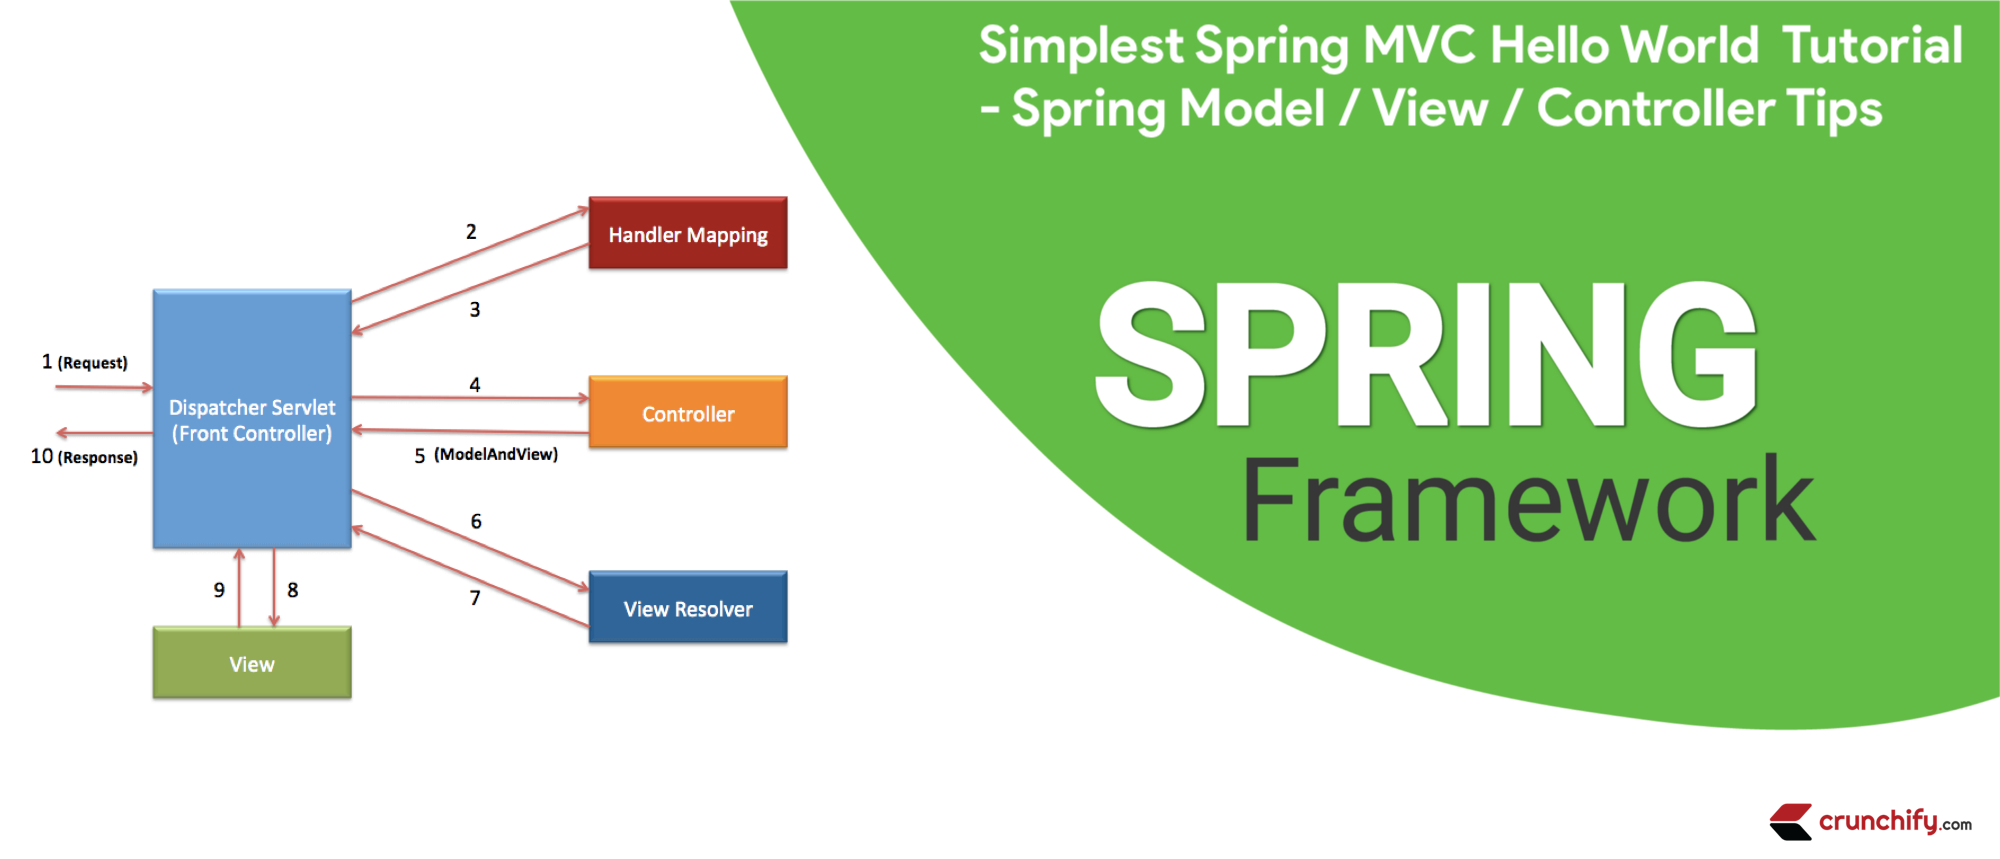
L'architettura Model-View-Controller (MVC) fornisce il modo più semplice per sviluppare applicazioni Web flessibili e ad accoppiamento libero.
In questo tutorial esamineremo come creare la tua prima applicazione Spring MVC con passaggi molto dettagliati.
Hai una delle seguenti domande?
- Fondamenti di Spring MVC 5.2.3
- Lo sviluppo di un'applicazione Spring Framework MVC 5 passo dopo passo.
- java – Tutorial MVC di primavera da zero
- Tutorial rapido MVC di primavera
- Esercitazione sul framework MVC di primavera
- Primo tutorial sull'applicazione Spring MVC
- Spring 5.x Tutorial MVC, AJAX Demo, jQuery Demo, JavaScript Demo, Tips & Tricks Spring 5 MVC
Allora sei nel posto giusto. Qui dimostrerò un semplice Spring MVC framework per la creazione di applicazioni web.
Per prima cosa: configuriamo l'ambiente
Ultimo aggiornamento e verifica del tutorial: settembre 2020 con le seguenti versioni dello strumento.
Sto usando gli strumenti seguenti che potresti dover scaricare se non li hai già.
- Tomcat 9.0.38 – Scarica l'ultimo Apache Tomcat da questo link.
- Assicurati di scaricare Eclipse IDE per sviluppatori
Java EE(2020‑09 R) – Link per il download. (schema sotto) -
Spring 5.2.9.RELEASE(nessun download richiesto) – useremo la dipendenza Maven. - JDK 15 – Collegamento per il download.
Assicurati di scaricare l'ultimo Java EE Developer Kit:

Obiettivo principale
Obiettivo principale di questo tutorial per creare l'applicazione Spring MVC nel modo più semplice.
Prima di iniziare, vediamo cosa vedremo alla fine di questo tutorial
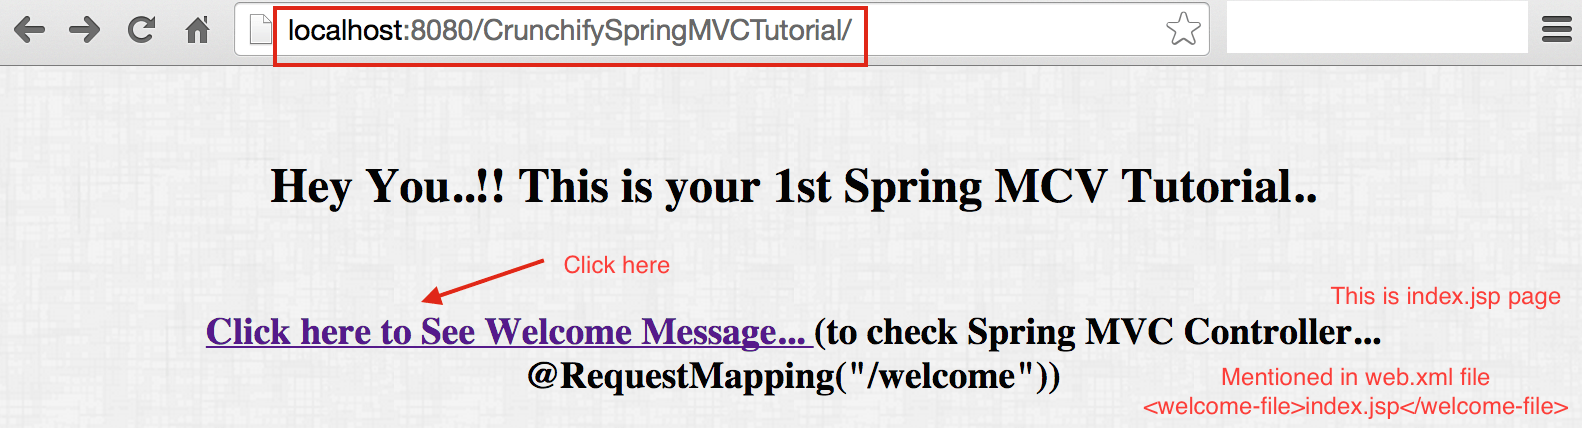
Ecco come apparirà il application result . Questo è un risultato finale una volta completati tutti i passaggi seguenti.
Ecco un risultato finale: Pagina di benvenuto ==> index.jsp
Il risultato viene restituito dalla classe controller
Ora iniziamo con Tutorial
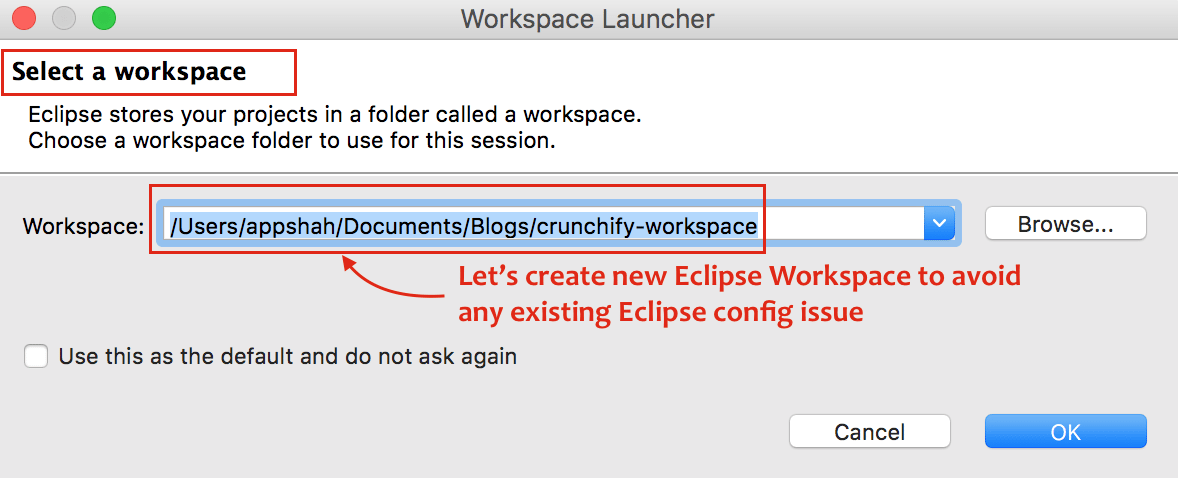
Passo 1
- Apri Eclipse
- Crea
New Eclipse Workspace– Questo èmustper evitare qualsiasi problema di configurazione dell'area di lavoro esistente.
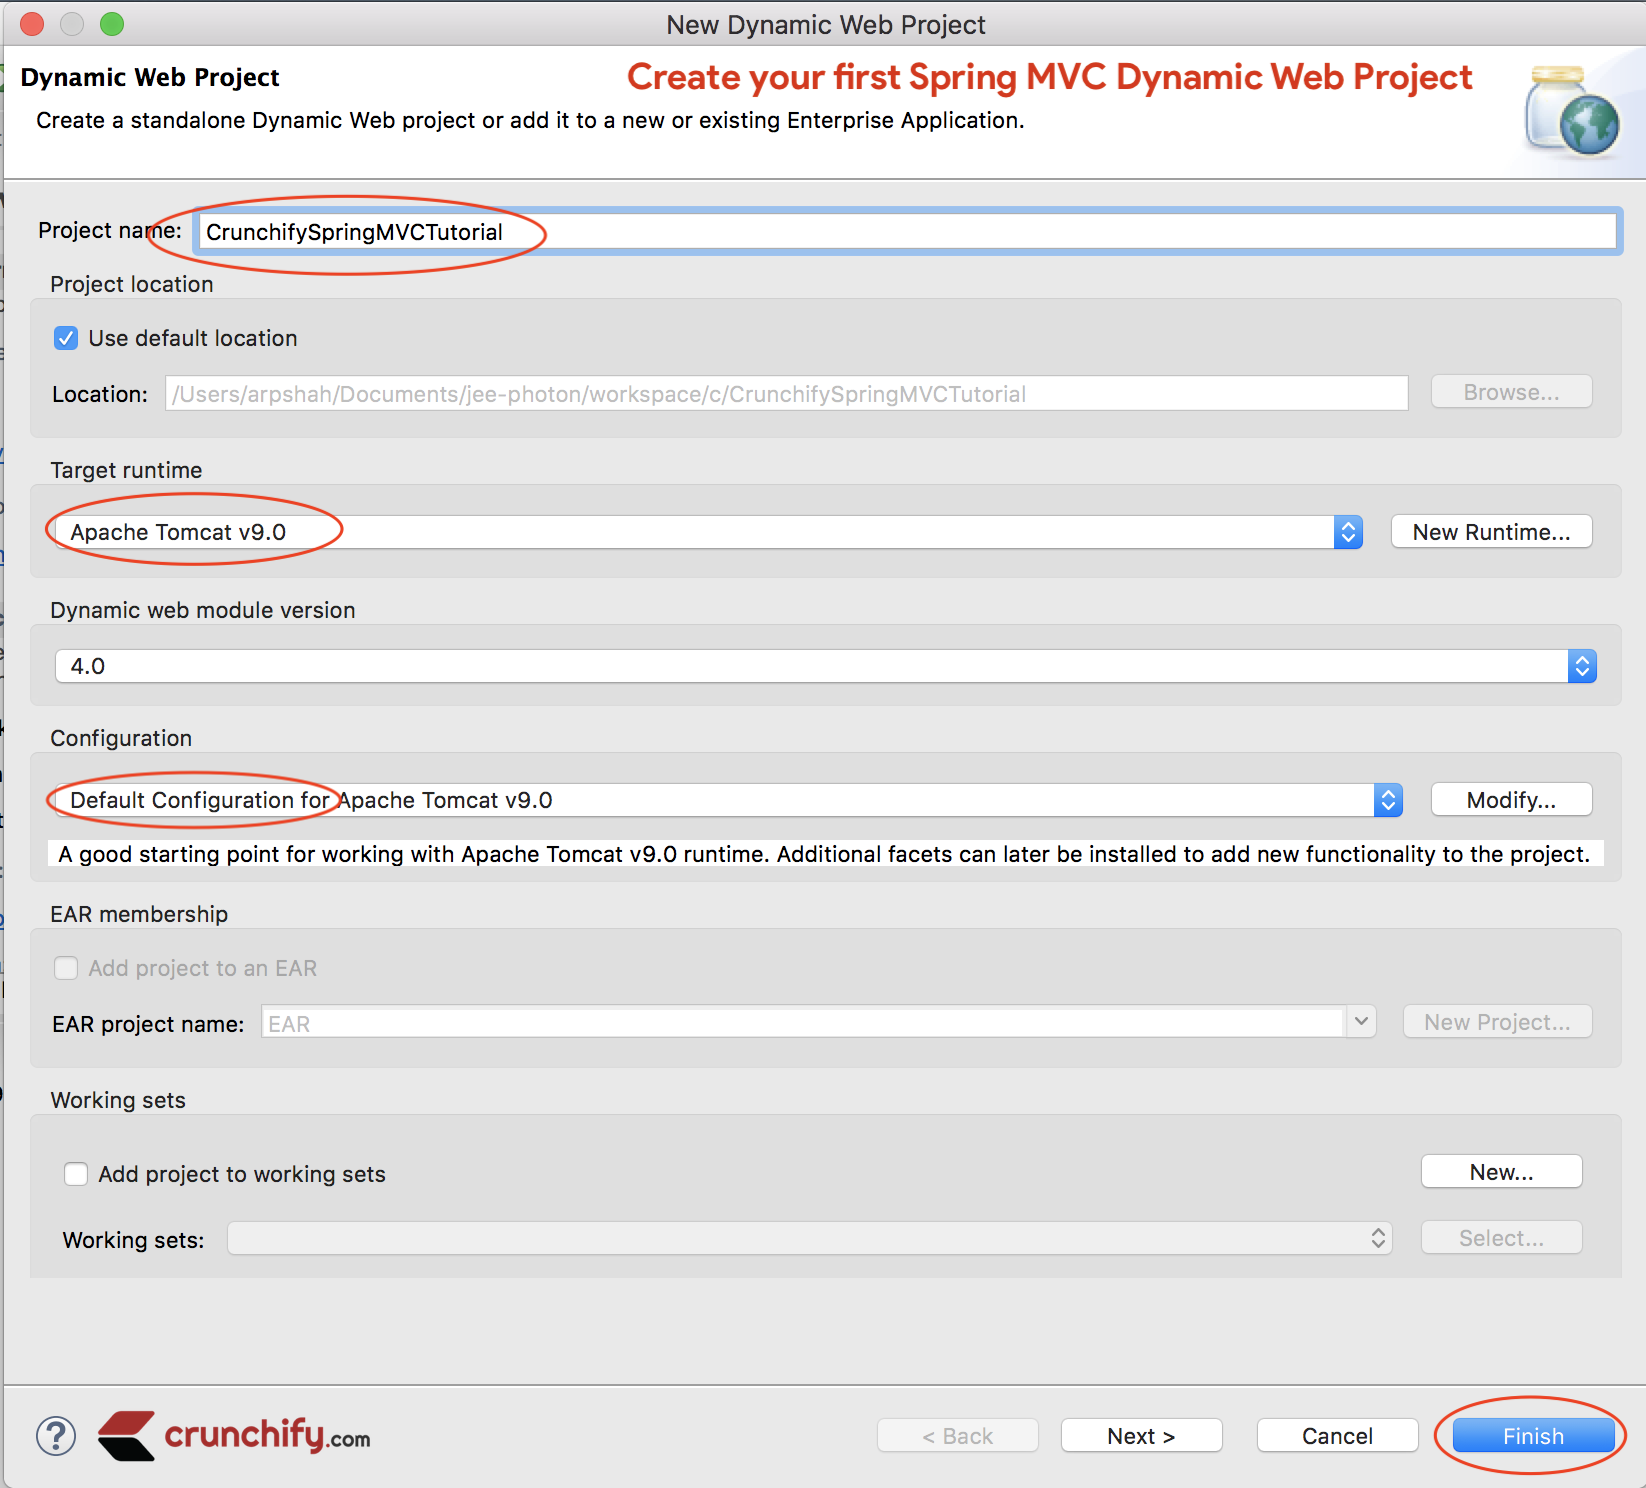
Passo 2
- Fare clic su
File - Fare clic su
New - Scegli
Dynamic Web Project - Una finestra popup, Fornisci il nome del progetto:
CrunchifySpringMVCTutorial - Assicurati di utilizzare
Target RuntimecomeApache Tomcat 9.0- Se non vedi Target Runtime, segui questi passaggi
- Scegli Configurazione come
Default Configuration
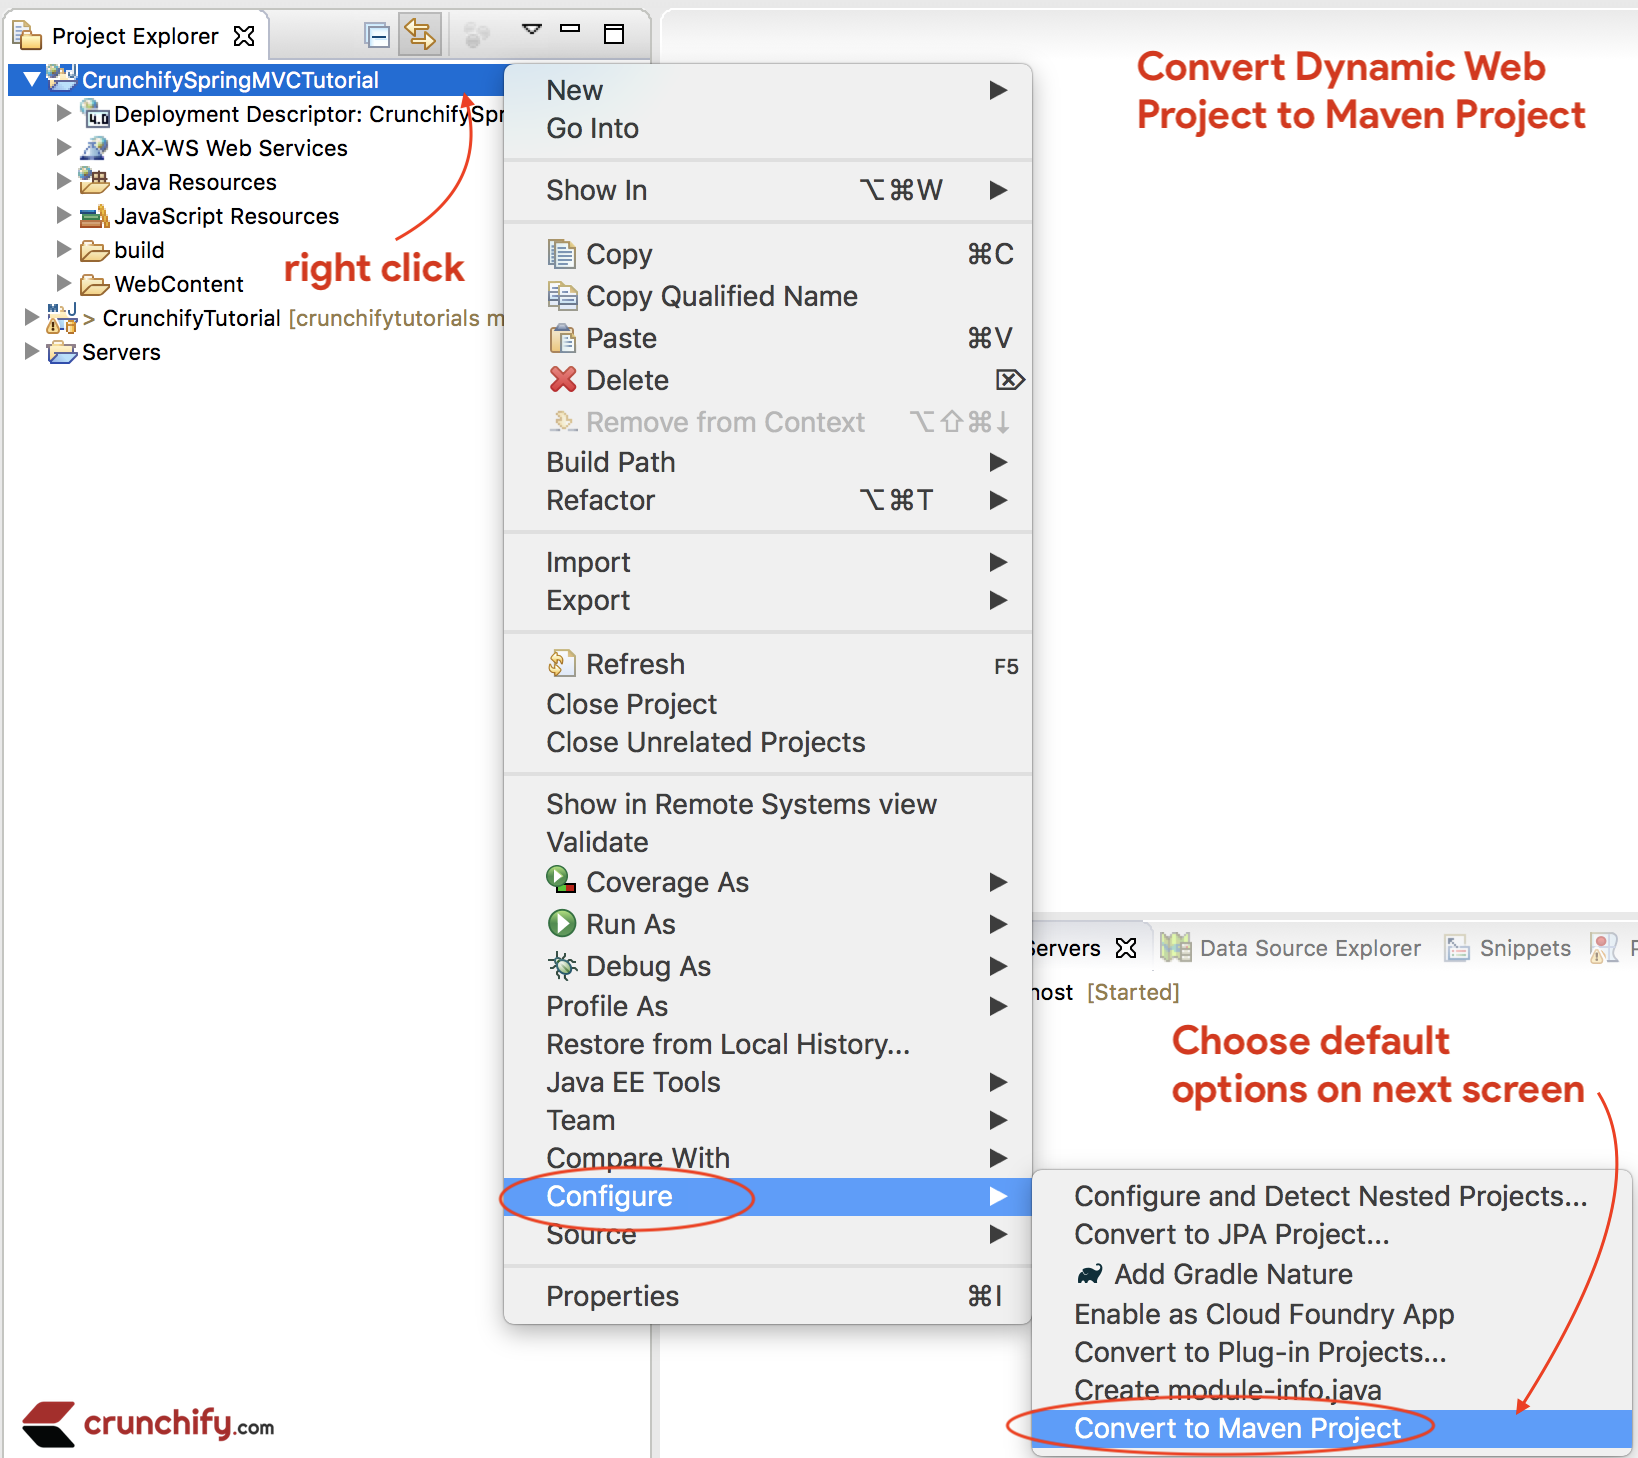
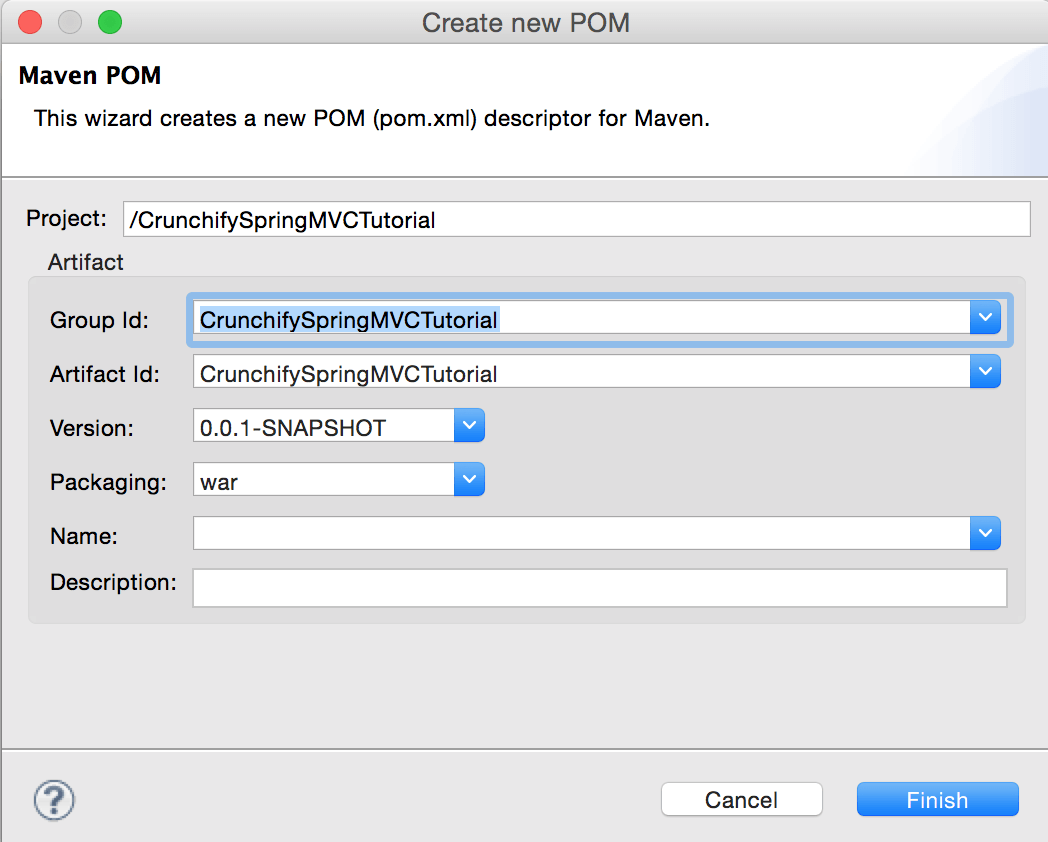
Passaggio 3
Converti progetto in progetto Maven per aggiungere tutte le dipendenze Spring MVC richieste al progetto.
Passi:
- Fare clic con il tasto destro del mouse sul progetto
- Configura
- Converti in progetto
Maven
Passaggio 4
Apri il file pom.xml e aggiungi sotto jar dependencies al progetto.
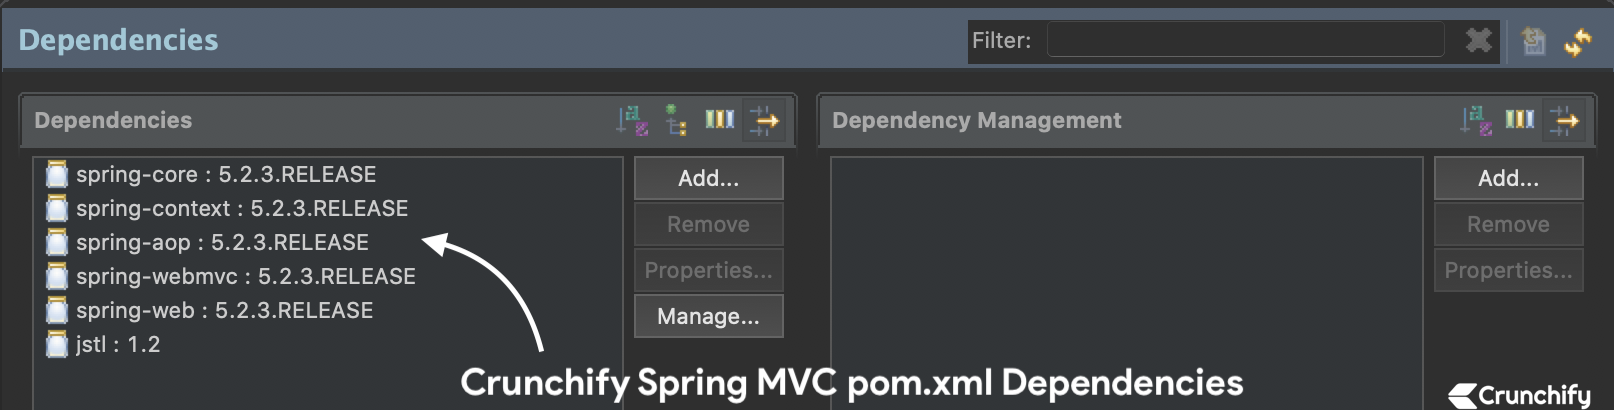
NOTE:ecco il mio filepom.xml. Assicurati di aggiornare la versione Java a13se non sei ancora passato aJDK 13. Continueremo ad aggiornare questo tutorial all'ultima versione di Spring MVC.Quindi sotto il file pom.xml potrebbe avere una versione diversa (ultima) delle dipendenze di Spring MVC rispetto all'immagine sopra
|
1 2 3 4 5 6 7 8 9 10 11 12 13 14 15 16 17 18 19 20 21 22 23 24 25 26 27 28 29 30 31 32 33 34 35 36 37 38 39 40 41 42 43 44 45 46 47 48 49 50 51 52 53 54 55 56 57 58 59 60 61 |
< project xmlns = "http://maven.apache.org/POM/4.0.0" xmlns : xsi = "http://www.w3.org/2001/XMLSchema-instance" xsi : schemaLocation = "http://maven.apache.org/POM/4.0.0 http://maven.apache.org/xsd/maven-4.0.0.xsd" > < modelVersion > 4.0.0 < / modelVersion > < groupId > CrunchifySpringMVCTutorial < / groupId > < artifactId > CrunchifySpringMVCTutorial < / artifactId > < version > 0.0.1 - SNAPSHOT < / version > < packaging > war < / packaging > < build > < sourceDirectory > src < / sourceDirectory > < plugins > < plugin > < artifactId > maven - compiler - plugin < / artifactId > < version > 3.8.0 < / version > < configuration > < release > 13 < / release > < / configuration > < / plugin > < plugin > < artifactId > maven - war - plugin < / artifactId > < version > 3.2.1 < / version > < configuration > < warSourceDirectory > WebContent < / warSourceDirectory > < / configuration > < / plugin > < / plugins > < / build > < dependencies > < dependency > < groupId > org . springframework < / groupId > < artifactId > spring - core < / artifactId > < version > 5.2.3.RELEASE < / version > < / dependency > < dependency > < groupId > org . springframework < / groupId > < artifactId > spring - context < / artifactId > < version > 5.2.3.RELEASE < / version > < / dependency > < dependency > < groupId > org . springframework < / groupId > < artifactId > spring - aop < / artifactId > < version > 5.2.3.RELEASE < / version > < / dependency > < dependency > < groupId > org . springframework < / groupId > < artifactId > spring - webmvc < / artifactId > < version > 5.2.3.RELEASE < / version > < / dependency > < dependency > < groupId > org . springframework < / groupId > < artifactId > spring - web < / artifactId > < version > 5.2.3.RELEASE < / version > < / dependency > < dependency > < groupId > javax . servlet < / groupId > < artifactId > jstl < / artifactId > < version > 1.2 < / version > < / dependency > < / dependencies > < / project > |
Passaggio 5
Crea un nuovo file Spring Configuration Bean : /WebContent/WEB-INF/crunchify-servlet.xml

crunchify-servlet.xml
|
1 2 3 4 5 6 7 8 9 10 11 12 13 14 15 16 17 18 19 20 21 22 23 24 25 26 27 |
<? xml version = "1.0" encoding = "UTF-8" ?> < beans xmlns = "http://www.springframework.org/schema/beans" xmlns : mvc = "http://www.springframework.org/schema/mvc" xmlns : context = "http://www.springframework.org/schema/context" xmlns : xsi = "http://www.w3.org/2001/XMLSchema-instance" xsi : schemaLocation = " http://www.springframework.org/schema/beans http://www.springframework.org/schema/beans/spring-beans.xsd http://www.springframework.org/schema/mvc http://www.springframework.org/schema/mvc/spring-mvc.xsd http://www.springframework.org/schema/context http://www.springframework.org/schema/context/spring-context.xsd" > < mvc : annotation - driven / > < context : component - scan base - package = "com.crunchify.controller" / > < mvc : default - servlet - handler / > < bean id = "viewResolver" class = "org.springframework.web.servlet.view.UrlBasedViewResolver" > < property name = "viewClass" value = "org.springframework.web.servlet.view.JstlView" / > < property name = "prefix" value = "/WEB-INF/jsp/" / > < property name = "suffix" value = ".jsp" / > < / bean > < / beans > |
In crunchify-servlet.xml sopra file di configurazione, abbiamo definito un tag <context:component-scan> . Ciò consentirà a Spring di caricare tutti i componenti dal pacchetto com.crunchify.controller e tutti i suoi pacchetti figlio.
Questo caricherà il nostro CrunchifyHelloWorld.class . Inoltre abbiamo definito un bean viewResolver . Questo bean risolverà la vista e aggiungerà la stringa di prefisso /WEB-INF/jsp/ e il suffisso .jsp alla vista in ModelAndView.
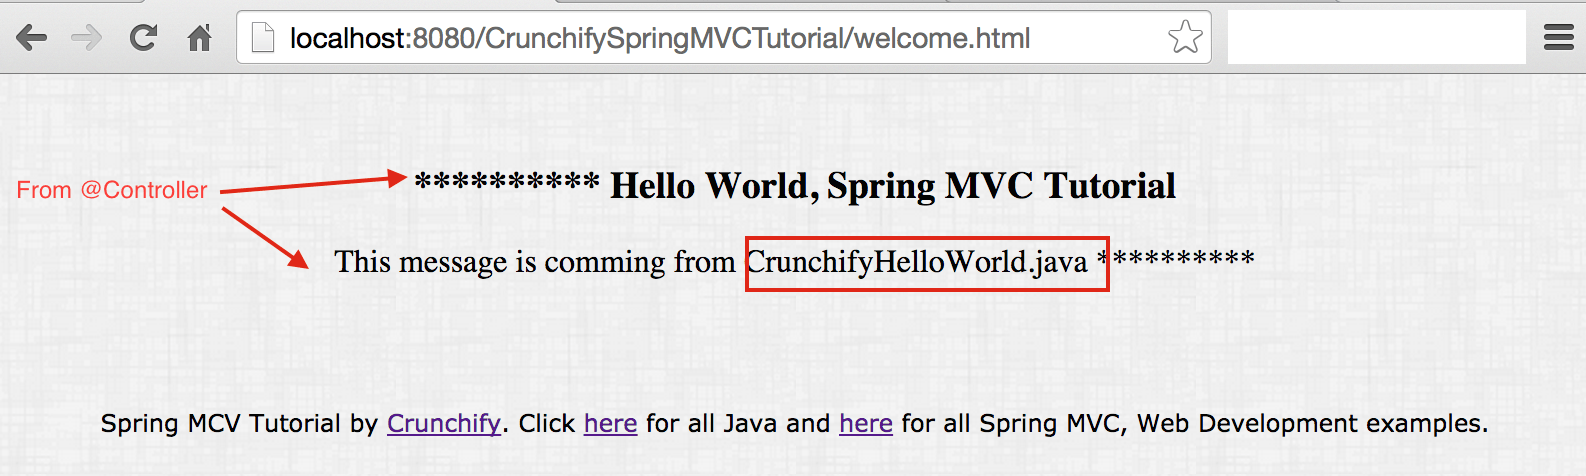
Nota che nella nostra classe CrunchifyHelloWorld , abbiamo restituito un oggetto ModelAndView con il nome di visualizzazione benvenuto.
Questo verrà risolto nel percorso /WEB-INF/jsp/welcome.jsp .
Passaggio 6
Crea un nuovo file web.xml se non è già presente. Mappa Spring MVC nel file /WebContent/WEB-INF/web.xml .
NOTE: se non vedi il file web.xml nel tuo " dynamic web project ", segui questi passaggi.
web.xml
|
1 2 3 4 5 6 7 8 9 10 11 12 13 14 15 16 17 18 19 20 21 22 23 24 25 26 27 28 |
<? xml version = "1.0" encoding = "UTF-8" ?> < web - app xmlns : xsi = "http://www.w3.org/2001/XMLSchema-instance" xmlns = "http://xmlns.jcp.org/xml/ns/javaee" xsi : schemaLocation = "http://xmlns.jcp.org/xml/ns/javaee http://xmlns.jcp.org/xml/ns/javaee/web-app_4_0.xsd" id = "WebApp_ID" version = "4.0" > < display - name > CrunchifySpringMVCTutorial < / display - name > < welcome - file - list > < welcome - file > index . html < / welcome - file > < welcome - file > index . htm < / welcome - file > < welcome - file > index . jsp < / welcome - file > < welcome - file > default . html < / welcome - file > < welcome - file > default . htm < / welcome - file > < welcome - file > default . jsp < / welcome - file > < / welcome - file - list > < servlet > < servlet - name > crunchify < / servlet - name > < servlet - class > org . springframework . web . servlet . DispatcherServlet < / servlet - class > < load - on - startup > 1 < / load - on - startup > < / servlet > < servlet - mapping > < servlet - name > crunchify < / servlet - name > < url - pattern > / welcome . jsp < / url - pattern > < url - pattern > / index . jsp < / url - pattern > < url - pattern > / welcome . html < / url - pattern > < url - pattern > * . html < / url - pattern > < / servlet - mapping > < / web - app > |
Il codice sopra in web.xml mapperà DispatcherServlet con il pattern URL /welcome.jsp . Nota anche che abbiamo definito index.jsp come file di benvenuto.
Una cosa da notare qui è il nome del servlet nel <servlet-name> in web.xml . Una volta che DispatcherServlet è stato inizializzato, cercherà un nome file [servlet-name]-servlet.xml nella cartella WEB-INF dell'applicazione web. In questo esempio, il framework cercherà il file chiamato crunchify-servlet.xml .
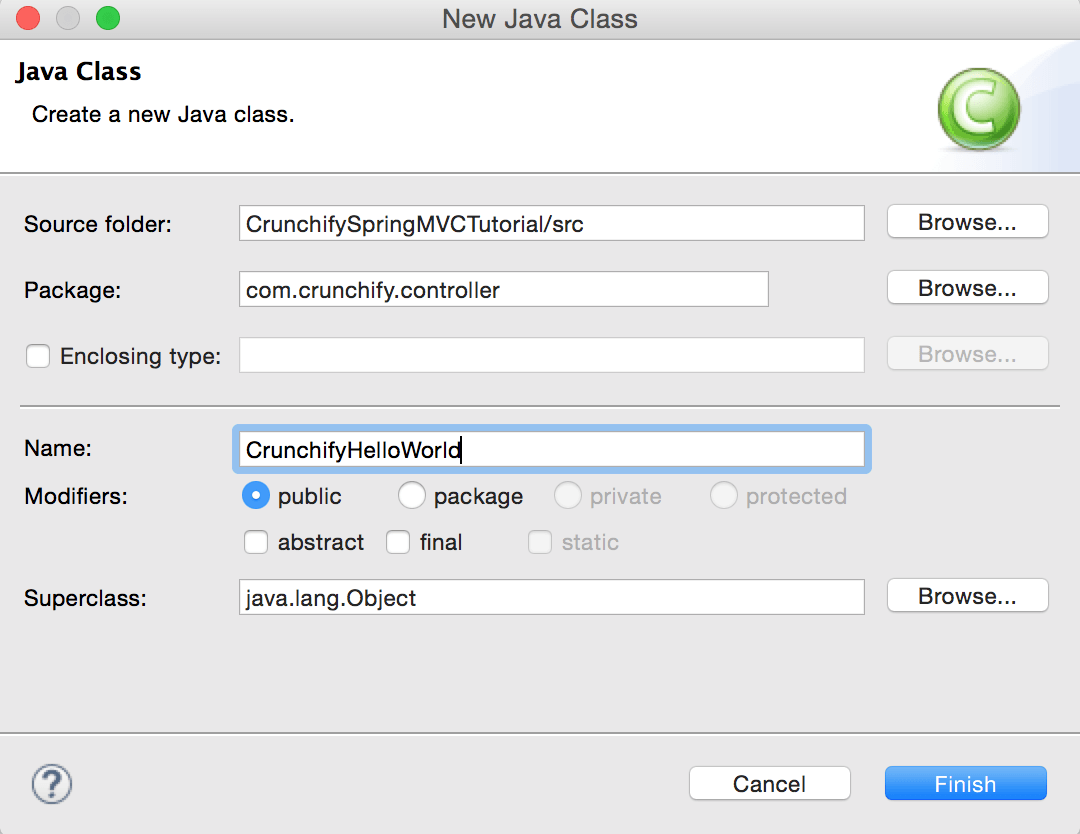
Passaggio 7
Crea classe controller.
- Fare clic con il tasto destro su
Java Resources->src - Fare clic su
New->Class - Pacchetto:
com.crunchify.controller - Nome file:
CrunchifyHelloWorld.java
CrunchifyHelloWorld.java
|
1 2 3 4 5 6 7 8 9 10 11 12 13 14 15 16 17 18 19 20 21 22 |
package com . crunchify . controller ; import org . springframework . stereotype . Controller ; import org . springframework . web . bind . annotation . RequestMapping ; import org . springframework . web . servlet . ModelAndView ; /* * author: Crunchify.com * */ @Controller public class CrunchifyHelloWorld { @RequestMapping ( "/welcome" ) public ModelAndView helloWorld ( ) { String message = "<br><div>" + "<h3>********** Hello World, Spring MVC Tutorial</h3>This message is coming from CrunchifyHelloWorld.java **********</div><br><br>" ; return new ModelAndView ( "welcome" , "message" , message ) ; } } |
Nota che abbiamo annotato la classe CrunchifyHelloWorld con @Controller e @RequestMapping("/welcome") . Quando Spring esegue la scansione del nostro pacchetto, riconoscerà questo bean come un bean Controller per l'elaborazione delle richieste. L'annotazione @RequestMapping dice a Spring che questo controller dovrebbe elaborare tutte le richieste che iniziano con /welcome nel percorso dell'URL. Ciò include /welcome/* e /welcome.html .

Il metodo helloWorld() restituisce l'oggetto ModelAndView . L'oggetto ModelAndView tenta di risolversi in una vista denominata "benvenuto" e il modello di dati viene ritrasmesso al browser in modo da poter accedere ai dati all'interno del JSP. Il nome della vista logica verrà risolto in /WEB-INF/jsp/welcome.jsp . Il nome logico "benvenuto" che viene restituito nell'oggetto ModelAndView è mappato sul percorso /WEB-INF/jsp/welcome.jsp.
L'oggetto ModelAndView contiene anche un messaggio con chiave "messaggio" e valore dettagliato. Questi sono i dati che stiamo passando alla nostra vista. Normalmente questo sarà un oggetto valore sotto forma di java bean che conterrà i dati da visualizzare sulla nostra vista. Qui stiamo semplicemente passando una stringa.
Passaggio 8
La vista: crea un nuovo file /WebContent/index.jsp .
index.jsp
|
1 2 3 4 5 6 7 8 9 10 11 12 13 14 15 16 17 18 19 20 21 22 |
< html > < head > < title > Spring MVC Tutorial Series by Crunchify . com < / title > <style type ="text/css"> body { background-image : url ( 'https://cdn.crunchify.com/bg.png' ) ; } </style> < / head > < body > < br > < div style = "text-align: center" > < h2 > Hey You . . ! ! This is your 1st Spring MCV Tutorial . . < br > < br > < / h2 > < h3 > < a href = "welcome.html" > Click here to See Welcome Message . . . < / a > ( to check Spring MVC Controller . . . @ RequestMapping ( "/welcome" ) ) < / h3 > < / div > < / body > < / html > |
Crea un altro file /WebContent/WEB-INF/jsp/welcome.jsp .
NOTE: non dimenticare di creare la cartella jsp e di inserire welcome.jsp al suo interno
benvenuto.jsp
|
1 2 3 4 5 6 7 8 9 10 11 12 13 14 15 16 17 18 19 20 21 22 23 24 25 |
< html > < head > < title > Spring MVC Tutorial by Crunchify - Hello World Spring MVC Example < / title > <style type ="text/css"> body { background-image : url ( 'https://cdn.crunchify.com/bg.png' ) ; } </style> < / head > < body > $ { message } < br > < br > < div style = "font-family: verdana; padding: 10px; border-radius: 10px; font-size: 12px; text-align: center;" > Spring MCV Tutorial by < a href = "https://crunchify.com" > Crunchify < / a > . Click < a href = "https://crunchify.com/category/java-tutorials/" target = "_blank" > here < / a > for all Java and < a href = 'https://crunchify.com/category/spring-mvc/' target = '_blank' > here < / a > for all Spring MVC , Web Development examples . < br > < / div > < / body > < / html > |
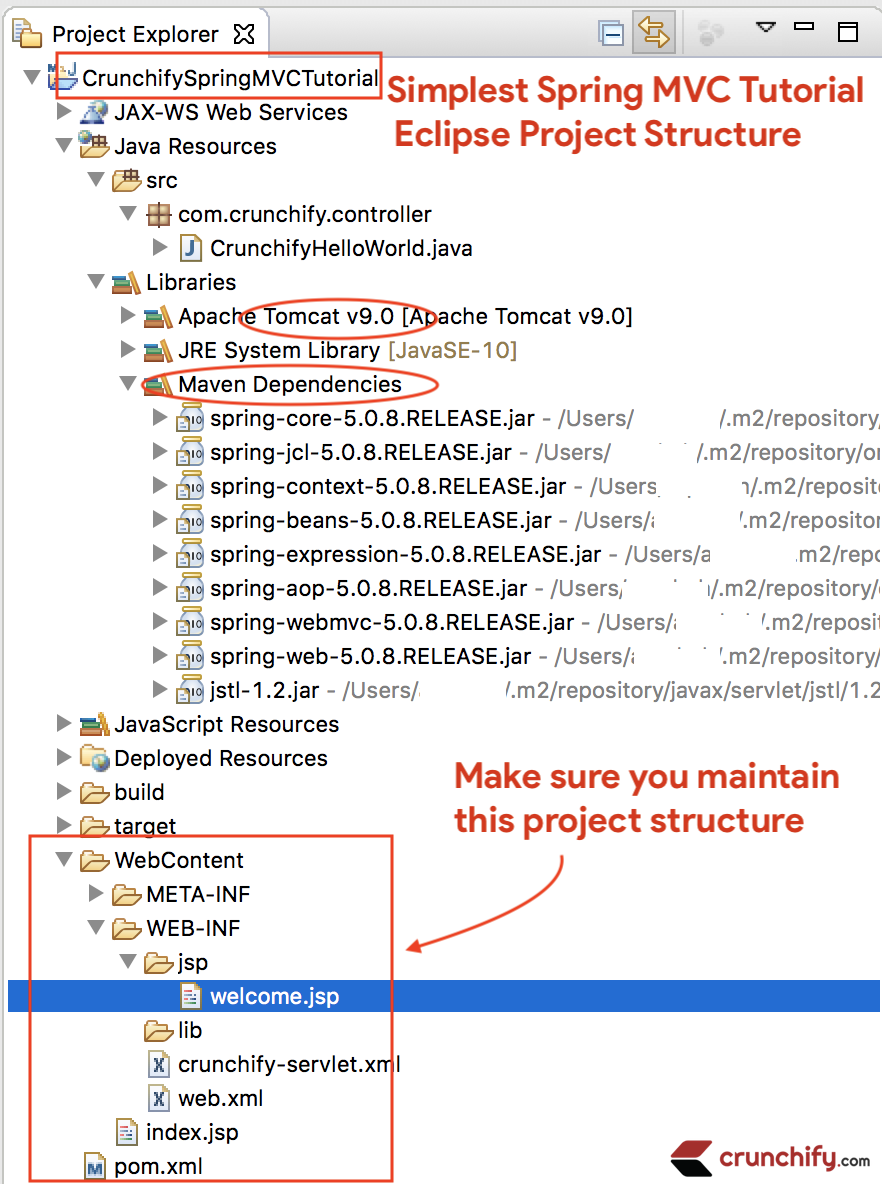
Dopo tutto, ecco come dovrebbe apparire il tuo spazio di lavoro.
Passaggio 9
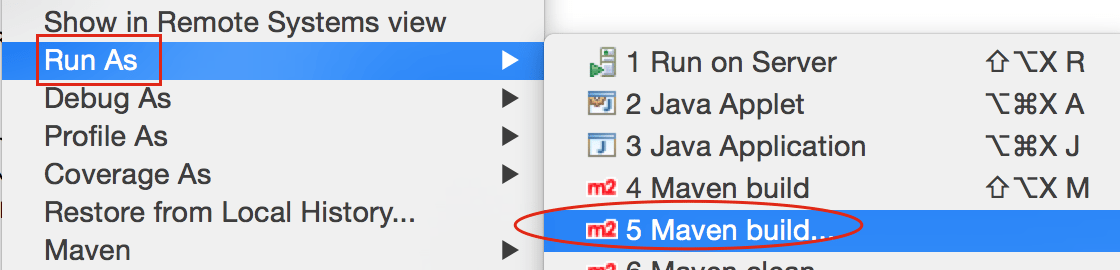
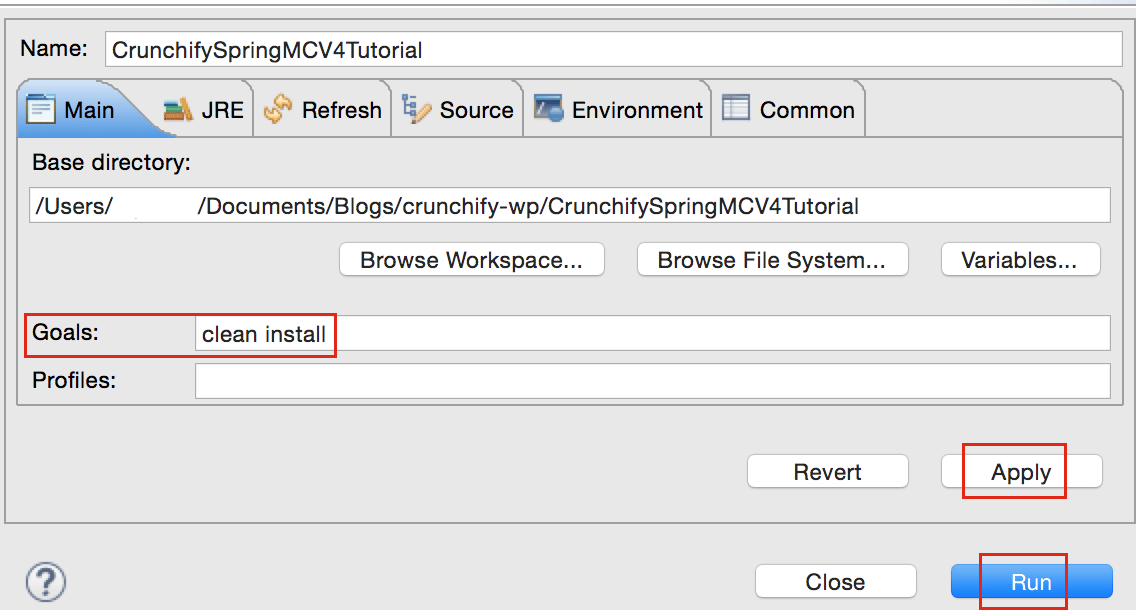
Fare clic con il tasto destro su Project -> Run As -> Maven Build...
Add Goals : clean install . Fare clic su Apply ed Run .
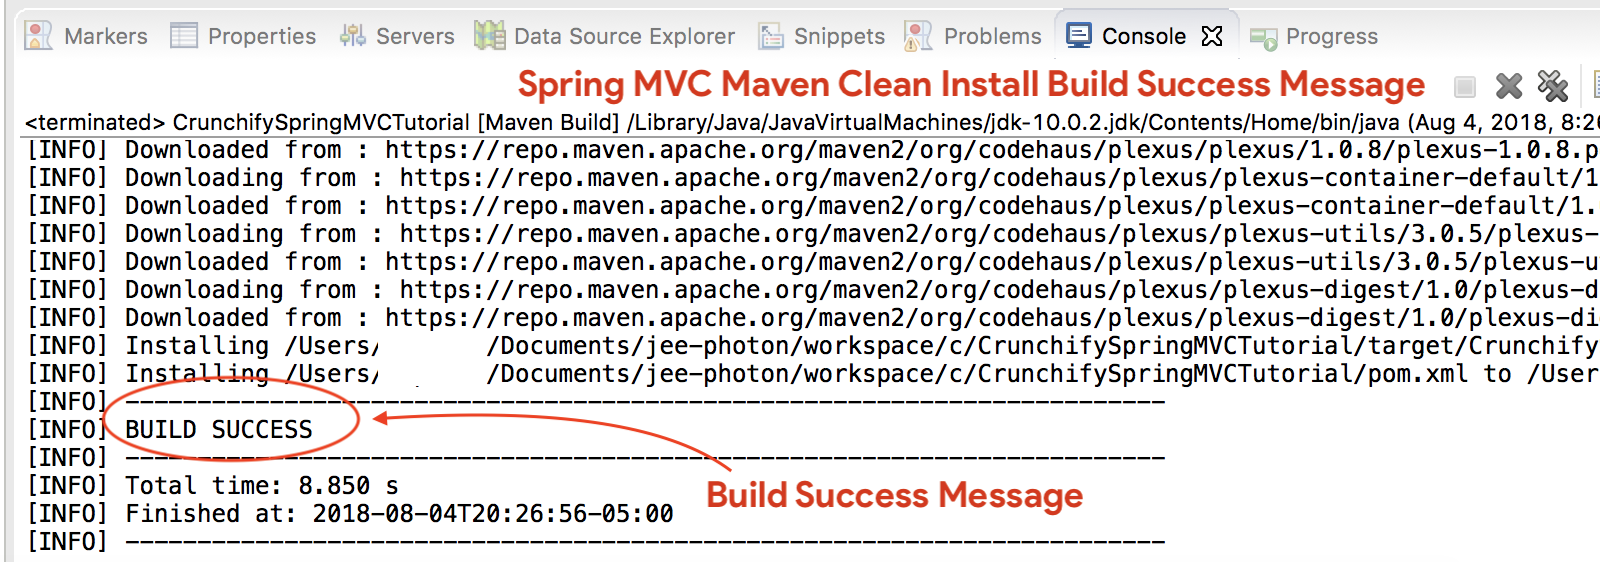
Dovresti vedere success message compilazione:
Dove sono tutti i miei file .jar?
Vedrai tutti i file .jar nella cartella /target . Immagine dello schermo.
Passaggio 10
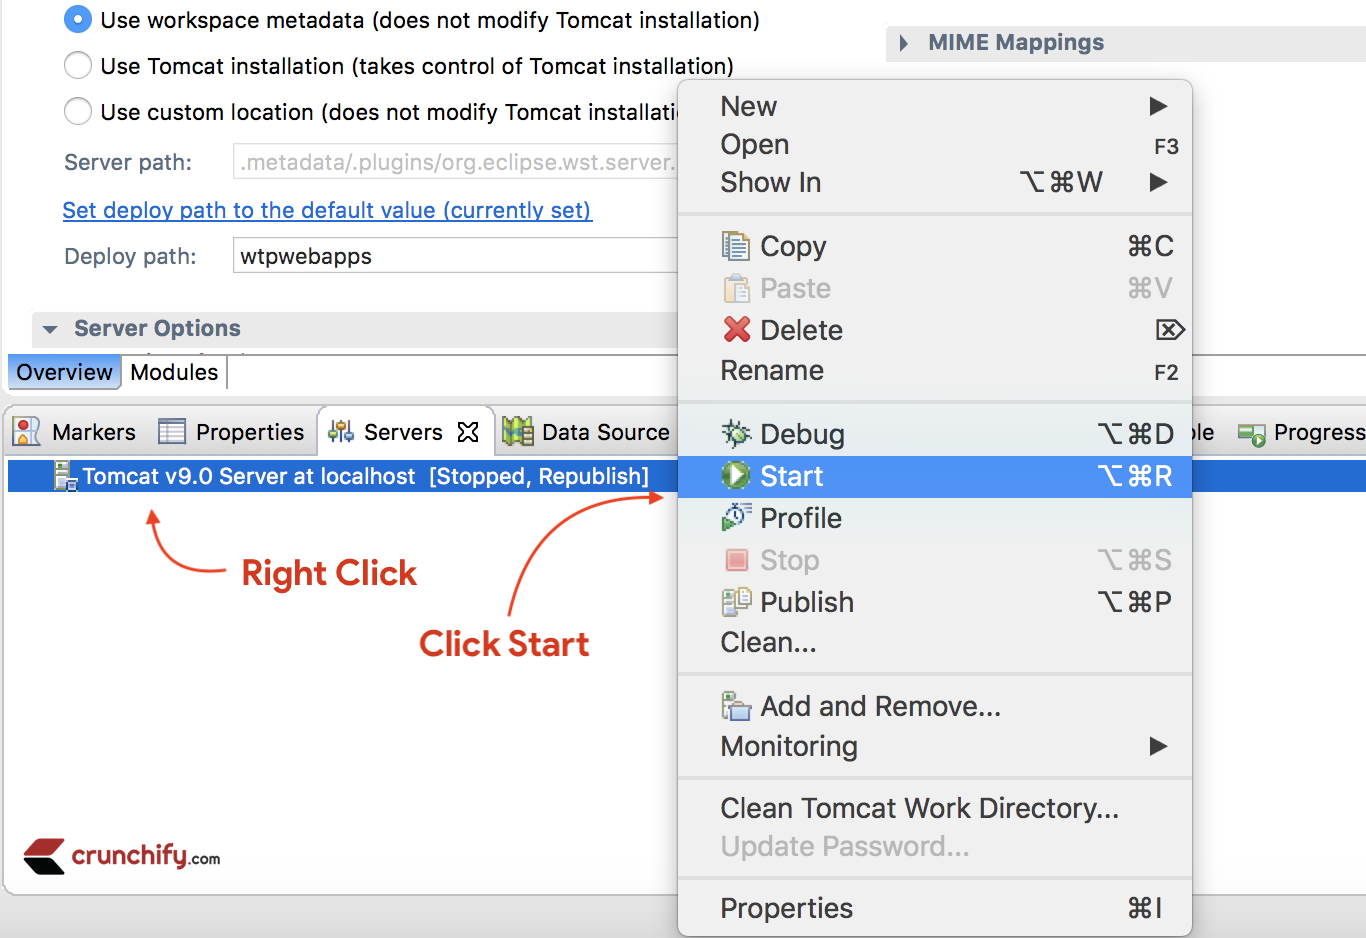
- Se
don't seeTomcat Server nella schedaServers, segui i passaggi per aggiungere Apache Tomcat a Eclipse. - Distribuisci il progetto su
Apache Tomcat- Fare clic con il tasto destro
- Aggiungi e rimuovi
- Aggiungi progetto al server (sezione sul lato destro).
- Fare clic su Avvia.
Assicurati di vedere i log di seguito. Ciò significa che la tua applicazione è stata distribuita correttamente su Tomcat Web Server.
|
1 2 3 4 5 6 7 8 9 10 11 12 13 14 15 16 17 18 19 20 21 22 23 24 25 26 27 28 29 30 31 32 33 34 35 36 37 38 39 40 |
Aug 04 , 2018 9 : 08 : 10 PM org . apache . tomcat . util . digester . SetPropertiesRule begin WARNING : [ SetPropertiesRule ] { Server / Service / Engine / Host / Context } Setting property 'source' to 'org.eclipse.jst.jee.server:CrunchifySpringMVCTutorial' did not find a matching property . INFO : Server version : Apache Tomcat / 9.0.10 INFO : Server built : Jun 20 2018 17 : 32 : 21 UTC INFO : Server number : 9.0.10.0 INFO : OS Name : Mac OS X INFO : OS Version : 10.13.6 INFO : Architecture : x86_64 INFO : Java Home : / Library / Java / JavaVirtualMachines / jdk - 10.0.2.jdk / Contents / Home INFO : JVM Version : 10.0.2 + 13 INFO : JVM Vendor : "Oracle Corporation" INFO : CATALINA_BASE : / Users / appshah / Documents / jee - photon / workspace / c / . metadata / . plugins / org . eclipse . wst . server . core / tmp0 INFO : CATALINA_HOME : / Users / appshah / Documents / jee - photon / apache - tomcat - 9.0.10 INFO : Command line argument : - Dcatalina . base =/ Users / appshah / Documents / jee - photon / workspace / c / . metadata / . plugins / org . eclipse . wst . server . core / tmp0 INFO : Command line argument : - Dcatalina . home =/ Users / appshah / Documents / jee - photon / apache - tomcat - 9.0.10 INFO : Command line argument : - Dwtp . deploy =/ Users / appshah / Documents / jee - photon / workspace / c / . metadata / . plugins / org . eclipse . wst . server . core / tmp0 / wtpwebapps INFO : Command line argument : - Dfile . encoding = UTF - 8 INFO : The APR based Apache Tomcat Native library which allows optimal performance in production environments was not found on the java . library . path : [ / Users / appshah / Library / Java / Extensions : / Library / Java / Extensions : / Network / Library / Java / Extensions : / System / Library / Java / Extensions : / usr / lib / java : . ] INFO : Initializing ProtocolHandler [ "http-nio-8080" ] INFO : Using a shared selector for servlet write / read INFO : Initializing ProtocolHandler [ "ajp-nio-8009" ] INFO : Using a shared selector for servlet write / read INFO : Initialization processed in 841 ms INFO : Starting service [ Catalina ] INFO : Starting Servlet Engine : Apache Tomcat / 9.0.10 INFO : At least one JAR was scanned for TLDs yet contained no TLDs . Enable debug logging for this logger for a complete list of JARs that were scanned but no TLDs were found in them . Skipping unneeded JARs during scanning can improve startup time and JSP compilation time . INFO : At least one JAR was scanned for TLDs yet contained no TLDs . Enable debug logging for this logger for a complete list of JARs that were scanned but no TLDs were found in them . Skipping unneeded JARs during scanning can improve startup time and JSP compilation time . INFO : No Spring WebApplicationInitializer types detected on classpath INFO : Initializing Spring FrameworkServlet 'crunchify' INFO : FrameworkServlet 'crunchify' : initialization started INFO : Refreshing WebApplicationContext for namespace 'crunchify-servlet' : startup date [ Sat Aug 04 21 : 08 : 13 CDT 2018 ] ; root of context hierarchy INFO : Loading XML bean definitions from ServletContext resource [ / WEB - INF / crunchify - servlet . xml ] INFO : Mapped "{[/welcome]}" onto public org . springframework . web . servlet . ModelAndView com . crunchify . controller . CrunchifyHelloWorld . helloWorld ( ) INFO : Looking for @ ControllerAdvice : WebApplicationContext for namespace 'crunchify-servlet' : startup date [ Sat Aug 04 21 : 08 : 13 CDT 2018 ] ; root of context hierarchy INFO : Looking for @ ControllerAdvice : WebApplicationContext for namespace 'crunchify-servlet' : startup date [ Sat Aug 04 21 : 08 : 13 CDT 2018 ] ; root of context hierarchy INFO : Mapped URL path [ /** ] onto handler 'org.springframework.web.servlet.resource.DefaultServletHttpRequestHandler#0' INFO : FrameworkServlet 'crunchify' : initialization completed in 1607 ms INFO : Starting ProtocolHandler [ "http-nio-8080" ] INFO : Starting ProtocolHandler [ "ajp-nio-8009" ] INFO : Server startup in 3579 ms |
Passaggio 11. Fatto.
Visita: http://localhost:8080/CrunchifySpringMVCTutorial/ e dovresti essere tutto pronto.
Evviva .. Ora conosci Hello World Spring MVC 5 Example . Fammi sapere se incontri qualche eccezione durante l'esecuzione di questo. Ci sono molti altri esempi che puoi trovare qui.
Do you want to include JS, CSS and images into JSP file? Segui questo tutorial: il modo migliore per aggiungere/integrare JS, CSS e immagini in un file JSP usando 'mvc:resources mapping'.
Avere problemi? Qualsiasi problema?
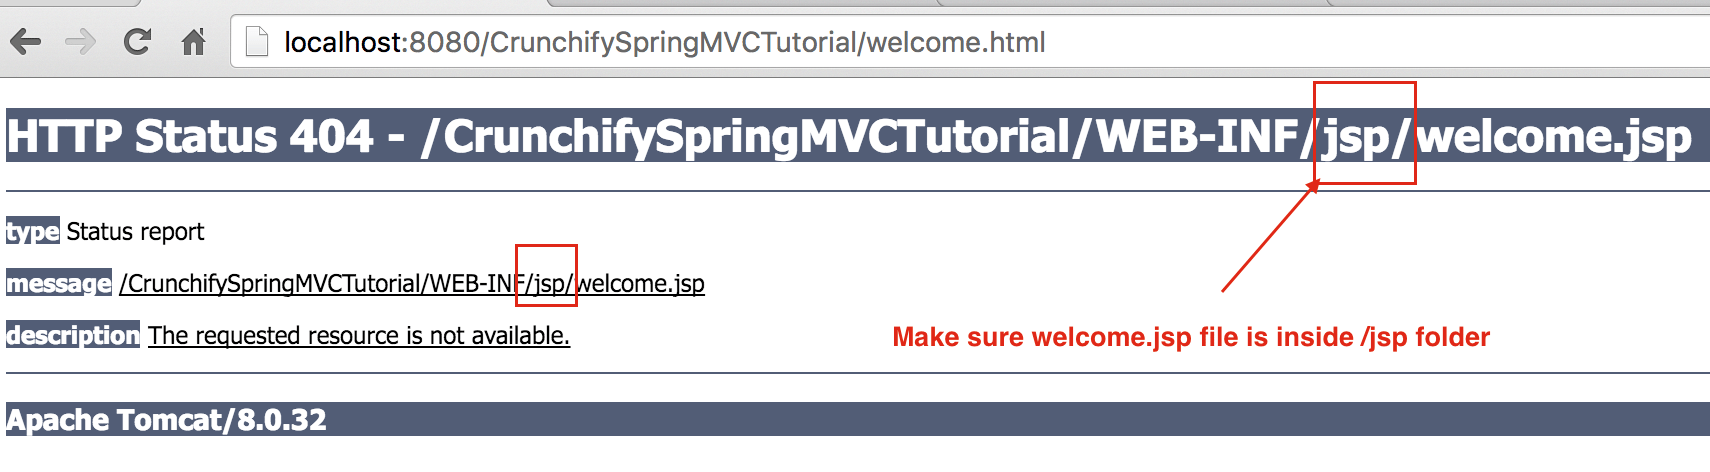
Triaging Step-1: errore HTTP Status 404?
Inoltre, segui il tutorial qui sotto:
Fase 2 del triage: l'URL non funziona? Errore Tomcat?
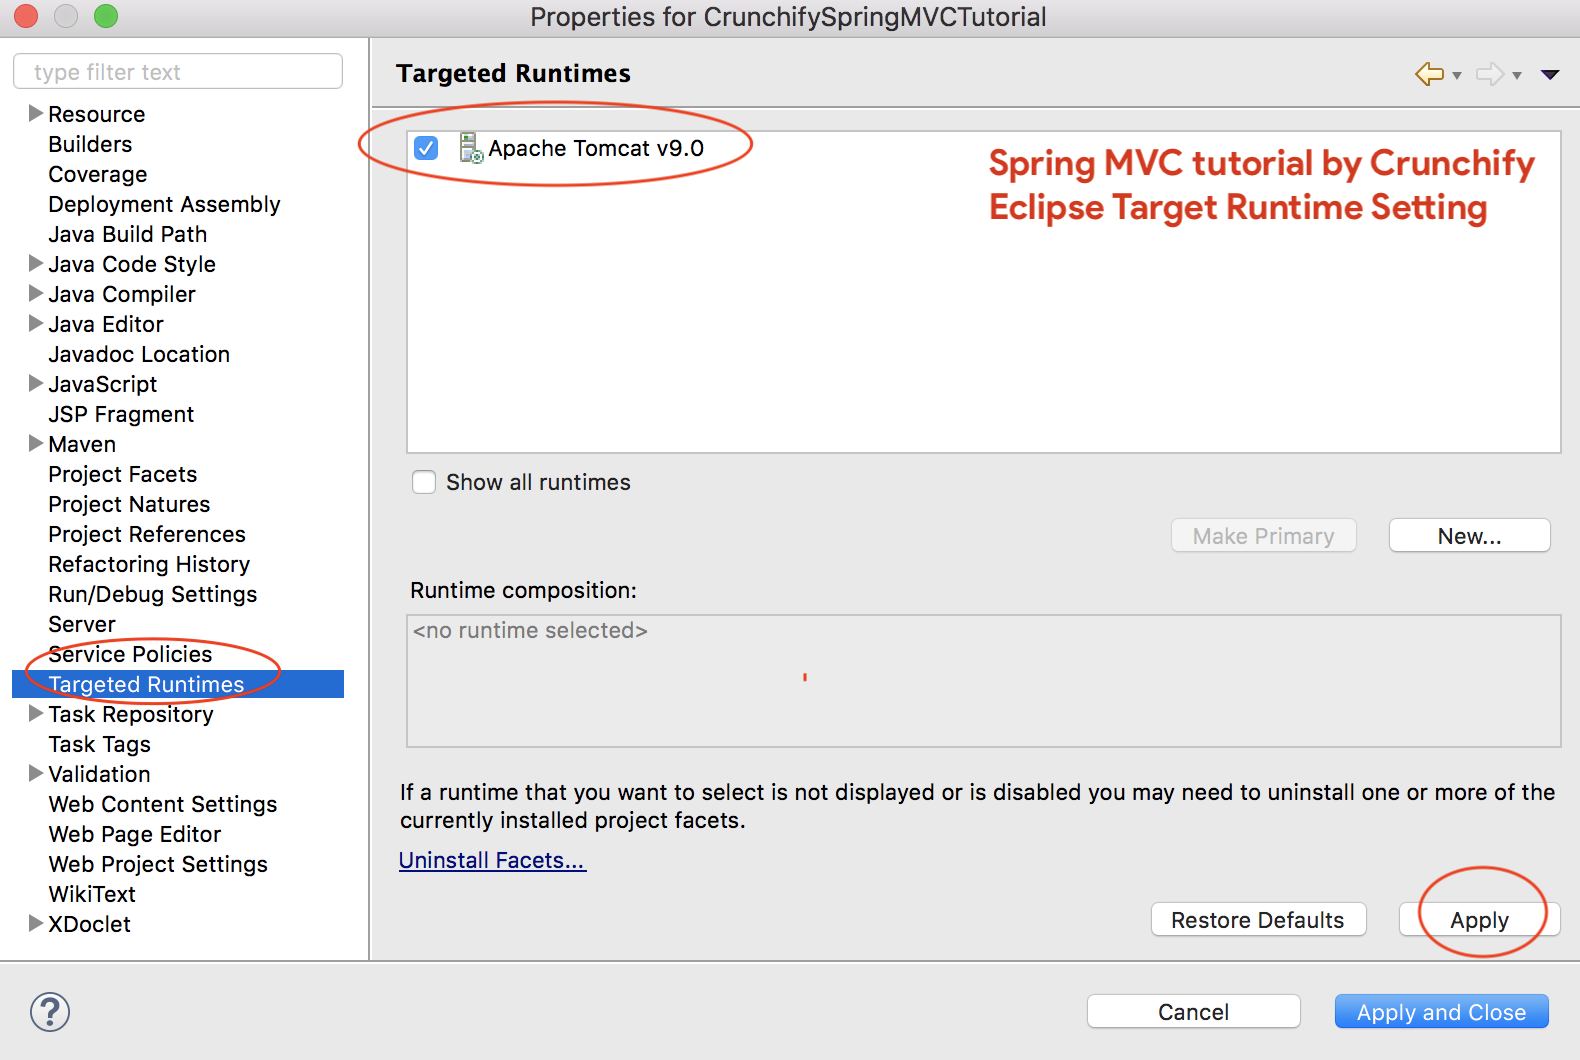
Assicurati di aggiungere Apache Tomcat Server a Targeted Runtime . Che potresti aver selezionato nel Step-1 . Tomcat 7 o 8 qualsiasi: il server dovrebbe funzionare.
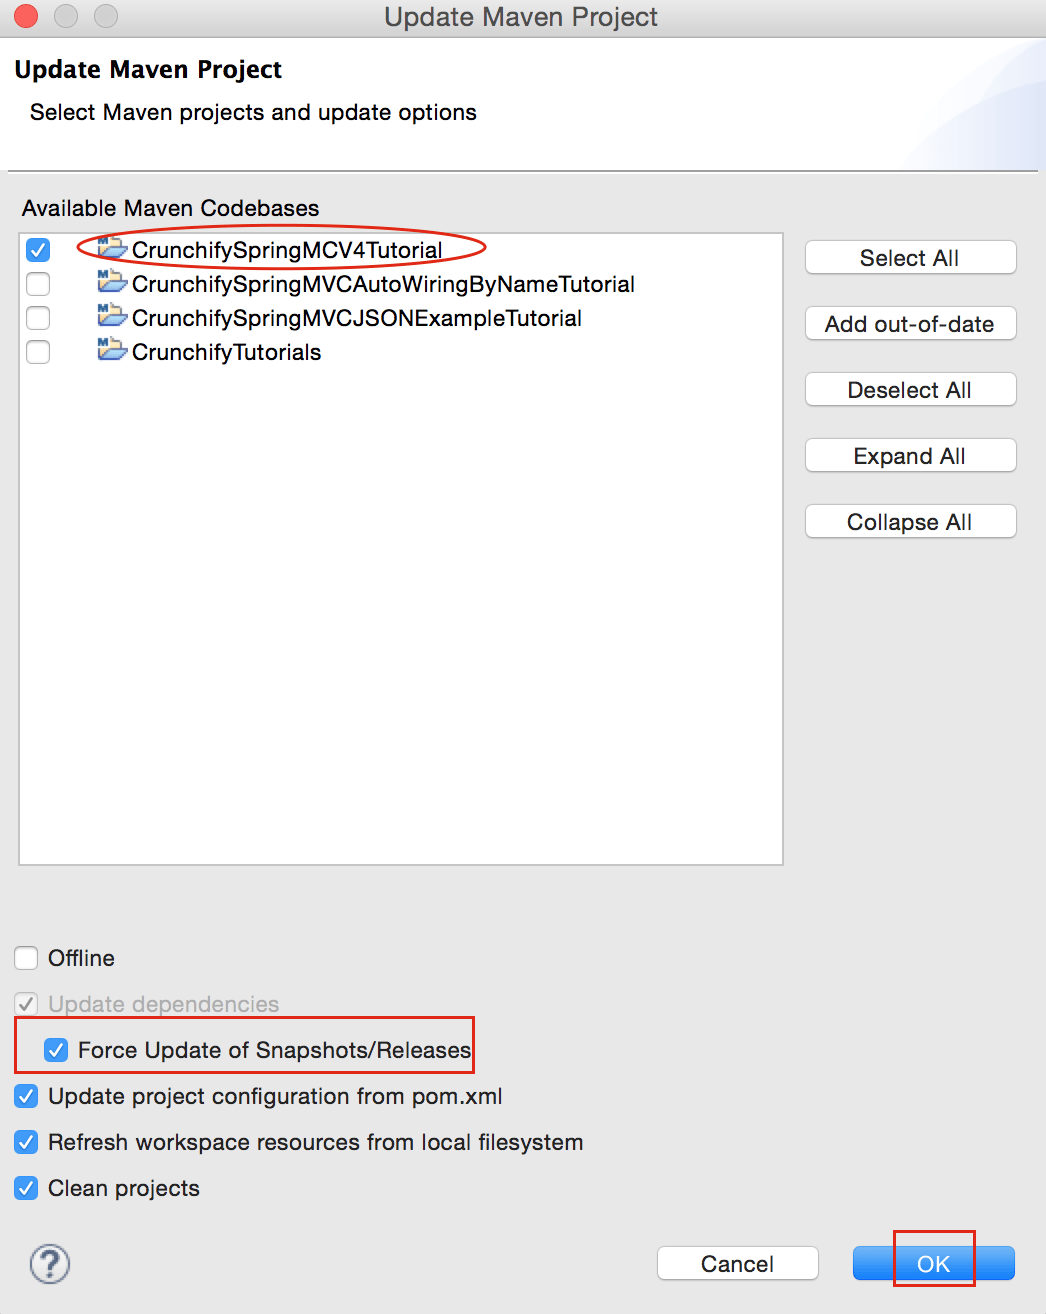
Triaging Step-3: errori di maven?
Assicurati di aggiornare tutte le dipendenze di Maven.
Sentiti libero di inviare un'e-mail o commentare di seguito in caso di problemi con l'esecuzione del tutorial sopra.