
Tutorial Java Spring Boot – Exemplu de aplicație web live Hello-World cu pași detaliați
Publicat: 2018-04-05
De ce Spring Boot? Pentru ce se folosește Spring Boot?
Doriți să creați microservicii bazate pe Java pentru aplicația dvs.? Ei bine, Spring Boot este o soluție open source bazată pe Java pentru aceeași
Este folosit pentru a construi aplicații bazate pe Spring gata de producție, create de echipa Pivotal.
Ideea Spring Boot este foarte simplă. Oferă un set preconfigurat de funcționalități și cadru, cu care puteți publica prima aplicație web bazată pe Spring Boot cu doar few lines of code . Doar cu o singură comandă puteți lansa și testa aplicația dvs. web.
Setul de toate configurațiile personalizate, setările bazei de date, modulele terță parte vine out-0f-the-box în Spring Boot.
Deoarece avem un tutorial Hello World Spring MVC foarte popular, vom începe și tutorialul Hello World Spring Boot în mod similar.
Noțiuni introductive cu Spring Boot:
- Acesta este Tutorialul tău de primăvară pentru începători
- Hello World Spring Boot Tutorial
- Cel mai simplu exemplu de boot de primăvară
- Spring Boot Maven tutorial
- exemplu de aplicație web Spring Boot
Să începem.
Pasul 1
Pentru a începe cu Spring Boot, veți avea nevoie de setările de mai jos.
- JDK 8. Asigurați-vă că
download and installcel mai recent JDK. - Eclipse IDE. Asigurați-vă că descărcați
Eclipse IDE for Java EE Developers. link de descărcare oficial. - Spring Boot 2.4.3.
Pasul 2
Odată ce instalați Eclipse pe laptop / desktop, accesați Eclipse. Vom crea un nou proiect web dinamic.
- Faceți clic pe File
- Nou
-
Dynamic Web Project - Pe primul ecran furnizați numele proiectului:
CrunchifySpringBootHelloWorld
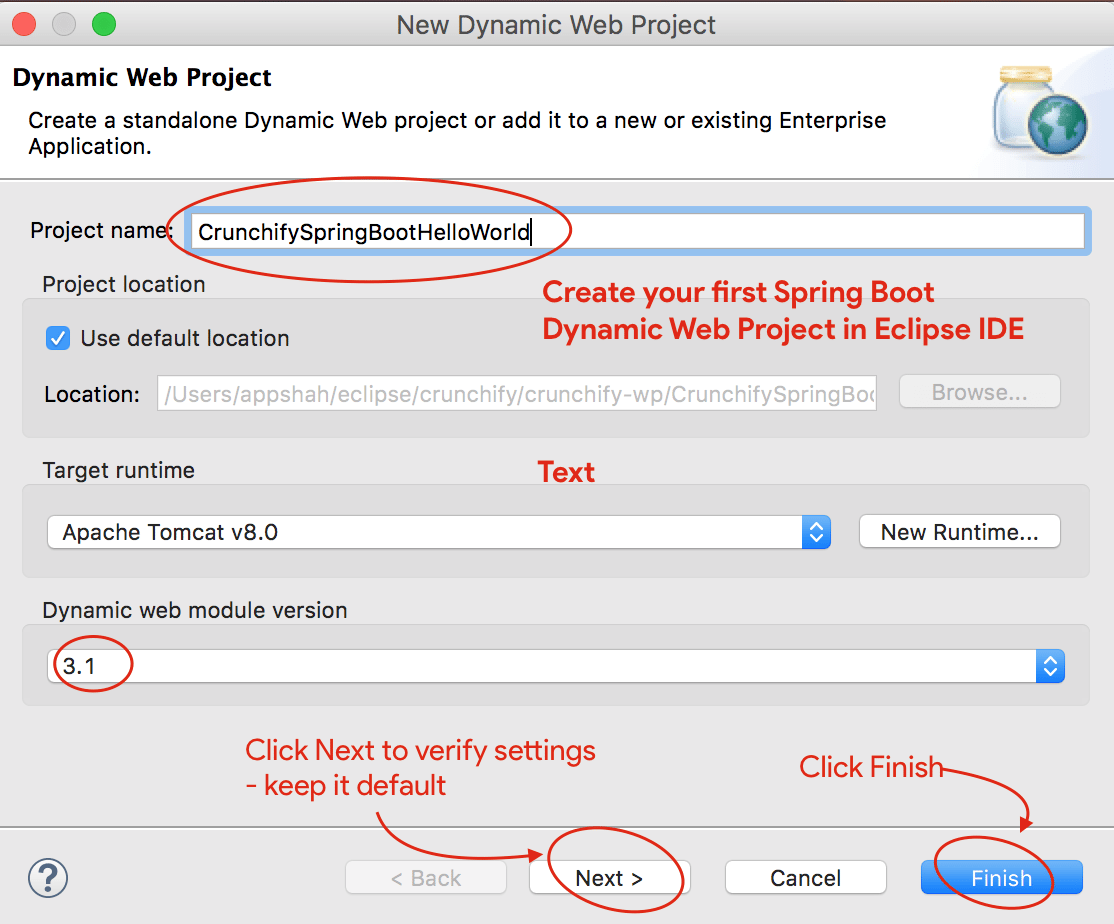
- Asigurați-vă că aveți versiunea modulului Dynamic Web la
3.1și Target Runtime Apache Tomcat 8. - Dacă nu aveți deja configurarea Apache Tomcat, urmați acești pași pentru a configura Tomcat în Eclipse.
- Faceți clic pe Următorul de două ori și asigurați-vă că setările sunt aceleași ca acestea. Captură de ecran 1, Captură de ecran 2.
- SAU faceți clic pe Finish pentru a crea Dynamic Web Project.
Pasul 3
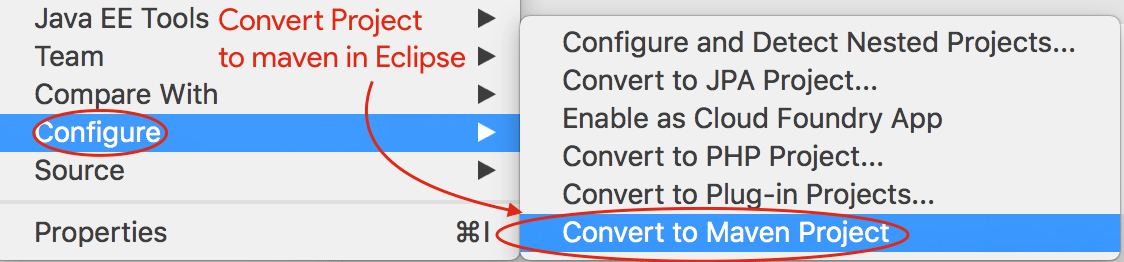
Următorul pas este să convertiți proiectul Java în proiectul Maven.
- Faceți clic dreapta pe proiect
- Faceți clic pe Configurare
- Faceți clic pe
Convert to Maven Project - Păstrați configurația implicită
- Faceți clic pe Terminare
Pasul-4
Pasul de mai sus va crea fișierul pom.xml pentru proiectul dvs. Următorul pas este să actualizați fișierul pom.xml cu conținutul de mai jos și să adăugați Spring Boot Dependency .
|
1 2 3 4 5 6 7 8 9 10 11 12 13 14 15 16 17 18 19 20 21 22 23 24 25 26 27 28 29 30 31 32 33 34 35 36 37 38 39 40 41 42 43 44 45 46 47 48 49 50 |
< project xmlns = "http://maven.apache.org/POM/4.0.0" xmlns : xsi = "http://www.w3.org/2001/XMLSchema-instance" xsi : schemaLocation = "http://maven.apache.org/POM/4.0.0 http://maven.apache.org/xsd/maven-4.0.0.xsd" > < modelVersion > 4.0.0 < / modelVersion > < groupId > CrunchifySpringBootHelloWorld < / groupId > < artifactId > CrunchifySpringBootHelloWorld < / artifactId > < version > 1.0.0 - RELEASE < / version > < packaging > war < / packaging > < parent > < groupId > org . springframework . boot < / groupId > < artifactId > spring - boot - starter - parent < / artifactId > < version > 2.4.3 < / version > < / parent > < dependencies > < dependency > < groupId > org . springframework . boot < / groupId > < artifactId > spring - boot - starter - web < / artifactId > < / dependency > < / dependencies > < properties > < java . version > 1.8 < / java . version > < / properties > < build > < sourceDirectory > src < / sourceDirectory > < plugins > < plugin > < artifactId > maven - compiler - plugin < / artifactId > < configuration > < source > 1.8 < / source > < target > 1.8 < / target > < / configuration > < / plugin > < plugin > < groupId > org . springframework . boot < / groupId > < artifactId > spring - boot - maven - plugin < / artifactId > < / plugin > < plugin > < artifactId > maven - war - plugin < / artifactId > < configuration > < warSourceDirectory > WebContent < / warSourceDirectory > < / configuration > < / plugin > < / plugins > < / build > < / project > |
După cum vedeți mai sus, adăugăm org.springframework.boot 2.4.3 jar în proiectul nostru. În plus, adăugăm încă două artefacte:
- spring-boot-maven-plugin
- primăvară-boot-starter-web
Pasul-5
Acum să lucrăm la crearea unui fișier simplu Hello World Application pe care îl vom putea accesa folosind adrese URL
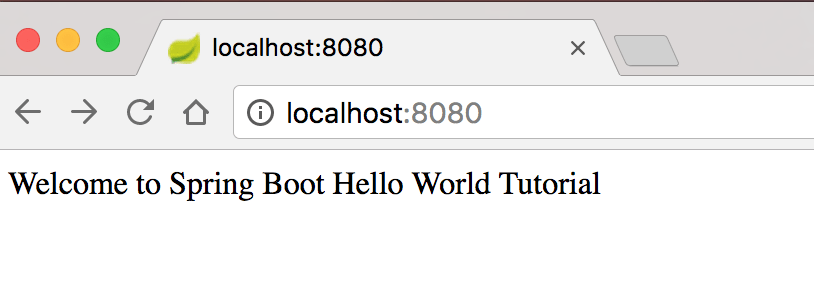
- http://locahost:8080
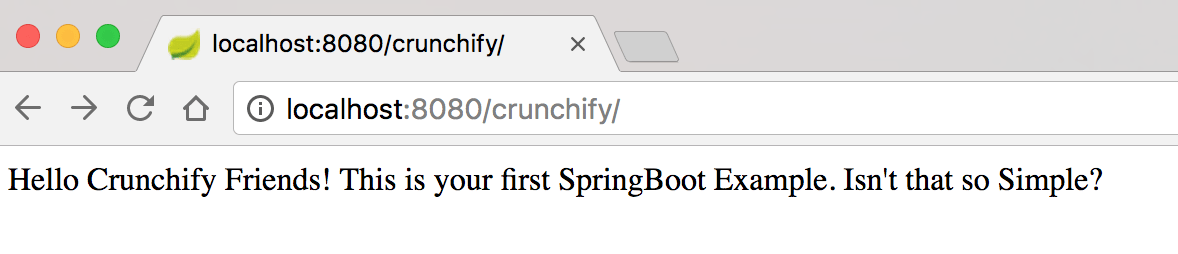
- http://locahost:8080/crunchify
Creați fișierul CrunchifyHelloWorldSpringBoot.java cu conținutul codului de mai jos:
|
1 2 3 4 5 6 7 8 9 10 11 12 13 14 15 16 17 18 19 20 21 22 23 24 25 26 27 28 29 30 31 32 33 34 35 36 37 38 39 |
package crunchify . com . springboot ; import org . springframework . boot . SpringApplication ; import org . springframework . boot . autoconfigure . EnableAutoConfiguration ; import org . springframework . web . bind . annotation . RequestMapping ; import org . springframework . web . bind . annotation . RestController ; /** * @author Crunchify.com - Simple Spring Boot Example * */ // @RestController is a convenience annotation that is itself annotated with @Controller and @ResponseBody @ RestController // @EnableAutoConfiguration enables auto-configuration of the Spring Application Context, attempting to guess // and configure beans that you are likely to need. @ EnableAutoConfiguration public class CrunchifyHelloWorldSpringBoot { // @RequestMapping annotation is used for mapping web requests onto specific handler classes @ RequestMapping ( "/" ) String basicURL ( ) { return "Welcome to Spring Boot Hello World Tutorial" ; } @ RequestMapping ( "crunchify" ) String crunchifyURL ( ) { return "Hello Crunchify Friends! This is your first SpringBoot Example. Isn't that so Simple?" ; } public static void main ( String [ ] args ) throws Exception { // SpringApplication classes that can be used to bootstrap and launch a Spring application from a Java // main method. By default class will perform the following steps to bootstrap your application. SpringApplication . run ( CrunchifyHelloWorldSpringBoot . class , args ) ; } } |
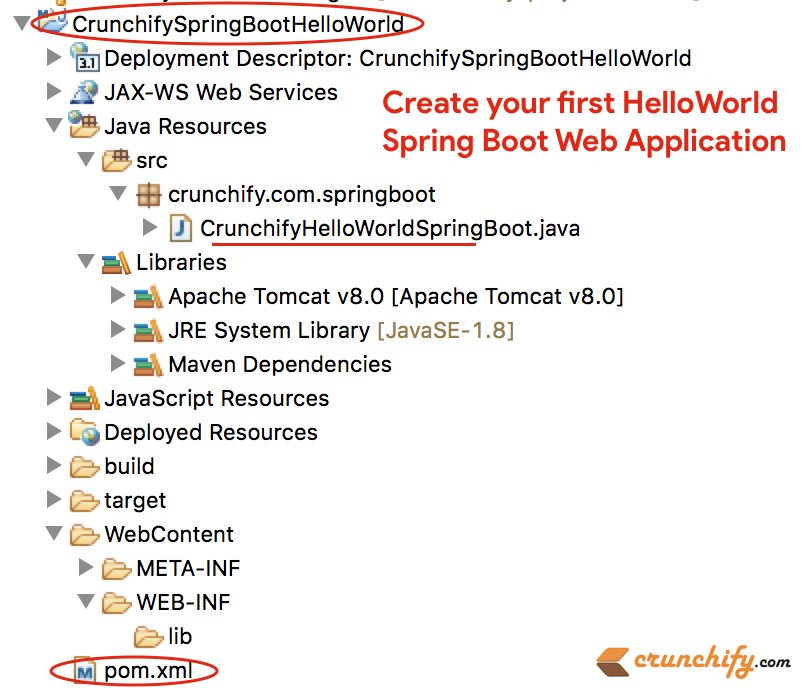
Odată ce adăugați mai sus fișierul java, structura proiectului dvs. Eclipse ar trebui să arate astfel:
Pasul-6
Acum, folosind comanda simplă spring-boot:run maven, puteți porni Spring Boot Application .
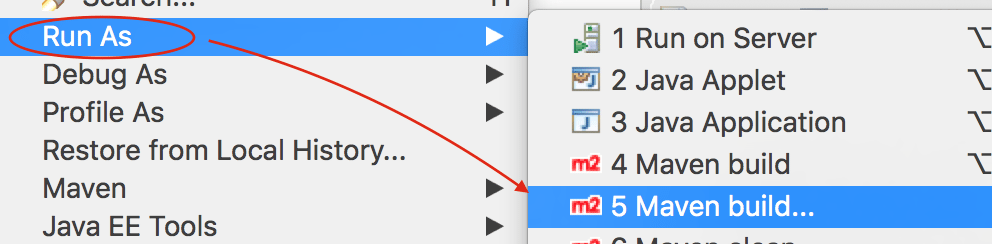
- Faceți clic dreapta pe proiect
- Faceți clic pe
Run As -> Maven build...
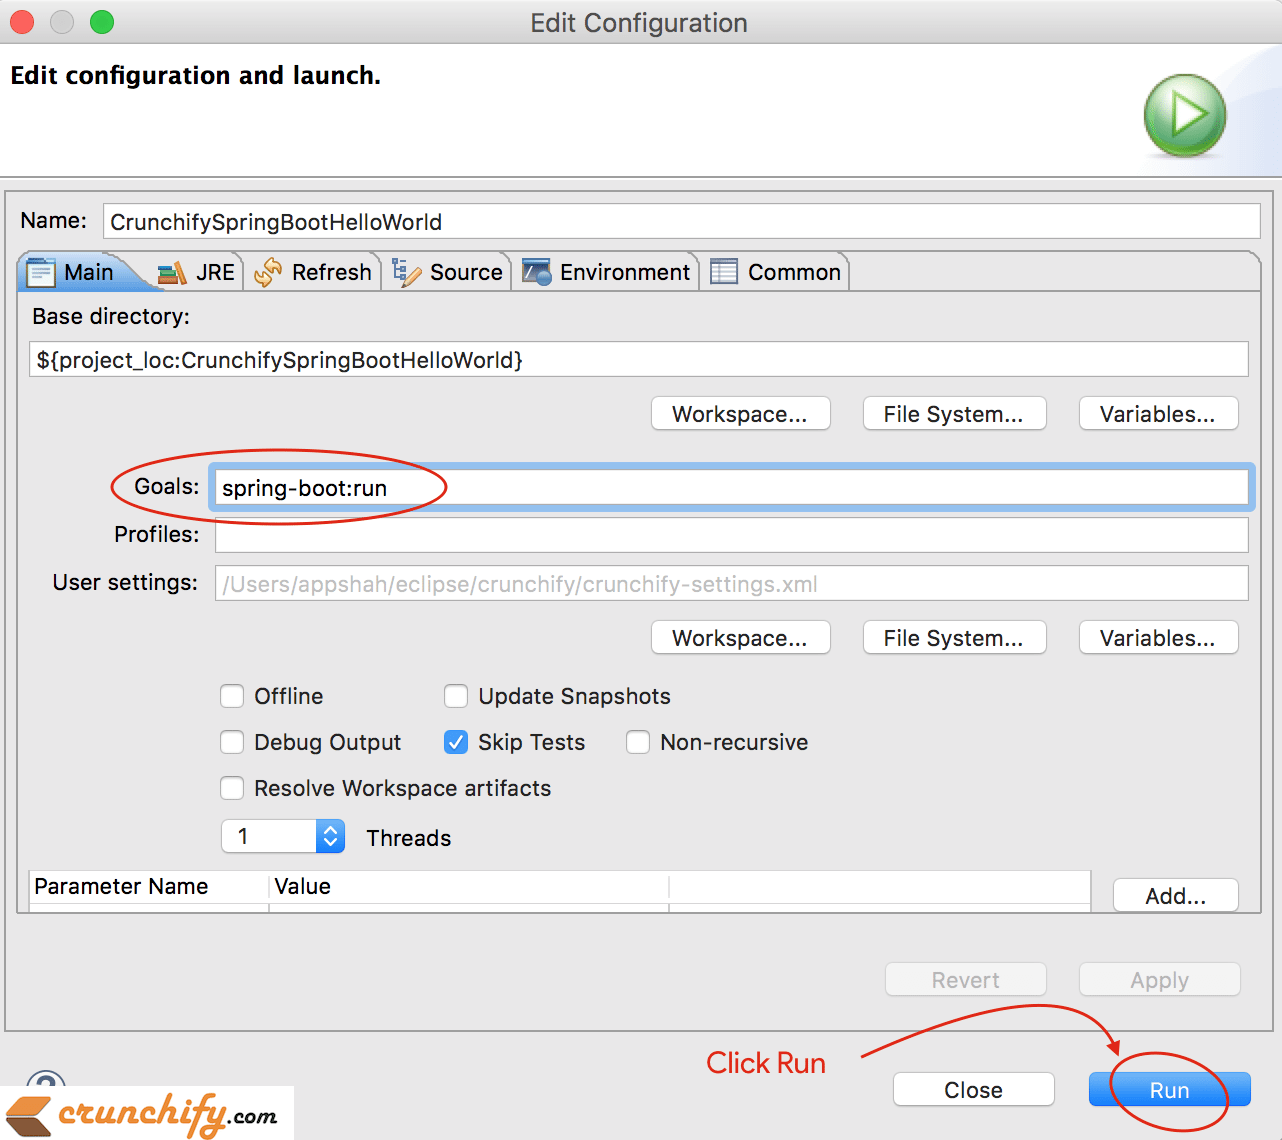
Următorul Windows păstrează configurația implicită și oferă goal as spring-boot:run așa cum vedeți în imaginea de mai jos.
Pasul-7
Asigurați-vă că nu aveți nicio eroare în consola Eclipse. Iată o ieșire de consolă din Eclipse IDE.
|
1 2 3 4 5 6 7 8 9 10 11 12 13 14 15 16 17 18 19 20 21 22 23 24 25 26 27 28 29 30 31 32 33 34 35 36 37 38 39 40 41 42 43 44 45 46 47 48 49 50 51 52 53 54 55 56 57 58 59 60 61 |
SLF4J : Class path contains multiple SLF4J bindings . SLF4J : Found binding in [ jar : file : / Applications / Eclipse . app / Contents / Eclipse / plugins / org . eclipse . m2e . maven . runtime . slf4j . simple_1 . 16.0.20200610 - 1735 / jars / slf4j - simple - 1.7.5.jar ! / org / slf4j / impl / StaticLoggerBinder . class ] SLF4J : Found binding in [ file : / Applications / Eclipse . app / Contents / Eclipse / configuration / org . eclipse . osgi / 5 / 0 / . cp / org / slf4j / impl / StaticLoggerBinder . class ] SLF4J : See http : //www.slf4j.org/codes.html#multiple_bindings for an explanation. SLF4J : Actual binding is of type [ org . slf4j . impl . SimpleLoggerFactory ] SLF4J : Class path contains multiple SLF4J bindings . SLF4J : Found binding in [ jar : file : / Applications / Eclipse . app / Contents / Eclipse / plugins / org . eclipse . m2e . maven . runtime . slf4j . simple_1 . 16.0.20200610 - 1735 / jars / slf4j - simple - 1.7.5.jar ! / org / slf4j / impl / StaticLoggerBinder . class ] SLF4J : Found binding in [ file : / Applications / Eclipse . app / Contents / Eclipse / configuration / org . eclipse . osgi / 5 / 0 / . cp / org / slf4j / impl / StaticLoggerBinder . class ] SLF4J : See http : //www.slf4j.org/codes.html#multiple_bindings for an explanation. SLF4J : Actual binding is of type [ org . slf4j . impl . SimpleLoggerFactory ] [ INFO ] Scanning for projects . . . [ INFO ] [ INFO ] ---- < CrunchifySpringBootHelloWorld : CrunchifySpringBootHelloWorld > ----- [ INFO ] Building CrunchifySpringBootHelloWorld 1.0.0 - RELEASE [ INFO ] -------------------------------- [ war ] --------------------------------- [ INFO ] [ INFO ] > > > spring - boot - maven - plugin : 2.4.3 : run ( default - cli ) > test - compile @ CrunchifySpringBootHelloWorld > > > [ INFO ] [ INFO ] --- maven - resources - plugin : 3.2.0 : resources ( default - resources ) @ CrunchifySpringBootHelloWorld --- [ INFO ] Using 'UTF-8' encoding to copy filtered resources . [ INFO ] Using 'UTF-8' encoding to copy filtered properties files . [ INFO ] skip non existing resourceDirectory / Users / app / crunchify / eclipse - workspace / CrunchifySpringBootHelloWorld / src / main / resources [ INFO ] skip non existing resourceDirectory / Users / app / crunchify / eclipse - workspace / CrunchifySpringBootHelloWorld / src / main / resources [ INFO ] [ INFO ] --- maven - compiler - plugin : 3.8.1 : compile ( default - compile ) @ CrunchifySpringBootHelloWorld --- [ INFO ] Nothing to compile - all classes are up to date [ INFO ] [ INFO ] --- maven - resources - plugin : 3.2.0 : testResources ( default - testResources ) @ CrunchifySpringBootHelloWorld --- [ INFO ] Not copying test resources [ INFO ] [ INFO ] --- maven - compiler - plugin : 3.8.1 : testCompile ( default - testCompile ) @ CrunchifySpringBootHelloWorld --- [ INFO ] Not compiling test sources [ INFO ] [ INFO ] < < < spring - boot - maven - plugin : 2.4.3 : run ( default - cli ) < test - compile @ CrunchifySpringBootHelloWorld < < < [ INFO ] [ INFO ] [ INFO ] --- spring - boot - maven - plugin : 2.4.3 : run ( default - cli ) @ CrunchifySpringBootHelloWorld --- [ INFO ] Attaching agents : [ ] . ____ _ __ _ _ / \ \ / ___ '_ __ _ _(_)_ __ __ _ \ \ \ \ ( ( )\___ | ' _ | '_| | ' _ \ / _ ` | \ \ \ \ \ \ / ___ ) | | _ ) | | | | | | | ( _ | | ) ) ) ) ' |____| .__|_| |_|_| |_\__, | / / / / =========|_|==============|___/=/_/_/_/ :: Spring Boot :: (v2.4.3) 2021-02-21 21:05:10.614 INFO 36654 --- [ main] c.c.s.CrunchifyHelloWorldSpringBoot : Starting CrunchifyHelloWorldSpringBoot using Java 15 on LM-AUN-11021095 with PID 36654 (/Users/app/crunchify/eclipse-workspace/CrunchifySpringBootHelloWorld/target/classes started by arpshah in /Users/app/crunchify/eclipse-workspace/CrunchifySpringBootHelloWorld) 2021-02-21 21:05:10.616 INFO 36654 --- [ main] c.c.s.CrunchifyHelloWorldSpringBoot : No active profile set, falling back to default profiles: default 2021-02-21 21:05:11.008 INFO 36654 --- [ main] o.s.b.w.embedded.tomcat.TomcatWebServer : Tomcat initialized with port(s): 8080 (http) 2021-02-21 21:05:11.014 INFO 36654 --- [ main] o.apache.catalina.core.StandardService : Starting service [Tomcat] 2021-02-21 21:05:11.015 INFO 36654 --- [ main] org.apache.catalina.core.StandardEngine : Starting Servlet engine: [Apache Tomcat/9.0.43] 2021-02-21 21:05:11.054 INFO 36654 --- [ main] o.a.c.c.C.[Tomcat].[localhost].[/] : Initializing Spring embedded WebApplicationContext 2021-02-21 21:05:11.054 INFO 36654 --- [ main] w.s.c.ServletWebServerApplicationContext : Root WebApplicationContext: initialization completed in 417 ms 2021-02-21 21:05:11.147 INFO 36654 --- [ main] o.s.s.concurrent.ThreadPoolTaskExecutor : Initializing ExecutorService ' applicationTaskExecutor ' 2021-02-21 21:05:11.241 INFO 36654 --- [ main] o.s.b.w.embedded.tomcat.TomcatWebServer : Tomcat started on port(s): 8080 (http) with context path ' ' 2021-02-21 21:05:11.247 INFO 36654 --- [ main] c.c.s.CrunchifyHelloWorldSpringBoot : Started CrunchifyHelloWorldSpringBoot in 0.843 seconds (JVM running for 1.04) 2021-02-21 21:07:04.240 INFO 36654 --- [nio-8080-exec-1] o.a.c.c.C.[Tomcat].[localhost].[/] : Initializing Spring DispatcherServlet ' dispatcherServlet ' 2021-02-21 21:07:04.240 INFO 36654 --- [nio-8080-exec-1] o.s.web.servlet.DispatcherServlet : Initializing Servlet ' dispatcherServlet ' 2021 - 02 - 21 21 : 07 : 04.241 INFO 36654 --- [ nio - 8080 - exec - 1 ] o . s . web . servlet . DispatcherServlet : Completed initialization in 1 ms |
Pasul-8
Acum vizitați adresele URL http://localhost:8080 și http://locahost:8080/crunchify pentru a vedea rezultatul live.

Sper că acest tutorial vă ajută să începeți cu exemplul Java Spring Boot. Anunțați-mă dacă vedeți vreo problemă la rularea primei aplicații Spring Boot.
În săptămânile următoare, vom adăuga exemple de Spring Boot din ce în ce mai complexe pentru dvs. Dacă aveți cerințe speciale, anunțați-ne în secțiunea de comentarii.
Ce urmează?
- Creați o
Spring Boot applicationsuper simplă în IntelliJ IDEA - Creați un
Rest Serviceweb simplu în IntelliJ IDEA