
Tutorial Boot Musim Semi Java – Contoh Aplikasi Web Hello-World Langsung dengan Langkah-Langkah Terperinci
Diterbitkan: 2018-04-05
Mengapa Sepatu Musim Semi? Untuk apa Boot Musim Semi digunakan?
Ingin membuat layanan mikro berbasis java untuk aplikasi Anda? Nah, Spring boot adalah solusi berbasis Java open source untuk hal yang sama
Ini digunakan untuk membangun aplikasi berbasis Spring siap produksi yang dibuat oleh tim Pivotal.
Ide Spring Boot sangat sederhana. Ini menyediakan serangkaian fungsionalitas dan kerangka kerja yang telah dikonfigurasi sebelumnya dengan Anda dapat menerbitkan Aplikasi Web berbasis Spring Boot pertama Anda hanya dengan few lines of code . Hanya dengan satu perintah sederhana Anda dapat meluncurkan dan menguji aplikasi web Anda.
Set dari semua konfigurasi khusus, pengaturan Database, modul pihak ke-3 out-0f-the-box di Spring Boot.
Seperti tutorial Hello World Spring MVC yang sangat populer, kami juga akan memulai tutorial Hello World Spring Boot dengan cara yang sama.
Memulai dengan Spring Boot:
- Ini adalah Tutorial Boot Musim Semi Anda Untuk Pemula
- Halo Tutorial Boot Musim Semi Dunia
- Contoh Boot Musim Semi Paling Sederhana
- tutorial maven boot musim semi
- contoh aplikasi web boot musim semi
Mari kita mulai.
Langkah 1
Untuk memulai dengan Spring Boot, Anda memerlukan pengaturan di bawah ini.
- JDK 8. Pastikan Anda
download and installJDK terbaru. - IDE gerhana. Pastikan Anda mengunduh
Eclipse IDE for Java EE Developers. tautan unduhan resmi. - Sepatu Musim Semi 2.4.3.
Langkah 2
Setelah Anda menginstal Eclipse di Laptop / Desktop Anda, buka Eclipse. Kami akan membuat Proyek Web Dinamis baru.
- Klik File
- Baru
-
Dynamic Web Project - Pada layar pertama berikan nama proyek:
CrunchifySpringBootHelloWorld
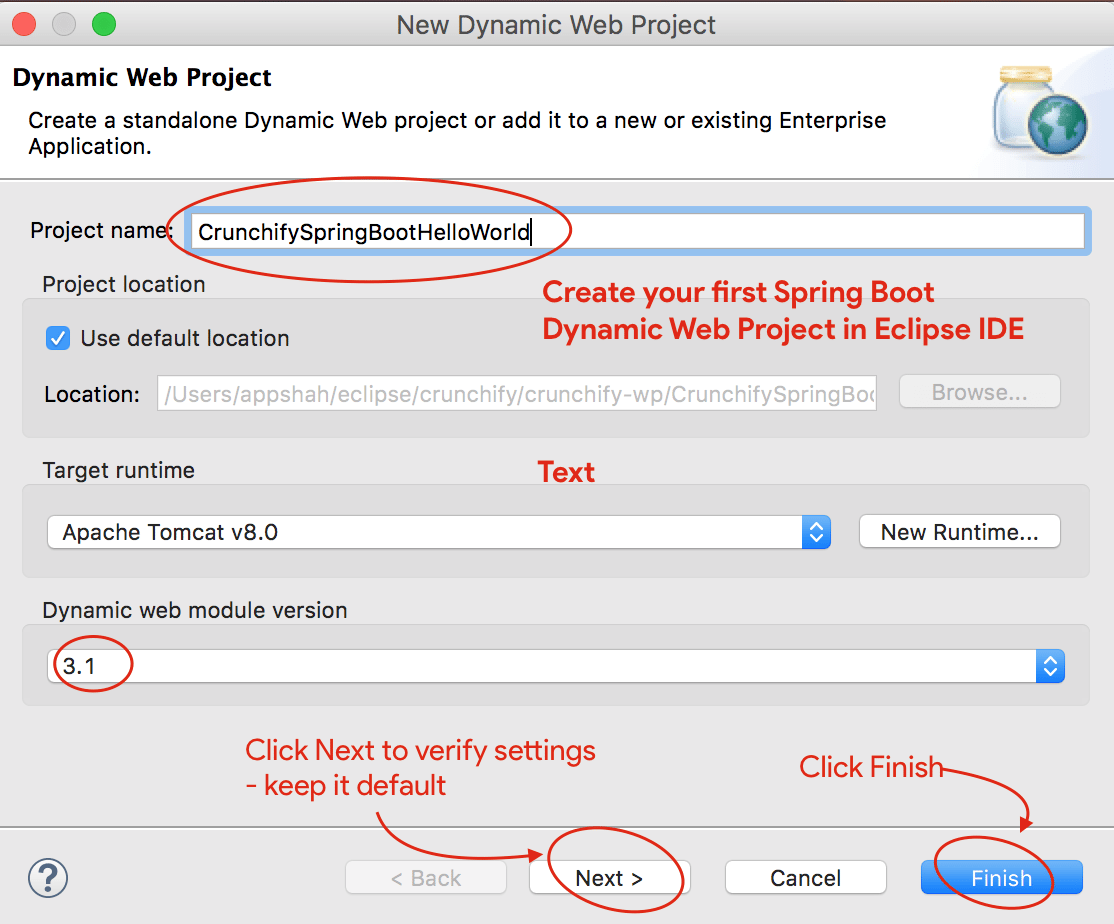
- Pastikan Anda memiliki modul Dynamic Web versi
3.1dan Target runtime Apache Tomcat 8. - Jika Anda belum memiliki pengaturan Apache Tomcat, ikuti langkah-langkah ini untuk mengatur Tomcat di Eclipse.
- Klik Berikutnya dua kali dan pastikan pengaturannya sama dengan yang ini. Tangkapan Layar1, Tangkapan Layar2.
- ATAU klik Selesai untuk membuat Proyek Web Dinamis.
Langkah-3
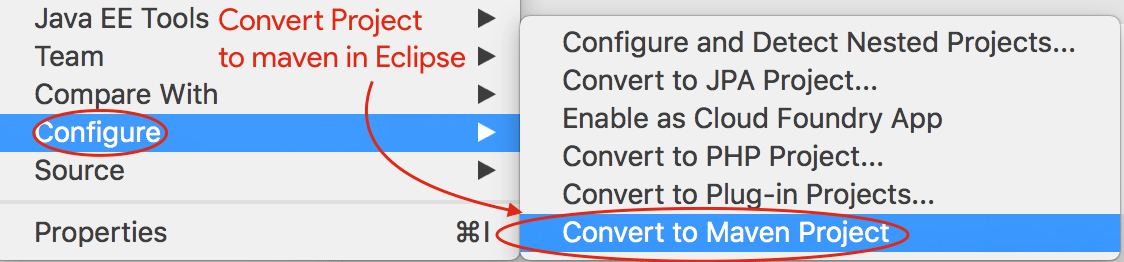
Langkah selanjutnya adalah Mengkonversi Proyek Java ke Proyek Maven.
- Klik kanan pada proyek
- Klik Konfigurasi
- Klik pada
Convert to Maven Project - Pertahankan konfigurasi default
- Klik selesai
Langkah-4
Langkah di atas akan membuat file pom.xml untuk proyek Anda. Langkah selanjutnya adalah memperbarui file pom.xml dengan konten di bawah ini dan menambahkan Spring Boot Dependency .
|
1 2 3 4 5 6 7 8 9 10 11 12 13 14 15 16 17 18 19 20 21 22 23 24 25 26 27 28 29 30 31 32 33 34 35 36 37 38 39 40 41 42 43 44 45 46 47 48 49 50 |
< project xmlns = "http://maven.apache.org/POM/4.0.0" xmlns : xsi = "http://www.w3.org/2001/XMLSchema-instance" xsi : schemaLocation = "http://maven.apache.org/POM/4.0.0 http://maven.apache.org/xsd/maven-4.0.0.xsd" > < modelVersion > 4.0.0 < / modelVersion > < groupId > CrunchifySpringBootHelloWorld < / groupId > < artifactId > CrunchifySpringBootHelloWorld < / artifactId > < version > 1.0.0 - RELEASE < / version > < packaging > war < / packaging > < parent > < groupId > org . springframework . boot < / groupId > < artifactId > spring - boot - starter - parent < / artifactId > < version > 2.4.3 < / version > < / parent > < dependencies > < dependency > < groupId > org . springframework . boot < / groupId > < artifactId > spring - boot - starter - web < / artifactId > < / dependency > < / dependencies > < properties > < java . version > 1.8 < / java . version > < / properties > < build > < sourceDirectory > src < / sourceDirectory > < plugins > < plugin > < artifactId > maven - compiler - plugin < / artifactId > < configuration > < source > 1.8 < / source > < target > 1.8 < / target > < / configuration > < / plugin > < plugin > < groupId > org . springframework . boot < / groupId > < artifactId > spring - boot - maven - plugin < / artifactId > < / plugin > < plugin > < artifactId > maven - war - plugin < / artifactId > < configuration > < warSourceDirectory > WebContent < / warSourceDirectory > < / configuration > < / plugin > < / plugins > < / build > < / project > |
Seperti yang Anda lihat di atas, kami menambahkan jar org.springframework.boot 2.4.3 ke dalam proyek kami. Selain itu kami menambahkan dua artefak lagi:
- spring-boot-maven-plugin
- spring-boot-starter-web
Langkah-5
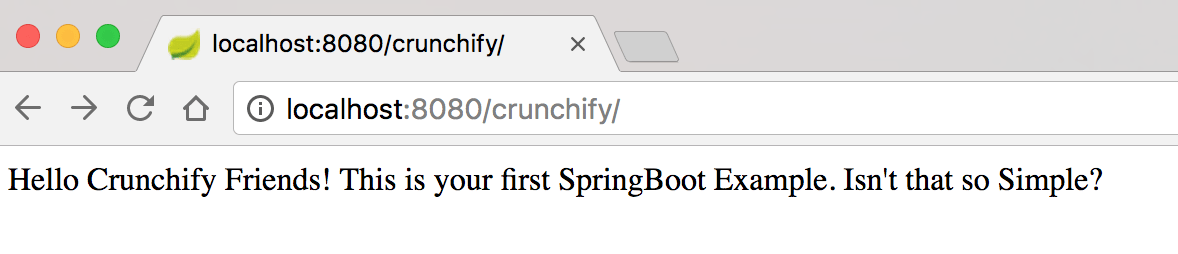
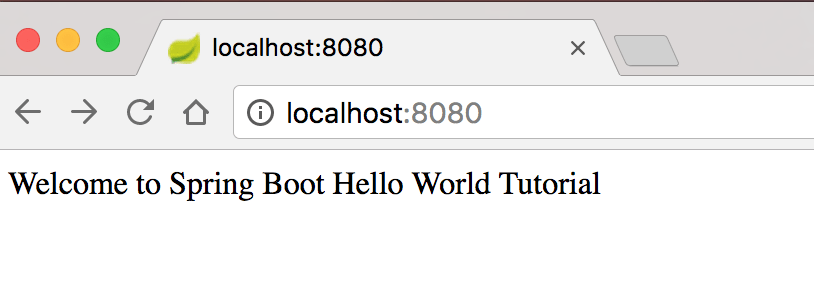
Sekarang mari bekerja membuat file Hello World Application sederhana yang dapat kita akses menggunakan URL
- http://locahost:8080
- http://locahost:8080/crunchify
Buat file CrunchifyHelloWorldSpringBoot.java dengan isi kode di bawah ini:
|
1 2 3 4 5 6 7 8 9 10 11 12 13 14 15 16 17 18 19 20 21 22 23 24 25 26 27 28 29 30 31 32 33 34 35 36 37 38 39 |
package crunchify . com . springboot ; import org . springframework . boot . SpringApplication ; import org . springframework . boot . autoconfigure . EnableAutoConfiguration ; import org . springframework . web . bind . annotation . RequestMapping ; import org . springframework . web . bind . annotation . RestController ; /** * @author Crunchify.com - Simple Spring Boot Example * */ // @RestController is a convenience annotation that is itself annotated with @Controller and @ResponseBody @ RestController // @EnableAutoConfiguration enables auto-configuration of the Spring Application Context, attempting to guess // and configure beans that you are likely to need. @ EnableAutoConfiguration public class CrunchifyHelloWorldSpringBoot { // @RequestMapping annotation is used for mapping web requests onto specific handler classes @ RequestMapping ( "/" ) String basicURL ( ) { return "Welcome to Spring Boot Hello World Tutorial" ; } @ RequestMapping ( "crunchify" ) String crunchifyURL ( ) { return "Hello Crunchify Friends! This is your first SpringBoot Example. Isn't that so Simple?" ; } public static void main ( String [ ] args ) throws Exception { // SpringApplication classes that can be used to bootstrap and launch a Spring application from a Java // main method. By default class will perform the following steps to bootstrap your application. SpringApplication . run ( CrunchifyHelloWorldSpringBoot . class , args ) ; } } |
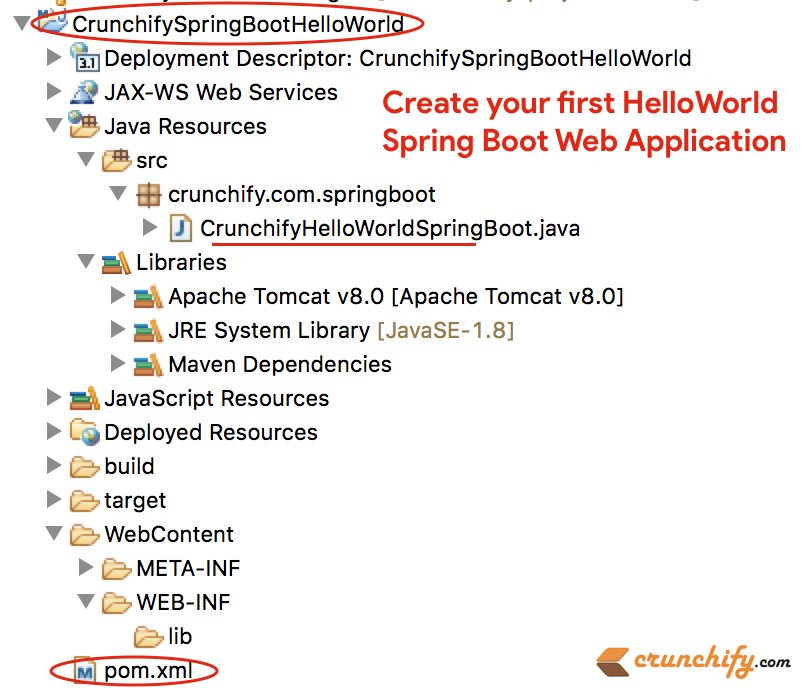
Setelah Anda menambahkan file Java di atas, struktur proyek Eclipse Anda akan terlihat seperti ini:
Langkah-6
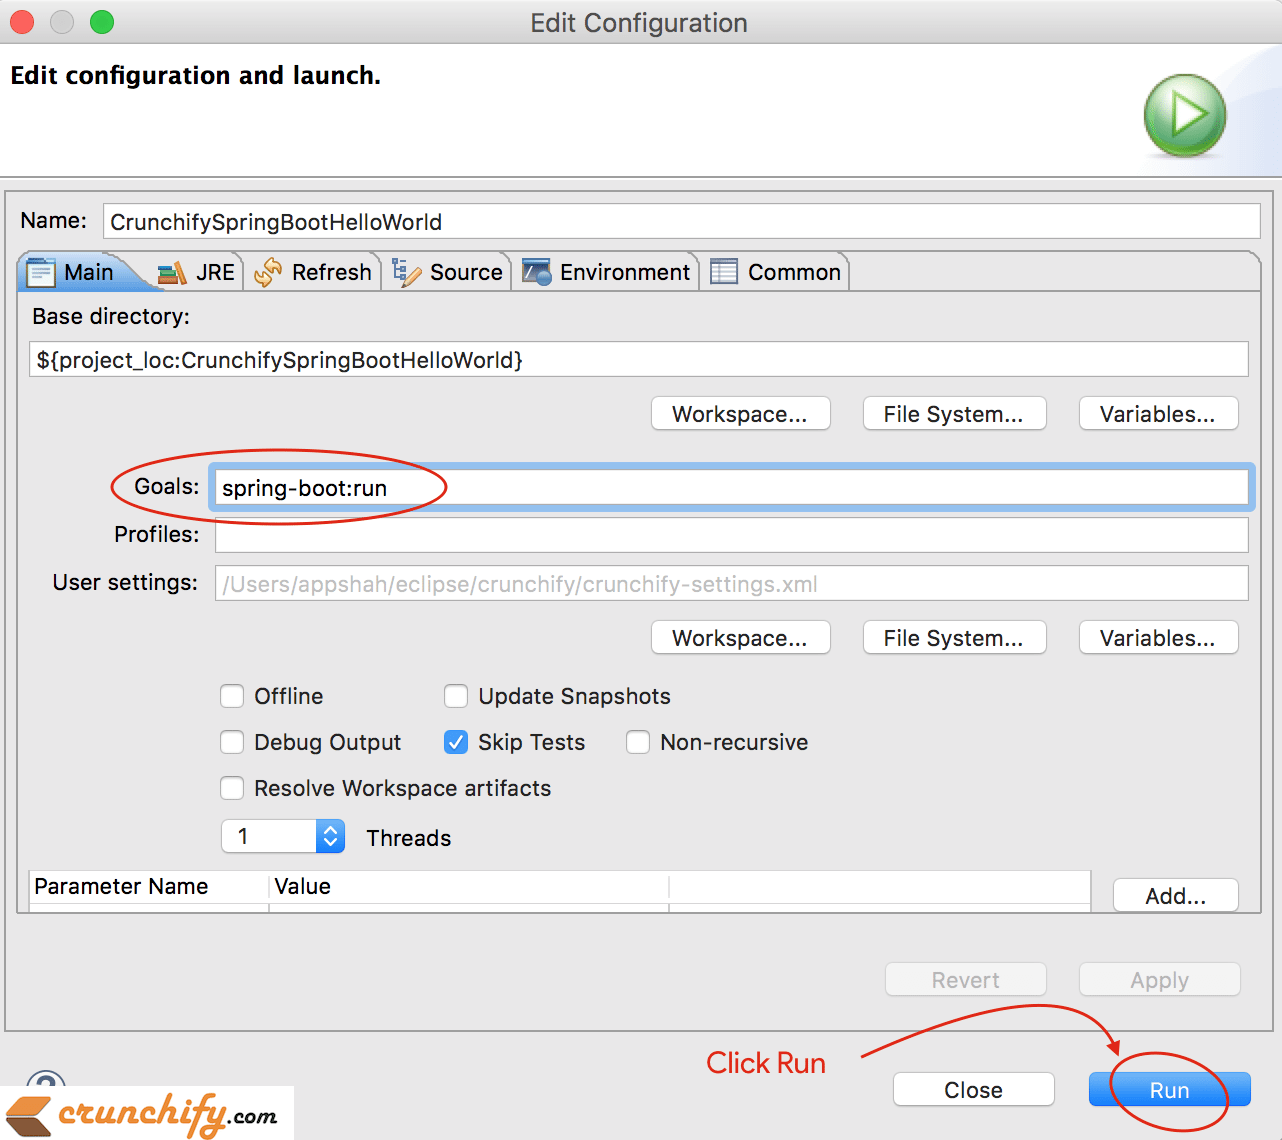
Sekarang menggunakan perintah spring-boot:run maven sederhana, Anda dapat memulai Spring Boot Application .
- Klik kanan pada proyek
- Klik
Run As -> Maven build...
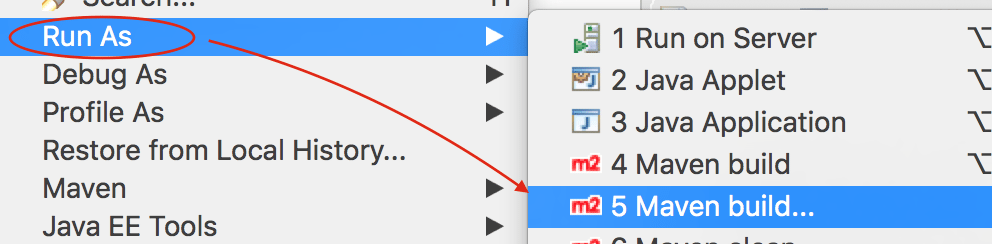
Selanjutnya Windows menyimpan konfigurasi default dan memberikan goal as spring-boot:run seperti yang Anda lihat pada gambar di bawah ini.
Langkah-7
Pastikan Anda tidak memiliki kesalahan di konsol Eclipse. Berikut ini adalah keluaran konsol dari Eclipse IDE.
|
1 2 3 4 5 6 7 8 9 10 11 12 13 14 15 16 17 18 19 20 21 22 23 24 25 26 27 28 29 30 31 32 33 34 35 36 37 38 39 40 41 42 43 44 45 46 47 48 49 50 51 52 53 54 55 56 57 58 59 60 61 |
SLF4J : Class path contains multiple SLF4J bindings . SLF4J : Found binding in [ jar : file : / Applications / Eclipse . app / Contents / Eclipse / plugins / org . eclipse . m2e . maven . runtime . slf4j . simple_1 . 16.0.20200610 - 1735 / jars / slf4j - simple - 1.7.5.jar ! / org / slf4j / impl / StaticLoggerBinder . class ] SLF4J : Found binding in [ file : / Applications / Eclipse . app / Contents / Eclipse / configuration / org . eclipse . osgi / 5 / 0 / . cp / org / slf4j / impl / StaticLoggerBinder . class ] SLF4J : See http : //www.slf4j.org/codes.html#multiple_bindings for an explanation. SLF4J : Actual binding is of type [ org . slf4j . impl . SimpleLoggerFactory ] SLF4J : Class path contains multiple SLF4J bindings . SLF4J : Found binding in [ jar : file : / Applications / Eclipse . app / Contents / Eclipse / plugins / org . eclipse . m2e . maven . runtime . slf4j . simple_1 . 16.0.20200610 - 1735 / jars / slf4j - simple - 1.7.5.jar ! / org / slf4j / impl / StaticLoggerBinder . class ] SLF4J : Found binding in [ file : / Applications / Eclipse . app / Contents / Eclipse / configuration / org . eclipse . osgi / 5 / 0 / . cp / org / slf4j / impl / StaticLoggerBinder . class ] SLF4J : See http : //www.slf4j.org/codes.html#multiple_bindings for an explanation. SLF4J : Actual binding is of type [ org . slf4j . impl . SimpleLoggerFactory ] [ INFO ] Scanning for projects . . . [ INFO ] [ INFO ] ---- < CrunchifySpringBootHelloWorld : CrunchifySpringBootHelloWorld > ----- [ INFO ] Building CrunchifySpringBootHelloWorld 1.0.0 - RELEASE [ INFO ] -------------------------------- [ war ] --------------------------------- [ INFO ] [ INFO ] > > > spring - boot - maven - plugin : 2.4.3 : run ( default - cli ) > test - compile @ CrunchifySpringBootHelloWorld > > > [ INFO ] [ INFO ] --- maven - resources - plugin : 3.2.0 : resources ( default - resources ) @ CrunchifySpringBootHelloWorld --- [ INFO ] Using 'UTF-8' encoding to copy filtered resources . [ INFO ] Using 'UTF-8' encoding to copy filtered properties files . [ INFO ] skip non existing resourceDirectory / Users / app / crunchify / eclipse - workspace / CrunchifySpringBootHelloWorld / src / main / resources [ INFO ] skip non existing resourceDirectory / Users / app / crunchify / eclipse - workspace / CrunchifySpringBootHelloWorld / src / main / resources [ INFO ] [ INFO ] --- maven - compiler - plugin : 3.8.1 : compile ( default - compile ) @ CrunchifySpringBootHelloWorld --- [ INFO ] Nothing to compile - all classes are up to date [ INFO ] [ INFO ] --- maven - resources - plugin : 3.2.0 : testResources ( default - testResources ) @ CrunchifySpringBootHelloWorld --- [ INFO ] Not copying test resources [ INFO ] [ INFO ] --- maven - compiler - plugin : 3.8.1 : testCompile ( default - testCompile ) @ CrunchifySpringBootHelloWorld --- [ INFO ] Not compiling test sources [ INFO ] [ INFO ] < < < spring - boot - maven - plugin : 2.4.3 : run ( default - cli ) < test - compile @ CrunchifySpringBootHelloWorld < < < [ INFO ] [ INFO ] [ INFO ] --- spring - boot - maven - plugin : 2.4.3 : run ( default - cli ) @ CrunchifySpringBootHelloWorld --- [ INFO ] Attaching agents : [ ] . ____ _ __ _ _ / \ \ / ___ '_ __ _ _(_)_ __ __ _ \ \ \ \ ( ( )\___ | ' _ | '_| | ' _ \ / _ ` | \ \ \ \ \ \ / ___ ) | | _ ) | | | | | | | ( _ | | ) ) ) ) ' |____| .__|_| |_|_| |_\__, | / / / / =========|_|==============|___/=/_/_/_/ :: Spring Boot :: (v2.4.3) 2021-02-21 21:05:10.614 INFO 36654 --- [ main] c.c.s.CrunchifyHelloWorldSpringBoot : Starting CrunchifyHelloWorldSpringBoot using Java 15 on LM-AUN-11021095 with PID 36654 (/Users/app/crunchify/eclipse-workspace/CrunchifySpringBootHelloWorld/target/classes started by arpshah in /Users/app/crunchify/eclipse-workspace/CrunchifySpringBootHelloWorld) 2021-02-21 21:05:10.616 INFO 36654 --- [ main] c.c.s.CrunchifyHelloWorldSpringBoot : No active profile set, falling back to default profiles: default 2021-02-21 21:05:11.008 INFO 36654 --- [ main] o.s.b.w.embedded.tomcat.TomcatWebServer : Tomcat initialized with port(s): 8080 (http) 2021-02-21 21:05:11.014 INFO 36654 --- [ main] o.apache.catalina.core.StandardService : Starting service [Tomcat] 2021-02-21 21:05:11.015 INFO 36654 --- [ main] org.apache.catalina.core.StandardEngine : Starting Servlet engine: [Apache Tomcat/9.0.43] 2021-02-21 21:05:11.054 INFO 36654 --- [ main] o.a.c.c.C.[Tomcat].[localhost].[/] : Initializing Spring embedded WebApplicationContext 2021-02-21 21:05:11.054 INFO 36654 --- [ main] w.s.c.ServletWebServerApplicationContext : Root WebApplicationContext: initialization completed in 417 ms 2021-02-21 21:05:11.147 INFO 36654 --- [ main] o.s.s.concurrent.ThreadPoolTaskExecutor : Initializing ExecutorService ' applicationTaskExecutor ' 2021-02-21 21:05:11.241 INFO 36654 --- [ main] o.s.b.w.embedded.tomcat.TomcatWebServer : Tomcat started on port(s): 8080 (http) with context path ' ' 2021-02-21 21:05:11.247 INFO 36654 --- [ main] c.c.s.CrunchifyHelloWorldSpringBoot : Started CrunchifyHelloWorldSpringBoot in 0.843 seconds (JVM running for 1.04) 2021-02-21 21:07:04.240 INFO 36654 --- [nio-8080-exec-1] o.a.c.c.C.[Tomcat].[localhost].[/] : Initializing Spring DispatcherServlet ' dispatcherServlet ' 2021-02-21 21:07:04.240 INFO 36654 --- [nio-8080-exec-1] o.s.web.servlet.DispatcherServlet : Initializing Servlet ' dispatcherServlet ' 2021 - 02 - 21 21 : 07 : 04.241 INFO 36654 --- [ nio - 8080 - exec - 1 ] o . s . web . servlet . DispatcherServlet : Completed initialization in 1 ms |
Langkah-8
Sekarang kunjungi URL http://localhost:8080 dan http://locahost:8080/crunchify untuk melihat hasil langsung.

Semoga tutorial ini membantu Anda memulai dengan contoh Java Spring Boot. Beri tahu saya jika Anda melihat masalah saat menjalankan aplikasi Boot Musim Semi pertama Anda.
Dalam beberapa minggu mendatang, kami akan menambahkan Contoh Boot Musim Semi yang semakin kompleks untuk Anda. Jika Anda memiliki persyaratan khusus, beri tahu kami di bagian komentar.
Apa selanjutnya?
- Buat
Spring Boot applicationsuper sederhana di IntelliJ IDEA - Buat
Rest ServiceWeb sederhana di IntelliJ IDEA