
Cum să apelați serviciul dvs. web odihnitor folosind JMeter? Efectuați o testare simplă de încărcare și o automatizare
Publicat: 2018-02-12
Transferul de stat reprezentativ (REST) a câștigat acceptarea pe scară largă pe web ca o alternativă mai simplă la serviciile web bazate pe SOAP și Web Services Description Language (WSDL).
Dovada cheie a acestei schimbări în designul interfeței este adoptarea REST de către furnizorii de servicii web 2.0 de bază, inclusiv Yahoo, Google și Facebook, care au depreciat sau au transferat interfețele bazate pe SOAP și WSDL în favoarea unei interfețe mai ușor de utilizat, model orientat către resurse pentru a-și expune serviciile. Uneori trebuie să vă testați serviciul web RESTFul. Este posibil să aveți două opțiuni:
- Accesați serviciul dvs. web folosind un singur URL
- Utilizați
JMeterși apăsați WebService în buclă. Acest test efectuează și unLoad Testsimplă.
Aici, în acest exemplu, vă voi explica cum să creați un serviciu web simplu Hello World WebService și să accesați același serviciu web folosind JMeter.
Dacă aveți oricare dintre întrebările de mai jos, vă aflați la locul potrivit:
- Testarea serviciilor web SOAP/REST folosind JMeter
- Testarea performanței unui API RESTful folosind JMeter
- Rest API Automation în JMeter – Testarea performanței
- Cum se testează REST API folosind JMeter
- Utilizarea JMeter pentru a testa un serviciu web RESTful (Jersey)
Rezumatul acțiunii:
- Cerință prealabilă
Pre-Requisite:implementați complet acest serviciu RESTFul. - Creați o clasă Java simplă: CrunchifyJMeterTest.java (Serviciul pe care îl vom atinge folosind JMeter).
- Reinstalați aceeași aplicație pe serverul web Apache Tomcat.
- Rulați JMeter și deschideți fișierul
.jmxfurnizat de mai jos - Rulați și analizați-vă testul
Altul trebuie să citească:
- SOAP vs REST: Protocol simplu de acces la obiect vs. Transfer de stat reprezentativ
Pasul 1
Cerință prealabilă Pre-Requisite: implementați complet acest serviciu RESTFul. Implementați și rulați aplicația.
Anunțați-mă dacă vedeți vreo problemă cu el.
Pasul 2
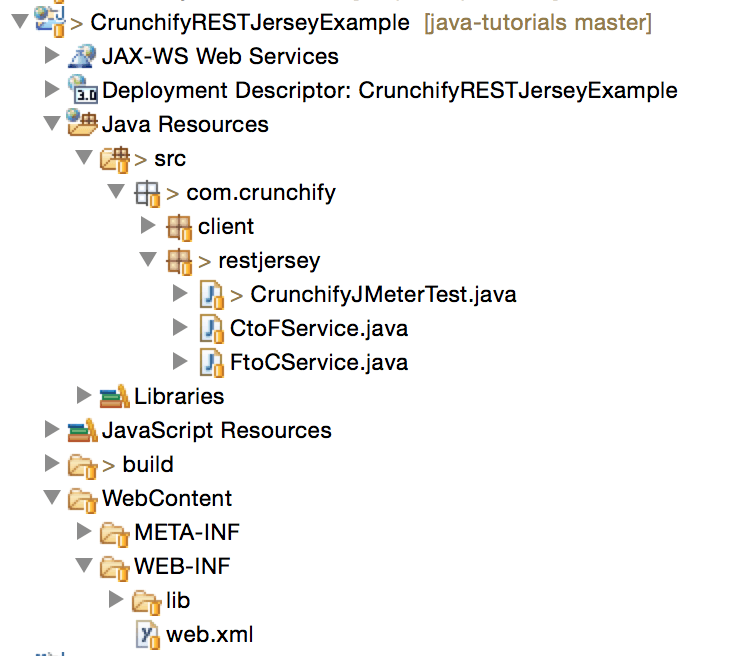
Creați fișierul CrunchifyJMeterTest.java
|
1 2 3 4 5 6 7 8 9 10 11 12 13 14 15 16 17 18 19 20 21 22 23 24 25 26 |
package com . crunchify . restjersey ; import java . io . FileNotFoundException ; import java . io . IOException ; import javax . ws . rs . GET ; import javax . ws . rs . Path ; import javax . ws . rs . Produces ; /** * @author Crunchify * */ @ Path ( "/index" ) public class CrunchifyJMeterTest { @ GET @ Produces ( "text/html" ) public String checkECV ( ) throws InterruptedException , FileNotFoundException , IOException { String result = "<br><div align='center'><h2>Hey This is Crunchify's JMeter Test...</h2></div>" ; System . out . println ( result ) ; Thread . sleep ( 1000 ) ; return result ; } } |
Ar trebui să vedeți mai jos Structura directorului Eclipse:
Pasul 3
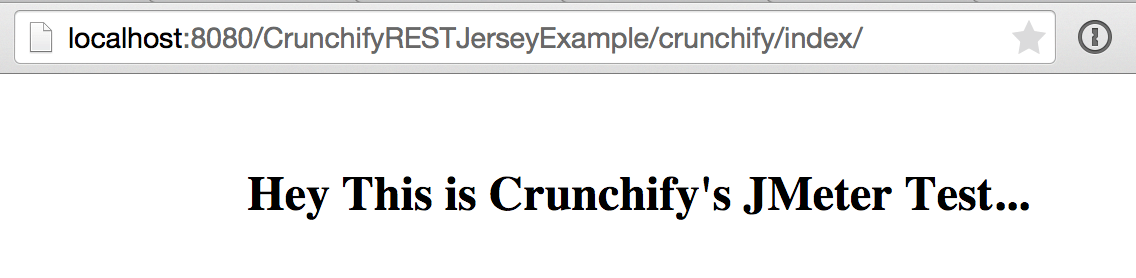
Reimplementați același proiect CrunchifyRESTJerseyExample pe Tomcat. Testați serviciul dvs. REST.
URL: http://localhost:8080/CrunchifyRESTJerseyExample/crunchify/index/
Pasul-4
Copiați codul de mai jos în fișier și salvați-l ca Crunchify-JMeter-Test.jmx .
|
1 2 3 4 5 6 7 8 9 10 11 12 13 14 15 16 17 18 19 20 21 22 23 24 25 26 27 28 29 30 31 32 33 34 35 36 37 38 39 40 41 42 43 44 45 46 47 48 49 50 51 52 53 54 55 56 57 58 59 60 61 62 63 64 65 66 67 68 69 70 71 72 73 74 75 76 77 78 79 80 81 82 83 84 85 86 87 88 89 90 91 92 93 94 95 96 97 98 99 100 101 102 103 104 105 106 107 108 109 110 111 112 113 114 115 116 117 118 119 120 121 122 123 |
<? xml version = "1.0" encoding = "UTF-8" ?> < jmeterTestPlan version = "1.2" properties = "2.4" jmeter = "2.9 r1437961" > < hashTree > < TestPlan guiclass = "TestPlanGui" testclass = "TestPlan" testname = "App Shah Desktop Test" enabled = "true" > < stringProp name = "TestPlan.comments" > < / stringProp > < boolProp name = "TestPlan.functional_mode" > false < / boolProp > < boolProp name = "TestPlan.serialize_threadgroups" > false < / boolProp > < elementProp name = "TestPlan.user_defined_variables" elementType = "Arguments" guiclass = "ArgumentsPanel" testclass = "Arguments" testname = "User Defined Variables" enabled = "true" > < collectionProp name = "Arguments.arguments" / > < / elementProp > < stringProp name = "TestPlan.user_define_classpath" > < / stringProp > < / TestPlan > < hashTree > < ThreadGroup guiclass = "ThreadGroupGui" testclass = "ThreadGroup" testname = "Crunchify's REST Service JMeter Test" enabled = "true" > < stringProp name = "ThreadGroup.on_sample_error" > continue < / stringProp > < elementProp name = "ThreadGroup.main_controller" elementType = "LoopController" guiclass = "LoopControlPanel" testclass = "LoopController" testname = "Loop Controller" enabled = "true" > < boolProp name = "LoopController.continue_forever" > false < / boolProp > < intProp name = "LoopController.loops" > - 1 < / intProp > < / elementProp > < stringProp name = "ThreadGroup.num_threads" > 5 < / stringProp > < stringProp name = "ThreadGroup.ramp_time" > 2 < / stringProp > < longProp name = "ThreadGroup.start_time" > 1367432020000 < / longProp > < longProp name = "ThreadGroup.end_time" > 1367432020000 < / longProp > < boolProp name = "ThreadGroup.scheduler" > false < / boolProp > < stringProp name = "ThreadGroup.duration" > < / stringProp > < stringProp name = "ThreadGroup.delay" > < / stringProp > < / ThreadGroup > < hashTree > < HTTPSamplerProxy guiclass = "HttpTestSampleGui" testclass = "HTTPSamplerProxy" testname = "HTTP Request" enabled = "true" > < boolProp name = "HTTPSampler.postBodyRaw" > true < / boolProp > < elementProp name = "HTTPsampler.Arguments" elementType = "Arguments" > < collectionProp name = "Arguments.arguments" > < elementProp name = "" elementType = "HTTPArgument" > < boolProp name = "HTTPArgument.always_encode" > false < / boolProp > < stringProp name = "Argument.value" > < / stringProp > < stringProp name = "Argument.metadata" > = < / stringProp > < / elementProp > < / collectionProp > < / elementProp > < stringProp name = "HTTPSampler.domain" > localhost < / stringProp > < stringProp name = "HTTPSampler.port" > 8080 < / stringProp > < stringProp name = "HTTPSampler.connect_timeout" > 10000 < / stringProp > < stringProp name = "HTTPSampler.response_timeout" > 10000 < / stringProp > < stringProp name = "HTTPSampler.protocol" > < / stringProp > < stringProp name = "HTTPSampler.contentEncoding" > < / stringProp > < stringProp name = "HTTPSampler.path" > / CrunchifyRESTJerseyExample / crunchify / index < / stringProp > < stringProp name = "HTTPSampler.method" > GET < / stringProp > < boolProp name = "HTTPSampler.follow_redirects" > true < / boolProp > < boolProp name = "HTTPSampler.auto_redirects" > false < / boolProp > < boolProp name = "HTTPSampler.use_keepalive" > true < / boolProp > < boolProp name = "HTTPSampler.DO_MULTIPART_POST" > false < / boolProp > < boolProp name = "HTTPSampler.monitor" > false < / boolProp > < stringProp name = "HTTPSampler.embedded_url_re" > < / stringProp > < / HTTPSamplerProxy > < hashTree / > < ResultCollector guiclass = "StatGraphVisualizer" testclass = "ResultCollector" testname = "Aggregate Graph" enabled = "true" > < boolProp name = "ResultCollector.error_logging" > false < / boolProp > < objProp > < name > saveConfig < / name > < value class = "SampleSaveConfiguration" > < time > true < / time > < latency > true < / latency > < timestamp > true < / timestamp > < success > true < / success > < label > true < / label > < code > true < / code > < message > true < / message > < threadName > true < / threadName > < dataType > true < / dataType > < encoding > false < / encoding > < assertions > true < / assertions > < subresults > true < / subresults > < responseData > false < / responseData > < samplerData > false < / samplerData > < xml > true < / xml > < fieldNames > false < / fieldNames > < responseHeaders > false < / responseHeaders > < requestHeaders > false < / requestHeaders > < responseDataOnError > false < / responseDataOnError > < saveAssertionResultsFailureMessage > false < / saveAssertionResultsFailureMessage > < assertionsResultsToSave > 0 < / assertionsResultsToSave > < bytes > true < / bytes > < / value > < / objProp > < stringProp name = "filename" > < / stringProp > < / ResultCollector > < hashTree / > < ResultCollector guiclass = "StatVisualizer" testclass = "ResultCollector" testname = "Aggregate Report" enabled = "true" > < boolProp name = "ResultCollector.error_logging" > false < / boolProp > < objProp > < name > saveConfig < / name > < value class = "SampleSaveConfiguration" > < time > true < / time > < latency > true < / latency > < timestamp > true < / timestamp > < success > true < / success > < label > true < / label > < code > true < / code > < message > true < / message > < threadName > true < / threadName > < dataType > true < / dataType > < encoding > false < / encoding > < assertions > true < / assertions > < subresults > true < / subresults > < responseData > false < / responseData > < samplerData > false < / samplerData > < xml > false < / xml > < fieldNames > false < / fieldNames > < responseHeaders > false < / responseHeaders > < requestHeaders > false < / requestHeaders > < responseDataOnError > false < / responseDataOnError > < saveAssertionResultsFailureMessage > false < / saveAssertionResultsFailureMessage > < assertionsResultsToSave > 0 < / assertionsResultsToSave > < bytes > true < / bytes > < / value > < / objProp > < stringProp name = "filename" > < / stringProp > < / ResultCollector > < hashTree / > < / hashTree > < / hashTree > < / hashTree > < / jmeterTestPlan > |

Pasul-5
- Descărcați Apache JMeter.
- Rulați JMeter folosind fișierul jmeter.bat sau jmeter.sh
- Faceți clic pe
File -> Open - Accesați folderul în care ați salvat fișierul Crunchify-JMeter-Test.jmx și selectați fișierul
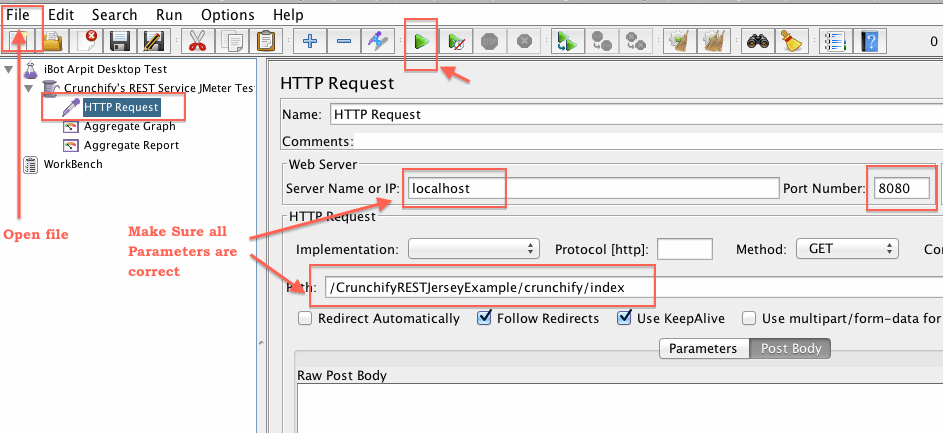
Pasul-6
- Acum extindeți Testul JMeter al serviciului de odihnă Crunchify, așa cum vedeți în imaginea de mai jos
- Faceți clic pe Solicitare HTTP
- Asigurați-vă că parametrii de mai jos sunt corecti
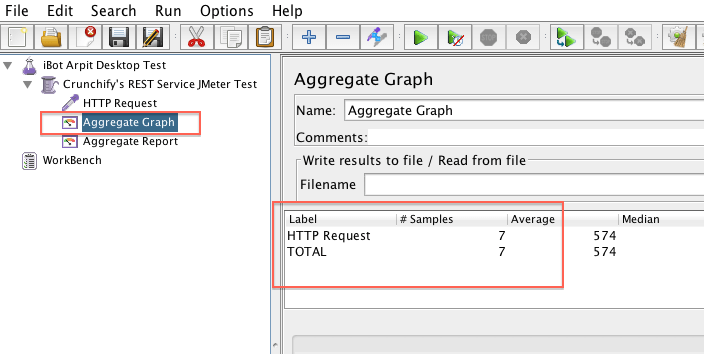
Pasul-7
Analizați-vă rezultatul testului.
Rest API Automation în JMeter?
Ei bine, după fiecare ciclu de dezvoltare, puteți rula testul pe care l-ați definit deja în fișierul JMeter la un anumit interval.
Există o serie de alte moduri prin care vă puteți modifica parametrii de testare. Joacă-te cu el și spune-mi cum merge sau dacă vezi vreo problemă cu asta.