
Tutoriel Java Spring Boot - Exemple d'application Web Hello-World en direct avec des étapes détaillées
Publié: 2018-04-05
Pourquoi Spring Boot ? A quoi sert Spring Boot ?
Vous souhaitez créer des micro-services basés sur Java pour votre application ? Eh bien, Spring Boot est une solution open source basée sur Java pour le même
Il est utilisé pour créer une application basée sur Spring prête pour la production et créée par l'équipe Pivotal.
L'idée de Spring Boot est très simple. Il fournit un ensemble de fonctionnalités et un cadre préconfigurés avec lesquels vous pouvez publier votre première application Web basée sur Spring Boot avec seulement few lines of code . Avec une simple commande, vous pouvez lancer et tester votre application Web.
L'ensemble de toutes les configurations personnalisées, les configurations de base de données et les modules tiers sont out-0f-the-box dans Spring Boot.
Comme nous avons le très populaire didacticiel Hello World Spring MVC, nous allons également commencer notre didacticiel Hello World Spring Boot de la même manière.
Premiers pas avec Spring Boot :
- Ceci est votre tutoriel Spring Boot pour les débutants
- Tutoriel Hello World Spring Boot
- Exemple de démarrage de printemps le plus simple
- Tutoriel Spring Boot Maven
- exemple d'application web de démarrage de printemps
Commençons.
Étape 1
Pour démarrer avec Spring Boot, vous aurez besoin des configurations ci-dessous.
- JDK 8. Assurez-vous de
download and installdernier JDK. - Eclipse IDE. Assurez-vous de télécharger
Eclipse IDE for Java EE Developers. lien de téléchargement officiel. - Démarrage de printemps 2.4.3.
Étape 2
Une fois que vous avez installé Eclipse sur votre ordinateur portable/de bureau, accédez à Eclipse. Nous allons créer un nouveau projet Web dynamique.
- Cliquez sur Fichier
- Nouvelle
-
Dynamic Web Project - Sur le premier écran, indiquez le nom du projet :
CrunchifySpringBootHelloWorld
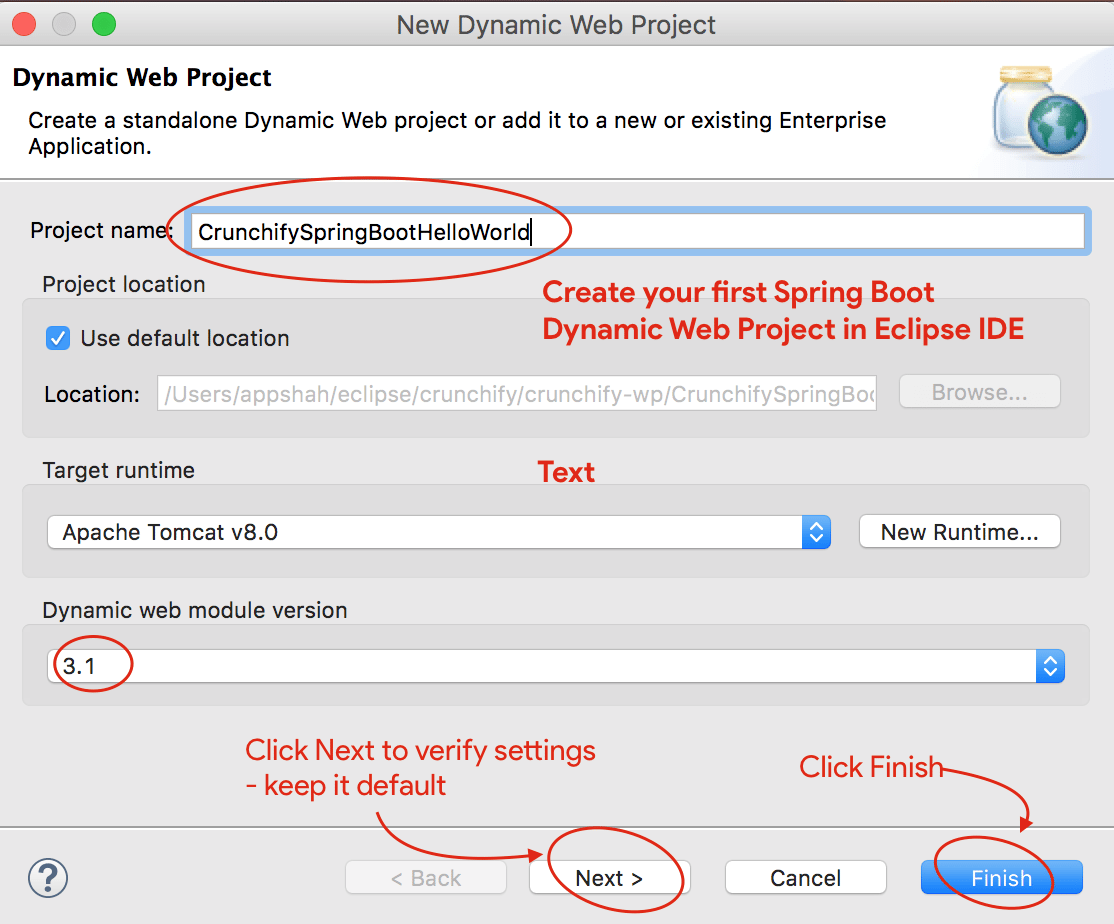
- Assurez-vous que vous disposez de la version du module Web dynamique à
3.1et de l'environnement d'exécution cible Apache Tomcat 8. - Si vous n'avez pas encore configuré Apache Tomcat, suivez ces étapes pour configurer Tomcat dans Eclipse.
- Cliquez sur Suivant deux fois et assurez-vous que les paramètres sont identiques à ceux-ci. Capture d'écran1, Capture d'écran2.
- OU cliquez sur Terminer pour créer un projet Web dynamique.
Étape 3
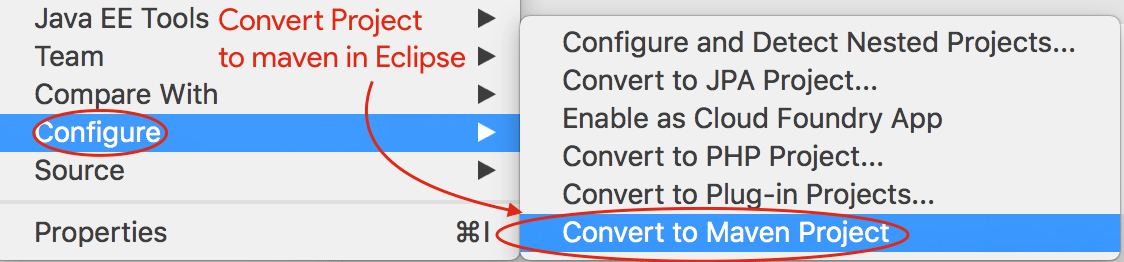
L'étape suivante consiste à convertir le projet Java en projet Maven.
- Clic droit sur le projet
- Cliquez sur Configurer
- Cliquez sur
Convert to Maven Project - Conserver la configuration par défaut
- Cliquez sur terminer
Étape 4
L'étape ci-dessus créera un fichier pom.xml pour votre projet. L'étape suivante consiste à mettre à jour le fichier pom.xml avec le contenu ci-dessous et à ajouter Spring Boot Dependency .
|
1 2 3 4 5 6 7 8 9 10 11 12 13 14 15 16 17 18 19 20 21 22 23 24 25 26 27 28 29 30 31 32 33 34 35 36 37 38 39 40 41 42 43 44 45 46 47 48 49 50 |
< project xmlns = "http://maven.apache.org/POM/4.0.0" xmlns : xsi = "http://www.w3.org/2001/XMLSchema-instance" xsi : schemaLocation = "http://maven.apache.org/POM/4.0.0 http://maven.apache.org/xsd/maven-4.0.0.xsd" > < modelVersion > 4.0.0 < / modelVersion > < groupId > CrunchifySpringBootHelloWorld < / groupId > < artifactId > CrunchifySpringBootHelloWorld < / artifactId > < version > 1.0.0 - RELEASE < / version > < packaging > war < / packaging > < parent > < groupId > org . springframework . boot < / groupId > < artifactId > spring - boot - starter - parent < / artifactId > < version > 2.4.3 < / version > < / parent > < dependencies > < dependency > < groupId > org . springframework . boot < / groupId > < artifactId > spring - boot - starter - web < / artifactId > < / dependency > < / dependencies > < properties > < java . version > 1.8 < / java . version > < / properties > < build > < sourceDirectory > src < / sourceDirectory > < plugins > < plugin > < artifactId > maven - compiler - plugin < / artifactId > < configuration > < source > 1.8 < / source > < target > 1.8 < / target > < / configuration > < / plugin > < plugin > < groupId > org . springframework . boot < / groupId > < artifactId > spring - boot - maven - plugin < / artifactId > < / plugin > < plugin > < artifactId > maven - war - plugin < / artifactId > < configuration > < warSourceDirectory > WebContent < / warSourceDirectory > < / configuration > < / plugin > < / plugins > < / build > < / project > |
Comme vous le voyez ci-dessus, nous ajoutons le jar org.springframework.boot 2.4.3 à notre projet. De plus, nous ajoutons deux autres artefacts :
- plugin spring-boot-maven
- spring-boot-starter-web
Étape-5
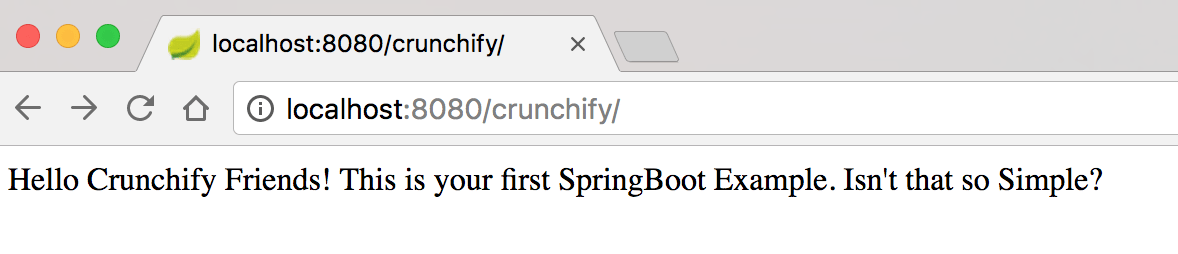
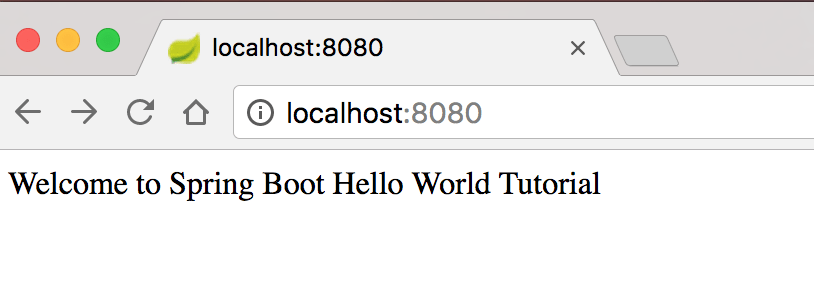
Travaillons maintenant sur la création d'un simple fichier Hello World Application auquel nous pourrons accéder à l'aide d'URL
- http://locahost:8080
- http://locahost:8080/crunchify
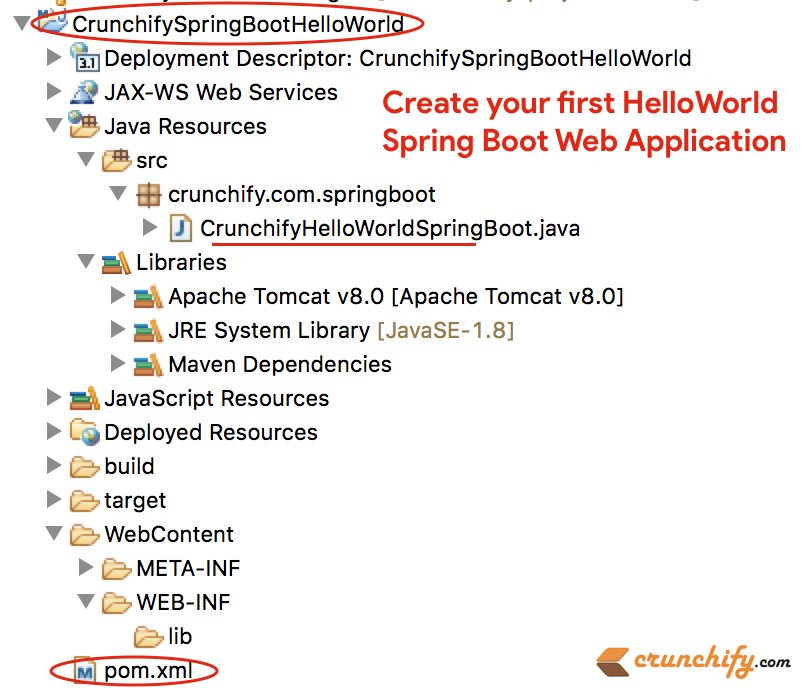
Créez le fichier CrunchifyHelloWorldSpringBoot.java avec le contenu du code ci-dessous :
|
1 2 3 4 5 6 7 8 9 10 11 12 13 14 15 16 17 18 19 20 21 22 23 24 25 26 27 28 29 30 31 32 33 34 35 36 37 38 39 |
package crunchify . com . springboot ; import org . springframework . boot . SpringApplication ; import org . springframework . boot . autoconfigure . EnableAutoConfiguration ; import org . springframework . web . bind . annotation . RequestMapping ; import org . springframework . web . bind . annotation . RestController ; /** * @author Crunchify.com - Simple Spring Boot Example * */ // @RestController is a convenience annotation that is itself annotated with @Controller and @ResponseBody @ RestController // @EnableAutoConfiguration enables auto-configuration of the Spring Application Context, attempting to guess // and configure beans that you are likely to need. @ EnableAutoConfiguration public class CrunchifyHelloWorldSpringBoot { // @RequestMapping annotation is used for mapping web requests onto specific handler classes @ RequestMapping ( "/" ) String basicURL ( ) { return "Welcome to Spring Boot Hello World Tutorial" ; } @ RequestMapping ( "crunchify" ) String crunchifyURL ( ) { return "Hello Crunchify Friends! This is your first SpringBoot Example. Isn't that so Simple?" ; } public static void main ( String [ ] args ) throws Exception { // SpringApplication classes that can be used to bootstrap and launch a Spring application from a Java // main method. By default class will perform the following steps to bootstrap your application. SpringApplication . run ( CrunchifyHelloWorldSpringBoot . class , args ) ; } } |
Une fois que vous avez ajouté le fichier Java ci-dessus, la structure de votre projet Eclipse devrait ressembler à ceci :
Étape-6
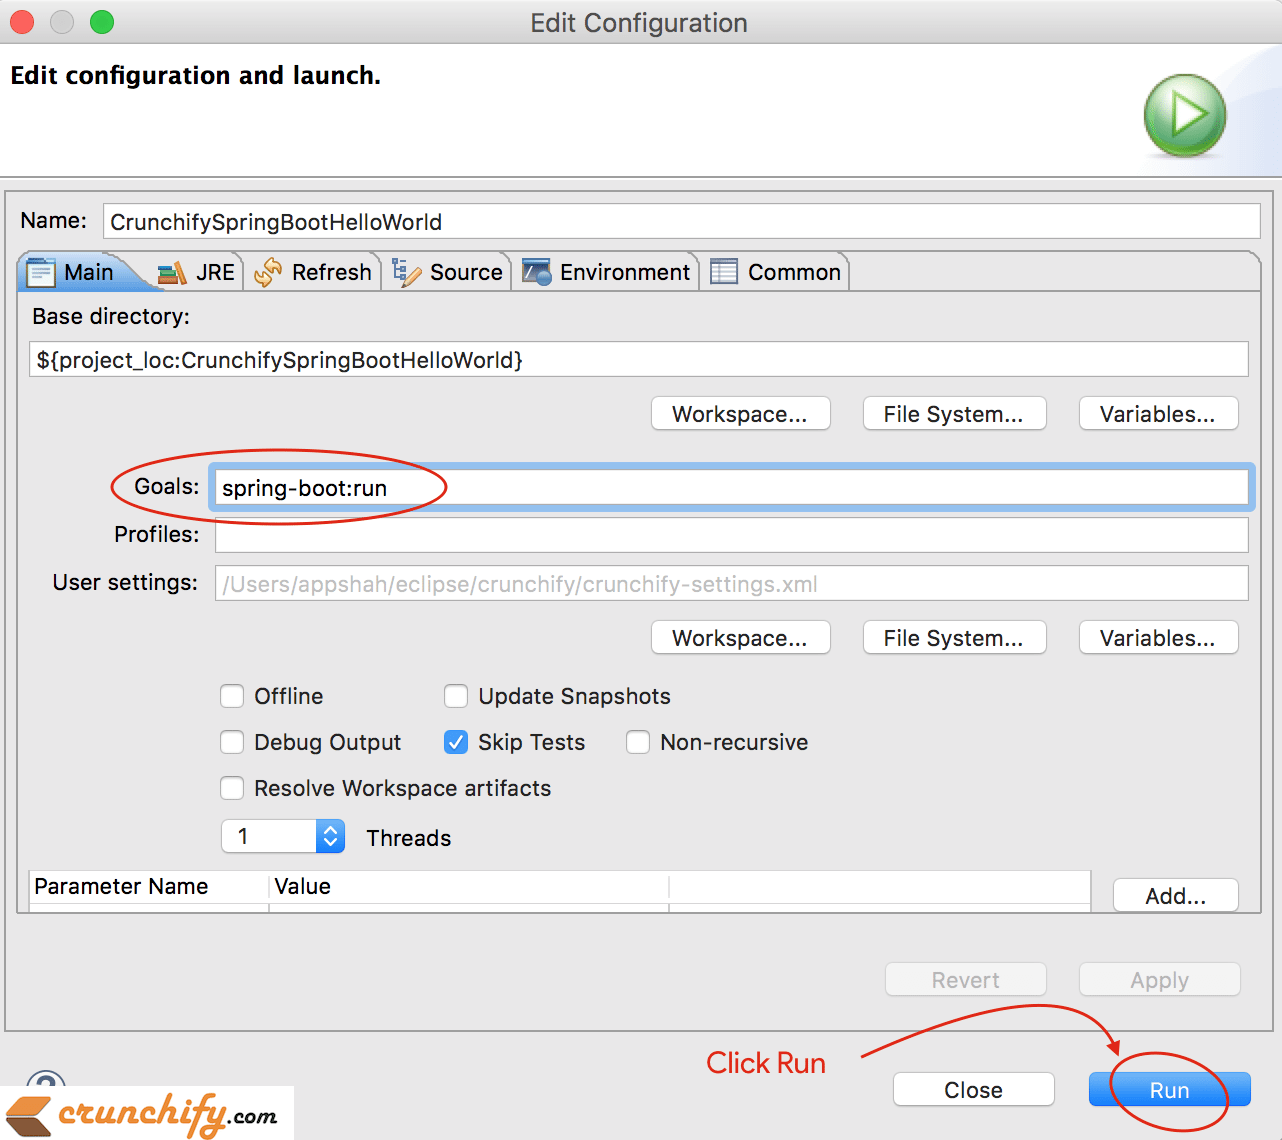
Maintenant, en utilisant la simple commande spring-boot:run maven, vous pouvez démarrer votre Spring Boot Application .
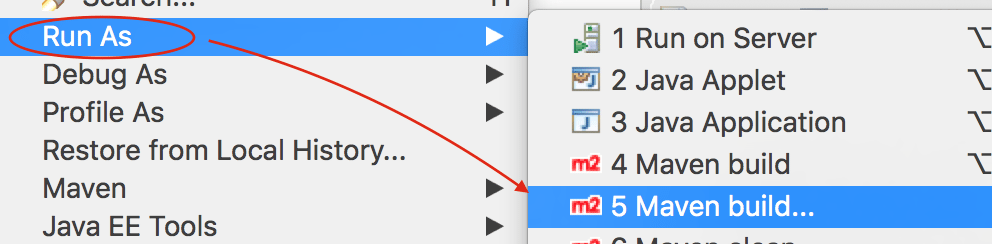
- Clic droit sur le projet
- Cliquez sur
Run As -> Maven build...
Ensuite, Windows conserve la configuration par défaut et fournit l' goal as spring-boot:run comme vous le voyez dans l'image ci-dessous.
Étape-7
Assurez-vous que vous n'avez aucune erreur dans la console Eclipse. Voici une sortie console d'Eclipse IDE.
|
1 2 3 4 5 6 7 8 9 10 11 12 13 14 15 16 17 18 19 20 21 22 23 24 25 26 27 28 29 30 31 32 33 34 35 36 37 38 39 40 41 42 43 44 45 46 47 48 49 50 51 52 53 54 55 56 57 58 59 60 61 |
SLF4J : Class path contains multiple SLF4J bindings . SLF4J : Found binding in [ jar : file : / Applications / Eclipse . app / Contents / Eclipse / plugins / org . eclipse . m2e . maven . runtime . slf4j . simple_1 . 16.0.20200610 - 1735 / jars / slf4j - simple - 1.7.5.jar ! / org / slf4j / impl / StaticLoggerBinder . class ] SLF4J : Found binding in [ file : / Applications / Eclipse . app / Contents / Eclipse / configuration / org . eclipse . osgi / 5 / 0 / . cp / org / slf4j / impl / StaticLoggerBinder . class ] SLF4J : See http : //www.slf4j.org/codes.html#multiple_bindings for an explanation. SLF4J : Actual binding is of type [ org . slf4j . impl . SimpleLoggerFactory ] SLF4J : Class path contains multiple SLF4J bindings . SLF4J : Found binding in [ jar : file : / Applications / Eclipse . app / Contents / Eclipse / plugins / org . eclipse . m2e . maven . runtime . slf4j . simple_1 . 16.0.20200610 - 1735 / jars / slf4j - simple - 1.7.5.jar ! / org / slf4j / impl / StaticLoggerBinder . class ] SLF4J : Found binding in [ file : / Applications / Eclipse . app / Contents / Eclipse / configuration / org . eclipse . osgi / 5 / 0 / . cp / org / slf4j / impl / StaticLoggerBinder . class ] SLF4J : See http : //www.slf4j.org/codes.html#multiple_bindings for an explanation. SLF4J : Actual binding is of type [ org . slf4j . impl . SimpleLoggerFactory ] [ INFO ] Scanning for projects . . . [ INFO ] [ INFO ] ---- < CrunchifySpringBootHelloWorld : CrunchifySpringBootHelloWorld > ----- [ INFO ] Building CrunchifySpringBootHelloWorld 1.0.0 - RELEASE [ INFO ] -------------------------------- [ war ] --------------------------------- [ INFO ] [ INFO ] > > > spring - boot - maven - plugin : 2.4.3 : run ( default - cli ) > test - compile @ CrunchifySpringBootHelloWorld > > > [ INFO ] [ INFO ] --- maven - resources - plugin : 3.2.0 : resources ( default - resources ) @ CrunchifySpringBootHelloWorld --- [ INFO ] Using 'UTF-8' encoding to copy filtered resources . [ INFO ] Using 'UTF-8' encoding to copy filtered properties files . [ INFO ] skip non existing resourceDirectory / Users / app / crunchify / eclipse - workspace / CrunchifySpringBootHelloWorld / src / main / resources [ INFO ] skip non existing resourceDirectory / Users / app / crunchify / eclipse - workspace / CrunchifySpringBootHelloWorld / src / main / resources [ INFO ] [ INFO ] --- maven - compiler - plugin : 3.8.1 : compile ( default - compile ) @ CrunchifySpringBootHelloWorld --- [ INFO ] Nothing to compile - all classes are up to date [ INFO ] [ INFO ] --- maven - resources - plugin : 3.2.0 : testResources ( default - testResources ) @ CrunchifySpringBootHelloWorld --- [ INFO ] Not copying test resources [ INFO ] [ INFO ] --- maven - compiler - plugin : 3.8.1 : testCompile ( default - testCompile ) @ CrunchifySpringBootHelloWorld --- [ INFO ] Not compiling test sources [ INFO ] [ INFO ] < < < spring - boot - maven - plugin : 2.4.3 : run ( default - cli ) < test - compile @ CrunchifySpringBootHelloWorld < < < [ INFO ] [ INFO ] [ INFO ] --- spring - boot - maven - plugin : 2.4.3 : run ( default - cli ) @ CrunchifySpringBootHelloWorld --- [ INFO ] Attaching agents : [ ] . ____ _ __ _ _ / \ \ / ___ '_ __ _ _(_)_ __ __ _ \ \ \ \ ( ( )\___ | ' _ | '_| | ' _ \ / _ ` | \ \ \ \ \ \ / ___ ) | | _ ) | | | | | | | ( _ | | ) ) ) ) ' |____| .__|_| |_|_| |_\__, | / / / / =========|_|==============|___/=/_/_/_/ :: Spring Boot :: (v2.4.3) 2021-02-21 21:05:10.614 INFO 36654 --- [ main] c.c.s.CrunchifyHelloWorldSpringBoot : Starting CrunchifyHelloWorldSpringBoot using Java 15 on LM-AUN-11021095 with PID 36654 (/Users/app/crunchify/eclipse-workspace/CrunchifySpringBootHelloWorld/target/classes started by arpshah in /Users/app/crunchify/eclipse-workspace/CrunchifySpringBootHelloWorld) 2021-02-21 21:05:10.616 INFO 36654 --- [ main] c.c.s.CrunchifyHelloWorldSpringBoot : No active profile set, falling back to default profiles: default 2021-02-21 21:05:11.008 INFO 36654 --- [ main] o.s.b.w.embedded.tomcat.TomcatWebServer : Tomcat initialized with port(s): 8080 (http) 2021-02-21 21:05:11.014 INFO 36654 --- [ main] o.apache.catalina.core.StandardService : Starting service [Tomcat] 2021-02-21 21:05:11.015 INFO 36654 --- [ main] org.apache.catalina.core.StandardEngine : Starting Servlet engine: [Apache Tomcat/9.0.43] 2021-02-21 21:05:11.054 INFO 36654 --- [ main] o.a.c.c.C.[Tomcat].[localhost].[/] : Initializing Spring embedded WebApplicationContext 2021-02-21 21:05:11.054 INFO 36654 --- [ main] w.s.c.ServletWebServerApplicationContext : Root WebApplicationContext: initialization completed in 417 ms 2021-02-21 21:05:11.147 INFO 36654 --- [ main] o.s.s.concurrent.ThreadPoolTaskExecutor : Initializing ExecutorService ' applicationTaskExecutor ' 2021-02-21 21:05:11.241 INFO 36654 --- [ main] o.s.b.w.embedded.tomcat.TomcatWebServer : Tomcat started on port(s): 8080 (http) with context path ' ' 2021-02-21 21:05:11.247 INFO 36654 --- [ main] c.c.s.CrunchifyHelloWorldSpringBoot : Started CrunchifyHelloWorldSpringBoot in 0.843 seconds (JVM running for 1.04) 2021-02-21 21:07:04.240 INFO 36654 --- [nio-8080-exec-1] o.a.c.c.C.[Tomcat].[localhost].[/] : Initializing Spring DispatcherServlet ' dispatcherServlet ' 2021-02-21 21:07:04.240 INFO 36654 --- [nio-8080-exec-1] o.s.web.servlet.DispatcherServlet : Initializing Servlet ' dispatcherServlet ' 2021 - 02 - 21 21 : 07 : 04.241 INFO 36654 --- [ nio - 8080 - exec - 1 ] o . s . web . servlet . DispatcherServlet : Completed initialization in 1 ms |
Étape-8
Visitez maintenant les URL http://localhost:8080 et http://locahost:8080/crunchify pour voir le résultat en direct.

J'espère que ce tutoriel vous aidera à démarrer avec l'exemple Java Spring Boot. Faites-moi savoir si vous rencontrez un problème lors de l'exécution de votre première application Spring Boot.
Dans les semaines à venir, nous ajouterons des exemples de démarrage de printemps de plus en plus complexes pour votre. Si vous avez des exigences particulières, faites-le nous savoir dans la section des commentaires.
Et ensuite ?
- Créez une
Spring Boot applicationsuper simple dans IntelliJ IDEA - Créer un
Rest Servicesimple dans IntelliJ IDEA