
Java Spring Boot Tutorial – ตัวอย่างเว็บแอปพลิเคชัน Hello-World แบบสดพร้อมขั้นตอนโดยละเอียด
เผยแพร่แล้ว: 2018-04-05
ทำไมต้อง Spring Boot? Spring Boot ใช้สำหรับอะไร?
ต้องการสร้างบริการไมโครที่ใช้จาวาสำหรับแอปพลิเคชันของคุณหรือไม่? Spring boot เป็นโซลูชันที่ใช้ Java แบบโอเพ่นซอร์สสำหรับสิ่งเดียวกัน
ใช้เพื่อสร้างแอปพลิเคชันที่ใช้ Spring ที่พร้อมสำหรับการผลิตซึ่งสร้างโดยทีม Pivotal
แนวคิด Spring Boot นั้นง่ายมาก มันมีชุดการทำงานและเฟรมเวิร์กที่กำหนดค่าไว้ล่วงหน้าโดยคุณสามารถเผยแพร่เว็บแอปพลิเคชัน Spring Boot แรกของคุณโดยใช้ few lines of code เพียงใช้คำสั่งง่ายๆ เดียว คุณก็สามารถเปิดและทดสอบเว็บแอปพลิเคชันของคุณได้
ชุดการกำหนดค่าแบบกำหนดเองทั้งหมด การตั้งค่าฐานข้อมูล โมดูลของบุคคลที่สามพร้อม out-0f-the-box ทันทีใน Spring Boot
เช่นเดียวกับที่เรามีบทช่วยสอน Hello World Spring MVC ที่ได้รับความนิยม เราจะเริ่มการสอน Hello World Spring Boot ในลักษณะเดียวกัน
เริ่มต้นใช้งาน Spring Boot:
- นี่คือการสอน Spring Boot สำหรับผู้เริ่มต้น
- สวัสดีชาวโลก Spring Boot Tutorial
- ตัวอย่าง Spring Boot ที่ง่ายที่สุด
- สปริงบูต maven กวดวิชา
- ตัวอย่างเว็บแอปพลิเคชั่น spring boot
มาเริ่มกันเลย.
ขั้นตอนที่ 1
ในการเริ่มต้นใช้งาน Spring Boot คุณจะต้องตั้งค่าด้านล่าง
- JDK 8. ตรวจสอบให้แน่ใจว่าคุณ
download and installJDK ล่าสุด - Eclipse IDE ตรวจสอบให้แน่ใจว่าคุณดาวน์โหลด
Eclipse IDE for Java EE Developersลิงค์ดาวน์โหลดอย่างเป็นทางการ - สปริงบูต 2.4.3
ขั้นตอนที่ 2
เมื่อคุณติดตั้ง Eclipse บนแล็ปท็อป / เดสก์ท็อปแล้ว ให้ไปที่ Eclipse เรากำลังจะสร้าง Dynamic Web Project ใหม่
- คลิกที่ไฟล์
- ใหม่
-
Dynamic Web Project - ในหน้าจอแรกให้ระบุชื่อโครงการ:
CrunchifySpringBootHelloWorld
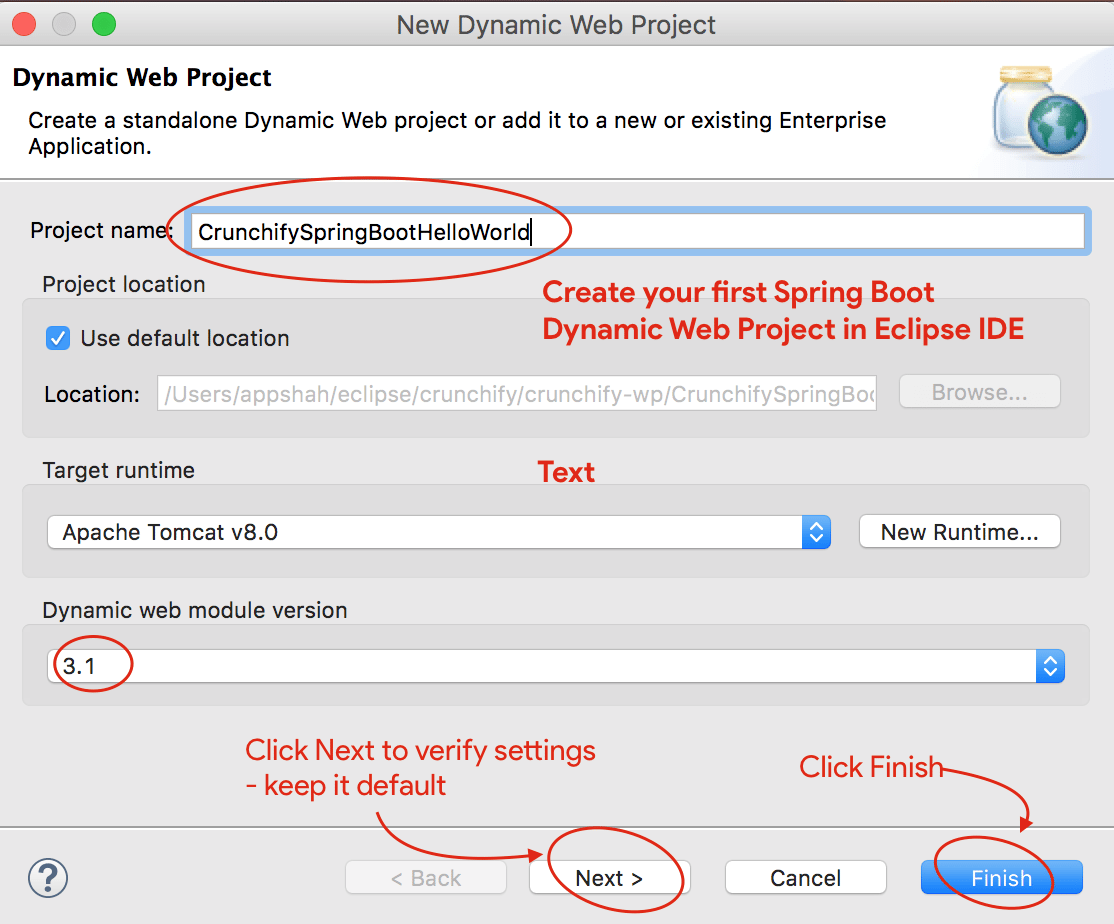
- ตรวจสอบให้แน่ใจว่าคุณมี Dynamic Web module เวอร์ชัน
3.1และ Target runtime Apache Tomcat 8 - หากคุณยังไม่มีการตั้งค่า Apache Tomcat ให้ทำตามขั้นตอนเหล่านี้เพื่อตั้งค่า Tomcat ใน Eclipse
- คลิกที่ ถัดไป สองครั้ง และตรวจสอบให้แน่ใจว่าการตั้งค่าเหมือนกับการตั้งค่าเหล่านี้ ภาพหน้าจอ1, ภาพหน้าจอ2.
- หรือคลิกที่ Finish เพื่อสร้าง Dynamic Web Project
ขั้นตอนที่ 3
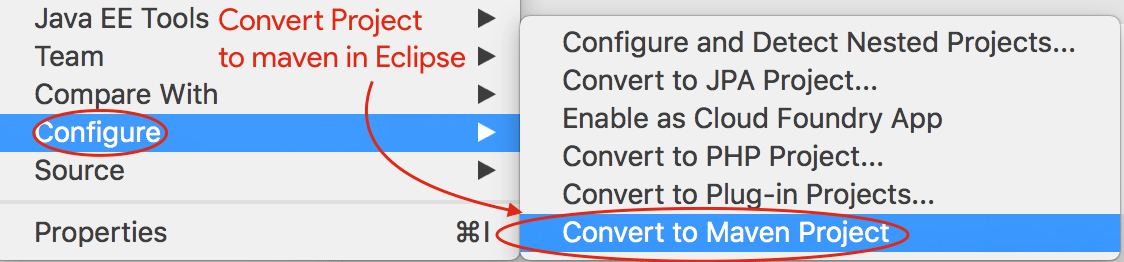
ขั้นตอนต่อไปคือการแปลงโครงการ Java เป็นโครงการ Maven
- คลิกขวาที่โครงการ
- คลิกที่กำหนดค่า
- คลิกที่
Convert to Maven Project - คงการกำหนดค่าเริ่มต้นไว้
- คลิกเสร็จสิ้น
ขั้นตอนที่ 4
ขั้นตอนข้างต้นจะสร้างไฟล์ pom.xml สำหรับโครงการของคุณ ขั้นตอนต่อไปคือการอัพเดตไฟล์ pom.xml ด้วยเนื้อหาด้านล่างและเพิ่ม Spring Boot Dependency
|
1 2 3 4 5 6 7 8 9 10 11 12 13 14 15 16 17 18 19 20 21 22 23 24 25 26 27 28 29 30 31 32 33 34 35 36 37 38 39 40 41 42 43 44 45 46 47 48 49 50 |
< project xmlns = "http://maven.apache.org/POM/4.0.0" xmlns : xsi = "http://www.w3.org/2001/XMLSchema-instance" xsi : schemaLocation = "http://maven.apache.org/POM/4.0.0 http://maven.apache.org/xsd/maven-4.0.0.xsd" > < modelVersion > 4.0.0 < / modelVersion > < groupId > CrunchifySpringBootHelloWorld < / groupId > < artifactId > CrunchifySpringBootHelloWorld < / artifactId > < version > 1.0.0 - RELEASE < / version > < packaging > war < / packaging > < parent > < groupId > org . springframework . boot < / groupId > < artifactId > spring - boot - starter - parent < / artifactId > < version > 2.4.3 < / version > < / parent > < dependencies > < dependency > < groupId > org . springframework . boot < / groupId > < artifactId > spring - boot - starter - web < / artifactId > < / dependency > < / dependencies > < properties > < java . version > 1.8 < / java . version > < / properties > < build > < sourceDirectory > src < / sourceDirectory > < plugins > < plugin > < artifactId > maven - compiler - plugin < / artifactId > < configuration > < source > 1.8 < / source > < target > 1.8 < / target > < / configuration > < / plugin > < plugin > < groupId > org . springframework . boot < / groupId > < artifactId > spring - boot - maven - plugin < / artifactId > < / plugin > < plugin > < artifactId > maven - war - plugin < / artifactId > < configuration > < warSourceDirectory > WebContent < / warSourceDirectory > < / configuration > < / plugin > < / plugins > < / build > < / project > |
ดังที่คุณเห็นด้านบน เรากำลังเพิ่ม org.springframework.boot 2.4.3 jar ในโครงการของเรา นอกจากนี้ เรากำลังเพิ่มสิ่งประดิษฐ์อีกสองอย่าง:
- spring-boot-maven-plugin
- spring-boot-starter-web
ขั้นตอนที่ -5
ตอนนี้เรามาสร้างไฟล์ Hello World Application แบบง่าย ๆ ซึ่งเราจะสามารถเข้าถึงได้โดยใช้ URL
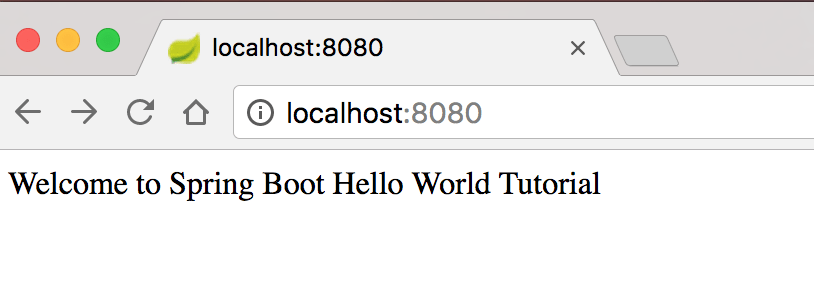
- http://locahost:8080
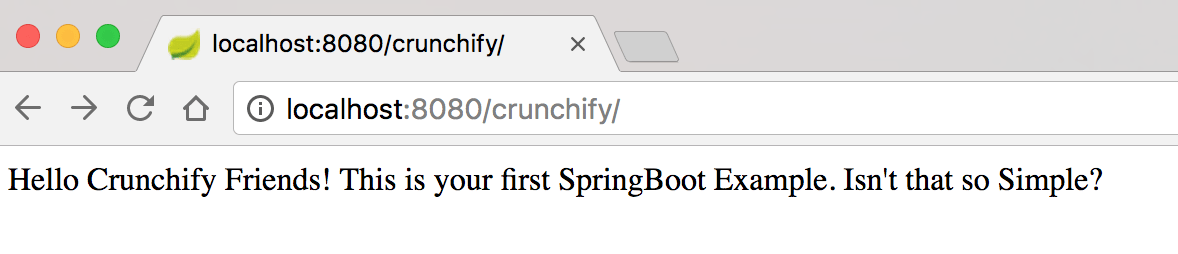
- http://locahost:8080/crunchify
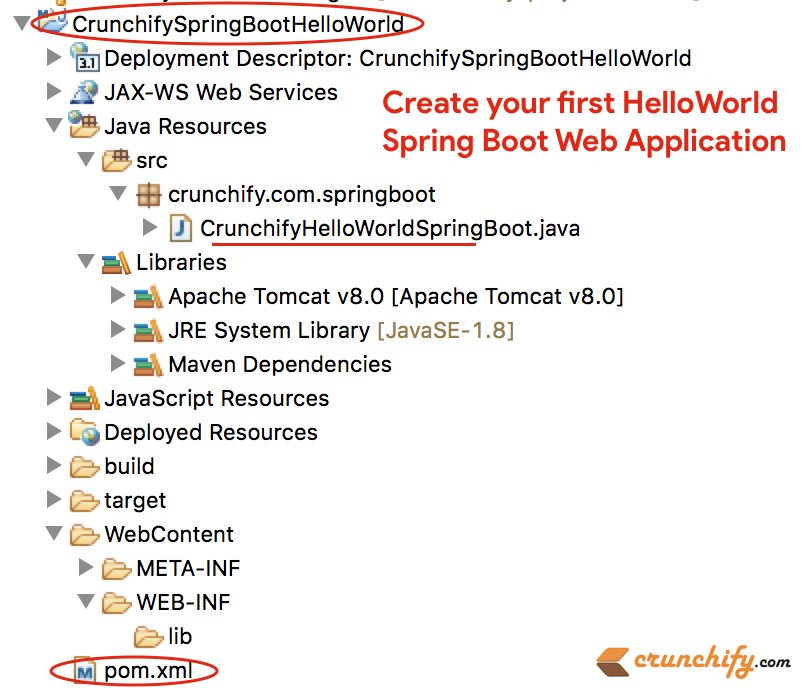
สร้างไฟล์ CrunchifyHelloWorldSpringBoot.java ด้วยเนื้อหาโค้ดด้านล่าง:
|
1 2 3 4 5 6 7 8 9 10 11 12 13 14 15 16 17 18 19 20 21 22 23 24 25 26 27 28 29 30 31 32 33 34 35 36 37 38 39 |
package crunchify . com . springboot ; import org . springframework . boot . SpringApplication ; import org . springframework . boot . autoconfigure . EnableAutoConfiguration ; import org . springframework . web . bind . annotation . RequestMapping ; import org . springframework . web . bind . annotation . RestController ; /** * @author Crunchify.com - Simple Spring Boot Example * */ // @RestController is a convenience annotation that is itself annotated with @Controller and @ResponseBody @ RestController // @EnableAutoConfiguration enables auto-configuration of the Spring Application Context, attempting to guess // and configure beans that you are likely to need. @ EnableAutoConfiguration public class CrunchifyHelloWorldSpringBoot { // @RequestMapping annotation is used for mapping web requests onto specific handler classes @ RequestMapping ( "/" ) String basicURL ( ) { return "Welcome to Spring Boot Hello World Tutorial" ; } @ RequestMapping ( "crunchify" ) String crunchifyURL ( ) { return "Hello Crunchify Friends! This is your first SpringBoot Example. Isn't that so Simple?" ; } public static void main ( String [ ] args ) throws Exception { // SpringApplication classes that can be used to bootstrap and launch a Spring application from a Java // main method. By default class will perform the following steps to bootstrap your application. SpringApplication . run ( CrunchifyHelloWorldSpringBoot . class , args ) ; } } |
เมื่อคุณเพิ่มไฟล์ java ด้านบน โครงสร้างโปรเจ็กต์ Eclipse ของคุณควรมีลักษณะดังนี้:
ขั้นตอนที่ 6
ตอนนี้ใช้คำสั่ง spring-boot:run maven อย่างง่าย คุณสามารถเริ่ม Spring Boot Application ของคุณได้
- คลิกขวาที่โครงการ
- คลิกที่
Run As -> Maven build...
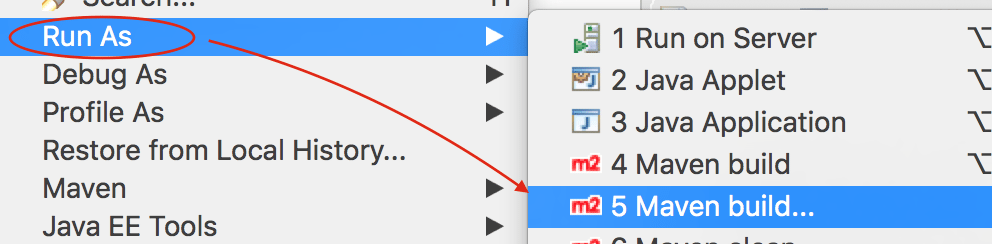
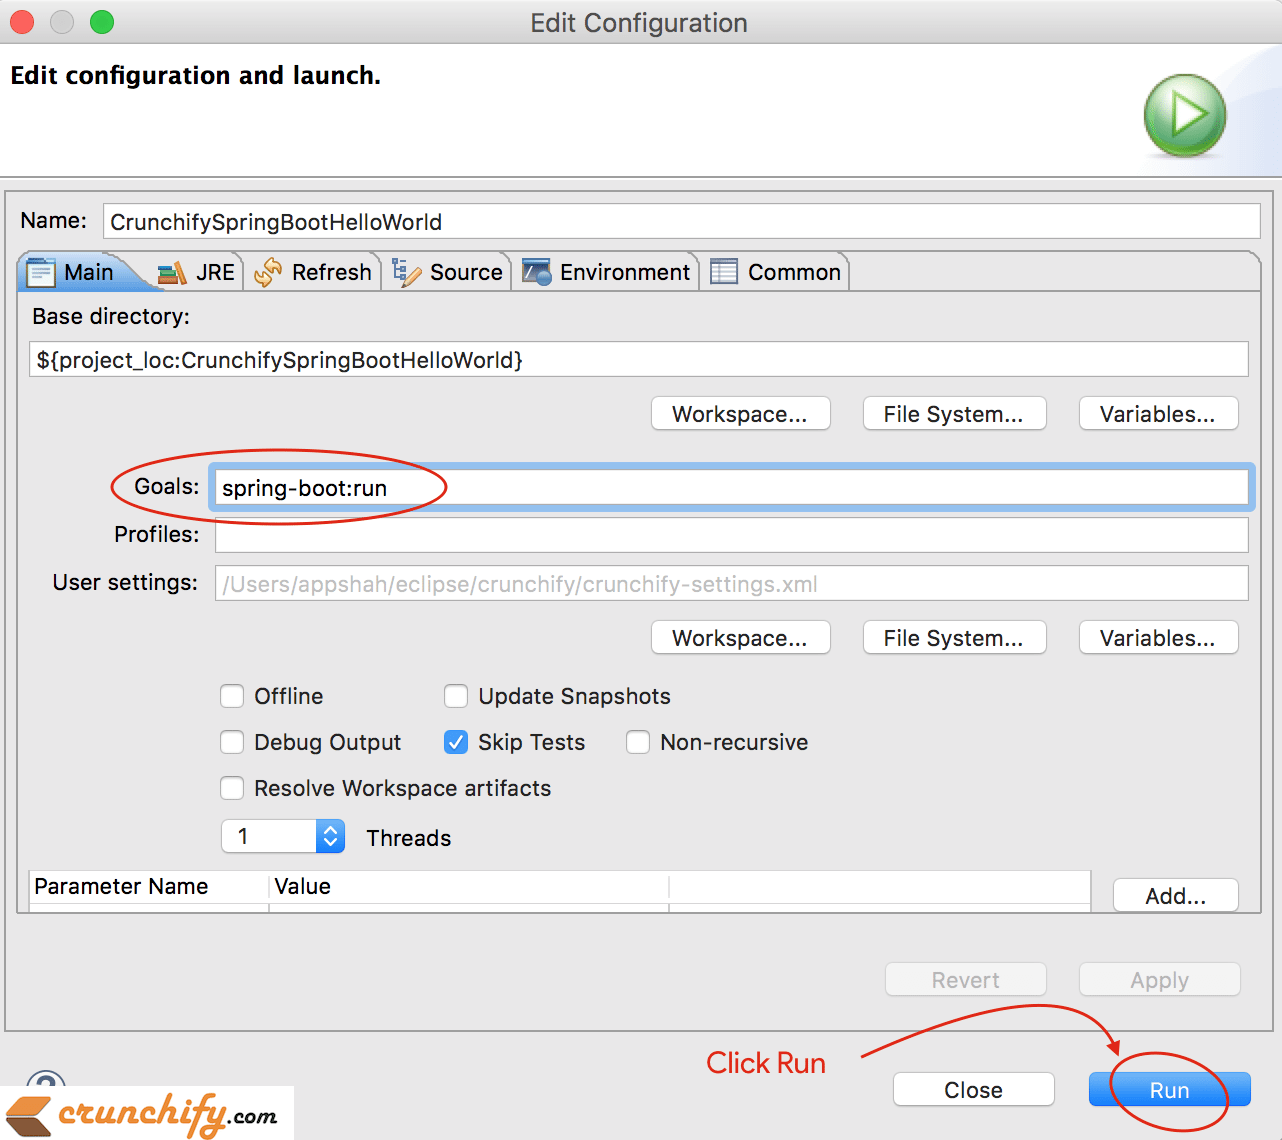
Windows ถัดไปจะคงการกำหนดค่าเริ่มต้นไว้และ goal as spring-boot:run ดังที่คุณเห็นในภาพด้านล่าง
ขั้นตอนที่ 7
ตรวจสอบให้แน่ใจว่าคุณไม่มีข้อผิดพลาดใดๆ ในคอนโซล Eclipse นี่คือเอาต์พุตคอนโซลจาก Eclipse IDE
|
1 2 3 4 5 6 7 8 9 10 11 12 13 14 15 16 17 18 19 20 21 22 23 24 25 26 27 28 29 30 31 32 33 34 35 36 37 38 39 40 41 42 43 44 45 46 47 48 49 50 51 52 53 54 55 56 57 58 59 60 61 |
SLF4J : Class path contains multiple SLF4J bindings . SLF4J : Found binding in [ jar : file : / Applications / Eclipse . app / Contents / Eclipse / plugins / org . eclipse . m2e . maven . runtime . slf4j . simple_1 . 16.0.20200610 - 1735 / jars / slf4j - simple - 1.7.5.jar ! / org / slf4j / impl / StaticLoggerBinder . class ] SLF4J : Found binding in [ file : / Applications / Eclipse . app / Contents / Eclipse / configuration / org . eclipse . osgi / 5 / 0 / . cp / org / slf4j / impl / StaticLoggerBinder . class ] SLF4J : See http : //www.slf4j.org/codes.html#multiple_bindings for an explanation. SLF4J : Actual binding is of type [ org . slf4j . impl . SimpleLoggerFactory ] SLF4J : Class path contains multiple SLF4J bindings . SLF4J : Found binding in [ jar : file : / Applications / Eclipse . app / Contents / Eclipse / plugins / org . eclipse . m2e . maven . runtime . slf4j . simple_1 . 16.0.20200610 - 1735 / jars / slf4j - simple - 1.7.5.jar ! / org / slf4j / impl / StaticLoggerBinder . class ] SLF4J : Found binding in [ file : / Applications / Eclipse . app / Contents / Eclipse / configuration / org . eclipse . osgi / 5 / 0 / . cp / org / slf4j / impl / StaticLoggerBinder . class ] SLF4J : See http : //www.slf4j.org/codes.html#multiple_bindings for an explanation. SLF4J : Actual binding is of type [ org . slf4j . impl . SimpleLoggerFactory ] [ INFO ] Scanning for projects . . . [ INFO ] [ INFO ] ---- < CrunchifySpringBootHelloWorld : CrunchifySpringBootHelloWorld > ----- [ INFO ] Building CrunchifySpringBootHelloWorld 1.0.0 - RELEASE [ INFO ] -------------------------------- [ war ] --------------------------------- [ INFO ] [ INFO ] > > > spring - boot - maven - plugin : 2.4.3 : run ( default - cli ) > test - compile @ CrunchifySpringBootHelloWorld > > > [ INFO ] [ INFO ] --- maven - resources - plugin : 3.2.0 : resources ( default - resources ) @ CrunchifySpringBootHelloWorld --- [ INFO ] Using 'UTF-8' encoding to copy filtered resources . [ INFO ] Using 'UTF-8' encoding to copy filtered properties files . [ INFO ] skip non existing resourceDirectory / Users / app / crunchify / eclipse - workspace / CrunchifySpringBootHelloWorld / src / main / resources [ INFO ] skip non existing resourceDirectory / Users / app / crunchify / eclipse - workspace / CrunchifySpringBootHelloWorld / src / main / resources [ INFO ] [ INFO ] --- maven - compiler - plugin : 3.8.1 : compile ( default - compile ) @ CrunchifySpringBootHelloWorld --- [ INFO ] Nothing to compile - all classes are up to date [ INFO ] [ INFO ] --- maven - resources - plugin : 3.2.0 : testResources ( default - testResources ) @ CrunchifySpringBootHelloWorld --- [ INFO ] Not copying test resources [ INFO ] [ INFO ] --- maven - compiler - plugin : 3.8.1 : testCompile ( default - testCompile ) @ CrunchifySpringBootHelloWorld --- [ INFO ] Not compiling test sources [ INFO ] [ INFO ] < < < spring - boot - maven - plugin : 2.4.3 : run ( default - cli ) < test - compile @ CrunchifySpringBootHelloWorld < < < [ INFO ] [ INFO ] [ INFO ] --- spring - boot - maven - plugin : 2.4.3 : run ( default - cli ) @ CrunchifySpringBootHelloWorld --- [ INFO ] Attaching agents : [ ] . ____ _ __ _ _ / \ \ / ___ '_ __ _ _(_)_ __ __ _ \ \ \ \ ( ( )\___ | ' _ | '_| | ' _ \ / _ ` | \ \ \ \ \ \ / ___ ) | | _ ) | | | | | | | ( _ | | ) ) ) ) ' |____| .__|_| |_|_| |_\__, | / / / / =========|_|==============|___/=/_/_/_/ :: Spring Boot :: (v2.4.3) 2021-02-21 21:05:10.614 INFO 36654 --- [ main] c.c.s.CrunchifyHelloWorldSpringBoot : Starting CrunchifyHelloWorldSpringBoot using Java 15 on LM-AUN-11021095 with PID 36654 (/Users/app/crunchify/eclipse-workspace/CrunchifySpringBootHelloWorld/target/classes started by arpshah in /Users/app/crunchify/eclipse-workspace/CrunchifySpringBootHelloWorld) 2021-02-21 21:05:10.616 INFO 36654 --- [ main] c.c.s.CrunchifyHelloWorldSpringBoot : No active profile set, falling back to default profiles: default 2021-02-21 21:05:11.008 INFO 36654 --- [ main] o.s.b.w.embedded.tomcat.TomcatWebServer : Tomcat initialized with port(s): 8080 (http) 2021-02-21 21:05:11.014 INFO 36654 --- [ main] o.apache.catalina.core.StandardService : Starting service [Tomcat] 2021-02-21 21:05:11.015 INFO 36654 --- [ main] org.apache.catalina.core.StandardEngine : Starting Servlet engine: [Apache Tomcat/9.0.43] 2021-02-21 21:05:11.054 INFO 36654 --- [ main] o.a.c.c.C.[Tomcat].[localhost].[/] : Initializing Spring embedded WebApplicationContext 2021-02-21 21:05:11.054 INFO 36654 --- [ main] w.s.c.ServletWebServerApplicationContext : Root WebApplicationContext: initialization completed in 417 ms 2021-02-21 21:05:11.147 INFO 36654 --- [ main] o.s.s.concurrent.ThreadPoolTaskExecutor : Initializing ExecutorService ' applicationTaskExecutor ' 2021-02-21 21:05:11.241 INFO 36654 --- [ main] o.s.b.w.embedded.tomcat.TomcatWebServer : Tomcat started on port(s): 8080 (http) with context path ' ' 2021-02-21 21:05:11.247 INFO 36654 --- [ main] c.c.s.CrunchifyHelloWorldSpringBoot : Started CrunchifyHelloWorldSpringBoot in 0.843 seconds (JVM running for 1.04) 2021-02-21 21:07:04.240 INFO 36654 --- [nio-8080-exec-1] o.a.c.c.C.[Tomcat].[localhost].[/] : Initializing Spring DispatcherServlet ' dispatcherServlet ' 2021-02-21 21:07:04.240 INFO 36654 --- [nio-8080-exec-1] o.s.web.servlet.DispatcherServlet : Initializing Servlet ' dispatcherServlet ' 2021 - 02 - 21 21 : 07 : 04.241 INFO 36654 --- [ nio - 8080 - exec - 1 ] o . s . web . servlet . DispatcherServlet : Completed initialization in 1 ms |
ขั้นตอนที่-8
ตอนนี้ไปที่ URL http://localhost:8080 และ http://locahost:8080/crunchify เพื่อดูผลลัพธ์แบบสด

หวังว่าบทช่วยสอนนี้จะช่วยให้คุณเริ่มต้นใช้งานตัวอย่าง Java Spring Boot แจ้งให้เราทราบหากคุณพบปัญหาในการใช้งานแอปพลิเคชัน Spring Boot แรกของคุณ
ในอีกไม่กี่สัปดาห์ข้างหน้า เราจะเพิ่ม Spring Boot Example ที่ซับซ้อนขึ้นเรื่อยๆ สำหรับคุณ หากคุณมีข้อกำหนดพิเศษใด ๆ โปรดแจ้งให้เราทราบในส่วนความคิดเห็น
อะไรต่อไป?
- สร้าง
Spring Boot applicationง่ายสุด ๆ ใน IntelliJ IDEA - สร้าง Web
Rest Serviceอย่างง่ายใน IntelliJ IDEA