
برنامج Java Spring Boot التعليمي - مثال حي لتطبيق الويب Hello-World مع خطوات مفصلة
نشرت: 2018-04-05
لماذا سبرينج بوت؟ لأي غرض يستخدم حذاء الربيع؟
هل تريد إنشاء خدمات صغيرة تستند إلى جافا لتطبيقك؟ حسنًا ، Spring boot هو حل مفتوح المصدر قائم على جافا لنفسه
يتم استخدامه لبناء تطبيق قائم على الربيع جاهز للإنتاج تم إنشاؤه بواسطة فريق Pivotal.
فكرة Spring Boot بسيطة جدا. إنه يوفر مجموعة مكونة مسبقًا من الوظائف والإطار ، يمكنك نشر أول تطبيق ويب يستند إلى Spring Boot مع few lines of code . فقط بأمر واحد بسيط يمكنك تشغيل واختبار تطبيق الويب الخاص بك.
مجموعة من جميع التكوينات المخصصة ، وإعدادات قاعدة البيانات ، ووحدات الطرف الثالث تأتي out-0f-the-box في Spring Boot.
كما لدينا البرنامج التعليمي الشهير Hello World Spring MVC ، سنبدأ أيضًا البرنامج التعليمي Hello World Spring Boot بطريقة مماثلة.
الشروع في العمل مع Spring Boot:
- هذا هو البرنامج التعليمي لفصل الربيع للمبتدئين
- برنامج Hello World Spring Boot التعليمي
- أبسط مثال على حذاء الربيع
- الربيع التمهيد خضرمة البرنامج التعليمي
- مثال على تطبيق ويب التمهيد الربيع
هيا بنا نبدأ.
الخطوة 1
من أجل البدء في Spring Boot ، ستحتاج إلى الإعدادات أدناه.
- JDK 8. تأكد من
download and installأحدث إصدار من JDK. - كسوف IDE. تأكد من تنزيل
Eclipse IDE for Java EE Developers. رابط التحميل الرسمي. - حذاء الربيع 2.4.3.
الخطوة 2
بمجرد تثبيت Eclipse على الكمبيوتر المحمول / سطح المكتب ، انتقل إلى Eclipse. سنقوم بإنشاء مشروع ويب ديناميكي جديد.
- انقر فوق ملف
- جديد
-
Dynamic Web Project - في الشاشة الأولى ، أدخل اسم المشروع:
CrunchifySpringBootHelloWorld
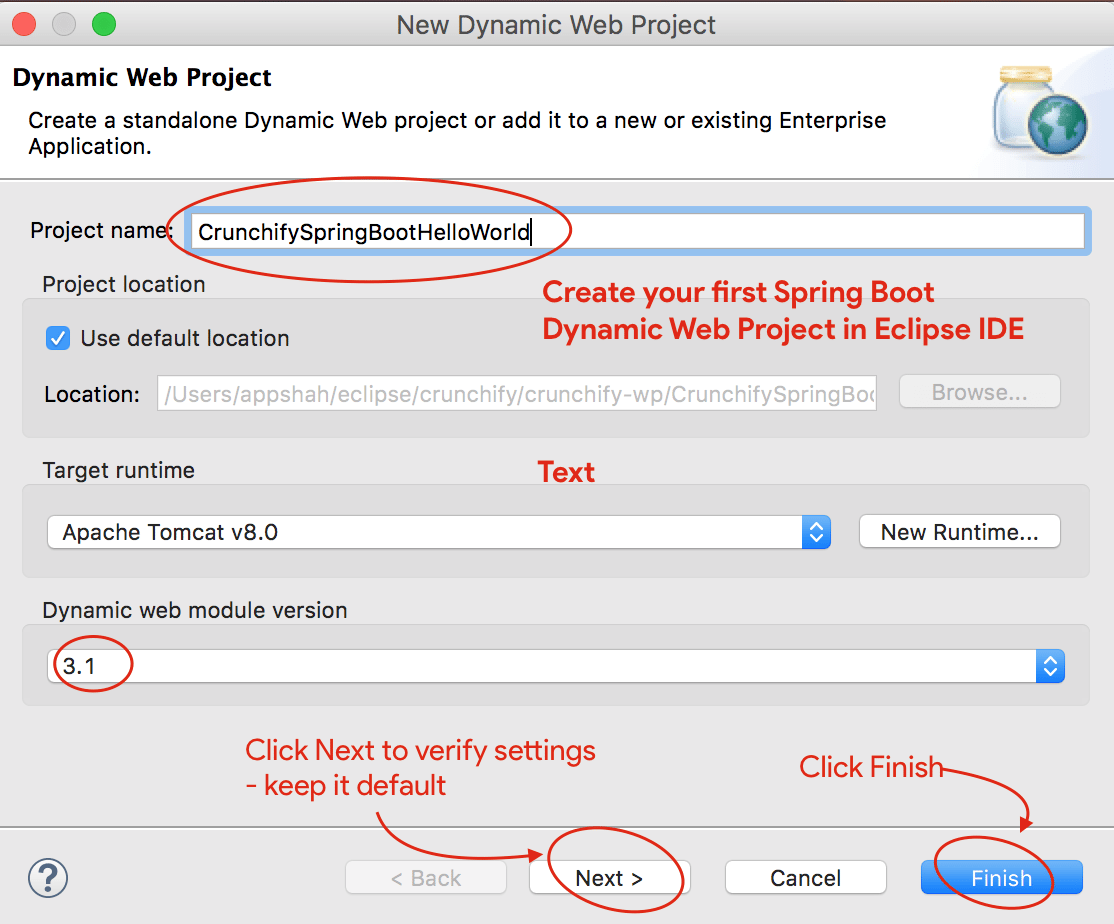
- تأكد من أن لديك إصدار وحدة الويب الديناميكي إلى
3.1ووقت التشغيل المستهدف Apache Tomcat 8. - إذا لم يكن لديك بالفعل إعداد Apache Tomcat ، فاتبع هذه الخطوات لإعداد Tomcat في Eclipse.
- انقر فوق التالي مرتين وتأكد من أن الإعدادات هي نفسها. لقطة شاشة 1 ، لقطة شاشة 2.
- أو انقر فوق "إنهاء" لإنشاء مشروع ويب ديناميكي.
الخطوه 3
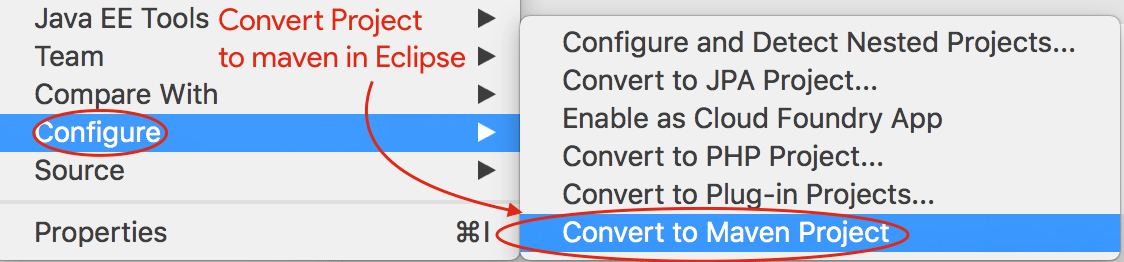
الخطوة التالية هي تحويل مشروع Java إلى مشروع Maven.
- انقر بزر الماوس الأيمن على المشروع
- انقر فوق تكوين
- انقر فوق
Convert to Maven Project - احتفظ بالتكوين الافتراضي
- انقر فوق إنهاء
الخطوة 4
الخطوة أعلاه ستنشئ ملف pom.xml لمشروعك. الخطوة التالية هي تحديث ملف pom.xml بالمحتوى أدناه وإضافة Spring Boot Dependency .
|
1 2 3 4 5 6 7 8 9 10 11 12 13 14 15 16 17 18 19 20 21 22 23 24 25 26 27 28 29 30 31 32 33 34 35 36 37 38 39 40 41 42 43 44 45 46 47 48 49 50 |
< project xmlns = "http://maven.apache.org/POM/4.0.0" xmlns : xsi = "http://www.w3.org/2001/XMLSchema-instance" xsi : schemaLocation = "http://maven.apache.org/POM/4.0.0 http://maven.apache.org/xsd/maven-4.0.0.xsd" > < modelVersion > 4.0.0 < / modelVersion > < groupId > CrunchifySpringBootHelloWorld < / groupId > < artifactId > CrunchifySpringBootHelloWorld < / artifactId > < version > 1.0.0 - RELEASE < / version > < packaging > war < / packaging > < parent > < groupId > org . springframework . boot < / groupId > < artifactId > spring - boot - starter - parent < / artifactId > < version > 2.4.3 < / version > < / parent > < dependencies > < dependency > < groupId > org . springframework . boot < / groupId > < artifactId > spring - boot - starter - web < / artifactId > < / dependency > < / dependencies > < properties > < java . version > 1.8 < / java . version > < / properties > < build > < sourceDirectory > src < / sourceDirectory > < plugins > < plugin > < artifactId > maven - compiler - plugin < / artifactId > < configuration > < source > 1.8 < / source > < target > 1.8 < / target > < / configuration > < / plugin > < plugin > < groupId > org . springframework . boot < / groupId > < artifactId > spring - boot - maven - plugin < / artifactId > < / plugin > < plugin > < artifactId > maven - war - plugin < / artifactId > < configuration > < warSourceDirectory > WebContent < / warSourceDirectory > < / configuration > < / plugin > < / plugins > < / build > < / project > |
كما ترى أعلاه ، فإننا نضيف org.springframework.boot 2.4.3 جرة في مشروعنا. بالإضافة إلى أننا نضيف قطعتين اثنتين أخريين:
- الربيع التمهيد مخضرم البرنامج المساعد
- الربيع التمهيد بداية الويب
الخطوة 5
لنعمل الآن على إنشاء ملف Hello World Application بسيط يمكننا الوصول إليه باستخدام عناوين URL
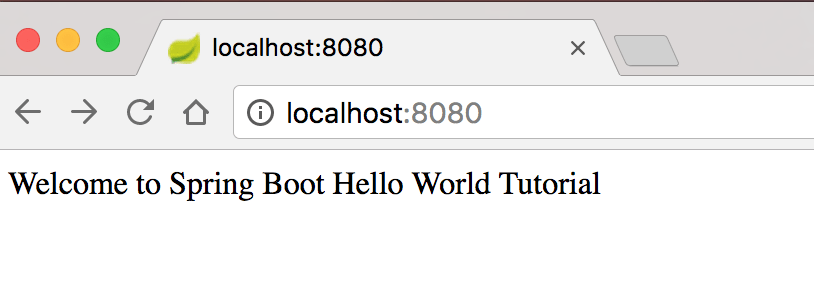
- http: // locahost: 8080
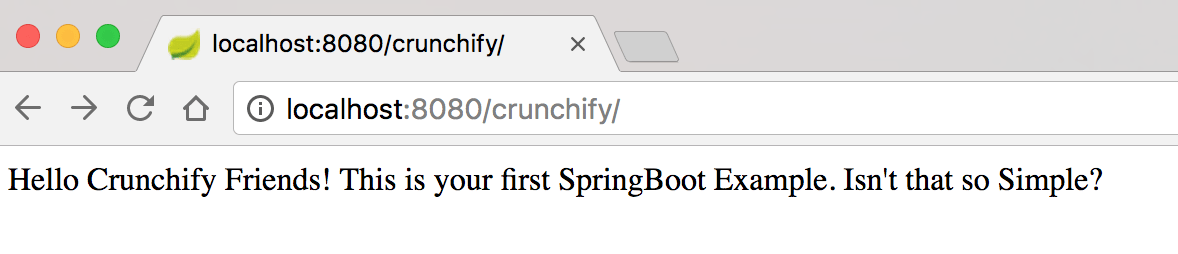
- http: // locahost: 8080 / crunchify
قم بإنشاء ملف CrunchifyHelloWorldSpringBoot.java مع محتويات الكود أدناه:
|
1 2 3 4 5 6 7 8 9 10 11 12 13 14 15 16 17 18 19 20 21 22 23 24 25 26 27 28 29 30 31 32 33 34 35 36 37 38 39 |
package crunchify . com . springboot ; import org . springframework . boot . SpringApplication ; import org . springframework . boot . autoconfigure . EnableAutoConfiguration ; import org . springframework . web . bind . annotation . RequestMapping ; import org . springframework . web . bind . annotation . RestController ; /** * @author Crunchify.com - Simple Spring Boot Example * */ // @RestController is a convenience annotation that is itself annotated with @Controller and @ResponseBody @ RestController // @EnableAutoConfiguration enables auto-configuration of the Spring Application Context, attempting to guess // and configure beans that you are likely to need. @ EnableAutoConfiguration public class CrunchifyHelloWorldSpringBoot { // @RequestMapping annotation is used for mapping web requests onto specific handler classes @ RequestMapping ( "/" ) String basicURL ( ) { return "Welcome to Spring Boot Hello World Tutorial" ; } @ RequestMapping ( "crunchify" ) String crunchifyURL ( ) { return "Hello Crunchify Friends! This is your first SpringBoot Example. Isn't that so Simple?" ; } public static void main ( String [ ] args ) throws Exception { // SpringApplication classes that can be used to bootstrap and launch a Spring application from a Java // main method. By default class will perform the following steps to bootstrap your application. SpringApplication . run ( CrunchifyHelloWorldSpringBoot . class , args ) ; } } |
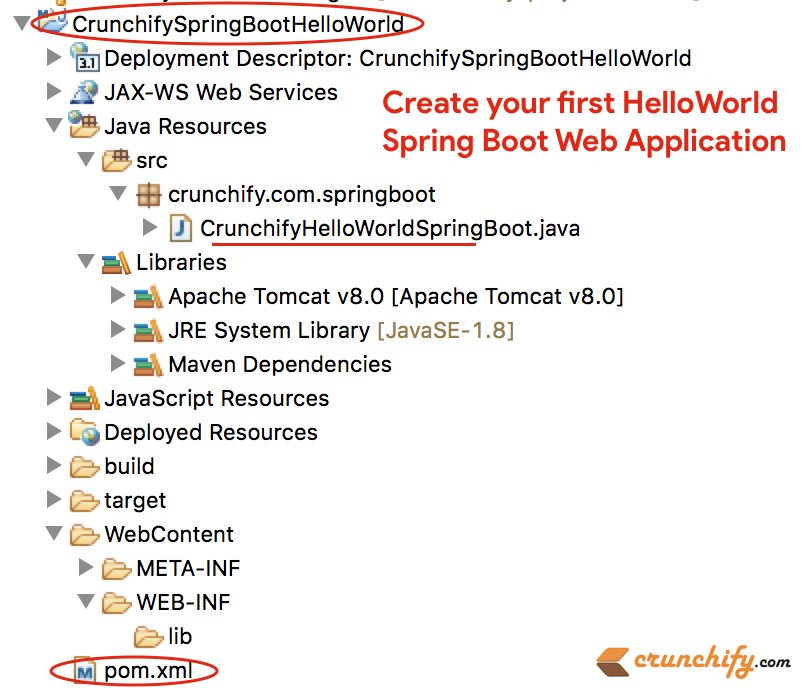
بمجرد إضافة ملف جافا أعلاه ، يجب أن تبدو بنية مشروع Eclipse كما يلي:
الخطوة 6
الآن باستخدام spring-boot:run maven ، يمكنك بدء Spring Boot Application .
- انقر بزر الماوس الأيمن على المشروع
- انقر فوق
Run As -> Maven build...
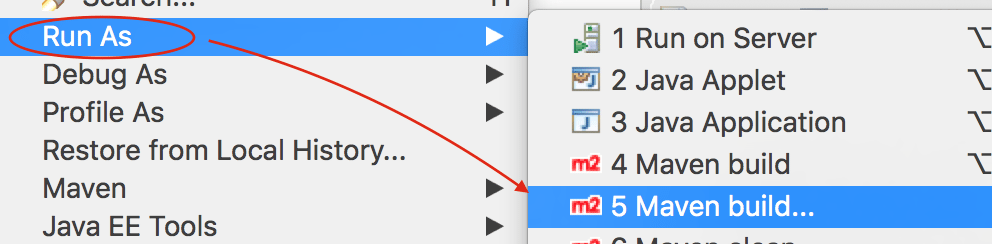
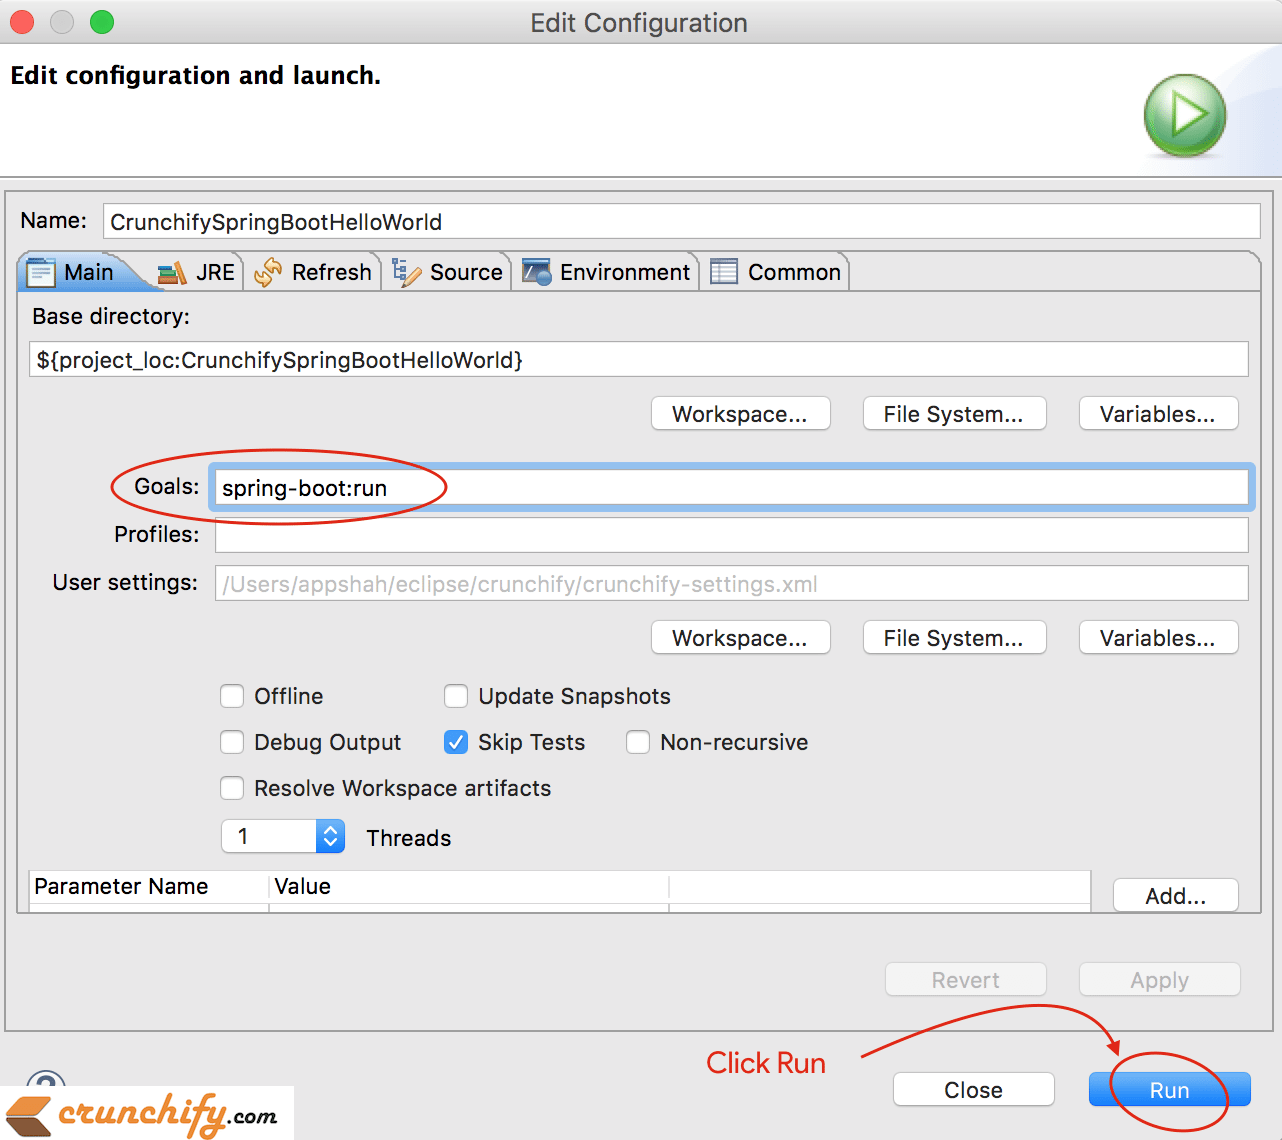
يحتفظ Windows التالي بالتكوين الافتراضي ويوفر goal as spring-boot:run كما ترى في الصورة أدناه.
الخطوة 7
تأكد من عدم وجود أي خطأ في وحدة تحكم Eclipse. إليك إخراج وحدة التحكم من Eclipse IDE.
|
1 2 3 4 5 6 7 8 9 10 11 12 13 14 15 16 17 18 19 20 21 22 23 24 25 26 27 28 29 30 31 32 33 34 35 36 37 38 39 40 41 42 43 44 45 46 47 48 49 50 51 52 53 54 55 56 57 58 59 60 61 |
SLF4J : Class path contains multiple SLF4J bindings . SLF4J : Found binding in [ jar : file : / Applications / Eclipse . app / Contents / Eclipse / plugins / org . eclipse . m2e . maven . runtime . slf4j . simple_1 . 16.0.20200610 - 1735 / jars / slf4j - simple - 1.7.5.jar ! / org / slf4j / impl / StaticLoggerBinder . class ] SLF4J : Found binding in [ file : / Applications / Eclipse . app / Contents / Eclipse / configuration / org . eclipse . osgi / 5 / 0 / . cp / org / slf4j / impl / StaticLoggerBinder . class ] SLF4J : See http : //www.slf4j.org/codes.html#multiple_bindings for an explanation. SLF4J : Actual binding is of type [ org . slf4j . impl . SimpleLoggerFactory ] SLF4J : Class path contains multiple SLF4J bindings . SLF4J : Found binding in [ jar : file : / Applications / Eclipse . app / Contents / Eclipse / plugins / org . eclipse . m2e . maven . runtime . slf4j . simple_1 . 16.0.20200610 - 1735 / jars / slf4j - simple - 1.7.5.jar ! / org / slf4j / impl / StaticLoggerBinder . class ] SLF4J : Found binding in [ file : / Applications / Eclipse . app / Contents / Eclipse / configuration / org . eclipse . osgi / 5 / 0 / . cp / org / slf4j / impl / StaticLoggerBinder . class ] SLF4J : See http : //www.slf4j.org/codes.html#multiple_bindings for an explanation. SLF4J : Actual binding is of type [ org . slf4j . impl . SimpleLoggerFactory ] [ INFO ] Scanning for projects . . . [ INFO ] [ INFO ] ---- < CrunchifySpringBootHelloWorld : CrunchifySpringBootHelloWorld > ----- [ INFO ] Building CrunchifySpringBootHelloWorld 1.0.0 - RELEASE [ INFO ] -------------------------------- [ war ] --------------------------------- [ INFO ] [ INFO ] > > > spring - boot - maven - plugin : 2.4.3 : run ( default - cli ) > test - compile @ CrunchifySpringBootHelloWorld > > > [ INFO ] [ INFO ] --- maven - resources - plugin : 3.2.0 : resources ( default - resources ) @ CrunchifySpringBootHelloWorld --- [ INFO ] Using 'UTF-8' encoding to copy filtered resources . [ INFO ] Using 'UTF-8' encoding to copy filtered properties files . [ INFO ] skip non existing resourceDirectory / Users / app / crunchify / eclipse - workspace / CrunchifySpringBootHelloWorld / src / main / resources [ INFO ] skip non existing resourceDirectory / Users / app / crunchify / eclipse - workspace / CrunchifySpringBootHelloWorld / src / main / resources [ INFO ] [ INFO ] --- maven - compiler - plugin : 3.8.1 : compile ( default - compile ) @ CrunchifySpringBootHelloWorld --- [ INFO ] Nothing to compile - all classes are up to date [ INFO ] [ INFO ] --- maven - resources - plugin : 3.2.0 : testResources ( default - testResources ) @ CrunchifySpringBootHelloWorld --- [ INFO ] Not copying test resources [ INFO ] [ INFO ] --- maven - compiler - plugin : 3.8.1 : testCompile ( default - testCompile ) @ CrunchifySpringBootHelloWorld --- [ INFO ] Not compiling test sources [ INFO ] [ INFO ] < < < spring - boot - maven - plugin : 2.4.3 : run ( default - cli ) < test - compile @ CrunchifySpringBootHelloWorld < < < [ INFO ] [ INFO ] [ INFO ] --- spring - boot - maven - plugin : 2.4.3 : run ( default - cli ) @ CrunchifySpringBootHelloWorld --- [ INFO ] Attaching agents : [ ] . ____ _ __ _ _ / \ \ / ___ '_ __ _ _(_)_ __ __ _ \ \ \ \ ( ( )\___ | ' _ | '_| | ' _ \ / _ ` | \ \ \ \ \ \ / ___ ) | | _ ) | | | | | | | ( _ | | ) ) ) ) ' |____| .__|_| |_|_| |_\__, | / / / / =========|_|==============|___/=/_/_/_/ :: Spring Boot :: (v2.4.3) 2021-02-21 21:05:10.614 INFO 36654 --- [ main] c.c.s.CrunchifyHelloWorldSpringBoot : Starting CrunchifyHelloWorldSpringBoot using Java 15 on LM-AUN-11021095 with PID 36654 (/Users/app/crunchify/eclipse-workspace/CrunchifySpringBootHelloWorld/target/classes started by arpshah in /Users/app/crunchify/eclipse-workspace/CrunchifySpringBootHelloWorld) 2021-02-21 21:05:10.616 INFO 36654 --- [ main] c.c.s.CrunchifyHelloWorldSpringBoot : No active profile set, falling back to default profiles: default 2021-02-21 21:05:11.008 INFO 36654 --- [ main] o.s.b.w.embedded.tomcat.TomcatWebServer : Tomcat initialized with port(s): 8080 (http) 2021-02-21 21:05:11.014 INFO 36654 --- [ main] o.apache.catalina.core.StandardService : Starting service [Tomcat] 2021-02-21 21:05:11.015 INFO 36654 --- [ main] org.apache.catalina.core.StandardEngine : Starting Servlet engine: [Apache Tomcat/9.0.43] 2021-02-21 21:05:11.054 INFO 36654 --- [ main] o.a.c.c.C.[Tomcat].[localhost].[/] : Initializing Spring embedded WebApplicationContext 2021-02-21 21:05:11.054 INFO 36654 --- [ main] w.s.c.ServletWebServerApplicationContext : Root WebApplicationContext: initialization completed in 417 ms 2021-02-21 21:05:11.147 INFO 36654 --- [ main] o.s.s.concurrent.ThreadPoolTaskExecutor : Initializing ExecutorService ' applicationTaskExecutor ' 2021-02-21 21:05:11.241 INFO 36654 --- [ main] o.s.b.w.embedded.tomcat.TomcatWebServer : Tomcat started on port(s): 8080 (http) with context path ' ' 2021-02-21 21:05:11.247 INFO 36654 --- [ main] c.c.s.CrunchifyHelloWorldSpringBoot : Started CrunchifyHelloWorldSpringBoot in 0.843 seconds (JVM running for 1.04) 2021-02-21 21:07:04.240 INFO 36654 --- [nio-8080-exec-1] o.a.c.c.C.[Tomcat].[localhost].[/] : Initializing Spring DispatcherServlet ' dispatcherServlet ' 2021-02-21 21:07:04.240 INFO 36654 --- [nio-8080-exec-1] o.s.web.servlet.DispatcherServlet : Initializing Servlet ' dispatcherServlet ' 2021 - 02 - 21 21 : 07 : 04.241 INFO 36654 --- [ nio - 8080 - exec - 1 ] o . s . web . servlet . DispatcherServlet : Completed initialization in 1 ms |
الخطوة 8
قم الآن بزيارة URLs http://localhost:8080 و http://locahost:8080/crunchify لمشاهدة النتيجة الحية.

آمل أن يساعدك هذا البرنامج التعليمي في البدء باستخدام مثال Java Spring Boot. يُرجى إعلامي إذا رأيت أي مشكلة في تشغيل تطبيق Spring Boot الأول.
في الأسابيع القادمة ، سنضيف المزيد والمزيد من أمثلة Spring Boot المعقدة لك. إذا كان لديك أي متطلبات خاصة ، فأخبرنا بذلك في قسم التعليقات.
ماذا بعد؟
- قم بإنشاء
Spring Boot applicationفائق البساطة في IntelliJ IDEA - قم بإنشاء خدمة Web
Rest Serviceبسيطة في IntelliJ IDEA