
Java Spring Boot Tutorial – Live-Hello-World-Webanwendungsbeispiel mit detaillierten Schritten
Veröffentlicht: 2018-04-05
Warum Springboot? Wofür wird Spring Boot verwendet?
Möchten Sie Java-basierte Microservices für Ihre Anwendung erstellen? Nun, Spring Boot ist eine Java-basierte Open-Source-Lösung für dasselbe
Es wird verwendet, um eine produktionsreife Spring-basierte Anwendung zu erstellen, die vom Pivotal-Team erstellt wurde.
Die Spring Boot-Idee ist sehr einfach. Es bietet vorkonfigurierte Funktionen und Frameworks, mit denen Sie Ihre erste Spring Boot-basierte Webanwendung mit nur few lines of code veröffentlichen können. Mit nur einem einzigen Befehl können Sie Ihre Webanwendung starten und testen.
Ein Satz aller benutzerdefinierten Konfigurationen, Datenbank out-0f-the-box .
So wie wir ein sehr beliebtes Hello World Spring MVC-Tutorial haben, werden wir auch unser Hello World Spring Boot Tutorial auf ähnliche Weise starten.
Erste Schritte mit Spring Boot:
- Dies ist Ihr Spring Boot Tutorial für Anfänger
- Hallo Welt Spring Boot Tutorial
- Einfachstes Spring-Boot-Beispiel
- Spring Boot Maven Tutorial
- Beispiel für eine Spring Boot-Webanwendung
Lass uns anfangen.
Schritt 1
Um mit Spring Boot zu beginnen, benötigen Sie die folgenden Setups.
- JDK 8. Stellen Sie sicher, dass Sie das neueste JDK
download and install. - Eclipse-IDE. Stellen Sie sicher, dass Sie
Eclipse IDE for Java EE Developersherunterladen. offizieller Downloadlink. - Springboot 2.4.3.
Schritt 2
Sobald Sie Eclipse auf Ihrem Laptop / Desktop installiert haben, gehen Sie zu Eclipse. Wir werden ein neues dynamisches Webprojekt erstellen.
- Klicken Sie auf Datei
- Neu
-
Dynamic Web Project - Geben Sie auf dem ersten Bildschirm den Projektnamen an:
CrunchifySpringBootHelloWorld
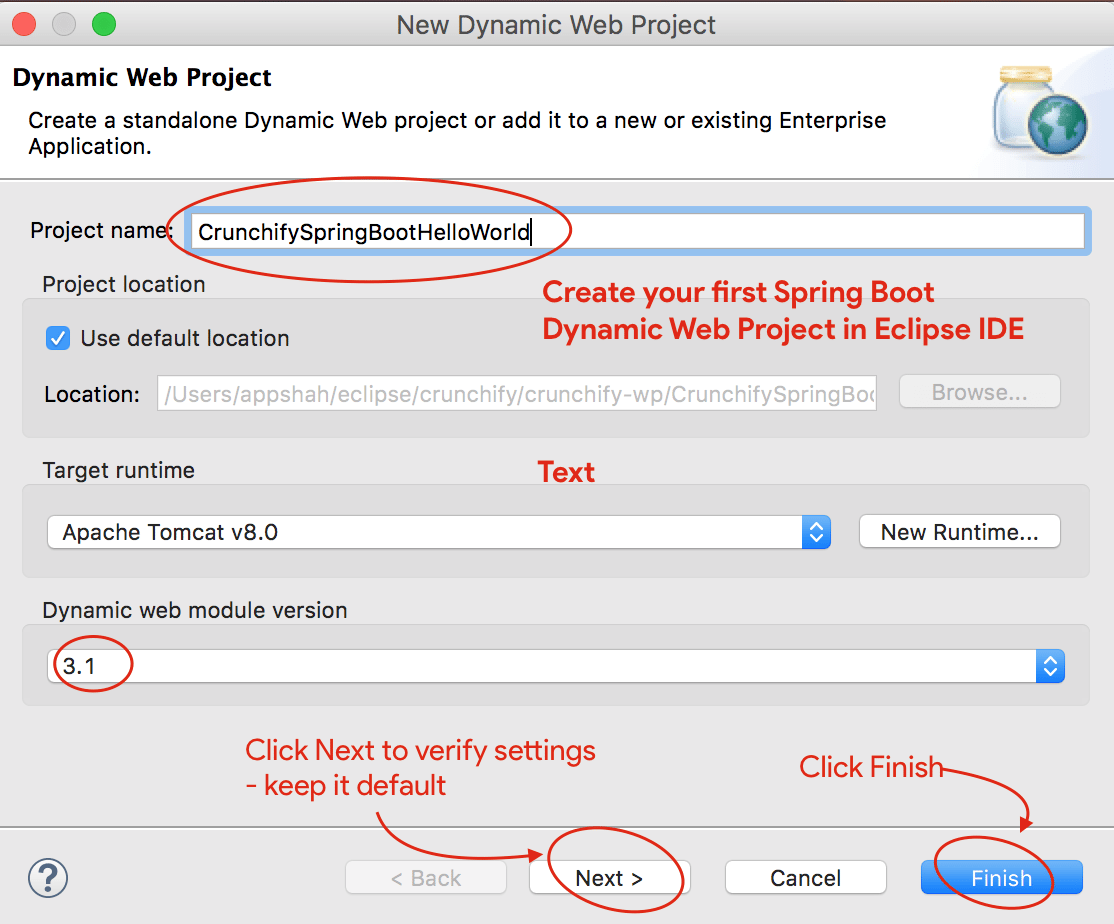
- Stellen Sie sicher, dass Sie über die Version des dynamischen Webmoduls
3.1und die Target-Laufzeit Apache Tomcat 8 verfügen. - Wenn Sie Apache Tomcat noch nicht eingerichtet haben, befolgen Sie diese Schritte, um Tomcat in Eclipse einzurichten.
- Klicken Sie zweimal auf Weiter und stellen Sie sicher, dass die Einstellungen mit diesen übereinstimmen. Screenshot1, Screenshot2.
- ODER klicken Sie auf Fertig stellen, um ein dynamisches Webprojekt zu erstellen.
Schritt 3
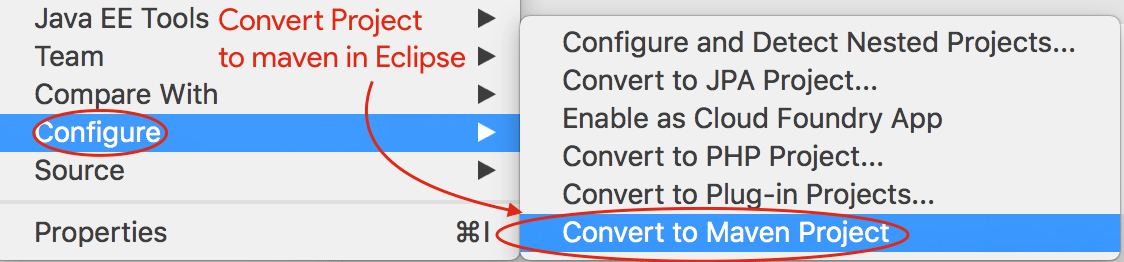
Der nächste Schritt besteht darin, das Java-Projekt in das Maven-Projekt zu konvertieren.
- Rechtsklick auf Projekt
- Klicken Sie auf Konfigurieren
- Klicken Sie auf
Convert to Maven Project - Behalten Sie die Standardkonfiguration bei
- Klicken Sie auf Fertig stellen
Schritt 4
Der obige Schritt erstellt eine pom.xml-Datei für Ihr Projekt. Der nächste Schritt besteht darin, die Datei pom.xml mit dem folgenden Inhalt zu aktualisieren und Spring Boot Dependency hinzuzufügen.
|
1 2 3 4 5 6 7 8 9 10 11 12 13 14 15 16 17 18 19 20 21 22 23 24 25 26 27 28 29 30 31 32 33 34 35 36 37 38 39 40 41 42 43 44 45 46 47 48 49 50 |
< project xmlns = "http://maven.apache.org/POM/4.0.0" xmlns : xsi = "http://www.w3.org/2001/XMLSchema-instance" xsi : schemaLocation = "http://maven.apache.org/POM/4.0.0 http://maven.apache.org/xsd/maven-4.0.0.xsd" > < modelVersion > 4.0.0 < / modelVersion > < groupId > CrunchifySpringBootHelloWorld < / groupId > < artifactId > CrunchifySpringBootHelloWorld < / artifactId > < version > 1.0.0 - RELEASE < / version > < packaging > war < / packaging > < parent > < groupId > org . springframework . boot < / groupId > < artifactId > spring - boot - starter - parent < / artifactId > < version > 2.4.3 < / version > < / parent > < dependencies > < dependency > < groupId > org . springframework . boot < / groupId > < artifactId > spring - boot - starter - web < / artifactId > < / dependency > < / dependencies > < properties > < java . version > 1.8 < / java . version > < / properties > < build > < sourceDirectory > src < / sourceDirectory > < plugins > < plugin > < artifactId > maven - compiler - plugin < / artifactId > < configuration > < source > 1.8 < / source > < target > 1.8 < / target > < / configuration > < / plugin > < plugin > < groupId > org . springframework . boot < / groupId > < artifactId > spring - boot - maven - plugin < / artifactId > < / plugin > < plugin > < artifactId > maven - war - plugin < / artifactId > < configuration > < warSourceDirectory > WebContent < / warSourceDirectory > < / configuration > < / plugin > < / plugins > < / build > < / project > |
Wie Sie oben sehen, fügen wir org.springframework.boot 2.4.3 jar zu unserem Projekt hinzu. Zusätzlich fügen wir zwei weitere Artefakte hinzu:
- spring-boot-maven-plugin
- spring-boot-starter-web
Schritt-5
Lassen Sie uns nun daran arbeiten, eine einfache Hello World Application zu erstellen, auf die wir über URLs zugreifen können
- http://locahost:8080
- http://locahost:8080/crunchify
Erstellen Sie die Datei CrunchifyHelloWorldSpringBoot.java mit dem folgenden Codeinhalt:
|
1 2 3 4 5 6 7 8 9 10 11 12 13 14 15 16 17 18 19 20 21 22 23 24 25 26 27 28 29 30 31 32 33 34 35 36 37 38 39 |
package crunchify . com . springboot ; import org . springframework . boot . SpringApplication ; import org . springframework . boot . autoconfigure . EnableAutoConfiguration ; import org . springframework . web . bind . annotation . RequestMapping ; import org . springframework . web . bind . annotation . RestController ; /** * @author Crunchify.com - Simple Spring Boot Example * */ // @RestController is a convenience annotation that is itself annotated with @Controller and @ResponseBody @ RestController // @EnableAutoConfiguration enables auto-configuration of the Spring Application Context, attempting to guess // and configure beans that you are likely to need. @ EnableAutoConfiguration public class CrunchifyHelloWorldSpringBoot { // @RequestMapping annotation is used for mapping web requests onto specific handler classes @ RequestMapping ( "/" ) String basicURL ( ) { return "Welcome to Spring Boot Hello World Tutorial" ; } @ RequestMapping ( "crunchify" ) String crunchifyURL ( ) { return "Hello Crunchify Friends! This is your first SpringBoot Example. Isn't that so Simple?" ; } public static void main ( String [ ] args ) throws Exception { // SpringApplication classes that can be used to bootstrap and launch a Spring application from a Java // main method. By default class will perform the following steps to bootstrap your application. SpringApplication . run ( CrunchifyHelloWorldSpringBoot . class , args ) ; } } |
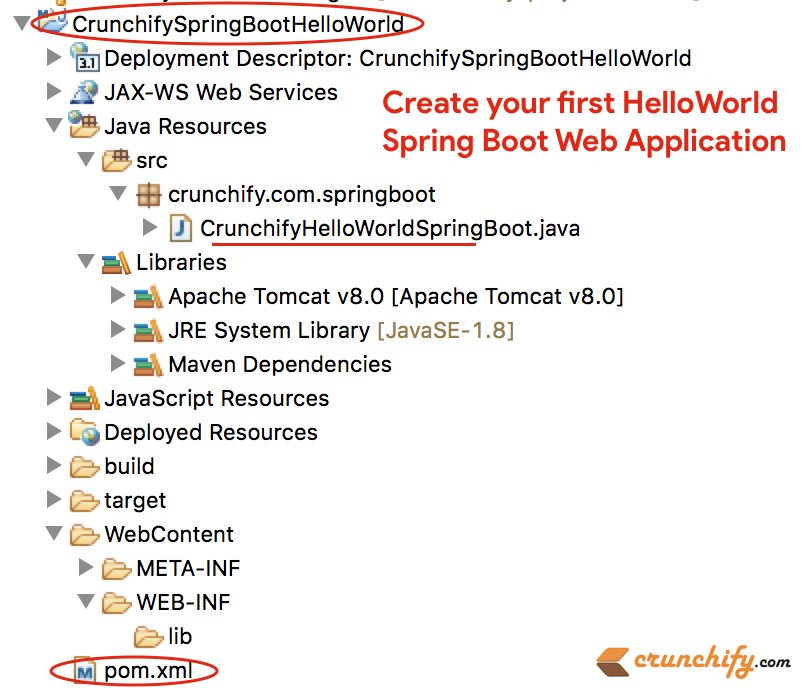
Sobald Sie die obige Java-Datei hinzugefügt haben, sollte Ihre Eclipse-Projektstruktur wie folgt aussehen:
Schritt-6
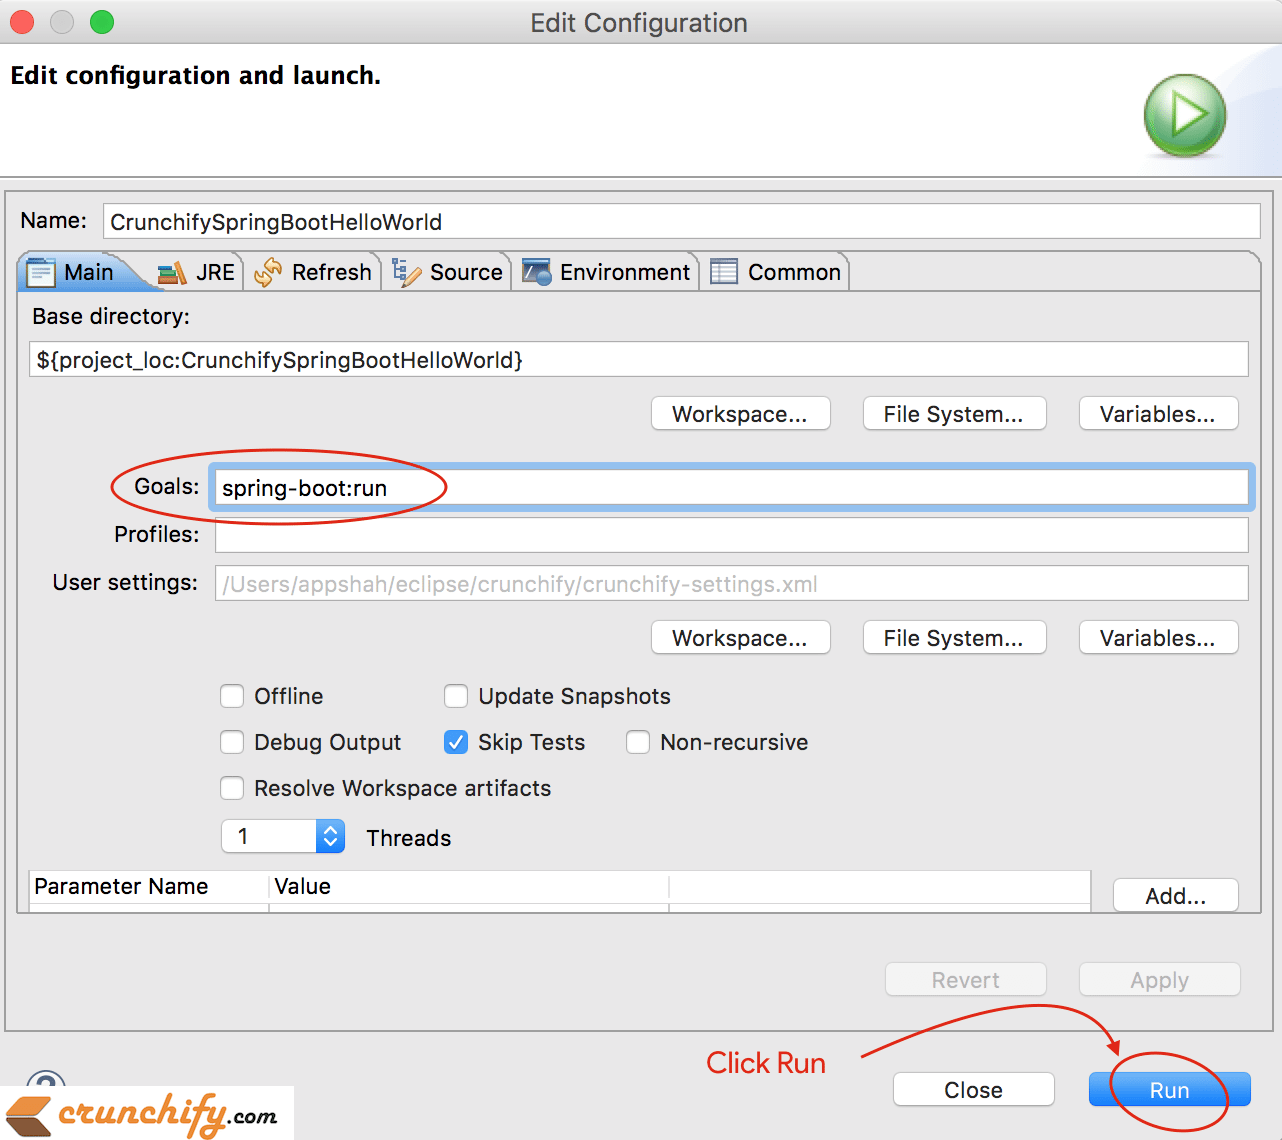
Mit dem einfachen Befehl spring-boot:run maven können Sie jetzt Ihre Spring Boot Application starten.
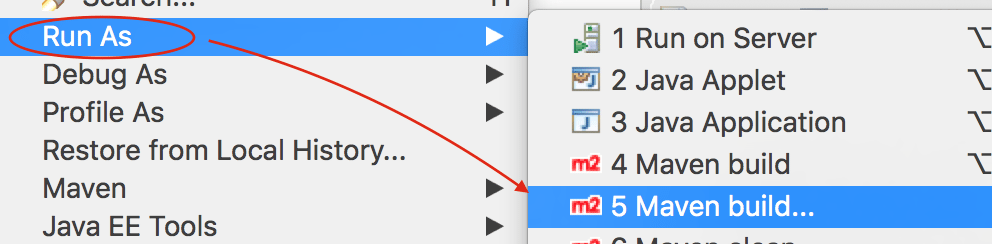
- Rechtsklick auf Projekt
- Klicken Sie auf
Run As -> Maven build...
Als nächstes behält Windows die Standardkonfiguration bei und stellt das goal as spring-boot:run bereit, wie Sie im folgenden Bild sehen.
Schritt-7
Stellen Sie sicher, dass Sie keinen Fehler in der Eclipse-Konsole haben. Hier ist eine Konsolenausgabe von Eclipse IDE.
|
1 2 3 4 5 6 7 8 9 10 11 12 13 14 15 16 17 18 19 20 21 22 23 24 25 26 27 28 29 30 31 32 33 34 35 36 37 38 39 40 41 42 43 44 45 46 47 48 49 50 51 52 53 54 55 56 57 58 59 60 61 |
SLF4J : Class path contains multiple SLF4J bindings . SLF4J : Found binding in [ jar : file : / Applications / Eclipse . app / Contents / Eclipse / plugins / org . eclipse . m2e . maven . runtime . slf4j . simple_1 . 16.0.20200610 - 1735 / jars / slf4j - simple - 1.7.5.jar ! / org / slf4j / impl / StaticLoggerBinder . class ] SLF4J : Found binding in [ file : / Applications / Eclipse . app / Contents / Eclipse / configuration / org . eclipse . osgi / 5 / 0 / . cp / org / slf4j / impl / StaticLoggerBinder . class ] SLF4J : See http : //www.slf4j.org/codes.html#multiple_bindings for an explanation. SLF4J : Actual binding is of type [ org . slf4j . impl . SimpleLoggerFactory ] SLF4J : Class path contains multiple SLF4J bindings . SLF4J : Found binding in [ jar : file : / Applications / Eclipse . app / Contents / Eclipse / plugins / org . eclipse . m2e . maven . runtime . slf4j . simple_1 . 16.0.20200610 - 1735 / jars / slf4j - simple - 1.7.5.jar ! / org / slf4j / impl / StaticLoggerBinder . class ] SLF4J : Found binding in [ file : / Applications / Eclipse . app / Contents / Eclipse / configuration / org . eclipse . osgi / 5 / 0 / . cp / org / slf4j / impl / StaticLoggerBinder . class ] SLF4J : See http : //www.slf4j.org/codes.html#multiple_bindings for an explanation. SLF4J : Actual binding is of type [ org . slf4j . impl . SimpleLoggerFactory ] [ INFO ] Scanning for projects . . . [ INFO ] [ INFO ] ---- < CrunchifySpringBootHelloWorld : CrunchifySpringBootHelloWorld > ----- [ INFO ] Building CrunchifySpringBootHelloWorld 1.0.0 - RELEASE [ INFO ] -------------------------------- [ war ] --------------------------------- [ INFO ] [ INFO ] > > > spring - boot - maven - plugin : 2.4.3 : run ( default - cli ) > test - compile @ CrunchifySpringBootHelloWorld > > > [ INFO ] [ INFO ] --- maven - resources - plugin : 3.2.0 : resources ( default - resources ) @ CrunchifySpringBootHelloWorld --- [ INFO ] Using 'UTF-8' encoding to copy filtered resources . [ INFO ] Using 'UTF-8' encoding to copy filtered properties files . [ INFO ] skip non existing resourceDirectory / Users / app / crunchify / eclipse - workspace / CrunchifySpringBootHelloWorld / src / main / resources [ INFO ] skip non existing resourceDirectory / Users / app / crunchify / eclipse - workspace / CrunchifySpringBootHelloWorld / src / main / resources [ INFO ] [ INFO ] --- maven - compiler - plugin : 3.8.1 : compile ( default - compile ) @ CrunchifySpringBootHelloWorld --- [ INFO ] Nothing to compile - all classes are up to date [ INFO ] [ INFO ] --- maven - resources - plugin : 3.2.0 : testResources ( default - testResources ) @ CrunchifySpringBootHelloWorld --- [ INFO ] Not copying test resources [ INFO ] [ INFO ] --- maven - compiler - plugin : 3.8.1 : testCompile ( default - testCompile ) @ CrunchifySpringBootHelloWorld --- [ INFO ] Not compiling test sources [ INFO ] [ INFO ] < < < spring - boot - maven - plugin : 2.4.3 : run ( default - cli ) < test - compile @ CrunchifySpringBootHelloWorld < < < [ INFO ] [ INFO ] [ INFO ] --- spring - boot - maven - plugin : 2.4.3 : run ( default - cli ) @ CrunchifySpringBootHelloWorld --- [ INFO ] Attaching agents : [ ] . ____ _ __ _ _ / \ \ / ___ '_ __ _ _(_)_ __ __ _ \ \ \ \ ( ( )\___ | ' _ | '_| | ' _ \ / _ ` | \ \ \ \ \ \ / ___ ) | | _ ) | | | | | | | ( _ | | ) ) ) ) ' |____| .__|_| |_|_| |_\__, | / / / / =========|_|==============|___/=/_/_/_/ :: Spring Boot :: (v2.4.3) 2021-02-21 21:05:10.614 INFO 36654 --- [ main] c.c.s.CrunchifyHelloWorldSpringBoot : Starting CrunchifyHelloWorldSpringBoot using Java 15 on LM-AUN-11021095 with PID 36654 (/Users/app/crunchify/eclipse-workspace/CrunchifySpringBootHelloWorld/target/classes started by arpshah in /Users/app/crunchify/eclipse-workspace/CrunchifySpringBootHelloWorld) 2021-02-21 21:05:10.616 INFO 36654 --- [ main] c.c.s.CrunchifyHelloWorldSpringBoot : No active profile set, falling back to default profiles: default 2021-02-21 21:05:11.008 INFO 36654 --- [ main] o.s.b.w.embedded.tomcat.TomcatWebServer : Tomcat initialized with port(s): 8080 (http) 2021-02-21 21:05:11.014 INFO 36654 --- [ main] o.apache.catalina.core.StandardService : Starting service [Tomcat] 2021-02-21 21:05:11.015 INFO 36654 --- [ main] org.apache.catalina.core.StandardEngine : Starting Servlet engine: [Apache Tomcat/9.0.43] 2021-02-21 21:05:11.054 INFO 36654 --- [ main] o.a.c.c.C.[Tomcat].[localhost].[/] : Initializing Spring embedded WebApplicationContext 2021-02-21 21:05:11.054 INFO 36654 --- [ main] w.s.c.ServletWebServerApplicationContext : Root WebApplicationContext: initialization completed in 417 ms 2021-02-21 21:05:11.147 INFO 36654 --- [ main] o.s.s.concurrent.ThreadPoolTaskExecutor : Initializing ExecutorService ' applicationTaskExecutor ' 2021-02-21 21:05:11.241 INFO 36654 --- [ main] o.s.b.w.embedded.tomcat.TomcatWebServer : Tomcat started on port(s): 8080 (http) with context path ' ' 2021-02-21 21:05:11.247 INFO 36654 --- [ main] c.c.s.CrunchifyHelloWorldSpringBoot : Started CrunchifyHelloWorldSpringBoot in 0.843 seconds (JVM running for 1.04) 2021-02-21 21:07:04.240 INFO 36654 --- [nio-8080-exec-1] o.a.c.c.C.[Tomcat].[localhost].[/] : Initializing Spring DispatcherServlet ' dispatcherServlet ' 2021-02-21 21:07:04.240 INFO 36654 --- [nio-8080-exec-1] o.s.web.servlet.DispatcherServlet : Initializing Servlet ' dispatcherServlet ' 2021 - 02 - 21 21 : 07 : 04.241 INFO 36654 --- [ nio - 8080 - exec - 1 ] o . s . web . servlet . DispatcherServlet : Completed initialization in 1 ms |
Schritt-8
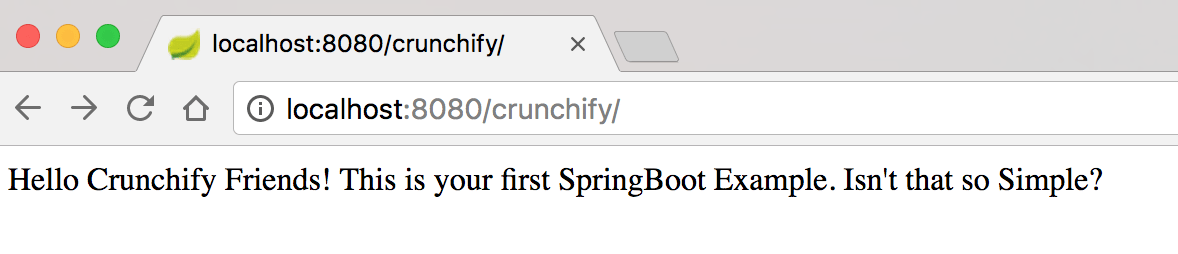
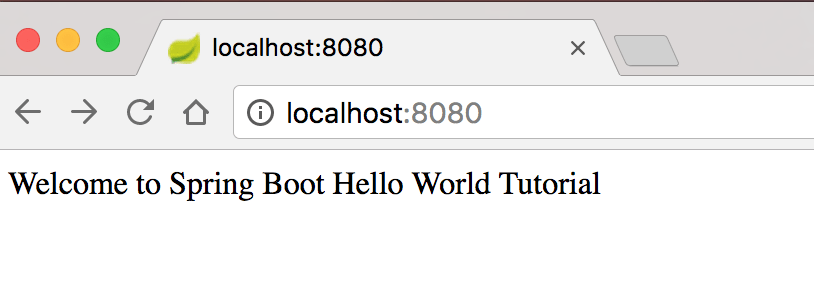
Besuchen Sie jetzt die URLs http://localhost:8080 und http://locahost:8080/crunchify , um das Live-Ergebnis zu sehen.

Ich hoffe, dieses Tutorial hilft Ihnen beim Einstieg in das Java Spring Boot-Beispiel. Lassen Sie mich wissen, wenn Sie Probleme beim Ausführen Ihrer ersten Spring Boot-Anwendung feststellen.
In den kommenden Wochen werden wir immer komplexere Spring Boot-Beispiele für Sie hinzufügen. Wenn Sie spezielle Anforderungen haben, teilen Sie uns dies im Kommentarbereich mit.
Was als nächstes?
- Erstellen Sie eine supereinfache
Spring Boot applicationin IntelliJ IDEA - Erstellen Sie einen einfachen Web
Rest Servicein IntelliJ IDEA