
Java Spring Boot Tutorial – Exemplo de aplicativo da Web ao vivo Hello-World com etapas detalhadas
Publicados: 2018-04-05
Por que Spring Boot? Para que serve o Spring Boot?
Quer criar micro serviços baseados em Java para sua aplicação? Bem, o Spring boot é uma solução baseada em java de código aberto para o mesmo
Ele é usado para construir aplicativos baseados em Spring prontos para produção criados pela equipe Pivotal.
A ideia do Spring Boot é muito simples. Ele fornece um conjunto pré-configurado de funcionalidade e estrutura com o qual você pode publicar seu primeiro aplicativo Web baseado em Spring Boot com apenas few lines of code . Apenas com um simples comando, você pode iniciar e testar seu aplicativo da web.
Conjunto de todas as configurações personalizadas, configurações de banco de dados, módulos out-0f-the-box no Spring Boot.
Como temos o tutorial Hello World Spring MVC muito popular, também iniciaremos nosso tutorial Hello World Spring Boot de maneira semelhante.
Introdução ao Spring Boot:
- Este é o seu tutorial de inicialização do Spring para iniciantes
- Hello World Spring Boot Tutorial
- Exemplo mais simples de inicialização do Spring
- tutorial maven de inicialização de primavera
- exemplo de aplicativo da web de inicialização por mola
Vamos começar.
Passo 1
Para começar com o Spring Boot, você precisará das configurações abaixo.
- JDK 8. Certifique-se
download and installo JDK mais recente. - Eclipse IDE. Certifique-se de fazer download
Eclipse IDE for Java EE Developers. link oficial para download. - Spring Boot 2.4.3.
Passo 2
Depois de instalar o Eclipse em seu Laptop/Desktop, vá para Eclipse. Vamos criar um novo Projeto Web Dinâmico.
- Clique em Arquivo
- Novo
-
Dynamic Web Project - Na primeira tela, forneça o nome do projeto:
CrunchifySpringBootHelloWorld
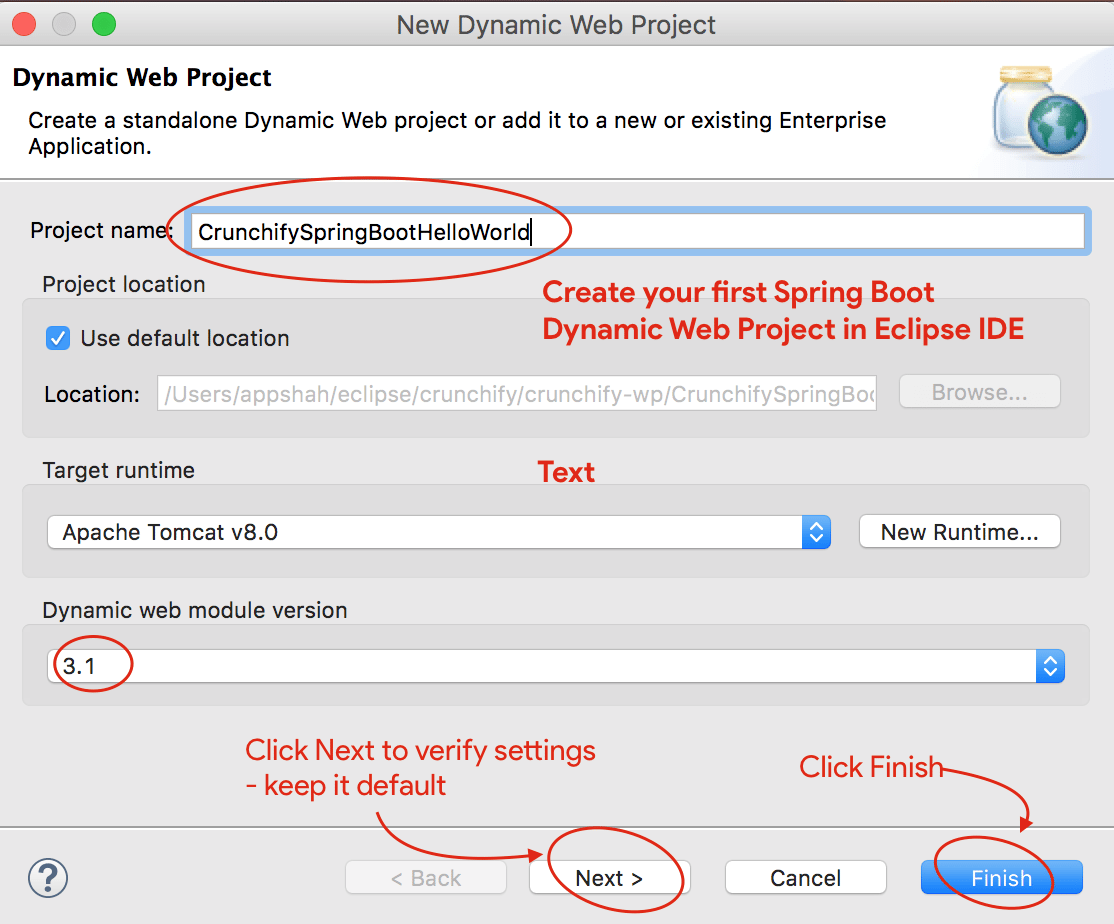
- Certifique-se de ter a versão do módulo Dynamic Web para
3.1e o tempo de execução de destino Apache Tomcat 8. - Se você ainda não tiver configurado o Apache Tomcat, siga estas etapas para configurar o Tomcat no Eclipse.
- Clique em Avançar duas vezes e verifique se as configurações são as mesmas. Captura de tela1, Captura de tela2.
- OU clique em Concluir para criar Projeto Web Dinâmico.
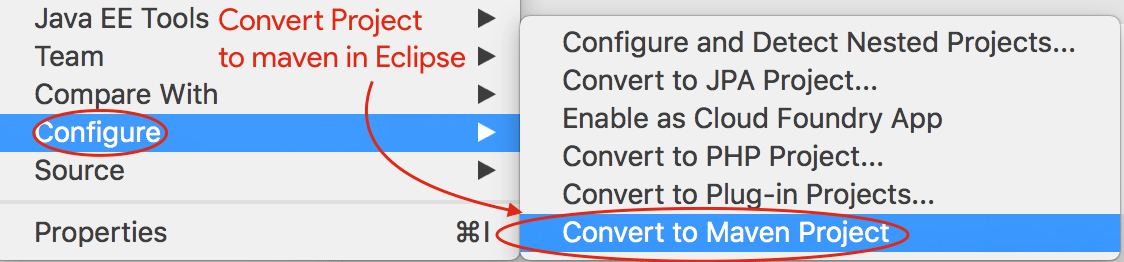
Etapa 3
O próximo passo é converter o projeto Java para o projeto Maven.
- Clique com o botão direito no projeto
- Clique em Configurar
- Clique em
Convert to Maven Project - Mantenha a configuração padrão
- Clique em terminar
Passo 4
A etapa acima criará o arquivo pom.xml para seu projeto. O próximo passo é atualizar o arquivo pom.xml com o conteúdo abaixo e adicionar Spring Boot Dependency .
|
1 2 3 4 5 6 7 8 9 10 11 12 13 14 15 16 17 18 19 20 21 22 23 24 25 26 27 28 29 30 31 32 33 34 35 36 37 38 39 40 41 42 43 44 45 46 47 48 49 50 |
< project xmlns = "http://maven.apache.org/POM/4.0.0" xmlns : xsi = "http://www.w3.org/2001/XMLSchema-instance" xsi : schemaLocation = "http://maven.apache.org/POM/4.0.0 http://maven.apache.org/xsd/maven-4.0.0.xsd" > < modelVersion > 4.0.0 < / modelVersion > < groupId > CrunchifySpringBootHelloWorld < / groupId > < artifactId > CrunchifySpringBootHelloWorld < / artifactId > < version > 1.0.0 - RELEASE < / version > < packaging > war < / packaging > < parent > < groupId > org . springframework . boot < / groupId > < artifactId > spring - boot - starter - parent < / artifactId > < version > 2.4.3 < / version > < / parent > < dependencies > < dependency > < groupId > org . springframework . boot < / groupId > < artifactId > spring - boot - starter - web < / artifactId > < / dependency > < / dependencies > < properties > < java . version > 1.8 < / java . version > < / properties > < build > < sourceDirectory > src < / sourceDirectory > < plugins > < plugin > < artifactId > maven - compiler - plugin < / artifactId > < configuration > < source > 1.8 < / source > < target > 1.8 < / target > < / configuration > < / plugin > < plugin > < groupId > org . springframework . boot < / groupId > < artifactId > spring - boot - maven - plugin < / artifactId > < / plugin > < plugin > < artifactId > maven - war - plugin < / artifactId > < configuration > < warSourceDirectory > WebContent < / warSourceDirectory > < / configuration > < / plugin > < / plugins > < / build > < / project > |
Como você vê acima, estamos adicionando o jar org.springframework.boot 2.4.3 em nosso projeto. Além disso, estamos adicionando mais dois artefatos:
- spring-boot-maven-plugin
- spring-boot-starter-web
Passo-5
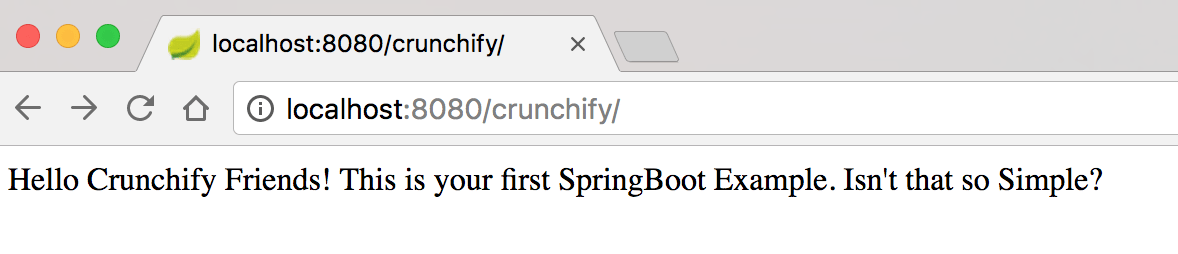
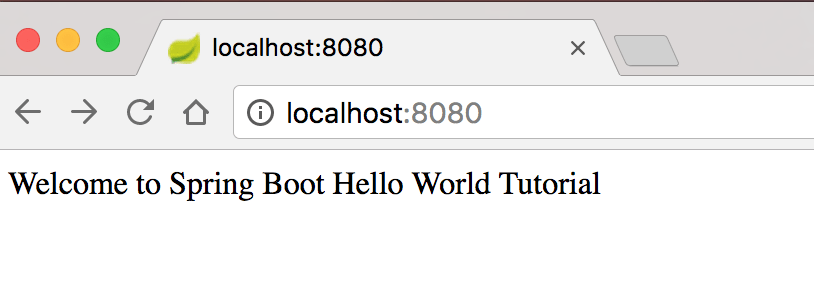
Agora vamos trabalhar na criação de um arquivo simples Hello World Application que poderemos acessar usando URLs
- http://localhost:8080
- http://locahost:8080/crunchify
Crie o arquivo CrunchifyHelloWorldSpringBoot.java com o conteúdo do código abaixo:
|
1 2 3 4 5 6 7 8 9 10 11 12 13 14 15 16 17 18 19 20 21 22 23 24 25 26 27 28 29 30 31 32 33 34 35 36 37 38 39 |
package crunchify . com . springboot ; import org . springframework . boot . SpringApplication ; import org . springframework . boot . autoconfigure . EnableAutoConfiguration ; import org . springframework . web . bind . annotation . RequestMapping ; import org . springframework . web . bind . annotation . RestController ; /** * @author Crunchify.com - Simple Spring Boot Example * */ // @RestController is a convenience annotation that is itself annotated with @Controller and @ResponseBody @ RestController // @EnableAutoConfiguration enables auto-configuration of the Spring Application Context, attempting to guess // and configure beans that you are likely to need. @ EnableAutoConfiguration public class CrunchifyHelloWorldSpringBoot { // @RequestMapping annotation is used for mapping web requests onto specific handler classes @ RequestMapping ( "/" ) String basicURL ( ) { return "Welcome to Spring Boot Hello World Tutorial" ; } @ RequestMapping ( "crunchify" ) String crunchifyURL ( ) { return "Hello Crunchify Friends! This is your first SpringBoot Example. Isn't that so Simple?" ; } public static void main ( String [ ] args ) throws Exception { // SpringApplication classes that can be used to bootstrap and launch a Spring application from a Java // main method. By default class will perform the following steps to bootstrap your application. SpringApplication . run ( CrunchifyHelloWorldSpringBoot . class , args ) ; } } |
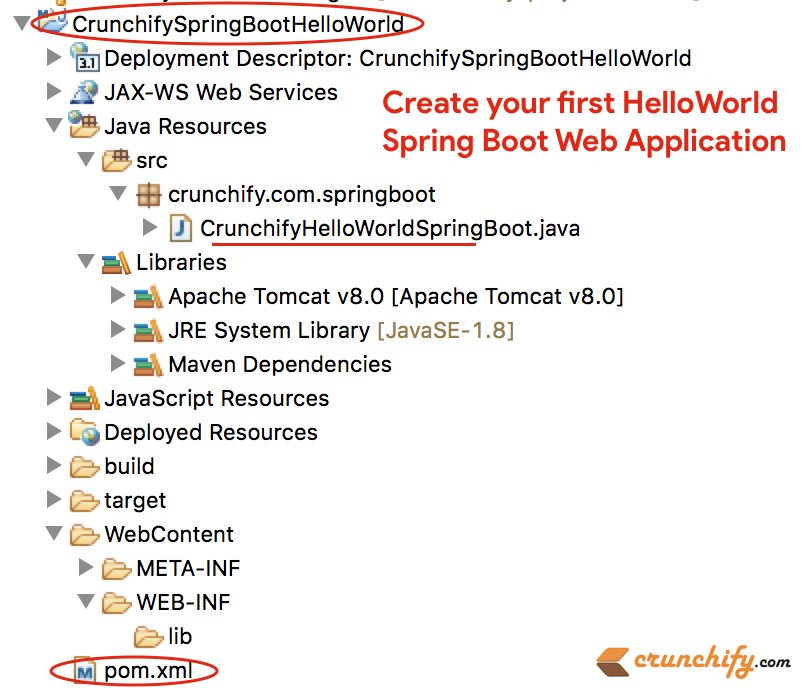
Depois de adicionar o arquivo java acima, a estrutura do seu projeto Eclipse deve ficar assim:
Passo-6
Agora, usando o comando spring-boot:run maven, você pode iniciar seu Spring Boot Application .
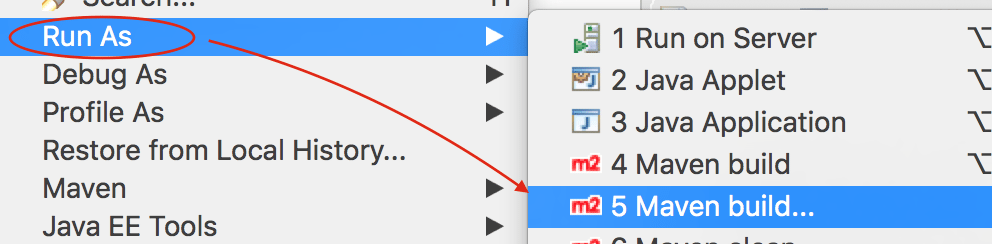
- Clique com o botão direito no projeto
- Clique em
Run As -> Maven build...
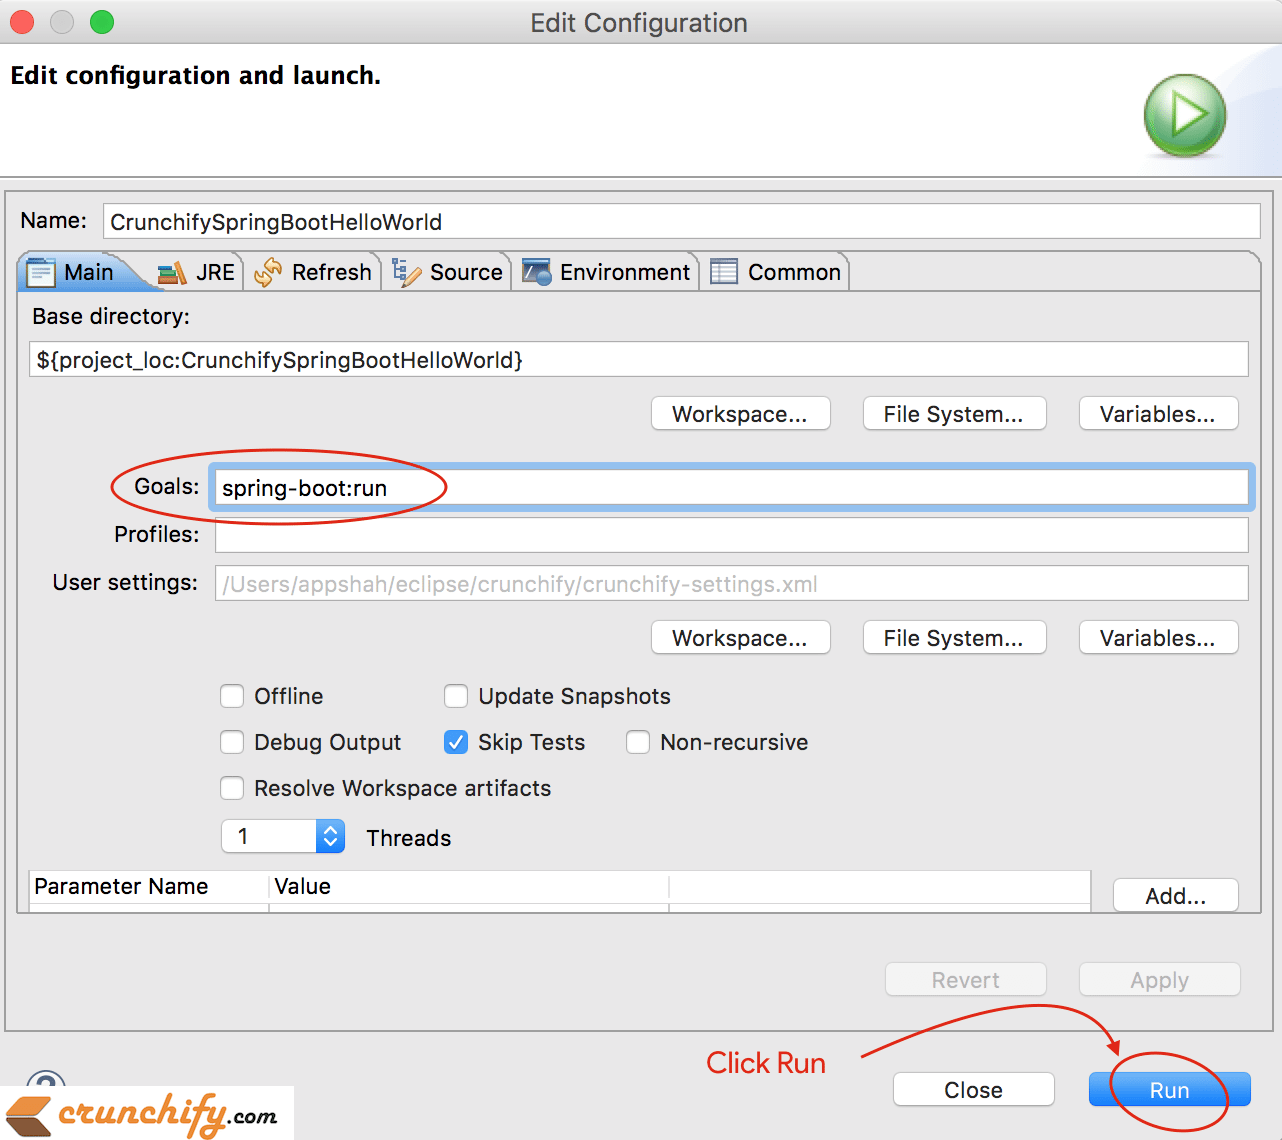
O próximo Windows mantém a configuração padrão e fornece goal as spring-boot:run como você vê na imagem abaixo.
Passo-7
Certifique-se de não ter nenhum erro no console do Eclipse. Aqui está uma saída do console do Eclipse IDE.
|
1 2 3 4 5 6 7 8 9 10 11 12 13 14 15 16 17 18 19 20 21 22 23 24 25 26 27 28 29 30 31 32 33 34 35 36 37 38 39 40 41 42 43 44 45 46 47 48 49 50 51 52 53 54 55 56 57 58 59 60 61 |
SLF4J : Class path contains multiple SLF4J bindings . SLF4J : Found binding in [ jar : file : / Applications / Eclipse . app / Contents / Eclipse / plugins / org . eclipse . m2e . maven . runtime . slf4j . simple_1 . 16.0.20200610 - 1735 / jars / slf4j - simple - 1.7.5.jar ! / org / slf4j / impl / StaticLoggerBinder . class ] SLF4J : Found binding in [ file : / Applications / Eclipse . app / Contents / Eclipse / configuration / org . eclipse . osgi / 5 / 0 / . cp / org / slf4j / impl / StaticLoggerBinder . class ] SLF4J : See http : //www.slf4j.org/codes.html#multiple_bindings for an explanation. SLF4J : Actual binding is of type [ org . slf4j . impl . SimpleLoggerFactory ] SLF4J : Class path contains multiple SLF4J bindings . SLF4J : Found binding in [ jar : file : / Applications / Eclipse . app / Contents / Eclipse / plugins / org . eclipse . m2e . maven . runtime . slf4j . simple_1 . 16.0.20200610 - 1735 / jars / slf4j - simple - 1.7.5.jar ! / org / slf4j / impl / StaticLoggerBinder . class ] SLF4J : Found binding in [ file : / Applications / Eclipse . app / Contents / Eclipse / configuration / org . eclipse . osgi / 5 / 0 / . cp / org / slf4j / impl / StaticLoggerBinder . class ] SLF4J : See http : //www.slf4j.org/codes.html#multiple_bindings for an explanation. SLF4J : Actual binding is of type [ org . slf4j . impl . SimpleLoggerFactory ] [ INFO ] Scanning for projects . . . [ INFO ] [ INFO ] ---- < CrunchifySpringBootHelloWorld : CrunchifySpringBootHelloWorld > ----- [ INFO ] Building CrunchifySpringBootHelloWorld 1.0.0 - RELEASE [ INFO ] -------------------------------- [ war ] --------------------------------- [ INFO ] [ INFO ] > > > spring - boot - maven - plugin : 2.4.3 : run ( default - cli ) > test - compile @ CrunchifySpringBootHelloWorld > > > [ INFO ] [ INFO ] --- maven - resources - plugin : 3.2.0 : resources ( default - resources ) @ CrunchifySpringBootHelloWorld --- [ INFO ] Using 'UTF-8' encoding to copy filtered resources . [ INFO ] Using 'UTF-8' encoding to copy filtered properties files . [ INFO ] skip non existing resourceDirectory / Users / app / crunchify / eclipse - workspace / CrunchifySpringBootHelloWorld / src / main / resources [ INFO ] skip non existing resourceDirectory / Users / app / crunchify / eclipse - workspace / CrunchifySpringBootHelloWorld / src / main / resources [ INFO ] [ INFO ] --- maven - compiler - plugin : 3.8.1 : compile ( default - compile ) @ CrunchifySpringBootHelloWorld --- [ INFO ] Nothing to compile - all classes are up to date [ INFO ] [ INFO ] --- maven - resources - plugin : 3.2.0 : testResources ( default - testResources ) @ CrunchifySpringBootHelloWorld --- [ INFO ] Not copying test resources [ INFO ] [ INFO ] --- maven - compiler - plugin : 3.8.1 : testCompile ( default - testCompile ) @ CrunchifySpringBootHelloWorld --- [ INFO ] Not compiling test sources [ INFO ] [ INFO ] < < < spring - boot - maven - plugin : 2.4.3 : run ( default - cli ) < test - compile @ CrunchifySpringBootHelloWorld < < < [ INFO ] [ INFO ] [ INFO ] --- spring - boot - maven - plugin : 2.4.3 : run ( default - cli ) @ CrunchifySpringBootHelloWorld --- [ INFO ] Attaching agents : [ ] . ____ _ __ _ _ / \ \ / ___ '_ __ _ _(_)_ __ __ _ \ \ \ \ ( ( )\___ | ' _ | '_| | ' _ \ / _ ` | \ \ \ \ \ \ / ___ ) | | _ ) | | | | | | | ( _ | | ) ) ) ) ' |____| .__|_| |_|_| |_\__, | / / / / =========|_|==============|___/=/_/_/_/ :: Spring Boot :: (v2.4.3) 2021-02-21 21:05:10.614 INFO 36654 --- [ main] c.c.s.CrunchifyHelloWorldSpringBoot : Starting CrunchifyHelloWorldSpringBoot using Java 15 on LM-AUN-11021095 with PID 36654 (/Users/app/crunchify/eclipse-workspace/CrunchifySpringBootHelloWorld/target/classes started by arpshah in /Users/app/crunchify/eclipse-workspace/CrunchifySpringBootHelloWorld) 2021-02-21 21:05:10.616 INFO 36654 --- [ main] c.c.s.CrunchifyHelloWorldSpringBoot : No active profile set, falling back to default profiles: default 2021-02-21 21:05:11.008 INFO 36654 --- [ main] o.s.b.w.embedded.tomcat.TomcatWebServer : Tomcat initialized with port(s): 8080 (http) 2021-02-21 21:05:11.014 INFO 36654 --- [ main] o.apache.catalina.core.StandardService : Starting service [Tomcat] 2021-02-21 21:05:11.015 INFO 36654 --- [ main] org.apache.catalina.core.StandardEngine : Starting Servlet engine: [Apache Tomcat/9.0.43] 2021-02-21 21:05:11.054 INFO 36654 --- [ main] o.a.c.c.C.[Tomcat].[localhost].[/] : Initializing Spring embedded WebApplicationContext 2021-02-21 21:05:11.054 INFO 36654 --- [ main] w.s.c.ServletWebServerApplicationContext : Root WebApplicationContext: initialization completed in 417 ms 2021-02-21 21:05:11.147 INFO 36654 --- [ main] o.s.s.concurrent.ThreadPoolTaskExecutor : Initializing ExecutorService ' applicationTaskExecutor ' 2021-02-21 21:05:11.241 INFO 36654 --- [ main] o.s.b.w.embedded.tomcat.TomcatWebServer : Tomcat started on port(s): 8080 (http) with context path ' ' 2021-02-21 21:05:11.247 INFO 36654 --- [ main] c.c.s.CrunchifyHelloWorldSpringBoot : Started CrunchifyHelloWorldSpringBoot in 0.843 seconds (JVM running for 1.04) 2021-02-21 21:07:04.240 INFO 36654 --- [nio-8080-exec-1] o.a.c.c.C.[Tomcat].[localhost].[/] : Initializing Spring DispatcherServlet ' dispatcherServlet ' 2021-02-21 21:07:04.240 INFO 36654 --- [nio-8080-exec-1] o.s.web.servlet.DispatcherServlet : Initializing Servlet ' dispatcherServlet ' 2021 - 02 - 21 21 : 07 : 04.241 INFO 36654 --- [ nio - 8080 - exec - 1 ] o . s . web . servlet . DispatcherServlet : Completed initialization in 1 ms |
Passo-8
Agora visite os URLs http://localhost:8080 e http://locahost:8080/crunchify para ver o resultado ao vivo.

Espero que este tutorial ajude você a começar com o exemplo do Java Spring Boot. Deixe-me saber se você encontrar algum problema ao executar seu primeiro aplicativo Spring Boot.
Nas próximas semanas, adicionaremos exemplos de Spring Boot cada vez mais complexos para o seu. Se você tiver quaisquer requisitos especiais, informe-nos na seção de comentários.
Qual o proximo?
- Crie um
Spring Boot applicationsuper simples no IntelliJ IDEA - Crie um Web
Rest Servicesimples no IntelliJ IDEA