
Java Spring Boot Eğitimi – Ayrıntılı Adımlarla Canlı Hello-World Web Uygulaması Örneği
Yayınlanan: 2018-04-05
Neden Bahar Çizmesi? Spring Boot ne için kullanılır?
Uygulamanız için java tabanlı mikro hizmetler oluşturmak ister misiniz? Spring boot, aynı şey için açık kaynaklı bir Java tabanlı çözümdür.
Pivotal ekibi tarafından oluşturulan üretime hazır Spring tabanlı uygulama oluşturmak için kullanılır.
Spring Boot fikri çok basittir. İlk Spring Boot tabanlı Web Uygulamanızı yalnızca few lines of code yayınlayabilmeniz için önceden yapılandırılmış işlevsellik ve çerçeve sağlar. Sadece basit bir komutla web uygulamanızı başlatabilir ve test edebilirsiniz.
Tüm özel konfigürasyonlar, Veritabanı kurulumları, 3. parti modüller Spring out-0f-the-box olarak gelir.
Çok popüler Hello World Spring MVC eğitimimiz olduğu gibi, Hello World Spring Boot eğitimimize de benzer şekilde başlayacağız.
Spring Boot'u kullanmaya başlama:
- Bu, Yeni Başlayanlar İçin Bahar Önyükleme Eğitiminiz
- Merhaba Dünya Baharı Önyükleme Eğitimi
- En Basit Yaylı Önyükleme Örneği
- bahar önyükleme maven öğretici
- bahar önyükleme web uygulaması örneği
Başlayalım.
Aşama 1
Spring Boot'a başlamak için aşağıdaki kurulumlara ihtiyacınız olacak.
- JDK 8. En son JDK'yı
download and installkurduğunuzdan emin olun. - Tutulma IDE'si.
Eclipse IDE for Java EE Developersindirdiğinizden emin olun. resmi indirme linki. - Yaylı Önyükleme 2.4.3.
Adım 2
Eclipse'i Dizüstü / Masaüstü bilgisayarınıza yükledikten sonra Eclipse'e gidin. Yeni Dinamik Web Projesi oluşturacağız.
- Dosyaya tıklayın
- Yeni
-
Dynamic Web Project - İlk ekranda proje adını girin:
CrunchifySpringBootHelloWorld
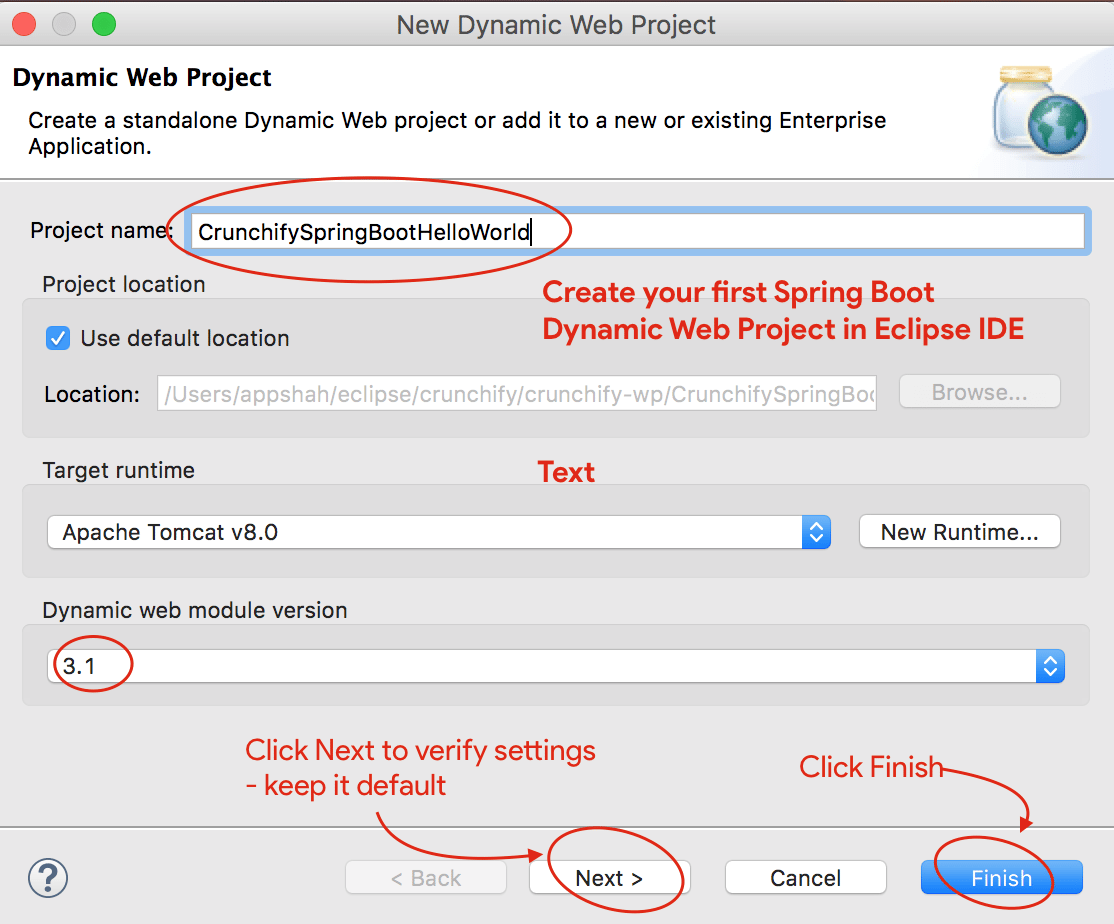
- Dinamik Web modülü sürümünün
3.1ve Target runtime Apache Tomcat 8'e sahip olduğunuzdan emin olun. - Henüz Apache Tomcat kurulumunuz yoksa, Tomcat'i Eclipse'de kurmak için bu adımları izleyin.
- İki kez İleri'ye tıklayın ve ayarların bunlarla aynı olduğundan emin olun. Ekran Görüntüsü1, Ekran Görüntüsü2.
- VEYA Dinamik Web Projesi oluşturmak için Bitir'e tıklayın.
Aşama 3
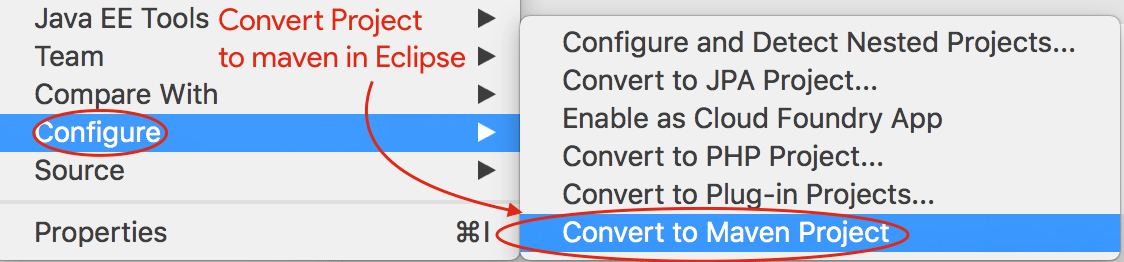
Sonraki adım Java Projesini Maven Projesine Dönüştürmektir.
- Projeye sağ tıklayın
- Yapılandır'a tıklayın
-
Convert to Maven Projecttıklayın - Varsayılan yapılandırmayı koru
- Bitir'i tıklayın
4. Adım
Yukarıdaki adım projeniz için pom.xml dosyası oluşturacaktır. Sonraki adım, pom.xml dosyasını aşağıdaki içerikle güncellemek ve Spring Boot Dependency eklemektir.
|
1 2 3 4 5 6 7 8 9 10 11 12 13 14 15 16 17 18 19 20 21 22 23 24 25 26 27 28 29 30 31 32 33 34 35 36 37 38 39 40 41 42 43 44 45 46 47 48 49 50 |
< project xmlns = "http://maven.apache.org/POM/4.0.0" xmlns : xsi = "http://www.w3.org/2001/XMLSchema-instance" xsi : schemaLocation = "http://maven.apache.org/POM/4.0.0 http://maven.apache.org/xsd/maven-4.0.0.xsd" > < modelVersion > 4.0.0 < / modelVersion > < groupId > CrunchifySpringBootHelloWorld < / groupId > < artifactId > CrunchifySpringBootHelloWorld < / artifactId > < version > 1.0.0 - RELEASE < / version > < packaging > war < / packaging > < parent > < groupId > org . springframework . boot < / groupId > < artifactId > spring - boot - starter - parent < / artifactId > < version > 2.4.3 < / version > < / parent > < dependencies > < dependency > < groupId > org . springframework . boot < / groupId > < artifactId > spring - boot - starter - web < / artifactId > < / dependency > < / dependencies > < properties > < java . version > 1.8 < / java . version > < / properties > < build > < sourceDirectory > src < / sourceDirectory > < plugins > < plugin > < artifactId > maven - compiler - plugin < / artifactId > < configuration > < source > 1.8 < / source > < target > 1.8 < / target > < / configuration > < / plugin > < plugin > < groupId > org . springframework . boot < / groupId > < artifactId > spring - boot - maven - plugin < / artifactId > < / plugin > < plugin > < artifactId > maven - war - plugin < / artifactId > < configuration > < warSourceDirectory > WebContent < / warSourceDirectory > < / configuration > < / plugin > < / plugins > < / build > < / project > |
Yukarıda gördüğünüz gibi projemize org.springframework.boot 2.4.3 jar ekliyoruz. Buna ek olarak iki eser daha ekliyoruz:
- yay-önyükleme-maven-eklenti
- yay-önyükleme-başlangıç-web
Adım 5
Şimdi URL'leri kullanarak erişebileceğimiz basit Hello World Application dosyası oluşturmaya çalışalım.
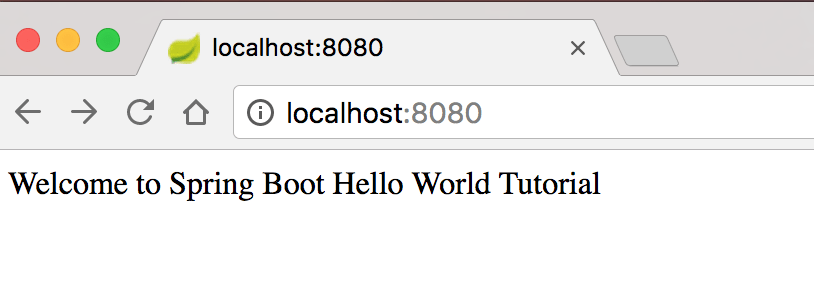
- http://locahost:8080
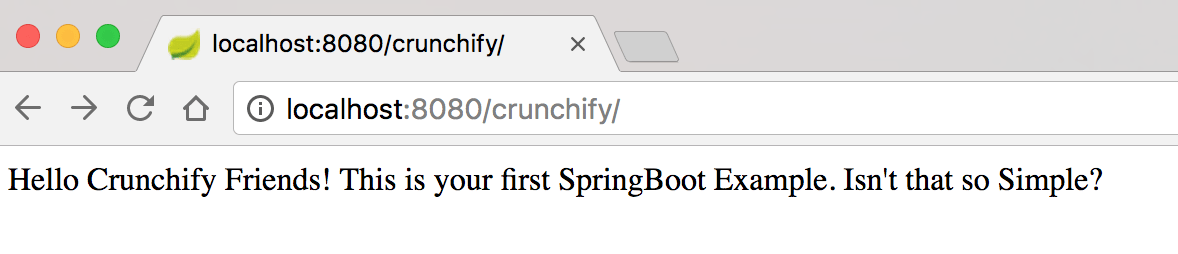
- http://locahost:8080/crunchify
Aşağıdaki kod içeriğiyle CrunchifyHelloWorldSpringBoot.java dosyasını oluşturun:
|
1 2 3 4 5 6 7 8 9 10 11 12 13 14 15 16 17 18 19 20 21 22 23 24 25 26 27 28 29 30 31 32 33 34 35 36 37 38 39 |
package crunchify . com . springboot ; import org . springframework . boot . SpringApplication ; import org . springframework . boot . autoconfigure . EnableAutoConfiguration ; import org . springframework . web . bind . annotation . RequestMapping ; import org . springframework . web . bind . annotation . RestController ; /** * @author Crunchify.com - Simple Spring Boot Example * */ // @RestController is a convenience annotation that is itself annotated with @Controller and @ResponseBody @ RestController // @EnableAutoConfiguration enables auto-configuration of the Spring Application Context, attempting to guess // and configure beans that you are likely to need. @ EnableAutoConfiguration public class CrunchifyHelloWorldSpringBoot { // @RequestMapping annotation is used for mapping web requests onto specific handler classes @ RequestMapping ( "/" ) String basicURL ( ) { return "Welcome to Spring Boot Hello World Tutorial" ; } @ RequestMapping ( "crunchify" ) String crunchifyURL ( ) { return "Hello Crunchify Friends! This is your first SpringBoot Example. Isn't that so Simple?" ; } public static void main ( String [ ] args ) throws Exception { // SpringApplication classes that can be used to bootstrap and launch a Spring application from a Java // main method. By default class will perform the following steps to bootstrap your application. SpringApplication . run ( CrunchifyHelloWorldSpringBoot . class , args ) ; } } |
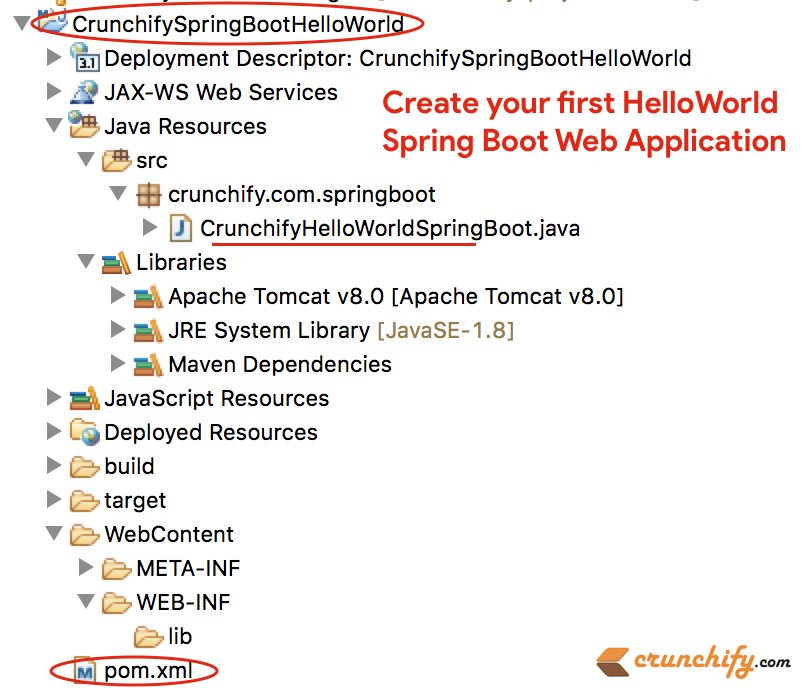
Yukarıdaki java dosyasını eklediğinizde, Eclipse proje yapınız şöyle görünmelidir:
Adım-6
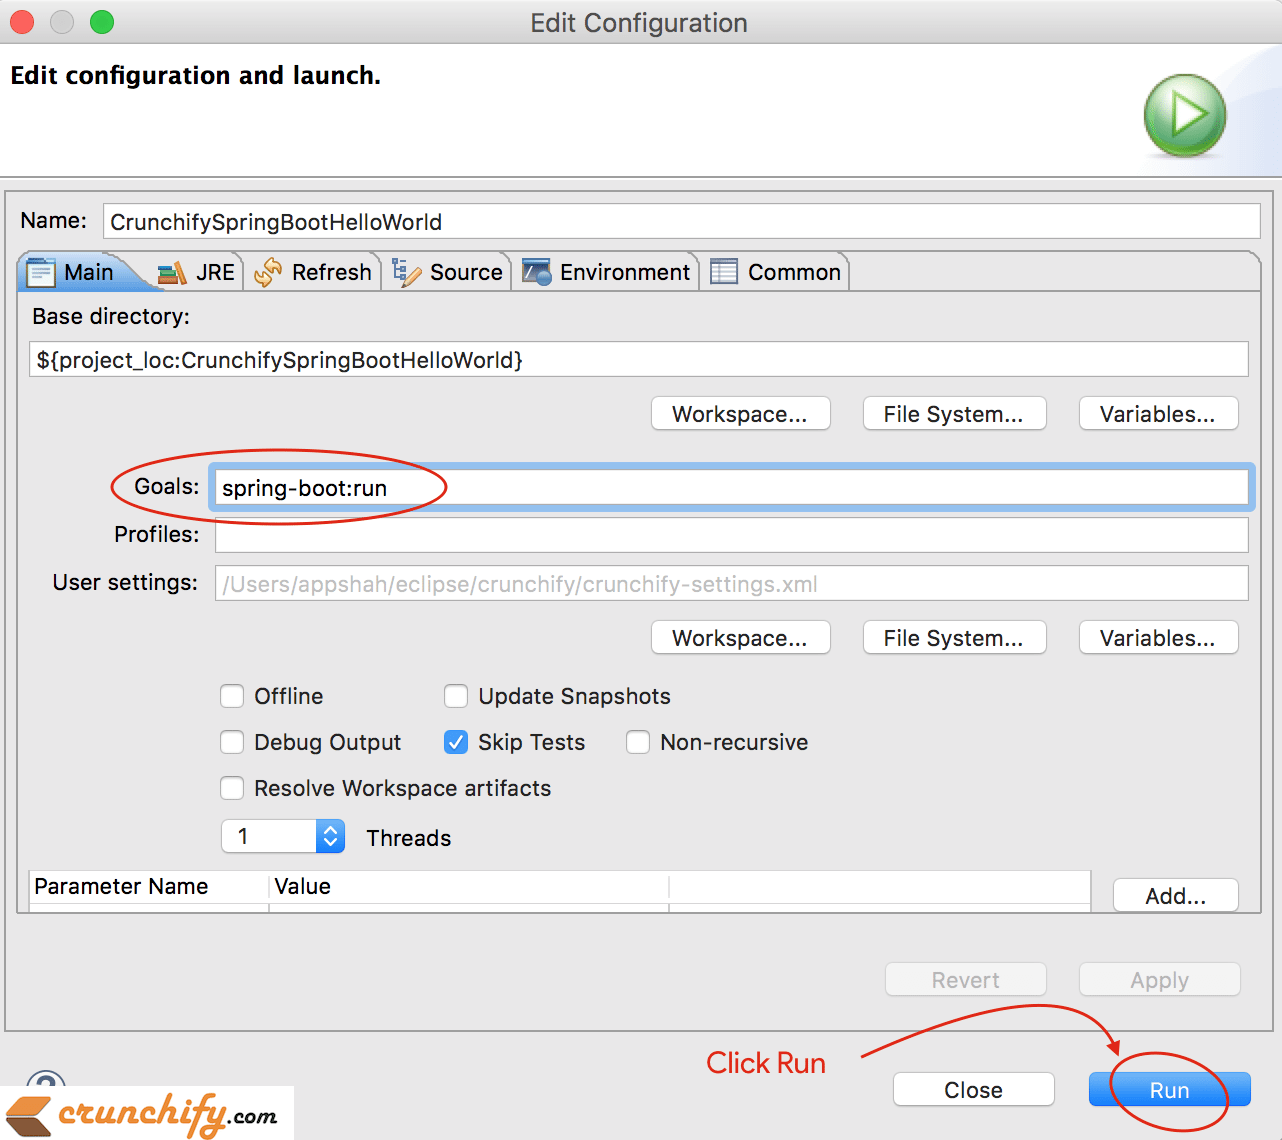
Şimdi basit spring-boot:run maven komutunu kullanarak Spring Boot Application başlatabilirsiniz.
- Projeye sağ tıklayın
-
Run As -> Maven build...'e tıklayın.
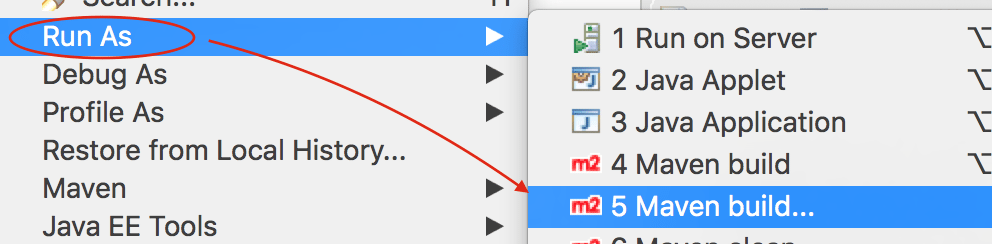
Sonraki Windows, varsayılan yapılandırmayı korur ve goal as spring-boot:run .
Adım-7
Eclipse konsolunda herhangi bir hata olmadığından emin olun. İşte Eclipse IDE'den bir konsol çıktısı.
|
1 2 3 4 5 6 7 8 9 10 11 12 13 14 15 16 17 18 19 20 21 22 23 24 25 26 27 28 29 30 31 32 33 34 35 36 37 38 39 40 41 42 43 44 45 46 47 48 49 50 51 52 53 54 55 56 57 58 59 60 61 |
SLF4J : Class path contains multiple SLF4J bindings . SLF4J : Found binding in [ jar : file : / Applications / Eclipse . app / Contents / Eclipse / plugins / org . eclipse . m2e . maven . runtime . slf4j . simple_1 . 16.0.20200610 - 1735 / jars / slf4j - simple - 1.7.5.jar ! / org / slf4j / impl / StaticLoggerBinder . class ] SLF4J : Found binding in [ file : / Applications / Eclipse . app / Contents / Eclipse / configuration / org . eclipse . osgi / 5 / 0 / . cp / org / slf4j / impl / StaticLoggerBinder . class ] SLF4J : See http : //www.slf4j.org/codes.html#multiple_bindings for an explanation. SLF4J : Actual binding is of type [ org . slf4j . impl . SimpleLoggerFactory ] SLF4J : Class path contains multiple SLF4J bindings . SLF4J : Found binding in [ jar : file : / Applications / Eclipse . app / Contents / Eclipse / plugins / org . eclipse . m2e . maven . runtime . slf4j . simple_1 . 16.0.20200610 - 1735 / jars / slf4j - simple - 1.7.5.jar ! / org / slf4j / impl / StaticLoggerBinder . class ] SLF4J : Found binding in [ file : / Applications / Eclipse . app / Contents / Eclipse / configuration / org . eclipse . osgi / 5 / 0 / . cp / org / slf4j / impl / StaticLoggerBinder . class ] SLF4J : See http : //www.slf4j.org/codes.html#multiple_bindings for an explanation. SLF4J : Actual binding is of type [ org . slf4j . impl . SimpleLoggerFactory ] [ INFO ] Scanning for projects . . . [ INFO ] [ INFO ] ---- < CrunchifySpringBootHelloWorld : CrunchifySpringBootHelloWorld > ----- [ INFO ] Building CrunchifySpringBootHelloWorld 1.0.0 - RELEASE [ INFO ] -------------------------------- [ war ] --------------------------------- [ INFO ] [ INFO ] > > > spring - boot - maven - plugin : 2.4.3 : run ( default - cli ) > test - compile @ CrunchifySpringBootHelloWorld > > > [ INFO ] [ INFO ] --- maven - resources - plugin : 3.2.0 : resources ( default - resources ) @ CrunchifySpringBootHelloWorld --- [ INFO ] Using 'UTF-8' encoding to copy filtered resources . [ INFO ] Using 'UTF-8' encoding to copy filtered properties files . [ INFO ] skip non existing resourceDirectory / Users / app / crunchify / eclipse - workspace / CrunchifySpringBootHelloWorld / src / main / resources [ INFO ] skip non existing resourceDirectory / Users / app / crunchify / eclipse - workspace / CrunchifySpringBootHelloWorld / src / main / resources [ INFO ] [ INFO ] --- maven - compiler - plugin : 3.8.1 : compile ( default - compile ) @ CrunchifySpringBootHelloWorld --- [ INFO ] Nothing to compile - all classes are up to date [ INFO ] [ INFO ] --- maven - resources - plugin : 3.2.0 : testResources ( default - testResources ) @ CrunchifySpringBootHelloWorld --- [ INFO ] Not copying test resources [ INFO ] [ INFO ] --- maven - compiler - plugin : 3.8.1 : testCompile ( default - testCompile ) @ CrunchifySpringBootHelloWorld --- [ INFO ] Not compiling test sources [ INFO ] [ INFO ] < < < spring - boot - maven - plugin : 2.4.3 : run ( default - cli ) < test - compile @ CrunchifySpringBootHelloWorld < < < [ INFO ] [ INFO ] [ INFO ] --- spring - boot - maven - plugin : 2.4.3 : run ( default - cli ) @ CrunchifySpringBootHelloWorld --- [ INFO ] Attaching agents : [ ] . ____ _ __ _ _ / \ \ / ___ '_ __ _ _(_)_ __ __ _ \ \ \ \ ( ( )\___ | ' _ | '_| | ' _ \ / _ ` | \ \ \ \ \ \ / ___ ) | | _ ) | | | | | | | ( _ | | ) ) ) ) ' |____| .__|_| |_|_| |_\__, | / / / / =========|_|==============|___/=/_/_/_/ :: Spring Boot :: (v2.4.3) 2021-02-21 21:05:10.614 INFO 36654 --- [ main] c.c.s.CrunchifyHelloWorldSpringBoot : Starting CrunchifyHelloWorldSpringBoot using Java 15 on LM-AUN-11021095 with PID 36654 (/Users/app/crunchify/eclipse-workspace/CrunchifySpringBootHelloWorld/target/classes started by arpshah in /Users/app/crunchify/eclipse-workspace/CrunchifySpringBootHelloWorld) 2021-02-21 21:05:10.616 INFO 36654 --- [ main] c.c.s.CrunchifyHelloWorldSpringBoot : No active profile set, falling back to default profiles: default 2021-02-21 21:05:11.008 INFO 36654 --- [ main] o.s.b.w.embedded.tomcat.TomcatWebServer : Tomcat initialized with port(s): 8080 (http) 2021-02-21 21:05:11.014 INFO 36654 --- [ main] o.apache.catalina.core.StandardService : Starting service [Tomcat] 2021-02-21 21:05:11.015 INFO 36654 --- [ main] org.apache.catalina.core.StandardEngine : Starting Servlet engine: [Apache Tomcat/9.0.43] 2021-02-21 21:05:11.054 INFO 36654 --- [ main] o.a.c.c.C.[Tomcat].[localhost].[/] : Initializing Spring embedded WebApplicationContext 2021-02-21 21:05:11.054 INFO 36654 --- [ main] w.s.c.ServletWebServerApplicationContext : Root WebApplicationContext: initialization completed in 417 ms 2021-02-21 21:05:11.147 INFO 36654 --- [ main] o.s.s.concurrent.ThreadPoolTaskExecutor : Initializing ExecutorService ' applicationTaskExecutor ' 2021-02-21 21:05:11.241 INFO 36654 --- [ main] o.s.b.w.embedded.tomcat.TomcatWebServer : Tomcat started on port(s): 8080 (http) with context path ' ' 2021-02-21 21:05:11.247 INFO 36654 --- [ main] c.c.s.CrunchifyHelloWorldSpringBoot : Started CrunchifyHelloWorldSpringBoot in 0.843 seconds (JVM running for 1.04) 2021-02-21 21:07:04.240 INFO 36654 --- [nio-8080-exec-1] o.a.c.c.C.[Tomcat].[localhost].[/] : Initializing Spring DispatcherServlet ' dispatcherServlet ' 2021-02-21 21:07:04.240 INFO 36654 --- [nio-8080-exec-1] o.s.web.servlet.DispatcherServlet : Initializing Servlet ' dispatcherServlet ' 2021 - 02 - 21 21 : 07 : 04.241 INFO 36654 --- [ nio - 8080 - exec - 1 ] o . s . web . servlet . DispatcherServlet : Completed initialization in 1 ms |
Adım-8
Şimdi canlı sonucu görmek için http://localhost:8080 ve http://locahost:8080/crunchify URL'lerini ziyaret edin.

Umarım bu eğitim, Java Spring Boot örneğini kullanmaya başlamanıza yardımcı olur. İlk Spring Boot uygulamanızı çalıştırırken herhangi bir sorun görürseniz bana bildirin.
Önümüzdeki haftalarda, sizin için daha karmaşık Spring Boot Örnekleri ekleyeceğiz. Herhangi bir özel gereksiniminiz varsa, yorum bölümünde bize bildirin.
Sıradaki ne?
- IntelliJ IDEA'da süper basit
Spring Boot applicationoluşturun - IntelliJ IDEA'da basit Web
Rest Serviceoluşturun