
Tutorial Java Spring Boot – Esempio di applicazione Web Hello-World dal vivo con passaggi dettagliati
Pubblicato: 2018-04-05
Perché Spring Boot? A cosa serve Spring Boot?
Vuoi creare microservizi basati su Java per la tua applicazione? Bene, Spring boot è una soluzione basata su Java open source per lo stesso
Viene utilizzato per creare applicazioni basate su Spring pronte per la produzione create dal team Pivotal.
L'idea di Spring Boot è molto semplice. Fornisce un set preconfigurato di funzionalità e framework con cui puoi pubblicare la tua prima applicazione Web basata su Spring Boot con few lines of code . Basta un semplice comando per avviare e testare la tua applicazione web.
Il set di tutte le configurazioni personalizzate, le impostazioni del database, i moduli di terze parti sono out-0f-the-box in Spring Boot.
Come se avessimo un tutorial MVC molto popolare di Hello World Spring, inizieremo anche il nostro tutorial di Hello World Spring Boot in modo simile.
Per iniziare con Spring Boot:
- Questo è il tuo tutorial di avvio primaverile per principianti
- Hello World Spring Boot Tutorial
- Esempio di avvio a molla più semplice
- tutorial per gli stivali primaverili
- esempio di applicazione web di avvio a molla
Iniziamo.
Passo 1
Per iniziare con Spring Boot, avrai bisogno delle seguenti configurazioni.
- JDK 8. Assicurati di
download and installl'ultimo JDK. - Eclipse IDE. Assicurati di scaricare
Eclipse IDE for Java EE Developers. link ufficiale per il download. - Avvio a molla 2.4.3.
Passo 2
Dopo aver installato Eclipse sul tuo laptop / desktop, vai su Eclipse. Creeremo un nuovo progetto Web dinamico.
- Fare clic su File
- Nuovo
-
Dynamic Web Project - Nella prima schermata fornire il nome del progetto:
CrunchifySpringBootHelloWorld
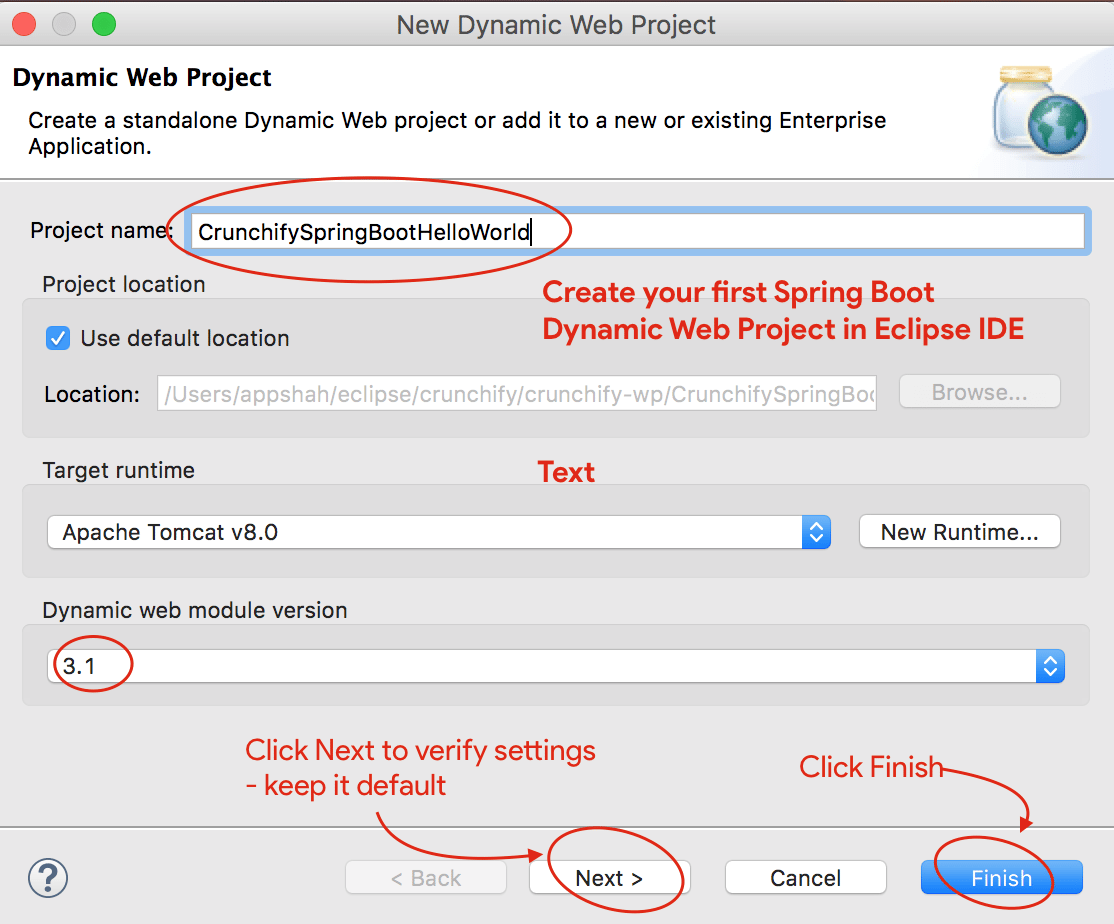
- Assicurati di avere la versione del modulo Web dinamico a
3.1e il runtime di destinazione Apache Tomcat 8. - Se non hai già configurato Apache Tomcat, segui questi passaggi per configurare Tomcat in Eclipse.
- Fare clic su Avanti due volte e assicurarsi che le impostazioni siano le stesse di queste. Schermata1, Schermata2.
- OPPURE fare clic su Fine per creare un progetto Web dinamico.
Passaggio 3
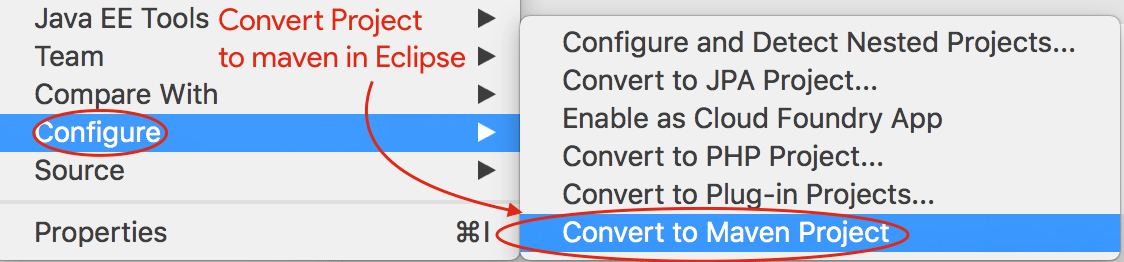
Il prossimo passo è convertire Java Project in Maven Project.
- Fare clic con il tasto destro del mouse sul progetto
- Fare clic su Configura
- Fare clic su
Convert to Maven Project - Mantieni la configurazione predefinita
- Fare clic su Fine
Passaggio 4
Il passaggio precedente creerà il file pom.xml per il tuo progetto. Il prossimo passo è aggiornare il file pom.xml con il contenuto sottostante e aggiungere Spring Boot Dependency .
|
1 2 3 4 5 6 7 8 9 10 11 12 13 14 15 16 17 18 19 20 21 22 23 24 25 26 27 28 29 30 31 32 33 34 35 36 37 38 39 40 41 42 43 44 45 46 47 48 49 50 |
< project xmlns = "http://maven.apache.org/POM/4.0.0" xmlns : xsi = "http://www.w3.org/2001/XMLSchema-instance" xsi : schemaLocation = "http://maven.apache.org/POM/4.0.0 http://maven.apache.org/xsd/maven-4.0.0.xsd" > < modelVersion > 4.0.0 < / modelVersion > < groupId > CrunchifySpringBootHelloWorld < / groupId > < artifactId > CrunchifySpringBootHelloWorld < / artifactId > < version > 1.0.0 - RELEASE < / version > < packaging > war < / packaging > < parent > < groupId > org . springframework . boot < / groupId > < artifactId > spring - boot - starter - parent < / artifactId > < version > 2.4.3 < / version > < / parent > < dependencies > < dependency > < groupId > org . springframework . boot < / groupId > < artifactId > spring - boot - starter - web < / artifactId > < / dependency > < / dependencies > < properties > < java . version > 1.8 < / java . version > < / properties > < build > < sourceDirectory > src < / sourceDirectory > < plugins > < plugin > < artifactId > maven - compiler - plugin < / artifactId > < configuration > < source > 1.8 < / source > < target > 1.8 < / target > < / configuration > < / plugin > < plugin > < groupId > org . springframework . boot < / groupId > < artifactId > spring - boot - maven - plugin < / artifactId > < / plugin > < plugin > < artifactId > maven - war - plugin < / artifactId > < configuration > < warSourceDirectory > WebContent < / warSourceDirectory > < / configuration > < / plugin > < / plugins > < / build > < / project > |
Come vedete sopra, stiamo aggiungendo org.springframework.boot 2.4.3 jar al nostro progetto. Inoltre stiamo aggiungendo altri due artefatti:
- plugin di avvio-primavera-maven
- primavera-avvio-starter-web
Passaggio 5
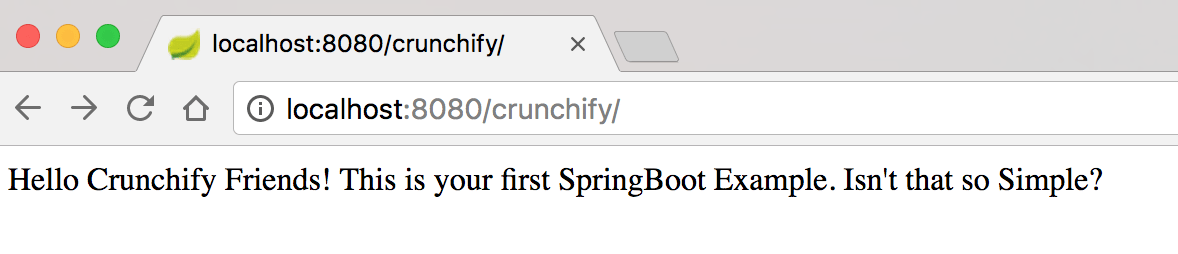
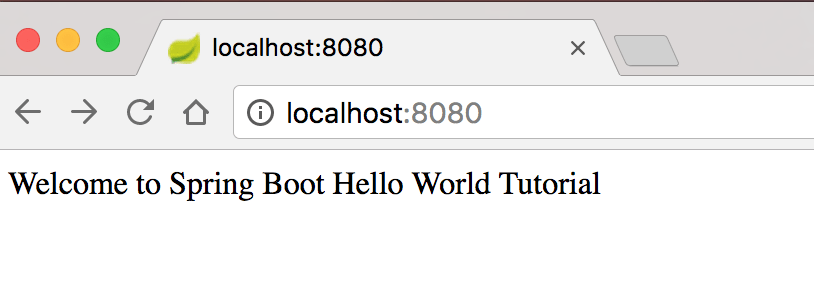
Ora lavoriamo alla creazione di un semplice file Hello World Application a cui potremo accedere utilizzando gli URL
- http://localhost:8080
- http://locahost:8080/crunchify
Crea il file CrunchifyHelloWorldSpringBoot.java con i seguenti contenuti del codice:
|
1 2 3 4 5 6 7 8 9 10 11 12 13 14 15 16 17 18 19 20 21 22 23 24 25 26 27 28 29 30 31 32 33 34 35 36 37 38 39 |
package crunchify . com . springboot ; import org . springframework . boot . SpringApplication ; import org . springframework . boot . autoconfigure . EnableAutoConfiguration ; import org . springframework . web . bind . annotation . RequestMapping ; import org . springframework . web . bind . annotation . RestController ; /** * @author Crunchify.com - Simple Spring Boot Example * */ // @RestController is a convenience annotation that is itself annotated with @Controller and @ResponseBody @ RestController // @EnableAutoConfiguration enables auto-configuration of the Spring Application Context, attempting to guess // and configure beans that you are likely to need. @ EnableAutoConfiguration public class CrunchifyHelloWorldSpringBoot { // @RequestMapping annotation is used for mapping web requests onto specific handler classes @ RequestMapping ( "/" ) String basicURL ( ) { return "Welcome to Spring Boot Hello World Tutorial" ; } @ RequestMapping ( "crunchify" ) String crunchifyURL ( ) { return "Hello Crunchify Friends! This is your first SpringBoot Example. Isn't that so Simple?" ; } public static void main ( String [ ] args ) throws Exception { // SpringApplication classes that can be used to bootstrap and launch a Spring application from a Java // main method. By default class will perform the following steps to bootstrap your application. SpringApplication . run ( CrunchifyHelloWorldSpringBoot . class , args ) ; } } |
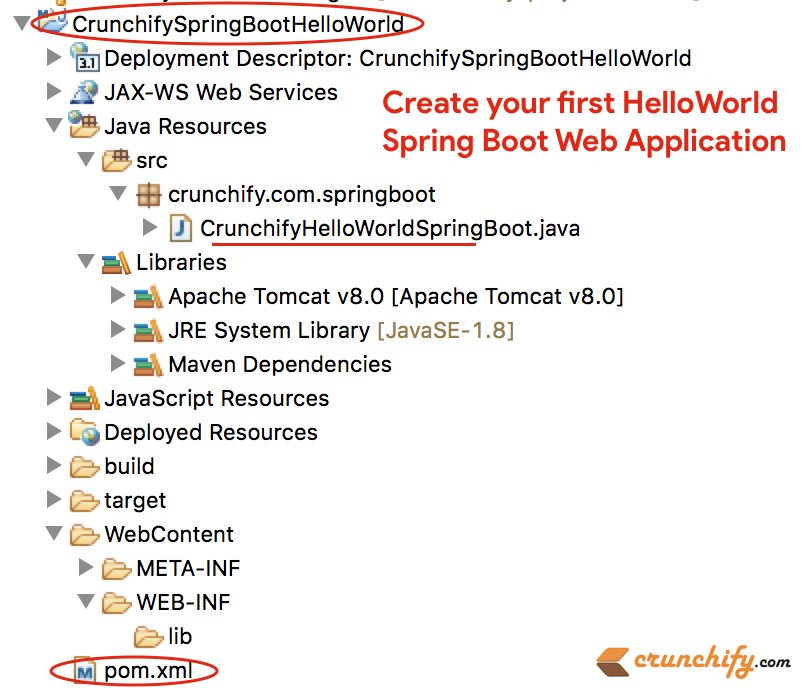
Dopo aver aggiunto sopra il file java, la struttura del tuo progetto Eclipse dovrebbe assomigliare a questa:
Passaggio 6
Ora usando il semplice comando spring-boot:run maven puoi avviare la tua Spring Boot Application .
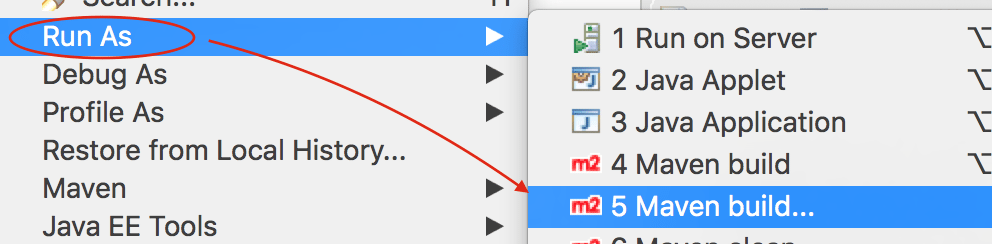
- Fare clic con il tasto destro del mouse sul progetto
- Fare clic su
Run As -> Maven build...
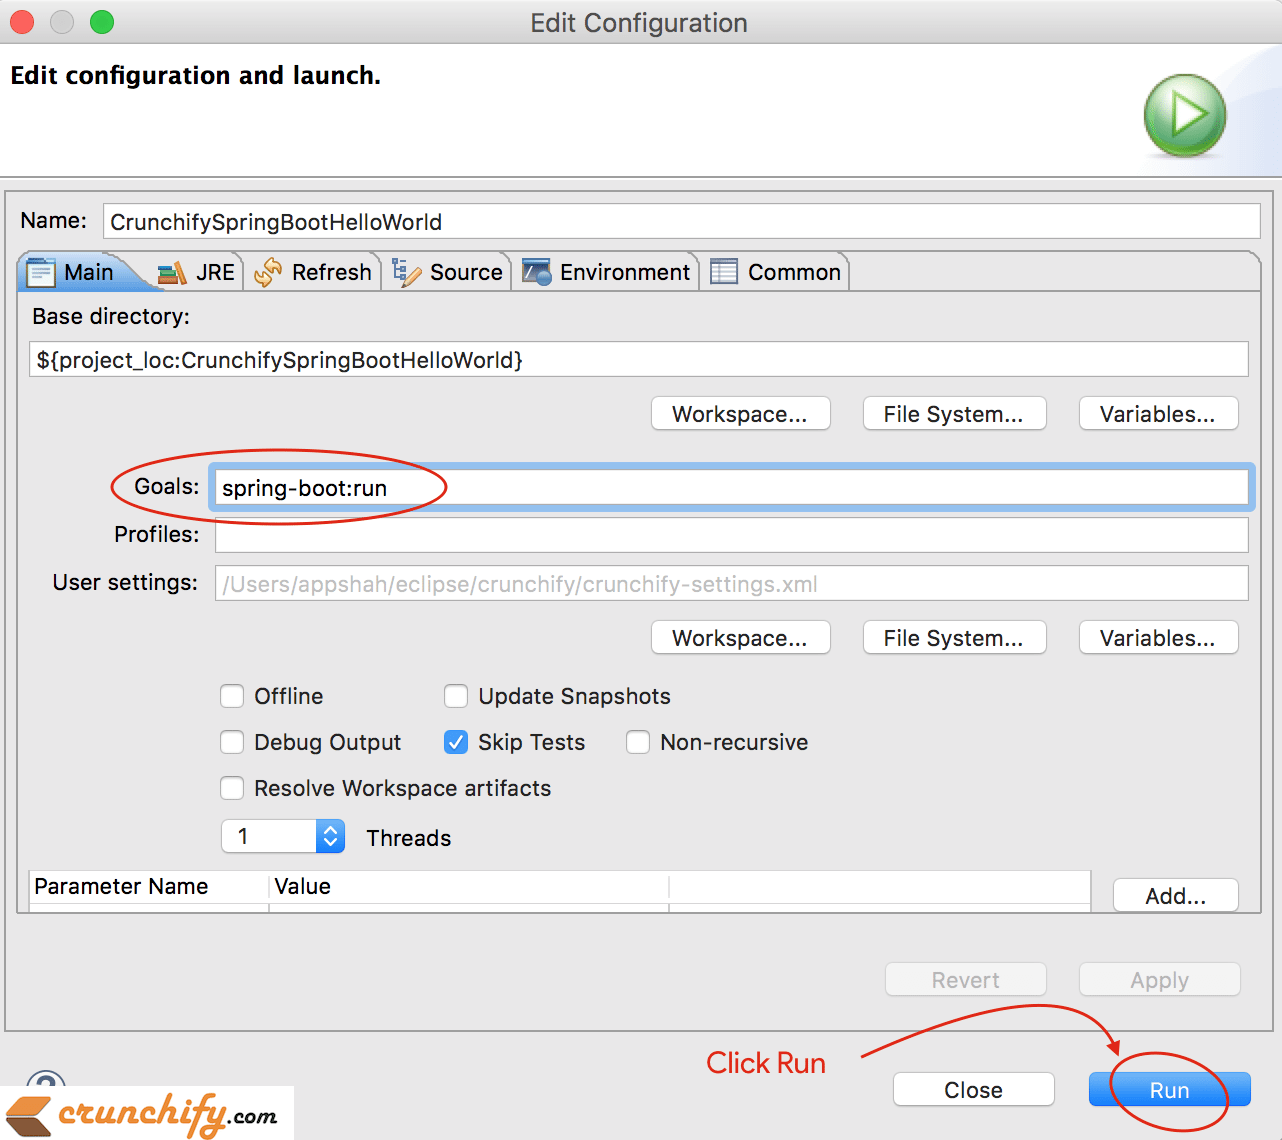
Avanti Windows mantiene la configurazione predefinita e fornisce goal as spring-boot:run come vedi nell'immagine sottostante.
Passaggio 7
Assicurati di non avere alcun errore nella console di Eclipse. Ecco un output della console da Eclipse IDE.
|
1 2 3 4 5 6 7 8 9 10 11 12 13 14 15 16 17 18 19 20 21 22 23 24 25 26 27 28 29 30 31 32 33 34 35 36 37 38 39 40 41 42 43 44 45 46 47 48 49 50 51 52 53 54 55 56 57 58 59 60 61 |
SLF4J : Class path contains multiple SLF4J bindings . SLF4J : Found binding in [ jar : file : / Applications / Eclipse . app / Contents / Eclipse / plugins / org . eclipse . m2e . maven . runtime . slf4j . simple_1 . 16.0.20200610 - 1735 / jars / slf4j - simple - 1.7.5.jar ! / org / slf4j / impl / StaticLoggerBinder . class ] SLF4J : Found binding in [ file : / Applications / Eclipse . app / Contents / Eclipse / configuration / org . eclipse . osgi / 5 / 0 / . cp / org / slf4j / impl / StaticLoggerBinder . class ] SLF4J : See http : //www.slf4j.org/codes.html#multiple_bindings for an explanation. SLF4J : Actual binding is of type [ org . slf4j . impl . SimpleLoggerFactory ] SLF4J : Class path contains multiple SLF4J bindings . SLF4J : Found binding in [ jar : file : / Applications / Eclipse . app / Contents / Eclipse / plugins / org . eclipse . m2e . maven . runtime . slf4j . simple_1 . 16.0.20200610 - 1735 / jars / slf4j - simple - 1.7.5.jar ! / org / slf4j / impl / StaticLoggerBinder . class ] SLF4J : Found binding in [ file : / Applications / Eclipse . app / Contents / Eclipse / configuration / org . eclipse . osgi / 5 / 0 / . cp / org / slf4j / impl / StaticLoggerBinder . class ] SLF4J : See http : //www.slf4j.org/codes.html#multiple_bindings for an explanation. SLF4J : Actual binding is of type [ org . slf4j . impl . SimpleLoggerFactory ] [ INFO ] Scanning for projects . . . [ INFO ] [ INFO ] ---- < CrunchifySpringBootHelloWorld : CrunchifySpringBootHelloWorld > ----- [ INFO ] Building CrunchifySpringBootHelloWorld 1.0.0 - RELEASE [ INFO ] -------------------------------- [ war ] --------------------------------- [ INFO ] [ INFO ] > > > spring - boot - maven - plugin : 2.4.3 : run ( default - cli ) > test - compile @ CrunchifySpringBootHelloWorld > > > [ INFO ] [ INFO ] --- maven - resources - plugin : 3.2.0 : resources ( default - resources ) @ CrunchifySpringBootHelloWorld --- [ INFO ] Using 'UTF-8' encoding to copy filtered resources . [ INFO ] Using 'UTF-8' encoding to copy filtered properties files . [ INFO ] skip non existing resourceDirectory / Users / app / crunchify / eclipse - workspace / CrunchifySpringBootHelloWorld / src / main / resources [ INFO ] skip non existing resourceDirectory / Users / app / crunchify / eclipse - workspace / CrunchifySpringBootHelloWorld / src / main / resources [ INFO ] [ INFO ] --- maven - compiler - plugin : 3.8.1 : compile ( default - compile ) @ CrunchifySpringBootHelloWorld --- [ INFO ] Nothing to compile - all classes are up to date [ INFO ] [ INFO ] --- maven - resources - plugin : 3.2.0 : testResources ( default - testResources ) @ CrunchifySpringBootHelloWorld --- [ INFO ] Not copying test resources [ INFO ] [ INFO ] --- maven - compiler - plugin : 3.8.1 : testCompile ( default - testCompile ) @ CrunchifySpringBootHelloWorld --- [ INFO ] Not compiling test sources [ INFO ] [ INFO ] < < < spring - boot - maven - plugin : 2.4.3 : run ( default - cli ) < test - compile @ CrunchifySpringBootHelloWorld < < < [ INFO ] [ INFO ] [ INFO ] --- spring - boot - maven - plugin : 2.4.3 : run ( default - cli ) @ CrunchifySpringBootHelloWorld --- [ INFO ] Attaching agents : [ ] . ____ _ __ _ _ / \ \ / ___ '_ __ _ _(_)_ __ __ _ \ \ \ \ ( ( )\___ | ' _ | '_| | ' _ \ / _ ` | \ \ \ \ \ \ / ___ ) | | _ ) | | | | | | | ( _ | | ) ) ) ) ' |____| .__|_| |_|_| |_\__, | / / / / =========|_|==============|___/=/_/_/_/ :: Spring Boot :: (v2.4.3) 2021-02-21 21:05:10.614 INFO 36654 --- [ main] c.c.s.CrunchifyHelloWorldSpringBoot : Starting CrunchifyHelloWorldSpringBoot using Java 15 on LM-AUN-11021095 with PID 36654 (/Users/app/crunchify/eclipse-workspace/CrunchifySpringBootHelloWorld/target/classes started by arpshah in /Users/app/crunchify/eclipse-workspace/CrunchifySpringBootHelloWorld) 2021-02-21 21:05:10.616 INFO 36654 --- [ main] c.c.s.CrunchifyHelloWorldSpringBoot : No active profile set, falling back to default profiles: default 2021-02-21 21:05:11.008 INFO 36654 --- [ main] o.s.b.w.embedded.tomcat.TomcatWebServer : Tomcat initialized with port(s): 8080 (http) 2021-02-21 21:05:11.014 INFO 36654 --- [ main] o.apache.catalina.core.StandardService : Starting service [Tomcat] 2021-02-21 21:05:11.015 INFO 36654 --- [ main] org.apache.catalina.core.StandardEngine : Starting Servlet engine: [Apache Tomcat/9.0.43] 2021-02-21 21:05:11.054 INFO 36654 --- [ main] o.a.c.c.C.[Tomcat].[localhost].[/] : Initializing Spring embedded WebApplicationContext 2021-02-21 21:05:11.054 INFO 36654 --- [ main] w.s.c.ServletWebServerApplicationContext : Root WebApplicationContext: initialization completed in 417 ms 2021-02-21 21:05:11.147 INFO 36654 --- [ main] o.s.s.concurrent.ThreadPoolTaskExecutor : Initializing ExecutorService ' applicationTaskExecutor ' 2021-02-21 21:05:11.241 INFO 36654 --- [ main] o.s.b.w.embedded.tomcat.TomcatWebServer : Tomcat started on port(s): 8080 (http) with context path ' ' 2021-02-21 21:05:11.247 INFO 36654 --- [ main] c.c.s.CrunchifyHelloWorldSpringBoot : Started CrunchifyHelloWorldSpringBoot in 0.843 seconds (JVM running for 1.04) 2021-02-21 21:07:04.240 INFO 36654 --- [nio-8080-exec-1] o.a.c.c.C.[Tomcat].[localhost].[/] : Initializing Spring DispatcherServlet ' dispatcherServlet ' 2021-02-21 21:07:04.240 INFO 36654 --- [nio-8080-exec-1] o.s.web.servlet.DispatcherServlet : Initializing Servlet ' dispatcherServlet ' 2021 - 02 - 21 21 : 07 : 04.241 INFO 36654 --- [ nio - 8080 - exec - 1 ] o . s . web . servlet . DispatcherServlet : Completed initialization in 1 ms |
Passaggio 8
Ora visita gli URL http://localhost:8080 e http://locahost:8080/crunchify per vedere il risultato in tempo reale.

Spero che questo tutorial ti aiuti a iniziare con l'esempio di Java Spring Boot. Fammi sapere se riscontri problemi durante l'esecuzione della tua prima applicazione Spring Boot.
Nelle prossime settimane, aggiungeremo esempi di Spring Boot sempre più complessi per il tuo. Se hai requisiti speciali, faccelo sapere nella sezione commenti.
E dopo?
- Crea
Spring Boot applicationsuper semplice in IntelliJ IDEA - Crea un semplice
Rest Servicein IntelliJ IDEA