
จะโทรหาบริการเว็บที่สงบโดยใช้ JMeter ได้อย่างไร ทำการทดสอบโหลดอย่างง่ายและระบบอัตโนมัติ
เผยแพร่แล้ว: 2018-02-12
Representational State Transfer (REST) ได้รับการยอมรับอย่างกว้างขวางทั่วทั้งเว็บว่าเป็นทางเลือกที่ง่ายกว่าสำหรับบริการบนเว็บที่ใช้ SOAP และ Web Services Description Language (WSDL)
หลักฐานสำคัญของการเปลี่ยนแปลงในการออกแบบอินเทอร์เฟซนี้คือการนำ REST มาใช้โดยผู้ให้บริการ Web 2.0 กระแสหลัก ซึ่งรวมถึง Yahoo, Google และ Facebook ซึ่งเลิกใช้หรือส่งต่อบนอินเทอร์เฟซแบบ SOAP และ WSDL เพื่อให้ง่ายต่อการใช้งาน โมเดลเชิงทรัพยากรเพื่อแสดงบริการของพวกเขา บางครั้งคุณต้องทดสอบบริการเว็บ RESTFul ของคุณ คุณอาจมีสองสามตัวเลือก:
- กด WebService ของคุณโดยใช้ URL เดียว
- ใช้
JMeterและกด WebService แบบวนซ้ำ การทดสอบนี้ยังทำการLoad Testอย่างง่ายอีกด้วย
ในตัวอย่างนี้ ฉันจะอธิบายวิธีสร้าง Simple Hello World WebService และเข้าชม WebService เดียวกันโดยใช้ JMeter
หากคุณมีคำถามใด ๆ ด้านล่างแสดงว่าคุณมาถูกที่แล้ว:
- ทดสอบ SOAP/REST Web Services โดยใช้ JMeter
- การทดสอบประสิทธิภาพของ RESTful API โดยใช้ JMeter
- พักการทำงานอัตโนมัติของ API ใน JMeter – การทดสอบประสิทธิภาพ
- วิธีทดสอบ REST API โดยใช้ JMeter
- การใช้ JMeter เพื่อทดสอบบริการเว็บ RESTful (เจอร์ซีย์)
สรุปการดำเนินการ:
- ข้อกำหนดเบื้องต้น
Pre-Requisite:ใช้บริการ RESTFul นี้อย่างสมบูรณ์ - สร้างคลาส Java อย่างง่าย: CrunchifyJMeterTest.java (บริการที่เราจะกดโดยใช้ JMeter)
- ปรับใช้แอปพลิเคชันเดียวกันซ้ำบนเว็บเซิร์ฟเวอร์ Apache Tomcat
- เรียกใช้ JMeter และเปิดด้านล่าง
.jmxfile - เรียกใช้และวิเคราะห์การทดสอบของคุณ
ต้องอ่านอีก:
- SOAP เทียบกับ REST: Simple Object Access Protocol เทียบกับ การโอนสถานะตัวแทน
ขั้นตอนที่ 1
ข้อกำหนดเบื้องต้น Pre-Requisite: ใช้บริการ RESTFul นี้อย่างสมบูรณ์ ปรับใช้และเรียกใช้แอปพลิเคชัน
แจ้งให้เราทราบหากคุณพบปัญหาใด ๆ กับมัน
ขั้นตอนที่ 2
สร้างไฟล์ CrunchifyJMeterTest.java
|
1 2 3 4 5 6 7 8 9 10 11 12 13 14 15 16 17 18 19 20 21 22 23 24 25 26 |
package com . crunchify . restjersey ; import java . io . FileNotFoundException ; import java . io . IOException ; import javax . ws . rs . GET ; import javax . ws . rs . Path ; import javax . ws . rs . Produces ; /** * @author Crunchify * */ @ Path ( "/index" ) public class CrunchifyJMeterTest { @ GET @ Produces ( "text/html" ) public String checkECV ( ) throws InterruptedException , FileNotFoundException , IOException { String result = "<br><div align='center'><h2>Hey This is Crunchify's JMeter Test...</h2></div>" ; System . out . println ( result ) ; Thread . sleep ( 1000 ) ; return result ; } } |
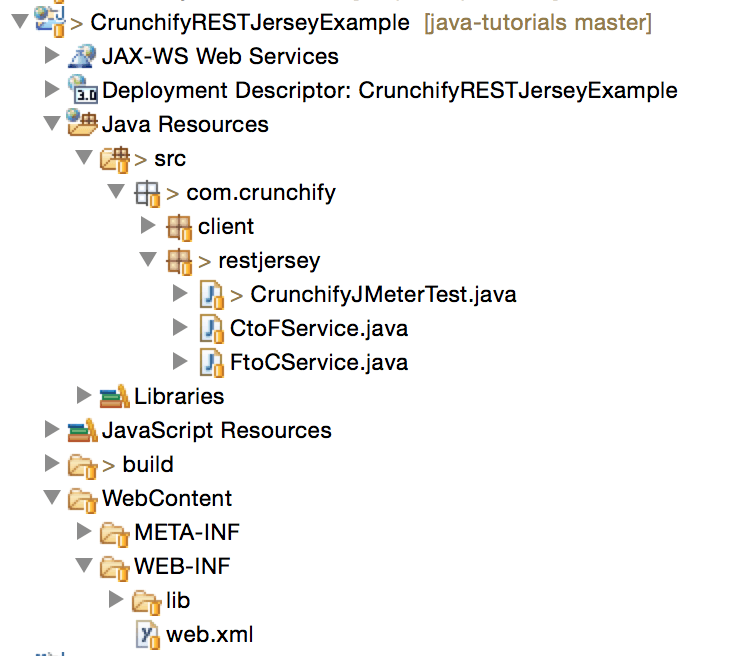
คุณควรเห็นโครงสร้างไดเรกทอรี Eclipse ด้านล่าง:
ขั้นตอนที่ 3
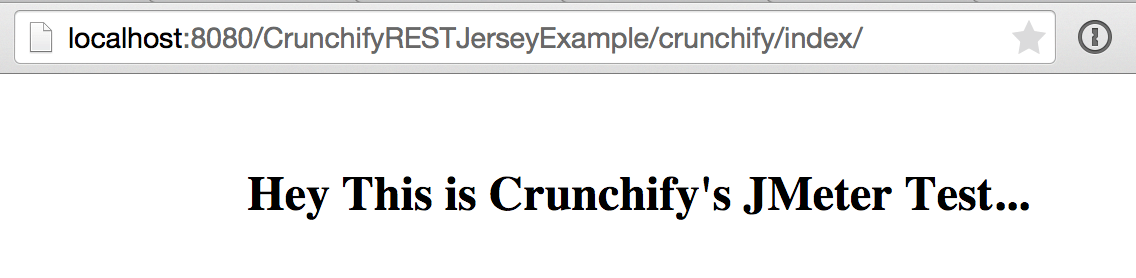
ปรับใช้โครงการ CrunchifyRESTJerseyExample เดียวกันบน Tomcat อีกครั้ง ทดสอบบริการ REST ของคุณ
URL: http://localhost:8080/CrunchifyRESTJerseyExample/crunchify/index/
ขั้นตอนที่ 4
คัดลอกโค้ดด้านล่างไปยังไฟล์และบันทึกเป็น Crunchify-JMeter-Test.jmx
|
1 2 3 4 5 6 7 8 9 10 11 12 13 14 15 16 17 18 19 20 21 22 23 24 25 26 27 28 29 30 31 32 33 34 35 36 37 38 39 40 41 42 43 44 45 46 47 48 49 50 51 52 53 54 55 56 57 58 59 60 61 62 63 64 65 66 67 68 69 70 71 72 73 74 75 76 77 78 79 80 81 82 83 84 85 86 87 88 89 90 91 92 93 94 95 96 97 98 99 100 101 102 103 104 105 106 107 108 109 110 111 112 113 114 115 116 117 118 119 120 121 122 123 |
<? xml version = "1.0" encoding = "UTF-8" ?> < jmeterTestPlan version = "1.2" properties = "2.4" jmeter = "2.9 r1437961" > < hashTree > < TestPlan guiclass = "TestPlanGui" testclass = "TestPlan" testname = "App Shah Desktop Test" enabled = "true" > < stringProp name = "TestPlan.comments" > < / stringProp > < boolProp name = "TestPlan.functional_mode" > false < / boolProp > < boolProp name = "TestPlan.serialize_threadgroups" > false < / boolProp > < elementProp name = "TestPlan.user_defined_variables" elementType = "Arguments" guiclass = "ArgumentsPanel" testclass = "Arguments" testname = "User Defined Variables" enabled = "true" > < collectionProp name = "Arguments.arguments" / > < / elementProp > < stringProp name = "TestPlan.user_define_classpath" > < / stringProp > < / TestPlan > < hashTree > < ThreadGroup guiclass = "ThreadGroupGui" testclass = "ThreadGroup" testname = "Crunchify's REST Service JMeter Test" enabled = "true" > < stringProp name = "ThreadGroup.on_sample_error" > continue < / stringProp > < elementProp name = "ThreadGroup.main_controller" elementType = "LoopController" guiclass = "LoopControlPanel" testclass = "LoopController" testname = "Loop Controller" enabled = "true" > < boolProp name = "LoopController.continue_forever" > false < / boolProp > < intProp name = "LoopController.loops" > - 1 < / intProp > < / elementProp > < stringProp name = "ThreadGroup.num_threads" > 5 < / stringProp > < stringProp name = "ThreadGroup.ramp_time" > 2 < / stringProp > < longProp name = "ThreadGroup.start_time" > 1367432020000 < / longProp > < longProp name = "ThreadGroup.end_time" > 1367432020000 < / longProp > < boolProp name = "ThreadGroup.scheduler" > false < / boolProp > < stringProp name = "ThreadGroup.duration" > < / stringProp > < stringProp name = "ThreadGroup.delay" > < / stringProp > < / ThreadGroup > < hashTree > < HTTPSamplerProxy guiclass = "HttpTestSampleGui" testclass = "HTTPSamplerProxy" testname = "HTTP Request" enabled = "true" > < boolProp name = "HTTPSampler.postBodyRaw" > true < / boolProp > < elementProp name = "HTTPsampler.Arguments" elementType = "Arguments" > < collectionProp name = "Arguments.arguments" > < elementProp name = "" elementType = "HTTPArgument" > < boolProp name = "HTTPArgument.always_encode" > false < / boolProp > < stringProp name = "Argument.value" > < / stringProp > < stringProp name = "Argument.metadata" > = < / stringProp > < / elementProp > < / collectionProp > < / elementProp > < stringProp name = "HTTPSampler.domain" > localhost < / stringProp > < stringProp name = "HTTPSampler.port" > 8080 < / stringProp > < stringProp name = "HTTPSampler.connect_timeout" > 10000 < / stringProp > < stringProp name = "HTTPSampler.response_timeout" > 10000 < / stringProp > < stringProp name = "HTTPSampler.protocol" > < / stringProp > < stringProp name = "HTTPSampler.contentEncoding" > < / stringProp > < stringProp name = "HTTPSampler.path" > / CrunchifyRESTJerseyExample / crunchify / index < / stringProp > < stringProp name = "HTTPSampler.method" > GET < / stringProp > < boolProp name = "HTTPSampler.follow_redirects" > true < / boolProp > < boolProp name = "HTTPSampler.auto_redirects" > false < / boolProp > < boolProp name = "HTTPSampler.use_keepalive" > true < / boolProp > < boolProp name = "HTTPSampler.DO_MULTIPART_POST" > false < / boolProp > < boolProp name = "HTTPSampler.monitor" > false < / boolProp > < stringProp name = "HTTPSampler.embedded_url_re" > < / stringProp > < / HTTPSamplerProxy > < hashTree / > < ResultCollector guiclass = "StatGraphVisualizer" testclass = "ResultCollector" testname = "Aggregate Graph" enabled = "true" > < boolProp name = "ResultCollector.error_logging" > false < / boolProp > < objProp > < name > saveConfig < / name > < value class = "SampleSaveConfiguration" > < time > true < / time > < latency > true < / latency > < timestamp > true < / timestamp > < success > true < / success > < label > true < / label > < code > true < / code > < message > true < / message > < threadName > true < / threadName > < dataType > true < / dataType > < encoding > false < / encoding > < assertions > true < / assertions > < subresults > true < / subresults > < responseData > false < / responseData > < samplerData > false < / samplerData > < xml > true < / xml > < fieldNames > false < / fieldNames > < responseHeaders > false < / responseHeaders > < requestHeaders > false < / requestHeaders > < responseDataOnError > false < / responseDataOnError > < saveAssertionResultsFailureMessage > false < / saveAssertionResultsFailureMessage > < assertionsResultsToSave > 0 < / assertionsResultsToSave > < bytes > true < / bytes > < / value > < / objProp > < stringProp name = "filename" > < / stringProp > < / ResultCollector > < hashTree / > < ResultCollector guiclass = "StatVisualizer" testclass = "ResultCollector" testname = "Aggregate Report" enabled = "true" > < boolProp name = "ResultCollector.error_logging" > false < / boolProp > < objProp > < name > saveConfig < / name > < value class = "SampleSaveConfiguration" > < time > true < / time > < latency > true < / latency > < timestamp > true < / timestamp > < success > true < / success > < label > true < / label > < code > true < / code > < message > true < / message > < threadName > true < / threadName > < dataType > true < / dataType > < encoding > false < / encoding > < assertions > true < / assertions > < subresults > true < / subresults > < responseData > false < / responseData > < samplerData > false < / samplerData > < xml > false < / xml > < fieldNames > false < / fieldNames > < responseHeaders > false < / responseHeaders > < requestHeaders > false < / requestHeaders > < responseDataOnError > false < / responseDataOnError > < saveAssertionResultsFailureMessage > false < / saveAssertionResultsFailureMessage > < assertionsResultsToSave > 0 < / assertionsResultsToSave > < bytes > true < / bytes > < / value > < / objProp > < stringProp name = "filename" > < / stringProp > < / ResultCollector > < hashTree / > < / hashTree > < / hashTree > < / hashTree > < / jmeterTestPlan > |

ขั้นตอนที่ -5
- ดาวน์โหลด Apache JMeter.dll
- เรียกใช้ JMeter โดยใช้ไฟล์ jmeter.bat หรือ jmeter.sh
- คลิกที่
File -> Open - ไปที่โฟลเดอร์ที่คุณบันทึกไฟล์ Crunchify-JMeter-Test.jmx และเลือก file
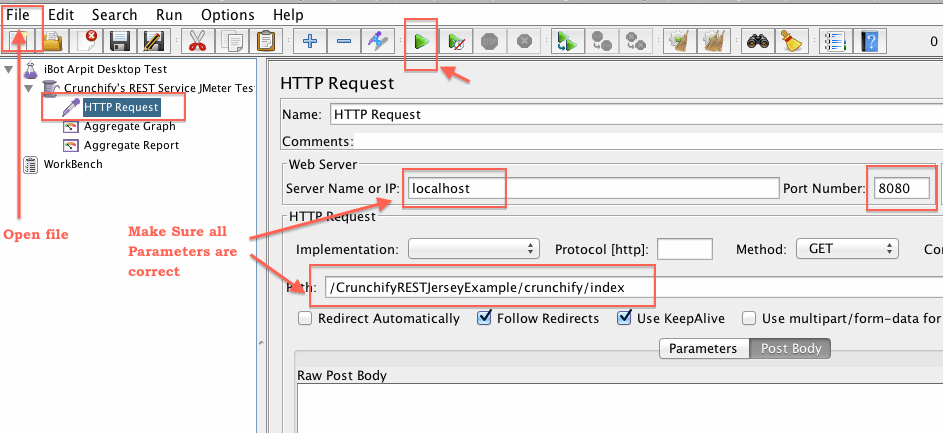
ขั้นตอนที่ 6
- ตอนนี้ขยายการทดสอบ Rest Service JMeter ของ Crunchify ดังที่คุณเห็นในภาพด้านล่าง
- คลิกที่คำขอ HTTP
- ตรวจสอบให้แน่ใจว่าพารามิเตอร์ด้านล่างถูกต้อง
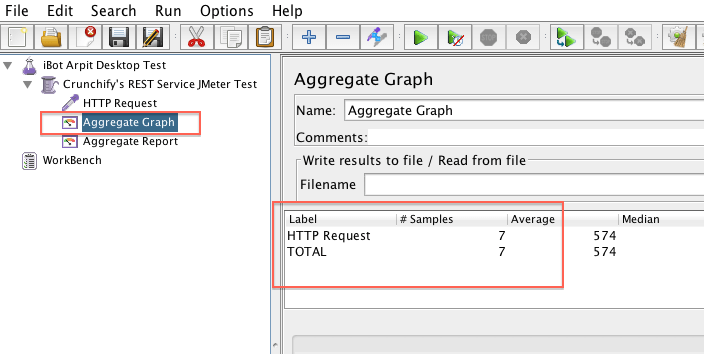
ขั้นตอนที่ 7
วิเคราะห์ผลการทดสอบของคุณ
พักการทำงานอัตโนมัติของ API ใน JMeter หรือไม่
หลังจากแต่ละรอบการพัฒนา คุณสามารถรันการทดสอบที่คุณได้กำหนดไว้แล้วในไฟล์ JMeter ในช่วงเวลาที่กำหนด
มีหลายวิธีที่คุณสามารถเปลี่ยนแปลงพารามิเตอร์ทดสอบได้ เล่นกับมันและแจ้งให้เราทราบว่ามันไปอย่างไรหรือหากคุณพบปัญหาใด ๆ กับสิ่งนี้