
如何使用多实例小部件选项创建 WordPress 插件以供侧边栏或页脚使用 – 准备使用 WordPress 插件代码
已发表: 2016-05-11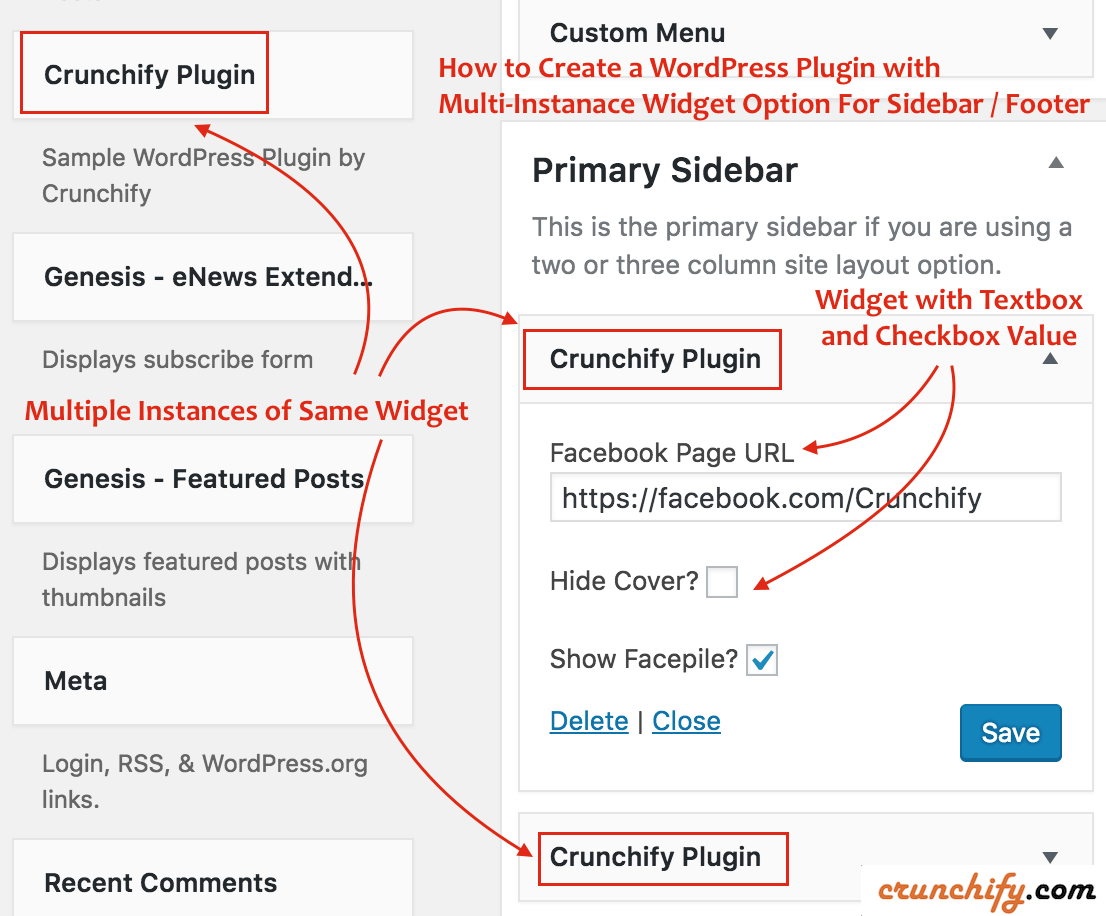
WordPress 小部件多个实例/WordPress 自定义小部件
Crunchify 在过去几年中创建了多个 WordPress 插件。 我们对插件 Facebook 成员的要求之一是拥有同一个小部件的multiple instance ,因为用户可能希望 Facebook 页面插件进入他们的Sidebar和Footer部分。
在过去几年与众多客户合作时,我们创建了很多带有多实例小部件选项的简单插件。
在本教程中,我们将Sample ready-to-use WordPress Plugin代码,该代码会将实时Facebook Page Plugin小部件放入您博客的侧边栏和/或页脚。 随意将此代码用于您的插件。
让我们开始吧:
第1步
我通常在 Eclipse IDE 中进行所有 Java 和 WordPress 开发。 因此,按照教程将 PHP 开发工具包设置到 Eclipse 中。
在crunchify-plugin文件夹下创建文件crunchify-plugin.php并放入以下代码。
|
1 2 3 4 5 6 7 8 9 10 11 12 13 14 15 16 17 18 19 20 21 22 23 24 25 26 27 28 29 30 31 32 33 34 35 36 37 38 39 40 41 42 43 44 45 46 47 48 49 50 51 52 53 54 55 56 57 58 59 60 61 62 63 64 65 66 67 68 69 70 71 72 73 74 75 76 77 78 79 80 81 82 83 84 85 86 87 88 89 90 |
<?php /* * Plugin Name: Crunchify Plugin * Plugin URI: https://crunchify.com/ * Description: The Simplest Ready to use WordPress Plugin with Multiple Instance of the same Widgets option - by Crunchify * Version: 1.0 * Author: Crunchify * Author URI: https://crunchify.com * Text Domain: crunchify-plugin */ class crunchify_widget extends WP_Widget { // Create Multiple WordPress Widgets function __construct ( ) { parent : : __construct ( 'crunchify_widget' , __ ( 'Crunchify Plugin' , 'crunchify_plugin_domain' ) , array ( 'description' = > __ ( 'Sample WordPress Plugin by Crunchify' , 'crunchify_plugin_domain' ) ) ) ; } // This function creates nice Facebook Page Like box in Header or Footer public function widget ( $args , $instance ) { $crunchify_facebook_url = apply_filters ( 'crunchify_facebook_url' , $instance [ 'crunchify_facebook_url' ] ) ; $crunchify_facebook_hidecover = $instance [ 'crunchify_facebook_hidecover' ] ? 'true' : 'false' ; $crunchify_facebook_showface = $instance [ 'crunchify_facebook_showface' ] ? 'true' : 'false' ; $facebookpage = '<div><iframe src="//www.facebook.com/plugins/page.php?href=' . $crunchify_facebook_url . '&tabs=&width=300&height=220&small_header=false&adapt_container_width=true&hide_cover=' . $crunchify_facebook_hidecover . '&show_facepile=' . $crunchify_facebook_showface . '&show_border=false&header=false" scrolling="no" frameborder="0" allowTransparency="true"></iframe></div>' ; echo $before_widget ; echo $before_title . $after_title ; echo $facebookpage ; echo $after_widget ; } // Create Instance and Assign Values public function form ( $instance ) { if ( isset ( $instance [ 'crunchify_facebook_url' ] ) ) { $crunchify_facebook_url = $instance [ 'crunchify_facebook_url' ] ; } else { $crunchify_facebook_url = __ ( 'https://facebook.com/Crunchify' , 'crunchify_plugin_domain' ) ; } $instance [ 'crunchify_facebook_hidecover' ] = $instance [ 'crunchify_facebook_hidecover' ] ? 'true' : 'false' ; $instance [ 'crunchify_facebook_showface' ] = $instance [ 'crunchify_facebook_showface' ] ? 'true' : 'false' ; ?> < ! -- This is Crunchify Widget Form -- > < p > < label for = " <?php echo $this - > get_field_id ( 'crunchify_facebook_url' ) ; ?> " > <?php _e ( 'Facebook Page URL' ) ; ?> < / label > < input class = "widefat" id = " <?php echo $this - > get_field_id ( 'crunchify_facebook_url' ) ; ?> " name = " <?php echo $this - > get_field_name ( 'crunchify_facebook_url' ) ; ?> " type = "text" value = " <?php echo esc_attr ( $crunchify_facebook_url ) ; ?> " / > < br / > < br / > < label for = " <?php echo $this - > get_field_id ( 'crunchify_facebook_hidecover' ) ; ?> " > <?php _e ( 'Hide Cover?' ) ; ?> < / label > < input class = "checkbox" type = "checkbox" <?php checked ( $instance [ 'crunchify_facebook_hidecover' ] , 'true' ) ; ?> id = " <?php echo $this - > get_field_id ( 'crunchify_facebook_hidecover' ) ; ?> " name = " <?php echo $this - > get_field_name ( 'crunchify_facebook_hidecover' ) ; ?> " / > < br / > < br / > < label for = " <?php echo $this - > get_field_id ( 'crunchify_facebook_showface' ) ; ?> " > <?php _e ( 'Show Facepile?' ) ; ?> < / label > < input class = "checkbox" type = "checkbox" <?php checked ( $instance [ 'crunchify_facebook_showface' ] , 'true' ) ; ?> id = " <?php echo $this - > get_field_id ( 'crunchify_facebook_showface' ) ; ?> " name = " <?php echo $this - > get_field_name ( 'crunchify_facebook_showface' ) ; ?> " / > < / p > <?php } // Updating widget replacing old instances with new function update ( $new_instance , $old_instance ) { $instance = array ( ) ; $instance [ 'crunchify_facebook_url' ] = ( ! empty ( $new_instance [ 'crunchify_facebook_url' ] ) ) ? strip_tags ( $new_instance [ 'crunchify_facebook_url' ] ) : '' ; $instance [ 'crunchify_facebook_hidecover' ] = $new_instance [ 'crunchify_facebook_hidecover' ] ; $instance [ 'crunchify_facebook_showface' ] = $new_instance [ 'crunchify_facebook_showface' ] ; return $instance ; } } function crunchify_plugin ( ) { register_widget ( 'crunchify_widget' ) ; } // Initialize Plugin add_action ( 'widgets_init' , 'crunchify_plugin' ) ; ?> |

让我们从上面的代码中理解 4 个突出显示的行:
- 函数 __construct()
- 使用名称和描述初始化 WordPress 插件
- 公共功能小部件($args,$instance)
- 这是您的博客上显示的内容 - 输出小部件的内容
- 公共函数形式($instance)
- 这是您在
Appearance->Widgets中指定 WordPress Widget 选项的地方
- 这是您在
- 函数更新($new_instance,$old_instance)
- 当您单击保存按钮时 - 选项值将被保存
NOTE: widgets_init操作将调用您的函数crunchify_plugin ,该函数在内部registers名称为crunchify_widget的小部件。
第2步
在同一个crunchify-plugin文件夹下创建readme.txt文件,内容如下。 随时根据您的需要更新它。
|
1 2 3 4 5 6 7 8 9 10 11 12 13 14 15 16 17 18 19 20 21 22 23 24 25 26 27 28 29 30 31 32 33 34 35 36 37 38 |
=== Crunchify Plugin === Contributors : Crunchify Tags : WordPress , WordPress Plugins , Crunchify , multiple widgets Requires at least : 4.3 Tested up to : 4.5.2 Stable tag : 1.0 The simplest ready to use WordPress Plugin with Multiple Instance of the same Widgets option - by Crunchify . com == Description == Sample WordPress Plugin which creates Multiple Widgets for your plugin . [ Feedback ] ( https : //crunchify.com/) | [Twitter](https://twitter.com/Crunchify) == Installation == 1. Unpack the ` download - package ` . 2. Upload the file to the ` / wp - content / plugins / ` directory . 3. Activate the plugin through the ` Plugins ` menu in WordPress . 4. Go to Appearance - > Widgets Section - > Select Plugin ` Crunchify Plugin ` . 5. Done and Ready . == Frequently Asked Questions == = FAQ1 = * Your Answer1 . = Where do I get latest updates on plugin ? = * On < a href = "http://twitter.com/Crunchify" target = "_blank" > Twitter < / a > and < a href = "http://www.facebook.com/Crunchify" target = "_blank" > Facebook < / a > . == Screenshots == 1. Screenshot1 details 2. Screenshot2 details == Changelog == = 1.0 = * Initial Working Version |
第三步
只是为了确保您的文件夹结构应如下所示:

将crunchify-plugin文件夹放在plugins文件夹下。
第 4 步如何启用?
- 转到您网站的
Admin Panel - 点击
Plugins -
Activate插件 Crunchify Plugin

第 5 步设置插件选项
- 点击
Appearance -> Widgets - 选择 Widget
Crunchify Plugin并将其放在Sidebar或Footer脚下 - 更新选项并点击
save
Step-6 如何验证?
我放置了两个具有不同选项的小部件。
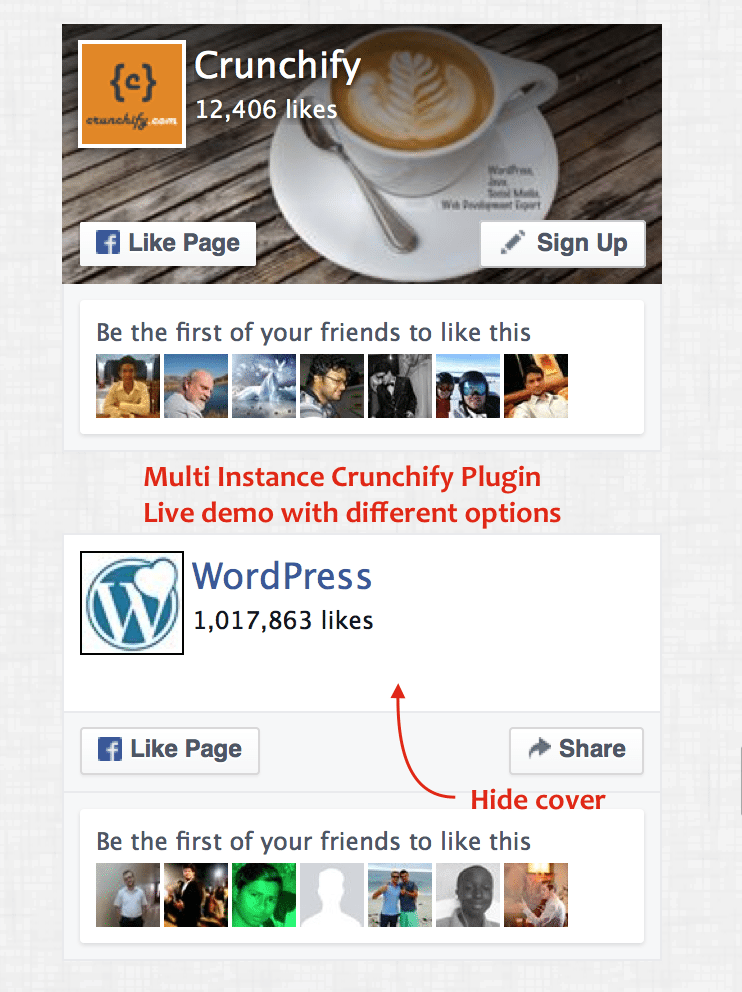
您应该会看到multiple instances of same Crunchify Plugin它们会根据您的设置在侧边栏或页脚中发出漂亮的Facebook Page Plugin 。