
如何创建 WordPress 自定义帖子类型 (CPT) 和分类法 – Hello World 教程、提示和技巧
已发表: 2016-03-11
惊人的。 让我们谈谈Custom Post Type (CPT)。 如果有以下问题,这也将对您有所帮助:
- 如何在 WordPress 中创建自定义帖子类型?
- 生成 WordPress 帖子类型
- 创建您的第一个 WordPress 自定义帖子类型
- WordPress CPT 分类
- WordPress自定义帖子类型的完整指南
WordPress 是使用最广泛的博客平台之一,具有许多强大的功能, Custom Post Type就是其中之一。 我以前从未在 WordPress 中查看过自定义帖子类型 (CPT),但最近我想为“交易”创建一个新部分。
有两种方法可以实现:
- 创建新子域:
http://deals.crunchify.com/://deals.crunchify.com/ - 创建新的自定义帖子类型:
https://crunchify.com/deals/://crunchify.com/deals/
要实现point 1 ,您可以简单地创建一个子域并安装新的 WordPress 安装并启动新博客。 但我相信,没有人愿意这样做来创建一个简单的部分。 因此,我们将看看本教程中的point 2 。
WordPress有一堆默认的帖子类型,比如:
- 附件(帖子类型:“附件”)
- 帖子(帖子类型:'post')
- 导航菜单(帖子类型:'nav_menu_item')
- 修订(帖子类型:'修订')
- 页面(帖子类型:“页面”)
现在什么是CPT?
Custom post types (CPT)是您可以创建的新帖子类型。 可以通过register_post_type()函数将自定义帖子类型添加到 WordPress。 此功能允许您通过标签、支持的功能、可用性和其他细节来定义新的帖子类型。
让我们开始吧。
第1步
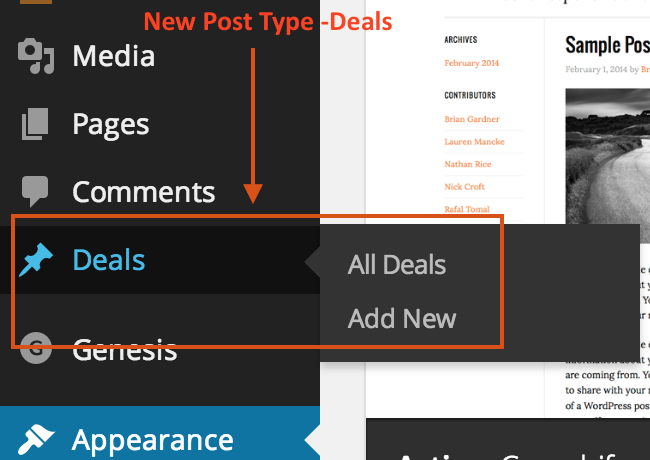
这是我们需要创建一个名为“ Deals ”的新Custom Post Type 。
|
1 2 3 4 5 6 7 8 9 10 11 12 13 14 15 16 17 18 19 20 21 22 23 24 25 26 27 28 29 30 31 32 33 34 35 36 37 38 39 |
// Creating a Deals Custom Post Type function crunchify_deals_custom_post_type ( ) { $labels = array ( 'name' = > __ ( 'Deals' ) , 'singular_name' = > __ ( 'Deal' ) , 'menu_name' = > __ ( 'Deals' ) , 'parent_item_colon' = > __ ( 'Parent Deal' ) , 'all_items' = > __ ( 'All Deals' ) , 'view_item' = > __ ( 'View Deal' ) , 'add_new_item' = > __ ( 'Add New Deal' ) , 'add_new' = > __ ( 'Add New' ) , 'edit_item' = > __ ( 'Edit Deal' ) , 'update_item' = > __ ( 'Update Deal' ) , 'search_items' = > __ ( 'Search Deal' ) , 'not_found' = > __ ( 'Not Found' ) , 'not_found_in_trash' = > __ ( 'Not found in Trash' ) ) ; $args = array ( 'label' = > __ ( 'deals' ) , 'description' = > __ ( 'Best Crunchify Deals' ) , 'labels' = > $labels , 'supports' = > array ( 'title' , 'editor' , 'excerpt' , 'author' , 'thumbnail' , 'revisions' , 'custom-fields' ) , 'public' = > true , 'hierarchical' = > false , 'show_ui' = > true , 'show_in_menu' = > true , 'show_in_nav_menus' = > true , 'show_in_admin_bar' = > true , 'has_archive' = > true , 'can_export' = > true , 'exclude_from_search' = > false , 'yarpp_support' = > true , 'taxonomies' = > array ( 'post_tag' ) , 'publicly_queryable' = > true , 'capability_type' = > 'page' ) ; register_post_type ( 'deals' , $args ) ; } add_action ( 'init' , 'crunchify_deals_custom_post_type' , 0 ) ; |
上面的代码将创建一个名为Deals的新部分,我们称之为 Custom Post Type

如何将标签添加到自定义帖子类型? 上面代码段中
'taxonomies' => array('post_tag')行会将标准 WordPress 标签添加到您的自定义帖子类型中。
第2步
现在,如果您想创建名为Type的Custom Taxonomy 。 使用register_taxonomy函数,您可以简单地创建分类。
|
1 2 3 4 5 6 7 8 9 10 11 12 13 14 15 16 17 18 19 20 21 22 23 24 25 26 27 28 29 |
// Let us create Taxonomy for Custom Post Type add_action ( 'init' , 'crunchify_create_deals_custom_taxonomy' , 0 ) ; //create a custom taxonomy name it "type" for your posts function crunchify_create_deals_custom_taxonomy ( ) { $labels = array ( 'name' = > _x ( 'Types' , 'taxonomy general name' ) , 'singular_name' = > _x ( 'Type' , 'taxonomy singular name' ) , 'search_items' = > __ ( 'Search Types' ) , 'all_items' = > __ ( 'All Types' ) , 'parent_item' = > __ ( 'Parent Type' ) , 'parent_item_colon' = > __ ( 'Parent Type:' ) , 'edit_item' = > __ ( 'Edit Type' ) , 'update_item' = > __ ( 'Update Type' ) , 'add_new_item' = > __ ( 'Add New Type' ) , 'new_item_name' = > __ ( 'New Type Name' ) , 'menu_name' = > __ ( 'Types' ) , ) ; register_taxonomy ( 'types' , array ( 'deals' ) , array ( 'hierarchical' = > true , 'labels' = > $labels , 'show_ui' = > true , 'show_admin_column' = > true , 'query_var' = > true , 'rewrite' = > array ( 'slug' = > 'type' ) , ) ) ; } |

第三步
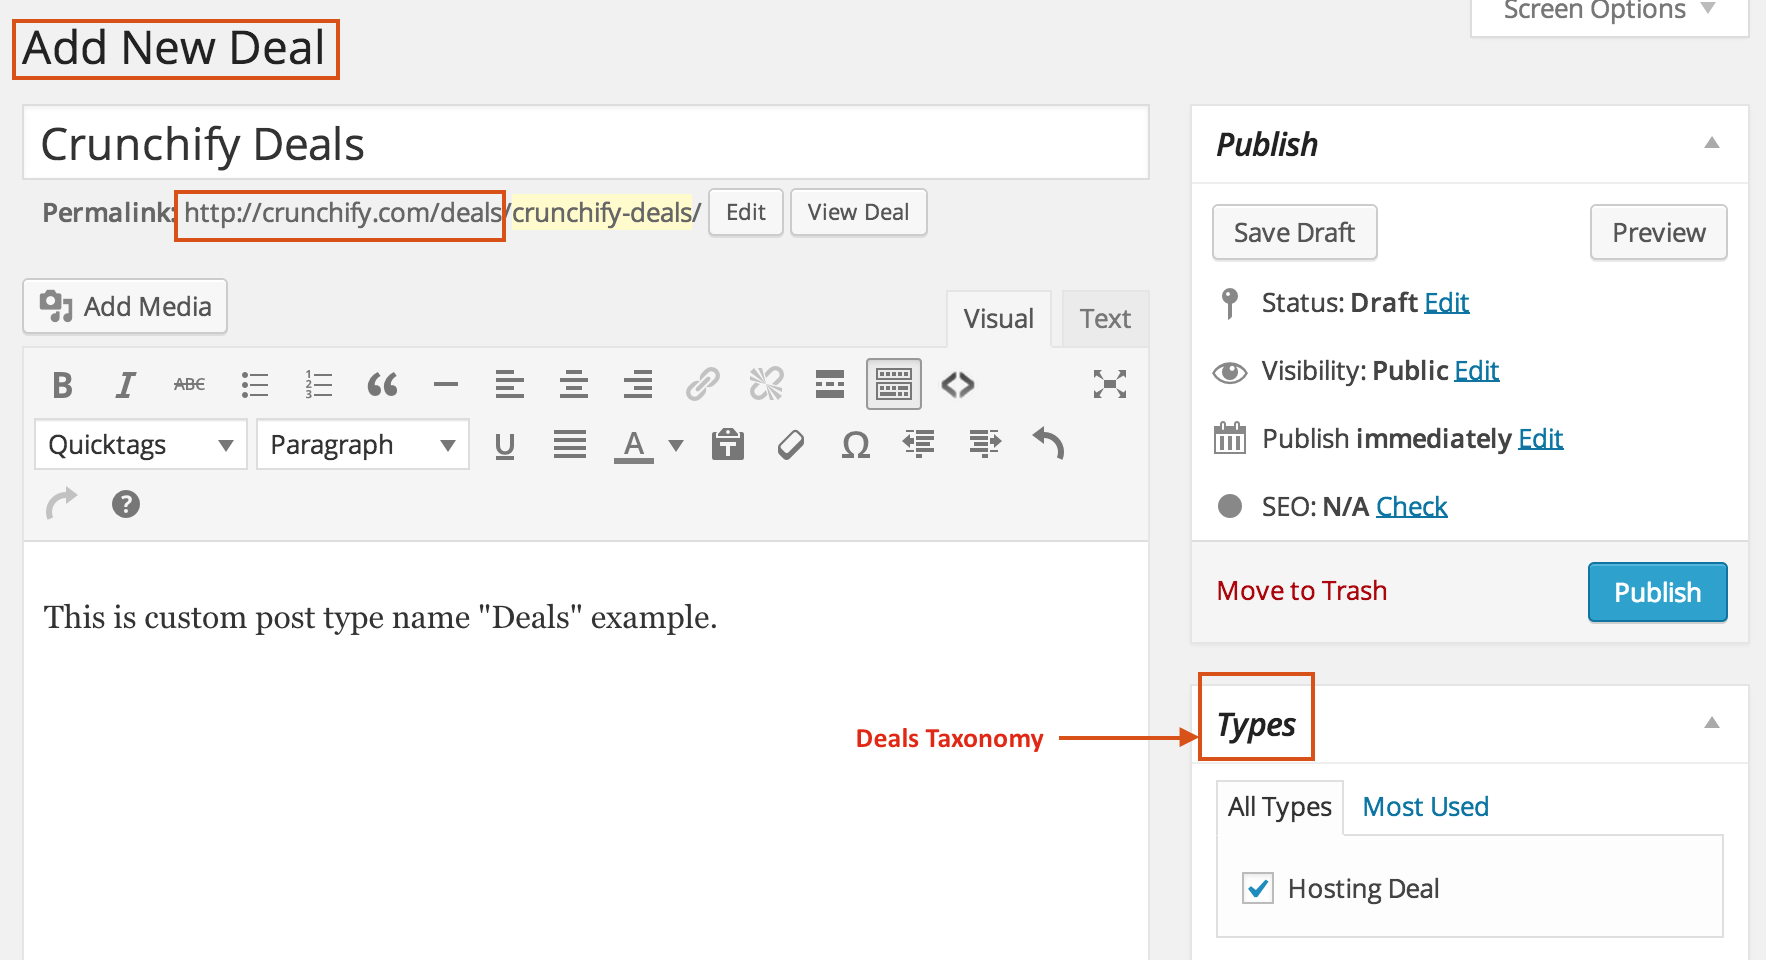
现在创建您的第一个交易帖子。 这是Add New Deal的屏幕截图。
第四步
创建您的第一个类型分类。 这是一个Add New Type页面。

我们使用本教程创建了 WordPress Custom Post Type - Deals和Custom Taxonomy - Types 。 在下一个教程中,我们将对此进行更多的自定义。
接下来是什么? 获取 RSS、YARPP、帖子元、页脚、主页的 WordPress 自定义帖子类型 (CPT) 提示和技巧。
另外,查看另一个关于 CPT 的教程。
如何在自定义帖子类型永久链接中添加自定义分类?