
サイドバーまたはフッター用のマルチインスタンスウィジェットオプションを使用してWordPressプラグインを作成する方法–WordPressプラグインコードをすぐに使用できます
公開: 2016-05-11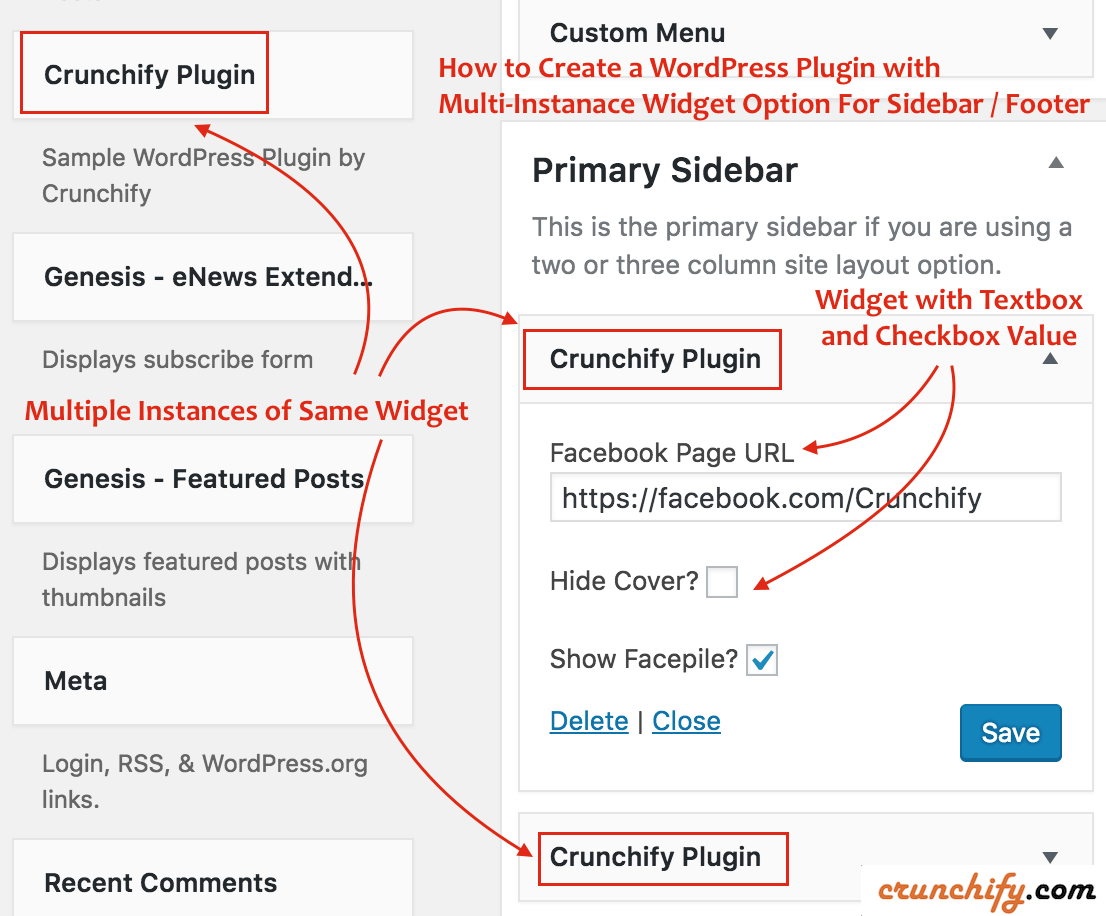
WordPressウィジェット複数インスタンス/ WordPressカスタムウィジェット
Crunchifyは、過去数年にわたって複数のWordPressプラグインを作成してきました。 プラグインFacebookメンバーに必要な要件の1つは、同じウィジェットのmultiple instanceを用意することです。これは、ユーザーがFacebookページプラグインをSidebarとFooterセクションに配置したい場合があるためです。
過去数年にわたって多数のクライアントと協力しながら、複数のインスタンスウィジェットオプションを備えたかなりの数の単純なプラグインを作成しました。
このチュートリアルでは、ライブFacebook Page Pluginウィジェットをブログのサイドバーやフッターに配置Sample ready-to-use WordPress Pluginについて説明します。 このコードをプラグインに自由に使用してください。
始めましょう:
ステップ1
私は通常、すべてのJavaおよびWordPress開発をEclipseIDEで行います。 したがって、チュートリアルに従って、PHP開発キットをEclipseにセットアップします。
crunchify-pluginフォルダーの下にファイルcrunchify-plugin.phpを作成し、以下のコードを配置します。
|
1 2 3 4 5 6 7 8 9 10 11 12 13 14 15 16 17 18 19 20 21 22 23 24 25 26 27 28 29 30 31 32 33 34 35 36 37 38 39 40 41 42 43 44 45 46 47 48 49 50 51 52 53 54 55 56 57 58 59 60 61 62 63 64 65 66 67 68 69 70 71 72 73 74 75 76 77 78 79 80 81 82 83 84 85 86 87 88 89 90 |
<?php /* * Plugin Name: Crunchify Plugin * Plugin URI: https://crunchify.com/ * Description: The Simplest Ready to use WordPress Plugin with Multiple Instance of the same Widgets option - by Crunchify * Version: 1.0 * Author: Crunchify * Author URI: https://crunchify.com * Text Domain: crunchify-plugin */ class crunchify_widget extends WP_Widget { // Create Multiple WordPress Widgets function __construct ( ) { parent : : __construct ( 'crunchify_widget' , __ ( 'Crunchify Plugin' , 'crunchify_plugin_domain' ) , array ( 'description' = > __ ( 'Sample WordPress Plugin by Crunchify' , 'crunchify_plugin_domain' ) ) ) ; } // This function creates nice Facebook Page Like box in Header or Footer public function widget ( $args , $instance ) { $crunchify_facebook_url = apply_filters ( 'crunchify_facebook_url' , $instance [ 'crunchify_facebook_url' ] ) ; $crunchify_facebook_hidecover = $instance [ 'crunchify_facebook_hidecover' ] ? 'true' : 'false' ; $crunchify_facebook_showface = $instance [ 'crunchify_facebook_showface' ] ? 'true' : 'false' ; $facebookpage = '<div><iframe src="//www.facebook.com/plugins/page.php?href=' . $crunchify_facebook_url . '&tabs=&width=300&height=220&small_header=false&adapt_container_width=true&hide_cover=' . $crunchify_facebook_hidecover . '&show_facepile=' . $crunchify_facebook_showface . '&show_border=false&header=false" scrolling="no" frameborder="0" allowTransparency="true"></iframe></div>' ; echo $before_widget ; echo $before_title . $after_title ; echo $facebookpage ; echo $after_widget ; } // Create Instance and Assign Values public function form ( $instance ) { if ( isset ( $instance [ 'crunchify_facebook_url' ] ) ) { $crunchify_facebook_url = $instance [ 'crunchify_facebook_url' ] ; } else { $crunchify_facebook_url = __ ( 'https://facebook.com/Crunchify' , 'crunchify_plugin_domain' ) ; } $instance [ 'crunchify_facebook_hidecover' ] = $instance [ 'crunchify_facebook_hidecover' ] ? 'true' : 'false' ; $instance [ 'crunchify_facebook_showface' ] = $instance [ 'crunchify_facebook_showface' ] ? 'true' : 'false' ; ?> < ! -- This is Crunchify Widget Form -- > < p > < label for = " <?php echo $this - > get_field_id ( 'crunchify_facebook_url' ) ; ?> " > <?php _e ( 'Facebook Page URL' ) ; ?> < / label > < input class = "widefat" id = " <?php echo $this - > get_field_id ( 'crunchify_facebook_url' ) ; ?> " name = " <?php echo $this - > get_field_name ( 'crunchify_facebook_url' ) ; ?> " type = "text" value = " <?php echo esc_attr ( $crunchify_facebook_url ) ; ?> " / > < br / > < br / > < label for = " <?php echo $this - > get_field_id ( 'crunchify_facebook_hidecover' ) ; ?> " > <?php _e ( 'Hide Cover?' ) ; ?> < / label > < input class = "checkbox" type = "checkbox" <?php checked ( $instance [ 'crunchify_facebook_hidecover' ] , 'true' ) ; ?> id = " <?php echo $this - > get_field_id ( 'crunchify_facebook_hidecover' ) ; ?> " name = " <?php echo $this - > get_field_name ( 'crunchify_facebook_hidecover' ) ; ?> " / > < br / > < br / > < label for = " <?php echo $this - > get_field_id ( 'crunchify_facebook_showface' ) ; ?> " > <?php _e ( 'Show Facepile?' ) ; ?> < / label > < input class = "checkbox" type = "checkbox" <?php checked ( $instance [ 'crunchify_facebook_showface' ] , 'true' ) ; ?> id = " <?php echo $this - > get_field_id ( 'crunchify_facebook_showface' ) ; ?> " name = " <?php echo $this - > get_field_name ( 'crunchify_facebook_showface' ) ; ?> " / > < / p > <?php } // Updating widget replacing old instances with new function update ( $new_instance , $old_instance ) { $instance = array ( ) ; $instance [ 'crunchify_facebook_url' ] = ( ! empty ( $new_instance [ 'crunchify_facebook_url' ] ) ) ? strip_tags ( $new_instance [ 'crunchify_facebook_url' ] ) : '' ; $instance [ 'crunchify_facebook_hidecover' ] = $new_instance [ 'crunchify_facebook_hidecover' ] ; $instance [ 'crunchify_facebook_showface' ] = $new_instance [ 'crunchify_facebook_showface' ] ; return $instance ; } } function crunchify_plugin ( ) { register_widget ( 'crunchify_widget' ) ; } // Initialize Plugin add_action ( 'widgets_init' , 'crunchify_plugin' ) ; ?> |

上記のコードから強調表示された4行を理解しましょう。
- 関数__construct()
- 名前と説明を使用してWordPressプラグインを初期化します
- パブリック関数ウィジェット($ args、$ instance)
- これはあなたのブログに表示されるものです–ウィジェットのコンテンツを出力します
- パブリック関数フォーム($ instance)
- ここで、[
Appearance]-> [Widgets内でWordPressウィジェットオプションを指定します
- ここで、[
- 関数の更新($ new_instance、$ old_instance)
- [保存]ボタンをクリックすると、オプションの値が保存されます
NOTE: widgets_initアクションは、 crunchify_widgetという名前でウィジェットを内部的にregistersする関数crunchify_pluginを呼び出します。
ステップ2
以下のコンテンツを含む同じcrunchify-pluginフォルダーの下にreadme.txtファイルを作成します。 必要に応じて更新してください。
|
1 2 3 4 5 6 7 8 9 10 11 12 13 14 15 16 17 18 19 20 21 22 23 24 25 26 27 28 29 30 31 32 33 34 35 36 37 38 |
=== Crunchify Plugin === Contributors : Crunchify Tags : WordPress , WordPress Plugins , Crunchify , multiple widgets Requires at least : 4.3 Tested up to : 4.5.2 Stable tag : 1.0 The simplest ready to use WordPress Plugin with Multiple Instance of the same Widgets option - by Crunchify . com == Description == Sample WordPress Plugin which creates Multiple Widgets for your plugin . [ Feedback ] ( https : //crunchify.com/) | [Twitter](https://twitter.com/Crunchify) == Installation == 1. Unpack the ` download - package ` . 2. Upload the file to the ` / wp - content / plugins / ` directory . 3. Activate the plugin through the ` Plugins ` menu in WordPress . 4. Go to Appearance - > Widgets Section - > Select Plugin ` Crunchify Plugin ` . 5. Done and Ready . == Frequently Asked Questions == = FAQ1 = * Your Answer1 . = Where do I get latest updates on plugin ? = * On < a href = "http://twitter.com/Crunchify" target = "_blank" > Twitter < / a > and < a href = "http://www.facebook.com/Crunchify" target = "_blank" > Facebook < / a > . == Screenshots == 1. Screenshot1 details 2. Screenshot2 details == Changelog == = 1.0 = * Initial Working Version |
ステップ-3
フォルダ構造が次のようになっていることを確認してください。

crunchify-pluginフォルダーをpluginsフォルダーの下に置きます。
ステップ-4有効にする方法は?
- サイトの
Admin Panelに移動します Pluginsをクリックします- プラグインを
ActivateするCrunchifyプラグイン

ステップ-5プラグインオプションの設定
- [
Appearance -> Widgetsをクリックします - Widget
Crunchify Pluginを選択し、SidebarまたはFooterの下に配置します - オプションを更新して[
save]をクリックします
ステップ-6確認する方法は?
オプションの異なる2つのウィジェットを配置しました。
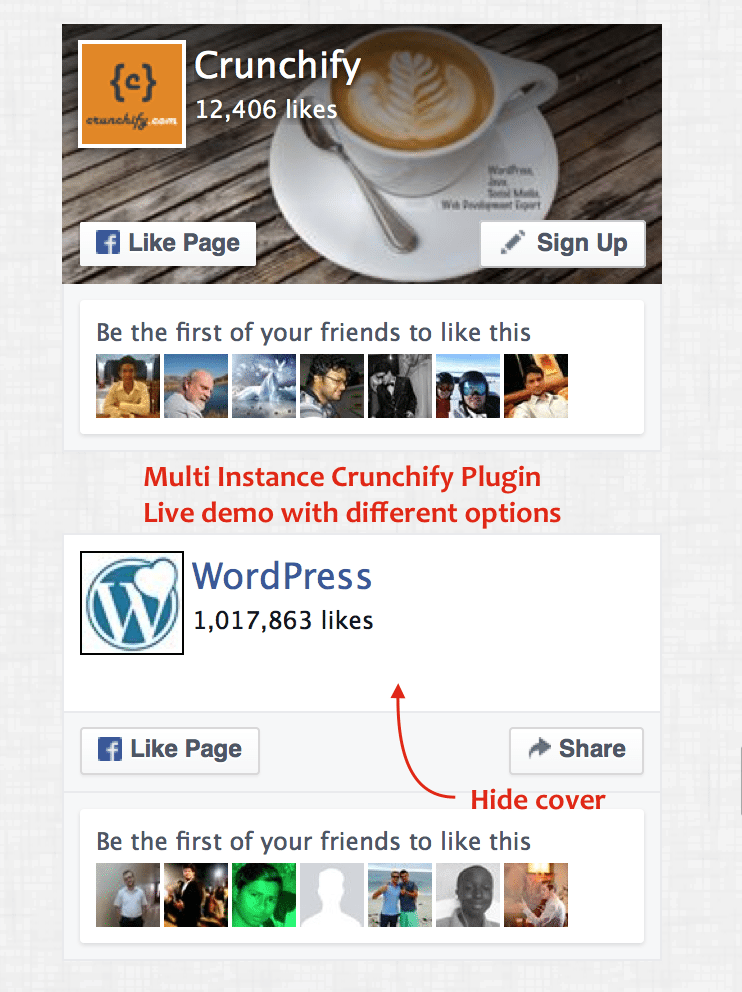
セットアップに従って、サイドバーまたはフッターに素敵なFacebook Page Pluginインを出力するmultiple instances of same Crunchify Plugin表示されるはずです。