
사이드바 또는 바닥글 사용을 위한 다중 인스턴스 위젯 옵션으로 WordPress 플러그인을 만드는 방법 – WordPress 플러그인 코드 사용 준비
게시 됨: 2016-05-11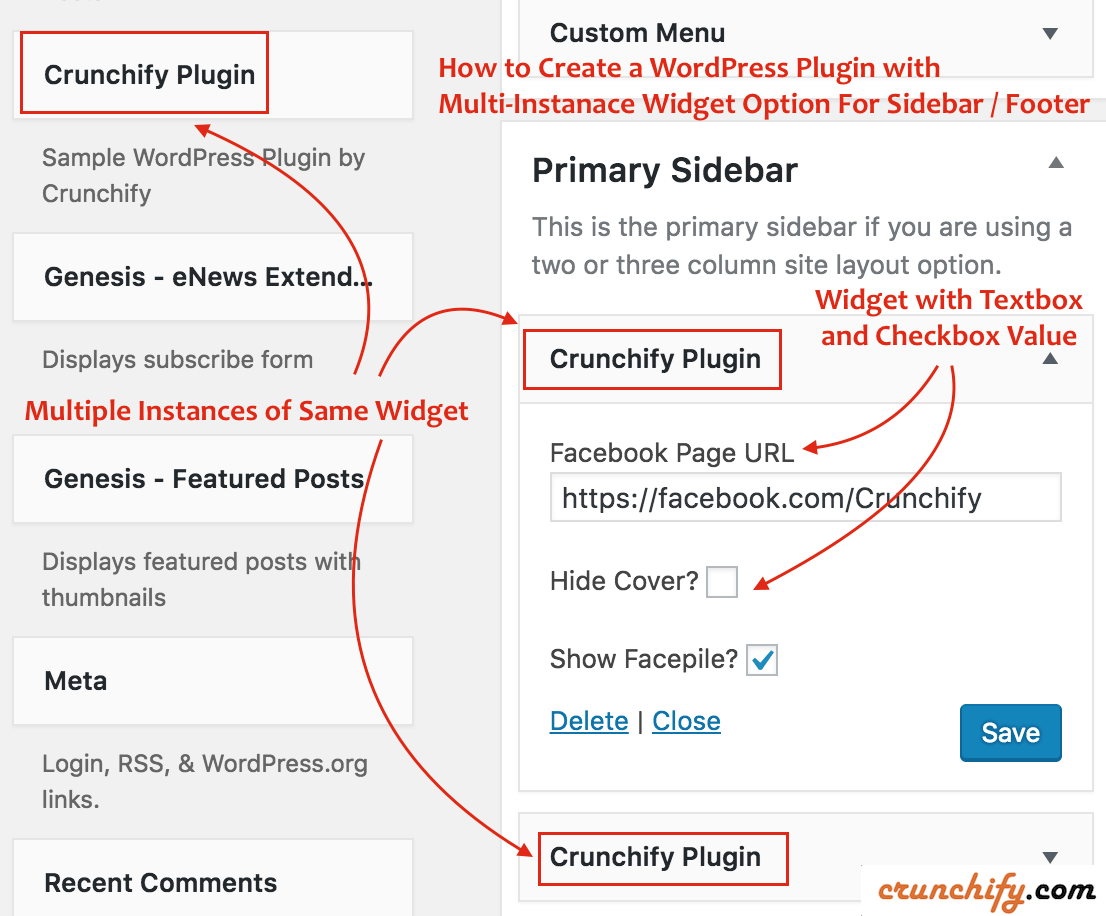
WordPress 위젯 다중 인스턴스 / WordPress 사용자 정의 위젯
Crunchify는 지난 몇 년 동안 여러 WordPress 플러그인을 만들었습니다. Facebook 회원 플러그인에 대한 요구 사항 중 하나는 사용자가 Facebook 페이지 플러그인을 Sidebar 및 Footer 섹션에 포함하기를 원할 수 있기 때문에 동일한 위젯의 multiple instance 를 갖는 것입니다.
지난 몇 년 동안 수많은 클라이언트와 작업하면서 여러 인스턴스 위젯 옵션이 있는 몇 가지 간단한 플러그인을 만들었습니다.
이 튜토리얼에서는 라이브 Facebook Page Plugin 위젯을 블로그의 사이드바 및/또는 바닥글에 넣는 Sample ready-to-use WordPress Plugin 을 살펴보겠습니다. 이 코드를 플러그인에 자유롭게 사용하십시오.
시작하자:
1 단계
나는 일반적으로 Eclipse IDE에서 모든 Java 및 WordPress 개발을 수행합니다. 따라서 튜토리얼을 따라 PHP 개발 키트를 Eclipse로 설정하십시오.
crunchify-plugin 폴더 아래에 crunchify crunchify-plugin.php 파일을 생성하고 아래 코드를 입력합니다.
|
1 2 3 4 5 6 7 8 9 10 11 12 13 14 15 16 17 18 19 20 21 22 23 24 25 26 27 28 29 30 31 32 33 34 35 36 37 38 39 40 41 42 43 44 45 46 47 48 49 50 51 52 53 54 55 56 57 58 59 60 61 62 63 64 65 66 67 68 69 70 71 72 73 74 75 76 77 78 79 80 81 82 83 84 85 86 87 88 89 90 |
<?php /* * Plugin Name: Crunchify Plugin * Plugin URI: https://crunchify.com/ * Description: The Simplest Ready to use WordPress Plugin with Multiple Instance of the same Widgets option - by Crunchify * Version: 1.0 * Author: Crunchify * Author URI: https://crunchify.com * Text Domain: crunchify-plugin */ class crunchify_widget extends WP_Widget { // Create Multiple WordPress Widgets function __construct ( ) { parent : : __construct ( 'crunchify_widget' , __ ( 'Crunchify Plugin' , 'crunchify_plugin_domain' ) , array ( 'description' = > __ ( 'Sample WordPress Plugin by Crunchify' , 'crunchify_plugin_domain' ) ) ) ; } // This function creates nice Facebook Page Like box in Header or Footer public function widget ( $args , $instance ) { $crunchify_facebook_url = apply_filters ( 'crunchify_facebook_url' , $instance [ 'crunchify_facebook_url' ] ) ; $crunchify_facebook_hidecover = $instance [ 'crunchify_facebook_hidecover' ] ? 'true' : 'false' ; $crunchify_facebook_showface = $instance [ 'crunchify_facebook_showface' ] ? 'true' : 'false' ; $facebookpage = '<div><iframe src="//www.facebook.com/plugins/page.php?href=' . $crunchify_facebook_url . '&tabs=&width=300&height=220&small_header=false&adapt_container_width=true&hide_cover=' . $crunchify_facebook_hidecover . '&show_facepile=' . $crunchify_facebook_showface . '&show_border=false&header=false" scrolling="no" frameborder="0" allowTransparency="true"></iframe></div>' ; echo $before_widget ; echo $before_title . $after_title ; echo $facebookpage ; echo $after_widget ; } // Create Instance and Assign Values public function form ( $instance ) { if ( isset ( $instance [ 'crunchify_facebook_url' ] ) ) { $crunchify_facebook_url = $instance [ 'crunchify_facebook_url' ] ; } else { $crunchify_facebook_url = __ ( 'https://facebook.com/Crunchify' , 'crunchify_plugin_domain' ) ; } $instance [ 'crunchify_facebook_hidecover' ] = $instance [ 'crunchify_facebook_hidecover' ] ? 'true' : 'false' ; $instance [ 'crunchify_facebook_showface' ] = $instance [ 'crunchify_facebook_showface' ] ? 'true' : 'false' ; ?> < ! -- This is Crunchify Widget Form -- > < p > < label for = " <?php echo $this - > get_field_id ( 'crunchify_facebook_url' ) ; ?> " > <?php _e ( 'Facebook Page URL' ) ; ?> < / label > < input class = "widefat" id = " <?php echo $this - > get_field_id ( 'crunchify_facebook_url' ) ; ?> " name = " <?php echo $this - > get_field_name ( 'crunchify_facebook_url' ) ; ?> " type = "text" value = " <?php echo esc_attr ( $crunchify_facebook_url ) ; ?> " / > < br / > < br / > < label for = " <?php echo $this - > get_field_id ( 'crunchify_facebook_hidecover' ) ; ?> " > <?php _e ( 'Hide Cover?' ) ; ?> < / label > < input class = "checkbox" type = "checkbox" <?php checked ( $instance [ 'crunchify_facebook_hidecover' ] , 'true' ) ; ?> id = " <?php echo $this - > get_field_id ( 'crunchify_facebook_hidecover' ) ; ?> " name = " <?php echo $this - > get_field_name ( 'crunchify_facebook_hidecover' ) ; ?> " / > < br / > < br / > < label for = " <?php echo $this - > get_field_id ( 'crunchify_facebook_showface' ) ; ?> " > <?php _e ( 'Show Facepile?' ) ; ?> < / label > < input class = "checkbox" type = "checkbox" <?php checked ( $instance [ 'crunchify_facebook_showface' ] , 'true' ) ; ?> id = " <?php echo $this - > get_field_id ( 'crunchify_facebook_showface' ) ; ?> " name = " <?php echo $this - > get_field_name ( 'crunchify_facebook_showface' ) ; ?> " / > < / p > <?php } // Updating widget replacing old instances with new function update ( $new_instance , $old_instance ) { $instance = array ( ) ; $instance [ 'crunchify_facebook_url' ] = ( ! empty ( $new_instance [ 'crunchify_facebook_url' ] ) ) ? strip_tags ( $new_instance [ 'crunchify_facebook_url' ] ) : '' ; $instance [ 'crunchify_facebook_hidecover' ] = $new_instance [ 'crunchify_facebook_hidecover' ] ; $instance [ 'crunchify_facebook_showface' ] = $new_instance [ 'crunchify_facebook_showface' ] ; return $instance ; } } function crunchify_plugin ( ) { register_widget ( 'crunchify_widget' ) ; } // Initialize Plugin add_action ( 'widgets_init' , 'crunchify_plugin' ) ; ?> |

위 코드에서 강조 표시된 4줄을 이해해 보겠습니다.
- 함수 __구성()
- 이름 및 설명으로 WordPress 플러그인 초기화
- 공개 함수 위젯($args, $instance)
- 블로그에 표시되는 내용입니다. 위젯의 내용을 출력합니다.
- 공개 함수 형식($instance)
- 여기에서
Appearance->Widgets내에서 WordPress 위젯 옵션을 지정합니다.
- 여기에서
- 함수 업데이트($new_instance, $old_instance)
- 저장 버튼을 클릭하면 – 옵션 값이 저장됩니다
NOTE: widgets_init 작업은 이름이 crunchify_widget 인 위젯을 내부적으로 registers 하는 함수 crunchify_plugin 을 호출합니다.
2 단계
아래 내용으로 동일한 crunchify-plugin 폴더 아래에 readme.txt 파일을 만듭니다. 필요에 따라 자유롭게 업데이트하십시오.
|
1 2 3 4 5 6 7 8 9 10 11 12 13 14 15 16 17 18 19 20 21 22 23 24 25 26 27 28 29 30 31 32 33 34 35 36 37 38 |
=== Crunchify Plugin === Contributors : Crunchify Tags : WordPress , WordPress Plugins , Crunchify , multiple widgets Requires at least : 4.3 Tested up to : 4.5.2 Stable tag : 1.0 The simplest ready to use WordPress Plugin with Multiple Instance of the same Widgets option - by Crunchify . com == Description == Sample WordPress Plugin which creates Multiple Widgets for your plugin . [ Feedback ] ( https : //crunchify.com/) | [Twitter](https://twitter.com/Crunchify) == Installation == 1. Unpack the ` download - package ` . 2. Upload the file to the ` / wp - content / plugins / ` directory . 3. Activate the plugin through the ` Plugins ` menu in WordPress . 4. Go to Appearance - > Widgets Section - > Select Plugin ` Crunchify Plugin ` . 5. Done and Ready . == Frequently Asked Questions == = FAQ1 = * Your Answer1 . = Where do I get latest updates on plugin ? = * On < a href = "http://twitter.com/Crunchify" target = "_blank" > Twitter < / a > and < a href = "http://www.facebook.com/Crunchify" target = "_blank" > Facebook < / a > . == Screenshots == 1. Screenshot1 details 2. Screenshot2 details == Changelog == = 1.0 = * Initial Working Version |
3단계
폴더 구조가 다음과 같아야 합니다.

플러그인 폴더 아래에 crunchify-plugin plugins 를 넣습니다.
4단계 활성화하는 방법?
- 사이트의
Admin Panel로 이동 -
Plugins클릭 - 플러그인 Crunchify 플러그인
Activate

5단계 플러그인 옵션 설정
-
Appearance -> Widgets을 클릭하십시오. - Widget
Crunchify Plugin을 선택하고Sidebar또는Footer아래에 둡니다. - 옵션 업데이트 및
save클릭
Step-6 확인 방법은?
옵션이 다른 두 개의 위젯을 배치했습니다.
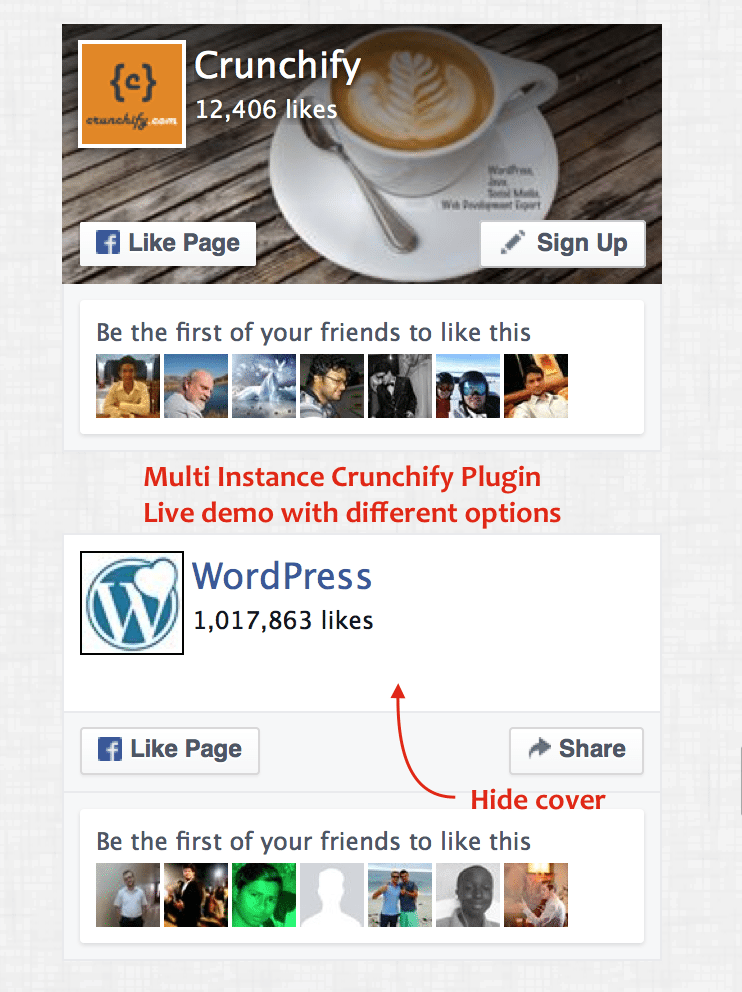
설정에 따라 사이드바 또는 바닥글에 멋진 Facebook Page Plugin 을 내보내는 multiple instances of same Crunchify Plugin 가 표시되어야 합니다.