
Comment créer un plugin WordPress avec une option de widget multi-instance pour une utilisation dans la barre latérale ou le pied de page – Code de plugin WordPress prêt à l'emploi
Publié: 2016-05-11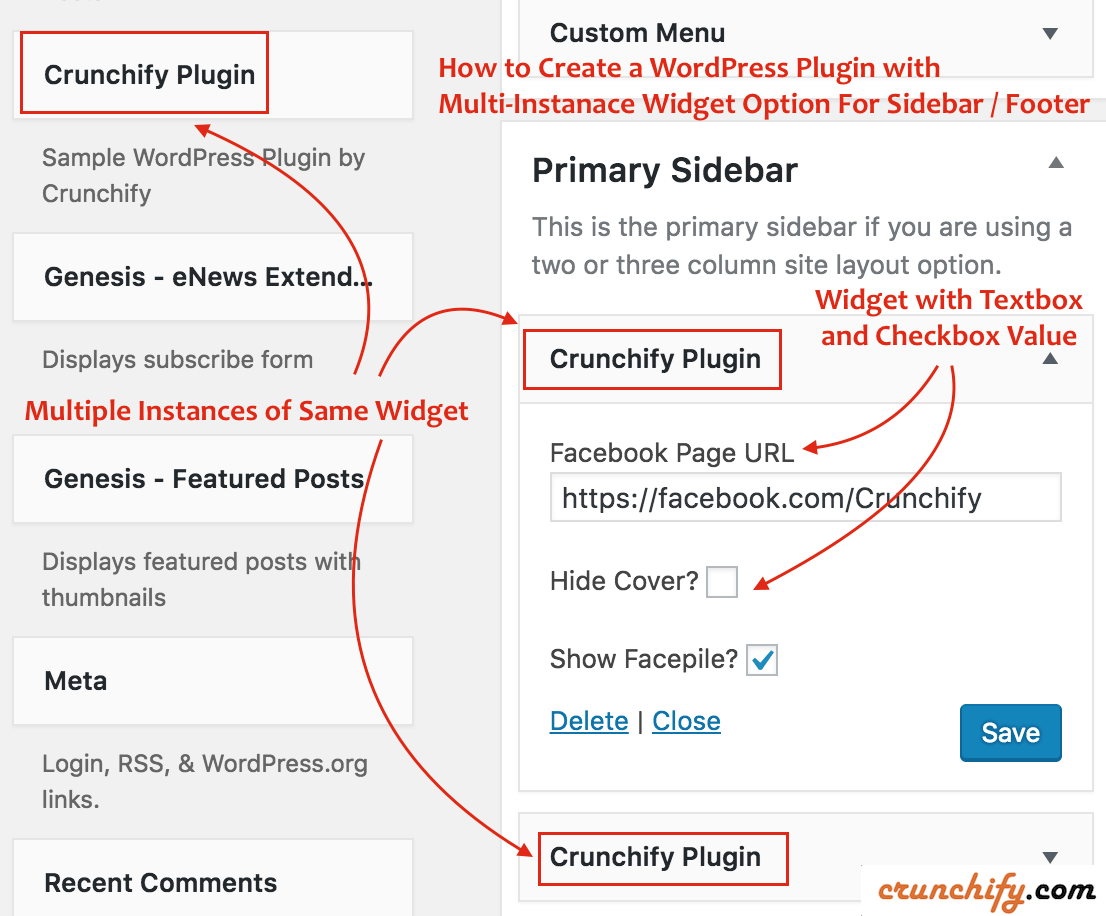
Widget WordPress instances multiples / Widget personnalisé WordPress
Crunchify a créé plusieurs plugins WordPress au cours des dernières années. L'une des exigences que nous avons pour notre plugin Facebook Members est d'avoir multiple instance du même widget, car les utilisateurs peuvent vouloir le plugin de page Facebook dans leur Sidebar et également dans la section Footer .
Tout en travaillant avec de nombreux clients au cours des dernières années, nous avons créé quelques plugins simples avec une option de widget à plusieurs instances.
Dans ce didacticiel, nous allons passer en revue un Sample ready-to-use WordPress Plugin qui placera le widget de Facebook Page Plugin en direct dans la barre latérale et/ou le pied de page de votre blog. N'hésitez pas à utiliser ce code dans votre plugin.
Commençons:
Étape 1
Je fais habituellement tout le développement Java et WordPress dans Eclipse IDE. Alors, suivez le tutoriel pour configurer le kit de développement PHP dans Eclipse.
Créez le fichier crunchify-plugin.php sous le dossier crunchify-plugin et mettez le code ci-dessous.
|
1 2 3 4 5 6 7 8 9 10 11 12 13 14 15 16 17 18 19 20 21 22 23 24 25 26 27 28 29 30 31 32 33 34 35 36 37 38 39 40 41 42 43 44 45 46 47 48 49 50 51 52 53 54 55 56 57 58 59 60 61 62 63 64 65 66 67 68 69 70 71 72 73 74 75 76 77 78 79 80 81 82 83 84 85 86 87 88 89 90 |
<?php /* * Plugin Name: Crunchify Plugin * Plugin URI: https://crunchify.com/ * Description: The Simplest Ready to use WordPress Plugin with Multiple Instance of the same Widgets option - by Crunchify * Version: 1.0 * Author: Crunchify * Author URI: https://crunchify.com * Text Domain: crunchify-plugin */ class crunchify_widget extends WP_Widget { // Create Multiple WordPress Widgets function __construct ( ) { parent : : __construct ( 'crunchify_widget' , __ ( 'Crunchify Plugin' , 'crunchify_plugin_domain' ) , array ( 'description' = > __ ( 'Sample WordPress Plugin by Crunchify' , 'crunchify_plugin_domain' ) ) ) ; } // This function creates nice Facebook Page Like box in Header or Footer public function widget ( $args , $instance ) { $crunchify_facebook_url = apply_filters ( 'crunchify_facebook_url' , $instance [ 'crunchify_facebook_url' ] ) ; $crunchify_facebook_hidecover = $instance [ 'crunchify_facebook_hidecover' ] ? 'true' : 'false' ; $crunchify_facebook_showface = $instance [ 'crunchify_facebook_showface' ] ? 'true' : 'false' ; $facebookpage = '<div><iframe src="//www.facebook.com/plugins/page.php?href=' . $crunchify_facebook_url . '&tabs=&width=300&height=220&small_header=false&adapt_container_width=true&hide_cover=' . $crunchify_facebook_hidecover . '&show_facepile=' . $crunchify_facebook_showface . '&show_border=false&header=false" scrolling="no" frameborder="0" allowTransparency="true"></iframe></div>' ; echo $before_widget ; echo $before_title . $after_title ; echo $facebookpage ; echo $after_widget ; } // Create Instance and Assign Values public function form ( $instance ) { if ( isset ( $instance [ 'crunchify_facebook_url' ] ) ) { $crunchify_facebook_url = $instance [ 'crunchify_facebook_url' ] ; } else { $crunchify_facebook_url = __ ( 'https://facebook.com/Crunchify' , 'crunchify_plugin_domain' ) ; } $instance [ 'crunchify_facebook_hidecover' ] = $instance [ 'crunchify_facebook_hidecover' ] ? 'true' : 'false' ; $instance [ 'crunchify_facebook_showface' ] = $instance [ 'crunchify_facebook_showface' ] ? 'true' : 'false' ; ?> < ! -- This is Crunchify Widget Form -- > < p > < label for = " <?php echo $this - > get_field_id ( 'crunchify_facebook_url' ) ; ?> " > <?php _e ( 'Facebook Page URL' ) ; ?> < / label > < input class = "widefat" id = " <?php echo $this - > get_field_id ( 'crunchify_facebook_url' ) ; ?> " name = " <?php echo $this - > get_field_name ( 'crunchify_facebook_url' ) ; ?> " type = "text" value = " <?php echo esc_attr ( $crunchify_facebook_url ) ; ?> " / > < br / > < br / > < label for = " <?php echo $this - > get_field_id ( 'crunchify_facebook_hidecover' ) ; ?> " > <?php _e ( 'Hide Cover?' ) ; ?> < / label > < input class = "checkbox" type = "checkbox" <?php checked ( $instance [ 'crunchify_facebook_hidecover' ] , 'true' ) ; ?> id = " <?php echo $this - > get_field_id ( 'crunchify_facebook_hidecover' ) ; ?> " name = " <?php echo $this - > get_field_name ( 'crunchify_facebook_hidecover' ) ; ?> " / > < br / > < br / > < label for = " <?php echo $this - > get_field_id ( 'crunchify_facebook_showface' ) ; ?> " > <?php _e ( 'Show Facepile?' ) ; ?> < / label > < input class = "checkbox" type = "checkbox" <?php checked ( $instance [ 'crunchify_facebook_showface' ] , 'true' ) ; ?> id = " <?php echo $this - > get_field_id ( 'crunchify_facebook_showface' ) ; ?> " name = " <?php echo $this - > get_field_name ( 'crunchify_facebook_showface' ) ; ?> " / > < / p > <?php } // Updating widget replacing old instances with new function update ( $new_instance , $old_instance ) { $instance = array ( ) ; $instance [ 'crunchify_facebook_url' ] = ( ! empty ( $new_instance [ 'crunchify_facebook_url' ] ) ) ? strip_tags ( $new_instance [ 'crunchify_facebook_url' ] ) : '' ; $instance [ 'crunchify_facebook_hidecover' ] = $new_instance [ 'crunchify_facebook_hidecover' ] ; $instance [ 'crunchify_facebook_showface' ] = $new_instance [ 'crunchify_facebook_showface' ] ; return $instance ; } } function crunchify_plugin ( ) { register_widget ( 'crunchify_widget' ) ; } // Initialize Plugin add_action ( 'widgets_init' , 'crunchify_plugin' ) ; ?> |

Comprenons 4 lignes en surbrillance du code ci-dessus :
- fonction __construct()
- Initialiser le plugin WordPress avec le nom et la description
- widget de fonction publique($args, $instance)
- C'est ce qui s'affiche sur votre blog - affichez le contenu du widget
- formulaire de fonction publique($instance)
- C'est ici que vous spécifiez les options WordPress Widget dans
Appearance->Widgets
- C'est ici que vous spécifiez les options WordPress Widget dans
- fonction mise à jour($new_instance, $old_instance)
- Lorsque vous cliquez sur le bouton Enregistrer - Les valeurs des options seront enregistrées
NOTE: l'action widgets_init appellera votre fonction crunchify_plugin qui registers en interne le widget avec le nom crunchify_widget .
Étape 2
Créez le fichier readme.txt sous le même dossier crunchify-plugin avec le contenu ci-dessous. N'hésitez pas à le mettre à jour selon vos besoins.
|
1 2 3 4 5 6 7 8 9 10 11 12 13 14 15 16 17 18 19 20 21 22 23 24 25 26 27 28 29 30 31 32 33 34 35 36 37 38 |
=== Crunchify Plugin === Contributors : Crunchify Tags : WordPress , WordPress Plugins , Crunchify , multiple widgets Requires at least : 4.3 Tested up to : 4.5.2 Stable tag : 1.0 The simplest ready to use WordPress Plugin with Multiple Instance of the same Widgets option - by Crunchify . com == Description == Sample WordPress Plugin which creates Multiple Widgets for your plugin . [ Feedback ] ( https : //crunchify.com/) | [Twitter](https://twitter.com/Crunchify) == Installation == 1. Unpack the ` download - package ` . 2. Upload the file to the ` / wp - content / plugins / ` directory . 3. Activate the plugin through the ` Plugins ` menu in WordPress . 4. Go to Appearance - > Widgets Section - > Select Plugin ` Crunchify Plugin ` . 5. Done and Ready . == Frequently Asked Questions == = FAQ1 = * Your Answer1 . = Where do I get latest updates on plugin ? = * On < a href = "http://twitter.com/Crunchify" target = "_blank" > Twitter < / a > and < a href = "http://www.facebook.com/Crunchify" target = "_blank" > Facebook < / a > . == Screenshots == 1. Screenshot1 details 2. Screenshot2 details == Changelog == = 1.0 = * Initial Working Version |
Étape 3
Juste pour vous assurer que la structure de votre dossier devrait ressembler à ceci :

Placez le dossier crunchify-plugin sous le dossier plugins .
Étape 4 Comment activer ?
- Accédez au
Admin Panelde votre site - Cliquez sur les
Plugins -
Activatele plugin Crunchify Plugin

Étape 5 Configurer les options du plug-in
- Cliquez sur
Appearance -> Widgets - Choisissez Widget
Crunchify Pluginet placez-le sous laSidebarou le pied deFooter - Mettre à jour les options et cliquer sur
save
Étape-6 Comment vérifier ?
J'ai placé deux widgets avec des options différentes.
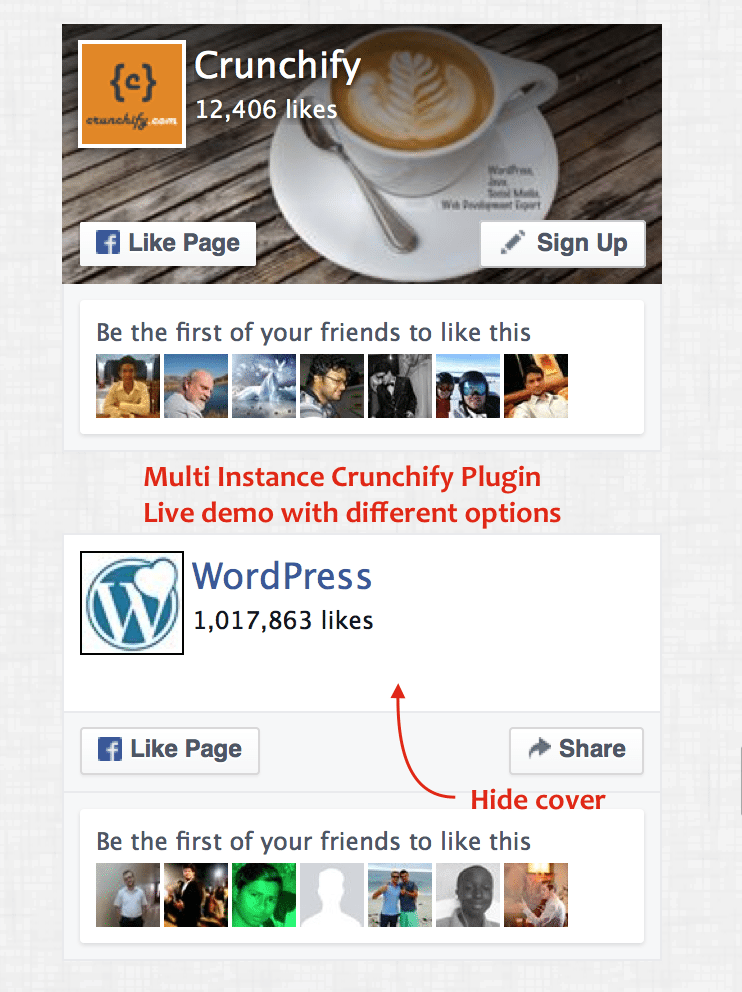
Vous devriez voir multiple instances of same Crunchify Plugin qui émet un joli Facebook Page Plugin dans votre barre latérale ou votre pied de page selon votre configuration.