
Cómo crear un complemento de WordPress con la opción de widget de múltiples instancias para usar en la barra lateral o en el pie de página: código de complemento de WordPress listo para usar
Publicado: 2016-05-11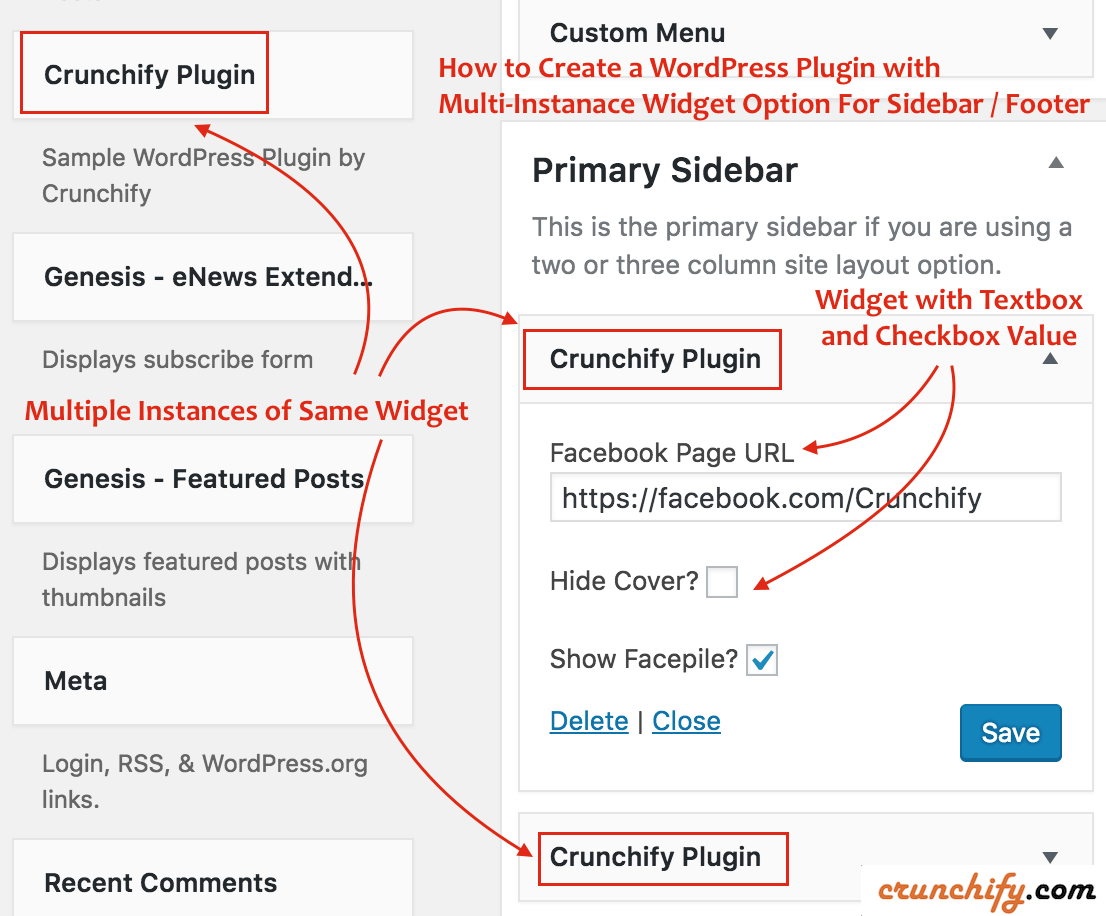
Widget de WordPress Múltiples instancias / Widget personalizado de WordPress
Crunchify ha creado múltiples complementos de WordPress en los últimos años. Uno de los requisitos que obtuvimos para nuestro complemento Miembros de Facebook es tener multiple instance del mismo Widget porque los usuarios pueden querer el complemento de la página de Facebook en su Sidebar y también en la sección de pie de Footer .
Mientras trabajamos con numerosos clientes en los últimos años, hemos creado bastantes complementos simples con la opción de widget de múltiples instancias.
En este tutorial, repasaremos el código Sample ready-to-use WordPress Plugin que colocará el widget del Facebook Page Plugin en vivo en la barra lateral o el pie de página de su blog. Siéntase libre de usar este código en su complemento.
Empecemos:
Paso 1
Normalmente hago todo el desarrollo de Java y WordPress en Eclipse IDE. Entonces, siga el tutorial para configurar el kit de desarrollo de PHP en Eclipse.
Cree el archivo crunchify-plugin.php en la carpeta crunchify-plugin y coloque el código debajo.
|
1 2 3 4 5 6 7 8 9 10 11 12 13 14 15 16 17 18 19 20 21 22 23 24 25 26 27 28 29 30 31 32 33 34 35 36 37 38 39 40 41 42 43 44 45 46 47 48 49 50 51 52 53 54 55 56 57 58 59 60 61 62 63 64 65 66 67 68 69 70 71 72 73 74 75 76 77 78 79 80 81 82 83 84 85 86 87 88 89 90 |
<?php /* * Plugin Name: Crunchify Plugin * Plugin URI: https://crunchify.com/ * Description: The Simplest Ready to use WordPress Plugin with Multiple Instance of the same Widgets option - by Crunchify * Version: 1.0 * Author: Crunchify * Author URI: https://crunchify.com * Text Domain: crunchify-plugin */ class crunchify_widget extends WP_Widget { // Create Multiple WordPress Widgets function __construct ( ) { parent : : __construct ( 'crunchify_widget' , __ ( 'Crunchify Plugin' , 'crunchify_plugin_domain' ) , array ( 'description' = > __ ( 'Sample WordPress Plugin by Crunchify' , 'crunchify_plugin_domain' ) ) ) ; } // This function creates nice Facebook Page Like box in Header or Footer public function widget ( $args , $instance ) { $crunchify_facebook_url = apply_filters ( 'crunchify_facebook_url' , $instance [ 'crunchify_facebook_url' ] ) ; $crunchify_facebook_hidecover = $instance [ 'crunchify_facebook_hidecover' ] ? 'true' : 'false' ; $crunchify_facebook_showface = $instance [ 'crunchify_facebook_showface' ] ? 'true' : 'false' ; $facebookpage = '<div><iframe src="//www.facebook.com/plugins/page.php?href=' . $crunchify_facebook_url . '&tabs=&width=300&height=220&small_header=false&adapt_container_width=true&hide_cover=' . $crunchify_facebook_hidecover . '&show_facepile=' . $crunchify_facebook_showface . '&show_border=false&header=false" scrolling="no" frameborder="0" allowTransparency="true"></iframe></div>' ; echo $before_widget ; echo $before_title . $after_title ; echo $facebookpage ; echo $after_widget ; } // Create Instance and Assign Values public function form ( $instance ) { if ( isset ( $instance [ 'crunchify_facebook_url' ] ) ) { $crunchify_facebook_url = $instance [ 'crunchify_facebook_url' ] ; } else { $crunchify_facebook_url = __ ( 'https://facebook.com/Crunchify' , 'crunchify_plugin_domain' ) ; } $instance [ 'crunchify_facebook_hidecover' ] = $instance [ 'crunchify_facebook_hidecover' ] ? 'true' : 'false' ; $instance [ 'crunchify_facebook_showface' ] = $instance [ 'crunchify_facebook_showface' ] ? 'true' : 'false' ; ?> < ! -- This is Crunchify Widget Form -- > < p > < label for = " <?php echo $this - > get_field_id ( 'crunchify_facebook_url' ) ; ?> " > <?php _e ( 'Facebook Page URL' ) ; ?> < / label > < input class = "widefat" id = " <?php echo $this - > get_field_id ( 'crunchify_facebook_url' ) ; ?> " name = " <?php echo $this - > get_field_name ( 'crunchify_facebook_url' ) ; ?> " type = "text" value = " <?php echo esc_attr ( $crunchify_facebook_url ) ; ?> " / > < br / > < br / > < label for = " <?php echo $this - > get_field_id ( 'crunchify_facebook_hidecover' ) ; ?> " > <?php _e ( 'Hide Cover?' ) ; ?> < / label > < input class = "checkbox" type = "checkbox" <?php checked ( $instance [ 'crunchify_facebook_hidecover' ] , 'true' ) ; ?> id = " <?php echo $this - > get_field_id ( 'crunchify_facebook_hidecover' ) ; ?> " name = " <?php echo $this - > get_field_name ( 'crunchify_facebook_hidecover' ) ; ?> " / > < br / > < br / > < label for = " <?php echo $this - > get_field_id ( 'crunchify_facebook_showface' ) ; ?> " > <?php _e ( 'Show Facepile?' ) ; ?> < / label > < input class = "checkbox" type = "checkbox" <?php checked ( $instance [ 'crunchify_facebook_showface' ] , 'true' ) ; ?> id = " <?php echo $this - > get_field_id ( 'crunchify_facebook_showface' ) ; ?> " name = " <?php echo $this - > get_field_name ( 'crunchify_facebook_showface' ) ; ?> " / > < / p > <?php } // Updating widget replacing old instances with new function update ( $new_instance , $old_instance ) { $instance = array ( ) ; $instance [ 'crunchify_facebook_url' ] = ( ! empty ( $new_instance [ 'crunchify_facebook_url' ] ) ) ? strip_tags ( $new_instance [ 'crunchify_facebook_url' ] ) : '' ; $instance [ 'crunchify_facebook_hidecover' ] = $new_instance [ 'crunchify_facebook_hidecover' ] ; $instance [ 'crunchify_facebook_showface' ] = $new_instance [ 'crunchify_facebook_showface' ] ; return $instance ; } } function crunchify_plugin ( ) { register_widget ( 'crunchify_widget' ) ; } // Initialize Plugin add_action ( 'widgets_init' , 'crunchify_plugin' ) ; ?> |

Entendamos 4 líneas resaltadas del código anterior:
- función __construir()
- Inicialice el complemento de WordPress con Nombre y Descripción
- widget de función pública ($ argumentos, $ instancia)
- Esto es lo que se muestra en su blog: envíe el contenido del widget
- formulario de función pública ($ instancia)
- Aquí es donde especifica las opciones de Widget de WordPress dentro de
Appearance->Widgets
- Aquí es donde especifica las opciones de Widget de WordPress dentro de
- actualización de la función ($nueva_instancia, $antigua_instancia)
- Al hacer clic en el botón Guardar, se guardarán los valores de las opciones
NOTE: la acción widgets_init llamará a su función crunchify_plugin que registers internamente el widget con el nombre crunchify_widget .
Paso 2
Cree el archivo readme.txt en la misma crunchify-plugin con el contenido a continuación. Siéntase libre de actualizarlo según sus necesidades.
|
1 2 3 4 5 6 7 8 9 10 11 12 13 14 15 16 17 18 19 20 21 22 23 24 25 26 27 28 29 30 31 32 33 34 35 36 37 38 |
=== Crunchify Plugin === Contributors : Crunchify Tags : WordPress , WordPress Plugins , Crunchify , multiple widgets Requires at least : 4.3 Tested up to : 4.5.2 Stable tag : 1.0 The simplest ready to use WordPress Plugin with Multiple Instance of the same Widgets option - by Crunchify . com == Description == Sample WordPress Plugin which creates Multiple Widgets for your plugin . [ Feedback ] ( https : //crunchify.com/) | [Twitter](https://twitter.com/Crunchify) == Installation == 1. Unpack the ` download - package ` . 2. Upload the file to the ` / wp - content / plugins / ` directory . 3. Activate the plugin through the ` Plugins ` menu in WordPress . 4. Go to Appearance - > Widgets Section - > Select Plugin ` Crunchify Plugin ` . 5. Done and Ready . == Frequently Asked Questions == = FAQ1 = * Your Answer1 . = Where do I get latest updates on plugin ? = * On < a href = "http://twitter.com/Crunchify" target = "_blank" > Twitter < / a > and < a href = "http://www.facebook.com/Crunchify" target = "_blank" > Facebook < / a > . == Screenshots == 1. Screenshot1 details 2. Screenshot2 details == Changelog == = 1.0 = * Initial Working Version |
Paso 3
Solo para asegurarse de que la estructura de su carpeta se vea así:

Coloque la carpeta crunchify-plugin en la carpeta de plugins .
Paso-4 ¿Cómo habilitar?
- Vaya al
Admin Panelde su sitio - Haga clic en
Plugins -
Activatecomplemento Complemento Crunchify

Paso 5 Opciones del complemento de configuración
- Haga clic en
Appearance -> Widgets - Elija Widget
Crunchify Pluginy colóquelo debajo de laSidebaro pie deFooter - Actualice las opciones y haga clic en
save
Paso 6 ¿Cómo verificar?
He colocado dos widgets con diferentes opciones.
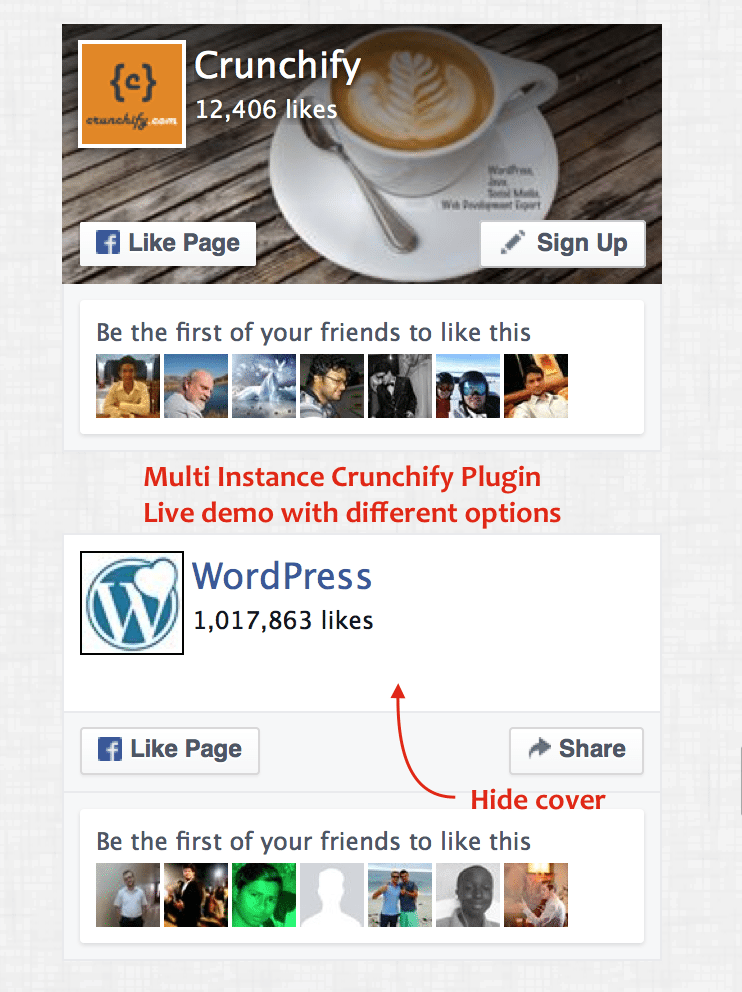
Debería ver multiple instances of same Crunchify Plugin que emite un buen Facebook Page Plugin en su barra lateral o pie de página según su configuración.