
كيفية إنشاء برنامج WordPress الإضافي باستخدام خيار عنصر واجهة المستخدم متعدد المثيلات لاستخدام الشريط الجانبي أو التذييل - جاهز لاستخدام رمز البرنامج المساعد WordPress
نشرت: 2016-05-11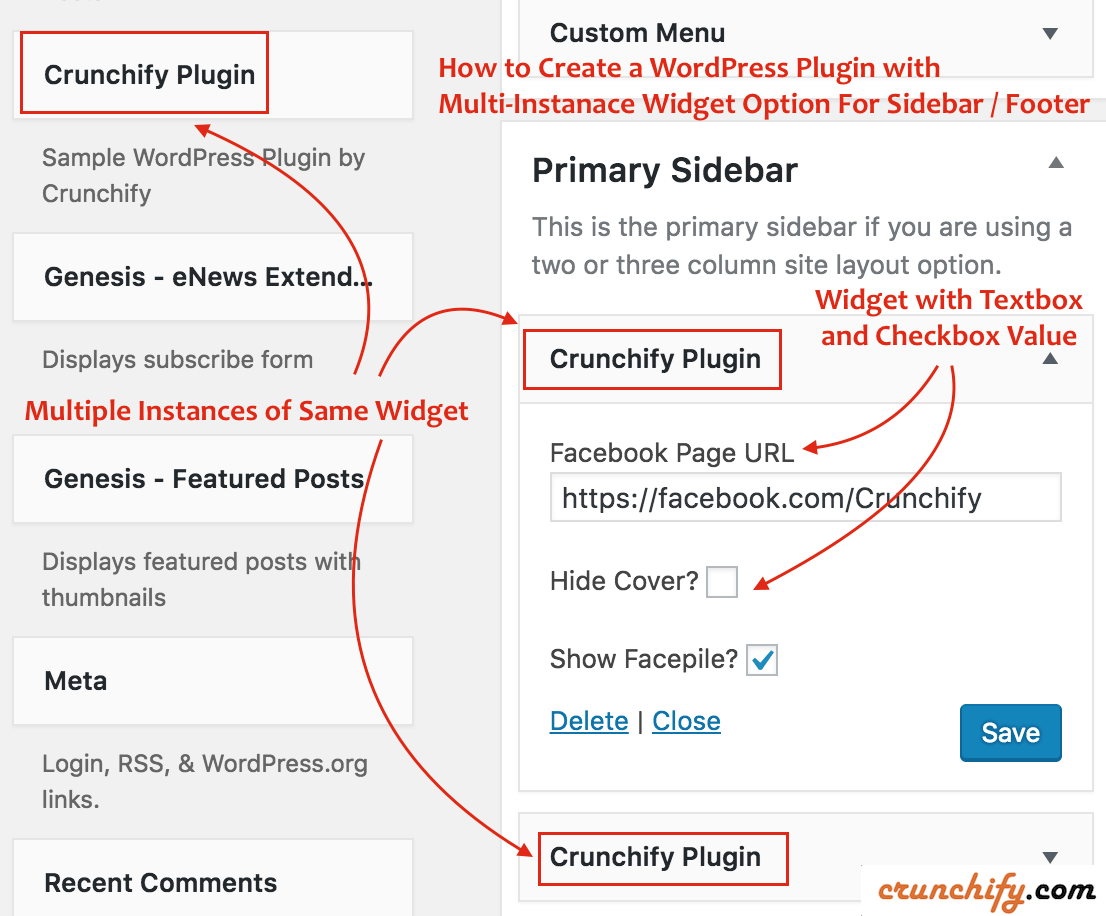
ودجة ووردبريس مثيلات متعددة / ودجة مخصصة ووردبريس
أنشأت Crunchify العديد من مكونات WordPress الإضافية على مدار السنوات القليلة الماضية. أحد المتطلبات التي حصلنا عليها لأعضاء Facebook هو أن يكون لدينا multiple instance من نفس القطعة لأن المستخدمين قد يريدون إضافة Facebook Page Plugin في Sidebar وأيضًا في قسم Footer .
أثناء العمل مع العديد من العملاء على مدار السنوات القليلة الماضية ، أنشأنا عددًا لا بأس به من المكونات الإضافية البسيطة مع خيار عناصر واجهة المستخدم المتعددة المثيلات.
في هذا البرنامج التعليمي ، سننتقل إلى Sample ready-to-use WordPress Plugin والذي سيضع عنصر واجهة مستخدم Facebook Page Plugin الحية في الشريط الجانبي و / أو التذييل في مدونتك. لا تتردد في استخدام هذا الرمز في البرنامج المساعد الخاص بك.
هيا بنا نبدأ:
الخطوة 1
عادةً ما أقوم بكل عمليات تطوير Java و WordPress في Eclipse IDE. لذلك ، اتبع البرنامج التعليمي لإعداد مجموعة تطوير PHP في Eclipse.
قم بإنشاء ملف crunchify-plugin.php ضمن مجلد crunchify-plugin ووضع الكود أدناه.
|
1 2 3 4 5 6 7 8 9 10 11 12 13 14 15 16 17 18 19 20 21 22 23 24 25 26 27 28 29 30 31 32 33 34 35 36 37 38 39 40 41 42 43 44 45 46 47 48 49 50 51 52 53 54 55 56 57 58 59 60 61 62 63 64 65 66 67 68 69 70 71 72 73 74 75 76 77 78 79 80 81 82 83 84 85 86 87 88 89 90 |
<?php /* * Plugin Name: Crunchify Plugin * Plugin URI: https://crunchify.com/ * Description: The Simplest Ready to use WordPress Plugin with Multiple Instance of the same Widgets option - by Crunchify * Version: 1.0 * Author: Crunchify * Author URI: https://crunchify.com * Text Domain: crunchify-plugin */ class crunchify_widget extends WP_Widget { // Create Multiple WordPress Widgets function __construct ( ) { parent : : __construct ( 'crunchify_widget' , __ ( 'Crunchify Plugin' , 'crunchify_plugin_domain' ) , array ( 'description' = > __ ( 'Sample WordPress Plugin by Crunchify' , 'crunchify_plugin_domain' ) ) ) ; } // This function creates nice Facebook Page Like box in Header or Footer public function widget ( $args , $instance ) { $crunchify_facebook_url = apply_filters ( 'crunchify_facebook_url' , $instance [ 'crunchify_facebook_url' ] ) ; $crunchify_facebook_hidecover = $instance [ 'crunchify_facebook_hidecover' ] ? 'true' : 'false' ; $crunchify_facebook_showface = $instance [ 'crunchify_facebook_showface' ] ? 'true' : 'false' ; $facebookpage = '<div><iframe src="//www.facebook.com/plugins/page.php?href=' . $crunchify_facebook_url . '&tabs=&width=300&height=220&small_header=false&adapt_container_width=true&hide_cover=' . $crunchify_facebook_hidecover . '&show_facepile=' . $crunchify_facebook_showface . '&show_border=false&header=false" scrolling="no" frameborder="0" allowTransparency="true"></iframe></div>' ; echo $before_widget ; echo $before_title . $after_title ; echo $facebookpage ; echo $after_widget ; } // Create Instance and Assign Values public function form ( $instance ) { if ( isset ( $instance [ 'crunchify_facebook_url' ] ) ) { $crunchify_facebook_url = $instance [ 'crunchify_facebook_url' ] ; } else { $crunchify_facebook_url = __ ( 'https://facebook.com/Crunchify' , 'crunchify_plugin_domain' ) ; } $instance [ 'crunchify_facebook_hidecover' ] = $instance [ 'crunchify_facebook_hidecover' ] ? 'true' : 'false' ; $instance [ 'crunchify_facebook_showface' ] = $instance [ 'crunchify_facebook_showface' ] ? 'true' : 'false' ; ?> < ! -- This is Crunchify Widget Form -- > < p > < label for = " <?php echo $this - > get_field_id ( 'crunchify_facebook_url' ) ; ?> " > <?php _e ( 'Facebook Page URL' ) ; ?> < / label > < input class = "widefat" id = " <?php echo $this - > get_field_id ( 'crunchify_facebook_url' ) ; ?> " name = " <?php echo $this - > get_field_name ( 'crunchify_facebook_url' ) ; ?> " type = "text" value = " <?php echo esc_attr ( $crunchify_facebook_url ) ; ?> " / > < br / > < br / > < label for = " <?php echo $this - > get_field_id ( 'crunchify_facebook_hidecover' ) ; ?> " > <?php _e ( 'Hide Cover?' ) ; ?> < / label > < input class = "checkbox" type = "checkbox" <?php checked ( $instance [ 'crunchify_facebook_hidecover' ] , 'true' ) ; ?> id = " <?php echo $this - > get_field_id ( 'crunchify_facebook_hidecover' ) ; ?> " name = " <?php echo $this - > get_field_name ( 'crunchify_facebook_hidecover' ) ; ?> " / > < br / > < br / > < label for = " <?php echo $this - > get_field_id ( 'crunchify_facebook_showface' ) ; ?> " > <?php _e ( 'Show Facepile?' ) ; ?> < / label > < input class = "checkbox" type = "checkbox" <?php checked ( $instance [ 'crunchify_facebook_showface' ] , 'true' ) ; ?> id = " <?php echo $this - > get_field_id ( 'crunchify_facebook_showface' ) ; ?> " name = " <?php echo $this - > get_field_name ( 'crunchify_facebook_showface' ) ; ?> " / > < / p > <?php } // Updating widget replacing old instances with new function update ( $new_instance , $old_instance ) { $instance = array ( ) ; $instance [ 'crunchify_facebook_url' ] = ( ! empty ( $new_instance [ 'crunchify_facebook_url' ] ) ) ? strip_tags ( $new_instance [ 'crunchify_facebook_url' ] ) : '' ; $instance [ 'crunchify_facebook_hidecover' ] = $new_instance [ 'crunchify_facebook_hidecover' ] ; $instance [ 'crunchify_facebook_showface' ] = $new_instance [ 'crunchify_facebook_showface' ] ; return $instance ; } } function crunchify_plugin ( ) { register_widget ( 'crunchify_widget' ) ; } // Initialize Plugin add_action ( 'widgets_init' , 'crunchify_plugin' ) ; ?> |

دعونا نفهم 4 سطور مظللة من الكود أعلاه:
- وظيفة __construct ()
- قم بتهيئة ملحق WordPress بالاسم والوصف
- أداة الوظيفة العامة ($ args ، $ example)
- هذا ما يظهر في مدونتك - قم بإخراج محتوى الأداة
- نموذج الوظيفة العامة (مثيل بالدولار)
- هذا هو المكان الذي تحدد فيه خيارات WordPress Widget داخل
Appearance->Widgets
- هذا هو المكان الذي تحدد فيه خيارات WordPress Widget داخل
- تحديث الوظيفة ($ new_instance ، $ old_instance)
- عند النقر فوق الزر "حفظ" - سيتم حفظ قيم الخيارات
NOTE: سوف يستدعي إجراء widgets_init crunchify_plugin التي registers عنصر واجهة المستخدم داخليًا بالاسم crunchify_widget .
الخطوة 2
قم بإنشاء ملف readme.txt ضمن نفس مجلد crunchify-plugin بالمحتوى أدناه. لا تتردد في تحديثه حسب حاجتك.
|
1 2 3 4 5 6 7 8 9 10 11 12 13 14 15 16 17 18 19 20 21 22 23 24 25 26 27 28 29 30 31 32 33 34 35 36 37 38 |
=== Crunchify Plugin === Contributors : Crunchify Tags : WordPress , WordPress Plugins , Crunchify , multiple widgets Requires at least : 4.3 Tested up to : 4.5.2 Stable tag : 1.0 The simplest ready to use WordPress Plugin with Multiple Instance of the same Widgets option - by Crunchify . com == Description == Sample WordPress Plugin which creates Multiple Widgets for your plugin . [ Feedback ] ( https : //crunchify.com/) | [Twitter](https://twitter.com/Crunchify) == Installation == 1. Unpack the ` download - package ` . 2. Upload the file to the ` / wp - content / plugins / ` directory . 3. Activate the plugin through the ` Plugins ` menu in WordPress . 4. Go to Appearance - > Widgets Section - > Select Plugin ` Crunchify Plugin ` . 5. Done and Ready . == Frequently Asked Questions == = FAQ1 = * Your Answer1 . = Where do I get latest updates on plugin ? = * On < a href = "http://twitter.com/Crunchify" target = "_blank" > Twitter < / a > and < a href = "http://www.facebook.com/Crunchify" target = "_blank" > Facebook < / a > . == Screenshots == 1. Screenshot1 details 2. Screenshot2 details == Changelog == = 1.0 = * Initial Working Version |
الخطوه 3
فقط للتأكد من أن هيكل المجلد الخاص بك يجب أن يبدو كما يلي:

ضع مجلد crunchify-plugin تحت مجلد plugins .
الخطوة 4 كيف يتم التمكين؟
- انتقل إلى
Admin Panelموقعك - انقر فوق
Plugins -
Activateالبرنامج المساعد Crunchify البرنامج المساعد

الخطوة 5 - إعداد خيارات البرنامج المساعد
- انقر فوق
Appearance -> Widgets - اختر Widget
Crunchify Pluginوضعه تحتSidebarأوFooter - خيارات التحديث وانقر فوق
save
خطوة 6 كيفية التحقق؟
لقد قمت بوضع اثنين من عناصر واجهة المستخدم بخيارات مختلفة.
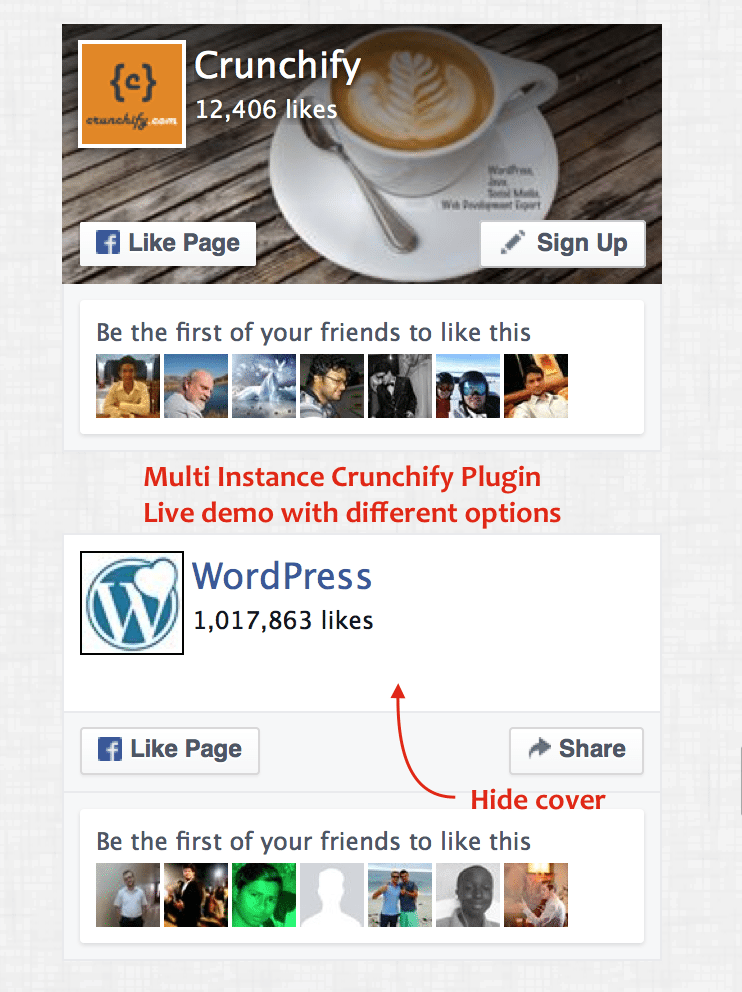
يجب أن تشاهد multiple instances of same Crunchify Plugin الذي ينبعث منه المكون الإضافي الرائع Facebook Page Plugin في الشريط الجانبي أو التذييل وفقًا للإعداد الخاص بك.