
ดำดิ่งสู่ React Native สำหรับการพัฒนา Android
เผยแพร่แล้ว: 2022-03-11เมื่อสองสามปีก่อน เพื่อนร่วมงานของฉันบอกฉันเกี่ยวกับ React Native ฉันสงสัยมาก ฉันแย้งว่ามันเป็นเพียงเฟรมเวิร์กข้ามแพลตฟอร์มอื่นที่จะใช้งานไม่ได้ในชีวิตจริง – ฉันไม่รู้ว่าตัวเองผิดแค่ไหน
หลายปีผ่านไปและทักษะ React Native เป็นที่ต้องการอย่างมาก เนื่องจากฉันได้เรียนรู้สิ่งใหม่มาระยะหนึ่งแล้ว ฉันคิดว่าทำไมไม่ลองดูล่ะ วันนี้ฉันเป็นผู้สนับสนุน React Native รายใหญ่
จุดด้อย:
- คุณไม่สามารถใช้ Android Studio ได้อีกต่อไป
- ไม่สามารถใช้ React Native กับทุกแอปพลิเคชั่นหรือฟีเจอร์
- React Native เป็นเฟรมเวิร์กใหม่และการอัพเดตอาจมีผลเสียต่อ codebase ปัจจุบันของคุณ
- JavaScript ไม่ใช่ภาษาที่พิมพ์อย่างเคร่งครัด
- React Native ต้องใช้เอ็นจิ้น JavaScript เพื่อทำงาน ซึ่งอาจทำให้ประสิทธิภาพน้อยลง
ข้อดี:
- เรียนง่าย
- Codebase ที่ใช้ร่วมกันระหว่างแอป Android และ iOS โดยมีการปรับแต่งเพียงเล็กน้อยเพื่อให้ตรงกับประสบการณ์ของแพลตฟอร์ม
- การรีโหลดแบบสดและร้อนแรง หมายความว่าไม่มีเวลาสร้างที่ไม่มีที่สิ้นสุดอีกต่อไป
- ส่วนประกอบดั้งเดิมสำหรับทั้งสองแพลตฟอร์ม
- พัฒนาอย่างต่อเนื่อง
- ชุมชนที่กำลังเติบโตอย่างแข็งขัน
- ห้องสมุดจำนวนมาก
- งานเอ็กซ์โปขจัดความจำเป็นในการเป็นเจ้าของ Mac เพื่อพัฒนาสำหรับ iOS
- การลดทรัพยากรแรงงาน—ในขณะที่คุณยังอาจต้องการการพัฒนา Android/iOS เนทีฟอยู่บ้าง แต่ก็ไม่บ่อยนัก
ฉันสามารถไปต่อได้ แต่ขอหยุดที่นี่และไปยังหัวข้อของโพสต์ในบล็อกนี้ ในโพสต์นี้ ฉันจะสร้างแอป Android ที่ขับเคลื่อนโดย React Native สี่แอป:
- ตัวนับพื้นฐานพร้อมปุ่มสำหรับเพิ่มและลดค่าตัวนับ
- แอพสำหรับค้นหา r/pics subreddit
- หน้าเข้าสู่ระบบทั่วไป
- แอพสำหรับเรียกดู subreddit r/pics
IDE
ดังที่ได้กล่าวไว้ข้างต้น ไม่มีทางที่เราจะสามารถใช้ Android Studio เพื่อพัฒนา React Native ได้ เราต้องการสิ่งทดแทน React Native สามารถพัฒนาได้ในโปรแกรมแก้ไขข้อความสมัยใหม่ที่มีอยู่ (Atom, VS Code, Sublime Text, วงเล็บ ฯลฯ ) แต่เนื่องจากเรามาพร้อมกับประสบการณ์ Android Studio ที่ฉันชอบคือ WebStorm ซึ่งสร้างโดยบริษัทเดียวกัน แม้ว่า WebStorm จะเป็นแอปพลิเคชันแบบชำระเงิน (129$ ต่อปี) คุณสามารถติดตั้งเวอร์ชัน Early Access ได้ การสร้าง EAP ของ WebStorm นั้นไม่มีค่าใช้จ่ายและค่อนข้างเสถียร หากคุณต้องการตัวแก้ไขที่ฟรีโดยสมบูรณ์ ให้ไปที่ VS Code Microsoft ได้พัฒนาปลั๊กอิน React Native ที่น่าทึ่งสำหรับมันและทำงานได้ดีมาก
การสร้างโครงการใหม่
ข้อกำหนดเบื้องต้น: Android SDK, Node และ React Native ติดตั้งบนคอมพิวเตอร์ของคุณ
มีสองวิธีในการสร้างโปรเจ็กต์ React Native ใหม่
- วิธีธรรมดา. ไม่ว่าจะด้วย WebStorm GUI หรือด้วยคำสั่งเทอร์มินัล:
react-native init AwesomeToptalProject - วิธีที่ง่ายกว่า "สร้าง React Native App"
create-react-native-app AwesomeToptalProject
หากคุณใช้ create-react-native-app โปรเจ็กต์ที่สร้างขึ้นจะถูกบูตด้วยงานเอ็กซ์โป ฉันจะไม่ลงรายละเอียด แต่โดยทั่วไป หมายความว่าคุณไม่จำเป็นต้องติดตั้ง Xcode เพื่อเรียกใช้แอปบน iOS นอกจากนี้ยังง่ายกว่าที่จะให้ลูกค้าอัปเดตอยู่เสมอผ่านฟังก์ชันของ expo.io และคุณสมบัติอื่นๆ แต่คุณไม่สามารถเพิ่มโค้ดเนทีฟได้ ดังนั้น หากคุณกำลังพัฒนาคุณลักษณะเฉพาะ คุณอาจต้องนำแอปออกจากงาน Expo และใช้โครงการ React Native ปกติแทน
ฉันจะใช้วิธีแรก
มาดำเนินโครงการกัน ขั้นแรก เปิดโปรแกรมจำลองหรือเชื่อมต่ออุปกรณ์ หากคุณสร้างโปรเจ็กต์ด้วย WebStorm GUI สิ่งที่คุณต้องทำคือเลือกการกำหนดค่า ที่มุมบนขวาของ WebStorm คลิกเมนูแบบเลื่อนลงทางด้านซ้ายของปุ่ม Run เลือก Android แล้วคลิก Run หรือ Debug หากคุณสร้างโปรเจ็กต์ด้วย Terminal คุณสามารถเพิ่ม React Native config ใหม่หรือเรียกใช้โดยใช้ Terminal:
cd AwesomeToptalProject react-native run-androidหากทุกอย่างเป็นไปด้วยดี คุณจะพบกับหน้าจอต่อไปนี้:
โครงสร้างและการตั้งค่าพื้นฐาน
รายการเด่นภายในโครงการ ได้แก่
- android - โครงการ Android Studio ที่กำหนดค่าไว้ล่วงหน้าพร้อมรองรับ React Native
- ios - โครงการ Xcode ที่กำหนดค่าไว้ล่วงหน้าด้วยการสนับสนุน React Native
- node_modules - โฟลเดอร์ที่มี React Native framework และไลบรารี Javascript อื่นๆ
- index.js - จุดเริ่มต้นสำหรับแอพของเรา
- App.js - โหลดส่วนประกอบเริ่มต้นแล้ว
มาสร้างโฟลเดอร์ “src” ภายในรูทของโปรเจ็กต์และย้าย App.js ไปที่นั่น คุณจะต้องอัปเดตการนำเข้า index.js เพื่อให้ตรงกับตำแหน่งใหม่ของ App.js
import App from './src/App';ลบทุกอย่างใน App.js และวางรหัสนี้:
import React from 'react'; import {Text} from 'react-native'; export default class App extends React.Component { render() { return ( <Text>Hello TopTal</Text> ); } } รหัสที่เราวางค่อนข้างตรงไปตรงมา เราสร้างคลาส App (ลูกของ React.Component ) ซึ่งแทนที่เมธอด render() และส่งคืนองค์ประกอบ Text React.Component เป็นคลาสพื้นฐานสำหรับการสร้าง UI โดยใช้ JSX ตัวแก้ไข export default ทำให้คลาสเป็น public
ตอนนี้เราพร้อมที่จะเริ่มออกแบบเค้าโครงของเราแล้ว
เลย์เอาต์ด้วย Flexbox
Flexbox นั้นคล้ายกับ LinearLayout แต่ Flexbox มากกว่าความสามารถของ LinearLayout
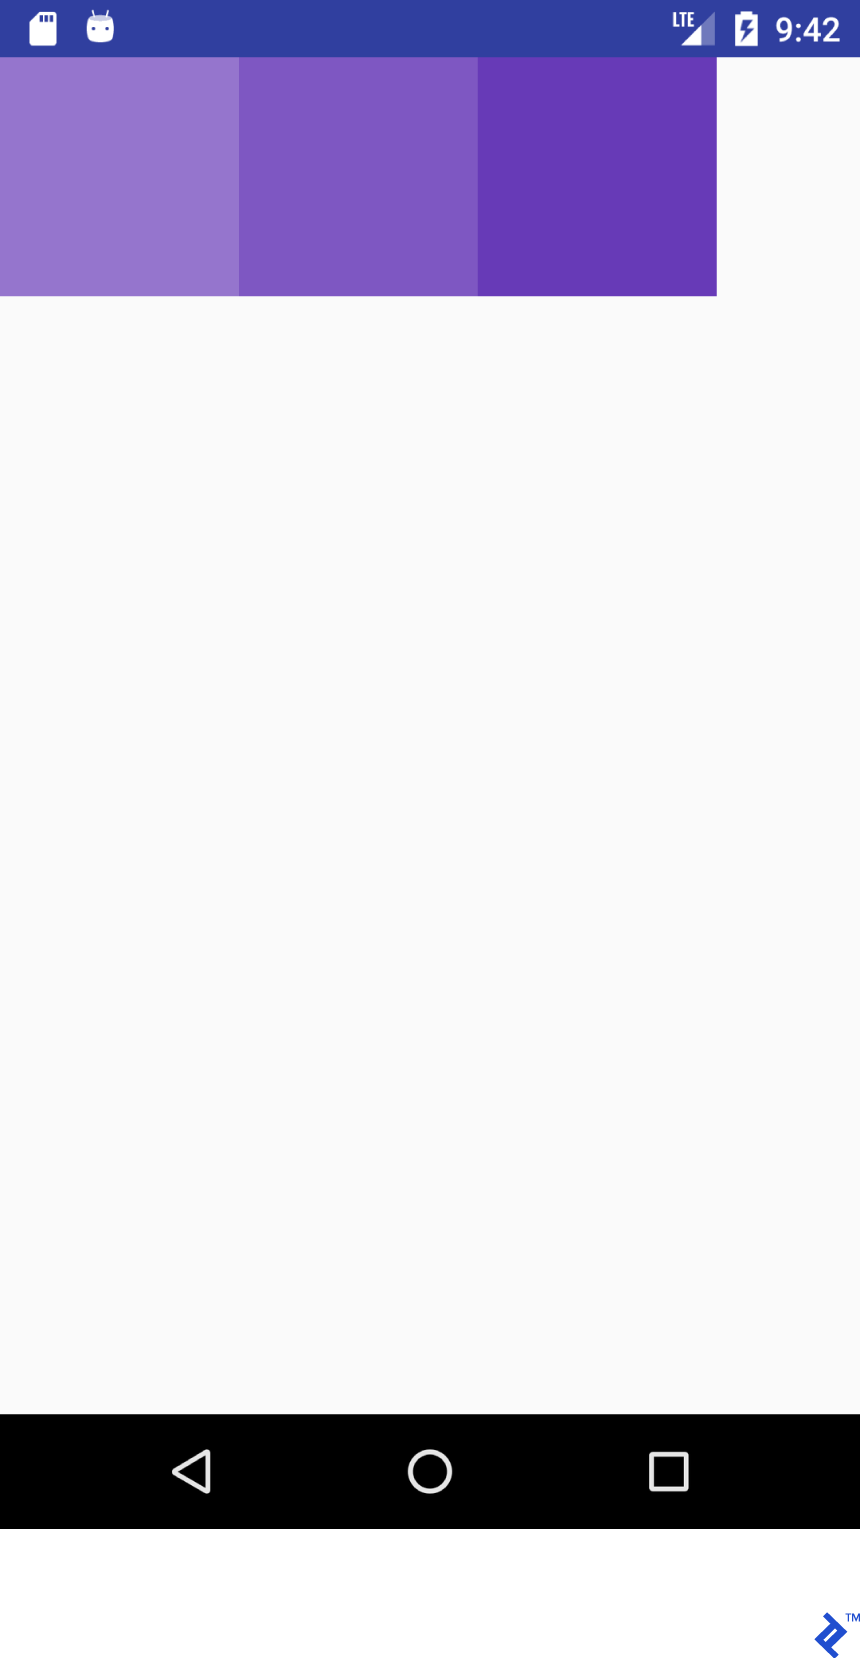
ข้อมูลโค้ด JSX นี้:
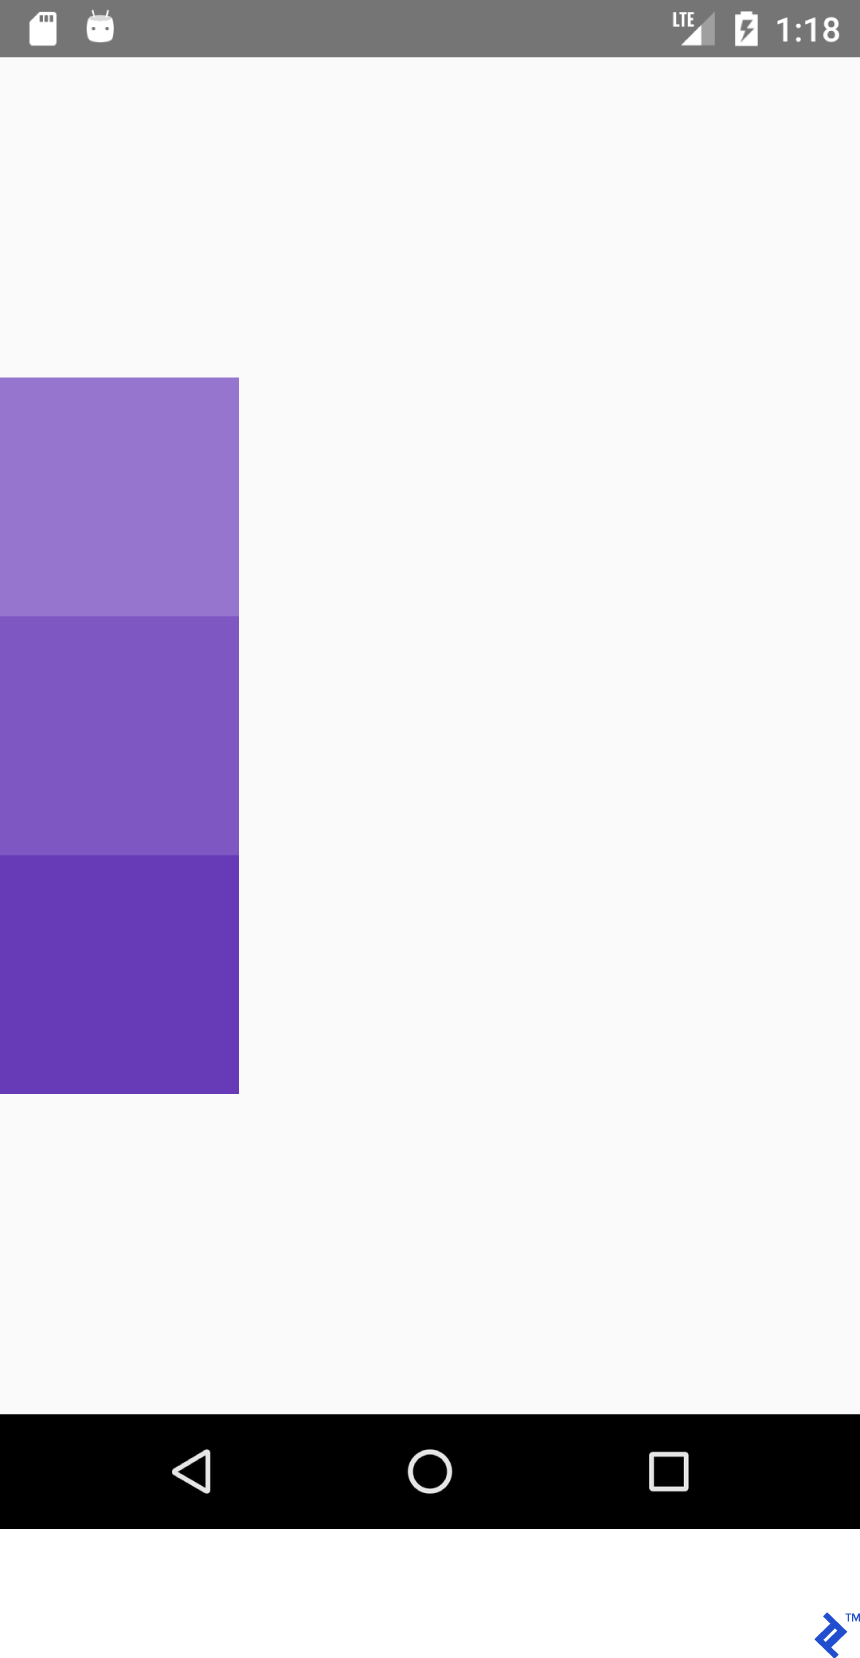
<View style={{ flex: 1, flexDirection: 'row' }}> <View style={{ width: 100, height: 100, backgroundColor: '#9575CD' }}/> <View style={{ width: 100, height: 100, backgroundColor: '#7E57C2' }}/> <View style={{ width: 100, height: 100, backgroundColor: '#673AB7' }}/> </View>แสดงเค้าโครงนี้:

ในขณะที่ XML นี้:
<LinearLayout android:layout_width="match_parent" android:layout_height="match_parent" android:orientation="horizontal"> <View android:layout_width="100dp" android:layout_height="100dp" android:background="#9575CD" /> <View android:layout_width="100dp" android:layout_height="100dp" android:background="#7E57C2" /> <View android:layout_width="100dp" android:layout_height="100dp" android:background="#673AB7" /> </LinearLayout>แสดงผลนี้:
รหัส JSX ดูคุ้นเคยใช่มั้ย! มาสร้าง "พจนานุกรม" (หรือสูตรโกง) สำหรับเลย์เอาต์โดยใช้ที่มีลักษณะคล้ายกันใน JSX และ Android XML
โปรดทราบว่าฟังก์ชันไม่จำเป็นต้องเท่ากัน ฉันกำลังพยายามช่วยมือใหม่ React Native ให้เข้าใจแนวคิดของระบบเลย์เอาต์ใน React Native โปรดดูคำแนะนำอย่างเป็นทางการสำหรับข้อมูลโดยละเอียด
พิจารณาคุณสมบัติ JSX นี้:
flex: 1เทียบเท่ากับสิ่งนี้:
android:layout_width="match_parent" android:layout_height="match_parent"ข้อมูลโค้ด JSX นี้:
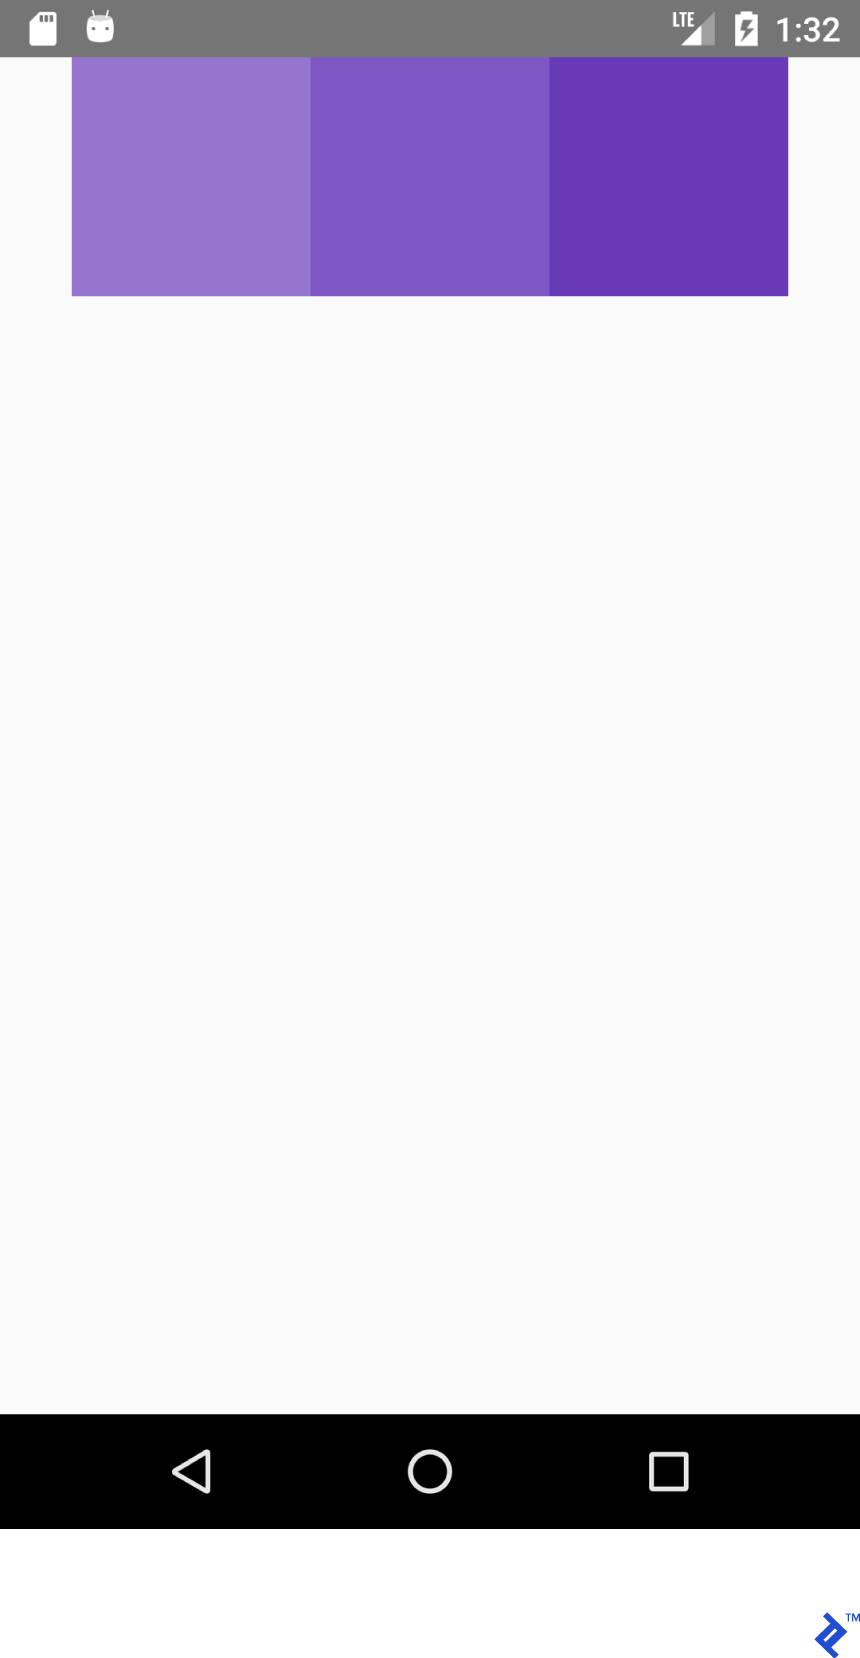
<View style={{flex: 1, flexDirection: 'row'}}> <View style={{ width: 100, height: 100, backgroundColor: '#9575CD'}}/> <View style={{ width: 100, height: 100, backgroundColor: '#7E57C2'}}/> <View style={{ width: 100, height: 100, backgroundColor: '#673AB7'}}/> </View>และ XML นี้:
<LinearLayout android:layout_width="match_parent" android:layout_height="match_parent" android:orientation="horizontal"> <View android:layout_width="100dp" android:layout_height="100dp" android:background="#9575CD" /> <View android:layout_width="100dp" android:layout_height="100dp" android:background="#7E57C2" /> <View android:layout_width="100dp" android:layout_height="100dp" android:background="#673AB7" /> </LinearLayout>ทั้งสองสร้างผลลัพธ์นี้:
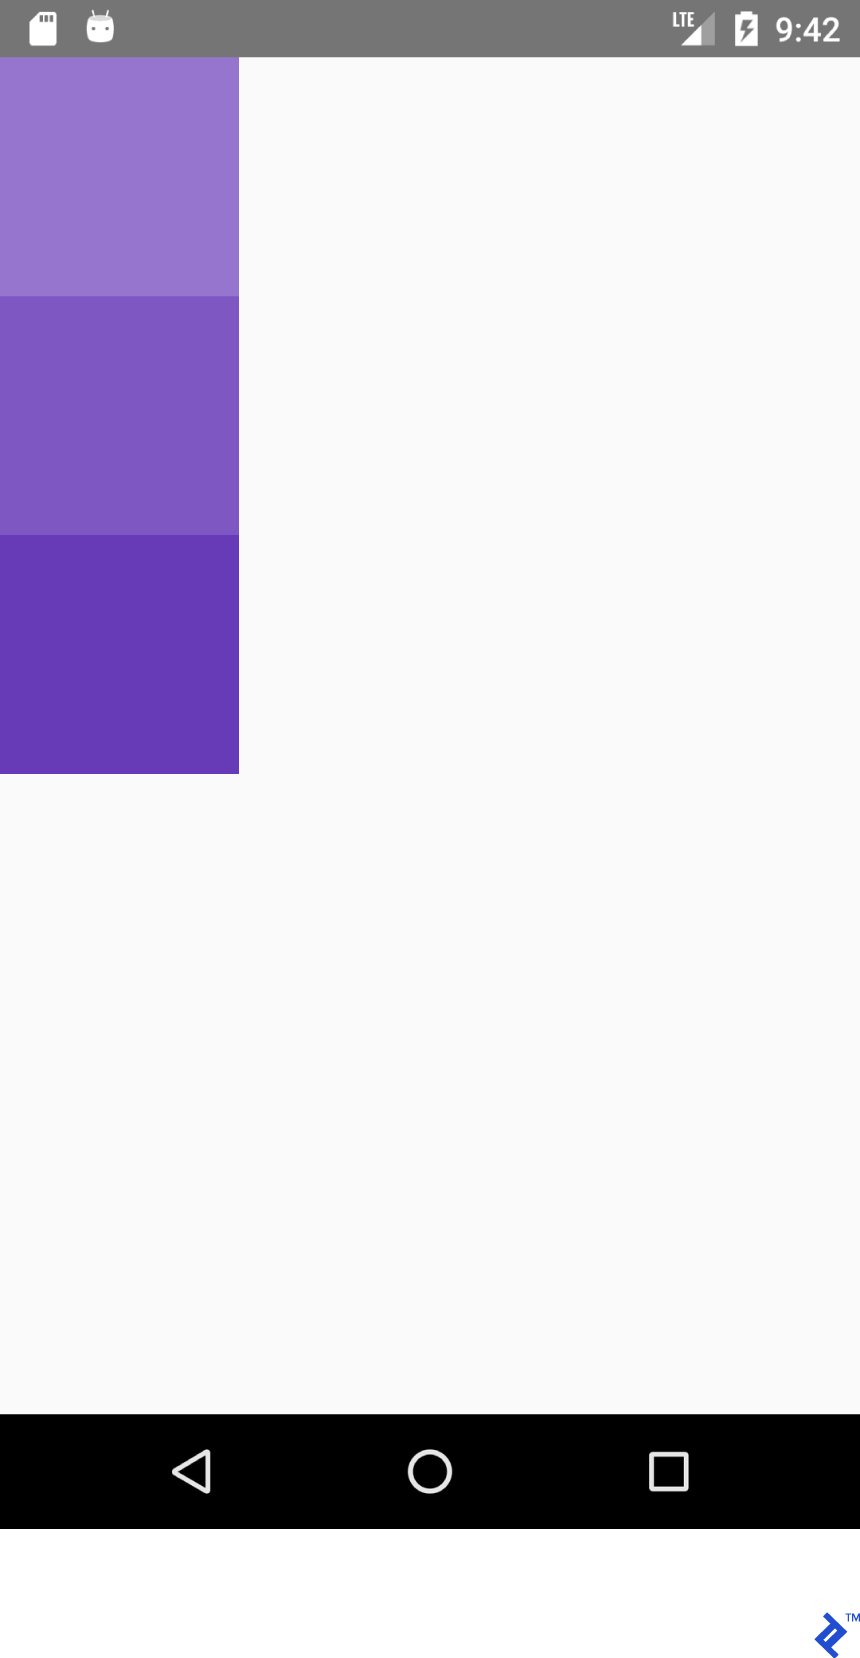
ในทำนองเดียวกัน JSX นี้:
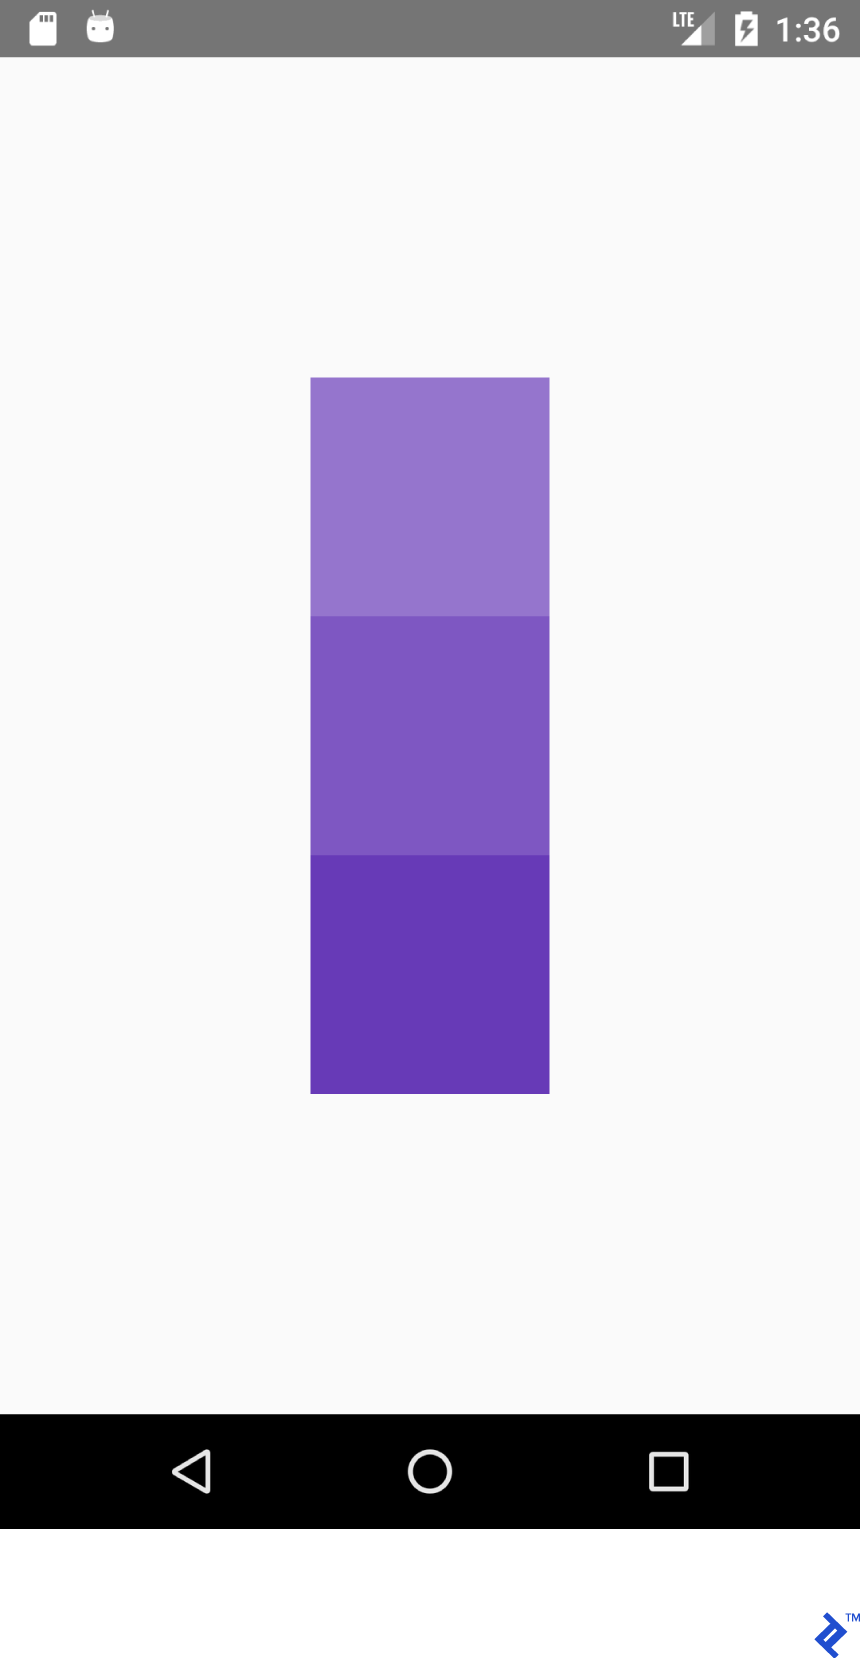
<View style={{flex: 1, flexDirection: 'column'}}> <View style={{ width: 100, height: 100, backgroundColor: '#9575CD'}}/> <View style={{ width: 100, height: 100, backgroundColor: '#7E57C2'}}/> <View style={{ width: 100, height: 100, backgroundColor: '#673AB7'}}/> </View>และ XML นี้:
<LinearLayout android:layout_width="match_parent" android:layout_height="match_parent" android:orientation="vertical"> <View android:layout_width="100dp" android:layout_height="100dp" android:background="#9575CD" /> <View android:layout_width="100dp" android:layout_height="100dp" android:background="#7E57C2" /> <View android:layout_width="100dp" android:layout_height="100dp" android:background="#673AB7" /> </LinearLayout>สร้างสิ่งนี้:
เพื่อให้ได้ตำแหน่งที่ถูกต้องภายในคอนเทนเนอร์ โดยทั่วไปเราจะใช้คุณสมบัติ flexDirection , alignItems และ justifyContent กัน
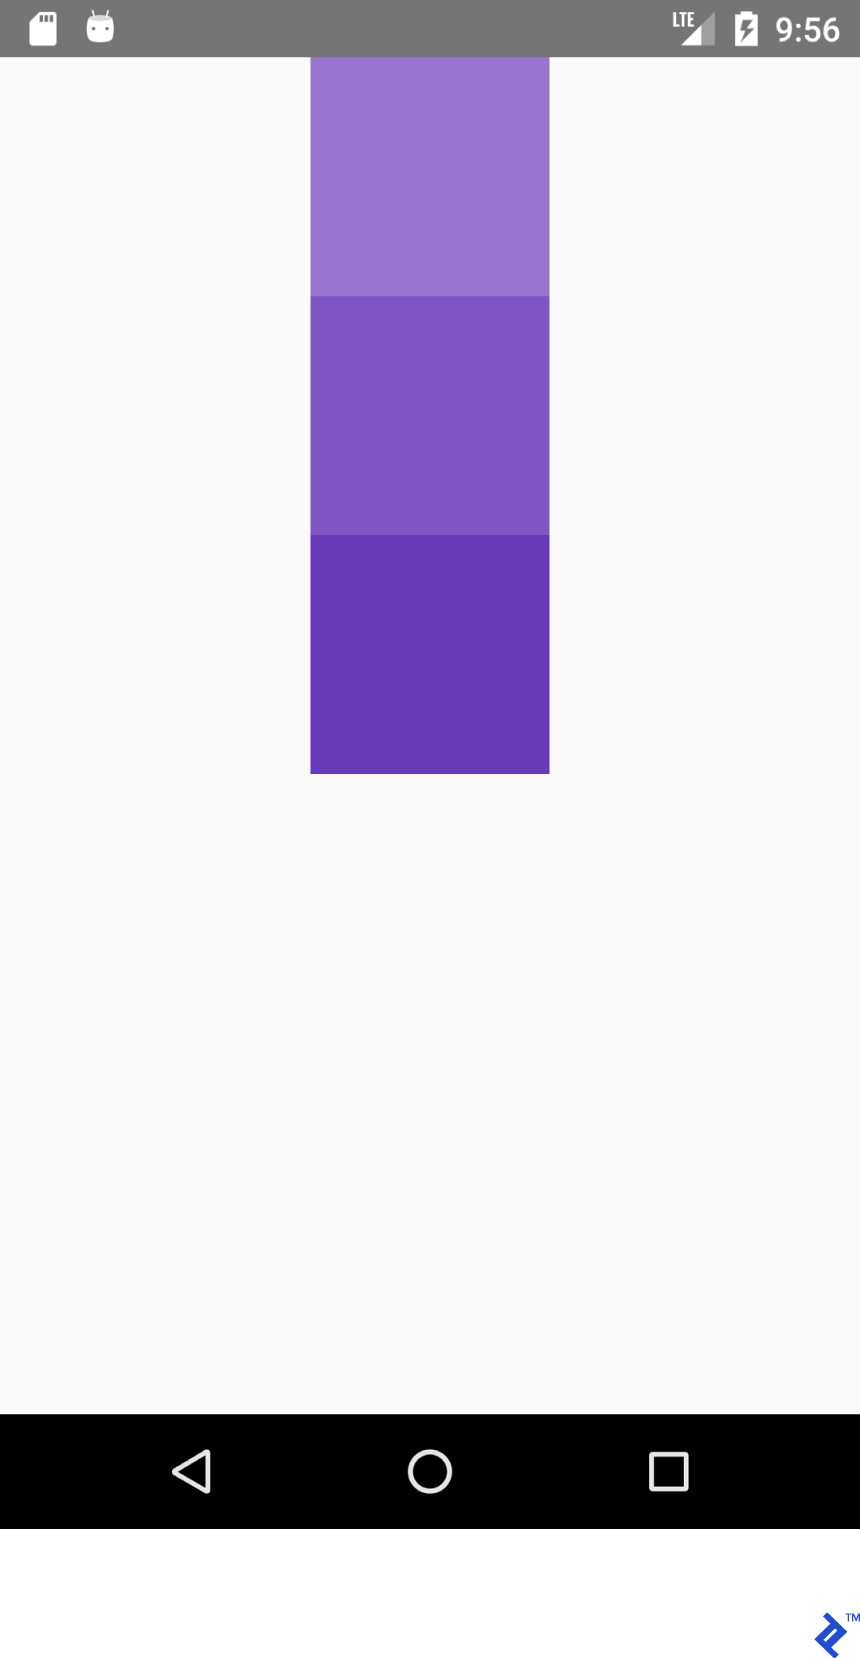
JSX นี้:
<View style={{flex: 1, flexDirection: 'column', alignItems: 'center'}}> <View style={{ width: 100, height: 100, backgroundColor: '#9575CD'}}/> <View style={{ width: 100, height: 100, backgroundColor: '#7E57C2'}}/> <View style={{ width: 100, height: 100, backgroundColor: '#673AB7'}}/> </View>และ XML นี้:
<LinearLayout android:layout_width="match_parent" android:layout_height="match_parent" android:gravity="center_horizontal" android:orientation="vertical"> <View android:layout_width="100dp" android:layout_height="100dp" android:background="#9575CD" /> <View android:layout_width="100dp" android:layout_height="100dp" android:background="#7E57C2" /> <View android:layout_width="100dp" android:layout_height="100dp" android:background="#673AB7" /> </LinearLayout>จะสร้างเค้าโครงนี้:

JSX นี้:
<View style={{flex: 1, flexDirection: 'column', justifyContent: 'center'}}> <View style={{ width: 100, height: 100, backgroundColor: '#9575CD'}}/> <View style={{ width: 100, height: 100, backgroundColor: '#7E57C2'}}/> <View style={{ width: 100, height: 100, backgroundColor: '#673AB7'}}/> </View>และ XML นี้
<LinearLayout android:layout_width="match_parent" android:layout_height="match_parent" android:gravity="center_vertical" android:orientation="vertical"> <View android:layout_width="100dp" android:layout_height="100dp" android:background="#9575CD" /> <View android:layout_width="100dp" android:layout_height="100dp" android:background="#7E57C2" /> <View android:layout_width="100dp" android:layout_height="100dp" android:background="#673AB7" /> </LinearLayout>จะสร้างเค้าโครงนี้:
JSX นี้:
<View style={{flex: 1, flexDirection: 'row', justifyContent: 'center'}}> <View style={{ width: 100, height: 100, backgroundColor: '#9575CD'}}/> <View style={{ width: 100, height: 100, backgroundColor: '#7E57C2'}}/> <View style={{ width: 100, height: 100, backgroundColor: '#673AB7'}}/> </View>และ XML นี้:
<LinearLayout android:layout_width="match_parent" android:layout_height="match_parent" android:gravity="center_horizontal" android:orientation="horizontal"> <View android:layout_width="100dp" android:layout_height="100dp" android:background="#9575CD" /> <View android:layout_width="100dp" android:layout_height="100dp" android:background="#7E57C2" /> <View android:layout_width="100dp" android:layout_height="100dp" android:background="#673AB7" /> </LinearLayout>จะสร้างเค้าโครงนี้:
JSX นี้:
<View style={{flex: 1, flexDirection: 'row', justifyContent: 'center', alignItems: 'center'}}> <View style={{ width: 100, height: 100, backgroundColor: '#9575CD'}}/> <View style={{ width: 100, height: 100, backgroundColor: '#7E57C2'}}/> <View style={{ width: 100, height: 100, backgroundColor: '#673AB7'}}/> </View>และ XML นี้:
<LinearLayout android:layout_width="match_parent" android:layout_height="match_parent" android:gravity="center" android:orientation="vertical"> <View android:layout_width="100dp" android:layout_height="100dp" android:background="#9575CD" /> <View android:layout_width="100dp" android:layout_height="100dp" android:background="#7E57C2" /> <View android:layout_width="100dp" android:layout_height="100dp" android:background="#673AB7" /> </LinearLayout>จะสร้างเค้าโครงนี้:
บทเรียนที่ต้องเรียนรู้: ถ้าเรามี flexDirection: row', alignItems works on Y axis and justifyContent works on X axis. Everything is mirrored for works on X axis. Everything is mirrored for flexDirection: คอลัมน์' - justifyContent ส่งผลต่อแกน Y และ alignItems ส่งผลต่อแกน Y
| justifyContent: 'เริ่มต้นแบบยืดหยุ่น' | แรงโน้มถ่วง = "เริ่มต้น | ซ้าย" |
| alignItems: 'เริ่มต้นแบบยืดหยุ่น' | แรงโน้มถ่วง = "เริ่มต้น | ซ้าย" |
| justifyContent: 'flex-end' | แรงโน้มถ่วง = "สิ้นสุด | ขวา" |
| alignItems: 'flex-end' | แรงโน้มถ่วง = "สิ้นสุด | ขวา" |
ลองด้วยตัวคุณเอง ตั้งค่า justifyContent เป็น space-around , space-between และ space-evenly evenly
การจัดการของรัฐ
สำหรับการอัพเดทสถานะแอพพลิเคชั่น คุณจะใช้ตัวแปร state ของ React เมื่อใดก็ตามที่มีการอัปเดต state render() จะถูกเรียกใช้
คัดลอกโค้ดด้านล่างไปยังแอปของคุณ:
import React from 'react'; import {Button, Text, View} from 'react-native'; export default class App extends React.Component { /* Initialize state object with variable 'number' set to 0 and variable name with value of empty string */ state = {number: 0}; render() { return ( <View style={{ flexDirection: 'row', justifyContent: 'space-between', alignItems: 'center', flex: 1, padding: 20 }}> <Button title='Decrement' color='#e57373' onPress={() => this.decrement()}/> <Text> {/* Text will be automatically updated whenever state.number has changed value */} Value = {this.state.number} </Text> <Button title='Increment' color='#64B5F6' {/* Set listener for click */} onPress={() => this.increment()}/> </View> ); } //Declaration of decrement function decrement() { //To update the state we need invoke this.setState //with new value for variable 'number' this.setState({number: this.state.number - 1}); } increment() { this.setState({number: this.state.number + 1}); } } 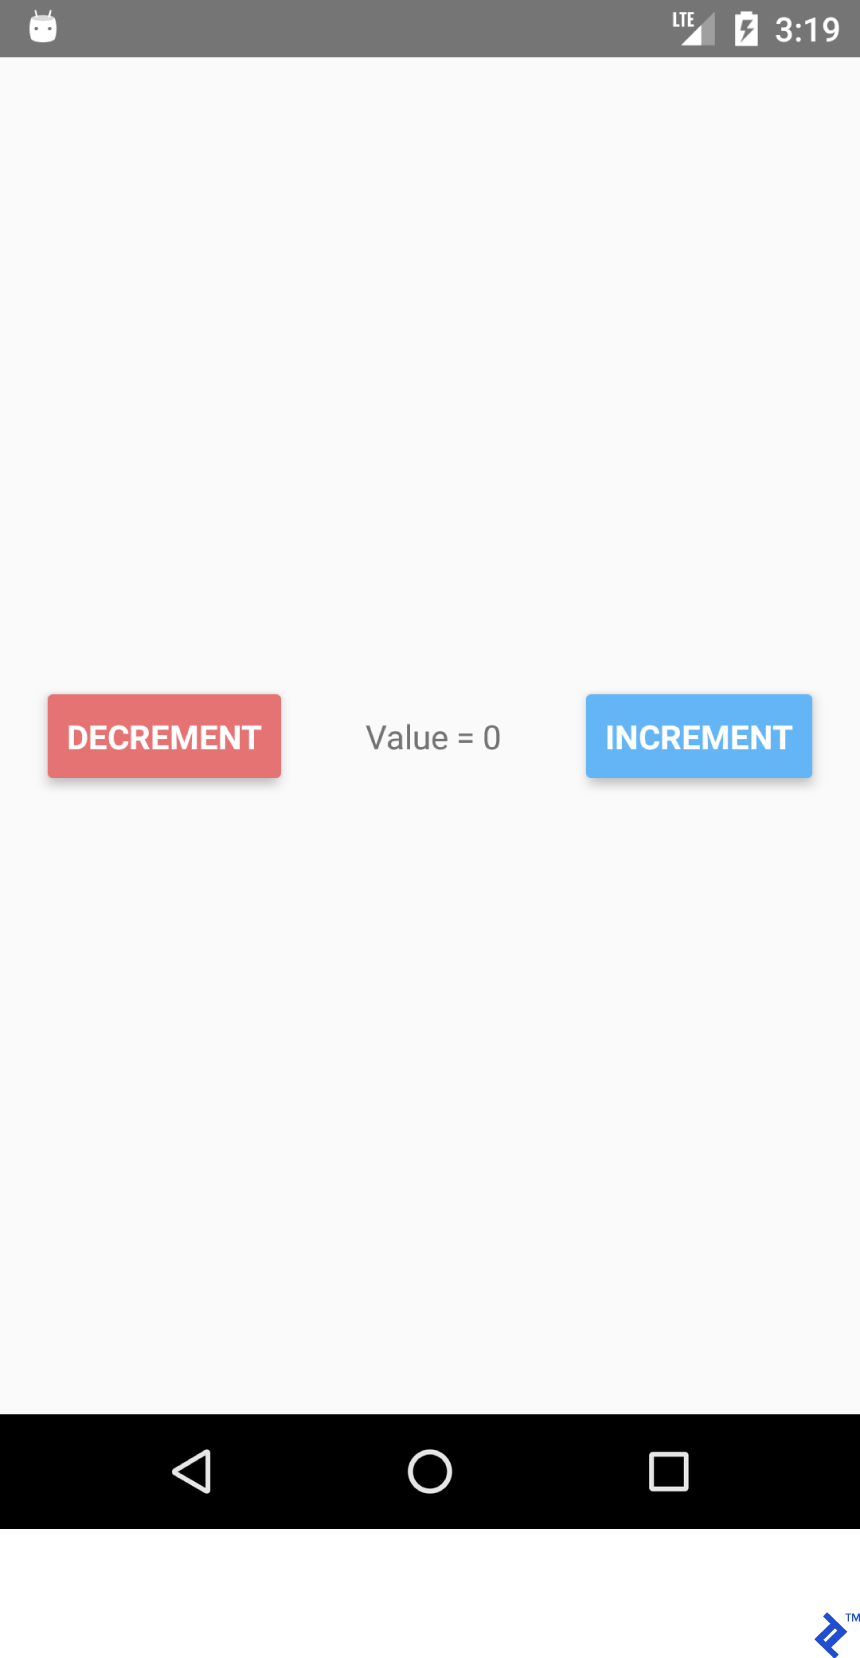
หากคุณคลิกปุ่ม DECREMENT และ INCREMENT คุณจะเห็นว่าข้อความนั้นได้รับการอัปเดตโดยอัตโนมัติสำหรับคุณ ไม่จำเป็นต้องใช้ textView.setText("Value " + number) อย่างชัดเจน

ฟังก์ชันสถานะมีประโยชน์ด้วยเหตุผลหลายประการ:
- ความง่ายในการรับค่า—คุณรู้เสมอว่าจะหาค่าของตัวแปรเฉพาะได้ที่ไหนและอย่างไร
- ข้อมูลไม่ได้ผูกกับวิดเจ็ตเฉพาะ
- การมีวิดเจ็ตหลายอันขึ้นอยู่กับการเปลี่ยนแปลงค่าทั่วไป
การสร้างแอปค้นหาสำหรับ /r/pics
ตอนนี้เราได้จัดการเรื่องพื้นฐานแล้ว มาสร้างสิ่งที่ซับซ้อนขึ้นอีกหน่อย: แอปค้นหาสำหรับ /r/pics Reddit มีจุดสิ้นสุด JSON API ที่ตรงไปตรงมา ดังนั้นเราจึงไม่ต้องทำภารกิจด้านข้างเพื่อรับการรับรองความถูกต้องเพื่อให้ทำงานได้อย่างถูกต้อง
React Native มี Fetch API ในตัว เนื่องจากพวกเราส่วนใหญ่คงคุ้นเคยกับ Retrofit และใช้งานง่าย เราจะใช้ axios คุณสามารถติดตั้ง axios ผ่านคำสั่งเทอร์มินัล
ใช้ yarn (วิธีที่ฉันชอบ):
yarn add axios
หรือใช้ npm :
npm install axios
การนำเข้า:
import React from 'react'; import { TextInput, View, Text, Image, ActivityIndicator, Platform, StyleSheet } from 'react-native'; import axios from 'axios'; TextInput = EditText, ActivityIndicator = ProgressBar Platform - Platform detecting module StyleSheet - Module for creating stylesheets and moving them away from JSXสร้างชั้นเรียน:
export default class App extends React.Component { }เพื่อเริ่มต้นสถานะ เราต้องการ:
- กำลังโหลด - สำหรับแสดงแถบความคืบหน้า
- error - เพื่อแสดงว่าเกิดข้อผิดพลาดบางอย่างเมื่อทำการร้องขอ REST API
- imgUrl - เพื่อดูตัวอย่างภาพที่ค้นหา
- ข้อความ - คำค้นหา
state = {text: '', loading: false, error: null, imgUrl: null}; เพิ่มรหัส JSX เรามีเลย์เอาต์แนวตั้งพร้อม TextInput และ Image
render() { return ( //Predefined style. See below <View style={styles.containerStyle}> {/* returnKeyType ~ imeOptions onSubmitEditing ~ et.OnEditorActionListener */} <TextInput style={styles.textInputStyle} placeholder="Enter text to search an image" returnKeyType='search' autoFocus={true} onChangeText={(text) => this.setState({text})} onSubmitEditing={() => this.searchPicture()}/> {/* Render error Image component if this.state.imgUrl is not equal to null */} { this.state.imgUrl && <Image source={{uri: this.state.imgUrl}} style={{flex: 1}}/> } </View> ); }สิ่งใหม่:
onChangeText={(text) => this.setState({text})} onSubmitEditing={() => this.searchPicture()} { this.state.imgUrl && <Image source={{uri: this.state.imgUrl}} style={{flex: 1}}/> } วิธีแรกทำงานคล้ายกับ EditText ด้วยคอมโพเนนต์ TextWatcher พูดตามตรง มันดีกว่าใน React Native มาก
วิธีที่สองถูกเรียกใช้เมื่อกดปุ่มย้อนกลับบนแป้นพิมพ์ ( et.OnEditorActionListener ) หลังจากที่ทริกเกอร์ searchPicture()
รูปภาพจะแสดงผลเมื่อ imgUrl ไม่เป็นค่าว่างหรือไม่ได้กำหนดไว้ เนื่องจากตัวดำเนินการ '&&' จะไม่ตรวจสอบอาร์กิวเมนต์ที่สองหากอาร์กิวเมนต์แรกเป็นเท็จอยู่แล้ว
คุณอาจสงสัยว่าเหตุใด this.state.imgUrl จึงเป็นเท็จ เมื่อใช้ตัวดำเนินการเชิงตรรกะใน JavaScript สิ่งใดก็ตามยกเว้น '' (สตริงว่าง) 0 , false , null หรือ undefined นั้นเป็นจริง ไม่จำเป็นต้องมีการตรวจสอบเฉพาะ
searchPicture() { //Default state this.setState({loading: true, error: null, imgUrl: null}); axios.get('https://www.reddit.com/r/pics/search.json', { params: { //the get param map restrict_sr: 'on', //search only /r/pics limit: 1, //limit to one search item sort: 'new', //sort by creation date q: this.state.text //our search query } }).then(response => { //promise is resolved and 'then' block is triggered //set state with new values this.setState({ imgUrl: response.data.data.children[0] .data.preview.images[0].source.url, error: null, loading: false }) }).catch(error => {//Some error occurred //set error this.setState({error: error.message, loading: false, imgUrl: null}) }) }ไปเลย. แอปพลิเคชันควรทำงานตามที่คาดไว้ในขณะนี้ ป้อนสตริงการค้นหาแล้วกดย้อนกลับ
เนื่องจากแอปพลิเคชันของเราพร้อมที่จะแสดง ActivityIndicator และข้อผิดพลาด เราจึงต้องเพิ่มโค้ดเพิ่มเติมหลังจากคอมโพเนนต์ Image :
{ //Separate method this.renderProgress() } {/* Render error Text component if this.state.error is not equal to null */} { this.state.error && <Text style={{margin: 16, color: 'red'}}> {this.state.error} </Text> } คุณสามารถย้ายองค์ประกอบการเรนเดอร์นอกเมธอด main render() ได้เช่นกัน:
renderProgress() { //If this.state.loading is true //return View containing a progressbar //View takes style array if (this.state.loading === true) { return ( <View style={ [styles.containerStyle, {justifyContent: 'center'}]}> <ActivityIndicator color='#e57373'/> </View> ); } } เหลือแต่สไตล์ ใส่สิ่งเหล่านี้นอกคลาส App
const styles = StyleSheet.create({ containerStyle: { flexDirection: 'column', flex: 1, //Since React Native is cross platform //let's handle both platforms. //Add top margin to fix status bar overlap marginTop: Platform.OS === 'ios' ? 20 : 0, }, textInputStyle: { marginLeft: 16, marginRight: 16, height: Platform.OS === 'ios' ? 30 : undefined } });ตอนนี้เราสามารถเพิ่มการปรับแต่งเพิ่มเติม เช่น การเปิดซอฟต์คีย์บอร์ดโดยอัตโนมัติเมื่อเปิดแอปพลิเคชัน
โปรดทราบว่ามีวิธีที่ง่ายกว่าในการทำให้ TextInput โฟกัสอัตโนมัติ ( autoFocus={true} prop ) แต่สำหรับตัวอย่างนี้ เราจะไม่ใช้มัน
เพิ่มการอ้างอิงไปยัง TextInput ด้วย prop:
ref={ref => this.searchInput = ref}
และแทนที่วิธีวงจรชีวิต componentDidMount() ดังนี้:
componentDidMount(){ this.searchInput.focus(); }โหลดแอปซ้ำและแป้นพิมพ์จะเปิดให้เราโดยอัตโนมัติ
วิธีวงจรชีวิตของส่วนประกอบ
เราได้สร้างส่วนประกอบแล้ว แต่มาดูอายุของส่วนประกอบกัน
นี่คือวงจรชีวิตของ React:
-
constructor()- Constructor จะถูกเรียกเสมอเมื่อแอพพลิเคชั่นเริ่มทำงาน -
static _getDerivedStateFromProps_(props, state)- เรียกก่อนเรนเดอร์และหลังอัปเดต ส่งกลับวัตถุสำหรับการปรับปรุงสถานะ คืนค่า null เพื่ออัปเดตอะไร -
render()- จำเป็นต้องมี Render สำหรับทุกคลาส React Component ใช้สำหรับแสดงผล View -
componentDidMount()- ถูกเรียกใช้หลังจากสร้างส่วนประกอบและประกอบเข้ากับแผนผังมุมมอง -
shouldComponentUpdate(nextProps, nextState)- เรียกหลังจากเปลี่ยนสถานะหรืออุปกรณ์ประกอบฉาก ค่าดีฟอลต์กลับเป็น true หลังจากอัพเดตสถานะทุกครั้ง เรียกrender()หากคืนค่าเป็น true -
getSnapshotBeforeUpdate(prevProps, prevState)- ถูกเรียกก่อนที่จะแสดงผลเอาต์พุต -
componentDidUpdate(prevProps, prevState, snapshot)- เรียกหลังจากเรนเดอร์อัปเดตใหม่ มันไม่ได้ถูกเรียกหลังจากrender()แรก -
componentWillUnmount()- ถูกเรียกก่อนที่ส่วนประกอบจะถูกยกเลิกการเมานท์และถูกทำลาย
ส่วนประกอบที่ใช้ซ้ำได้
เรามักจะต้องสร้างส่วนประกอบที่ใช้ซ้ำได้เมื่อทำงานในโครงการ มีสองวิธีในการสร้างส่วนประกอบ:
- การสร้างคลาสที่ขยาย
React.Componentควรใช้วิธีนี้หากเราต้องการวิธีวงจรชีวิต - โดยการเขียนฟังก์ชันที่ส่งคืน View สำหรับรูปแบบที่ง่ายกว่า
เนื่องจากเราได้สร้างคลาสคอมโพเนนต์แล้ว มาสร้างฟังก์ชันสำหรับอินสแตนซ์นี้
สมมติว่าเราต้องการแอนะล็อกเพื่อ <CardView> สร้างโฟลเดอร์ "ทั่วไป" ภายใต้ไดเร็กทอรี ./ ./src
สร้าง CardView.js
import React from "react"; import {View} from "react-native"; export default CardView = (props) => { return ( //Style will be merged from default containerStyle //and props.style. props.style attributes will override //values if parameters are same. <View style={{...styles.containerStyle, ...props.style}}> {/* props.children contain subviews add this line if the component is container */} {props.children} </View> ); }; const styles = { containerStyle: { borderRadius: 4, margin: 5, padding: 5, elevation: 5, shadowColor: 'black', shadowRadius: 5, shadowOpacity: 0.5, shadowOffset: {width: 0, height: 3}, backgroundColor: 'white' } }; แบบ CardView LoginForm ของเรา:
import React from "react"; import {TextInput, Platform, Button, StyleSheet} from "react-native"; import CardView from "../common/components/CardView"; export default class LoginForm extends React._Component _{ render() { return ( //Override default style <CardView style={{ borderRadius: 4, backgroundColor: '#fff' }}> <TextInput placeholder="Email" style={styles.textInputStyle}/> <TextInput placeholder="Password" style={styles.textInputStyle} secureTextEntry={true}/> <Button color="#841584" title="Login" onPress={() => console.log("onLoginPress")} buttonStyle={styles.buttonStyle}/> </CardView> ); } } const styles = StyleSheet.create({ buttonStyle: { elevation: 5, height: 40 }, textInputStyle: { padding: 10, //Additional params to make //iOS inputs prettier ...Platform.select({ ios: { borderRadius: 2, marginTop: 5, backgroundColor: '#eeeeee' } }) } }); นำเข้าคลาส LoginForm ในคลาส App และห่อด้วย View
<View style={{flex: 1, justifyContent: 'center'}}> <LoginForm/> </View>หากคุณปรับแต่งพารามิเตอร์ในสไตล์ คุณจะได้สิ่งที่ดูดีขึ้นมาก
การนำทาง
การนำทางไปยังฉากต่างๆ เป็นส่วนสำคัญสำหรับแอปพลิเคชันส่วนใหญ่ เรากำลังจะสร้างแอปเบราว์เซอร์ Reddit /r/pics
การสร้างการนำทางใน React Native นั้นค่อนข้างง่าย
ข้อกำหนดเบื้องต้น
- ติดตั้ง
react-navigationด้วยyarnหรือnpm - ติดตั้ง
axiosด้วยyarnหรือnpm
เริ่มต้นด้วยการสร้างสององค์ประกอบที่แตกต่างกัน
หมายเหตุ: โค้ดด้านล่างส่วนใหญ่น่าจะคุ้นเคยกับคุณอยู่แล้ว ฉันจะวางทั้งชั้นเรียน
PictureList.js:
import React from 'react'; import { ActivityIndicator, FlatList, Image, Text, TouchableHighlight, View } from "react-native"; import axios from "axios"; import CardView from "../common/CardView"; export default class PictureList extends React.Component { state = {loading: true, error: null, posts: null}; componentDidMount() { axios.get('https://www.reddit.com/r/pics.json') .then(response => { this.setState({ posts: response.data.data.children, loading: false }) }).catch(error => { this.setState({ error: error.message, loading: false }) }) } render() { return ( <View style={{flex: 1, justifyContent: 'center'}}> // FlatList ~ ListView // data - DataSource for the List // renderItem - function returns View item // keyExtractor - Unique id for items {this.state.posts && <FlatList data={this.state.posts} renderItem={this.renderItem.bind(this)} keyExtractor={(item) => (item.data.id + '')}/>} {this.state.loading && <ActivityIndicator size="large" color="#f4511e"/>} </View> ); } navigateToPicture(title, url) { this.props.navigation.navigate('PicturePreview', { 'title': title, 'url': url }) } renderItem(item) { //Destructuring values from item //Read more 'ES6 destructuring' const {data} = item.item; const {title} = data; const {url} = data.preview.images[0].source; return ( //Clickable view <TouchableHighlight onPress={() => this.navigateToPicture(title, url)}> {/Reusing our CardView/} <CardView> <Image style={{height: 150}} source={{uri: url}}/> <Text style={{padding: 5}}>{title}</Text> </CardView> </TouchableHighlight> ) } } PicturePreview.js :
import React from 'react'; import {Image} from "react-native"; export default class PicturePreview extends React.Component { //Destructure navigation //Set title to header static _navigationOptions = ({navigation}) => ({ title: navigation.state.params.title }); render() { const {url} = this.props.navigation.state.params; return (<Image style={{flex: 1}} source={{uri: url}}/>) } } navigationOptions จะถูกเรียกใช้โดยอัตโนมัติโดย React-Navigation
ตอนนี้ไปที่ App.js
หมายเหตุ: มีการนำทางหลายประเภทใน React-Navigation วันนี้เราจะเน้นที่ StackNavigation โปรดดูเว็บไซต์อย่างเป็นทางการสำหรับข้อมูลรายละเอียด
import React from 'react'; import {createStackNavigator} from "react-navigation"; import PictureList from "./components/PictureList"; import PicturePreview from "./components/PicturePreview"; export default class App extends React.Component { render() { return ( <Router/> ); } } //Customize the header_ const NavigationOptions = { headerTintColor: '#fff', headerStyle: { backgroundColor: '#f4511e', } }; //Create the router. const Router = createStackNavigator({ //Name the screen 'PictureList': { //Link the Component screen: PictureList, //Additional navigation options navigationOptions: { title: '/r/pics Browser', ...NavigationOptions } }, 'PicturePreview': { screen: PicturePreview, navigationOptions: NavigationOptions } }, { //Root initialRouterName: 'PictureList' } );อย่างที่คุณเห็น สิ่งที่เราต้องทำคือสร้างเราเตอร์การนำทางและทำให้ แอป แสดงผล หากทุกอย่างเป็นไปด้วยดี เราจะมีแอปเบราว์เซอร์ Reddit /r/pics ที่ใช้งานได้
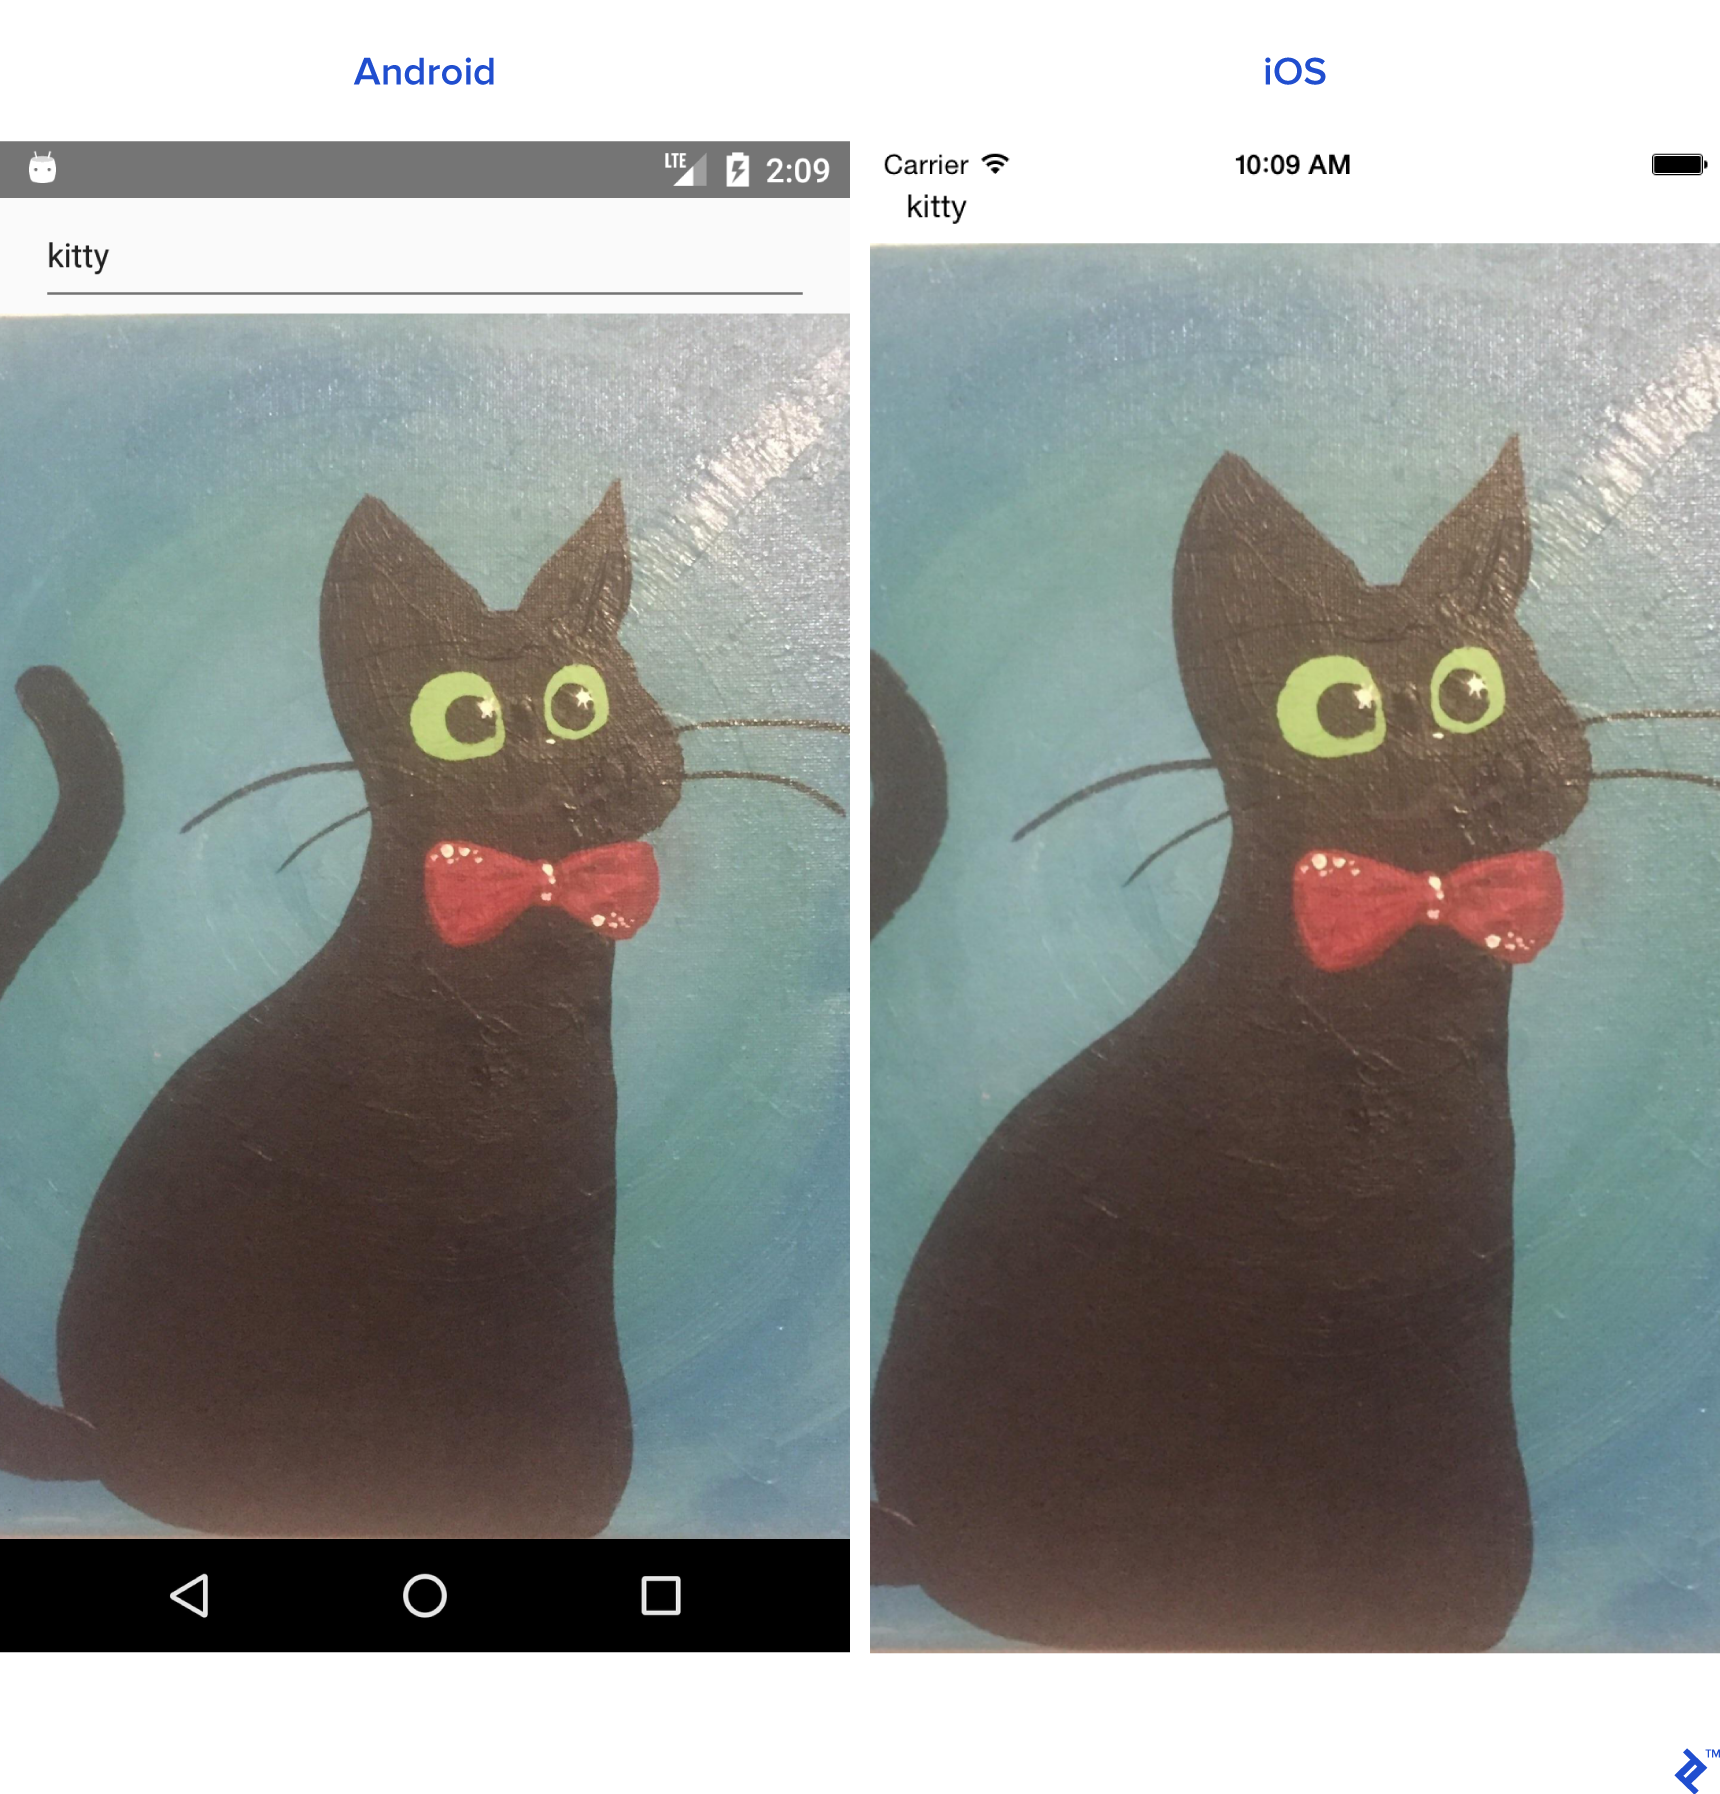
แอนดรอยด์:
ไอโอเอส:
React Native น่าทึ่งมาก!
ตั้งแต่ฉันเริ่มเขียนโปรแกรม ฉันมีประสบการณ์ในการพัฒนาอุปกรณ์พกพาอย่างแท้จริง แต่ตอนนี้ฉันสามารถเขียนโค้ดสำหรับอะไรก็ได้ด้วย React: มือถือ เดสก์ท็อป และเว็บ
หากคุณตัดสินใจที่จะเริ่มพัฒนาแอปพลิเคชั่นที่น่าทึ่งตัวต่อไปของคุณโดยใช้ React Native คุณจะพบว่ามันมีนิสัยใจคอและข้อบกพร่องบางอย่างที่นี่และที่นั่น แต่ React Native นั้นใช้งานได้ดีมากและเหมาะสำหรับโครงการส่วนใหญ่