
深入了解用于 Android 开发的 React Native
已发表: 2022-03-11几年前,我的一位同事向我介绍了 React Native。 我很怀疑。 我认为它只是另一个在现实生活中永远无法工作的跨平台框架——我几乎不知道我错了。
几年过去了,React Native 技能变得非常需要。 自从我学到了一些新东西已经有一段时间了,我想为什么不试一试呢? 今天,我是 React Native 的大力倡导者。
缺点:
- 你不能再使用 Android Studio
- React Native 不能用于每个应用程序或功能
- React Native 是一个新颖的框架,更新可能会对您当前的代码库产生负面影响
- JavaScript 不是严格类型的语言
- React Native 需要运行 JavaScript 引擎,这可能会降低其性能
优点:
- 简单易学
- Android 和 iOS 应用程序之间的共享代码库,只需稍作调整即可匹配平台体验
- 实时和热重载,意味着不再有无限的构建时间
- 两个平台的原生组件
- 不断改进
- 积极发展的社区
- 大量的图书馆
- Expo 消除了拥有 Mac 为 iOS 开发的需要
- 减少劳动力资源——虽然您可能仍需要一些 Android/iOS 原生开发,但这种情况并不常见。
我可以继续说下去,但让我们停在这里,继续讨论这篇博文的主题。 在这篇文章中,我将创建四个基于 React Native 的 Android 应用程序:
- 带有按钮的基本计数器,用于增加和减少计数器
- 搜索 r/pics subreddit 的应用程序
- 通用登录页面
- 浏览 r/pics subreddit 的应用程序
IDE
正如我上面提到的,我们无法使用 Android Studio 进行 React Native 开发。 我们需要一个替代品。 React Native 可能可以在任何可用的现代文本编辑器(Atom、VS Code、Sublime Text、Brackets 等)中开发,但由于我们使用的是 Android Studio 体验,我最喜欢的是由同一家公司构建的 WebStorm。 尽管 WebStorm 是付费应用程序(每年 129 美元),但您可以安装它的 Early Access 版本。 WebStorm 的 EAP 构建是免费的并且相当稳定。 如果您更喜欢完全免费的编辑器,请选择 VS Code。 微软甚至为它开发了很棒的 React Native 插件,而且效果很好。
创建新项目
先决条件:您的计算机上安装了 Android SDK、Node 和 React Native。
创建新的 React Native 项目有两种方法。
- 常规方式。 使用 WebStorm GUI 或使用终端命令:
react-native init AwesomeToptalProject - 更简单的方法“创建 React Native App”。
create-react-native-app AwesomeToptalProject
如果您使用create-react-native-app ,则创建的项目将使用 expo 引导。 我不会详细介绍,但基本上,这意味着您无需安装 Xcode 即可在 iOS 上运行该应用程序。 通过 expo.io 的功能和其他一些特性,让客户端始终保持最新状态也更容易。 但是您不能添加本机代码。 因此,如果您正在开发特定功能,您可能需要从 expo 中弹出应用程序并使用常规的 React Native 项目。
我将使用第一种方法。
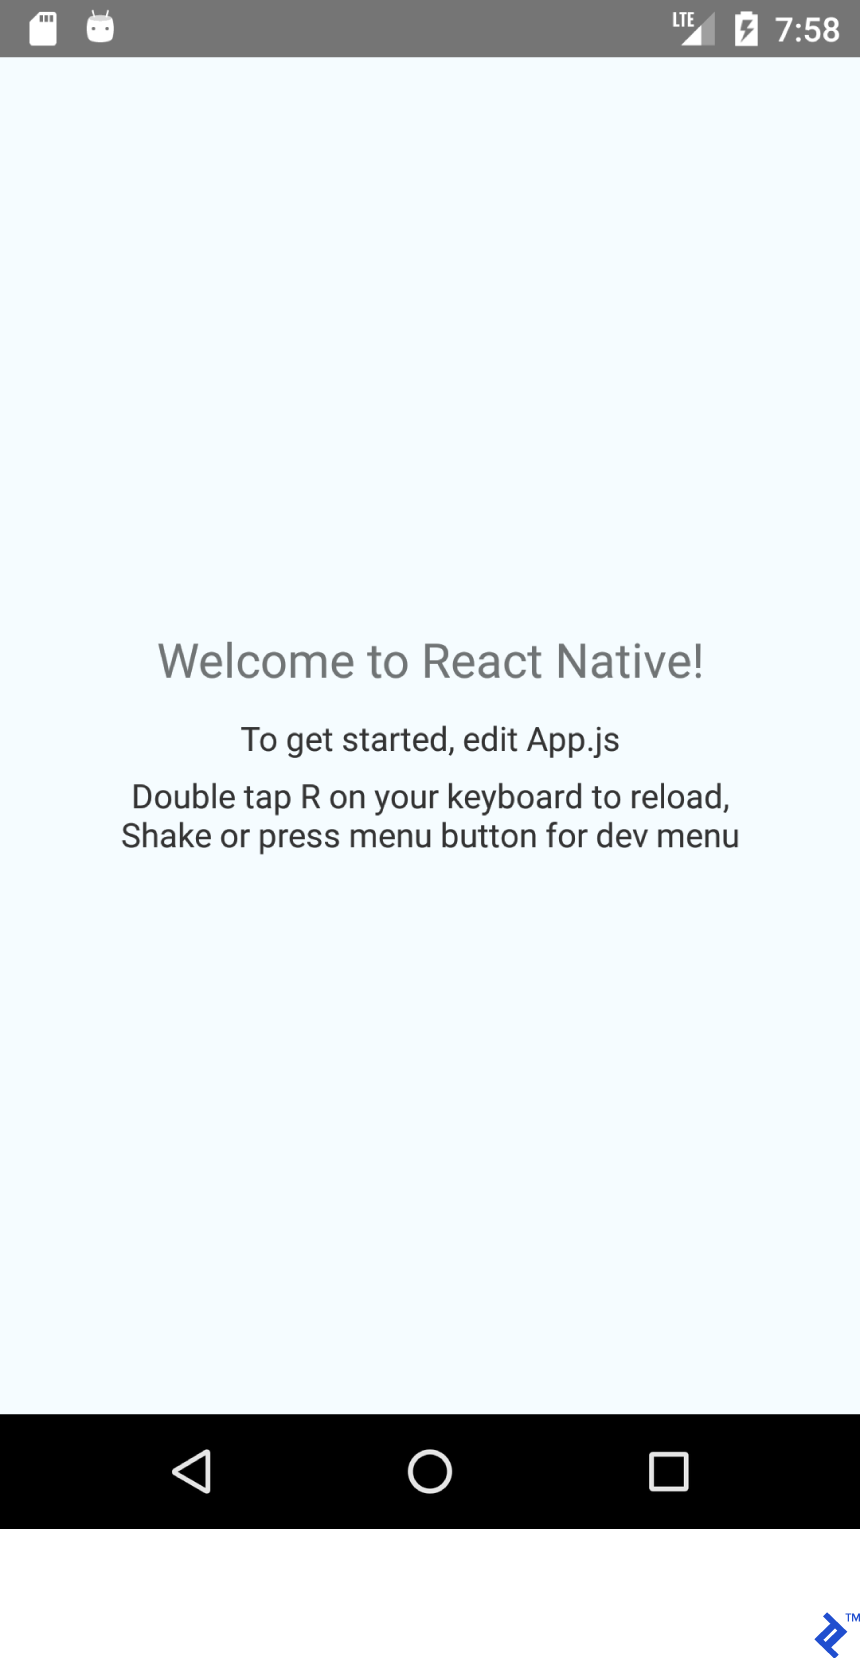
让我们运行这个项目。 首先,打开模拟器或连接设备。 如果您使用 WebStorm GUI 创建项目,您需要做的就是选择一个配置。 在 WebStorm 的右上角,单击 Run 按钮左侧的下拉菜单,选择 Android,然后单击 Run 或 Debug。 如果您使用终端创建项目,您可以添加新的 React Native 配置或使用终端运行它:
cd AwesomeToptalProject react-native run-android如果一切顺利,您将看到以下屏幕:
结构和基本设置
该项目中值得注意的项目是:
- android - 预配置了 React Native 支持的 Android Studio 项目。
- ios - 预先配置了 React Native 支持的 Xcode 项目。
- node_modules - 包含 React Native 框架和其他 Javascript 库的文件夹。
- index.js - 我们应用程序的入口点。
- App.js - 加载的初始组件。
让我们在项目的根目录中创建一个文件夹“src”并将 App.js 移动到那里。 您必须更新 index.js 导入以匹配新的 App.js 位置。
import App from './src/App';删除 App.js 中的所有内容并粘贴以下代码:
import React from 'react'; import {Text} from 'react-native'; export default class App extends React.Component { render() { return ( <Text>Hello TopTal</Text> ); } } 我们粘贴的代码非常简单。 我们创建了一个类App ( React.Component的子类),它覆盖了render()方法并返回了Text组件。 React.Component是使用 JSX 构建 UI 的基类。 export default修饰符使类public 。
我们现在准备开始设计我们的布局。
使用 Flexbox 布局
Flexbox类似于LinearLayout ,但Flexbox远远超出了LinearLayout的能力。
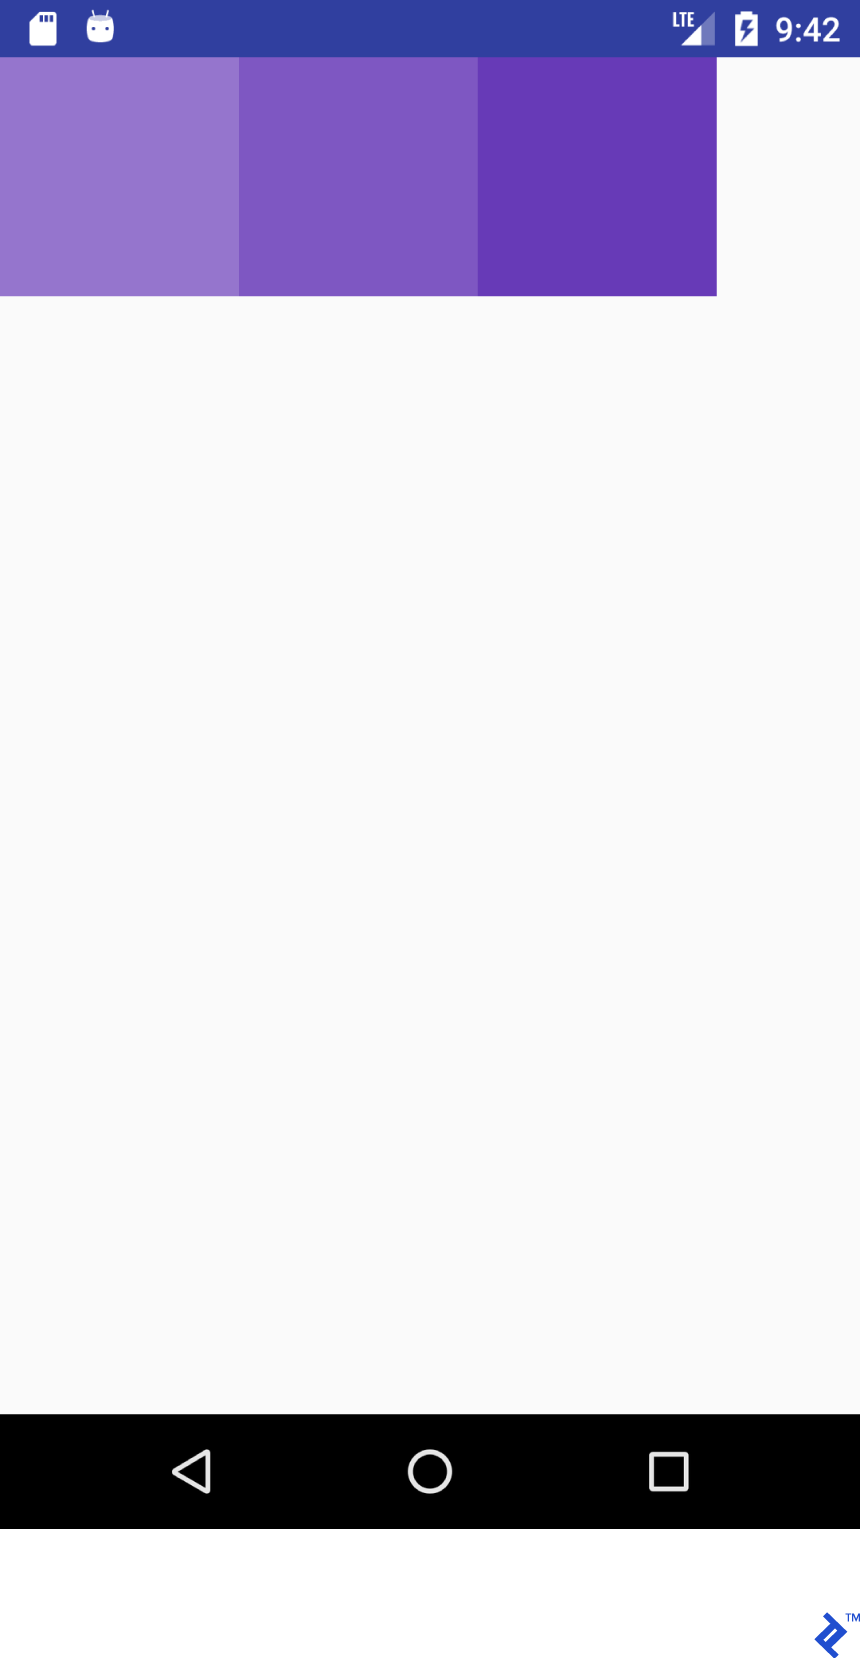
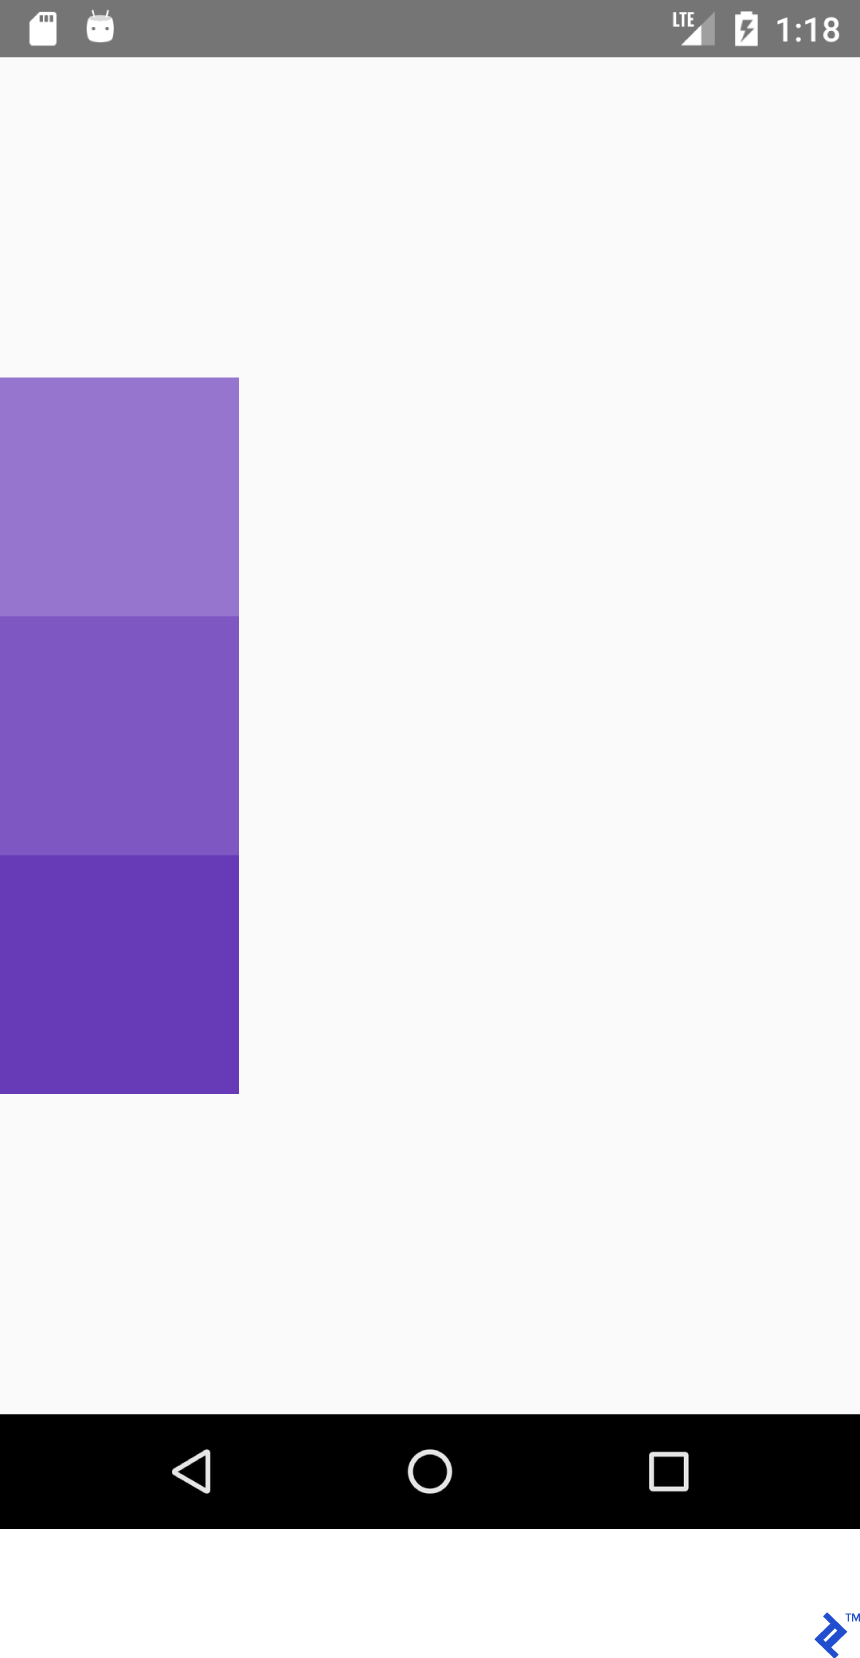
这个 JSX 片段:
<View style={{ flex: 1, flexDirection: 'row' }}> <View style={{ width: 100, height: 100, backgroundColor: '#9575CD' }}/> <View style={{ width: 100, height: 100, backgroundColor: '#7E57C2' }}/> <View style={{ width: 100, height: 100, backgroundColor: '#673AB7' }}/> </View>呈现此布局:

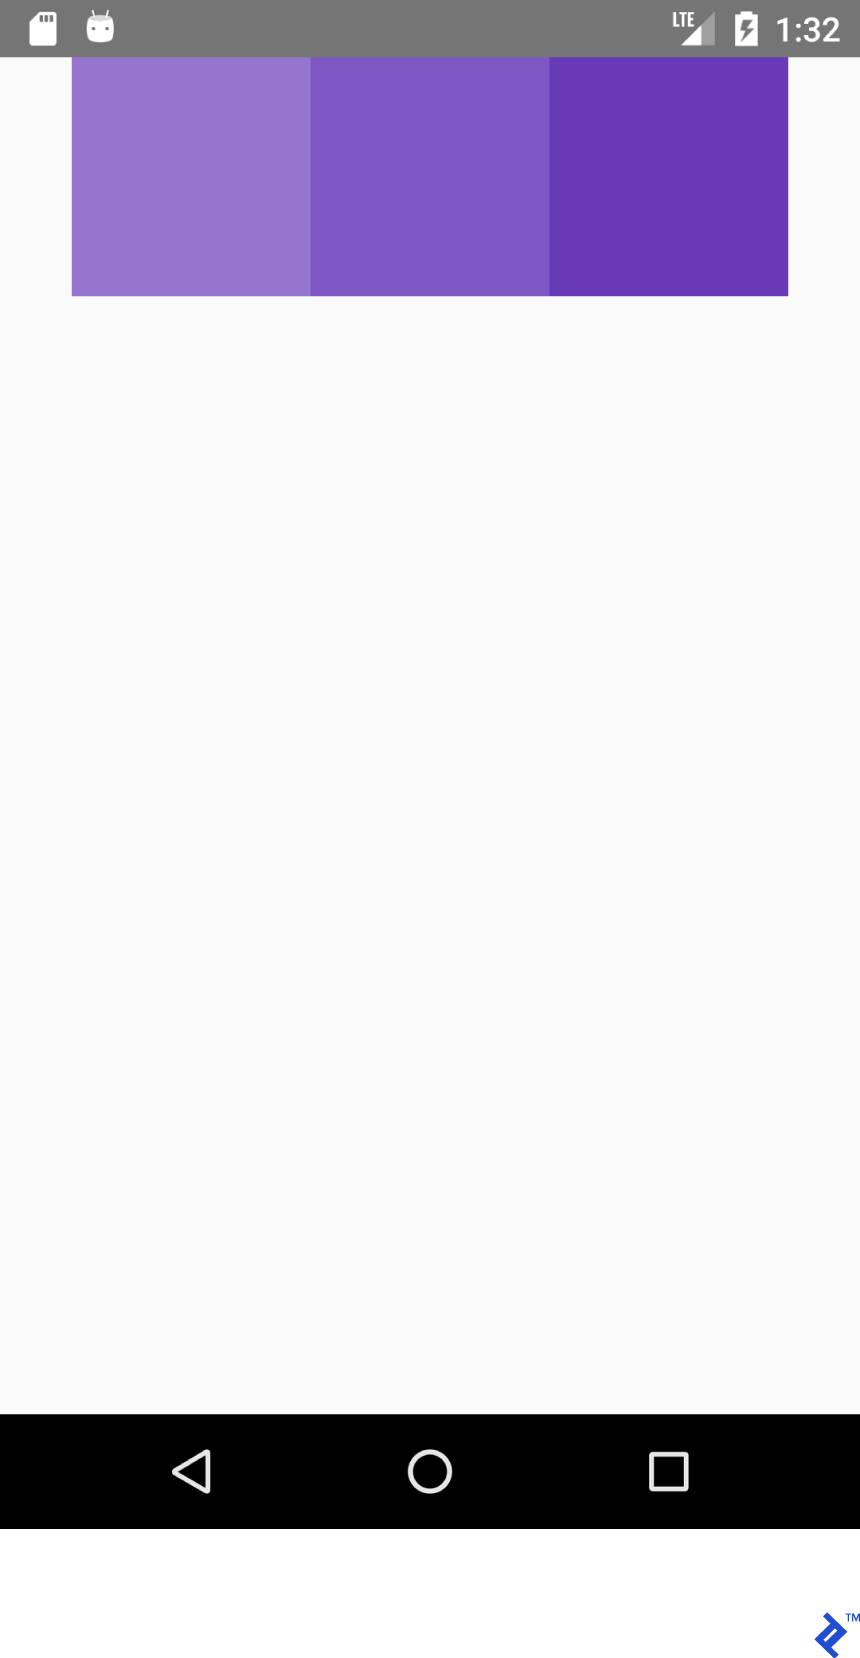
虽然这个 XML:
<LinearLayout android:layout_width="match_parent" android:layout_height="match_parent" android:orientation="horizontal"> <View android:layout_width="100dp" android:layout_height="100dp" android:background="#9575CD" /> <View android:layout_width="100dp" android:layout_height="100dp" android:background="#7E57C2" /> <View android:layout_width="100dp" android:layout_height="100dp" android:background="#673AB7" /> </LinearLayout>呈现:
JSX 代码看起来很眼熟,嗯?! 让我们使用 JSX 和 Android XML 中的外观为布局创建一个“字典”(或备忘单)。
请注意,功能不一定相同。 我试图帮助 React Native 新手掌握 React Native 中布局系统的概念。 详细信息请参考官方指南。
考虑这个 JSX 属性:
flex: 1这相当于:
android:layout_width="match_parent" android:layout_height="match_parent"这个 JSX 片段:
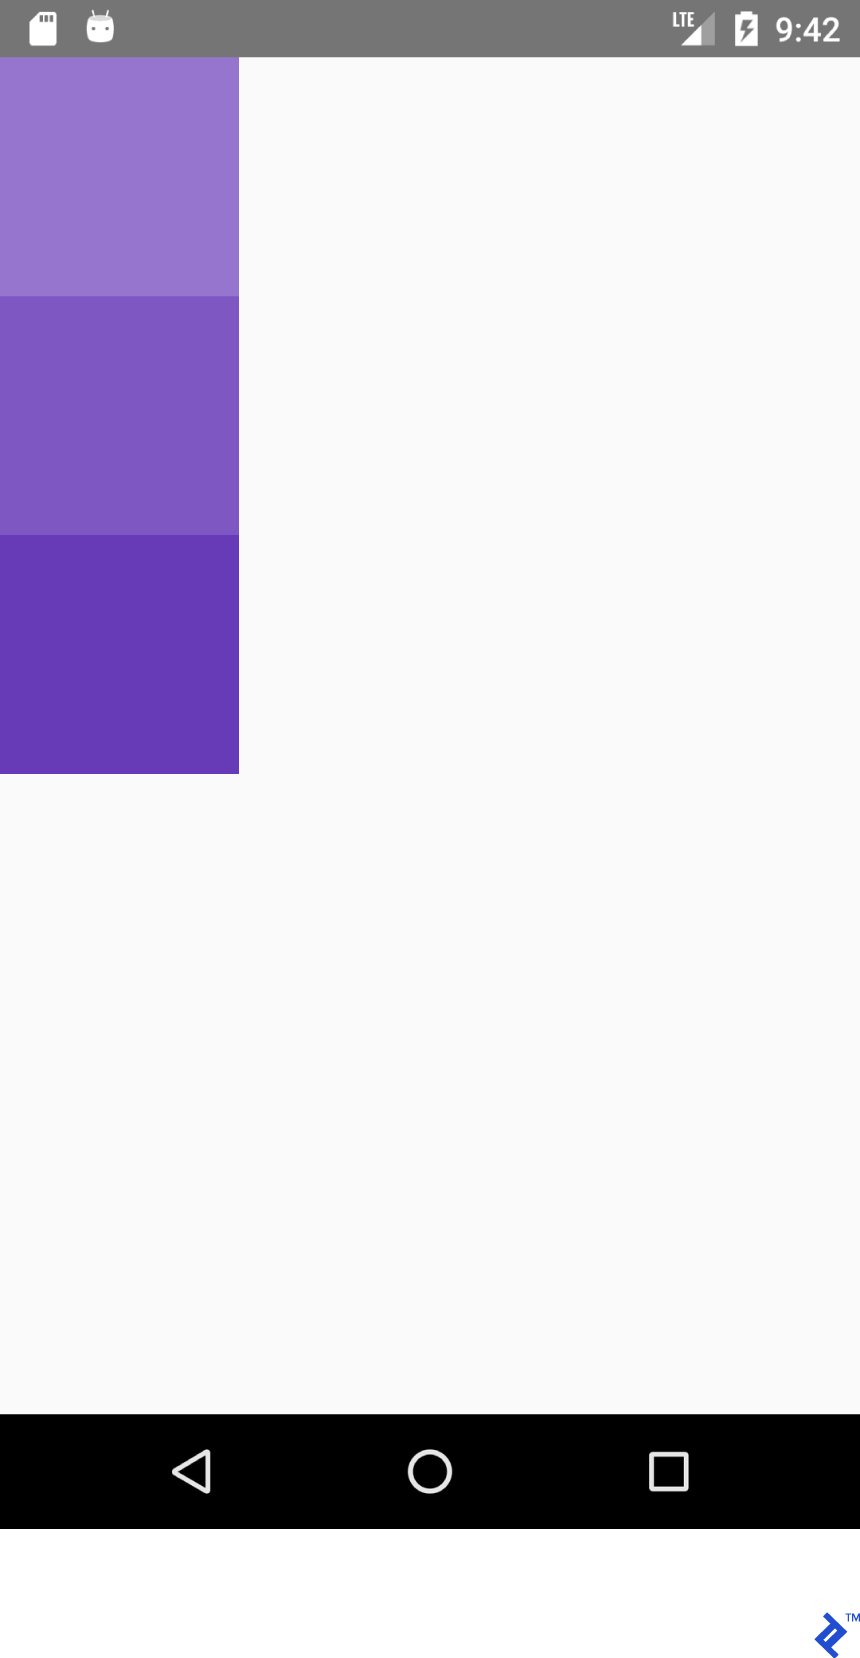
<View style={{flex: 1, flexDirection: 'row'}}> <View style={{ width: 100, height: 100, backgroundColor: '#9575CD'}}/> <View style={{ width: 100, height: 100, backgroundColor: '#7E57C2'}}/> <View style={{ width: 100, height: 100, backgroundColor: '#673AB7'}}/> </View>这个XML:
<LinearLayout android:layout_width="match_parent" android:layout_height="match_parent" android:orientation="horizontal"> <View android:layout_width="100dp" android:layout_height="100dp" android:background="#9575CD" /> <View android:layout_width="100dp" android:layout_height="100dp" android:background="#7E57C2" /> <View android:layout_width="100dp" android:layout_height="100dp" android:background="#673AB7" /> </LinearLayout>两者都生成此输出:
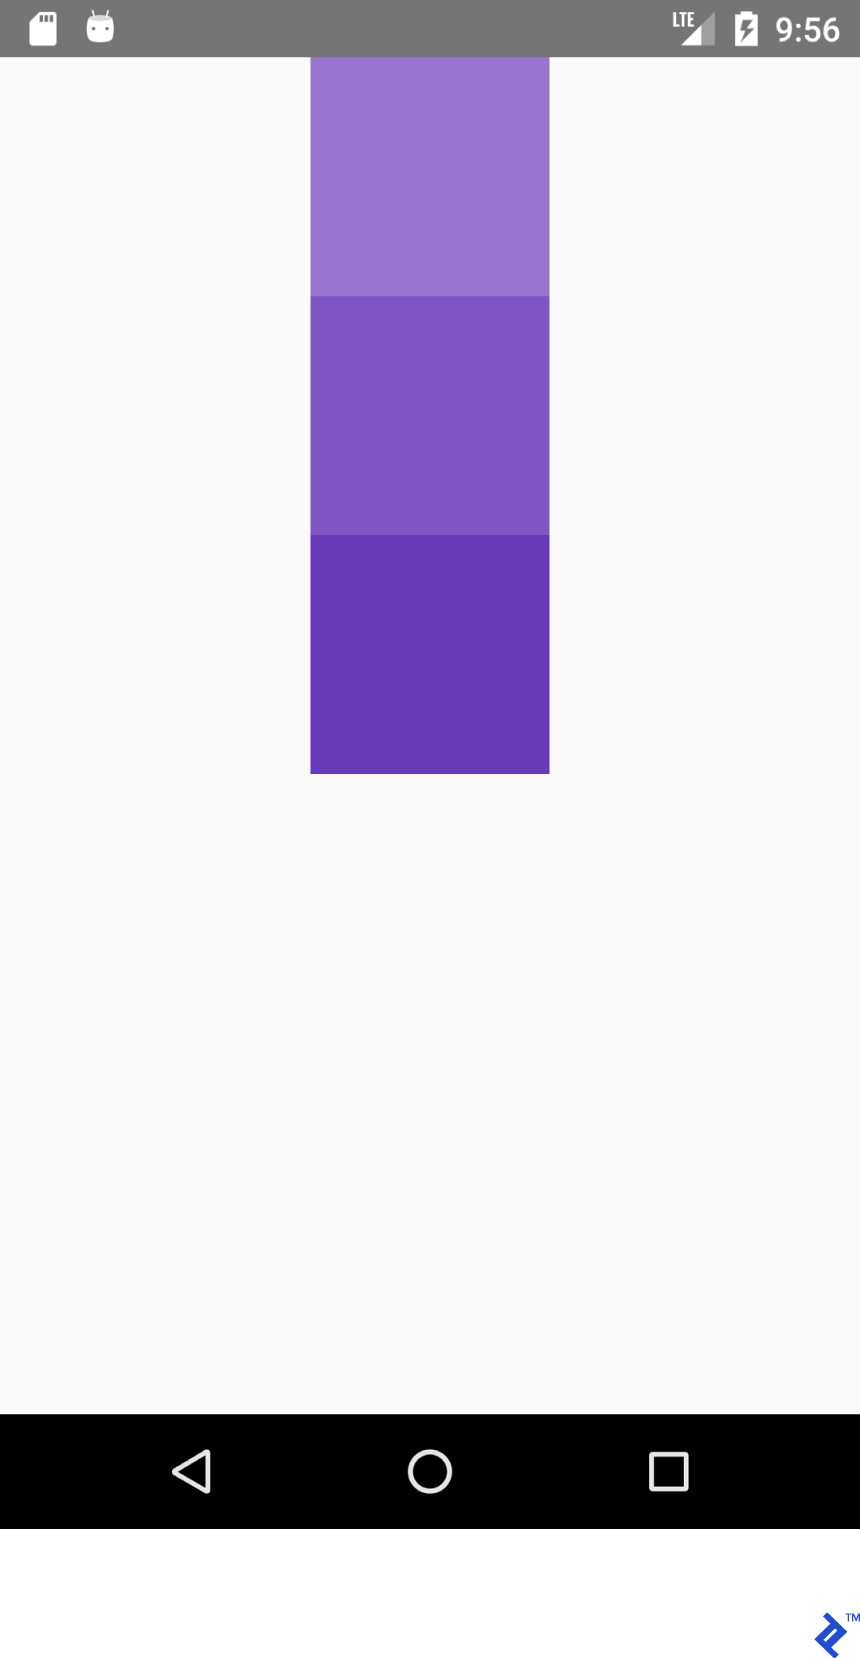
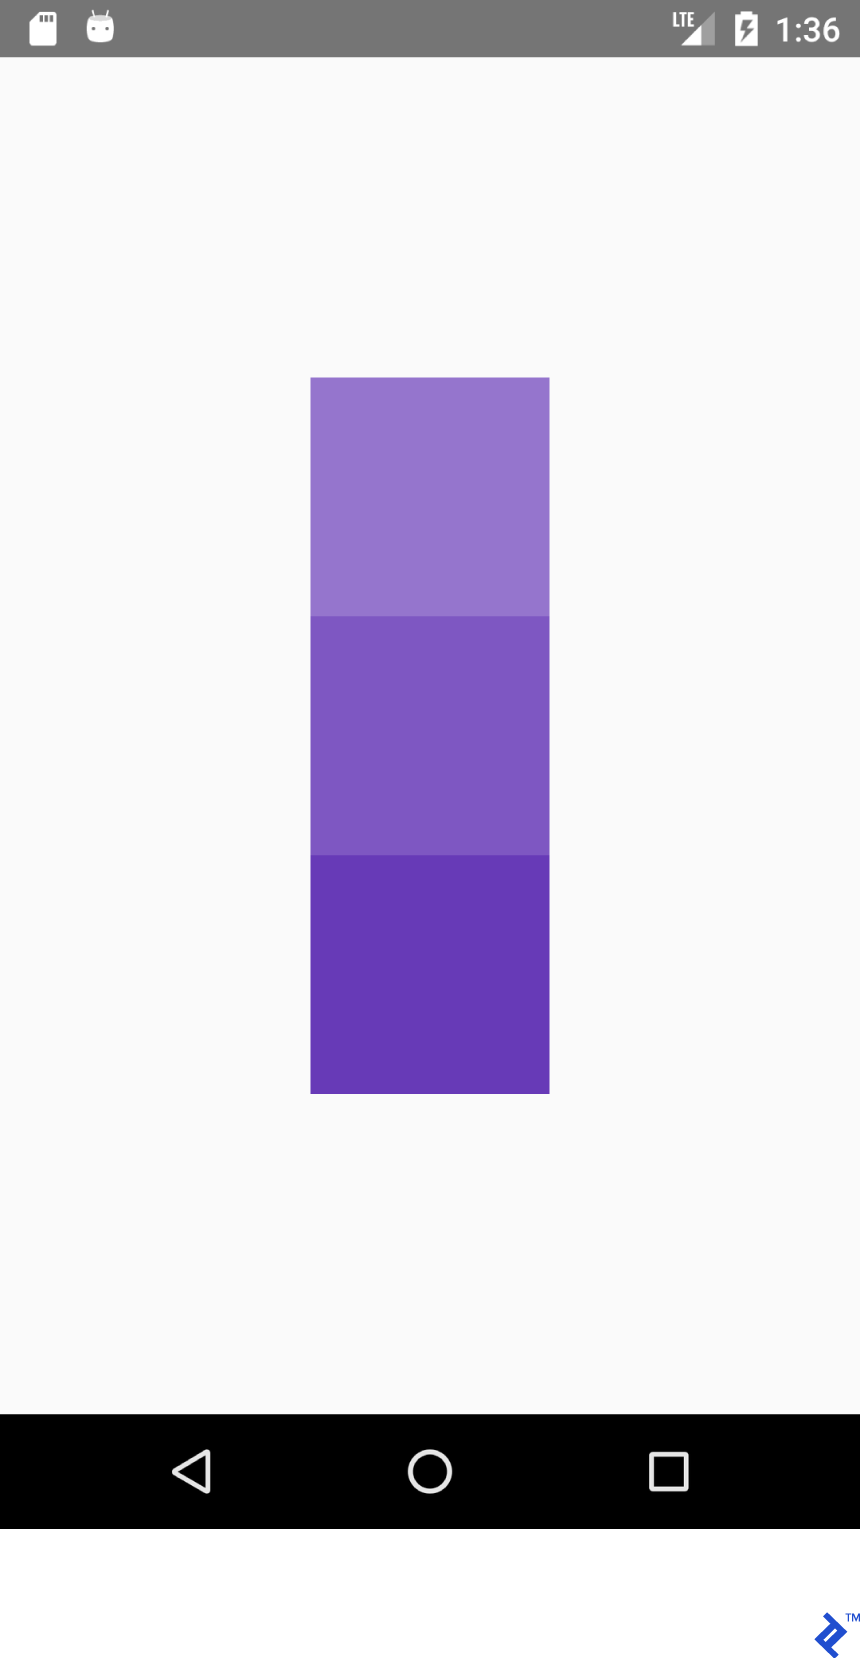
同样,这个 JSX:
<View style={{flex: 1, flexDirection: 'column'}}> <View style={{ width: 100, height: 100, backgroundColor: '#9575CD'}}/> <View style={{ width: 100, height: 100, backgroundColor: '#7E57C2'}}/> <View style={{ width: 100, height: 100, backgroundColor: '#673AB7'}}/> </View>这个XML:
<LinearLayout android:layout_width="match_parent" android:layout_height="match_parent" android:orientation="vertical"> <View android:layout_width="100dp" android:layout_height="100dp" android:background="#9575CD" /> <View android:layout_width="100dp" android:layout_height="100dp" android:background="#7E57C2" /> <View android:layout_width="100dp" android:layout_height="100dp" android:background="#673AB7" /> </LinearLayout>生成这个:
为了在容器内获得正确的位置,我们最常使用flexDirection 、 alignItems和justifyContent属性的组合。
这个 JSX:
<View style={{flex: 1, flexDirection: 'column', alignItems: 'center'}}> <View style={{ width: 100, height: 100, backgroundColor: '#9575CD'}}/> <View style={{ width: 100, height: 100, backgroundColor: '#7E57C2'}}/> <View style={{ width: 100, height: 100, backgroundColor: '#673AB7'}}/> </View>这个XML:
<LinearLayout android:layout_width="match_parent" android:layout_height="match_parent" android:gravity="center_horizontal" android:orientation="vertical"> <View android:layout_width="100dp" android:layout_height="100dp" android:background="#9575CD" /> <View android:layout_width="100dp" android:layout_height="100dp" android:background="#7E57C2" /> <View android:layout_width="100dp" android:layout_height="100dp" android:background="#673AB7" /> </LinearLayout>将产生这种布局:

这个 JSX:
<View style={{flex: 1, flexDirection: 'column', justifyContent: 'center'}}> <View style={{ width: 100, height: 100, backgroundColor: '#9575CD'}}/> <View style={{ width: 100, height: 100, backgroundColor: '#7E57C2'}}/> <View style={{ width: 100, height: 100, backgroundColor: '#673AB7'}}/> </View>而这个 XML
<LinearLayout android:layout_width="match_parent" android:layout_height="match_parent" android:gravity="center_vertical" android:orientation="vertical"> <View android:layout_width="100dp" android:layout_height="100dp" android:background="#9575CD" /> <View android:layout_width="100dp" android:layout_height="100dp" android:background="#7E57C2" /> <View android:layout_width="100dp" android:layout_height="100dp" android:background="#673AB7" /> </LinearLayout>将产生这种布局:
这个 JSX:
<View style={{flex: 1, flexDirection: 'row', justifyContent: 'center'}}> <View style={{ width: 100, height: 100, backgroundColor: '#9575CD'}}/> <View style={{ width: 100, height: 100, backgroundColor: '#7E57C2'}}/> <View style={{ width: 100, height: 100, backgroundColor: '#673AB7'}}/> </View>这个XML:
<LinearLayout android:layout_width="match_parent" android:layout_height="match_parent" android:gravity="center_horizontal" android:orientation="horizontal"> <View android:layout_width="100dp" android:layout_height="100dp" android:background="#9575CD" /> <View android:layout_width="100dp" android:layout_height="100dp" android:background="#7E57C2" /> <View android:layout_width="100dp" android:layout_height="100dp" android:background="#673AB7" /> </LinearLayout>将产生这种布局:
这个 JSX:
<View style={{flex: 1, flexDirection: 'row', justifyContent: 'center', alignItems: 'center'}}> <View style={{ width: 100, height: 100, backgroundColor: '#9575CD'}}/> <View style={{ width: 100, height: 100, backgroundColor: '#7E57C2'}}/> <View style={{ width: 100, height: 100, backgroundColor: '#673AB7'}}/> </View>这个XML:
<LinearLayout android:layout_width="match_parent" android:layout_height="match_parent" android:gravity="center" android:orientation="vertical"> <View android:layout_width="100dp" android:layout_height="100dp" android:background="#9575CD" /> <View android:layout_width="100dp" android:layout_height="100dp" android:background="#7E57C2" /> <View android:layout_width="100dp" android:layout_height="100dp" android:background="#673AB7" /> </LinearLayout>将产生这种布局:
经验教训:如果我们有flexDirection: row',则 alignItems works on Y axis and justifyContent works on X axis. Everything is mirrored for works on X axis. Everything is mirrored for - justifyContent影响 Y 轴,而alignItems影响 Y 轴。
| justifyContent: '弹性开始' | 重力=“开始|左” |
| alignItems:'弹性开始' | 重力=“开始|左” |
| justifyContent: 'flex-end' | 重力=“结束|右” |
| alignItems:'flex-end' | 重力=“结束|右” |
自己试试。 将justifyContent值设置为space-around 、 space-between和space-evenly evenly 。
状态管理
为了更新应用程序状态,您将使用 React 的state变量。 每当更新state时,都会调用render() 。
将以下代码复制到您的应用中:
import React from 'react'; import {Button, Text, View} from 'react-native'; export default class App extends React.Component { /* Initialize state object with variable 'number' set to 0 and variable name with value of empty string */ state = {number: 0}; render() { return ( <View style={{ flexDirection: 'row', justifyContent: 'space-between', alignItems: 'center', flex: 1, padding: 20 }}> <Button title='Decrement' color='#e57373' onPress={() => this.decrement()}/> <Text> {/* Text will be automatically updated whenever state.number has changed value */} Value = {this.state.number} </Text> <Button title='Increment' color='#64B5F6' {/* Set listener for click */} onPress={() => this.increment()}/> </View> ); } //Declaration of decrement function decrement() { //To update the state we need invoke this.setState //with new value for variable 'number' this.setState({number: this.state.number - 1}); } increment() { this.setState({number: this.state.number + 1}); } }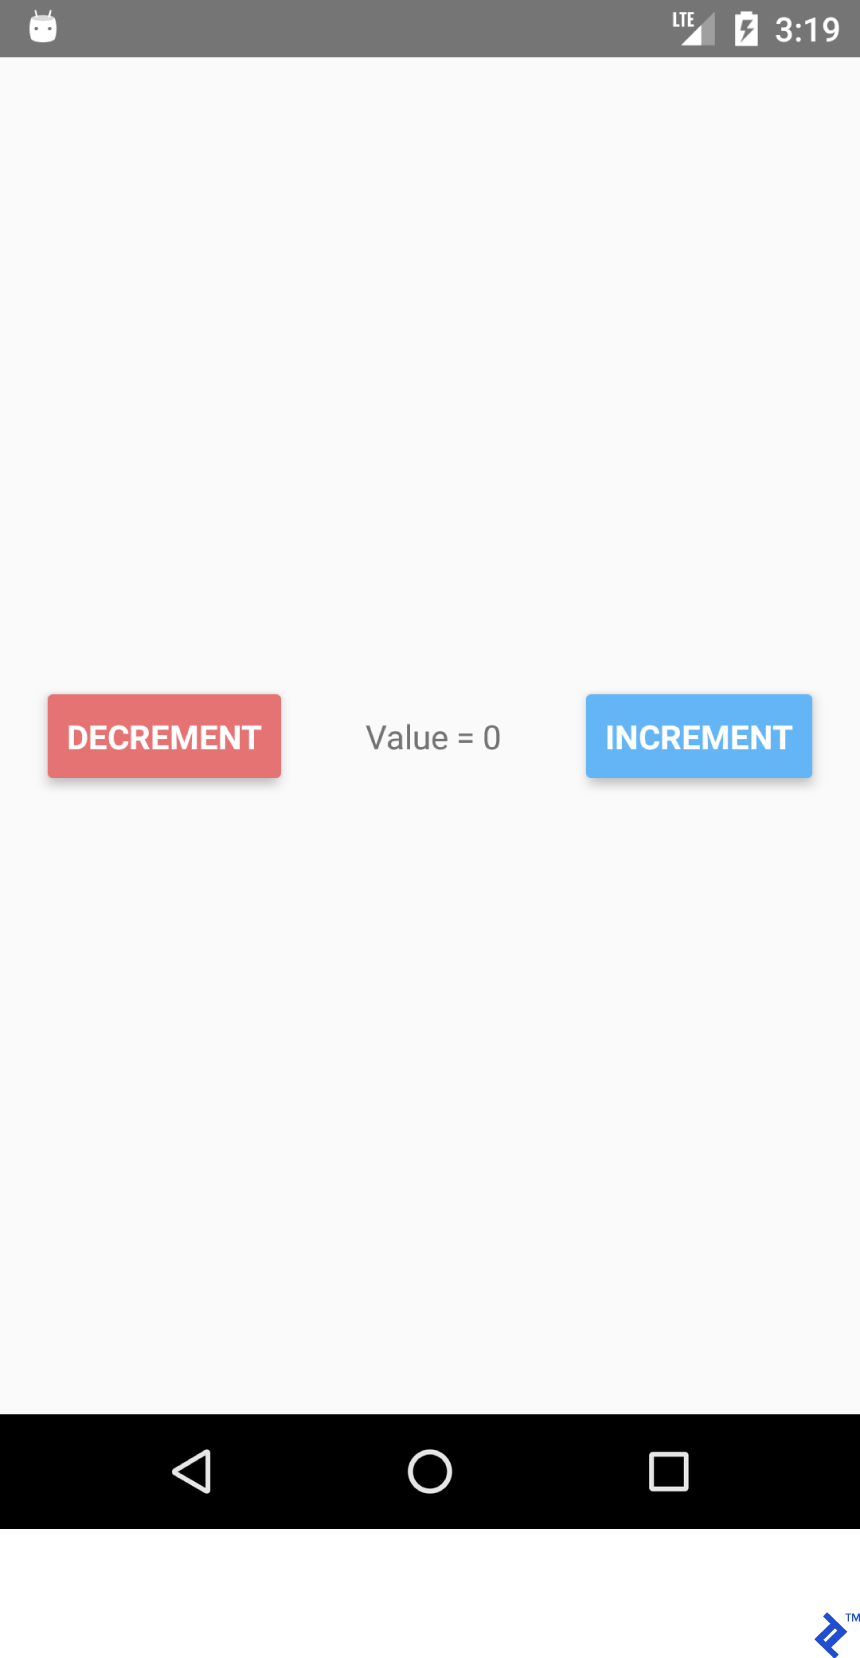
如果您单击减量和增量按钮,您会看到文本会自动为您更新。 无需显式使用textView.setText("Value " + number) 。

状态功能派上用场有多种原因:
- 易于获取值——您始终知道在何处以及如何获取特定变量的值。
- 数据不绑定到特定的小部件。
- 拥有多个依赖于共同值变化的小部件。
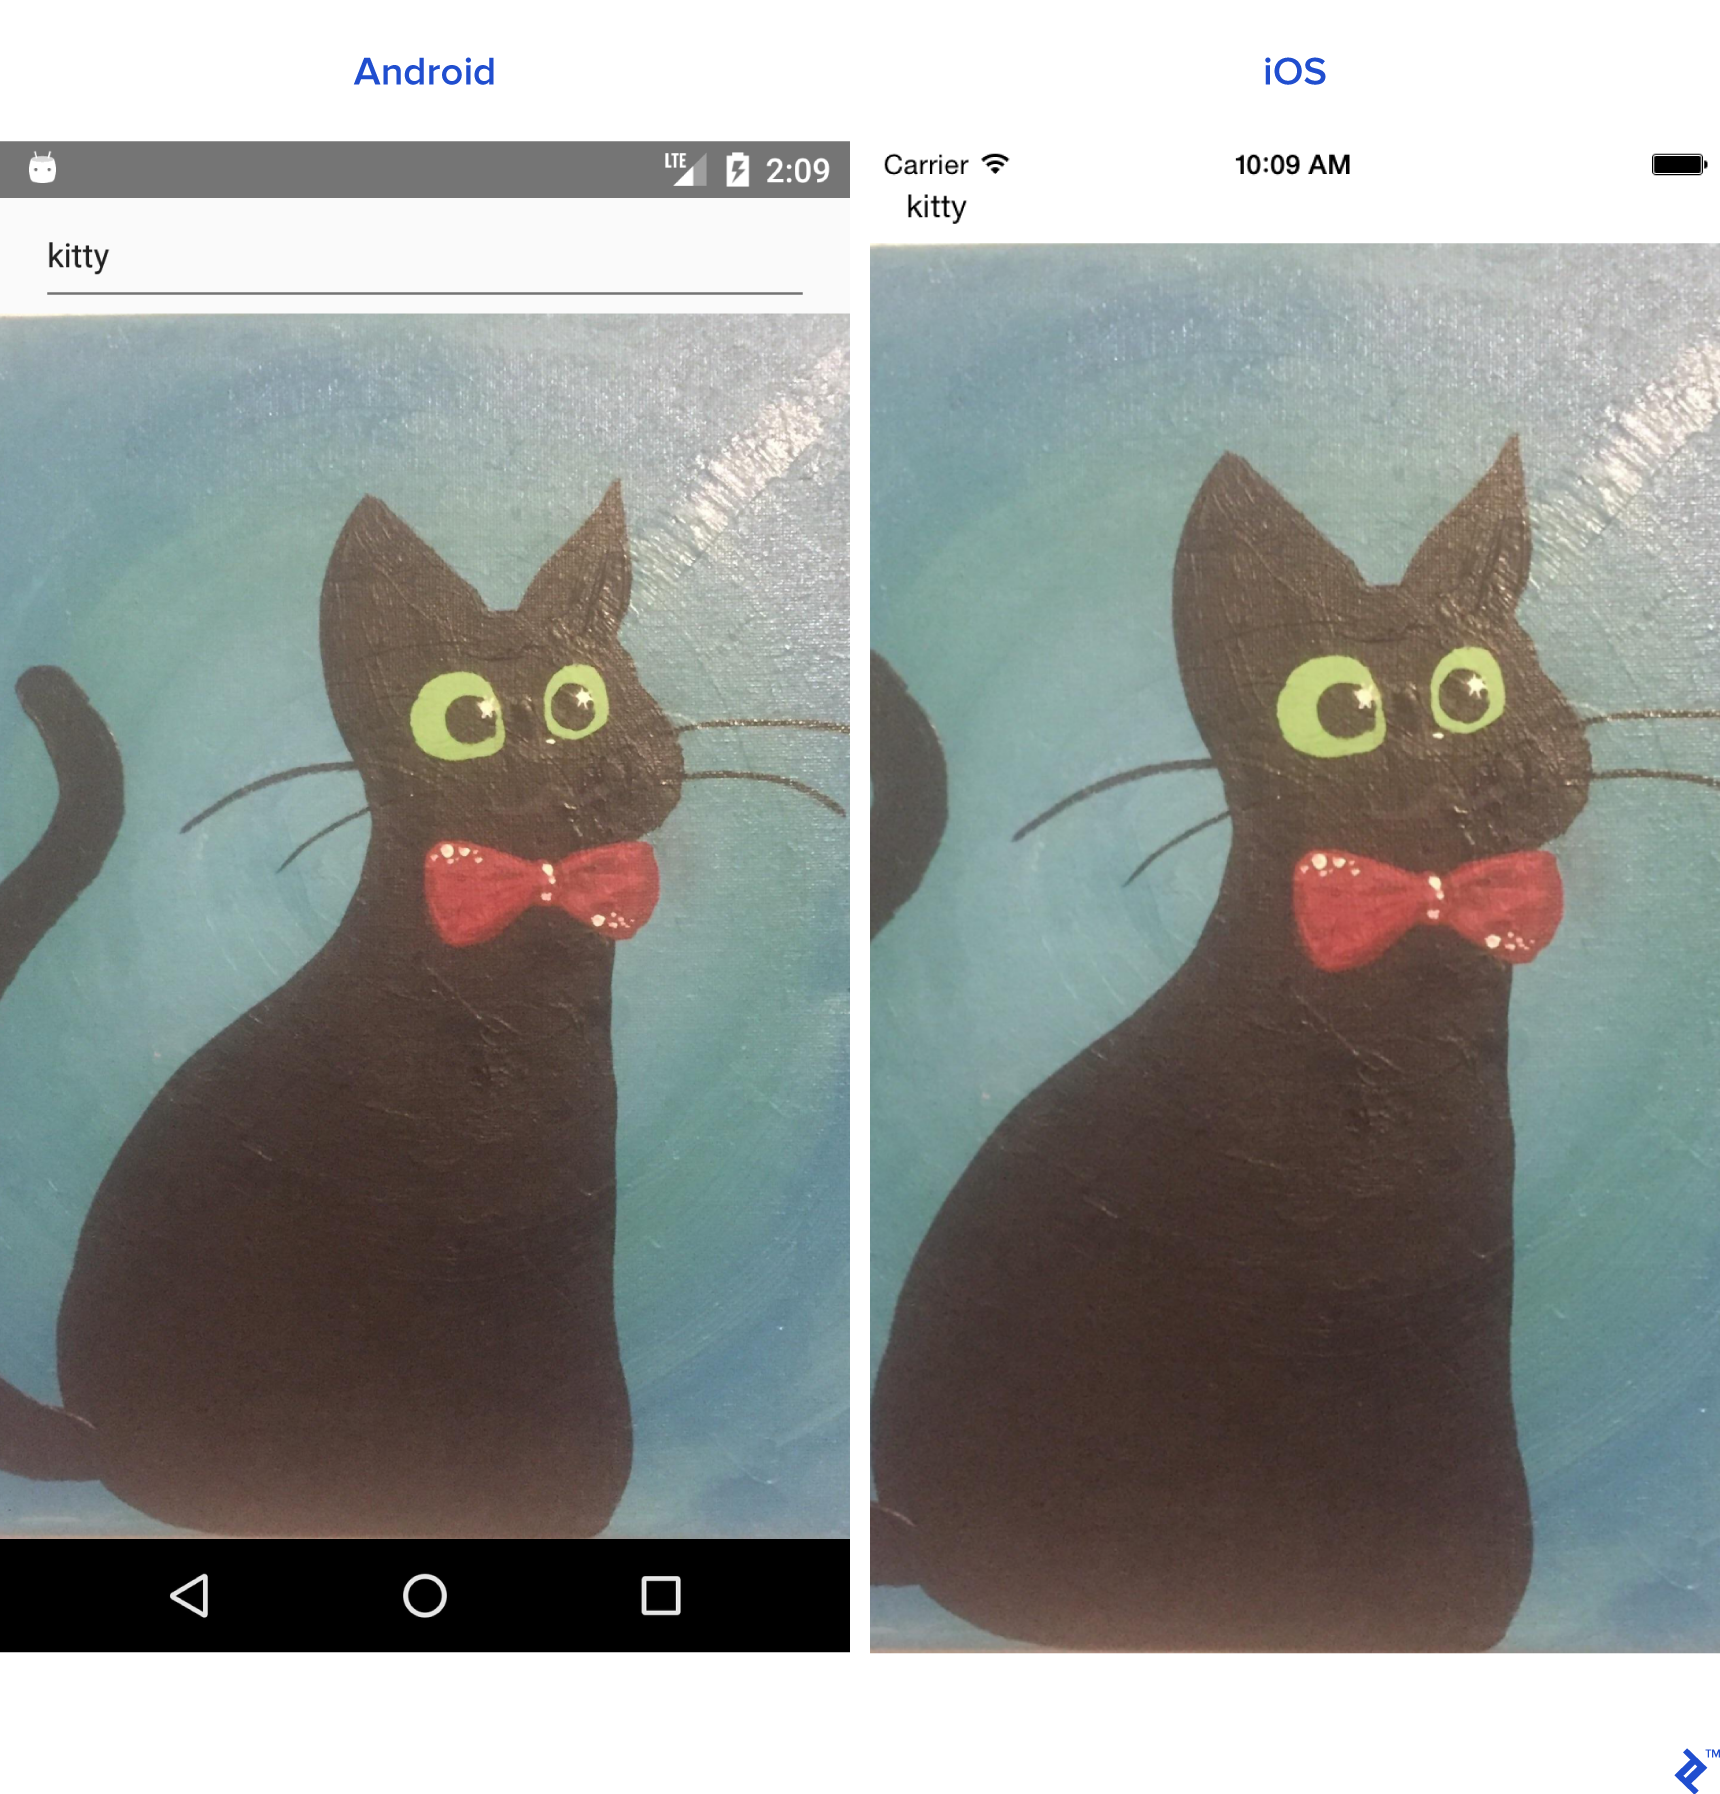
为 /r/pics 创建一个搜索应用程序
现在我们已经掌握了基础知识,让我们创建一个更复杂的东西:一个用于 /r/pics 的搜索应用程序。 Reddit 提供了一个简单的 JSON API 端点,因此我们不必进行辅助任务来获得身份验证以使其正常工作。
React Native 提供了内置的 Fetch API。 由于我们大多数人可能习惯于Retrofit及其易用性,因此我们将使用axios 。 可以通过终端命令安装axios
使用yarn (我的首选方法):
yarn add axios
或使用npm :
npm install axios
进口:
import React from 'react'; import { TextInput, View, Text, Image, ActivityIndicator, Platform, StyleSheet } from 'react-native'; import axios from 'axios'; TextInput = EditText, ActivityIndicator = ProgressBar Platform - Platform detecting module StyleSheet - Module for creating stylesheets and moving them away from JSX创建类:
export default class App extends React.Component { }初始化状态。 我们需要:
- loading - 用于显示进度条。
- error - 显示发出 REST API 请求时是否产生了一些错误。
- imgUrl - 预览搜索到的图像。
- 文本 - 搜索查询。
state = {text: '', loading: false, error: null, imgUrl: null}; 添加 JSX 代码。 我们有一个带有TextInput和Image组件的垂直布局。
render() { return ( //Predefined style. See below <View style={styles.containerStyle}> {/* returnKeyType ~ imeOptions onSubmitEditing ~ et.OnEditorActionListener */} <TextInput style={styles.textInputStyle} placeholder="Enter text to search an image" returnKeyType='search' autoFocus={true} onChangeText={(text) => this.setState({text})} onSubmitEditing={() => this.searchPicture()}/> {/* Render error Image component if this.state.imgUrl is not equal to null */} { this.state.imgUrl && <Image source={{uri: this.state.imgUrl}} style={{flex: 1}}/> } </View> ); }新的东西:
onChangeText={(text) => this.setState({text})} onSubmitEditing={() => this.searchPicture()} { this.state.imgUrl && <Image source={{uri: this.state.imgUrl}} style={{flex: 1}}/> } 第一种方法与使用TextWatcher组件的EditText执行类似的工作。 老实说,它在 React Native 中要好得多。
第二种方法在触发searchPicture()后在键盘上按下返回键 ( et.OnEditorActionListener ) 时调用。
当imgUrl不为 null 或未定义时呈现图像,因为如果第一个参数已经为假,'&&' 运算符不会检查第二个参数。
你可能想知道为什么this.state.imgUrl是假的。 好吧,当在 JavaScript 中使用逻辑运算符时,除了 ''(空字符串)、 0 、 false 、 null或undefined之外的任何内容都是 true。 无需进行特定检查。
searchPicture() { //Default state this.setState({loading: true, error: null, imgUrl: null}); axios.get('https://www.reddit.com/r/pics/search.json', { params: { //the get param map restrict_sr: 'on', //search only /r/pics limit: 1, //limit to one search item sort: 'new', //sort by creation date q: this.state.text //our search query } }).then(response => { //promise is resolved and 'then' block is triggered //set state with new values this.setState({ imgUrl: response.data.data.children[0] .data.preview.images[0].source.url, error: null, loading: false }) }).catch(error => {//Some error occurred //set error this.setState({error: error.message, loading: false, imgUrl: null}) }) }开始了。 该应用程序现在应该可以按预期工作了。 输入搜索字符串并按回车键。
由于我们的应用程序也准备好渲染ActivityIndicator和错误,我们需要在Image组件之后添加更多代码:
{ //Separate method this.renderProgress() } {/* Render error Text component if this.state.error is not equal to null */} { this.state.error && <Text style={{margin: 16, color: 'red'}}> {this.state.error} </Text> } 您也可以将渲染组件移到主render()方法之外:
renderProgress() { //If this.state.loading is true //return View containing a progressbar //View takes style array if (this.state.loading === true) { return ( <View style={ [styles.containerStyle, {justifyContent: 'center'}]}> <ActivityIndicator color='#e57373'/> </View> ); } } 剩下的就是样式。 将这些放在App类之外。
const styles = StyleSheet.create({ containerStyle: { flexDirection: 'column', flex: 1, //Since React Native is cross platform //let's handle both platforms. //Add top margin to fix status bar overlap marginTop: Platform.OS === 'ios' ? 20 : 0, }, textInputStyle: { marginLeft: 16, marginRight: 16, height: Platform.OS === 'ios' ? 30 : undefined } });我们现在可以添加更多调整,例如在启动应用程序时自动打开软键盘。
请注意,有一种更简单的方法可以使TextInput自动聚焦 ( autoFocus={true} prop ),但为了这个示例,我们不会使用它。
使用 prop 添加对TextInput的引用:
ref={ref => this.searchInput = ref}
并像这样覆盖componentDidMount()生命周期方法:
componentDidMount(){ this.searchInput.focus(); }重新加载应用程序,键盘会自动为我们打开。
组件生命周期方法
我们已经创建了一个组件,但让我们回顾一下组件的生命周期。
这是 React 的生命周期流程:
-
constructor()- 构造函数总是在应用程序启动时被调用 static _getDerivedStateFromProps_(props, state)- 在渲染之前和更新之后调用。 返回用于更新状态的对象。 返回 null 以不更新任何内容。-
render()- 每个 React 组件类都需要渲染。 它用于渲染视图。 -
componentDidMount()- 在组件被渲染并安装到视图树后调用。 -
shouldComponentUpdate(nextProps, nextState)- 在状态或道具改变后调用。 每次状态更新后返回默认为 true。 如果返回 true,则调用render()。 -
getSnapshotBeforeUpdate(prevProps, prevState)- 在提交渲染输出之前调用。 -
componentDidUpdate(prevProps, prevState, snapshot)- 在渲染新更新后调用。 在第一次render()之后不会调用它。 -
componentWillUnmount()- 在组件被卸载和销毁之前调用。
可重用组件
在处理项目时,我们经常需要创建可重用的组件。 创建组件有两种方式:
- 创建一个扩展
React.Component的类。 如果我们需要生命周期方法,则应使用此方法。 - 通过编写一个返回 View 的函数以获得更简单的语法。
由于我们已经创建了组件类,让我们为这个实例创建一个函数。
假设我们需要一个<CardView>的类比。 在./src目录下创建一个“common”文件夹。
创建CardView.js 。
import React from "react"; import {View} from "react-native"; export default CardView = (props) => { return ( //Style will be merged from default containerStyle //and props.style. props.style attributes will override //values if parameters are same. <View style={{...styles.containerStyle, ...props.style}}> {/* props.children contain subviews add this line if the component is container */} {props.children} </View> ); }; const styles = { containerStyle: { borderRadius: 4, margin: 5, padding: 5, elevation: 5, shadowColor: 'black', shadowRadius: 5, shadowOpacity: 0.5, shadowOffset: {width: 0, height: 3}, backgroundColor: 'white' } }; LoginForm使用我们新的CardView布局:
import React from "react"; import {TextInput, Platform, Button, StyleSheet} from "react-native"; import CardView from "../common/components/CardView"; export default class LoginForm extends React._Component _{ render() { return ( //Override default style <CardView style={{ borderRadius: 4, backgroundColor: '#fff' }}> <TextInput placeholder="Email" style={styles.textInputStyle}/> <TextInput placeholder="Password" style={styles.textInputStyle} secureTextEntry={true}/> <Button color="#841584" title="Login" onPress={() => console.log("onLoginPress")} buttonStyle={styles.buttonStyle}/> </CardView> ); } } const styles = StyleSheet.create({ buttonStyle: { elevation: 5, height: 40 }, textInputStyle: { padding: 10, //Additional params to make //iOS inputs prettier ...Platform.select({ ios: { borderRadius: 2, marginTop: 5, backgroundColor: '#eeeeee' } }) } }); 在App类中导入LoginForm类,并用View包装
<View style={{flex: 1, justifyContent: 'center'}}> <LoginForm/> </View>如果您调整样式中的参数,您可以获得看起来更好的东西。
导航
导航到不同的场景是大多数应用程序的重要组成部分。 我们将创建一个 Reddit /r/pics 浏览器应用程序。
在 React Native 中创建导航非常简单。
先决条件
- 使用
yarn或npm安装react-navigation - 使用
yarn或npm安装axios
让我们从创建两个不同的组件开始。
注意:下面的大部分代码你应该已经很熟悉了。 我将粘贴整个班级。
PictureList.js:
import React from 'react'; import { ActivityIndicator, FlatList, Image, Text, TouchableHighlight, View } from "react-native"; import axios from "axios"; import CardView from "../common/CardView"; export default class PictureList extends React.Component { state = {loading: true, error: null, posts: null}; componentDidMount() { axios.get('https://www.reddit.com/r/pics.json') .then(response => { this.setState({ posts: response.data.data.children, loading: false }) }).catch(error => { this.setState({ error: error.message, loading: false }) }) } render() { return ( <View style={{flex: 1, justifyContent: 'center'}}> // FlatList ~ ListView // data - DataSource for the List // renderItem - function returns View item // keyExtractor - Unique id for items {this.state.posts && <FlatList data={this.state.posts} renderItem={this.renderItem.bind(this)} keyExtractor={(item) => (item.data.id + '')}/>} {this.state.loading && <ActivityIndicator size="large" color="#f4511e"/>} </View> ); } navigateToPicture(title, url) { this.props.navigation.navigate('PicturePreview', { 'title': title, 'url': url }) } renderItem(item) { //Destructuring values from item //Read more 'ES6 destructuring' const {data} = item.item; const {title} = data; const {url} = data.preview.images[0].source; return ( //Clickable view <TouchableHighlight onPress={() => this.navigateToPicture(title, url)}> {/Reusing our CardView/} <CardView> <Image style={{height: 150}} source={{uri: url}}/> <Text style={{padding: 5}}>{title}</Text> </CardView> </TouchableHighlight> ) } } PicturePreview.js :
import React from 'react'; import {Image} from "react-native"; export default class PicturePreview extends React.Component { //Destructure navigation //Set title to header static _navigationOptions = ({navigation}) => ({ title: navigation.state.params.title }); render() { const {url} = this.props.navigation.state.params; return (<Image style={{flex: 1}} source={{uri: url}}/>) } } navigationOptions将由 React-Navigation 自动调用。
现在让我们转到App.js
注意:React-Navigation 中有很多导航类型。 今天,我们将专注于StackNavigation 。 详细信息请参考官方网站。
import React from 'react'; import {createStackNavigator} from "react-navigation"; import PictureList from "./components/PictureList"; import PicturePreview from "./components/PicturePreview"; export default class App extends React.Component { render() { return ( <Router/> ); } } //Customize the header_ const NavigationOptions = { headerTintColor: '#fff', headerStyle: { backgroundColor: '#f4511e', } }; //Create the router. const Router = createStackNavigator({ //Name the screen 'PictureList': { //Link the Component screen: PictureList, //Additional navigation options navigationOptions: { title: '/r/pics Browser', ...NavigationOptions } }, 'PicturePreview': { screen: PicturePreview, navigationOptions: NavigationOptions } }, { //Root initialRouterName: 'PictureList' } );如您所见,我们需要做的就是创建一个导航路由器并让应用程序渲染它。 如果一切顺利,我们将拥有一个功能齐全的 Reddit /r/pics 浏览器应用程序。
安卓:
IOS:
React Native 太棒了!
自从我开始编程以来,我就有了纯粹的移动开发经验。 但现在我可以使用 React 为几乎任何东西编写代码:移动、桌面和 Web。
如果你决定开始使用 React Native 开发你的下一个令人惊叹的应用程序,你会发现它到处都有它的怪癖和一些错误,但 React Native 非常实用,非常适合大多数项目。