
深入了解用於 Android 開發的 React Native
已發表: 2022-03-11幾年前,我的一位同事向我介紹了 React Native。 我很懷疑。 我認為它只是另一個在現實生活中永遠無法工作的跨平台框架——我幾乎不知道我錯了。
幾年過去了,React Native 技能變得非常需要。 自從我學到了一些新東西已經有一段時間了,我想為什麼不試一試呢? 今天,我是 React Native 的大力倡導者。
缺點:
- 你不能再使用 Android Studio
- React Native 不能用於每個應用程序或功能
- React Native 是一個新穎的框架,更新可能會對您當前的代碼庫產生負面影響
- JavaScript 不是嚴格類型的語言
- React Native 需要運行 JavaScript 引擎,這可能會降低其性能
優點:
- 簡單易學
- Android 和 iOS 應用程序之間的共享代碼庫,只需稍作調整即可匹配平台體驗
- 實時和熱重載,意味著不再有無限的構建時間
- 兩個平台的原生組件
- 不斷改進
- 積極發展的社區
- 大量的圖書館
- Expo 消除了擁有 Mac 為 iOS 開發的需要
- 減少勞動力資源——雖然您可能仍需要一些 Android/iOS 原生開發,但這種情況並不常見。
我可以繼續說下去,但讓我們停在這裡,繼續討論這篇博文的主題。 在這篇文章中,我將創建四個基於 React Native 的 Android 應用程序:
- 帶有按鈕的基本計數器,用於增加和減少計數器
- 搜索 r/pics subreddit 的應用程序
- 通用登錄頁面
- 瀏覽 r/pics subreddit 的應用程序
IDE
正如我上面提到的,我們無法使用 Android Studio 進行 React Native 開發。 我們需要一個替代品。 React Native 可能可以在任何可用的現代文本編輯器(Atom、VS Code、Sublime Text、Brackets 等)中開發,但由於我們使用的是 Android Studio 體驗,我最喜歡的是由同一家公司構建的 WebStorm。 儘管 WebStorm 是付費應用程序(每年 129 美元),但您可以安裝它的 Early Access 版本。 WebStorm 的 EAP 構建是免費的並且相當穩定。 如果您更喜歡完全免費的編輯器,請選擇 VS Code。 微軟甚至為它開發了很棒的 React Native 插件,而且效果很好。
創建新項目
先決條件:您的計算機上安裝了 Android SDK、Node 和 React Native。
創建新的 React Native 項目有兩種方法。
- 常規方式。 使用 WebStorm GUI 或使用終端命令:
react-native init AwesomeToptalProject - 更簡單的方法“創建 React Native App”。
create-react-native-app AwesomeToptalProject
如果您使用create-react-native-app ,則創建的項目將使用 expo 引導。 我不會詳細介紹,但基本上,這意味著您無需安裝 Xcode 即可在 iOS 上運行該應用程序。 通過 expo.io 的功能和其他一些特性,讓客戶端始終保持最新狀態也更容易。 但是您不能添加本機代碼。 因此,如果您正在開發特定功能,您可能需要從 expo 中彈出應用程序並使用常規的 React Native 項目。
我將使用第一種方法。
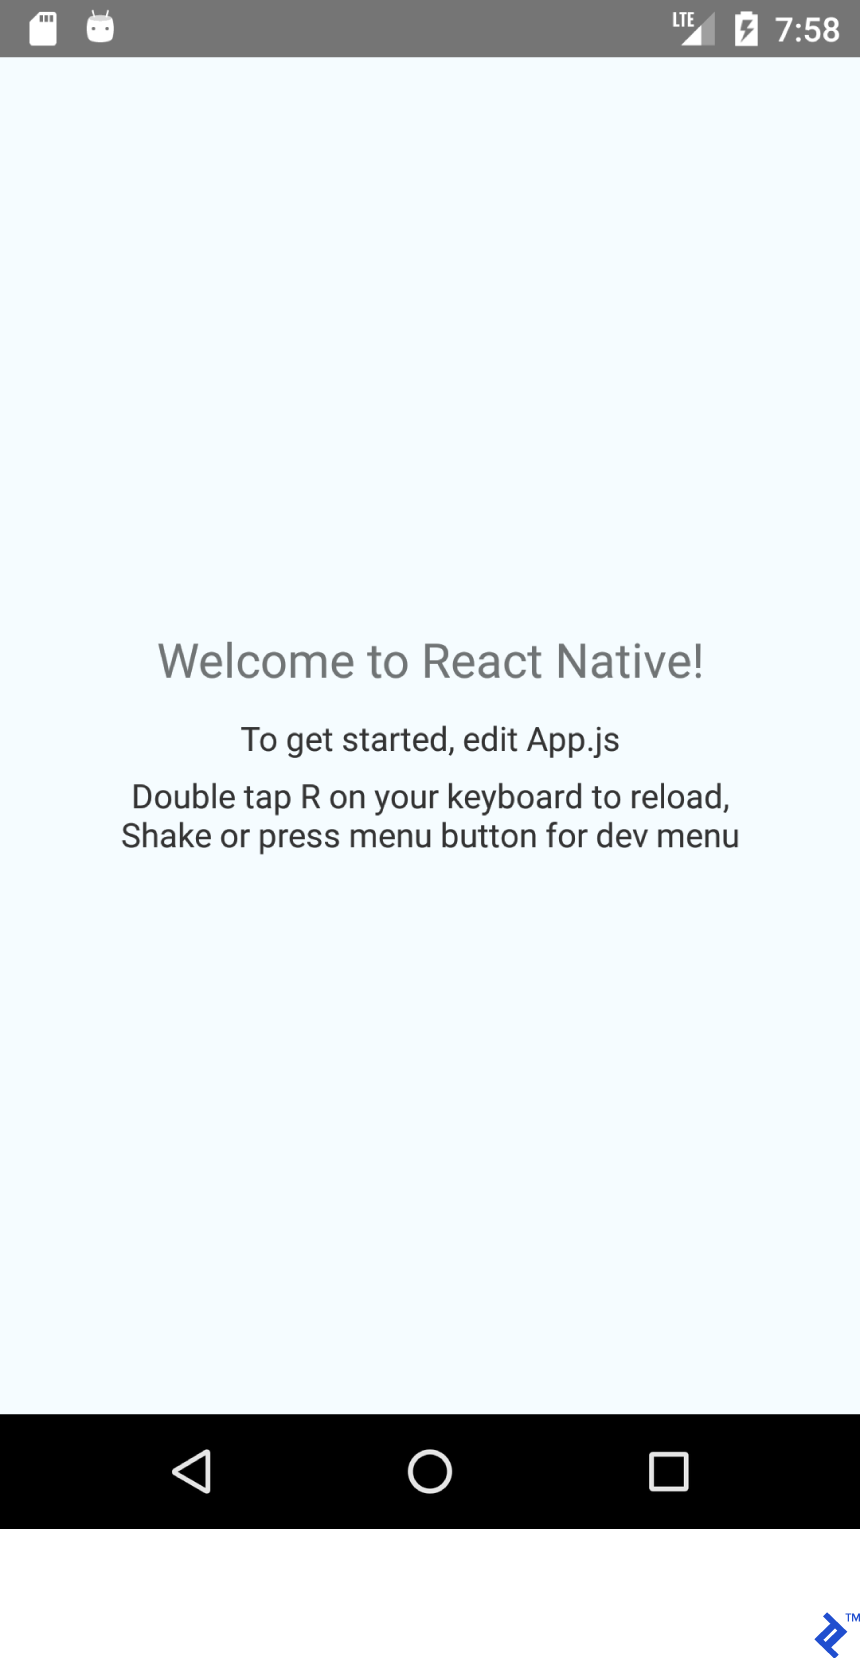
讓我們運行這個項目。 首先,打開模擬器或連接設備。 如果您使用 WebStorm GUI 創建項目,您需要做的就是選擇一個配置。 在 WebStorm 的右上角,單擊 Run 按鈕左側的下拉菜單,選擇 Android,然後單擊 Run 或 Debug。 如果您使用終端創建項目,您可以添加新的 React Native 配置或使用終端運行它:
cd AwesomeToptalProject react-native run-android如果一切順利,您將看到以下屏幕:
結構和基本設置
該項目中值得注意的項目是:
- android - 預配置了 React Native 支持的 Android Studio 項目。
- ios - 預先配置了 React Native 支持的 Xcode 項目。
- node_modules - 包含 React Native 框架和其他 Javascript 庫的文件夾。
- index.js - 我們應用程序的入口點。
- App.js - 加載的初始組件。
讓我們在項目的根目錄中創建一個文件夾“src”並將 App.js 移動到那裡。 您必須更新 index.js 導入以匹配新的 App.js 位置。
import App from './src/App';刪除 App.js 中的所有內容並粘貼以下代碼:
import React from 'react'; import {Text} from 'react-native'; export default class App extends React.Component { render() { return ( <Text>Hello TopTal</Text> ); } } 我們粘貼的代碼非常簡單。 我們創建了一個類App ( React.Component的子類),它覆蓋了render()方法並返回了Text組件。 React.Component是使用 JSX 構建 UI 的基類。 export default修飾符使類public 。
我們現在準備開始設計我們的佈局。
使用 Flexbox 佈局
Flexbox類似於LinearLayout ,但Flexbox遠遠超出了LinearLayout的能力。
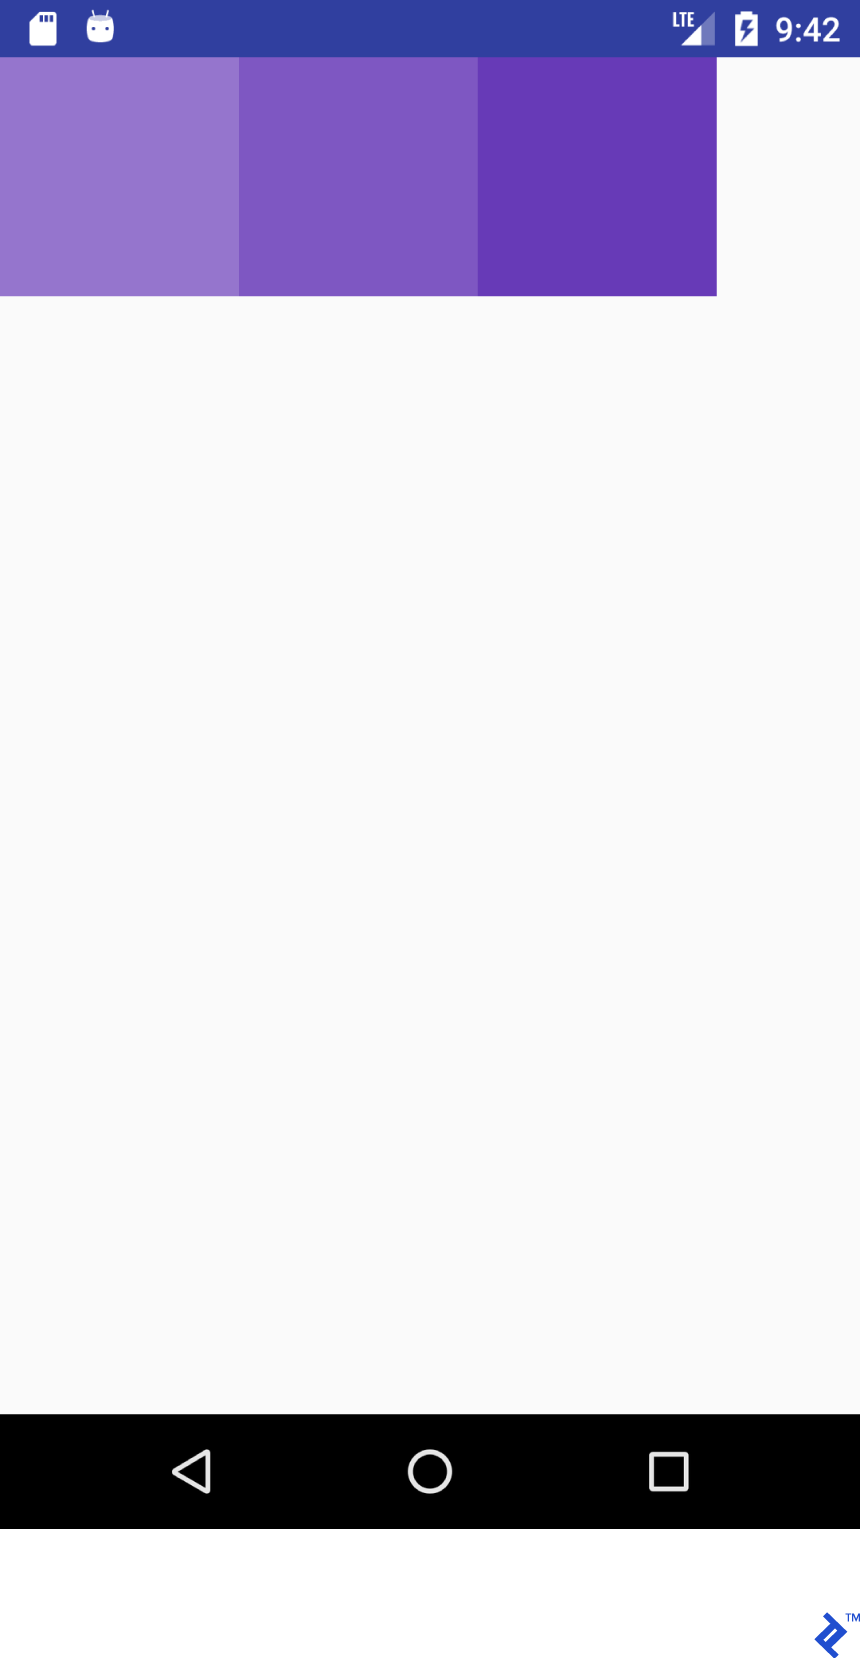
這個 JSX 片段:
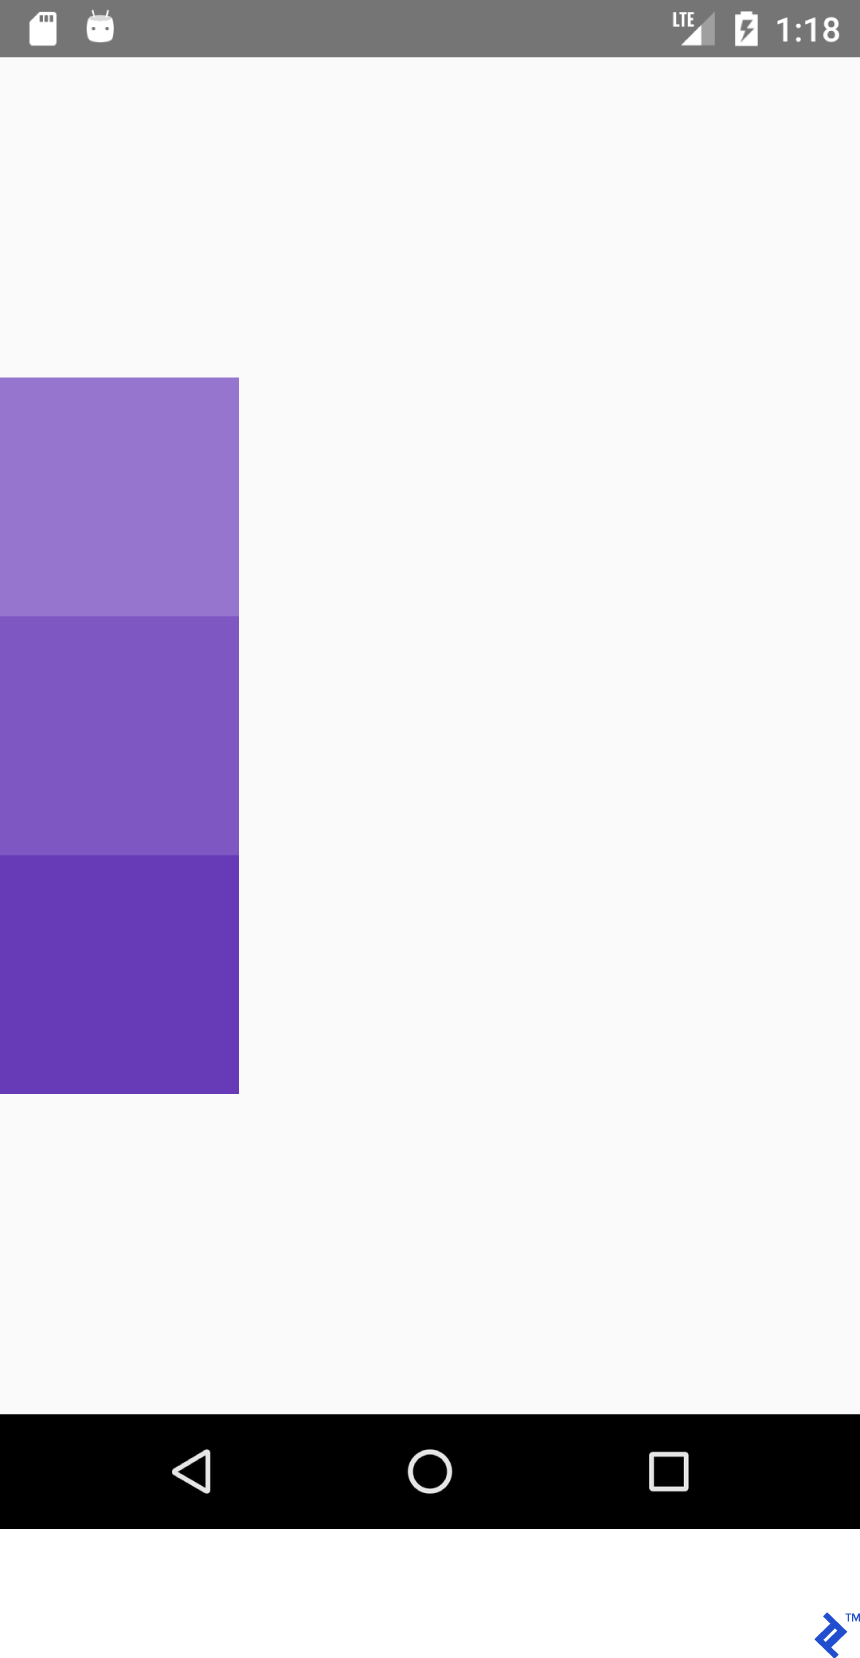
<View style={{ flex: 1, flexDirection: 'row' }}> <View style={{ width: 100, height: 100, backgroundColor: '#9575CD' }}/> <View style={{ width: 100, height: 100, backgroundColor: '#7E57C2' }}/> <View style={{ width: 100, height: 100, backgroundColor: '#673AB7' }}/> </View>呈現此佈局:

雖然這個 XML:
<LinearLayout android:layout_width="match_parent" android:layout_height="match_parent" android:orientation="horizontal"> <View android:layout_width="100dp" android:layout_height="100dp" android:background="#9575CD" /> <View android:layout_width="100dp" android:layout_height="100dp" android:background="#7E57C2" /> <View android:layout_width="100dp" android:layout_height="100dp" android:background="#673AB7" /> </LinearLayout>呈現:
JSX 代碼看起來很眼熟,嗯?! 讓我們使用 JSX 和 Android XML 中的外觀為佈局創建一個“字典”(或備忘單)。
請注意,功能不一定相同。 我試圖幫助 React Native 新手掌握 React Native 中佈局系統的概念。 詳細信息請參考官方指南。
考慮這個 JSX 屬性:
flex: 1這相當於:
android:layout_width="match_parent" android:layout_height="match_parent"這個 JSX 片段:
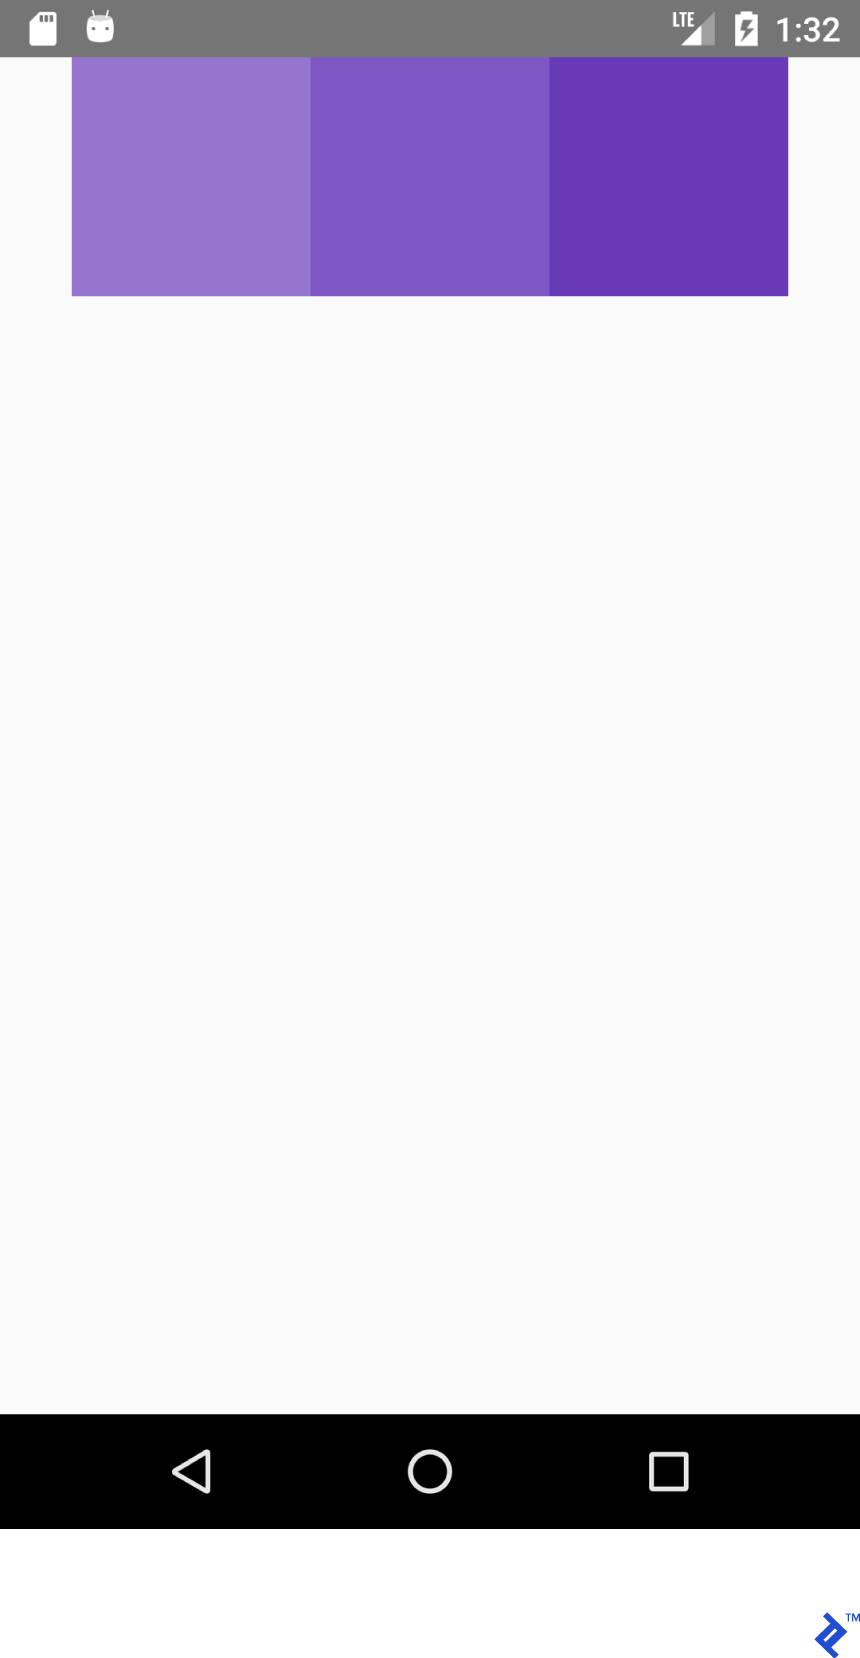
<View style={{flex: 1, flexDirection: 'row'}}> <View style={{ width: 100, height: 100, backgroundColor: '#9575CD'}}/> <View style={{ width: 100, height: 100, backgroundColor: '#7E57C2'}}/> <View style={{ width: 100, height: 100, backgroundColor: '#673AB7'}}/> </View>這個XML:
<LinearLayout android:layout_width="match_parent" android:layout_height="match_parent" android:orientation="horizontal"> <View android:layout_width="100dp" android:layout_height="100dp" android:background="#9575CD" /> <View android:layout_width="100dp" android:layout_height="100dp" android:background="#7E57C2" /> <View android:layout_width="100dp" android:layout_height="100dp" android:background="#673AB7" /> </LinearLayout>兩者都生成此輸出:
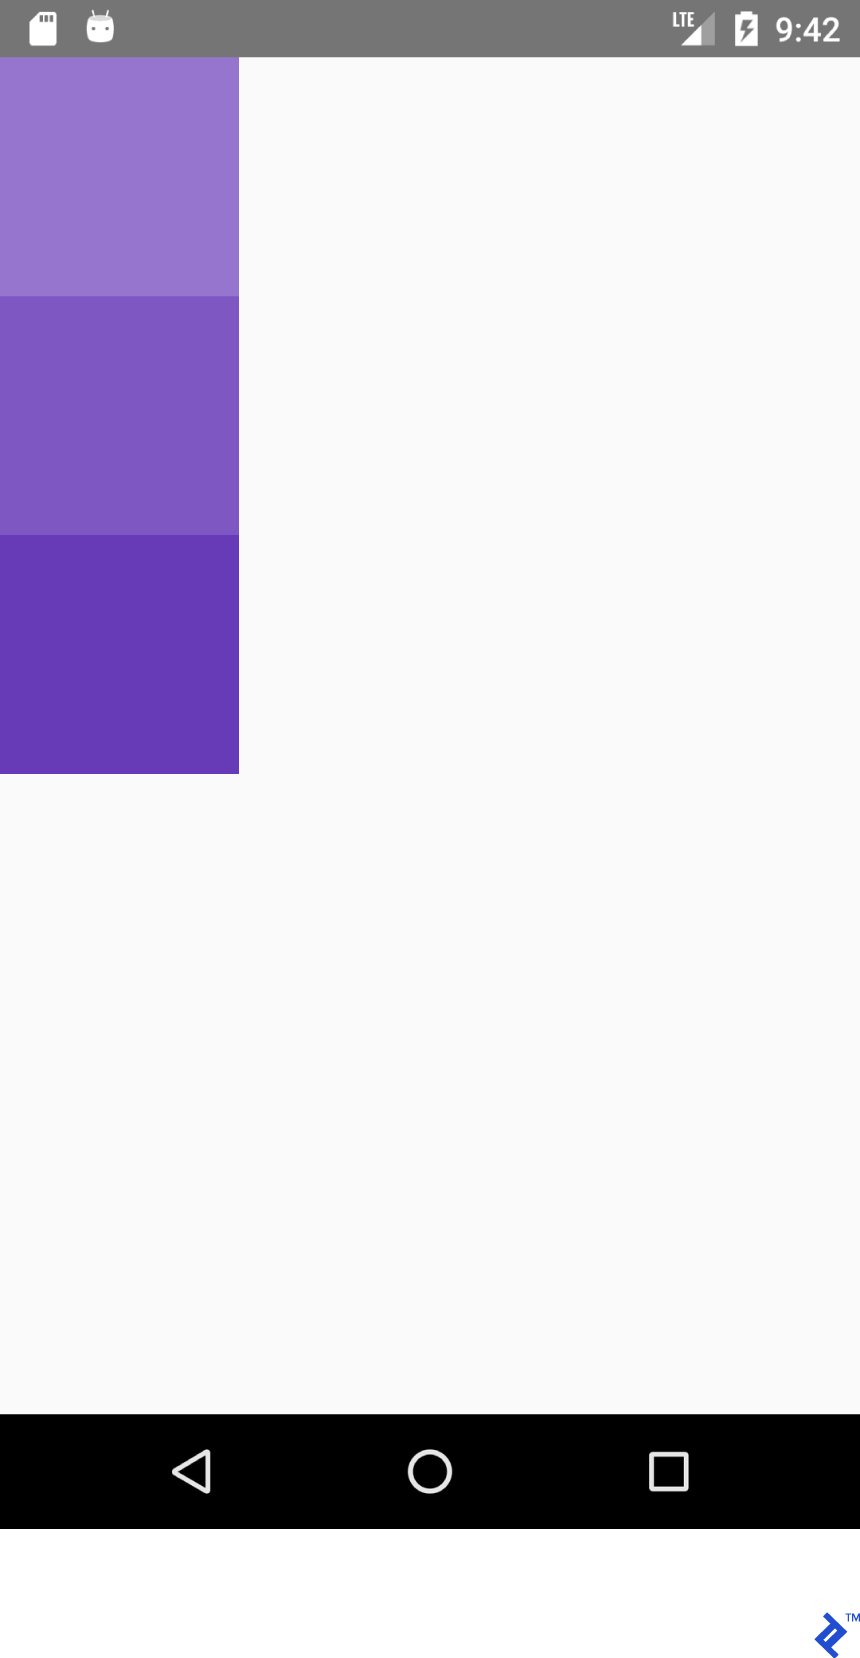
同樣,這個 JSX:
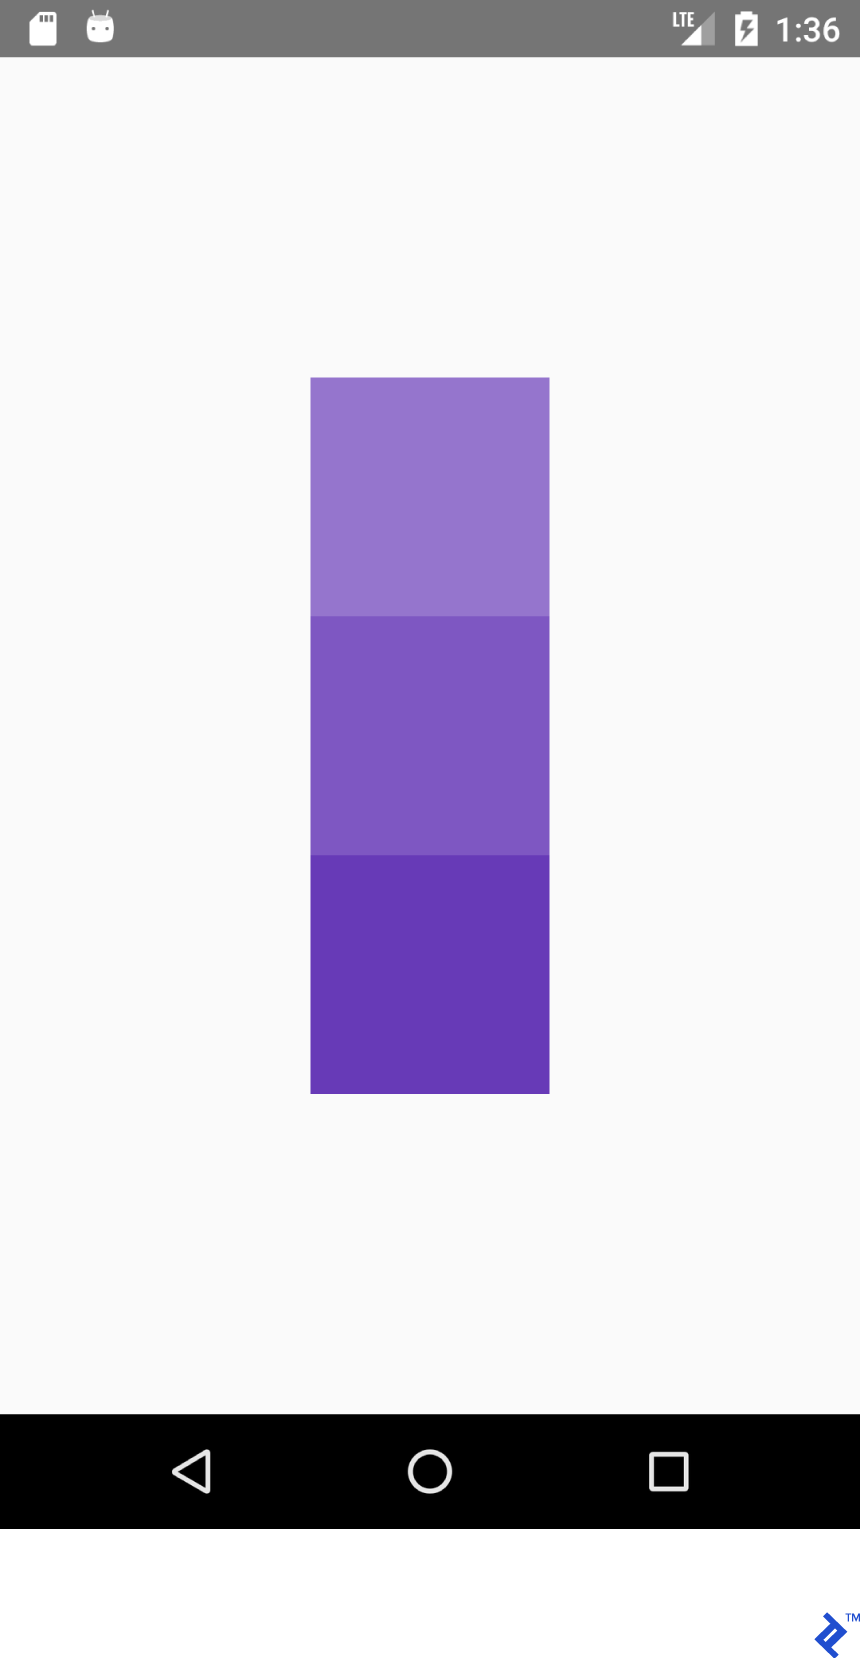
<View style={{flex: 1, flexDirection: 'column'}}> <View style={{ width: 100, height: 100, backgroundColor: '#9575CD'}}/> <View style={{ width: 100, height: 100, backgroundColor: '#7E57C2'}}/> <View style={{ width: 100, height: 100, backgroundColor: '#673AB7'}}/> </View>這個XML:
<LinearLayout android:layout_width="match_parent" android:layout_height="match_parent" android:orientation="vertical"> <View android:layout_width="100dp" android:layout_height="100dp" android:background="#9575CD" /> <View android:layout_width="100dp" android:layout_height="100dp" android:background="#7E57C2" /> <View android:layout_width="100dp" android:layout_height="100dp" android:background="#673AB7" /> </LinearLayout>生成這個:
為了在容器內獲得正確的位置,我們最常使用flexDirection 、 alignItems和justifyContent屬性的組合。
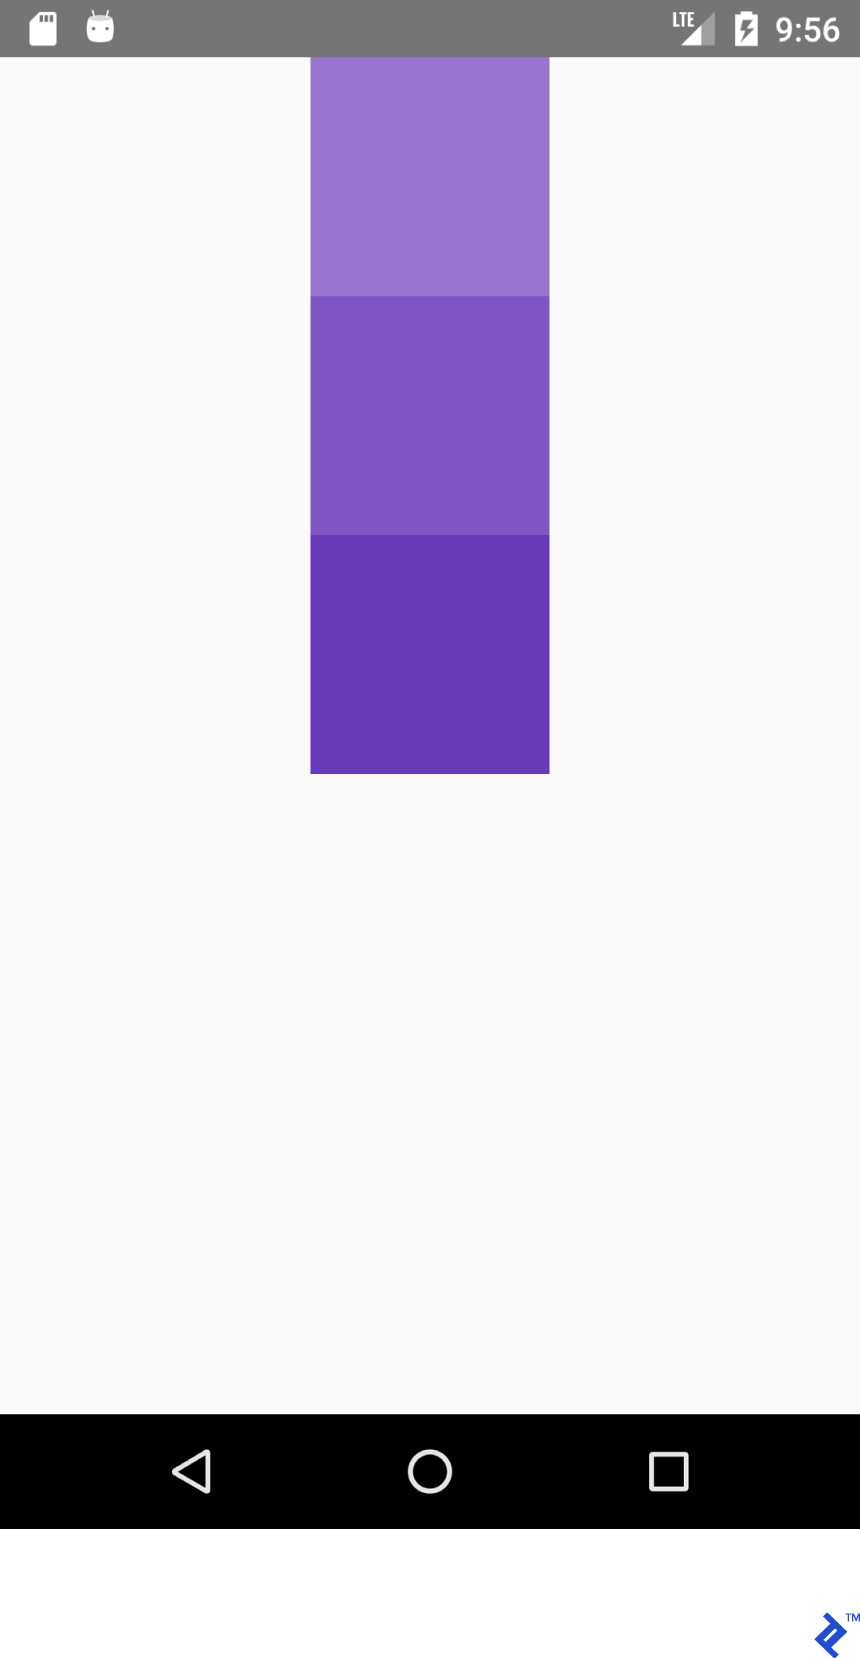
這個 JSX:
<View style={{flex: 1, flexDirection: 'column', alignItems: 'center'}}> <View style={{ width: 100, height: 100, backgroundColor: '#9575CD'}}/> <View style={{ width: 100, height: 100, backgroundColor: '#7E57C2'}}/> <View style={{ width: 100, height: 100, backgroundColor: '#673AB7'}}/> </View>這個XML:
<LinearLayout android:layout_width="match_parent" android:layout_height="match_parent" android:gravity="center_horizontal" android:orientation="vertical"> <View android:layout_width="100dp" android:layout_height="100dp" android:background="#9575CD" /> <View android:layout_width="100dp" android:layout_height="100dp" android:background="#7E57C2" /> <View android:layout_width="100dp" android:layout_height="100dp" android:background="#673AB7" /> </LinearLayout>將產生這種佈局:

這個 JSX:
<View style={{flex: 1, flexDirection: 'column', justifyContent: 'center'}}> <View style={{ width: 100, height: 100, backgroundColor: '#9575CD'}}/> <View style={{ width: 100, height: 100, backgroundColor: '#7E57C2'}}/> <View style={{ width: 100, height: 100, backgroundColor: '#673AB7'}}/> </View>而這個 XML
<LinearLayout android:layout_width="match_parent" android:layout_height="match_parent" android:gravity="center_vertical" android:orientation="vertical"> <View android:layout_width="100dp" android:layout_height="100dp" android:background="#9575CD" /> <View android:layout_width="100dp" android:layout_height="100dp" android:background="#7E57C2" /> <View android:layout_width="100dp" android:layout_height="100dp" android:background="#673AB7" /> </LinearLayout>將產生這種佈局:
這個 JSX:
<View style={{flex: 1, flexDirection: 'row', justifyContent: 'center'}}> <View style={{ width: 100, height: 100, backgroundColor: '#9575CD'}}/> <View style={{ width: 100, height: 100, backgroundColor: '#7E57C2'}}/> <View style={{ width: 100, height: 100, backgroundColor: '#673AB7'}}/> </View>這個XML:
<LinearLayout android:layout_width="match_parent" android:layout_height="match_parent" android:gravity="center_horizontal" android:orientation="horizontal"> <View android:layout_width="100dp" android:layout_height="100dp" android:background="#9575CD" /> <View android:layout_width="100dp" android:layout_height="100dp" android:background="#7E57C2" /> <View android:layout_width="100dp" android:layout_height="100dp" android:background="#673AB7" /> </LinearLayout>將產生這種佈局:
這個 JSX:
<View style={{flex: 1, flexDirection: 'row', justifyContent: 'center', alignItems: 'center'}}> <View style={{ width: 100, height: 100, backgroundColor: '#9575CD'}}/> <View style={{ width: 100, height: 100, backgroundColor: '#7E57C2'}}/> <View style={{ width: 100, height: 100, backgroundColor: '#673AB7'}}/> </View>這個XML:
<LinearLayout android:layout_width="match_parent" android:layout_height="match_parent" android:gravity="center" android:orientation="vertical"> <View android:layout_width="100dp" android:layout_height="100dp" android:background="#9575CD" /> <View android:layout_width="100dp" android:layout_height="100dp" android:background="#7E57C2" /> <View android:layout_width="100dp" android:layout_height="100dp" android:background="#673AB7" /> </LinearLayout>將產生這種佈局:
經驗教訓:如果我們有flexDirection: row',則 alignItems works on Y axis and justifyContent works on X axis. Everything is mirrored for works on X axis. Everything is mirrored for - justifyContent影響 Y 軸,而alignItems影響 Y 軸。
| justifyContent: '彈性開始' | 重力=“開始|左” |
| alignItems:'彈性開始' | 重力=“開始|左” |
| justifyContent: 'flex-end' | 重力=“結束|右” |
| alignItems:'flex-end' | 重力=“結束|右” |
自己試試。 將justifyContent值設置為space-around 、 space-between和space-evenly evenly 。
狀態管理
為了更新應用程序狀態,您將使用 React 的state變量。 每當更新state時,都會調用render() 。
將以下代碼複製到您的應用中:
import React from 'react'; import {Button, Text, View} from 'react-native'; export default class App extends React.Component { /* Initialize state object with variable 'number' set to 0 and variable name with value of empty string */ state = {number: 0}; render() { return ( <View style={{ flexDirection: 'row', justifyContent: 'space-between', alignItems: 'center', flex: 1, padding: 20 }}> <Button title='Decrement' color='#e57373' onPress={() => this.decrement()}/> <Text> {/* Text will be automatically updated whenever state.number has changed value */} Value = {this.state.number} </Text> <Button title='Increment' color='#64B5F6' {/* Set listener for click */} onPress={() => this.increment()}/> </View> ); } //Declaration of decrement function decrement() { //To update the state we need invoke this.setState //with new value for variable 'number' this.setState({number: this.state.number - 1}); } increment() { this.setState({number: this.state.number + 1}); } }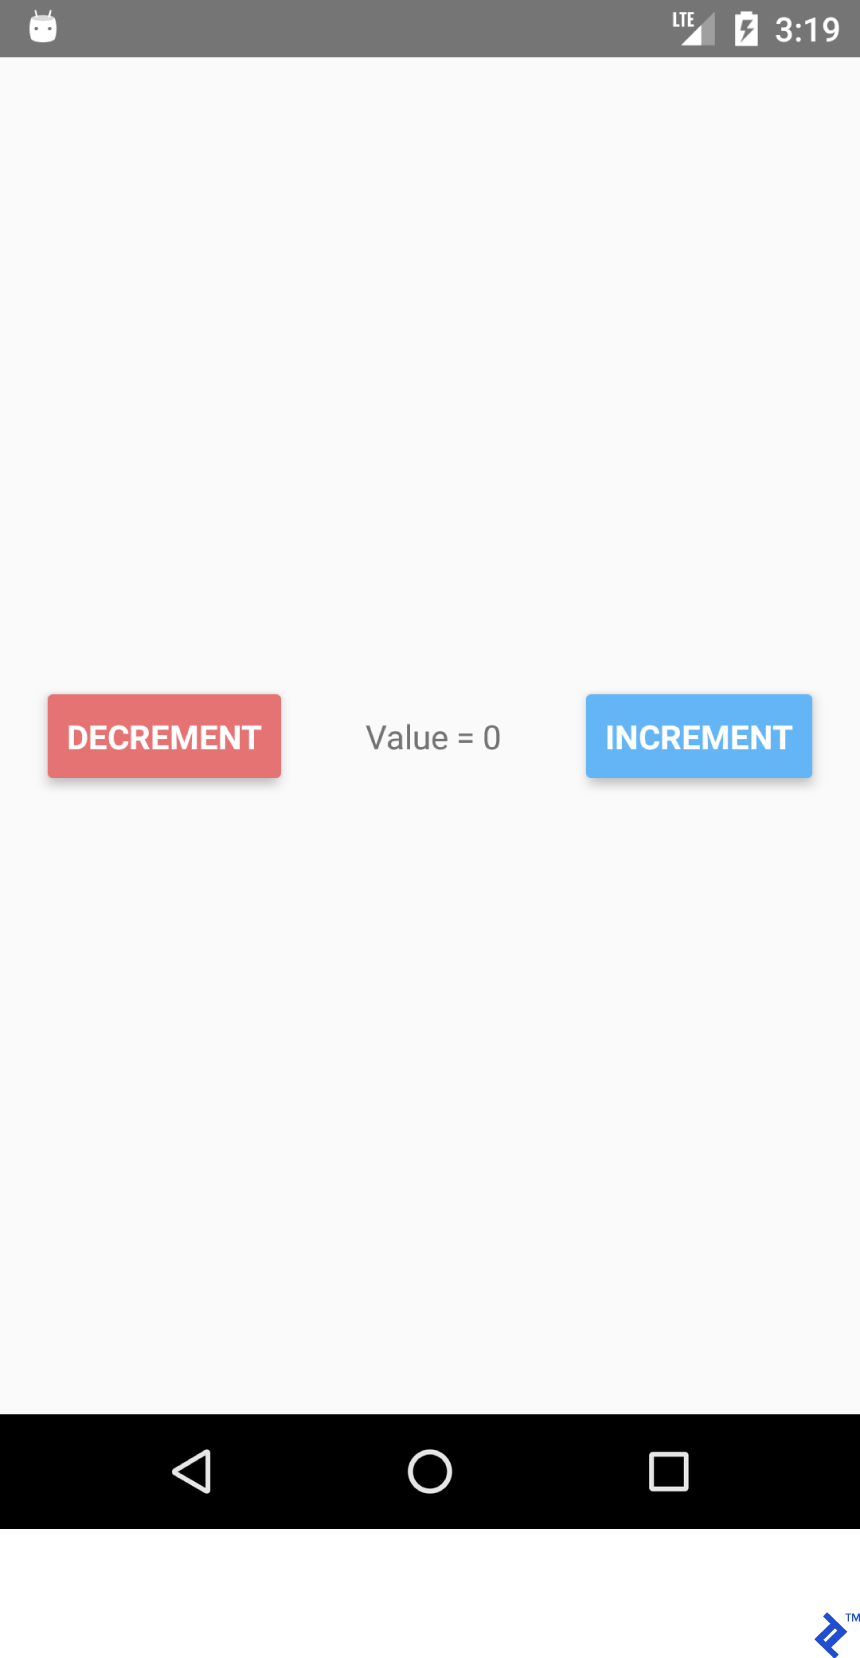
如果您單擊減量和增量按鈕,您會看到文本會自動為您更新。 無需顯式使用textView.setText("Value " + number) 。

狀態功能派上用場有多種原因:
- 易於獲取值——您始終知道在何處以及如何獲取特定變量的值。
- 數據不綁定到特定的小部件。
- 擁有多個依賴於共同值變化的小部件。
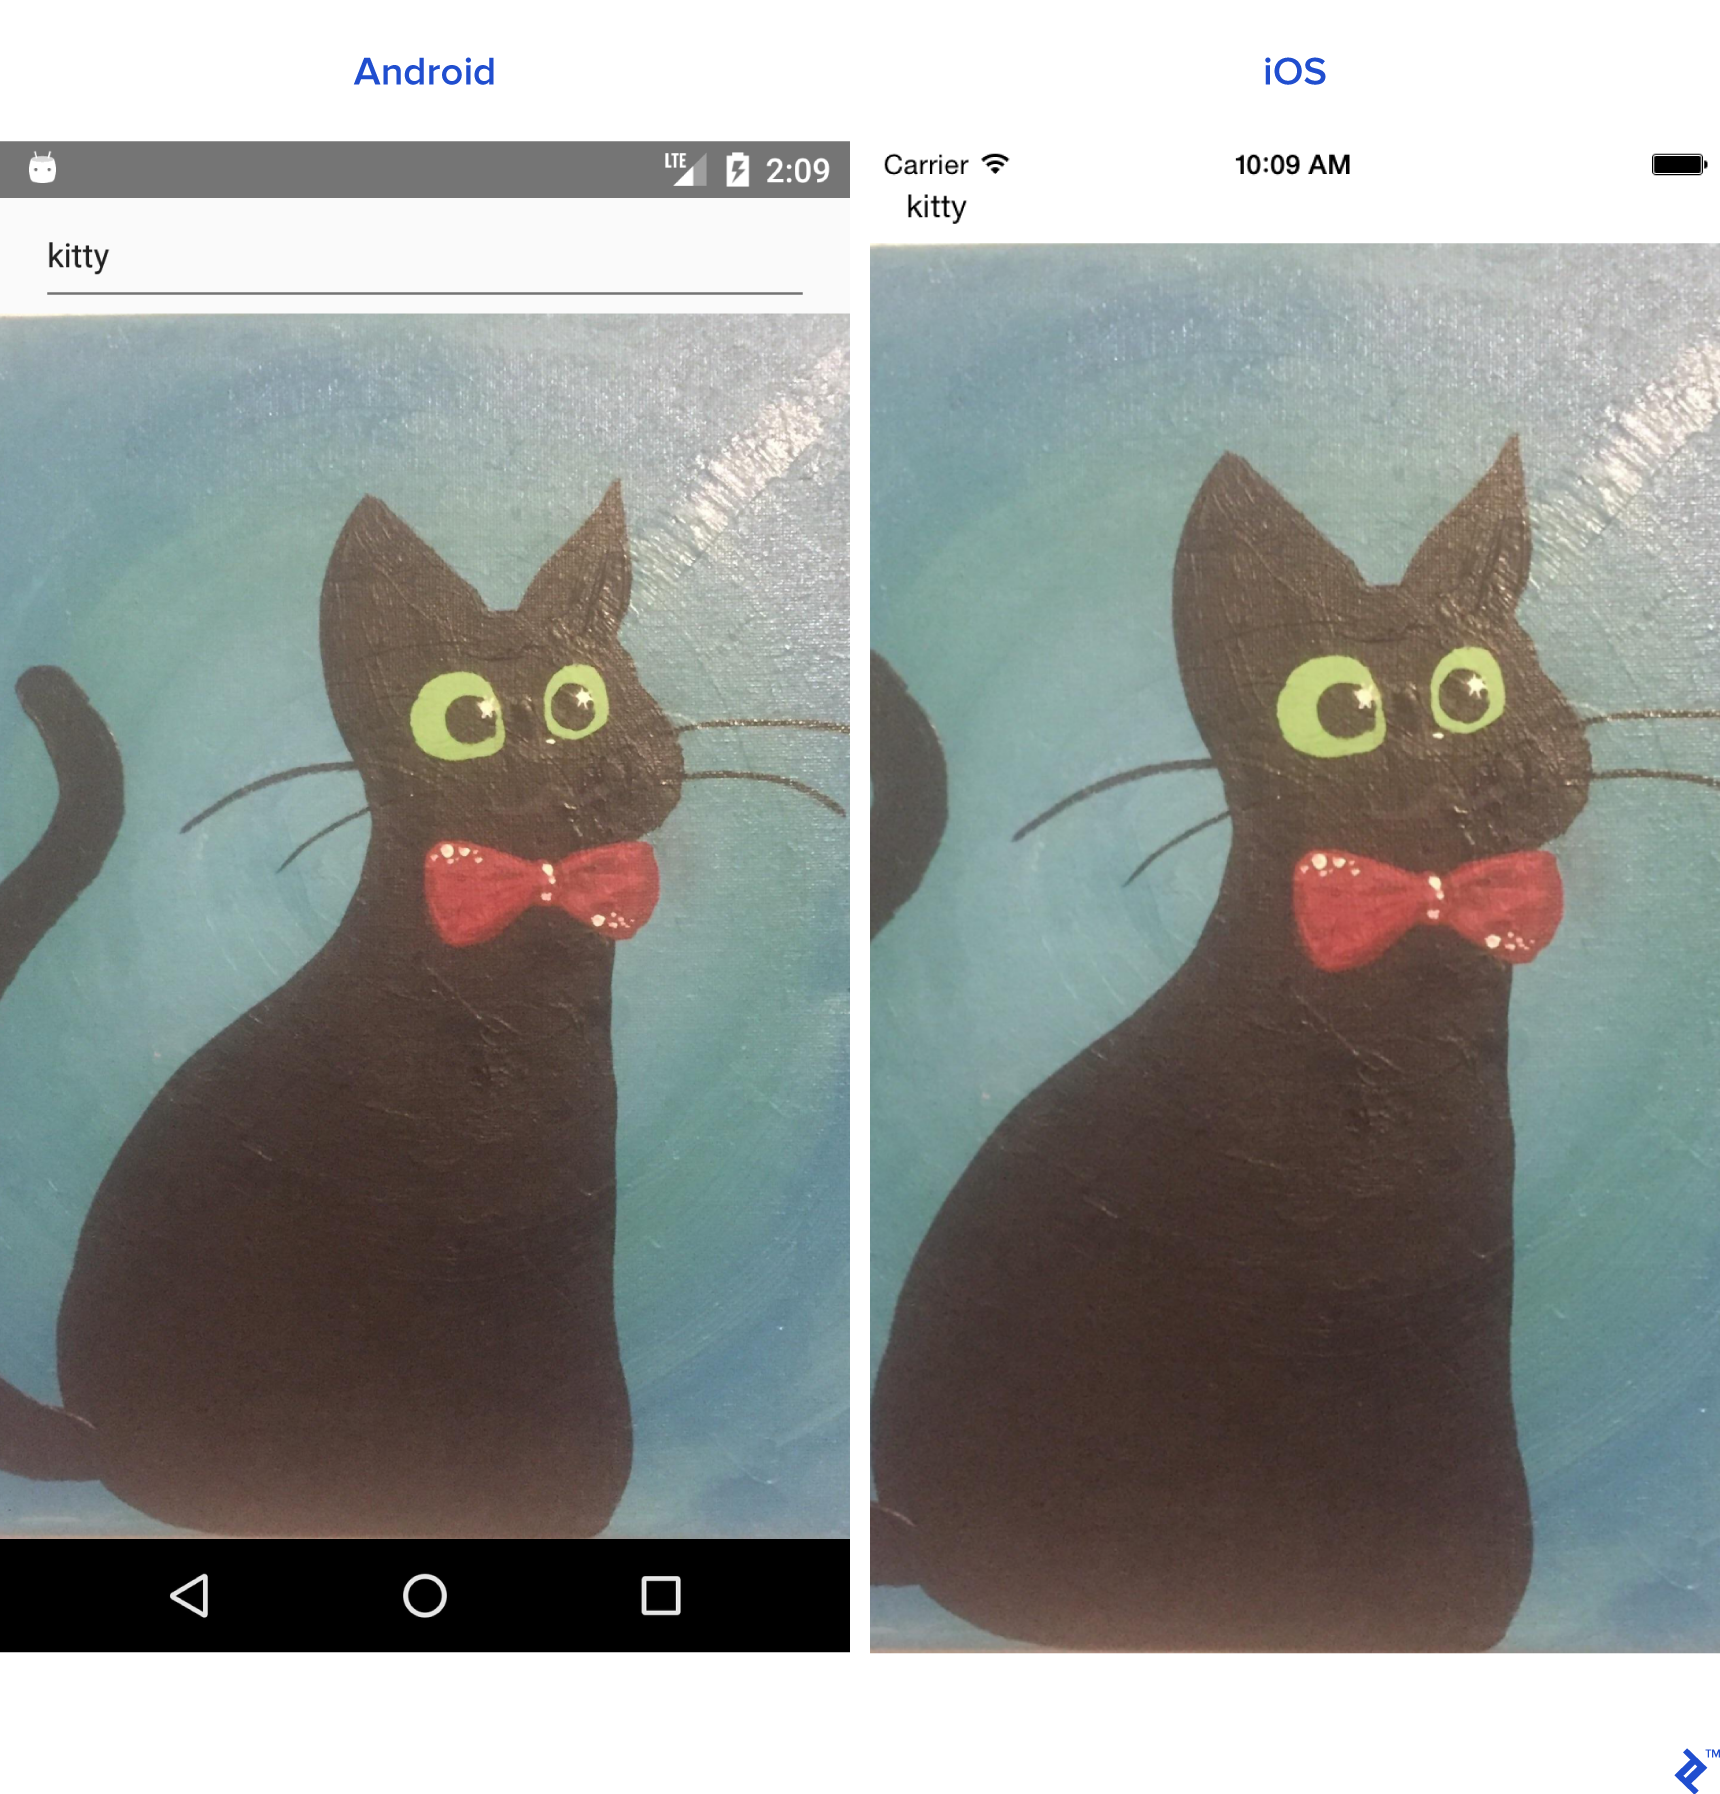
為 /r/pics 創建一個搜索應用程序
現在我們已經掌握了基礎知識,讓我們創建一個更複雜的東西:一個用於 /r/pics 的搜索應用程序。 Reddit 提供了一個簡單的 JSON API 端點,因此我們不必進行輔助任務來獲得身份驗證以使其正常工作。
React Native 提供了內置的 Fetch API。 由於我們大多數人可能習慣於Retrofit及其易用性,因此我們將使用axios 。 可以通過終端命令安裝axios
使用yarn (我的首選方法):
yarn add axios
或使用npm :
npm install axios
進口:
import React from 'react'; import { TextInput, View, Text, Image, ActivityIndicator, Platform, StyleSheet } from 'react-native'; import axios from 'axios'; TextInput = EditText, ActivityIndicator = ProgressBar Platform - Platform detecting module StyleSheet - Module for creating stylesheets and moving them away from JSX創建類:
export default class App extends React.Component { }初始化狀態。 我們需要:
- loading - 用於顯示進度條。
- error - 顯示發出 REST API 請求時是否產生了一些錯誤。
- imgUrl - 預覽搜索到的圖像。
- 文本 - 搜索查詢。
state = {text: '', loading: false, error: null, imgUrl: null}; 添加 JSX 代碼。 我們有一個帶有TextInput和Image組件的垂直佈局。
render() { return ( //Predefined style. See below <View style={styles.containerStyle}> {/* returnKeyType ~ imeOptions onSubmitEditing ~ et.OnEditorActionListener */} <TextInput style={styles.textInputStyle} placeholder="Enter text to search an image" returnKeyType='search' autoFocus={true} onChangeText={(text) => this.setState({text})} onSubmitEditing={() => this.searchPicture()}/> {/* Render error Image component if this.state.imgUrl is not equal to null */} { this.state.imgUrl && <Image source={{uri: this.state.imgUrl}} style={{flex: 1}}/> } </View> ); }新的東西:
onChangeText={(text) => this.setState({text})} onSubmitEditing={() => this.searchPicture()} { this.state.imgUrl && <Image source={{uri: this.state.imgUrl}} style={{flex: 1}}/> } 第一種方法與使用TextWatcher組件的EditText執行類似的工作。 老實說,它在 React Native 中要好得多。
第二種方法在觸發searchPicture()後在鍵盤上按下返回鍵 ( et.OnEditorActionListener ) 時調用。
當imgUrl不為 null 或未定義時呈現圖像,因為如果第一個參數已經為假,'&&' 運算符不會檢查第二個參數。
你可能想知道為什麼this.state.imgUrl是假的。 好吧,當在 JavaScript 中使用邏輯運算符時,除了 ''(空字符串)、 0 、 false 、 null或undefined之外的任何內容都是 true。 無需進行特定檢查。
searchPicture() { //Default state this.setState({loading: true, error: null, imgUrl: null}); axios.get('https://www.reddit.com/r/pics/search.json', { params: { //the get param map restrict_sr: 'on', //search only /r/pics limit: 1, //limit to one search item sort: 'new', //sort by creation date q: this.state.text //our search query } }).then(response => { //promise is resolved and 'then' block is triggered //set state with new values this.setState({ imgUrl: response.data.data.children[0] .data.preview.images[0].source.url, error: null, loading: false }) }).catch(error => {//Some error occurred //set error this.setState({error: error.message, loading: false, imgUrl: null}) }) }開始了。 該應用程序現在應該可以按預期工作了。 輸入搜索字符串並按回車鍵。
由於我們的應用程序也準備好渲染ActivityIndicator和錯誤,我們需要在Image組件之後添加更多代碼:
{ //Separate method this.renderProgress() } {/* Render error Text component if this.state.error is not equal to null */} { this.state.error && <Text style={{margin: 16, color: 'red'}}> {this.state.error} </Text> } 您也可以將渲染組件移到主render()方法之外:
renderProgress() { //If this.state.loading is true //return View containing a progressbar //View takes style array if (this.state.loading === true) { return ( <View style={ [styles.containerStyle, {justifyContent: 'center'}]}> <ActivityIndicator color='#e57373'/> </View> ); } } 剩下的就是樣式。 將這些放在App類之外。
const styles = StyleSheet.create({ containerStyle: { flexDirection: 'column', flex: 1, //Since React Native is cross platform //let's handle both platforms. //Add top margin to fix status bar overlap marginTop: Platform.OS === 'ios' ? 20 : 0, }, textInputStyle: { marginLeft: 16, marginRight: 16, height: Platform.OS === 'ios' ? 30 : undefined } });我們現在可以添加更多調整,例如在啟動應用程序時自動打開軟鍵盤。
請注意,有一種更簡單的方法可以使TextInput自動聚焦 ( autoFocus={true} prop ),但為了這個示例,我們不會使用它。
使用 prop 添加對TextInput的引用:
ref={ref => this.searchInput = ref}
並像這樣覆蓋componentDidMount()生命週期方法:
componentDidMount(){ this.searchInput.focus(); }重新加載應用程序,鍵盤會自動為我們打開。
組件生命週期方法
我們已經創建了一個組件,但讓我們回顧一下組件的生命週期。
這是 React 的生命週期流程:
-
constructor()- 構造函數總是在應用程序啟動時被調用 static _getDerivedStateFromProps_(props, state)- 在渲染之前和更新之後調用。 返回用於更新狀態的對象。 返回 null 以不更新任何內容。-
render()- 每個 React 組件類都需要渲染。 它用於渲染視圖。 -
componentDidMount()- 在組件被渲染並安裝到視圖樹後調用。 -
shouldComponentUpdate(nextProps, nextState)- 在狀態或道具改變後調用。 每次狀態更新後返回默認為 true。 如果返回 true,則調用render()。 -
getSnapshotBeforeUpdate(prevProps, prevState)- 在提交渲染輸出之前調用。 -
componentDidUpdate(prevProps, prevState, snapshot)- 在渲染新更新後調用。 在第一次render()之後不會調用它。 -
componentWillUnmount()- 在組件被卸載和銷毀之前調用。
可重用組件
在處理項目時,我們經常需要創建可重用的組件。 創建組件有兩種方式:
- 創建一個擴展
React.Component的類。 如果我們需要生命週期方法,則應使用此方法。 - 通過編寫一個返回 View 的函數以獲得更簡單的語法。
由於我們已經創建了組件類,讓我們為這個實例創建一個函數。
假設我們需要一個<CardView>的類比。 在./src目錄下創建一個“common”文件夾。
創建CardView.js 。
import React from "react"; import {View} from "react-native"; export default CardView = (props) => { return ( //Style will be merged from default containerStyle //and props.style. props.style attributes will override //values if parameters are same. <View style={{...styles.containerStyle, ...props.style}}> {/* props.children contain subviews add this line if the component is container */} {props.children} </View> ); }; const styles = { containerStyle: { borderRadius: 4, margin: 5, padding: 5, elevation: 5, shadowColor: 'black', shadowRadius: 5, shadowOpacity: 0.5, shadowOffset: {width: 0, height: 3}, backgroundColor: 'white' } }; LoginForm使用我們新的CardView佈局:
import React from "react"; import {TextInput, Platform, Button, StyleSheet} from "react-native"; import CardView from "../common/components/CardView"; export default class LoginForm extends React._Component _{ render() { return ( //Override default style <CardView style={{ borderRadius: 4, backgroundColor: '#fff' }}> <TextInput placeholder="Email" style={styles.textInputStyle}/> <TextInput placeholder="Password" style={styles.textInputStyle} secureTextEntry={true}/> <Button color="#841584" title="Login" onPress={() => console.log("onLoginPress")} buttonStyle={styles.buttonStyle}/> </CardView> ); } } const styles = StyleSheet.create({ buttonStyle: { elevation: 5, height: 40 }, textInputStyle: { padding: 10, //Additional params to make //iOS inputs prettier ...Platform.select({ ios: { borderRadius: 2, marginTop: 5, backgroundColor: '#eeeeee' } }) } }); 在App類中導入LoginForm類,並用View包裝
<View style={{flex: 1, justifyContent: 'center'}}> <LoginForm/> </View>如果您調整樣式中的參數,您可以獲得看起來更好的東西。
導航
導航到不同的場景是大多數應用程序的重要組成部分。 我們將創建一個 Reddit /r/pics 瀏覽器應用程序。
在 React Native 中創建導航非常簡單。
先決條件
- 使用
yarn或npm安裝react-navigation - 使用
yarn或npm安裝axios
讓我們從創建兩個不同的組件開始。
注意:下面的大部分代碼你應該已經很熟悉了。 我將粘貼整個班級。
PictureList.js:
import React from 'react'; import { ActivityIndicator, FlatList, Image, Text, TouchableHighlight, View } from "react-native"; import axios from "axios"; import CardView from "../common/CardView"; export default class PictureList extends React.Component { state = {loading: true, error: null, posts: null}; componentDidMount() { axios.get('https://www.reddit.com/r/pics.json') .then(response => { this.setState({ posts: response.data.data.children, loading: false }) }).catch(error => { this.setState({ error: error.message, loading: false }) }) } render() { return ( <View style={{flex: 1, justifyContent: 'center'}}> // FlatList ~ ListView // data - DataSource for the List // renderItem - function returns View item // keyExtractor - Unique id for items {this.state.posts && <FlatList data={this.state.posts} renderItem={this.renderItem.bind(this)} keyExtractor={(item) => (item.data.id + '')}/>} {this.state.loading && <ActivityIndicator size="large" color="#f4511e"/>} </View> ); } navigateToPicture(title, url) { this.props.navigation.navigate('PicturePreview', { 'title': title, 'url': url }) } renderItem(item) { //Destructuring values from item //Read more 'ES6 destructuring' const {data} = item.item; const {title} = data; const {url} = data.preview.images[0].source; return ( //Clickable view <TouchableHighlight onPress={() => this.navigateToPicture(title, url)}> {/Reusing our CardView/} <CardView> <Image style={{height: 150}} source={{uri: url}}/> <Text style={{padding: 5}}>{title}</Text> </CardView> </TouchableHighlight> ) } } PicturePreview.js :
import React from 'react'; import {Image} from "react-native"; export default class PicturePreview extends React.Component { //Destructure navigation //Set title to header static _navigationOptions = ({navigation}) => ({ title: navigation.state.params.title }); render() { const {url} = this.props.navigation.state.params; return (<Image style={{flex: 1}} source={{uri: url}}/>) } } navigationOptions將由 React-Navigation 自動調用。
現在讓我們轉到App.js
注意:React-Navigation 中有很多導航類型。 今天,我們將專注於StackNavigation 。 詳細信息請參考官方網站。
import React from 'react'; import {createStackNavigator} from "react-navigation"; import PictureList from "./components/PictureList"; import PicturePreview from "./components/PicturePreview"; export default class App extends React.Component { render() { return ( <Router/> ); } } //Customize the header_ const NavigationOptions = { headerTintColor: '#fff', headerStyle: { backgroundColor: '#f4511e', } }; //Create the router. const Router = createStackNavigator({ //Name the screen 'PictureList': { //Link the Component screen: PictureList, //Additional navigation options navigationOptions: { title: '/r/pics Browser', ...NavigationOptions } }, 'PicturePreview': { screen: PicturePreview, navigationOptions: NavigationOptions } }, { //Root initialRouterName: 'PictureList' } );如您所見,我們需要做的就是創建一個導航路由器並讓應用程序渲染它。 如果一切順利,我們將擁有一個功能齊全的 Reddit /r/pics 瀏覽器應用程序。
安卓:
IOS:
React Native 太棒了!
自從我開始編程以來,我就有了純粹的移動開發經驗。 但現在我可以使用 React 為幾乎任何東西編寫代碼:移動、桌面和 Web。
如果你決定開始使用 React Native 開發你的下一個令人驚嘆的應用程序,你會發現它到處都有它的怪癖和一些錯誤,但 React Native 非常實用,非常適合大多數項目。