
Spring MVC를 사용하여 특정 위치에 여러 파일을 업로드하는 방법은 무엇입니까? Java 코드가 포함된 완전한 자습서
게시 됨: 2013-06-22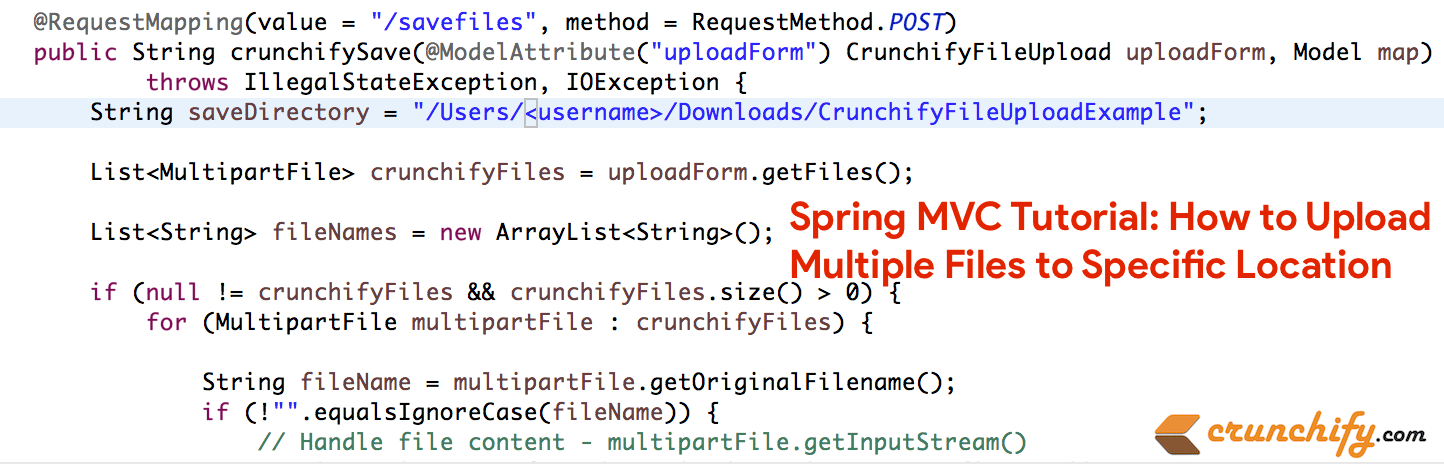
이것은 업로드 양식 의 파일을 수락하고 "제출" 이벤트의 특정 폴더에 복사하는 또 다른 완전한 Spring MVC 튜토리얼입니다. 평소와 같이 Hello World Spring MVC 예제에 대한 dependency 이 있습니다.
따라서 이 예에서 수행해야 하는 추가/변경 사항은 다음과 같습니다.
- 새 파일: CrunchifyFileUploadController.java
- 새 파일: CrunchifyFileUpload.java
- 새 파일: uploadfile.jsp
- 새 파일: uploadfilesuccess.jsp
- 수정된 파일: crunchify-servlet.xml
- 2개의 새로운 jar 파일:
commons-io-2.4.jar및commons-fileupload-1.3.jar
아래 질문이 있습니까? 그럼 당신은 바로 이곳에 있습니다.
- Java 다중 파일 업로드 예
- 여러 파일 또는 폴더 업로드
다음은 파일을 추가할 위치에 대한 아이디어를 얻을 수 있도록 최종 프로젝트 구조입니다.
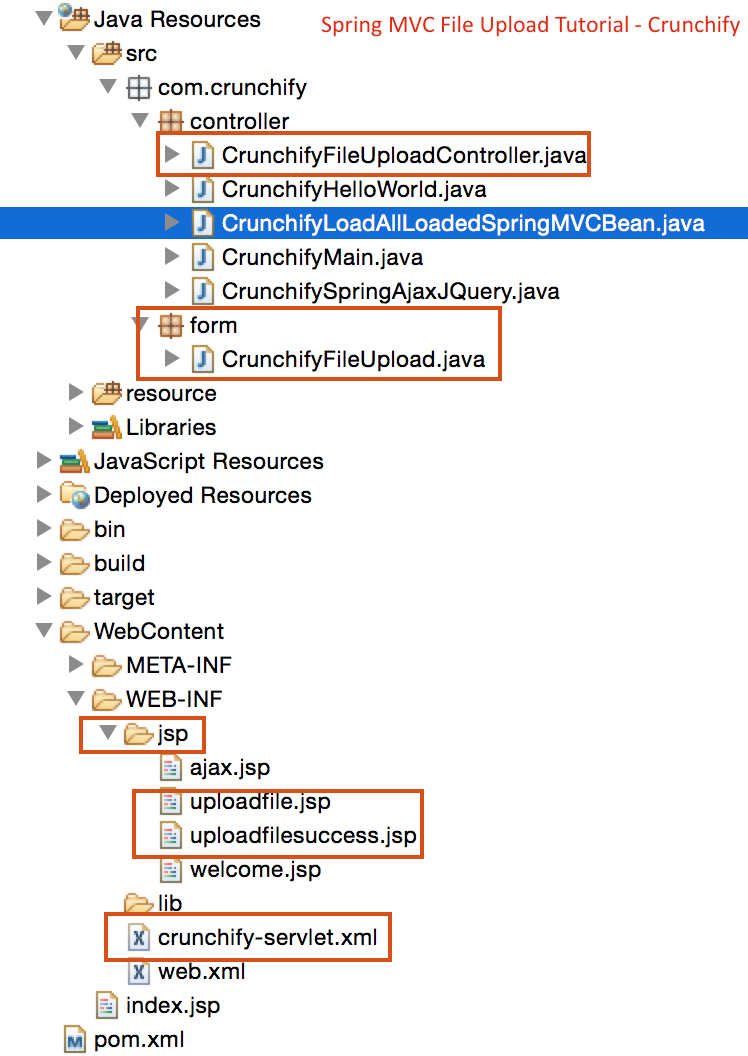
이제 시작하겠습니다.
1단계) 전제 조건:
https://crunchify.com/hello-world-example-spring-mvc-3-2-1/ (이 프로젝트를 Tomcat에 성공적으로 배포)
메이븐 종속성:
프로젝트의 pom.xml 파일에 아래의 새 종속성을 추가하십시오.
|
1 2 3 4 5 6 7 8 9 10 |
< dependency > < groupId > commons - fileupload < / groupId > < artifactId > commons - fileupload < / artifactId > < version > 1.2 < / version > < / dependency > < dependency > < groupId > commons - io < / groupId > < artifactId > commons - io < / artifactId > < version > 1.4 < / version > < / dependency > |
2단계) 스프링 컨트롤러
파일 업로드를 처리하는 Spring 3 MVC 기반 컨트롤러를 만듭니다. 이 컨트롤러에는 두 가지 방법이 있습니다.
-
crunchifyDisplayForm– 단순히 요청을 pageuploadfile.jsp로 전달합니다. -
crunchifySave–@ModelAttribute주석을 사용하여 양식을 가져오고 여기에서 파일 콘텐츠를 가져옵니다. 업로드 중인 파일의 파일 이름 목록을 만들고 이 목록을 성공 페이지로 전달합니다.
|
1 2 3 4 5 6 7 8 9 10 11 12 13 14 15 16 17 18 19 20 21 22 23 24 25 26 27 28 29 30 31 32 33 34 35 36 37 38 39 40 41 42 43 44 45 46 47 48 49 50 51 |
package com . crunchify . controller ; import com . crunchify . form . CrunchifyFileUpload ; import java . io . File ; import java . io . IOException ; import java . util . ArrayList ; import java . util . List ; import org . springframework . stereotype . Controller ; import org . springframework . ui . Model ; import org . springframework . web . bind . annotation . ModelAttribute ; import org . springframework . web . bind . annotation . RequestMapping ; import org . springframework . web . bind . annotation . RequestMethod ; import org . springframework . web . multipart . MultipartFile ; @Controller public class CrunchifyFileUploadController { @RequestMapping ( value = "/upload" , method = RequestMethod . GET ) public String crunchifyDisplayForm ( ) { return "uploadfile" ; } @RequestMapping ( value = "/savefiles" , method = RequestMethod . POST ) public String crunchifySave ( @ModelAttribute ( "uploadForm" ) CrunchifyFileUpload uploadForm , Model map ) throws IllegalStateException , IOException { String saveDirectory = "c:/crunchify/" ; List <MultipartFile> crunchifyFiles = uploadForm . getFiles ( ) ; List <String> fileNames = new ArrayList <String> ( ) ; if ( null ! = crunchifyFiles && crunchifyFiles.size() > 0) { for (MultipartFile multipartFile : crunchifyFiles) { String fileName = multipartFile.getOriginalFilename(); if ( ! "" . equalsIgnoreCase ( fileName ) ) { // Handle file content - multipartFile.getInputStream() multipartFile . transferTo ( new File ( saveDirectory + fileName ) ) ; fileNames . add ( fileName ) ; } } } map . addAttribute ( "files" , fileNames ) ; return "uploadfilesuccess" ; } } |
3단계) Model – Form Object
Spring 애플리케이션의 Model/Form 객체 역할을 하는 Java bean을 생성합니다. 이 빈에는 org.springframework.web.multipart.MultipartFile 객체의 List 이 포함되어 있습니다. Spring 프레임워크는 업로드된 파일의 파일 내용을 가져오는 데 사용할 수 있는 유용한 클래스 MultipartFile을 제공합니다. 내용 외에도 MultipartFile 개체는 파일 이름, 파일 크기 등과 같은 다른 유용한 정보도 제공합니다.
|
1 2 3 4 5 6 7 8 9 10 11 12 13 14 15 16 17 |
package com . crunchify . form ; import java . util . List ; import org . springframework . web . multipart . MultipartFile ; public class CrunchifyFileUpload { private List <MultipartFile> crunchifyFiles ; public List <MultipartFile> getFiles ( ) { return crunchifyFiles ; } public void setFiles ( List <MultipartFile> files ) { this . crunchifyFiles = files ; } } |
4단계) JSP 보기
이제 이 응용 프로그램에 대한 보기 페이지를 만듭니다. 두 개의 JSP가 필요합니다. 하나는 파일 업로드 양식을 표시하고 다른 하나는 성공적인 업로드에 대한 결과를 표시합니다.
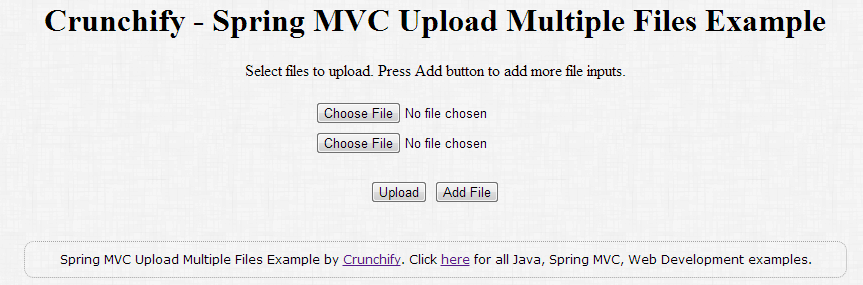
uploadfile.jsp 는 파일 입력이 있는 양식을 표시합니다. 이 외에도 추가 버튼 클릭 시 작은 jquery 스니펫을 추가했습니다. 이렇게 하면 양식 끝에 새 파일 입력 구성 요소가 추가됩니다. 이를 통해 사용자는 원하는 만큼 파일을 업로드할 수 있습니다.
<form> 태그의 enctype=”multipart/form-data” 속성을 설정했다는 점에 유의하십시오.
|
1 2 3 4 5 6 7 8 9 10 11 12 13 14 15 16 17 18 19 20 21 22 23 24 25 26 27 28 29 30 31 32 33 34 35 36 37 38 39 40 41 42 43 44 45 46 47 48 49 50 51 52 53 54 55 56 57 58 59 60 61 |
<% @ taglib uri = "http://www.springframework.org/tags/form" prefix = "form" %> < html > < head > < title > Crunchify - Spring MVC Upload Multiple Files Example < / title > <script src = "http://ajax.googleapis.com/ajax/libs/jquery/1.8.2/jquery.min.js" > </script> <script> $ ( document ) . ready ( function ( ) { //add more file components if Add is clicked $ ( '#addFile' ) . click ( function ( ) { var fileIndex = $ ( '#fileTable tr' ) . children ( ) . length - 1 ; $ ( '#fileTable' ) . append ( '<tr><td>' + ' <input type="file" name="files[' + fileIndex + ']" />' + '</td></tr>' ) ; } ) ; } ) ; </script> <style type ="text/css"> body { background-image : url ( 'https://cdn.crunchify.com/wp-content/uploads/2013/03/Crunchify.bg_.300.png' ) ; } </style> < / head > < body > < br > < br > < div align = "center" > < h1 > Crunchify - Spring MVC Upload Multiple Files Example < / h1 > < form : form method = "post" action = "savefiles.html" modelAttribute = "uploadForm" enctype = "multipart/form-data" > < p > Select files to upload . Press Add button to add more file inputs . < / p > < table id = "fileTable" > < tr > < td > < input name = "files[0]" type = "file" / > < / td > < / tr > < tr > < td > < input name = "files[1]" type = "file" / > < / td > < / tr > < / table > < br / > < input type = "submit" value = "Upload" / > < input id = "addFile" type = "button" value = "Add File" / > < / form : form > < br / > < / div > < / body > < / html > |

|
1 2 3 4 5 6 7 8 9 10 11 12 13 14 15 16 17 18 19 20 21 22 23 24 25 26 27 28 29 30 31 32 33 34 35 36 37 38 |
<% @ taglib uri = "http://java.sun.com/jsp/jstl/core" prefix = "c" %> < html > < head > < title > Crunchify - Upload Multiple Files Example < / title > <style type ="text/css"> body { background-image : url ( 'https://cdn.crunchify.com/wp-content/uploads/2013/03/Crunchify.bg_.300.png' ) ; } </style> < / head > < body > < br > < br > < div align = "center" > < h1 > Crunchify - Spring MVC Upload Multiple Files Example < / h1 > < p > Awesome . . Following files are uploaded successfully . < / p > < ol > < c : forEach items = "${files}" var = "file" > - $ { file } < br > < / c : forEach > < / ol > < a href = "http://localhost:8080/CrunchifySpringMVC3.2.1/upload.html" > < input type = "button" value = "Go Back" / > < / a > < br / > < br / > < br / > < div style = "font-family: verdana; line-height: 25px; padding: 5px 10px; border-radius: 10px; border: 1px dotted #A4A4A4; width: 50%; font-size: 12px;" > Spring MVC Upload Multiple Files Example by < a href = 'https://crunchify.com' > Crunchify < / a > . Click < a href = 'https://crunchify.com/category/java-tutorials/' > here < / a > for all Java , Spring MVC , Web Development examples . < br > < / div > < / div > < / body > < / html > |
5단계) 스프링 구성 업데이트
<bean class="org.springframework.web.servlet.view.UrlBasedViewResolver"> 라인 바로 위에 crunchify-servlet.xml 파일에 아래 bean을 추가하십시오.
|
1 2 |
< bean id = "multipartResolver" class = "org.springframework.web.multipart.commons.CommonsMultipartResolver" / > |
Step-6) 결제 결과
tomcat을 시작하고 브라우저에서 http://localhost:8080/CrunchifySpringMVC3.2.1/upload.html을 가리키면 이와 유사한 화면이 표시되어야 합니다.
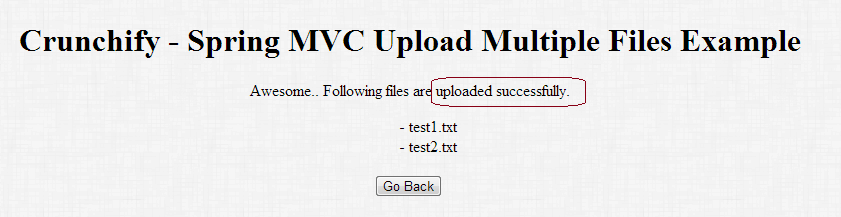
파일 업로드 후 다음과 같은 성공 메시지가 표시됩니다. 언제든지 원하는 방식으로 .jsp 파일을 아름답게 꾸밀 수 있습니다.
모든 Spring MVC 예제, Java 예제 목록.