
Spring MVCを使用して複数のファイルを特定の場所にアップロードするにはどうすればよいですか? Javaコードを使用した完全なチュートリアル
公開: 2013-06-22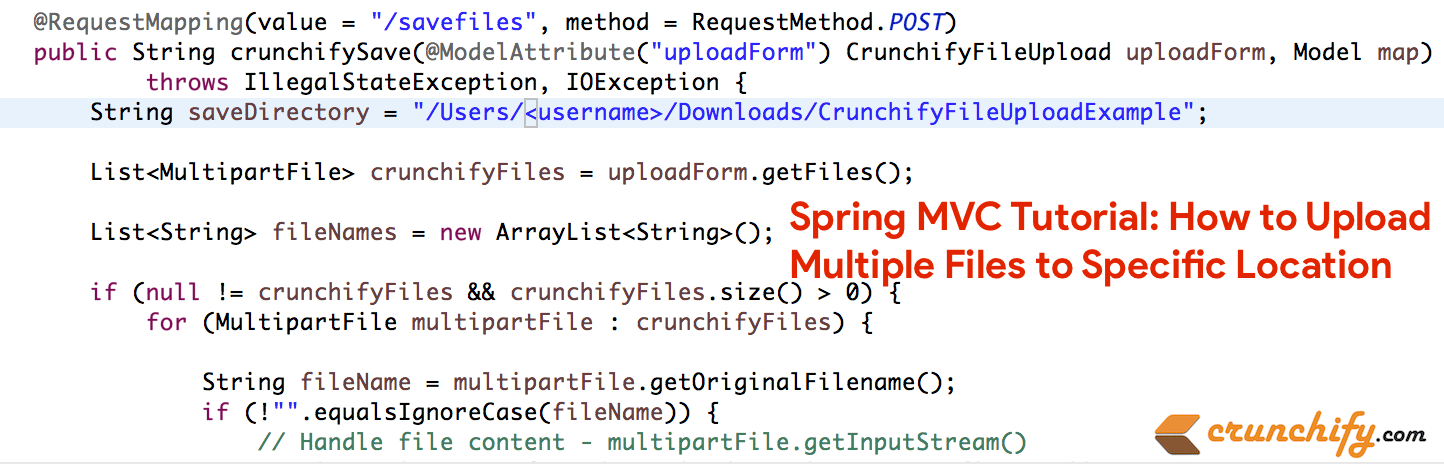
これは、アップロードフォームでファイルを受け入れ、「送信」イベントで特定のフォルダーにコピーする、もう1つの完全なSpringMVCチュートリアルです。 いつものように、Hello World Spring MVCExampleにdependencyしています。
したがって、これらは、この例で実行する必要のある追加/変更です。
- 新しいファイル:CrunchifyFileUploadController.java
- 新しいファイル:CrunchifyFileUpload.java
- 新しいファイル:uploadfile.jsp
- 新しいファイル:uploadfilesuccess.jsp
- 変更されたファイル:crunchify-servlet.xml
- 2つの新しいjarファイル:
commons-io-2.4.jarおよびcommons-fileupload-1.3.jar
以下の質問がありますか? その後、あなたは正しい場所にいます。
- Java複数ファイルのアップロード例
- 複数のファイルまたはフォルダをアップロードする
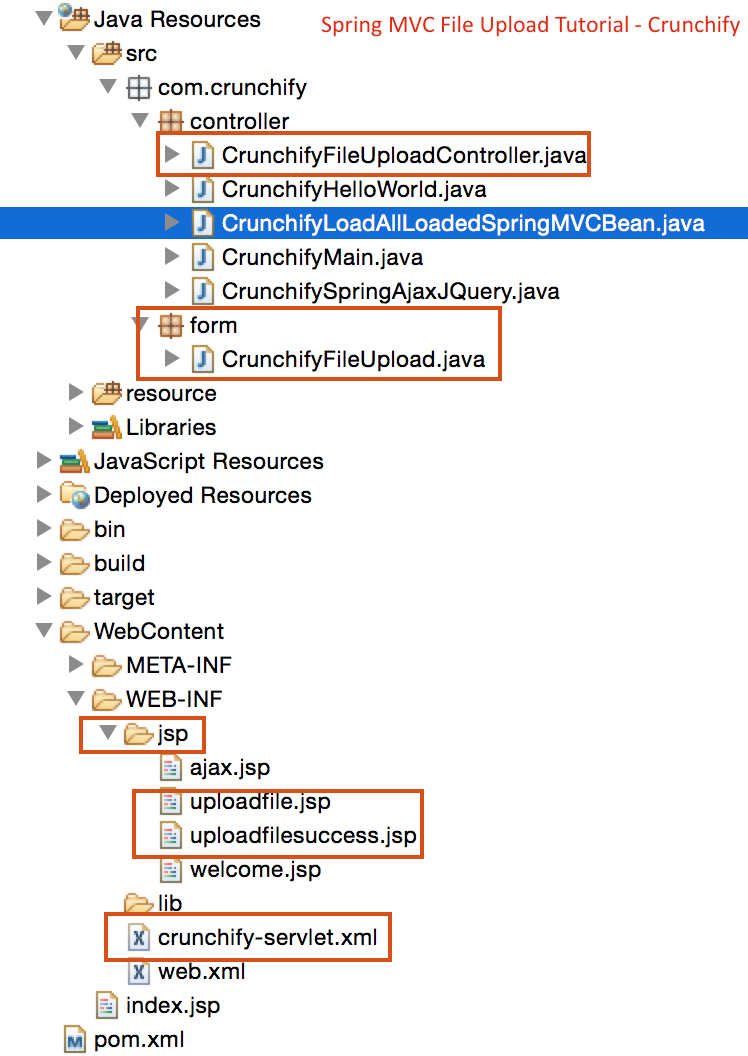
これが最終的なプロジェクト構造であるため、ファイルを追加する場所についてのアイデアが得られます。
それでは始めましょう:
ステップ-1)前提条件:
https://crunchify.com/hello-world-example-spring-mvc-3-2-1/(このプロジェクトをTomcatに正常にデプロイする)
Mavenの依存関係:
以下の新しい依存関係をプロジェクトのpom.xmlファイルに追加します。
|
1 2 3 4 5 6 7 8 9 10 |
< dependency > < groupId > commons - fileupload < / groupId > < artifactId > commons - fileupload < / artifactId > < version > 1.2 < / version > < / dependency > < dependency > < groupId > commons - io < / groupId > < artifactId > commons - io < / artifactId > < version > 1.4 < / version > < / dependency > |
ステップ-2)SpringController
ファイルのアップロードを処理するSpring3MVCベースのコントローラーを作成します。 このコントローラーには2つの方法があります。
-
crunchifyDisplayForm–リクエストをpageuploadfile.jspに転送するだけです。 -
crunchifySave–@ModelAttributeアノテーションを使用してフォームをフェッチし、そこからファイルコンテンツを取得します。 アップロードされているファイルのファイル名のリストを作成し、このリストを成功ページに渡します。
|
1 2 3 4 5 6 7 8 9 10 11 12 13 14 15 16 17 18 19 20 21 22 23 24 25 26 27 28 29 30 31 32 33 34 35 36 37 38 39 40 41 42 43 44 45 46 47 48 49 50 51 |
package com . crunchify . controller ; import com . crunchify . form . CrunchifyFileUpload ; import java . io . File ; import java . io . IOException ; import java . util . ArrayList ; import java . util . List ; import org . springframework . stereotype . Controller ; import org . springframework . ui . Model ; import org . springframework . web . bind . annotation . ModelAttribute ; import org . springframework . web . bind . annotation . RequestMapping ; import org . springframework . web . bind . annotation . RequestMethod ; import org . springframework . web . multipart . MultipartFile ; @Controller public class CrunchifyFileUploadController { @RequestMapping ( value = "/upload" , method = RequestMethod . GET ) public String crunchifyDisplayForm ( ) { return "uploadfile" ; } @RequestMapping ( value = "/savefiles" , method = RequestMethod . POST ) public String crunchifySave ( @ModelAttribute ( "uploadForm" ) CrunchifyFileUpload uploadForm , Model map ) throws IllegalStateException , IOException { String saveDirectory = "c:/crunchify/" ; List <MultipartFile> crunchifyFiles = uploadForm . getFiles ( ) ; List <String> fileNames = new ArrayList <String> ( ) ; if ( null ! = crunchifyFiles && crunchifyFiles.size() > 0) { for (MultipartFile multipartFile : crunchifyFiles) { String fileName = multipartFile.getOriginalFilename(); if ( ! "" . equalsIgnoreCase ( fileName ) ) { // Handle file content - multipartFile.getInputStream() multipartFile . transferTo ( new File ( saveDirectory + fileName ) ) ; fileNames . add ( fileName ) ; } } } map . addAttribute ( "files" , fileNames ) ; return "uploadfilesuccess" ; } } |
ステップ-3)モデル–フォームオブジェクト
SpringアプリケーションのModel / Formオブジェクトとして機能するJavaBeanを作成します。 このBeanには、 org.springframework.web.multipart.MultipartFileオブジェクトのListが含まれています。 Spring Frameworkは、アップロードされたファイルのファイルコンテンツをフェッチするために使用できる便利なクラスMultipartFileを提供します。 その内容とは別に、MultipartFileオブジェクトは、ファイル名、ファイルサイズなどの他の有用な情報も提供します。
|
1 2 3 4 5 6 7 8 9 10 11 12 13 14 15 16 17 |
package com . crunchify . form ; import java . util . List ; import org . springframework . web . multipart . MultipartFile ; public class CrunchifyFileUpload { private List <MultipartFile> crunchifyFiles ; public List <MultipartFile> getFiles ( ) { return crunchifyFiles ; } public void setFiles ( List <MultipartFile> files ) { this . crunchifyFiles = files ; } } |
ステップ-4)JSPビュー
次に、このアプリケーションのビューページを作成します。 2つのJSPが必要です。1つはファイルアップロードフォームを表示するためのもので、もう1つはアップロードが成功したときに結果を表示するためのものです。
uploadfile.jspは、ファイル入力のあるフォームを表示します。 これとは別に、[追加]ボタンをクリックして小さなjqueryスニペットを追加しました。 これにより、フォームの最後に新しいファイル入力コンポーネントが追加されます。 これにより、ユーザーは必要な数のファイルをアップロードできます。
<form>タグのenctype=”multipart/form-data”属性を設定していることに注意してください。
|
1 2 3 4 5 6 7 8 9 10 11 12 13 14 15 16 17 18 19 20 21 22 23 24 25 26 27 28 29 30 31 32 33 34 35 36 37 38 39 40 41 42 43 44 45 46 47 48 49 50 51 52 53 54 55 56 57 58 59 60 61 |
<% @ taglib uri = "http://www.springframework.org/tags/form" prefix = "form" %> < html > < head > < title > Crunchify - Spring MVC Upload Multiple Files Example < / title > <script src = "http://ajax.googleapis.com/ajax/libs/jquery/1.8.2/jquery.min.js" > </script> <script> $ ( document ) . ready ( function ( ) { //add more file components if Add is clicked $ ( '#addFile' ) . click ( function ( ) { var fileIndex = $ ( '#fileTable tr' ) . children ( ) . length - 1 ; $ ( '#fileTable' ) . append ( '<tr><td>' + ' <input type="file" name="files[' + fileIndex + ']" />' + '</td></tr>' ) ; } ) ; } ) ; </script> <style type ="text/css"> body { background-image : url ( 'https://cdn.crunchify.com/wp-content/uploads/2013/03/Crunchify.bg_.300.png' ) ; } </style> < / head > < body > < br > < br > < div align = "center" > < h1 > Crunchify - Spring MVC Upload Multiple Files Example < / h1 > < form : form method = "post" action = "savefiles.html" modelAttribute = "uploadForm" enctype = "multipart/form-data" > < p > Select files to upload . Press Add button to add more file inputs . < / p > < table id = "fileTable" > < tr > < td > < input name = "files[0]" type = "file" / > < / td > < / tr > < tr > < td > < input name = "files[1]" type = "file" / > < / td > < / tr > < / table > < br / > < input type = "submit" value = "Upload" / > < input id = "addFile" type = "button" value = "Add File" / > < / form : form > < br / > < / div > < / body > < / html > |

|
1 2 3 4 5 6 7 8 9 10 11 12 13 14 15 16 17 18 19 20 21 22 23 24 25 26 27 28 29 30 31 32 33 34 35 36 37 38 |
<% @ taglib uri = "http://java.sun.com/jsp/jstl/core" prefix = "c" %> < html > < head > < title > Crunchify - Upload Multiple Files Example < / title > <style type ="text/css"> body { background-image : url ( 'https://cdn.crunchify.com/wp-content/uploads/2013/03/Crunchify.bg_.300.png' ) ; } </style> < / head > < body > < br > < br > < div align = "center" > < h1 > Crunchify - Spring MVC Upload Multiple Files Example < / h1 > < p > Awesome . . Following files are uploaded successfully . < / p > < ol > < c : forEach items = "${files}" var = "file" > - $ { file } < br > < / c : forEach > < / ol > < a href = "http://localhost:8080/CrunchifySpringMVC3.2.1/upload.html" > < input type = "button" value = "Go Back" / > < / a > < br / > < br / > < br / > < div style = "font-family: verdana; line-height: 25px; padding: 5px 10px; border-radius: 10px; border: 1px dotted #A4A4A4; width: 50%; font-size: 12px;" > Spring MVC Upload Multiple Files Example by < a href = 'https://crunchify.com' > Crunchify < / a > . Click < a href = 'https://crunchify.com/category/java-tutorials/' > here < / a > for all Java , Spring MVC , Web Development examples . < br > < / div > < / div > < / body > < / html > |
ステップ-5)Spring構成を更新する
<bean class="org.springframework.web.servlet.view.UrlBasedViewResolver">行のすぐ上にあるcrunchify-servlet.xmlファイルに、以下のBeanを追加します。
|
1 2 |
< bean id = "multipartResolver" class = "org.springframework.web.multipart.commons.CommonsMultipartResolver" / > |
ステップ-6)チェックアウト結果
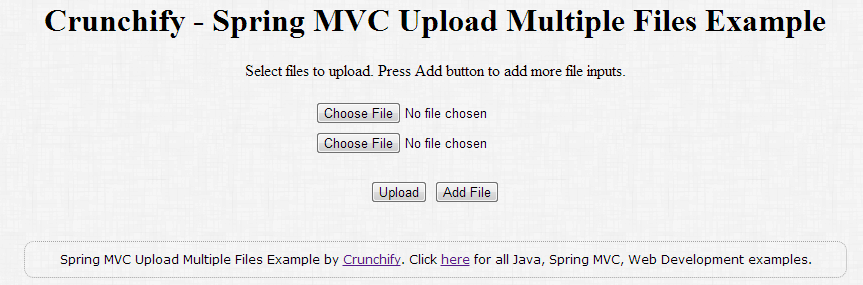
tomcatを起動し、ブラウザで次のURLを指定します:http:// localhost:8080 / CrunchifySpringMVC3.2.1 / upload.html次のような画面が表示されます。
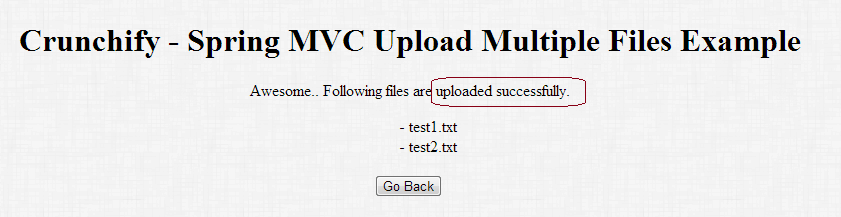
ファイルのアップロード後、次のような成功メッセージが表示されます。 .jspファイルはいつでも好きなように美しくすることができます。
すべてのSpringMVCの例、Javaの例のリスト。