Spring MVC에서 3초마다 스파크라인 그래프를 업데이트하는 방법(실시간 업데이트)
게시 됨: 2013-06-17
jQuery Sparkline: 이 jQuery 플러그인을 사용하면 HTML과 Javascript의 두 줄을 온라인으로 사용하여 브라우저에서 직접 다양한 유형의 스파크라인을 쉽게 생성할 수 있습니다.
플러그인에는 jQuery 이외의 종속성이 없으며 모든 최신 브라우저에서 작동합니다.
이제 Real Time Web Application 용 Spring MVC 아키텍처에서 이 라이브러리를 사용해보자. 여기에서 수행할 작업의 빠른 흐름은 다음과 같습니다.
- Spring MVC에서 내 컨트롤러는 3초마다 데이터를 가져와 .jsp 파일(View)로 보냅니다.
- (.jsp) 파일 보기, AJAX 호출을 통해 3초마다 JSONArray 데이터 가져오기
- AJAX 호출은 데이터를 consumerJSONData(jsonArray) 함수로 보냅니다.
- consumerJSONData는 3초마다 Sparkline을 업데이트합니다.
코딩을 시작해 보겠습니다.
1 단계
Pre-Requisite: https://crunchify.com/hello-world-example-spring-mvc-3-2-1/ (이 프로젝트를 Tomcat에 성공적으로 배포)
아래에 추가 json.jar Maven 종속성이 필요합니다. pom.xml 파일을 열고 아래 종속성을 추가하십시오.
|
1 2 3 4 5 |
< dependency > < groupId > org . json < / groupId > < artifactId > json < / artifactId > < version > 20150729 < / version > < / dependency > |
2 단계
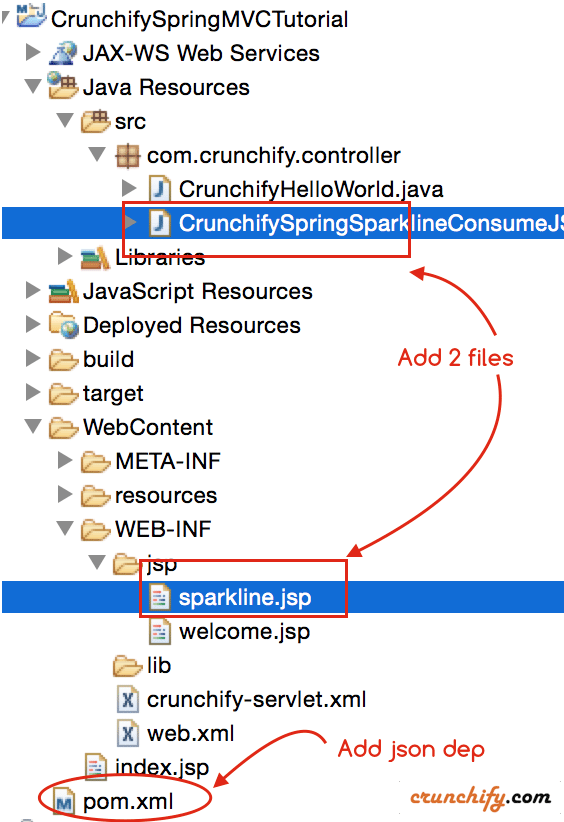
com.crunchify.controller 패키지 아래에 CrunchifySpringSparklineConsumeJSONArray .java 파일을 생성합니다.
|
1 2 3 4 5 6 7 8 9 10 11 12 13 14 15 16 17 18 19 20 21 22 23 24 25 26 27 28 29 30 31 32 33 34 35 36 37 38 39 40 41 42 43 44 45 46 47 48 49 50 51 52 53 54 55 |
package com . crunchify . controller ; import java . util . Random ; import org . json . JSONArray ; import org . json . JSONException ; import org . json . JSONObject ; import org . springframework . stereotype . Controller ; import org . springframework . web . bind . annotation . RequestMapping ; import org . springframework . web . bind . annotation . RequestMethod ; import org . springframework . web . bind . annotation . ResponseBody ; import org . springframework . web . servlet . ModelAndView ; /** * @author Crunchify.com * */ @Controller public class CrunchifySpringSparklineConsumeJSONArray { @RequestMapping ( "/sparkline" ) public ModelAndView crunchifySparklineTest ( ) { return new ModelAndView ( "sparkline" , "message" , "Sparkline.js Example which accepts JSONArray value every 3 seconds & updates graphs.." ) ; } @RequestMapping ( value = "/sparklinetest" , method = RequestMethod . GET ) public @ResponseBody String constructJSONArray ( ) throws JSONException { JSONObject one = new JSONObject ( ) ; JSONObject two = new JSONObject ( ) ; JSONObject three = new JSONObject ( ) ; JSONArray result = new JSONArray ( ) ; Random r = new Random ( ) ; int [ ] r1 = { r . nextInt ( 100 ) , r . nextInt ( 100 ) , r . nextInt ( 100 ) , r . nextInt ( 100 ) , r . nextInt ( 100 ) , r . nextInt ( 100 ) , r . nextInt ( 100 ) , r . nextInt ( 100 ) } ; int [ ] r2 = { r . nextInt ( 100 ) , r . nextInt ( 100 ) , r . nextInt ( 100 ) , r . nextInt ( 100 ) , r . nextInt ( 100 ) , r . nextInt ( 100 ) , r . nextInt ( 100 ) , r . nextInt ( 100 ) } ; int [ ] r3 = { r . nextInt ( 100 ) , r . nextInt ( 100 ) , r . nextInt ( 100 ) , r . nextInt ( 100 ) , r . nextInt ( 100 ) , r . nextInt ( 100 ) , r . nextInt ( 100 ) , r . nextInt ( 100 ) } ; one . put ( "one" , r1 ) ; two . put ( "two" , r2 ) ; three . put ( "three" , r3 ) ; result . put ( one ) ; result . put ( two ) ; result . put ( three ) ; JSONObject jsonObj = new JSONObject ( ) ; jsonObj . put ( "sparkData" , result ) ; System . out . println ( "Sendig this data to view (sparkline.jsp): " + jsonObj . toString ( ) ) ; return jsonObj . toString ( ) ; } } |
3단계
/WebContent/WEB-INF/jsp 폴더 아래에 sparkline.jsp 파일을 생성합니다.
|
1 2 3 4 5 6 7 8 9 10 11 12 13 14 15 16 17 18 19 20 21 22 23 24 25 26 27 28 29 30 31 32 33 34 35 36 37 38 39 40 41 42 43 44 45 46 47 48 49 50 51 52 53 54 55 56 57 58 59 60 61 62 63 64 65 66 67 68 69 70 71 72 73 74 75 76 77 78 79 80 81 82 83 84 85 86 87 |
< html > < head > < TITLE > Crunchify - Sparkline . js Example which accepts JSONArray value every 3 seconds < / TITLE > <style type ="text/css"> body { background-image : url ( 'https://cdn.crunchify.com/wp-content/uploads/2013/03/Crunchify.bg_.300.png' ) ; } </style> <script type = "text/javascript" src = "http://code.jquery.com/jquery-1.10.1.min.js" > </script> <script src = "https://cdn.crunchify.com/wp-content/uploads/code/jquery.sparkline.js" > </script> <script type = "text/javascript" > function crunchifySparkline ( ) { $ . ajax ( { url : 'sparklinetest.html' , dataType : "json" , cache : false , contentType : 'application/json; charset=utf-8' , type : 'GET' , success : function ( result ) { var one = result . sparkData ; //alert(one); consumeJSONData ( one ) ; } } ) ; } function consumeJSONData ( sparkData ) { console . log ( sparkData ) ; for ( var i = 0 ; i < sparkData . length ; i ++ ) { var obj = sparkData [ i ] ; var crunchifyName ; var crunchifyValue ; for ( var key in obj ) { crunchifyName = key ; crunchifyValue = obj [ key ] . toString ( ) ; crunchifyValue = crunchifyValue . substr ( 1 ) ; crunchifyValue = crunchifyValue . substring ( 0 , crunchifyValue . length - 1 ) ; var n = crunchifyValue . split ( "," ) ; console . log ( n ) ; $ ( "#" + crunchifyName ) . sparkline ( n , { type : 'line' , width : '80' , fillColor : '#eeeeee' } ) ; } } } </script> <script type = "text/javascript" > var intervalId = 0 ; intervalId = setInterval ( crunchifySparkline , 3000 ) ; </script> < / head > < body > < div align = "center" > < br > < br > $ { message } < br > < br > < div id = "result" > < / div > < br > < br > Sparkline One : < span id = "one" > . < / span > < br > < br > Sparkline Two : < span id = "two" > . < / span > < br > < br > Sparkline Three : < span id = "three" > . < / span > < br > < br > < br > < br > < div style = "font-family: verdana; line-height: 25px; padding: 5px 10px; border-radius: 10px; border: 3px solid #EE872A; width: 50%; font-size: 12px;" > Sparkline . js Example which accepts JSONArray value every 3 seconds by < a href = 'https://crunchify.com' > Crunchify < / a > . Click < a href = 'https://crunchify.com/category/java-tutorials/' > here < / a > for all Java , Spring MVC , Web Development examples . < br > < / div > < / div > < / body > < / html > |
다른 사람은 다음을 읽어야 합니다.

- 간단한 Java 열거형 예제
- Java MailAPI 예제 – Gmail SMTP를 통해 이메일 보내기
- Java에서 데몬 스레드란 무엇입니까? 첨부된 예
4단계
이 디렉토리 구조를 확인하십시오.
5단계
CrunchifySpringMVCTutorial 프로젝트를 Apache Tomcat 서버에 다시 배포합니다.
- Eclipse에서
Server탭으로 이동 -
Clean... -
Publish를 클릭하십시오 - 다시 시작을 클릭
Restart
6단계
웹 브라우저를 열고 다음 URL을 방문하여 결과를 확인하십시오. http://localhost:8080/CrunchifySpringMVCTutorial/sparkline.html
결과를 확인하고 전체 흐름을 확인하는 방법은 무엇입니까?
1 단계
결과를 조심하세요. 이 페이지 상단에 표시되는 것과 동일해야 합니다.
2 단계
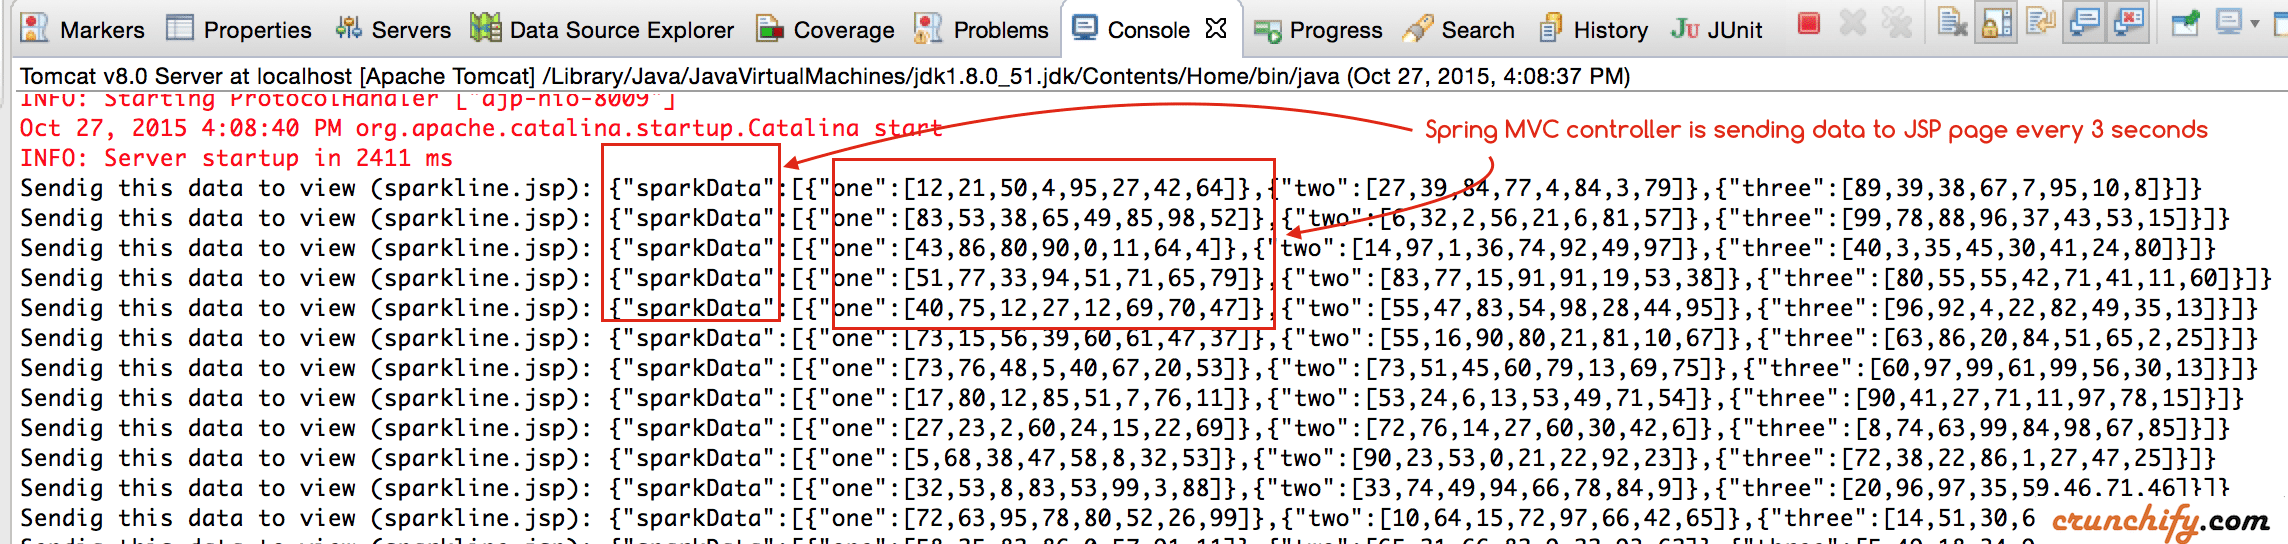
Eclipse 콘솔 출력을 확인하십시오. 3초마다 데이터가 포함된 콘솔 로그가 표시됩니다. 즉, Spring MVC 컨트롤러는 3초마다 JSP 페이지에 데이터를 보냅니다.
3단계
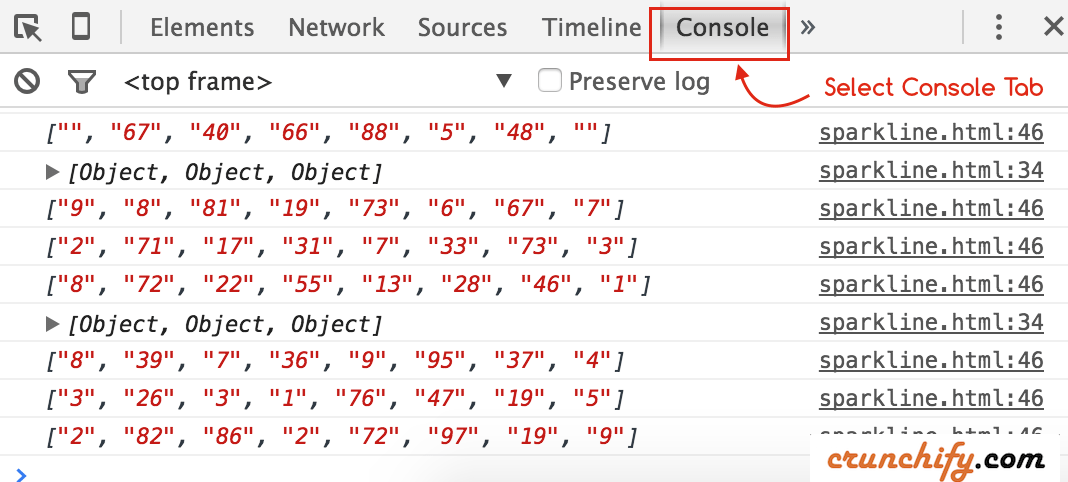
라이브 데이터를 보려면 브라우저 콘솔을 확인하세요.
- 페이지를 마우스 오른쪽 버튼으로 클릭하여
Inspect Element를 선택합니다. -
console탭 선택