
จะอัปโหลดหลายไฟล์ไปยังตำแหน่งเฉพาะโดยใช้ Spring MVC ได้อย่างไร จบการสอนด้วยโค้ด Java
เผยแพร่แล้ว: 2013-06-22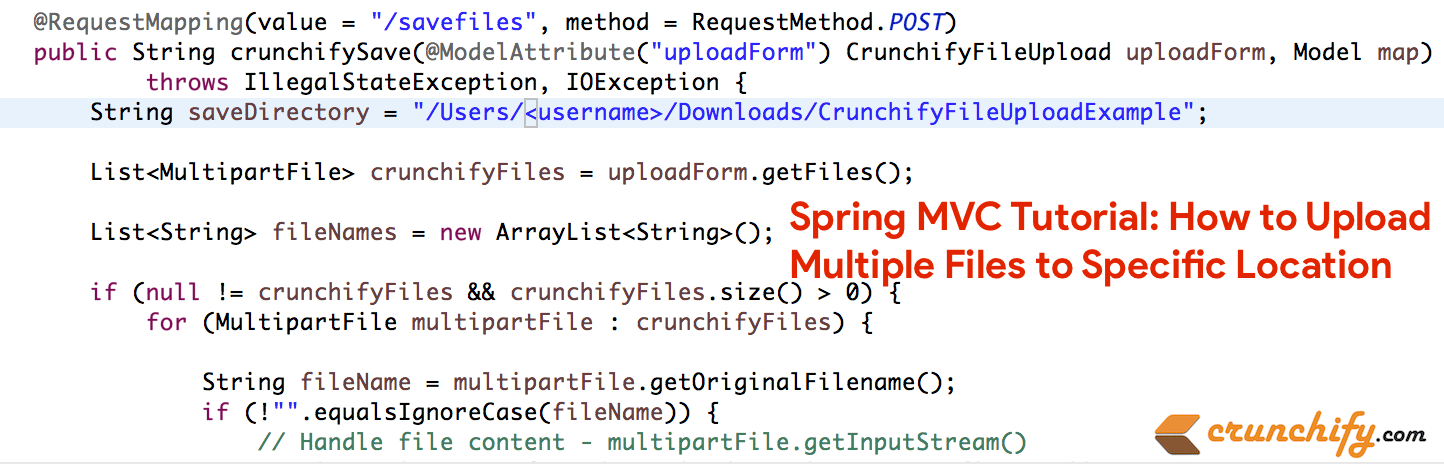
นี่เป็นอีกหนึ่งบทช่วยสอน Spring MVC ที่สมบูรณ์ซึ่งยอมรับไฟล์ใน แบบฟอร์มอัปโหลด และคัดลอกไปยังโฟลเดอร์เฉพาะในเหตุการณ์ "ส่ง" ตามปกติแล้ว เรามีการ dependency ตัวอย่าง MVC ของ Hello World Spring
ดังนั้น นี่คือส่วนเพิ่มเติม/การเปลี่ยนแปลงที่เราต้องทำในตัวอย่างนี้:
- ไฟล์ใหม่: CrunchifyFileUploadController.java
- ไฟล์ใหม่: CrunchifyFileUpload.java
- ไฟล์ใหม่: uploadfile.jsp
- ไฟล์ใหม่: uploadfilesuccess.jsp
- ไฟล์ที่ถูกแก้ไข: crunchify-servlet.xml
- ไฟล์ jar ใหม่ 2 ไฟล์:
commons-io-2.4.jarและcommons-fileupload-1.3.jar
มีคำถามด้านล่างหรือไม่? ถ้าอย่างนั้นคุณก็มาถูกที่แล้ว
- ตัวอย่างการอัปโหลดไฟล์ Java หลายไฟล์
- อัปโหลดหลายไฟล์หรือหลายโฟลเดอร์
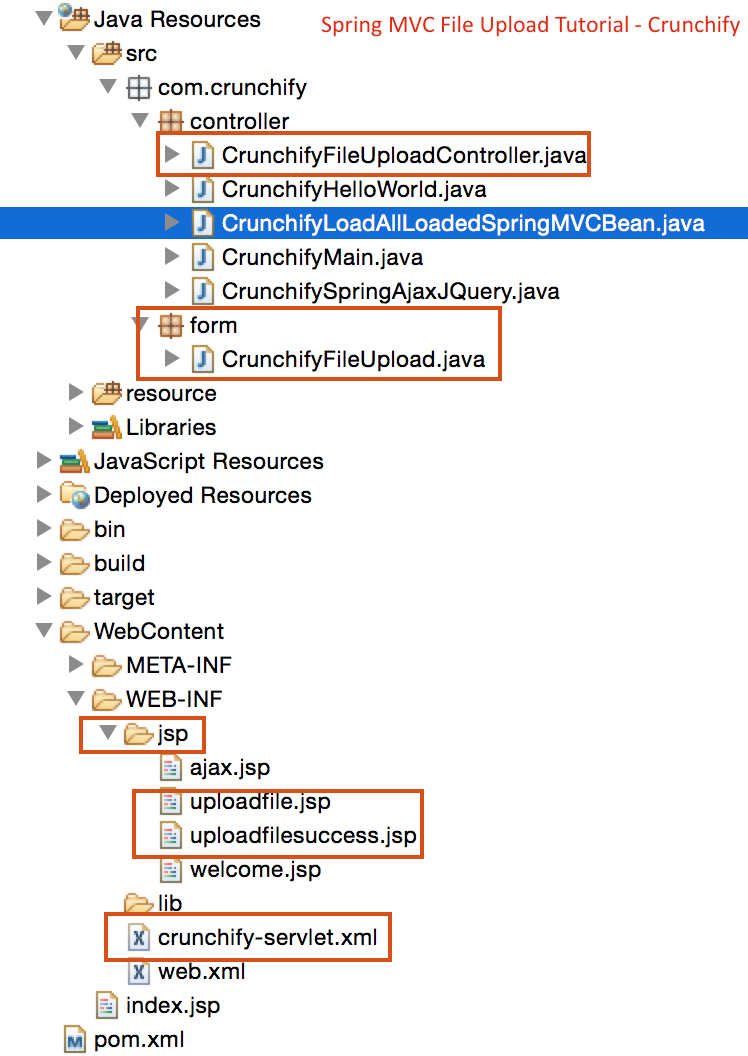
นี่คือโครงสร้างโปรเจ็กต์ขั้นสุดท้าย คุณจะได้ทราบแนวคิดเกี่ยวกับตำแหน่งที่จะเพิ่มไฟล์
มาเริ่มกันเลย:
ขั้นตอนที่ 1)) ข้อกำหนดเบื้องต้น:
https://crunchify.com/hello-world-example-spring-mvc-3-2-1/ (ทำให้โครงการนี้ใช้งานได้สำเร็จบน Tomcat)
การพึ่งพา Maven:
เพิ่มการพึ่งพาใหม่ด้านล่างให้กับไฟล์ pom.xml ของโปรเจ็กต์ของคุณ
|
1 2 3 4 5 6 7 8 9 10 |
< dependency > < groupId > commons - fileupload < / groupId > < artifactId > commons - fileupload < / artifactId > < version > 1.2 < / version > < / dependency > < dependency > < groupId > commons - io < / groupId > < artifactId > commons - io < / artifactId > < version > 1.4 < / version > < / dependency > |
ขั้นตอนที่ 2) SpringController
สร้างตัวควบคุมที่ใช้ Spring 3 MVC ซึ่งจัดการการอัปโหลดไฟล์ มีสองวิธีในตัวควบคุมนี้:
-
crunchifyDisplayForm– เพียงแค่ส่งต่อคำขอไปยัง pageuploadfile.jsp -
crunchifySave– ดึงแบบฟอร์มโดยใช้คำอธิบายประกอบ@ModelAttributeและรับเนื้อหาไฟล์จากมัน จะสร้างรายการชื่อไฟล์ของไฟล์ที่กำลังอัปโหลดและส่งรายการนี้ไปยังหน้าความสำเร็จ
|
1 2 3 4 5 6 7 8 9 10 11 12 13 14 15 16 17 18 19 20 21 22 23 24 25 26 27 28 29 30 31 32 33 34 35 36 37 38 39 40 41 42 43 44 45 46 47 48 49 50 51 |
package com . crunchify . controller ; import com . crunchify . form . CrunchifyFileUpload ; import java . io . File ; import java . io . IOException ; import java . util . ArrayList ; import java . util . List ; import org . springframework . stereotype . Controller ; import org . springframework . ui . Model ; import org . springframework . web . bind . annotation . ModelAttribute ; import org . springframework . web . bind . annotation . RequestMapping ; import org . springframework . web . bind . annotation . RequestMethod ; import org . springframework . web . multipart . MultipartFile ; @Controller public class CrunchifyFileUploadController { @RequestMapping ( value = "/upload" , method = RequestMethod . GET ) public String crunchifyDisplayForm ( ) { return "uploadfile" ; } @RequestMapping ( value = "/savefiles" , method = RequestMethod . POST ) public String crunchifySave ( @ModelAttribute ( "uploadForm" ) CrunchifyFileUpload uploadForm , Model map ) throws IllegalStateException , IOException { String saveDirectory = "c:/crunchify/" ; List <MultipartFile> crunchifyFiles = uploadForm . getFiles ( ) ; List <String> fileNames = new ArrayList <String> ( ) ; if ( null ! = crunchifyFiles && crunchifyFiles.size() > 0) { for (MultipartFile multipartFile : crunchifyFiles) { String fileName = multipartFile.getOriginalFilename(); if ( ! "" . equalsIgnoreCase ( fileName ) ) { // Handle file content - multipartFile.getInputStream() multipartFile . transferTo ( new File ( saveDirectory + fileName ) ) ; fileNames . add ( fileName ) ; } } } map . addAttribute ( "files" , fileNames ) ; return "uploadfilesuccess" ; } } |
ขั้นตอนที่ 3) โมเดล – วัตถุแบบฟอร์ม
สร้าง Java bean ซึ่งทำหน้าที่เป็นวัตถุ Model/Form สำหรับแอปพลิเคชัน Spring ของเรา bean นี้มี List ของอ็อบเจ็กต์ org.springframework.web.multipart.MultipartFile เฟรมเวิร์ก Spring จัดเตรียมคลาส MultipartFile ที่มีประโยชน์ซึ่งสามารถใช้เพื่อดึงเนื้อหาไฟล์ของไฟล์ที่อัพโหลด นอกเหนือจากเนื้อหาแล้ว วัตถุ MultipartFile ยังให้ข้อมูลที่เป็นประโยชน์อื่นๆ แก่คุณ เช่น ชื่อไฟล์ ขนาดไฟล์ เป็นต้น
|
1 2 3 4 5 6 7 8 9 10 11 12 13 14 15 16 17 |
package com . crunchify . form ; import java . util . List ; import org . springframework . web . multipart . MultipartFile ; public class CrunchifyFileUpload { private List <MultipartFile> crunchifyFiles ; public List <MultipartFile> getFiles ( ) { return crunchifyFiles ; } public void setFiles ( List <MultipartFile> files ) { this . crunchifyFiles = files ; } } |
ขั้นตอนที่ 4) JSP Views
ตอนนี้สร้างหน้าดูสำหรับแอปพลิเคชันนี้ เราจำเป็นต้องมี JSP สองตัว ตัวหนึ่งสำหรับแสดงแบบฟอร์มการอัพโหลดไฟล์ และอีกตัวสำหรับแสดงผลการอัพโหลดที่สำเร็จ
uploadfile.jsp แสดงแบบฟอร์มพร้อมไฟล์อินพุต นอกจากนี้ เราได้เพิ่มข้อมูลโค้ด jquery ขนาดเล็กเมื่อคลิกปุ่มเพิ่ม สิ่งนี้จะเพิ่มองค์ประกอบอินพุตไฟล์ใหม่ที่ส่วนท้ายของแบบฟอร์ม ซึ่งช่วยให้ผู้ใช้สามารถอัปโหลดไฟล์ได้มากเท่าที่ต้องการ
โปรดทราบว่าเราได้ตั้งค่าแอตทริบิวต์ enctype=”multipart/form-data” ของแท็ก <form>
|
1 2 3 4 5 6 7 8 9 10 11 12 13 14 15 16 17 18 19 20 21 22 23 24 25 26 27 28 29 30 31 32 33 34 35 36 37 38 39 40 41 42 43 44 45 46 47 48 49 50 51 52 53 54 55 56 57 58 59 60 61 |
<% @ taglib uri = "http://www.springframework.org/tags/form" prefix = "form" %> < html > < head > < title > Crunchify - Spring MVC Upload Multiple Files Example < / title > <script src = "http://ajax.googleapis.com/ajax/libs/jquery/1.8.2/jquery.min.js" > </script> <script> $ ( document ) . ready ( function ( ) { //add more file components if Add is clicked $ ( '#addFile' ) . click ( function ( ) { var fileIndex = $ ( '#fileTable tr' ) . children ( ) . length - 1 ; $ ( '#fileTable' ) . append ( '<tr><td>' + ' <input type="file" name="files[' + fileIndex + ']" />' + '</td></tr>' ) ; } ) ; } ) ; </script> <style type ="text/css"> body { background-image : url ( 'https://cdn.crunchify.com/wp-content/uploads/2013/03/Crunchify.bg_.300.png' ) ; } </style> < / head > < body > < br > < br > < div align = "center" > < h1 > Crunchify - Spring MVC Upload Multiple Files Example < / h1 > < form : form method = "post" action = "savefiles.html" modelAttribute = "uploadForm" enctype = "multipart/form-data" > < p > Select files to upload . Press Add button to add more file inputs . < / p > < table id = "fileTable" > < tr > < td > < input name = "files[0]" type = "file" / > < / td > < / tr > < tr > < td > < input name = "files[1]" type = "file" / > < / td > < / tr > < / table > < br / > < input type = "submit" value = "Upload" / > < input id = "addFile" type = "button" value = "Add File" / > < / form : form > < br / > < / div > < / body > < / html > |

|
1 2 3 4 5 6 7 8 9 10 11 12 13 14 15 16 17 18 19 20 21 22 23 24 25 26 27 28 29 30 31 32 33 34 35 36 37 38 |
<% @ taglib uri = "http://java.sun.com/jsp/jstl/core" prefix = "c" %> < html > < head > < title > Crunchify - Upload Multiple Files Example < / title > <style type ="text/css"> body { background-image : url ( 'https://cdn.crunchify.com/wp-content/uploads/2013/03/Crunchify.bg_.300.png' ) ; } </style> < / head > < body > < br > < br > < div align = "center" > < h1 > Crunchify - Spring MVC Upload Multiple Files Example < / h1 > < p > Awesome . . Following files are uploaded successfully . < / p > < ol > < c : forEach items = "${files}" var = "file" > - $ { file } < br > < / c : forEach > < / ol > < a href = "http://localhost:8080/CrunchifySpringMVC3.2.1/upload.html" > < input type = "button" value = "Go Back" / > < / a > < br / > < br / > < br / > < div style = "font-family: verdana; line-height: 25px; padding: 5px 10px; border-radius: 10px; border: 1px dotted #A4A4A4; width: 50%; font-size: 12px;" > Spring MVC Upload Multiple Files Example by < a href = 'https://crunchify.com' > Crunchify < / a > . Click < a href = 'https://crunchify.com/category/java-tutorials/' > here < / a > for all Java , Spring MVC , Web Development examples . < br > < / div > < / div > < / body > < / html > |
ขั้นตอนที่-5) อัปเดตการกำหนดค่าสปริง
เพิ่ม bean ด้านล่างเพื่อ crunchify-servlet.xml ไฟล์ เหนือบรรทัด <bean class="org.springframework.web.servlet.view.UrlBasedViewResolver">
|
1 2 |
< bean id = "multipartResolver" class = "org.springframework.web.multipart.commons.CommonsMultipartResolver" / > |
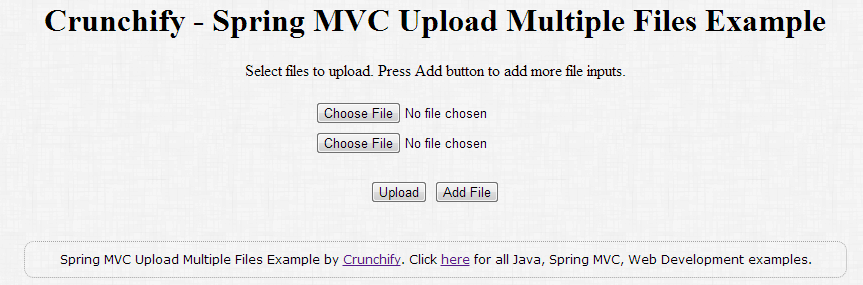
ขั้นตอนที่ 6) ผลการเช็คเอาต์
เริ่ม tomcat และชี้เบราว์เซอร์ของคุณไปที่ URL นี้: http://localhost:8080/CrunchifySpringMVC3.2.1/upload.html และคุณควรเห็นหน้าจอที่คล้ายกันนี้
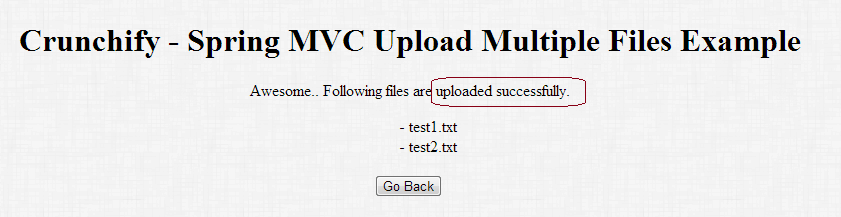
หลังจากอัพโหลดไฟล์แล้ว คุณจะเห็นข้อความแสดงความสำเร็จเช่นนี้ คุณสามารถตกแต่งไฟล์ .jsp ได้ตามที่คุณต้องการ
รายการตัวอย่าง Spring MVC ทั้งหมด ตัวอย่าง Java