
Bagaimana Mengunggah Banyak File ke Lokasi Tertentu menggunakan Spring MVC? Tutorial Lengkap dengan kode Java
Diterbitkan: 2013-06-22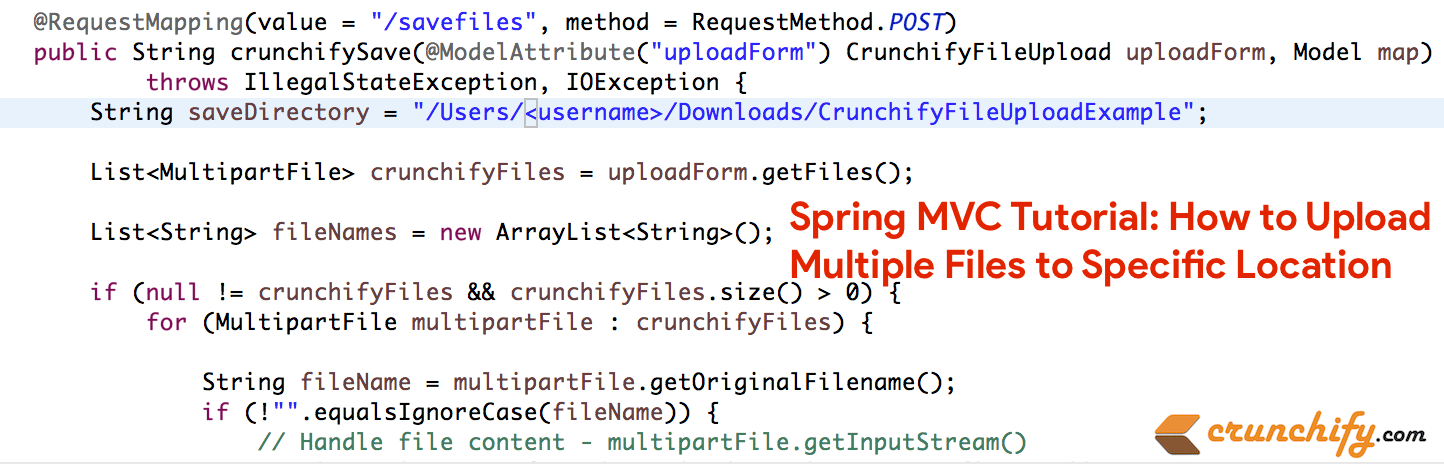
Ini adalah tutorial Spring MVC lengkap lainnya yang menerima file pada formulir Unggah dan menyalinnya ke folder tertentu pada acara "Kirim". Seperti biasa kita memiliki dependency pada Hello World Spring MVC Example.
Jadi, ini adalah penambahan/perubahan yang perlu kita lakukan dalam contoh ini:
- File baru: CrunchifyFileUploadController.java
- File baru: CrunchifyFileUpload.java
- File baru: uploadfile.jsp
- File baru: uploadfilesuccess.jsp
- File yang dimodifikasi: crunchify-servlet.xml
- 2 file jar baru:
commons-io-2.4.jardancommons-fileupload-1.3.jar
Punya pertanyaan di bawah ini? Maka Anda berada di tempat yang tepat.
- Contoh Unggah Beberapa File Java
- Unggah Banyak File atau Folder
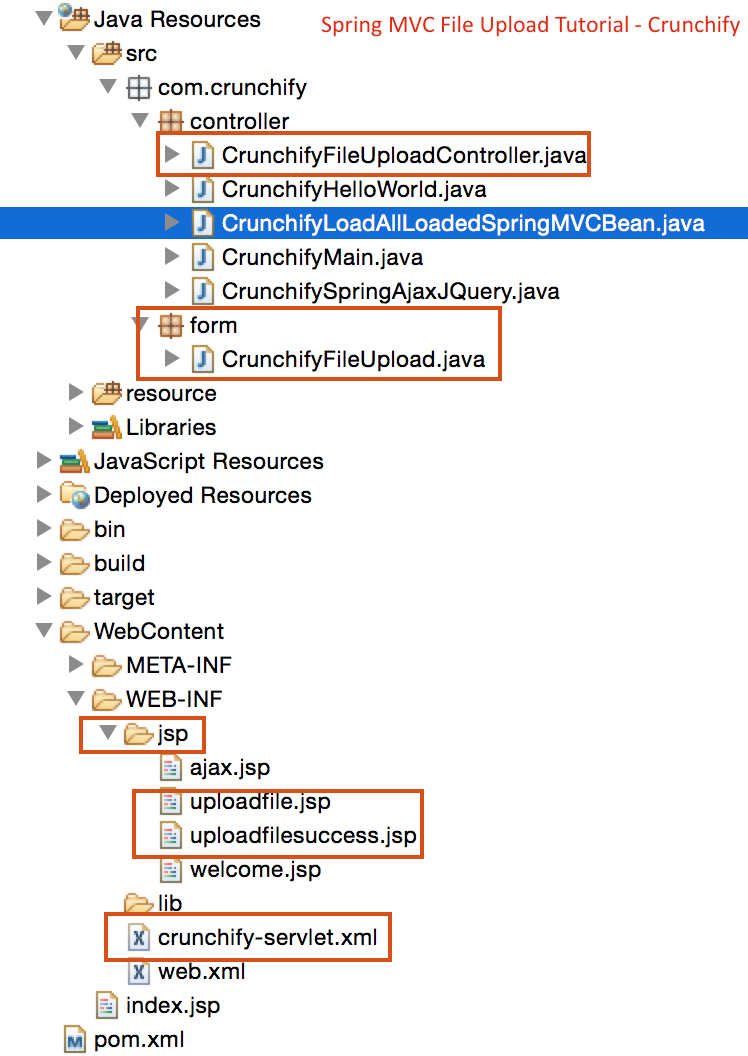
Berikut adalah struktur proyek akhir sehingga Anda akan mendapatkan beberapa ide di mana untuk menambahkan file.
Sekarang mari kita mulai:
Langkah-1) Prasyarat:
https://crunchify.com/hello-world-example-spring-mvc-3-2-1/ (Terapkan proyek ini dengan sukses di Tomcat)
Ketergantungan Maven:
Tambahkan dependensi baru di bawah ini ke file pom.xml proyek Anda.
|
1 2 3 4 5 6 7 8 9 10 |
< dependency > < groupId > commons - fileupload < / groupId > < artifactId > commons - fileupload < / artifactId > < version > 1.2 < / version > < / dependency > < dependency > < groupId > commons - io < / groupId > < artifactId > commons - io < / artifactId > < version > 1.4 < / version > < / dependency > |
Langkah-2) SpringController
Buat pengontrol berbasis Spring 3 MVC yang menangani unggahan file. Ada dua metode dalam pengontrol ini:
-
crunchifyDisplayForm– Ini hanya meneruskan permintaan ke pageuploadfile.jsp -
crunchifySave– Mengambil formulir menggunakan anotasi@ModelAttributedan mendapatkan konten File darinya. Itu membuat daftar nama file dari file yang diunggah dan meneruskan daftar ini ke halaman sukses.
|
1 2 3 4 5 6 7 8 9 10 11 12 13 14 15 16 17 18 19 20 21 22 23 24 25 26 27 28 29 30 31 32 33 34 35 36 37 38 39 40 41 42 43 44 45 46 47 48 49 50 51 |
package com . crunchify . controller ; import com . crunchify . form . CrunchifyFileUpload ; import java . io . File ; import java . io . IOException ; import java . util . ArrayList ; import java . util . List ; import org . springframework . stereotype . Controller ; import org . springframework . ui . Model ; import org . springframework . web . bind . annotation . ModelAttribute ; import org . springframework . web . bind . annotation . RequestMapping ; import org . springframework . web . bind . annotation . RequestMethod ; import org . springframework . web . multipart . MultipartFile ; @Controller public class CrunchifyFileUploadController { @RequestMapping ( value = "/upload" , method = RequestMethod . GET ) public String crunchifyDisplayForm ( ) { return "uploadfile" ; } @RequestMapping ( value = "/savefiles" , method = RequestMethod . POST ) public String crunchifySave ( @ModelAttribute ( "uploadForm" ) CrunchifyFileUpload uploadForm , Model map ) throws IllegalStateException , IOException { String saveDirectory = "c:/crunchify/" ; List <MultipartFile> crunchifyFiles = uploadForm . getFiles ( ) ; List <String> fileNames = new ArrayList <String> ( ) ; if ( null ! = crunchifyFiles && crunchifyFiles.size() > 0) { for (MultipartFile multipartFile : crunchifyFiles) { String fileName = multipartFile.getOriginalFilename(); if ( ! "" . equalsIgnoreCase ( fileName ) ) { // Handle file content - multipartFile.getInputStream() multipartFile . transferTo ( new File ( saveDirectory + fileName ) ) ; fileNames . add ( fileName ) ; } } } map . addAttribute ( "files" , fileNames ) ; return "uploadfilesuccess" ; } } |
Langkah-3) Model – Objek Bentuk
Buat kacang Java yang bertindak sebagai objek Model/Form untuk aplikasi Spring kami. Kacang ini berisi List objek org.springframework.web.multipart.MultipartFile . Kerangka kerja pegas menyediakan MultipartFile kelas yang berguna yang dapat digunakan untuk mengambil konten file dari file yang diunggah. Terlepas dari kontennya, objek MultipartFile juga memberi Anda informasi berguna lainnya seperti nama file, ukuran file, dll.
|
1 2 3 4 5 6 7 8 9 10 11 12 13 14 15 16 17 |
package com . crunchify . form ; import java . util . List ; import org . springframework . web . multipart . MultipartFile ; public class CrunchifyFileUpload { private List <MultipartFile> crunchifyFiles ; public List <MultipartFile> getFiles ( ) { return crunchifyFiles ; } public void setFiles ( List <MultipartFile> files ) { this . crunchifyFiles = files ; } } |
Langkah-4) Tampilan JSP
Sekarang buat halaman tampilan untuk aplikasi ini. Kami akan membutuhkan dua JSP, satu untuk menampilkan formulir unggah file dan satu lagi untuk menunjukkan hasil unggahan yang berhasil.
uploadfile.jsp menampilkan formulir dengan input file. Selain itu, kami telah menambahkan potongan jquery kecil saat mengklik tombol Tambah. Ini akan menambahkan komponen input file baru di akhir formulir. Ini memungkinkan pengguna untuk mengunggah file sebanyak yang mereka inginkan.
Perhatikan bahwa kita telah menyetel atribut enctype=”multipart/form-data” dari tag <form> kita.
|
1 2 3 4 5 6 7 8 9 10 11 12 13 14 15 16 17 18 19 20 21 22 23 24 25 26 27 28 29 30 31 32 33 34 35 36 37 38 39 40 41 42 43 44 45 46 47 48 49 50 51 52 53 54 55 56 57 58 59 60 61 |
<% @ taglib uri = "http://www.springframework.org/tags/form" prefix = "form" %> < html > < head > < title > Crunchify - Spring MVC Upload Multiple Files Example < / title > <script src = "http://ajax.googleapis.com/ajax/libs/jquery/1.8.2/jquery.min.js" > </script> <script> $ ( document ) . ready ( function ( ) { //add more file components if Add is clicked $ ( '#addFile' ) . click ( function ( ) { var fileIndex = $ ( '#fileTable tr' ) . children ( ) . length - 1 ; $ ( '#fileTable' ) . append ( '<tr><td>' + ' <input type="file" name="files[' + fileIndex + ']" />' + '</td></tr>' ) ; } ) ; } ) ; </script> <style type ="text/css"> body { background-image : url ( 'https://cdn.crunchify.com/wp-content/uploads/2013/03/Crunchify.bg_.300.png' ) ; } </style> < / head > < body > < br > < br > < div align = "center" > < h1 > Crunchify - Spring MVC Upload Multiple Files Example < / h1 > < form : form method = "post" action = "savefiles.html" modelAttribute = "uploadForm" enctype = "multipart/form-data" > < p > Select files to upload . Press Add button to add more file inputs . < / p > < table id = "fileTable" > < tr > < td > < input name = "files[0]" type = "file" / > < / td > < / tr > < tr > < td > < input name = "files[1]" type = "file" / > < / td > < / tr > < / table > < br / > < input type = "submit" value = "Upload" / > < input id = "addFile" type = "button" value = "Add File" / > < / form : form > < br / > < / div > < / body > < / html > |

|
1 2 3 4 5 6 7 8 9 10 11 12 13 14 15 16 17 18 19 20 21 22 23 24 25 26 27 28 29 30 31 32 33 34 35 36 37 38 |
<% @ taglib uri = "http://java.sun.com/jsp/jstl/core" prefix = "c" %> < html > < head > < title > Crunchify - Upload Multiple Files Example < / title > <style type ="text/css"> body { background-image : url ( 'https://cdn.crunchify.com/wp-content/uploads/2013/03/Crunchify.bg_.300.png' ) ; } </style> < / head > < body > < br > < br > < div align = "center" > < h1 > Crunchify - Spring MVC Upload Multiple Files Example < / h1 > < p > Awesome . . Following files are uploaded successfully . < / p > < ol > < c : forEach items = "${files}" var = "file" > - $ { file } < br > < / c : forEach > < / ol > < a href = "http://localhost:8080/CrunchifySpringMVC3.2.1/upload.html" > < input type = "button" value = "Go Back" / > < / a > < br / > < br / > < br / > < div style = "font-family: verdana; line-height: 25px; padding: 5px 10px; border-radius: 10px; border: 1px dotted #A4A4A4; width: 50%; font-size: 12px;" > Spring MVC Upload Multiple Files Example by < a href = 'https://crunchify.com' > Crunchify < / a > . Click < a href = 'https://crunchify.com/category/java-tutorials/' > here < / a > for all Java , Spring MVC , Web Development examples . < br > < / div > < / div > < / body > < / html > |
Langkah-5) Perbarui Konfigurasi Pegas
Tambahkan bean di bawah ini ke file crunchify-servlet.xml , tepat di atas baris <bean class="org.springframework.web.servlet.view.UrlBasedViewResolver"> .
|
1 2 |
< bean id = "multipartResolver" class = "org.springframework.web.multipart.commons.CommonsMultipartResolver" / > |
Langkah-6) Hasil Checkout
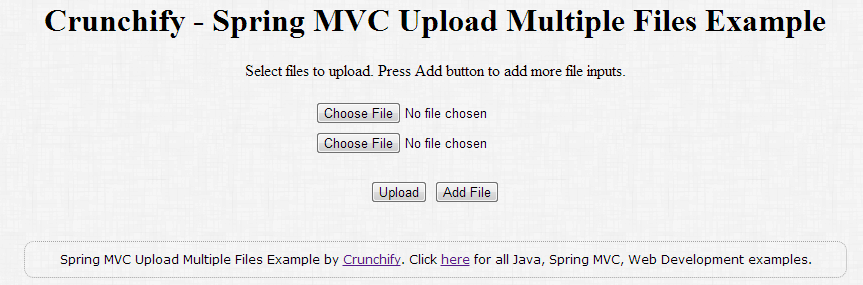
Mulai Tomcat dan arahkan browser Anda ke URL ini: http://localhost:8080/CrunchifySpringMVC3.2.1/upload.html dan Anda akan melihat layar yang mirip dengan ini.
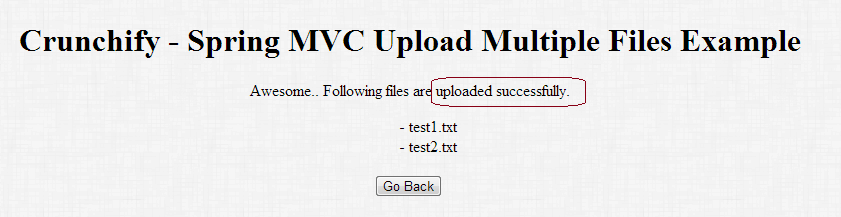
Setelah file diupload Anda akan melihat pesan sukses seperti ini. Anda selalu dapat mempercantik file .jsp Anda seperti yang Anda inginkan.
Daftar semua Contoh Spring MVC, Contoh Java.