
如何使用 Spring MVC 将多个文件上传到特定位置? 使用 Java 代码完成教程
已发表: 2013-06-22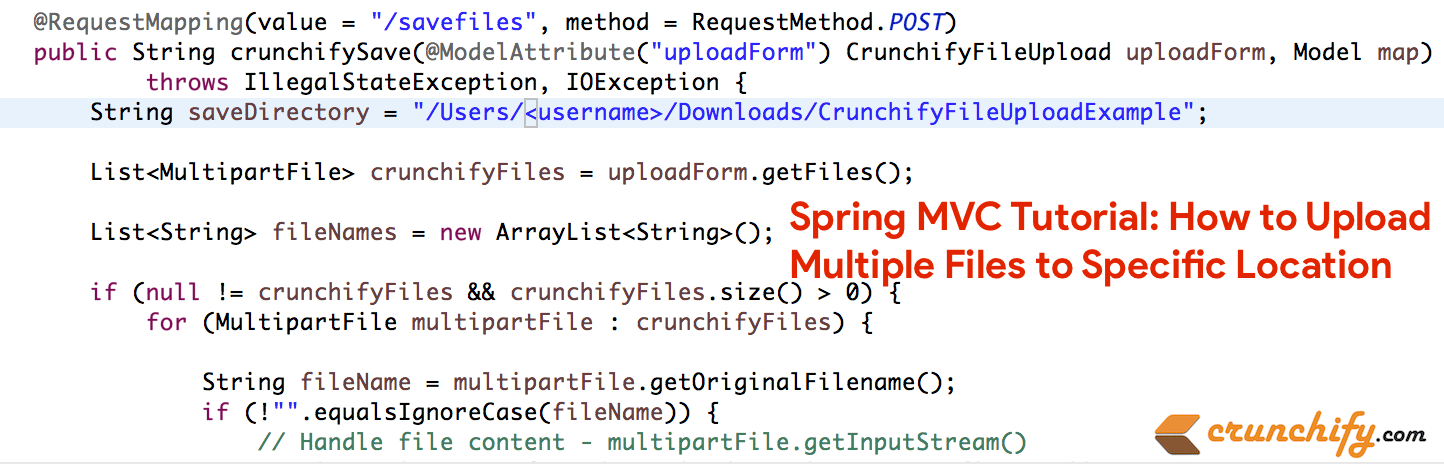
这是另一个完整的 Spring MVC 教程,它接受上传表单上的文件并在“提交”事件时将其复制到特定文件夹。 像往常一样,我们dependency于 Hello World Spring MVC Example。
因此,这些是我们需要在此示例中执行的添加/更改:
- 新文件:CrunchifyFileUploadController.java
- 新文件:CrunchifyFileUpload.java
- 新文件:uploadfile.jsp
- 新文件:uploadfilesuccess.jsp
- 修改文件:crunchify-servlet.xml
- 2 个新的 jar 文件:
commons-io-2.4.jar和commons-fileupload-1.3.jar
有以下任何问题吗? 那么你来对地方了。
- Java 多文件上传示例
- 上传多个文件或文件夹
这是最终的项目结构,因此您将对添加文件的位置有所了解。
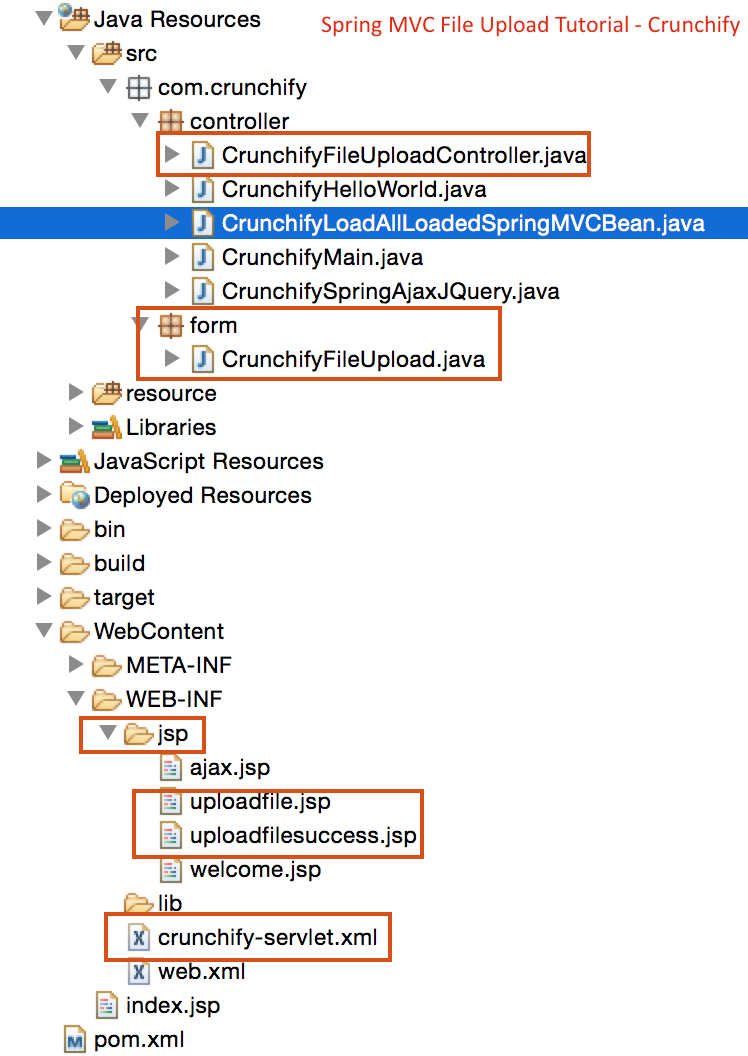
现在让我们开始吧:
步骤 1) 先决条件:
https://crunchify.com/hello-world-example-spring-mvc-3-2-1/(在Tomcat上部署这个项目成功)
Maven依赖:
将以下新依赖项添加到项目的pom.xml文件中。
|
1 2 3 4 5 6 7 8 9 10 |
< dependency > < groupId > commons - fileupload < / groupId > < artifactId > commons - fileupload < / artifactId > < version > 1.2 < / version > < / dependency > < dependency > < groupId > commons - io < / groupId > < artifactId > commons - io < / artifactId > < version > 1.4 < / version > < / dependency > |
Step-2) SpringController
创建一个基于 Spring 3 MVC 的控制器来处理文件上传。 这个控制器有两种方法:
-
crunchifyDisplayForm– 它只是将请求转发到 pageuploadfile.jsp -
crunchifySave– 使用@ModelAttribute注释获取表单并从中获取文件内容。 它创建正在上传的文件的文件名列表,并将此列表传递给成功页面。
|
1 2 3 4 5 6 7 8 9 10 11 12 13 14 15 16 17 18 19 20 21 22 23 24 25 26 27 28 29 30 31 32 33 34 35 36 37 38 39 40 41 42 43 44 45 46 47 48 49 50 51 |
package com . crunchify . controller ; import com . crunchify . form . CrunchifyFileUpload ; import java . io . File ; import java . io . IOException ; import java . util . ArrayList ; import java . util . List ; import org . springframework . stereotype . Controller ; import org . springframework . ui . Model ; import org . springframework . web . bind . annotation . ModelAttribute ; import org . springframework . web . bind . annotation . RequestMapping ; import org . springframework . web . bind . annotation . RequestMethod ; import org . springframework . web . multipart . MultipartFile ; @Controller public class CrunchifyFileUploadController { @RequestMapping ( value = "/upload" , method = RequestMethod . GET ) public String crunchifyDisplayForm ( ) { return "uploadfile" ; } @RequestMapping ( value = "/savefiles" , method = RequestMethod . POST ) public String crunchifySave ( @ModelAttribute ( "uploadForm" ) CrunchifyFileUpload uploadForm , Model map ) throws IllegalStateException , IOException { String saveDirectory = "c:/crunchify/" ; List <MultipartFile> crunchifyFiles = uploadForm . getFiles ( ) ; List <String> fileNames = new ArrayList <String> ( ) ; if ( null ! = crunchifyFiles && crunchifyFiles.size() > 0) { for (MultipartFile multipartFile : crunchifyFiles) { String fileName = multipartFile.getOriginalFilename(); if ( ! "" . equalsIgnoreCase ( fileName ) ) { // Handle file content - multipartFile.getInputStream() multipartFile . transferTo ( new File ( saveDirectory + fileName ) ) ; fileNames . add ( fileName ) ; } } } map . addAttribute ( "files" , fileNames ) ; return "uploadfilesuccess" ; } } |
Step-3) 模型——表单对象
创建一个 Java bean,它充当我们 Spring 应用程序的模型/表单对象。 这个 bean 包含一个org.springframework.web.multipart.MultipartFile对象的List 。 Spring 框架提供了一个有用的 MultipartFile 类,可用于获取上传文件的文件内容。 除了其内容,MultipartFile 对象还为您提供其他有用的信息,例如文件名、文件大小等。
|
1 2 3 4 5 6 7 8 9 10 11 12 13 14 15 16 17 |
package com . crunchify . form ; import java . util . List ; import org . springframework . web . multipart . MultipartFile ; public class CrunchifyFileUpload { private List <MultipartFile> crunchifyFiles ; public List <MultipartFile> getFiles ( ) { return crunchifyFiles ; } public void setFiles ( List <MultipartFile> files ) { this . crunchifyFiles = files ; } } |
步骤 4) JSP 视图
现在为这个应用程序创建视图页面。 我们将需要两个 JSP,一个用于显示文件上传表单,另一个用于显示成功上传的结果。
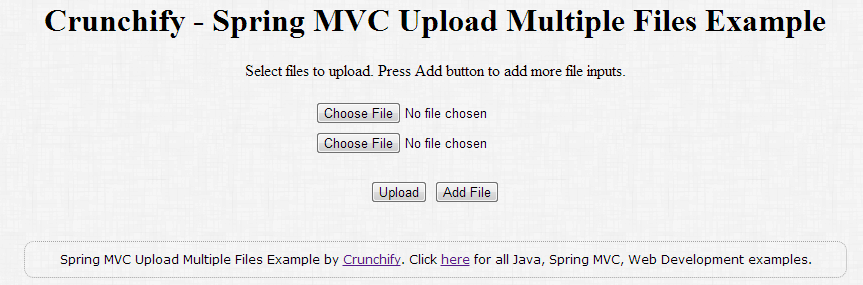
uploadfile.jsp显示带有文件输入的表单。 除此之外,我们还添加了单击添加按钮的小 jquery 片段。 这将在表单末尾添加一个新的文件输入组件。 这允许用户上传任意数量的文件。
请注意,我们设置了<form>标签的enctype=”multipart/form-data”属性。
|
1 2 3 4 5 6 7 8 9 10 11 12 13 14 15 16 17 18 19 20 21 22 23 24 25 26 27 28 29 30 31 32 33 34 35 36 37 38 39 40 41 42 43 44 45 46 47 48 49 50 51 52 53 54 55 56 57 58 59 60 61 |
<% @ taglib uri = "http://www.springframework.org/tags/form" prefix = "form" %> < html > < head > < title > Crunchify - Spring MVC Upload Multiple Files Example < / title > <script src = "http://ajax.googleapis.com/ajax/libs/jquery/1.8.2/jquery.min.js" > </script> <script> $ ( document ) . ready ( function ( ) { //add more file components if Add is clicked $ ( '#addFile' ) . click ( function ( ) { var fileIndex = $ ( '#fileTable tr' ) . children ( ) . length - 1 ; $ ( '#fileTable' ) . append ( '<tr><td>' + ' <input type="file" name="files[' + fileIndex + ']" />' + '</td></tr>' ) ; } ) ; } ) ; </script> <style type ="text/css"> body { background-image : url ( 'https://cdn.crunchify.com/wp-content/uploads/2013/03/Crunchify.bg_.300.png' ) ; } </style> < / head > < body > < br > < br > < div align = "center" > < h1 > Crunchify - Spring MVC Upload Multiple Files Example < / h1 > < form : form method = "post" action = "savefiles.html" modelAttribute = "uploadForm" enctype = "multipart/form-data" > < p > Select files to upload . Press Add button to add more file inputs . < / p > < table id = "fileTable" > < tr > < td > < input name = "files[0]" type = "file" / > < / td > < / tr > < tr > < td > < input name = "files[1]" type = "file" / > < / td > < / tr > < / table > < br / > < input type = "submit" value = "Upload" / > < input id = "addFile" type = "button" value = "Add File" / > < / form : form > < br / > < / div > < / body > < / html > |

|
1 2 3 4 5 6 7 8 9 10 11 12 13 14 15 16 17 18 19 20 21 22 23 24 25 26 27 28 29 30 31 32 33 34 35 36 37 38 |
<% @ taglib uri = "http://java.sun.com/jsp/jstl/core" prefix = "c" %> < html > < head > < title > Crunchify - Upload Multiple Files Example < / title > <style type ="text/css"> body { background-image : url ( 'https://cdn.crunchify.com/wp-content/uploads/2013/03/Crunchify.bg_.300.png' ) ; } </style> < / head > < body > < br > < br > < div align = "center" > < h1 > Crunchify - Spring MVC Upload Multiple Files Example < / h1 > < p > Awesome . . Following files are uploaded successfully . < / p > < ol > < c : forEach items = "${files}" var = "file" > - $ { file } < br > < / c : forEach > < / ol > < a href = "http://localhost:8080/CrunchifySpringMVC3.2.1/upload.html" > < input type = "button" value = "Go Back" / > < / a > < br / > < br / > < br / > < div style = "font-family: verdana; line-height: 25px; padding: 5px 10px; border-radius: 10px; border: 1px dotted #A4A4A4; width: 50%; font-size: 12px;" > Spring MVC Upload Multiple Files Example by < a href = 'https://crunchify.com' > Crunchify < / a > . Click < a href = 'https://crunchify.com/category/java-tutorials/' > here < / a > for all Java , Spring MVC , Web Development examples . < br > < / div > < / div > < / body > < / html > |
Step-5) 更新 Spring 配置
将下面的 bean 添加到crunchify-servlet.xml文件中,就在<bean class="org.springframework.web.servlet.view.UrlBasedViewResolver">行的上方。
|
1 2 |
< bean id = "multipartResolver" class = "org.springframework.web.multipart.commons.CommonsMultipartResolver" / > |
Step-6) 结账结果
启动 tomcat 并将浏览器指向此 URL:http://localhost:8080/CrunchifySpringMVC3.2.1/upload.html,您应该会看到与此类似的屏幕。
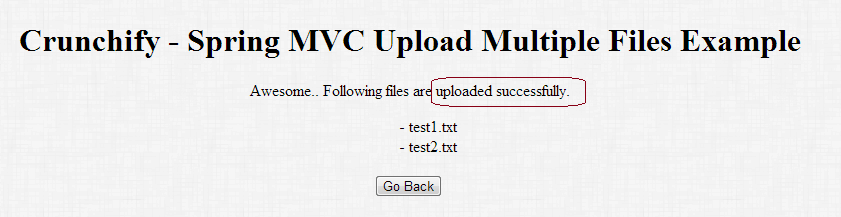
文件上传后,您将看到这样的成功消息。 您始终可以按照您想要的方式美化您的 .jsp 文件。
所有 Spring MVC 示例、Java 示例的列表。