Cara Update Grafik Sparkline Setiap 3 Detik di Spring MVC (Realtime Update)
Diterbitkan: 2013-06-17
jQuery Sparkline: Plugin jQuery ini memudahkan untuk menghasilkan sejumlah jenis grafik mini yang berbeda secara langsung di browser, menggunakan dua baris HTML dan Javascript secara online.
Plugin tidak memiliki dependensi selain jQuery dan berfungsi dengan semua browser modern
Sekarang mari kita gunakan perpustakaan ini dalam arsitektur Spring MVC untuk Aplikasi Web Waktu Nyata Anda. Berikut adalah aliran cepat dari apa yang akan kita lakukan di sini:
- Di Spring MVC, pengontrol saya mendapatkan data setiap 3 detik dan mengirimkannya ke file .jsp (Lihat).
- Lihat file (.jsp), dapatkan data JSONArray setiap 3 detik melalui panggilan AJAX
- Panggilan AJAX mengirimkan data ke fungsi mengkonsumsiJSONData(jsonArray)
- mengkonsumsiJSONData memperbarui Sparkline setiap 3 detik
Mari kita mulai coding:
Langkah 1
Pre-Requisite: https://crunchify.com/hello-world-example-spring-mvc-3-2-1/ (Terapkan proyek ini dengan sukses di Tomcat)
Anda memerlukan ketergantungan json.jar Maven tambahan di bawah ini. Buka file pom.xml dan tambahkan ketergantungan di bawah ini.
|
1 2 3 4 5 |
< dependency > < groupId > org . json < / groupId > < artifactId > json < / artifactId > < version > 20150729 < / version > < / dependency > |
Langkah 2
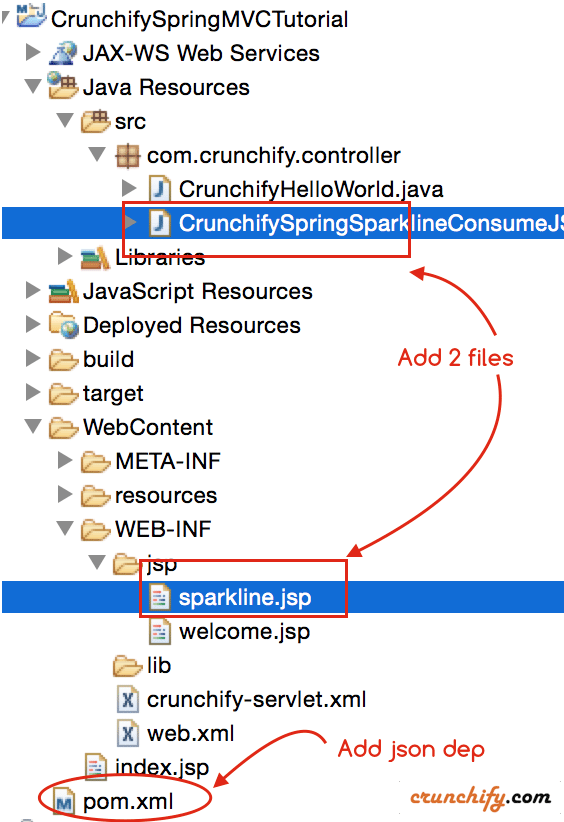
Buat file CrunchifySpringSparklineConsumeJSONArray .java di bawah paket com.crunchify.controller .
|
1 2 3 4 5 6 7 8 9 10 11 12 13 14 15 16 17 18 19 20 21 22 23 24 25 26 27 28 29 30 31 32 33 34 35 36 37 38 39 40 41 42 43 44 45 46 47 48 49 50 51 52 53 54 55 |
package com . crunchify . controller ; import java . util . Random ; import org . json . JSONArray ; import org . json . JSONException ; import org . json . JSONObject ; import org . springframework . stereotype . Controller ; import org . springframework . web . bind . annotation . RequestMapping ; import org . springframework . web . bind . annotation . RequestMethod ; import org . springframework . web . bind . annotation . ResponseBody ; import org . springframework . web . servlet . ModelAndView ; /** * @author Crunchify.com * */ @Controller public class CrunchifySpringSparklineConsumeJSONArray { @RequestMapping ( "/sparkline" ) public ModelAndView crunchifySparklineTest ( ) { return new ModelAndView ( "sparkline" , "message" , "Sparkline.js Example which accepts JSONArray value every 3 seconds & updates graphs.." ) ; } @RequestMapping ( value = "/sparklinetest" , method = RequestMethod . GET ) public @ResponseBody String constructJSONArray ( ) throws JSONException { JSONObject one = new JSONObject ( ) ; JSONObject two = new JSONObject ( ) ; JSONObject three = new JSONObject ( ) ; JSONArray result = new JSONArray ( ) ; Random r = new Random ( ) ; int [ ] r1 = { r . nextInt ( 100 ) , r . nextInt ( 100 ) , r . nextInt ( 100 ) , r . nextInt ( 100 ) , r . nextInt ( 100 ) , r . nextInt ( 100 ) , r . nextInt ( 100 ) , r . nextInt ( 100 ) } ; int [ ] r2 = { r . nextInt ( 100 ) , r . nextInt ( 100 ) , r . nextInt ( 100 ) , r . nextInt ( 100 ) , r . nextInt ( 100 ) , r . nextInt ( 100 ) , r . nextInt ( 100 ) , r . nextInt ( 100 ) } ; int [ ] r3 = { r . nextInt ( 100 ) , r . nextInt ( 100 ) , r . nextInt ( 100 ) , r . nextInt ( 100 ) , r . nextInt ( 100 ) , r . nextInt ( 100 ) , r . nextInt ( 100 ) , r . nextInt ( 100 ) } ; one . put ( "one" , r1 ) ; two . put ( "two" , r2 ) ; three . put ( "three" , r3 ) ; result . put ( one ) ; result . put ( two ) ; result . put ( three ) ; JSONObject jsonObj = new JSONObject ( ) ; jsonObj . put ( "sparkData" , result ) ; System . out . println ( "Sendig this data to view (sparkline.jsp): " + jsonObj . toString ( ) ) ; return jsonObj . toString ( ) ; } } |
Langkah-3
Buat file sparkline.jsp di bawah folder /WebContent/WEB-INF/jsp folder.
|
1 2 3 4 5 6 7 8 9 10 11 12 13 14 15 16 17 18 19 20 21 22 23 24 25 26 27 28 29 30 31 32 33 34 35 36 37 38 39 40 41 42 43 44 45 46 47 48 49 50 51 52 53 54 55 56 57 58 59 60 61 62 63 64 65 66 67 68 69 70 71 72 73 74 75 76 77 78 79 80 81 82 83 84 85 86 87 |
< html > < head > < TITLE > Crunchify - Sparkline . js Example which accepts JSONArray value every 3 seconds < / TITLE > <style type ="text/css"> body { background-image : url ( 'https://cdn.crunchify.com/wp-content/uploads/2013/03/Crunchify.bg_.300.png' ) ; } </style> <script type = "text/javascript" src = "http://code.jquery.com/jquery-1.10.1.min.js" > </script> <script src = "https://cdn.crunchify.com/wp-content/uploads/code/jquery.sparkline.js" > </script> <script type = "text/javascript" > function crunchifySparkline ( ) { $ . ajax ( { url : 'sparklinetest.html' , dataType : "json" , cache : false , contentType : 'application/json; charset=utf-8' , type : 'GET' , success : function ( result ) { var one = result . sparkData ; //alert(one); consumeJSONData ( one ) ; } } ) ; } function consumeJSONData ( sparkData ) { console . log ( sparkData ) ; for ( var i = 0 ; i < sparkData . length ; i ++ ) { var obj = sparkData [ i ] ; var crunchifyName ; var crunchifyValue ; for ( var key in obj ) { crunchifyName = key ; crunchifyValue = obj [ key ] . toString ( ) ; crunchifyValue = crunchifyValue . substr ( 1 ) ; crunchifyValue = crunchifyValue . substring ( 0 , crunchifyValue . length - 1 ) ; var n = crunchifyValue . split ( "," ) ; console . log ( n ) ; $ ( "#" + crunchifyName ) . sparkline ( n , { type : 'line' , width : '80' , fillColor : '#eeeeee' } ) ; } } } </script> <script type = "text/javascript" > var intervalId = 0 ; intervalId = setInterval ( crunchifySparkline , 3000 ) ; </script> < / head > < body > < div align = "center" > < br > < br > $ { message } < br > < br > < div id = "result" > < / div > < br > < br > Sparkline One : < span id = "one" > . < / span > < br > < br > Sparkline Two : < span id = "two" > . < / span > < br > < br > Sparkline Three : < span id = "three" > . < / span > < br > < br > < br > < br > < div style = "font-family: verdana; line-height: 25px; padding: 5px 10px; border-radius: 10px; border: 3px solid #EE872A; width: 50%; font-size: 12px;" > Sparkline . js Example which accepts JSONArray value every 3 seconds by < a href = 'https://crunchify.com' > Crunchify < / a > . Click < a href = 'https://crunchify.com/category/java-tutorials/' > here < / a > for all Java , Spring MVC , Web Development examples . < br > < / div > < / div > < / body > < / html > |
Yang lain harus membaca:

- Contoh Enum Java Sederhana
- Contoh Java MailAPI – Kirim Email melalui SMTP GMail
- Apa itu Daemon Thread di Jawa? Contoh Terlampir
Langkah-4
Periksa struktur direktori ini.
Langkah-5
Deploy ulang proyek CrunchifySpringMVCTutorial ke Apache Tomcat Server lagi.
- Buka Tab
Serverdi Eclipse - Klik
Clean... - Klik
Publish - Klik
Restart
Langkah-6
Buka Web Browser dan kunjungi URL ini untuk melihat hasilnya: http://localhost:8080/CrunchifySpringMVCTutorial/sparkline.html
Bagaimana cara memverifikasi hasil dan memeriksa aliran lengkap?
Langkah 1
Perhatikan Hasil Anda.. Seharusnya sama dengan yang Anda lihat di bagian atas halaman ini.
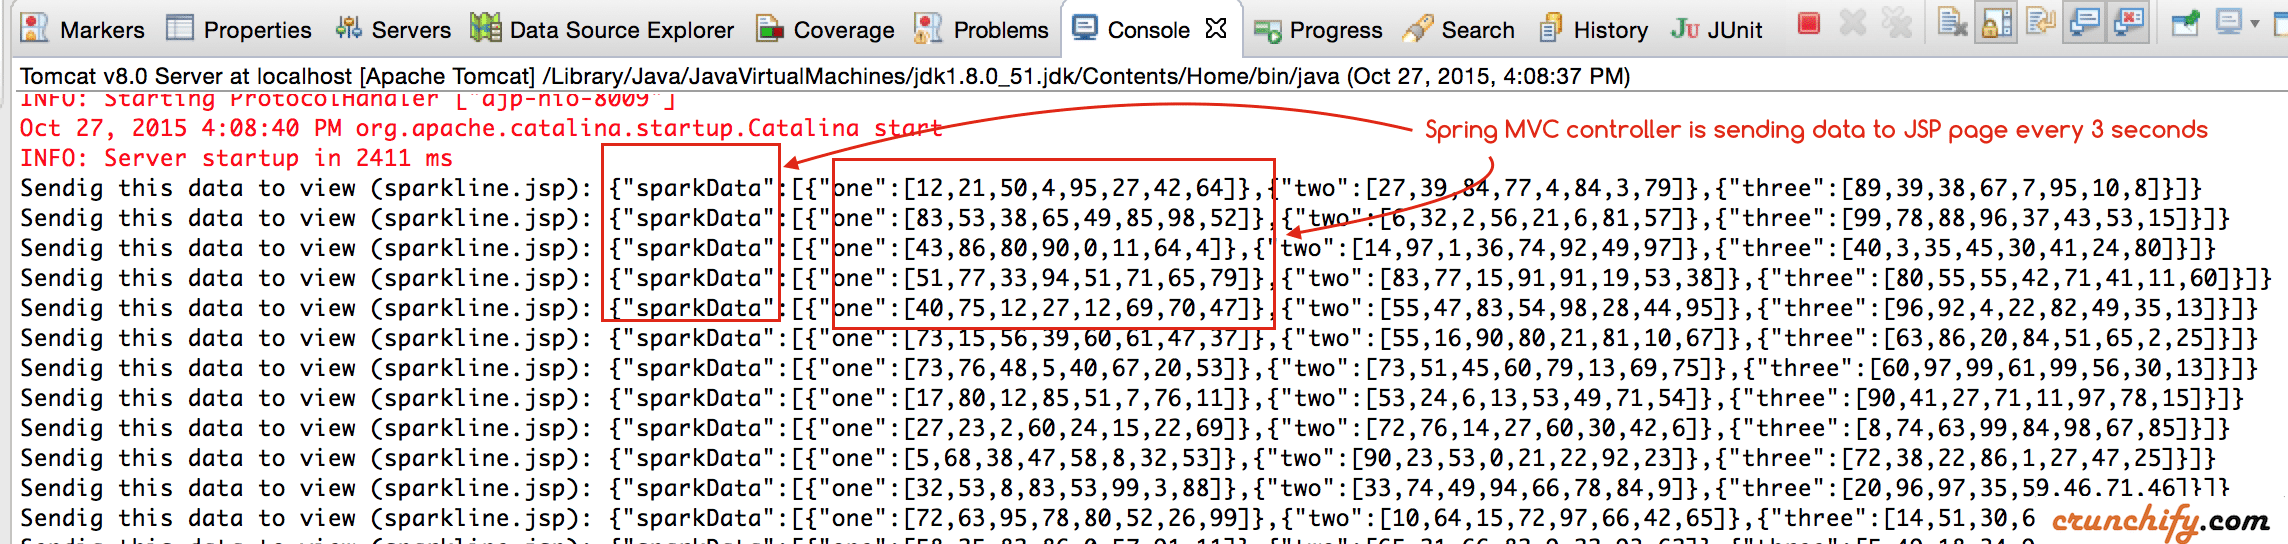
Langkah 2
Lihat Keluaran Konsol Eclipse. Anda akan melihat log konsol dengan data setiap 3 detik. Itu berarti pengontrol Spring MVC mengirim data ke halaman JSP setiap 3 detik.
Langkah-3
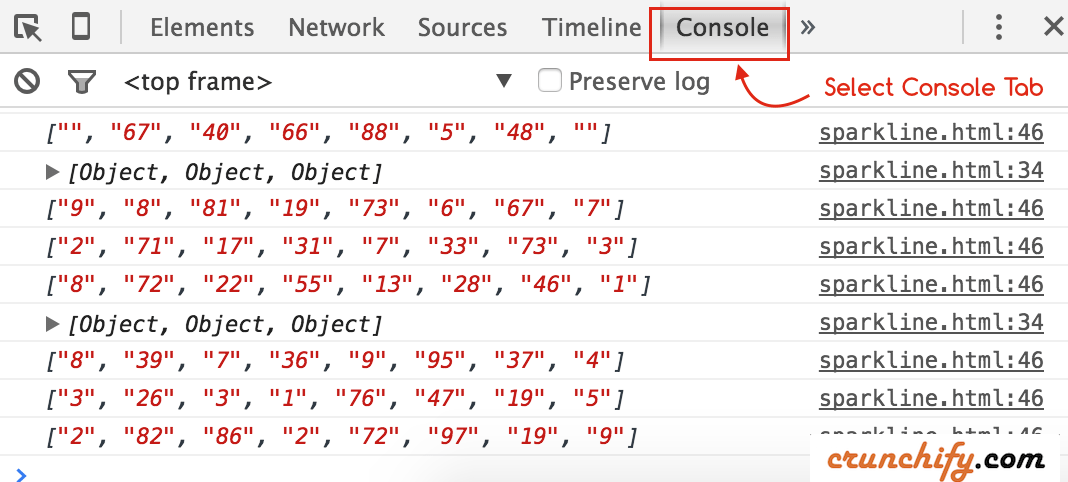
Periksa konsol Browser untuk melihat data langsung.
- Klik kanan pada halaman untuk memilih
Inspect Element - Pilih tab
console