
在 Ruby on Rails 中集成 Stripe 和 PayPal 支付方式
已發表: 2022-03-11對於全球速賣通、Ebay 和亞馬遜等大型電子商務公司來說,一個關鍵功能是一種安全的付款方式,這對他們的業務至關重要。 如果此功能失敗,後果將是毀滅性的。 這適用於從事電子商務應用程序的行業領導者和 Ruby on Rails 開發人員。
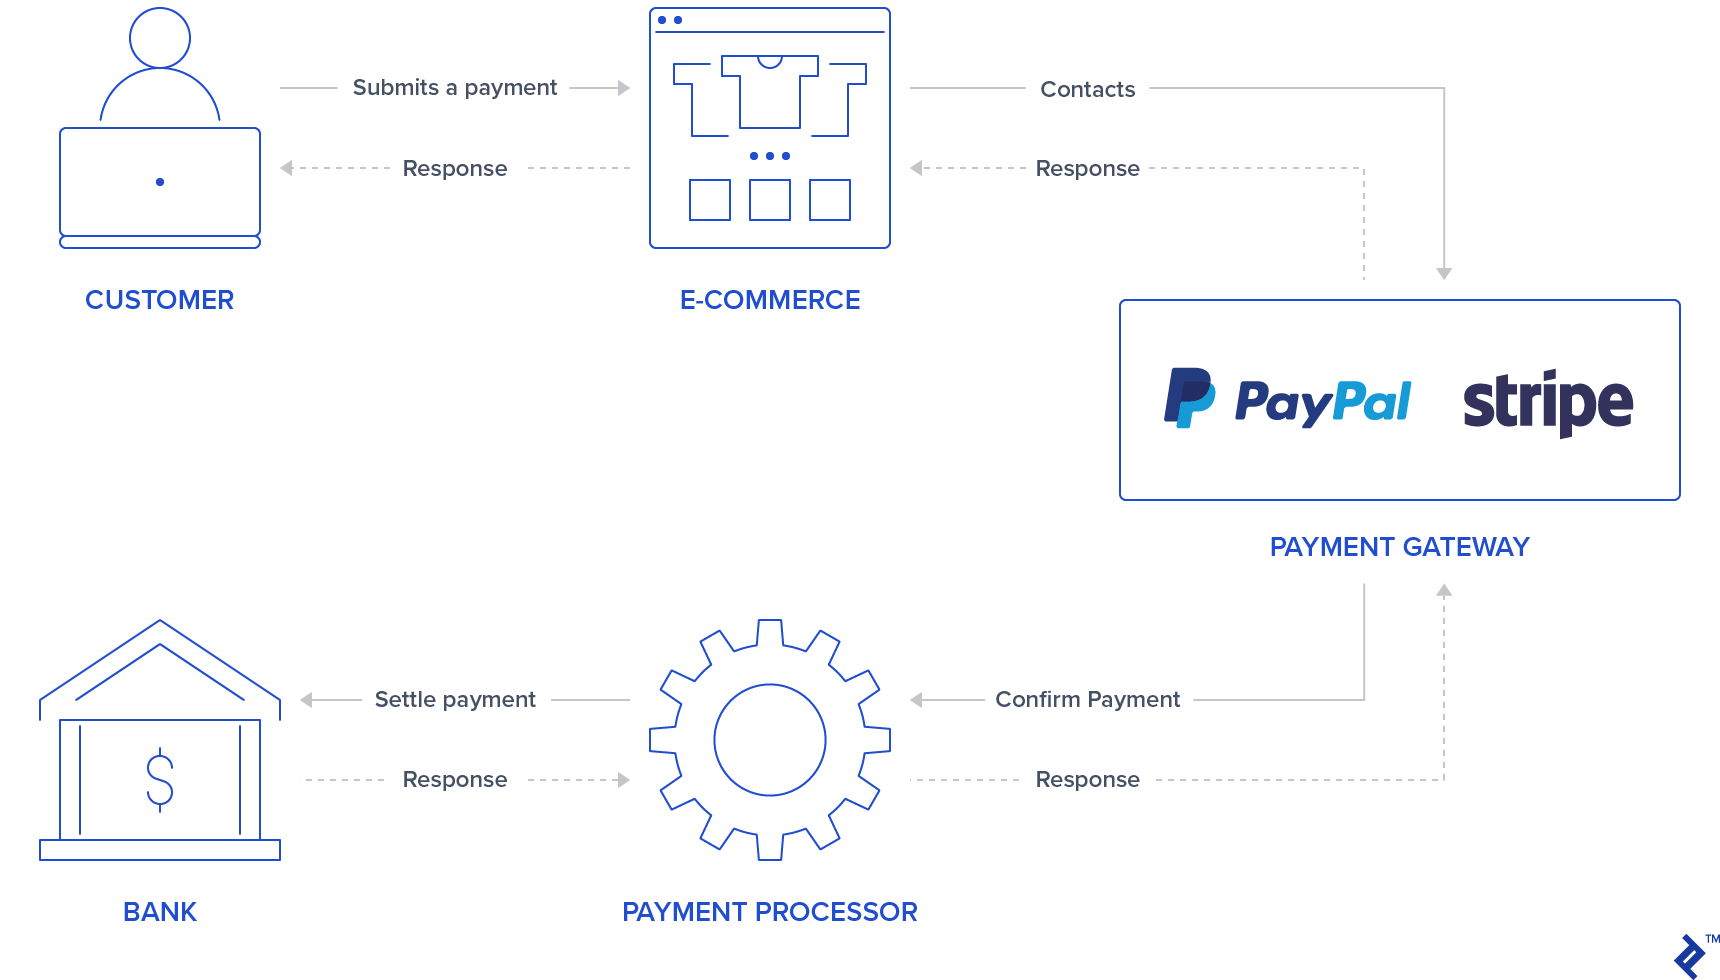
網絡安全對於防止攻擊至關重要,而使交易過程更加安全的一種方法是要求第三方服務來處理它。 在您的應用程序中包含支付網關是實現此目標的一種方式,因為它們提供用戶授權、數據加密和儀表板,因此您可以隨時跟踪交易狀態。
Web 上有多種支付網關服務,但在本文中,我將重點介紹將 Stripe 和 PayPal 集成到 Rails 應用程序。 再舉幾個其他的:Amazon Payments、Square、SecurePay、WorldPay、Authorize.Net、2Checkout.com、Braintree、Amazon 或 BlueSnap。
支付網關集成如何工作
通常,您的應用程序中會有一個表單/按鈕,用戶可以在其中登錄/插入信用卡數據。 PayPal 和 Stripe 已經通過使用iframe表單或popups使第一步更加安全,這些表單或彈出窗口會阻止您的應用程序存儲敏感的用戶信用卡信息,因為它們將返回代表此交易的令牌。 一些用戶可能已經因為知道第三方服務正在處理交易過程而對處理付款更有信心,因此這也可能對您的應用程序有吸引力。
在驗證用戶信息後,支付網關將通過聯繫支付處理器來確認支付,該支付處理器與銀行通信以結算付款。 這可確保交易正確借記/貸記。
Stripe 使用信用卡表格詢問信用卡號、cvv 和到期日期。 因此,用戶必須在安全的 Stripe 輸入中填寫信用卡信息。 提供此信息後,您的應用程序後端會通過令牌處理此付款。
與 Stripe 不同,PayPal 將用戶重定向到 PayPal 登錄頁面。 用戶通過 PayPal 授權並選擇付款方式,同樣,您的後端將處理令牌而不是用戶敏感數據。
值得一提的是,對於這兩個支付網關,您的後端應要求通過 Stripe 或 PayPal API 進行交易執行,這將給出 OK/NOK 響應,因此您的應用程序應相應地將用戶重定向到成功或錯誤頁面。
本文的目的是提供將這兩個支付網關集成到單個應用程序中的快速指南。 對於所有測試,我們將使用 Stripe 和 PayPal 提供的沙盒和測試帳戶來模擬付款。
設置
在集成支付網關之前,我們將通過添加 gem、數據庫表和索引頁面來進行初始化應用程序的設置。 該項目是使用 Rails 版本 5.2.3 和 Ruby 2.6.3 創建的。
注意:您可以在我們最近的文章中查看 Rails 6 的新功能。
第 1 步:初始化 Rails 應用程序。
通過使用您的應用名稱使用rails命令運行項目初始化來初始化項目:
rails new YOUR_APP_NAME 並cd在您的應用程序文件夾中。
第 2 步:安裝 gem。
除了 Stripe 和 PayPal gems,還添加了一些其他的 gems:
-
devise: 用於用戶認證和授權 haml: 用於渲染用戶頁面的模板工具jquery-rails: 用於前端腳本中的jquery-
money-rails:用於顯示格式化的貨幣值
添加到您的Gemfile :
gem "devise", ">= 4.7.1" gem "haml" gem "jquery-rails" gem "money-rails"添加後在您的 CLI 中運行:
bundle install第 3 步:初始化 gem。
除了通過bundle安裝之外,其中一些 gem 還需要初始化。
安裝裝置:
rails g devise:install 初始化money-rails :
rails g money_rails:initializer 通過將以下內容附加到app/assets/javascripts/application.js的底部來初始化jquery-rails :
//= require jquery //= require jquery_ujs第 4 步:表和遷移
本項目中將使用三個表Users 、 Products和Orders 。
-
Users:將通過設計生成 Products欄目:-
name -
price_cents -
Stripe_plan_name:表示在 Stripe 中創建的訂閱計劃的 ID,因此用戶可以訂閱它。 只有與 Stripe 計劃關聯的產品才需要此字段。 -
paypal_plan_name:與stripe_plan_name相同,但適用於 PayPal
-
-
Orders欄:-
product_id -
user_id -
status:這將通知訂單是否處於待處理、失敗或已付款狀態。 -
token:這是從 API(Stripe 或 PayPal)生成的令牌,用於初始化交易。 -
price_cents:與產品類似,但用於使該值在訂單記錄中持久化 payment_gateway:存儲用於 PayPal 或 Stripe 訂單的支付網關customer_id:這將用於 Stripe,以便為訂閱存儲 Stripe 客戶,將在後面的部分中進行更詳細的說明。
-
為了生成這些表,必須生成一些遷移:
用於創建用戶表。 跑步:
rails g devise User用於創建Products 表。 通過運行生成遷移:
rails generate migration CreateProducts name:string stripe_plan_name:string paypal_plan_name:string 打開您創建的遷移文件,該文件應位於db/migrate/ ,並進行更改以使您的遷移看起來類似於以下內容:
class CreateProducts < ActiveRecord::Migration[5.2] def change create_table :products do |t| t.string :name t.string :stripe_plan_name t.string :paypal_plan_name end add_money :products, :price, currency: { present: true } end end用於創建Orders 表。 通過運行生成遷移:
rails generate migration CreateOrders product_id:integer user_id:integer status:integer token:string charge_id:string error_message:string customer_id:string payment_gateway:integer 再次,打開您創建的遷移文件,該文件應該位於db/migrate/並對該文件進行更改,以使其看起來類似於以下內容:
class CreateOrders < ActiveRecord::Migration[5.2] def change create_table :orders do |t| t.integer :product_id t.integer :user_id t.integer :status, default: 0 t.string :token t.string :charge_id t.string :error_message t.string :customer_id t.integer :payment_gateway t.timestamps end add_money :orders, :price, currency: { present: false } end end通過執行以下命令運行數據庫遷移:
rails db:migrate第 5 步:創建模型。
用戶模型已經從設計安裝中創建,不需要對其進行任何更改。 除此之外,將為Product和Order創建兩個模型。
產品。 添加一個新文件app/models/product.rb ,其中包含:
class Product < ActiveRecord::Base monetize :price_cents has_many :orders end 命令。 添加一個新文件app/models/order.rb ,其中包含:
class Order < ApplicationRecord enum status: { pending: 0, failed: 1, paid: 2, paypal_executed: 3} enum payment_gateway: { stripe: 0, paypal: 1 } belongs_to :product belongs_to :user scope :recently_created, -> { where(created_at: 1.minutes.ago..DateTime.now) } def set_paid self.status = Order.statuses[:paid] end def set_failed self.status = Order.statuses[:failed] end def set_paypal_executed self.status = Order.statuses[:paypal_executed] end end步驟 6:填充數據庫。
將在控制台中創建一個用戶和兩個產品。 訂單記錄將根據付款測試創建。
- 運行
rails s - 在瀏覽器中,訪問
http://localhost:3000 - 您將被重定向到註冊頁面。
- 通過填寫用戶的電子郵件地址和密碼來註冊用戶。
- 在您的終端中,將提示以下日誌,顯示在您的數據庫中創建了一個用戶:
User Create (0.1ms) INSERT INTO "users" ("email", "encrypted_password", "created_at", "updated_at") VALUES (?, ?, ?, ?) …- 通過運行
rails c並添加以下內容來創建兩個沒有訂閱的產品:-
Product.create(name: "Awesome T-Shirt", price_cents: 3000) -
Product.create(name: "Awesome Sneakers", price_cents: 5000)
-
第 7 步:創建索引頁面
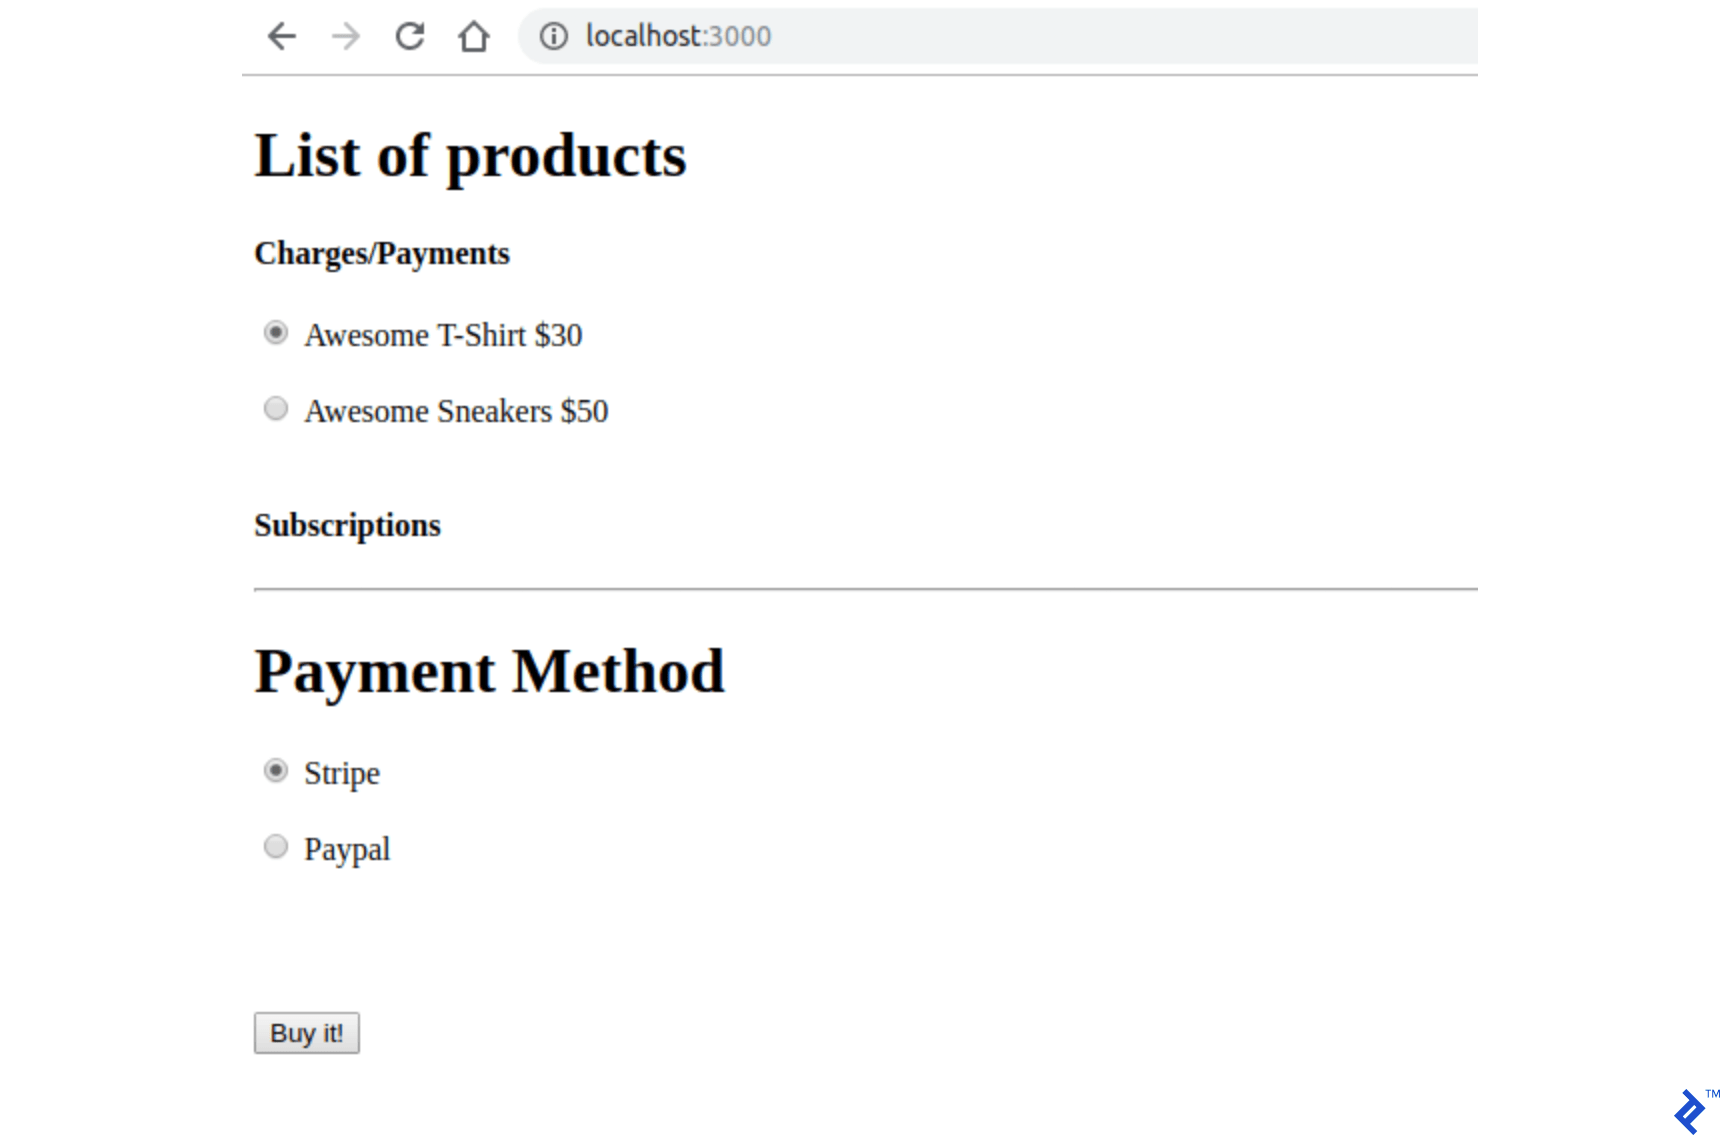
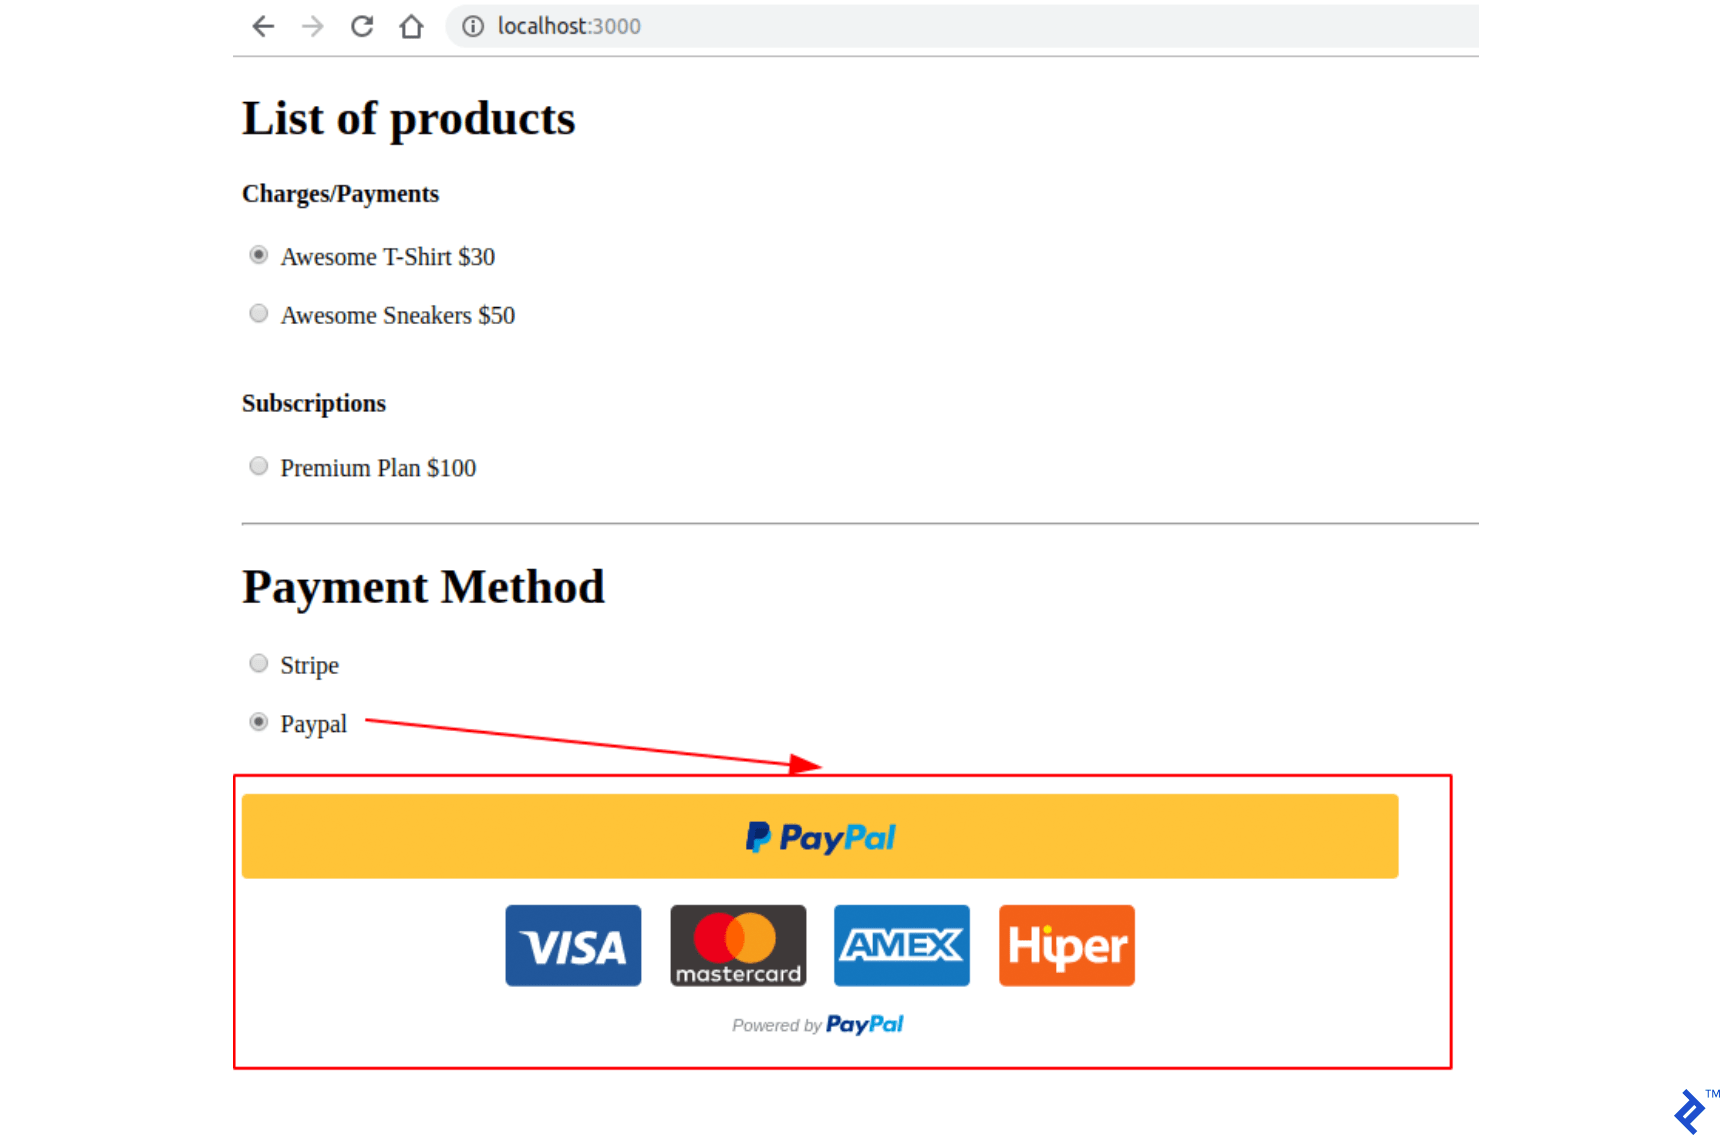
該項目的主頁包括購買或訂閱的產品選擇。 此外,它還有一個用於選擇付款方式(Stripe 或 PayPal)的部分。 提交按鈕也用於每種支付網關類型,對於 PayPal,我們將通過其 JavaScript 庫添加自己的按鈕設計。
首先,為index創建路由並在config/routes.rb中submit 。
Rails.application.routes.draw do devise_for :users get '/', to: 'orders#index' post '/orders/submit', to: 'orders#submit' end 在訂單控制器app/controllers/orders_controller.rb中創建和添加操作index並submit 。 orders#index操作存儲了兩個要在前端使用的變量: @products_purchase包含沒有計劃的產品列表, @products_subscription products_subscription 包含同時具有 PayPal 和 Stripe 計劃的產品。
class OrdersController < ApplicationController before_action :authenticate_user! def index products = Product.all @products_purchase = products.where(stripe_plan_name:nil, paypal_plan_name:nil) @products_subscription = products - @products_purchase end def submit end end 在app/views/orders/index.html.haml中創建一個文件。 該文件包含我們將通過提交方法發送到後端的所有輸入,以及支付網關和產品選擇的交互。 以下是一些輸入名稱屬性:
-
Orders[product_id]存儲產品 ID。 -
Orders[payment_gateway]包含帶有 Stripe 或 PayPal 值的支付網關。
%div %h1 List of products = form_tag({:controller => "orders", :action => "submit" }, {:id => 'order-details'}) do %input{id:'order-type', :type=>"hidden", :value=>"stripe", :name=>'orders[payment_gateway]'} .form_row %h4 Charges/Payments - @products_purchase.each do |product| %div{'data-charges-and-payments-section': true} = radio_button_tag 'orders[product_id]', product.id, @products_purchase.first == product %span{id: "radioButtonName#{product.id}"} #{product.name} %span{id: "radioButtonPrice#{product.id}", :'data-price' => "#{product.price_cents}"} #{humanized_money_with_symbol product.price} %br %h4 Subscriptions - @products_subscription.each do |product| %div = radio_button_tag 'orders[product_id]', product.id, false %span{id: "radioButtonName#{product.id}"} #{product.name} %span{id: "radioButtonPrice#{product.id}", :'data-price' => "#{product.price_cents}"} #{humanized_money_with_symbol product.price} %br %hr %h1 Payment Method .form_row %div = radio_button_tag 'payment-selection', 'stripe', true, onclick: "changeTab();" %span Stripe %br %div = radio_button_tag 'payment-selection', 'paypal', false, onclick: "changeTab();" %span Paypal %br %br %div{id:'tab-stripe', class:'paymentSelectionTab active'} %div{id:'card-element'} %div{id:'card-errors', role:"alert"} %br %br = submit_tag "Buy it!", id: "submit-stripe" %div{id:'tab-paypal', class:'paymentSelectionTab'} %div{id: "submit-paypal"} %br %br %hr :javascript function changeTab() { var newActiveTabID = $('input[name="payment-selection"]:checked').val(); $('.paymentSelectionTab').removeClass('active'); $('#tab-' + newActiveTabID).addClass('active'); } :css #card-element { width:500px; } .paymentSelectionTab { display: none; } .paymentSelectionTab.active { display: block !important; } 如果您使用rails s運行您的應用程序並在http://localhost:3000中訪問您的頁面。 您應該能夠看到如下頁面:
支付網關憑證存儲
PayPal 和 Stripe 密鑰將存儲在 Git 不跟踪的文件中。 對於每個支付網關,此文件中存儲了兩種類型的密鑰,現在,我們將為它們使用一個虛擬值。 創建這些密鑰的其他說明將在其他部分中介紹。
第 1 步:將其添加到.gitignore中。
/config/application.yml 第 2 步:在config/application.yml中使用您的憑據創建一個文件。 它應該包含用於訪問這些 API 的所有 PayPal 和 Stripe 沙盒/測試密鑰。
test: &default PAYPAL_ENV: sandbox PAYPAL_CLIENT_ID: YOUR_CREDENTIAL_HERE PAYPAL_CLIENT_SECRET: YOUR_CREDENTIAL_HERE STRIPE_PUBLISHABLE_KEY: YOUR_CREDENTIAL_HERE STRIPE_SECRET_KEY: YOUR_CREDENTIAL_HERE development: <<: *default 第 3 步:為了在應用程序啟動時存儲文件config/application.yml中的變量,請將這些行添加到Application類中的config/application.rb中,以便它們在ENV中可用。
config_file = Rails.application.config_for(:application) config_file.each do |key,value| ENV[key] = value end unless config_file.nil?條帶配置
我們將添加一個使用 Stripe API 的 gem: stripe-rails 。 還需要創建一個 Stripe 帳戶,以便處理費用和訂閱。 如果需要,可以參考官方文檔中 Stripe API 的 API 方法。
第 1 步:將 stripe-rails gem 添加到您的項目中。
stripe-rails gem 將為這個項目中使用的所有 API 請求提供一個接口。
在Gemfile中添加:
gem 'stripe-rails'跑步:
bundle install第 2 步:生成您的 API 密鑰。
為了獲得與 Stripe 通信的 API 密鑰,您需要在 Stripe 中創建一個帳戶。 測試應用程序可以使用測試模式,因此在創建Stripe帳戶的過程中無需填寫真實的業務信息。
- 如果您沒有,請在 Stripe 中創建一個帳戶 (https://dashboard.stripe.com/)。
- 雖然仍在 Stripe 儀表板中,但在登錄後,打開查看測試數據。
- 在 https://dashboard.stripe.com/test/apikeys,將
YOUR_CREDENTIAL_HERE中的值STRIPE_PUBLISHABLE_KEY和STRIPE_SECRET_KEY的/config/application.yml替換為Publishable Key和Secret key中的內容。
第三步:初始化 Stripe 模塊
除了替換鍵之外,我們還需要初始化 Stripe 模塊,以便它使用已經在我們的ENV中設置的鍵。
在config/initializers/stripe.rb中創建一個文件:
Rails.application.configure do config.stripe.secret_key = ENV["STRIPE_SECRET_KEY"] config.stripe.publishable_key = ENV["STRIPE_PUBLISHABLE_KEY"] end第 4 步:在前端集成 Stripe。
我們將添加 Stripe JavaScript 庫和發送代表用戶信用卡信息的令牌的邏輯,並將在我們的後端進行處理。
在index.html.haml文件中,將其添加到文件的頂部。 這將使用 Stripe 模塊(由 gem 提供)將 Stripe javascript 庫添加到用戶頁面。
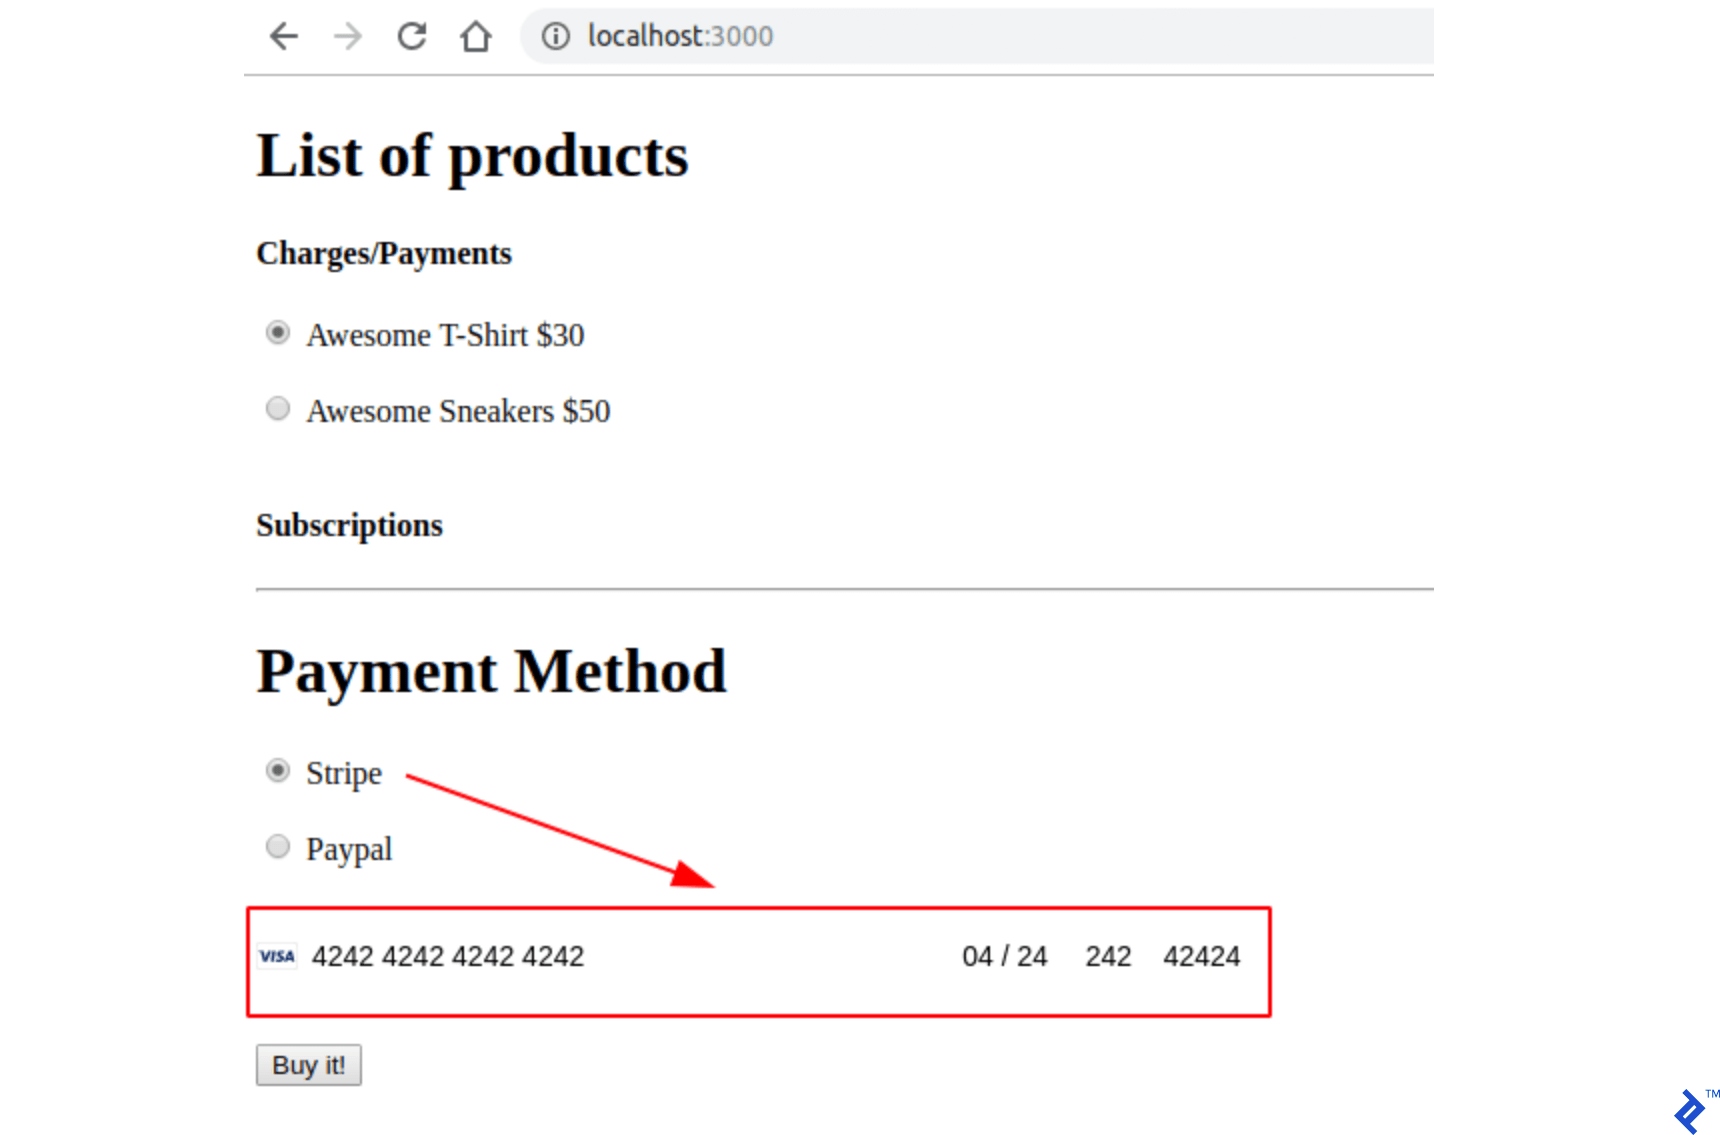
= stripe_javascript_tag Stripe 使用通過其 API 創建的安全輸入字段。 由於它們是在通過此 API 創建的iframe中創建的,因此您不必擔心處理用戶信用卡信息時可能存在的漏洞。 此外,您的後端將無法處理/存儲任何用戶敏感數據,它只會收到代表此信息的令牌。
這些輸入字段是通過調用stripe.elements().create('card') 。 之後,只需要使用mount()調用返回的對象,方法是將這些輸入應該掛載到的 HTML 元素 id/class 作為參數傳遞。 更多信息可以在 Stripe 找到。
當用戶使用 Stripe 支付方式點擊提交按鈕時,另一個返回 Promise 的 API 調用在創建的 Stripe 卡元素上執行:
stripe.createToken(card).then(function(result) 此函數的result變量,如果沒有分配屬性錯誤,將有一個令牌,可以通過訪問屬性result.token.id來檢索。 該令牌將被發送到後端。
為了進行這些更改,請將註釋代碼// YOUR STRIPE AND PAYPAL CODE WILL BE HERE在index.html.haml中替換為:
(function setupStripe() { //Initialize stripe with publishable key var stripe = Stripe("#{ENV['STRIPE_PUBLISHABLE_KEY']}"); //Create Stripe credit card elements. var elements = stripe.elements(); var card = elements.create('card'); //Add a listener in order to check if card.addEventListener('change', function(event) { //the div card-errors contains error details if any var displayError = document.getElementById('card-errors'); document.getElementById('submit-stripe').disabled = false; if (event.error) { // Display error displayError.textContent = event.error.message; } else { // Clear error displayError.textContent = ''; } }); // Mount Stripe card element in the #card-element div. card.mount('#card-element'); var form = document.getElementById('order-details'); // This will be called when the #submit-stripe button is clicked by the user. form.addEventListener('submit', function(event) { $('#submit-stripe').prop('disabled', true); event.preventDefault(); stripe.createToken(card).then(function(result) { if (result.error) { // Inform that there was an error. var errorElement = document.getElementById('card-errors'); errorElement.textContent = result.error.message; } else { // Now we submit the form. We also add a hidden input storing // the token. So our back-end can consume it. var $form = $("#order-details"); // Add a hidden input orders[token] $form.append($('<input type="hidden" name="orders[token]"/>').val(result.token.id)); // Set order type $('#order-type').val('stripe'); $form.submit(); } }); return false; }); }()); //YOUR PAYPAL CODE WILL BE HERE如果您訪問您的頁面,它應該與新的 Stripe 安全輸入字段如下所示:
第 5 步:測試您的應用程序。
使用測試卡 (https://stripe.com/docs/testing) 填寫信用卡表格並提交頁面。 檢查是否使用服務器輸出中的所有參數( product_id 、 payment_gateway和token )調用了submit操作。
條紋收費
條紋費用代表一次性交易。 因此,在 Stripe 收費交易之後,您將直接從客戶那裡收到錢。 這非常適合銷售與計劃無關的產品。 在後面的部分中,我將展示如何使用 PayPal 進行相同的交易類型,但 PayPal 對這種交易類型的名稱是Payment 。
在本節中,我還將提供處理和提交訂單的所有框架。 當 Stripe 表單被提交時,我們在submit動作中創建一個訂單。 此訂單最初將處於待處理狀態,因此如果在處理此訂單時出現任何問題,訂單仍將處於待處理狀態。
如果 Stripe API 調用出現任何錯誤,我們將訂單設置為失敗狀態,如果收費成功完成,它將處於已付款狀態。 用戶也會根據 Stripe API 響應重定向,如下圖所示:
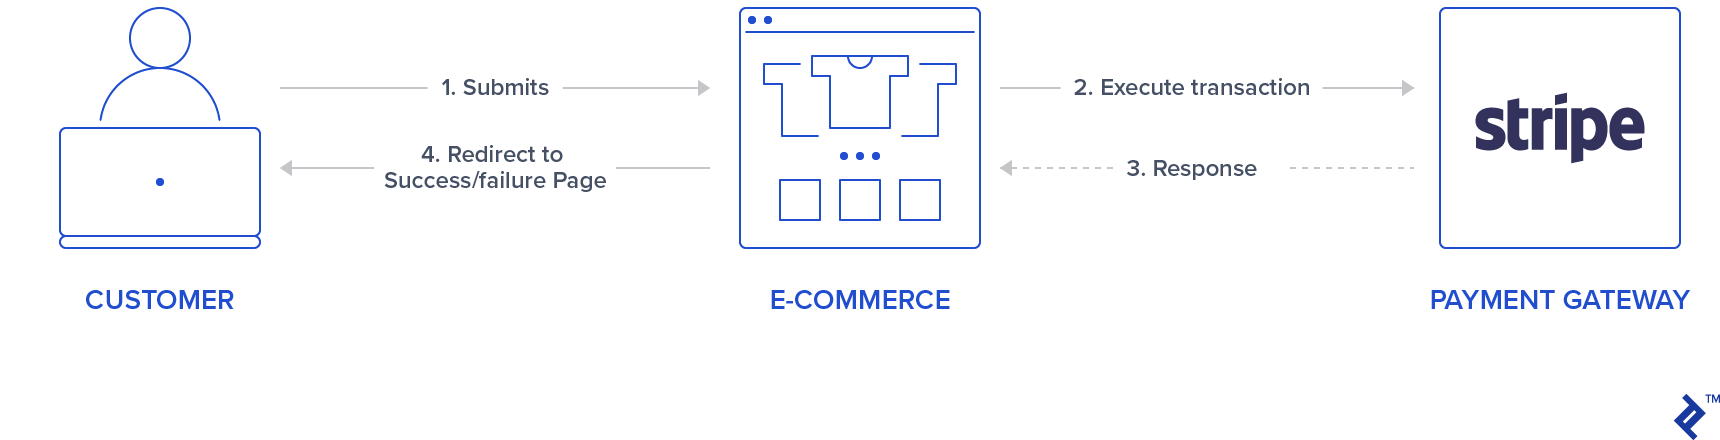
此外,在執行 Stripe 收費時,會返回一個 ID。 我們將存儲此 ID,以便您以後可以在需要時在 Stripe 儀表板中查找它。 如果訂單必須退款,也可以使用此 ID。 這樣的事情,本文將不作探討。
第 1 步:創建 Stripe 服務。
我們將使用一個單例類來表示使用 Stripe API 的 Stripe 操作。 為了創建費用,調用了Stripe::Charge.create方法,返回的對象 ID 屬性將存儲在訂單記錄charge_id中。 通過傳遞源自前端的令牌、訂單價格和描述來調用此create函數。
因此,創建一個新文件夾app/services/orders並添加一個 Stripe 服務: app/services/orders/stripe.rb包含Orders::Stripe單例類,該類在方法execute中有一個條目。
class Orders::Stripe INVALID_STRIPE_OPERATION = 'Invalid Stripe Operation' def self.execute(order:, user:) product = order.product # Check if the order is a plan if product.stripe_plan_name.blank? charge = self.execute_charge(price_cents: product.price_cents, description: product.name, card_token: order.token) else #SUBSCRIPTIONS WILL BE HANDLED HERE end unless charge&.id.blank? # If there is a charge with id, set order paid. order.charge_id = charge.id order.set_paid end rescue Stripe::StripeError => e # If a Stripe error is raised from the API, # set status failed and an error message order.error_message = INVALID_STRIPE_OPERATION order.set_failed end private def self.execute_charge(price_cents:, description:, card_token:) Stripe::Charge.create({ amount: price_cents.to_s, currency: "usd", description: description, source: card_token }) end end第 2 步:實現提交操作並調用 Stripe 服務。
在orders_controller.rb中,在submit操作中添加以下內容,這基本上將調用服務Orders::Stripe.execute 。 請注意,還添加了兩個新的私有函數: prepare_new_order和order_params 。
def submit @order = nil #Check which type of order it is if order_params[:payment_gateway] == "stripe" prepare_new_order Orders::Stripe.execute(order: @order, user: current_user) elsif order_params[:payment_gateway] == "paypal" #PAYPAL WILL BE HANDLED HERE end ensure if @order&.save if @order.paid? # Success is rendered when order is paid and saved return render html: SUCCESS_MESSAGE elsif @order.failed? && [email protected]_message.blank? # Render error only if order failed and there is an error_message return render html: @order.error_message end end render html: FAILURE_MESSAGE end private # Initialize a new order and and set its user, product and price. def prepare_new_order @order = Order.new(order_params) @order.user_id = current_user.id @product = Product.find(@order.product_id) @order.price_cents = @product.price_cents end def order_params params.require(:orders).permit(:product_id, :token, :payment_gateway, :charge_id) end第 3 步:測試您的應用程序。
檢查提交操作是否在使用有效的測試卡調用時執行重定向到成功的消息。 此外,如果還顯示了訂單,請檢查您的 Stripe 儀表板。
條紋訂閱
可以為定期付款創建訂閱或計劃。 使用這種類型的產品,用戶會根據計劃配置自動按天、按週、按月或按年計費。 在本節中,我們將使用 product stripe_plan_name字段來存儲計劃 ID——實際上,我們可以選擇 ID,我們將其稱為premium-plan plan——將用於創建關係customer <-> subscription 。
我們還將為 users 表創建一個名為stripe_customer_id的新列,該列將填充 Stripe 客戶對象的 id 屬性。 調用Stripe::Customer.create函數時會創建一個 Stripe 客戶,您還可以在 (https://dashboard.stripe.com/test/customers) 中查看創建並鏈接到您帳戶的客戶。 客戶是通過傳遞一個source參數來創建的,在我們的例子中,它是在提交表單時發送的前端生成的令牌。
從最後提到的 Stripe API 調用中獲得的客戶對像也用於創建訂閱,這是通過調用customer.subscriptions.create並將計劃 ID 作為參數傳遞來完成的。
此外, stripe-rails gem 提供了從 Stripe 檢索和更新客戶的接口,這通過分別調用Stripe::Customer.retrieve和Stripe::Customer.update來完成。
因此,當用戶記錄已經有一個stripe_customer_id時,我們將調用Stripe::Customer.retrieve並傳遞stripe_customer_id作為參數,而不是使用Stripe::Customer.create創建一個新客戶,然後是Stripe::Customer.update ,在這種情況下,將令牌傳遞給一個參數。
首先,我們將使用 Stripe API 創建一個計劃,以便我們可以使用字段stripe_plan_name創建一個新的訂閱產品。 之後,我們將對orders_controller和 Stripe 服務進行修改,以便處理 Stripe 訂閱的創建和執行。
第 1 步:使用 Stripe API 創建計劃。
使用命令rails c打開控制台。 使用以下命令為您的 Stripe 帳戶創建訂閱:
Stripe::Plan.create({ amount: 10000, interval: 'month', product: { name: 'Premium plan', }, currency: 'usd', id: 'premium-plan', })如果這一步返回的結果為真,則表示計劃創建成功,您可以在 Stripe 儀表板中訪問它。
第 2 步:在數據庫中創建一個帶有stripe_plan_name字段集的產品。
現在,在數據庫中創建一個將stripe_plan_name設置為premium-plan的產品:
Product.create(price_cents: 10000, name: 'Premium Plan', stripe_plan_name: 'premium-plan') 第 3 步:生成遷移以在users表中添加列stripe_customer_id 。
在終端中運行以下命令:

rails generate migration AddStripeCustomerIdToUser stripe_customer_id:string rails db:migrate第 4 步:在 Stripe 服務類中實現訂閱邏輯。
在app/services/orders/stripe.rb的私有方法中再添加兩個函數: execute_subscription負責在客戶對像中創建訂閱。 函數find_or_create_customer負責返回已創建的客戶或返回新創建的客戶。
def self.execute_subscription(plan:, token:, customer:) customer.subscriptions.create({ plan: plan }) end def self.find_or_create_customer(card_token:, customer_id:, email:) if customer_id stripe_customer = Stripe::Customer.retrieve({ id: customer_id }) if stripe_customer stripe_customer = Stripe::Customer.update(stripe_customer.id, { source: card_token}) end else stripe_customer = Stripe::Customer.create({ email: email, source: card_token }) end stripe_customer end 最後,在同一文件 ( app/services/orders/stripe.rb ) 中的execute函數中,我們將首先調用find_or_create_customer ,然後通過傳遞先前檢索/創建的客戶調用execute_subscription來執行訂閱。 因此,將execute方法中的註釋#SUBSCRIPTIONS WILL BE HANDLED HERE替換為以下代碼:
customer = self.find_or_create_customer(card_token: order.token, customer_id: user.stripe_customer_id, email: user.email) if customer user.update(stripe_customer_id: customer.id) order.customer_id = customer.id charge = self.execute_subscription(plan: product.stripe_plan_name, customer: customer)第 5 步:測試您的應用程序。
訪問您的網站,選擇訂閱產品Premium Plan ,並填寫有效的測試卡。 提交後,它應該將您重定向到一個成功的頁面。 此外,如果訂閱創建成功,請檢查您的 Stripe 儀表板。
貝寶配置
正如我們在 Stripe 中所做的那樣,我們還將添加一個用於使用 PayPal API 的 gem: paypal-sdk-rest ,並且還需要創建一個 PayPal 帳戶。 可以在官方 PayPal API 文檔中查閱使用此 gem 的 PayPal 描述性工作流程。
第 1 步:將paypal-sdk-rest gem 添加到您的項目中。
在Gemfile中添加:
gem 'paypal-sdk-rest'跑步:
bundle install第 2 步:生成您的 API 密鑰。
為了獲得與 PayPal 通信的 API 密鑰,您需要創建一個 PayPal 帳戶。 所以:
- 在 https://developer.paypal.com/ 創建一個帳戶(或使用您的 PayPal 帳戶)。
- 仍然登錄您的帳戶,在 https://developer.paypal.com/developer/accounts/ 創建兩個沙盒帳戶:
- 個人(買方帳戶)– 這將用於您的付款和訂閱測試。
- 商業(商家帳戶)– 這將鏈接到應用程序,該應用程序將具有我們正在尋找的 API 密鑰。 除此之外,所有交易都可以在這個賬戶中進行。
- 使用以前的業務沙盒帳戶在 https://developer.paypal.com/developer/applications 創建一個應用程序。
- 完成此步驟後,您將收到兩個 PayPal 密鑰:
Client ID和Secret。 - 在
config/application.yml中,將YOUR_CREDENTIAL_HERE和PAYPAL_CLIENT_SECRET中的PAYPAL_CLIENT_ID替換為您剛剛收到的密鑰。
第 3 步:初始化 PayPal 模塊。
與 Stripe 類似,除了替換application.yml中的鍵外,我們還需要初始化 PayPal 模塊,以便它可以使用已經在我們的ENV變量中設置的鍵。 為此,在config/initializers/paypal.rb中創建一個文件:
PayPal::SDK.configure( mode: ENV['PAYPAL_ENV'], client_id: ENV['PAYPAL_CLIENT_ID'], client_secret: ENV['PAYPAL_CLIENT_SECRET'], ) PayPal::SDK.logger.level = Logger::INFO第 4 步:在前端集成 PayPal。
在index.html.haml中將其添加到文件頂部:
%script(src="https://www.paypal.com/sdk/js?client-id=#{ENV['PAYPAL_CLIENT_ID']}") 與 Stripe 不同,PayPal 僅使用一個按鈕,單擊該按鈕會打開一個安全彈出窗口,用戶可以在其中登錄並繼續付款/訂閱。 這個按鈕可以通過調用方法paypal.Button(PARAM1).render(PARAM2)來呈現。
-
PARAM1是一個具有環境配置和兩個回調函數作為屬性的對象:createOrder和onApprove。 -
PARAM2指示應附加 PayPal 按鈕的 HTML 元素標識符。
因此,仍然在同一個文件中,將YOUR PAYPAL CODE WILL BE HERE的註釋代碼替換為:
(function setupPaypal() { function isPayment() { return $('[data-charges-and-payments-section] input[name="orders[product_id]"]:checked').length } function submitOrderPaypal(chargeID) { var $form = $("#order-details"); // Add a hidden input orders[charge_id] $form.append($('<input type="hidden" name="orders[charge_id]"/>').val(chargeID)); // Set order type $('#order-type').val('paypal'); $form.submit(); } paypal.Buttons({ env: "#{ENV['PAYPAL_ENV']}", createOrder: function() { }, onApprove: function(data) { } }).render('#submit-paypal'); }());第 5 步:測試您的應用程序。
訪問您的頁面並檢查當您選擇 PayPal 作為付款方式時是否呈現 PayPal 按鈕。
貝寶交易
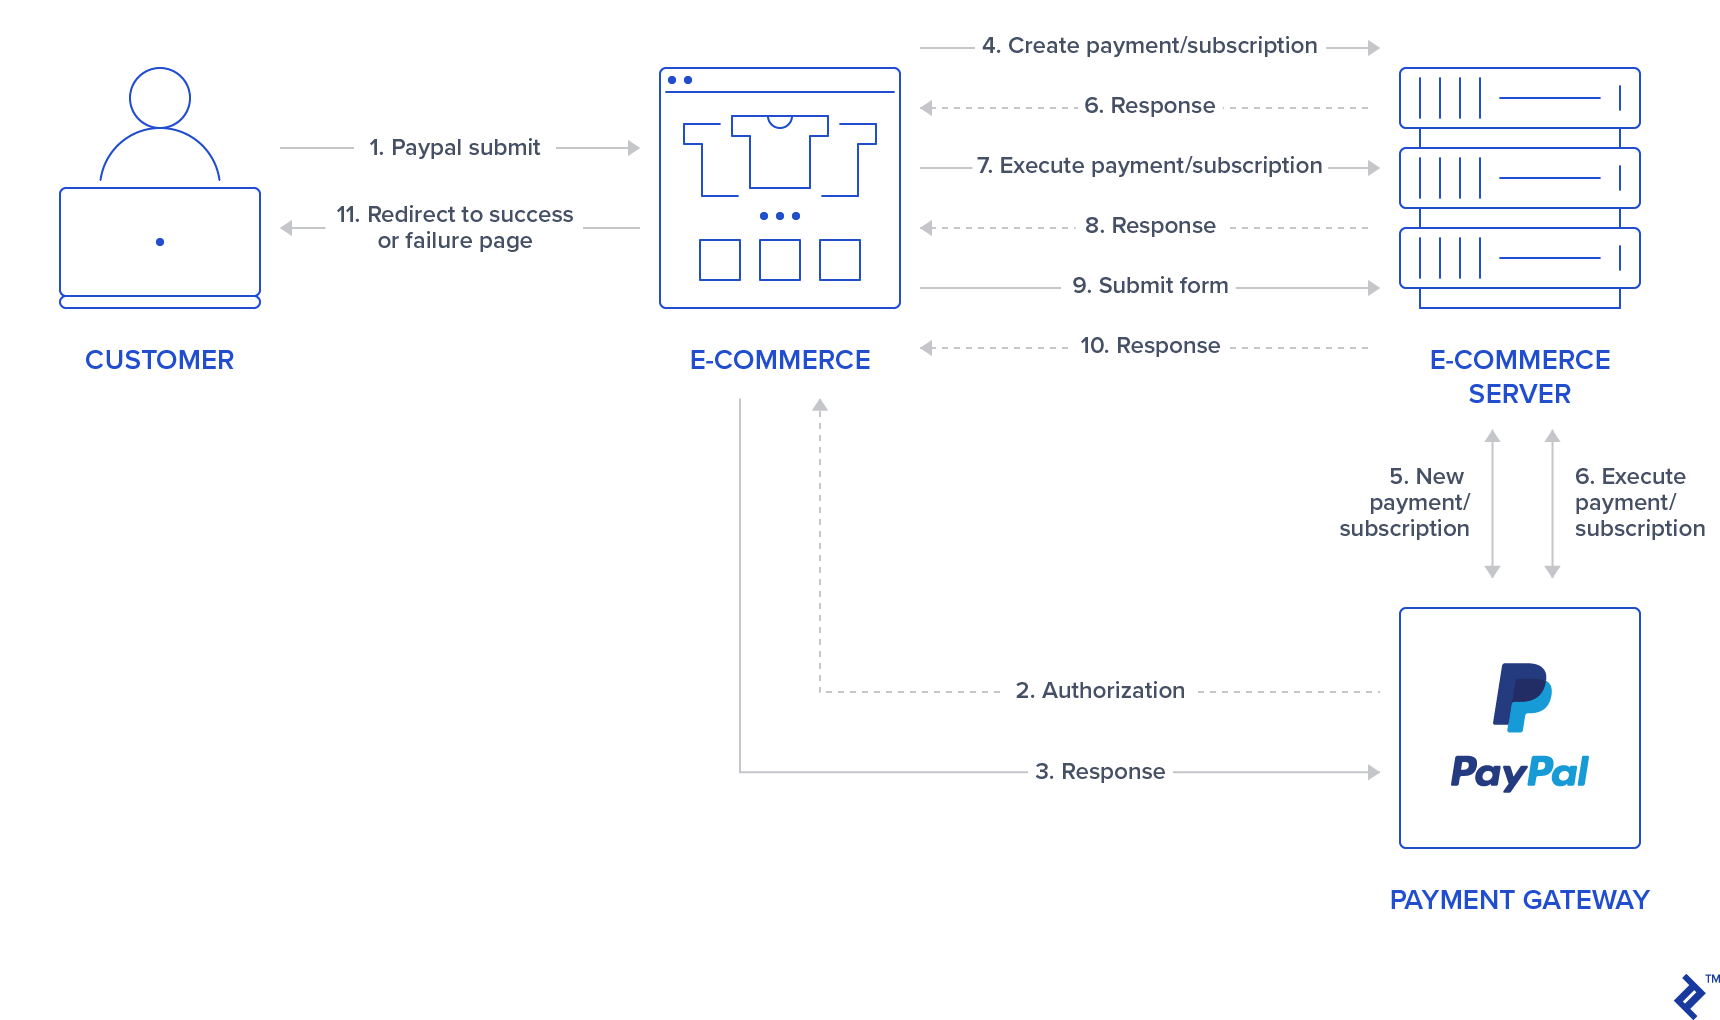
與 Stripe 不同,PayPal 交易的邏輯要復雜一些,因為它涉及更多來自前端到後端的請求。 這就是本節存在的原因。 我將或多或少地(沒有任何代碼)解釋createOrder和onApprove方法中描述的功能將如何實現以及後端流程中的預期內容。
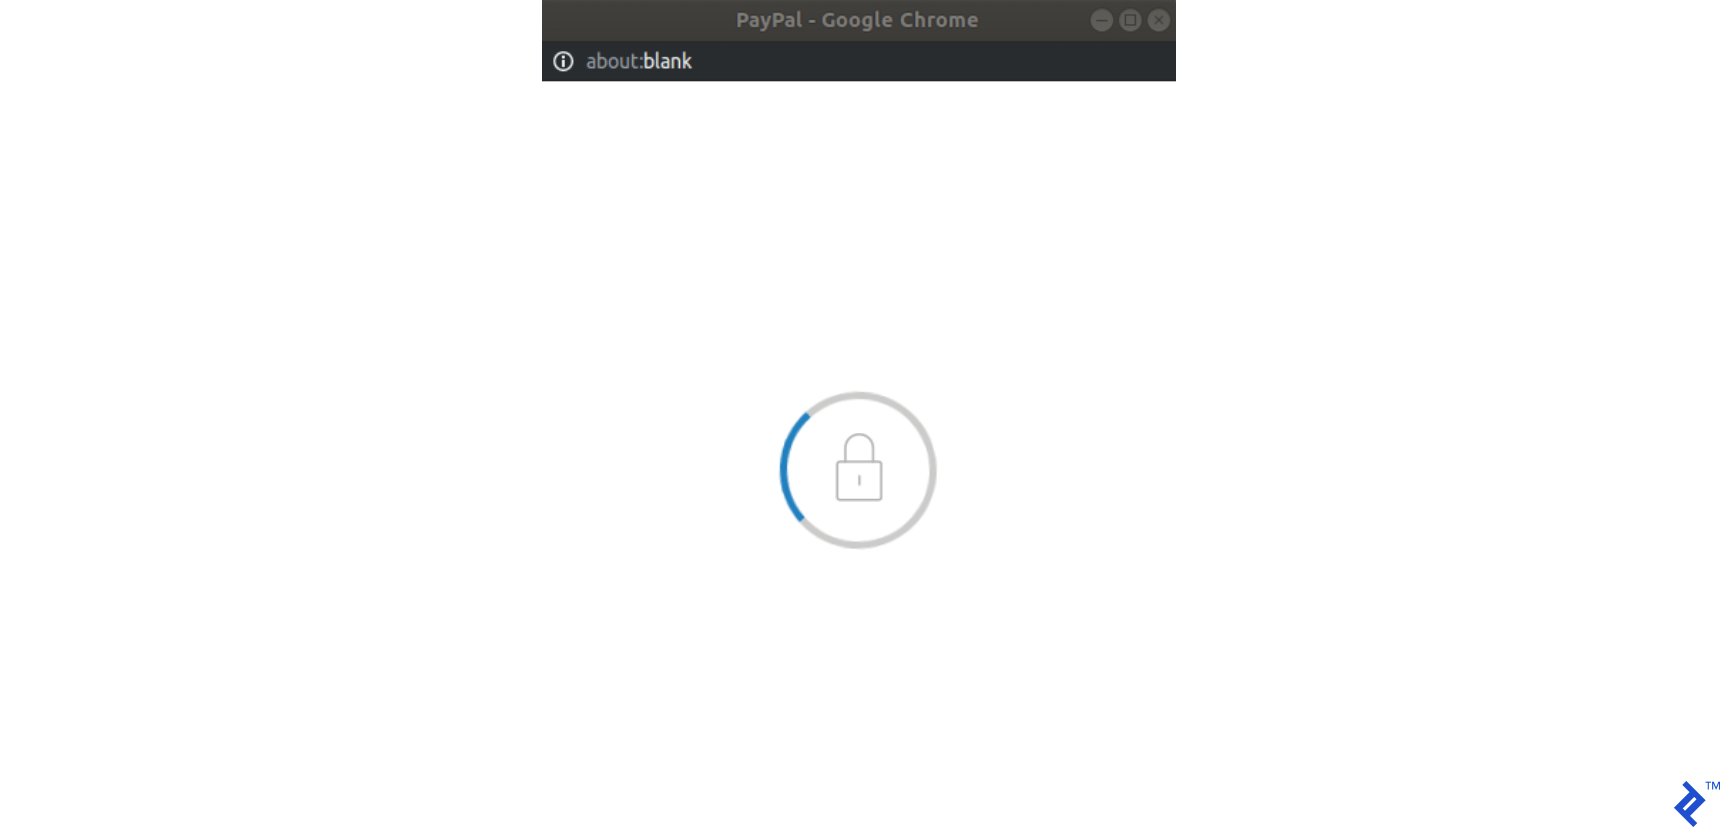
第 1 步:當用戶單擊 PayPal 提交按鈕時,會打開一個詢問用戶憑據的 PayPal 彈出窗口,但處於加載狀態。 調用函數回調createOrder 。
第 2 步:在此函數中,我們將向後端執行請求,該請求將創建支付/訂閱。 這是交易的開始,還不會收取任何費用,因此交易實際上處於待處理狀態。 我們的後端應該返回一個令牌,它將使用 PayPal 模塊(通過paypal-rest-sdk gem 提供)生成。
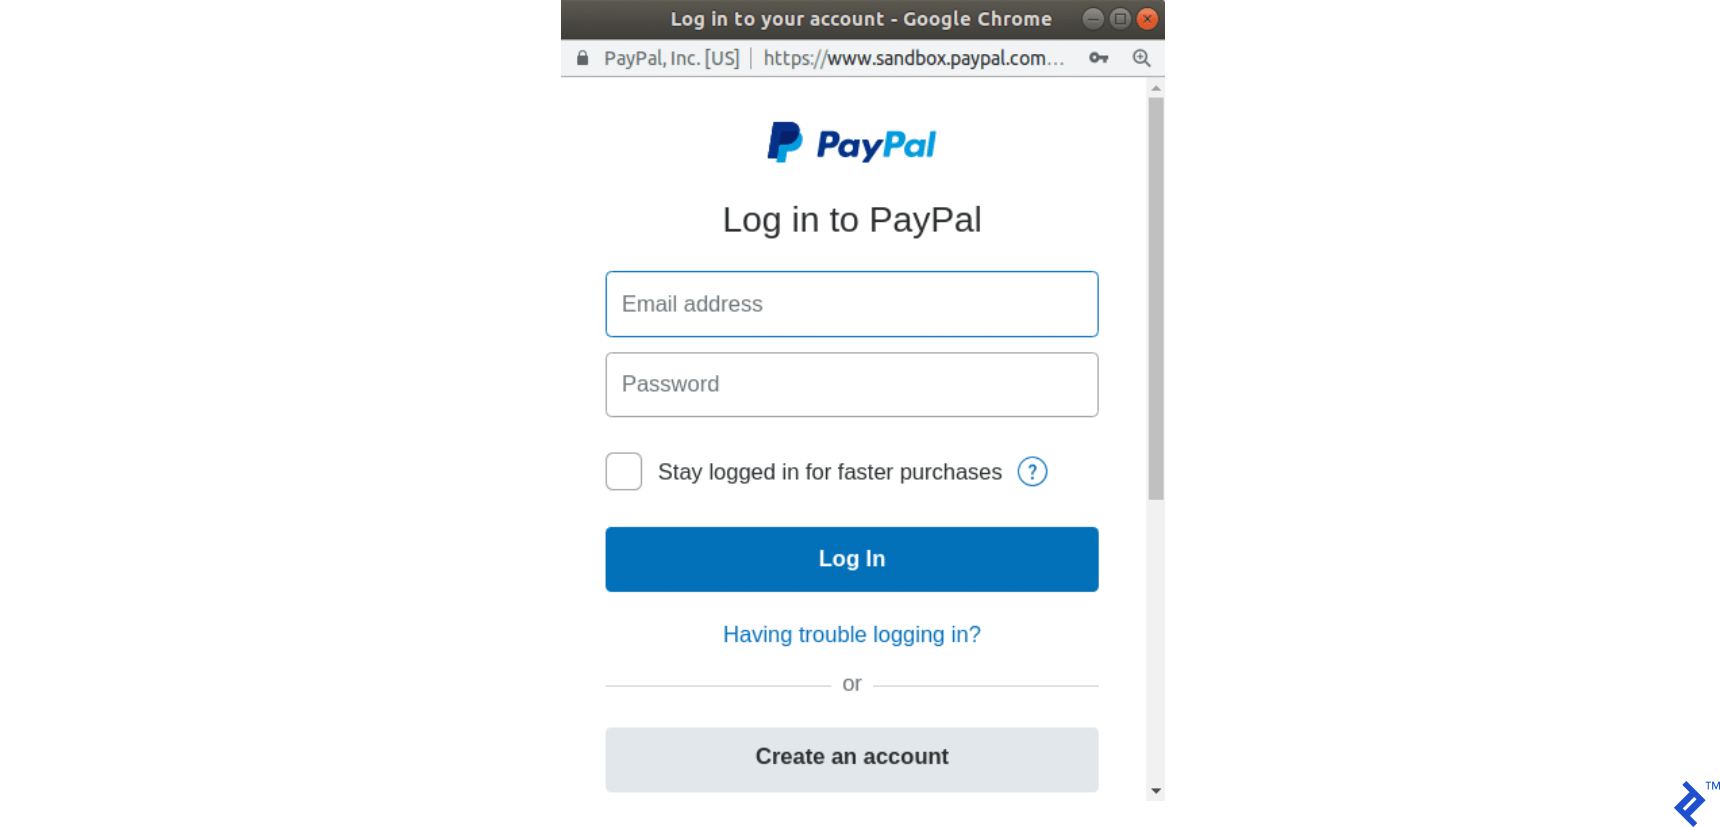
第 3 步:仍然在createOrder回調中,我們返回後端生成的令牌,如果一切正常,PayPal 彈出窗口將呈現以下內容,詢問用戶憑據:
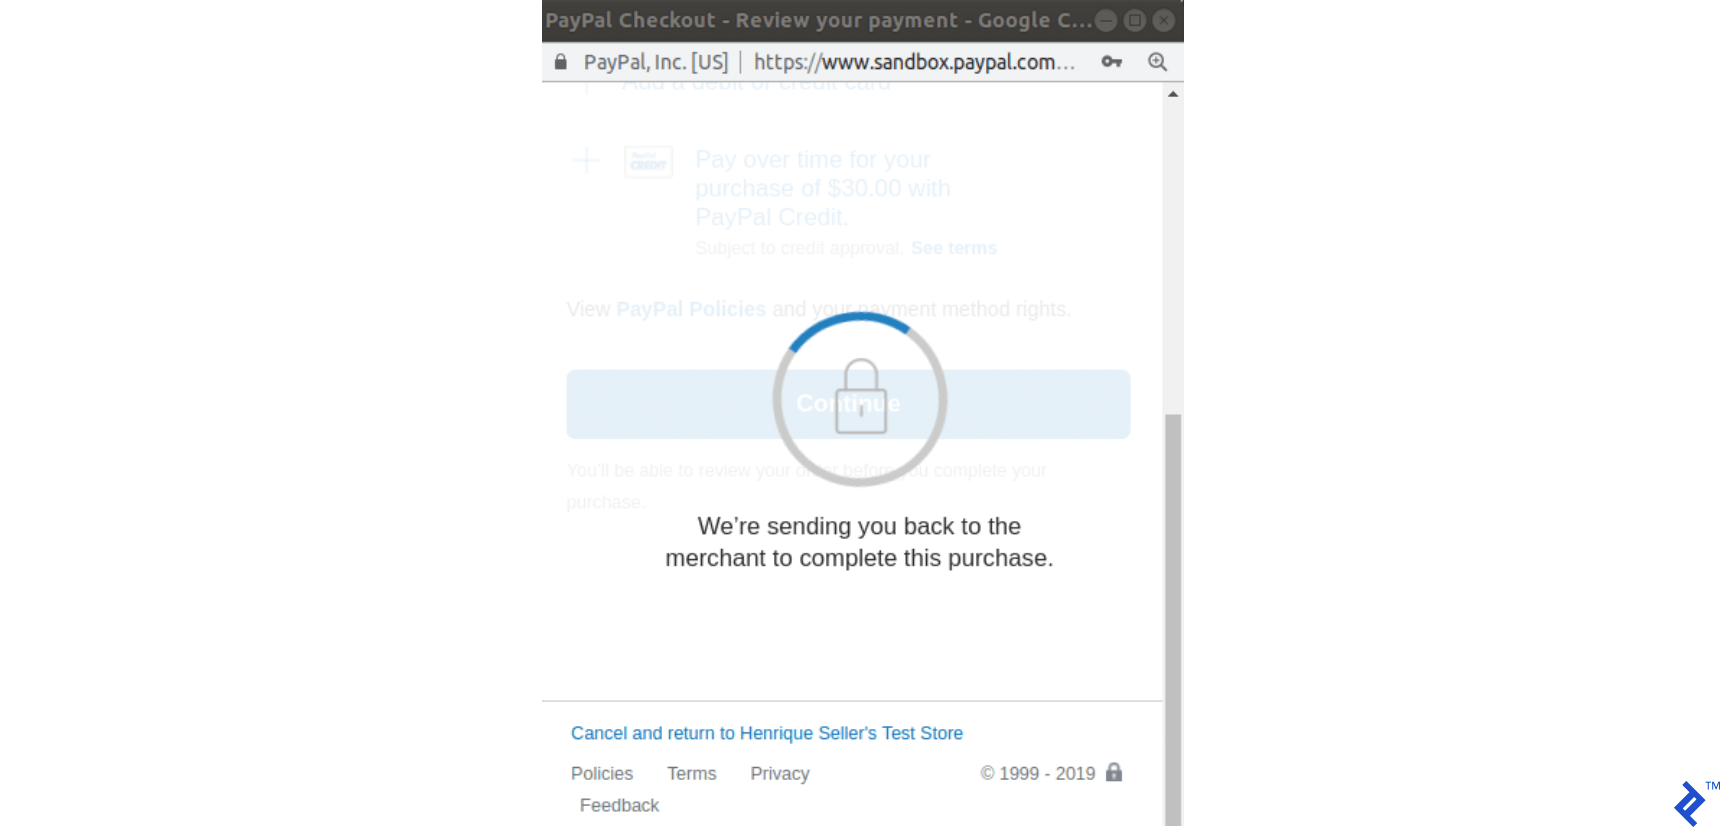
第 4 步:用戶登錄並選擇付款方式後,彈出窗口將其狀態更改為以下內容:
第 5 步:現在調用onApprove函數回調。 我們將其定義如下: onApprove: function(data) 。 data對象將具有支付信息以便執行它。 在這個回調中,這次將執行對我們後端函數的另一個請求,傳遞數據對像以執行 PayPal 訂單。
第 6 步:我們的後端執行此事務並返回 200(如果成功)。
第 7 步:當我們的後端返回時,我們提交表單。 這是我們向後端提出的第三個請求。
請注意,與 Stripe 不同的是,在此過程中向我們的後端發出了三個請求。 我們將相應地保持我們的訂單記錄狀態同步:
-
createOrder回調:創建交易,同時創建訂單記錄; 因此,它默認處於掛起狀態。 -
onApprove回調:交易被執行,我們的訂單將被設置為paypal_executed 。 - 訂單頁面已提交:交易已經執行,所以沒有任何變化。 訂單記錄將其狀態更改為已付款。
下圖描述了整個過程:
貝寶付款
PayPal 支付遵循與 Stripe Charges 相同的邏輯,因此它們代表一次性交易,但如上一節所述,它們具有不同的流程邏輯。 以下是處理 PayPal 付款需要執行的更改:
第 1 步:為 PayPal 創建新路線並執行付款。
Add the following routes in config/routes.rb :
post 'orders/paypal/create_payment' => 'orders#paypal_create_payment', as: :paypal_create_payment post 'orders/paypal/execute_payment' => 'orders#paypal_execute_payment', as: :paypal_execute_payment This will create two new routes for creating and executing payments which will be handled in the paypal_create_payment and paypal_execute_payment orders controller methods.
Step 2: Create the PayPal service.
Add the singleton class Orders::Paypal at: app/services/orders/paypal.rb .
This service will initially have three responsibilities:
- The
create_paymentmethod creates a payment by callingPayPal::SDK::REST::Payment.new. A token is generated and returned to the front-end. - The
execute_paymentmethod executes the payment by first finding the previous created payment object throughPayPal::SDK::REST::Payment.find(payment_id)which uses the payment_id as an argument which has the same value as the charge_id stored in the previous step in the order object. After that, we callexecutein the payment object with a given payer as the parameter. This payer is given by the front end after the user has provided credentials and selected a payment method in the popup. - The
finishmethod finds an order by a specific charge_id querying for recently created orders in the paypal_executed state. If a record is found, it is marked as paid.
class Orders::Paypal def self.finish(charge_id) order = Order.paypal_executed.recently_created.find_by(charge_id: charge_id) return nil if order.nil? order.set_paid order end def self.create_payment(order:, product:) payment_price = (product.price_cents/100.0).to_s currency = "USD" payment = PayPal::SDK::REST::Payment.new({ intent: "sale", payer: { payment_method: "paypal" }, redirect_urls: { return_url: "/", cancel_url: "/" }, transactions: [{ item_list: { items: [{ name: product.name, sku: product.name, price: payment_price, currency: currency, quantity: 1 } ] }, amount: { total: payment_price, currency: currency }, description: "Payment for: #{product.name}" }] }) if payment.create order.token = payment.token order.charge_id = payment.id return payment.token if order.save end end def self.execute_payment(payment_id:, payer_id:) order = Order.recently_created.find_by(charge_id: payment_id) return false unless order payment = PayPal::SDK::REST::Payment.find(payment_id) if payment.execute( payer_id: payer_id ) order.set_paypal_executed return order.save end endStep 3: Call the PayPal service in the controller in the submit action.
Add a callback for prepare_new_order before the action paypal_create_payment (which will be added in the next step) is requested by adding the following in the file app/controllers/orders_controller.rb :
class OrdersController < ApplicationController before_action :authenticate_user! before_action :prepare_new_order, only: [:paypal_create_payment] ... Again, in the same file, call PayPal service in the submit action by replacing the commented code #PAYPAL WILL BE HANDLED HERE. 具有以下內容:
... elsif order_params[:payment_gateway] == "paypal" @order = Orders::Paypal.finish(order_params[:token]) end ...Step 4: Create the actions for handling requests.
Still, in the app/controllers/orders_controller.rb file, create two new actions (which should be public) for handling requests to paypal_create_payment and paypal_execute_payment routes:
- The
paypal_create_paymentmethod: Will call our service methodcreate_payment. If that returns successfully, it will return the order token created byOrders::Paypal.create_payment. - The
paypal_execute_paymentmethod: Will call our service methodexecute_payment(which executes our payments). If the payment is performed successfully, it returns 200.
... def paypal_create_payment result = Orders::Paypal.create_payment(order: @order, product: @product) if result render json: { token: result }, status: :ok else render json: {error: FAILURE_MESSAGE}, status: :unprocessable_entity end end def paypal_execute_payment if Orders::Paypal.execute_payment(payment_id: params[:paymentID], payer_id: params[:payerID]) render json: {}, status: :ok else render json: {error: FAILURE_MESSAGE}, status: :unprocessable_entity end end ... Step 5: Implement the front-end callback functions for createOrder and onApprove .
Make your paypal.Button.render call look like this:
paypal.Buttons({ env: "#{ENV['PAYPAL_ENV']}", createOrder: function() { $('#order-type').val("paypal"); if (isPayment()) { return $.post("#{paypal_create_payment_url}", $('#order-details').serialize()).then(function(data) { return data.token; }); } else { } }, onApprove: function(data) { if (isPayment()) { return $.post("#{paypal_execute_payment_url}", { paymentID: data.paymentID, payerID: data.payerID }).then(function() { submitOrderPaypal(data.paymentID) }); } else { } } }).render('#submit-paypal'); As mentioned in the previous section, we call paypal_create_payment_url for the createOrder callback and paypal_execute_payment_url for the onApprove callback. Notice that if the last request returns success, we submit the order, which is the third request made to the server.
In the createOrder function handler, we return a token (obtained from the back end). In the onApprove callback, we have two properties passed down to our back-end paymentID and payerID . These will be used in order to execute the payment.
Finally, notice that we have two empty else clauses as I'm leaving room for the next section where we will be adding PayPal subscriptions.
If you visit your page after integrating the front-end JavaScript section and select PayPal as the payment method, it should look like the following:
Step 6: Test your application.
- 訪問索引頁面。
- 選擇付款/收費產品和 PayPal 作為付款方式。
- 單擊提交 PayPal 按鈕。
- 在 PayPal 彈出窗口中:
- 使用您創建的買家帳戶的憑據。
- 登錄並確認您的訂單。
- 彈出窗口應該關閉。
- 檢查您是否被重定向到成功頁面。
- 最後,通過在 https://www.sandbox.paypal.com/signin 使用您的企業帳戶登錄並檢查儀表板 https://www.sandbox.paypal.com/listing,檢查訂單是否在 PayPal 帳戶中執行/交易。
貝寶訂閱
PayPal 計劃/協議/訂閱遵循與 Stripe 訂閱相同的邏輯,並且是為定期付款而創建的。 使用這種類型的產品,用戶會根據其配置自動按日、週、月或年收費。
我們將使用產品paypal_plan_name的字段,以存儲 PayPal 提供的計劃 ID。 在這種情況下,與 Stripe 不同的是,我們不選擇 ID,並且 PayPal 返回此值,該值將用於更新我們數據庫中創建的最後一個產品。
對於創建訂閱,任何步驟都不需要customer信息,因為onApprove方法可能會在其底層實現中處理此鏈接。 所以我們的桌子將保持不變。
第 1 步:使用 PayPal API 創建計劃。
使用命令rails c打開控制台。 使用以下方式為您的 PayPal 帳戶創建訂閱:
plan = PayPal::SDK::REST::Plan.new({ name: 'Premium Plan', description: 'Premium Plan', type: 'fixed', payment_definitions: [{ name: 'Premium Plan', type: 'REGULAR', frequency_interval: '1', frequency: 'MONTH', cycles: '12', amount: { currency: 'USD', value: '100.00' } }], merchant_preferences: { cancel_url: 'http://localhost:3000/', return_url: 'http://localhost:3000/', max_fail_attempts: '0', auto_bill_amount: 'YES', initial_fail_amount_action: 'CONTINUE' } }) plan.create plan_update = { op: 'replace', path: '/', value: { state: 'ACTIVE' } } plan.update(plan_update) 第 2 步:使用返回的plan.id更新數據庫paypal_plan_name中的最後一個產品。
跑步:
Product.last.update(paypal_plan_name: plan.id)第 3 步:為 PayPal 訂閱添加路由。
在config/routes.rb中添加兩條新路由:
post 'orders/paypal/create_subscription' => 'orders#paypal_create_subscription', as: :paypal_create_subscription post 'orders/paypal/execute_subscription' => 'orders#paypal_execute_subscription', as: :paypal_execute_subscription第 4 步:在 PayPal 服務中處理創建和執行。
在app/services/orders/paypal.rb的Orders::Paypal中添加另外兩個用於創建和執行訂閱的函數:
def self.create_subscription(order:, product:) agreement = PayPal::SDK::REST::Agreement.new({ name: product.name, description: "Subscription for: #{product.name}", start_date: (Time.now.utc + 1.minute).iso8601, payer: { payment_method: "paypal" }, plan: { id: product.paypal_plan_name } }) if agreement.create order.token = agreement.token return agreement.token if order.save end end def self.execute_subscription(token:) order = Order.recently_created.find_by(token: token) return false unless order agreement = PayPal::SDK::REST::Agreement.new agreement.token = token if agreement.execute order.charge_id = agreement.id order.set_paypal_executed return order.charge_id if order.save end end 在create_subscription中,我們通過調用方法PayPal::SDK::REST::Agreement.new並將product.paypal_plan_name作為其屬性之一來初始化協議。 之後,我們創建它,現在將為最後一個對象設置一個令牌。 我們還將令牌返回到前端。
在execute_subscription中,我們找到了在之前調用中創建的order記錄。 之後,我們初始化一個新的協議,我們設置這個先前對象的令牌並執行它。 如果最後一步成功執行,訂單狀態將設置為paypal_executed 。 現在我們將協議 ID 返回到前端,該協議 ID 也存儲在order.chager_id中。
第 5 步:在orders_controller中添加創建和執行訂閱的操作。
更改app/controllers/orders_controller.rb 。 在類的頂部,首先,然後更新回調prepare_new_order以在調用paypal_create_subscription之前執行:
class OrdersController < ApplicationController before_action :authenticate_user! before_action :prepare_new_order, only: [:paypal_create_payment, :paypal_create_subscription] 此外,在同一個文件中添加兩個公共函數,以便它們調用Orders::Paypal服務,其流程與我們在 PayPal 支付中已有的流程相似:
... def paypal_create_subscription result = Orders::Paypal.create_subscription(order: @order, product: @product) if result render json: { token: result }, status: :ok else render json: {error: FAILURE_MESSAGE}, status: :unprocessable_entity end end def paypal_execute_subscription result = Orders::Paypal.execute_subscription(token: params[:subscriptionToken]) if result render json: { id: result}, status: :ok else render json: {error: FAILURE_MESSAGE}, status: :unprocessable_entity end end ... 第 6 步:在前端為createOrder和onApprove回調添加訂閱處理程序。
最後,在index.html.haml中,將paypal.Buttons函數替換為以下內容,這將填充我們之前的兩個空else :
paypal.Buttons({ env: "#{ENV['PAYPAL_ENV']}", createOrder: function() { $('#order-type').val("paypal"); if (isPayment()) { return $.post("#{paypal_create_payment_url}", $('#order-details').serialize()).then(function(data) { return data.token; }); } else { return $.post("#{paypal_create_subscription_url}", $('#order-details').serialize()).then(function(data) { return data.token; }); } }, onApprove: function(data) { if (isPayment()) { return $.post("#{paypal_execute_payment_url}", { paymentID: data.paymentID, payerID: data.payerID }).then(function() { submitOrderPaypal(data.paymentID) }); } else { return $.post("#{paypal_execute_subscription_url}", { subscriptionToken: data.orderID }).then(function(executeData) { submitOrderPaypal(executeData.id) }); } } }).render('#submit-paypal'); 訂閱的創建和執行具有與支付類似的邏輯。 一個區別是,在執行支付時,來自回調函數onApprove的數據已經有一個paymentID代表charge_id以通過submitOrderPaypal(data.paymentID)提交表單。 對於訂閱,我們只有在通過paypal_execute_subscription_url上的POST請求執行它之後才能獲得charge_id ,因此我們可以調用submitOrderPaypal(executeData.id) 。
第 7 步:測試您的應用程序。
- 訪問索引頁面。
- 選擇訂閱產品和 PayPal 作為付款方式。
- 單擊提交 PayPal 按鈕。
- 在 PayPal 彈出窗口中:
- 使用您創建的買家帳戶的憑據。
- 登錄並確認您的訂單。
- 彈出窗口應該關閉。
- 檢查您是否被重定向到成功頁面。
- 最後,通過在 https://www.sandbox.paypal.com/signin 使用您的企業帳戶登錄並檢查儀表板 https://www.sandbox.paypal.com/listing/,檢查訂單是否在 PayPal 帳戶中執行交易。
結論
閱讀本文後,您應該能夠在 Rails 應用程序中集成 PayPal 和 Stripe 的付款/收費以及訂閱交易。 有很多可以改進的地方,為了簡潔起見,我沒有在本文中添加。 我根據難度假設組織了所有內容:
- 更輕鬆:
- 使用傳輸層安全性 (TLS),以便您的請求使用 HTTPS。
- 為 PayPal 和 Stripe 實施生產環境配置。
- 添加一個新頁面,以便用戶可以訪問以前訂單的歷史記錄。
- 中等的:
- 退款或取消訂閱。
- 提供非註冊用戶支付解決方案。
- 更難:
- 如果用戶希望回來,請提供一種刪除帳戶並保留其令牌和customer_id的方法。 但是在一定天數之後,刪除這些數據,以便您的應用程序更符合 PCI。
- 移至服務器端的 PayPal 版本 2 API (https://developer.paypal.com/docs/api/payments/v2/) 我們在本教程中使用的 gem paypal-sdk-rest ,只有一個 beta 版本2,所以可以謹慎使用(https://github.com/paypal/PayPal-Ruby-SDK/tree/2.0-beta)。
- 包括冪等請求。
- 條紋:https://stripe.com/docs/api/idempotent_requests
- 貝寶:https://developer.paypal.com/docs/api-basics/#api-idempotency
我還推薦閱讀 Stripe Checkout 元素,這是在前端集成 Stripe 的另一種方式。 與我們在本教程中使用的 Stripe Elements 不同,Stripe Checkout 在單擊按鈕(類似於 PayPal)後會打開一個彈出窗口,用戶可以在其中填寫信用卡信息或選擇使用 Google Pay/Apple Pay https://stripe.com /文檔/網絡。
第二個閱讀建議是兩個支付網關的安全頁面。
- 對於條紋
- 對於貝寶
最後,感謝您閱讀本文! 您還可以查看我用於此項目示例的 GitHub 項目。 在那裡,我在開發時也添加了rspec測試。