
在 Ruby on Rails 中集成 Stripe 和 PayPal 支付方式
已发表: 2022-03-11对于全球速卖通、Ebay 和亚马逊等大型电子商务公司来说,一个关键功能是一种安全的付款方式,这对他们的业务至关重要。 如果此功能失败,后果将是毁灭性的。 这适用于从事电子商务应用程序的行业领导者和 Ruby on Rails 开发人员。
网络安全对于防止攻击至关重要,而使交易过程更加安全的一种方法是要求第三方服务来处理它。 在您的应用程序中包含支付网关是实现此目标的一种方式,因为它们提供用户授权、数据加密和仪表板,因此您可以随时跟踪交易状态。
Web 上有多种支付网关服务,但在本文中,我将重点介绍将 Stripe 和 PayPal 集成到 Rails 应用程序。 再举几个其他的:Amazon Payments、Square、SecurePay、WorldPay、Authorize.Net、2Checkout.com、Braintree、Amazon 或 BlueSnap。
支付网关集成如何工作
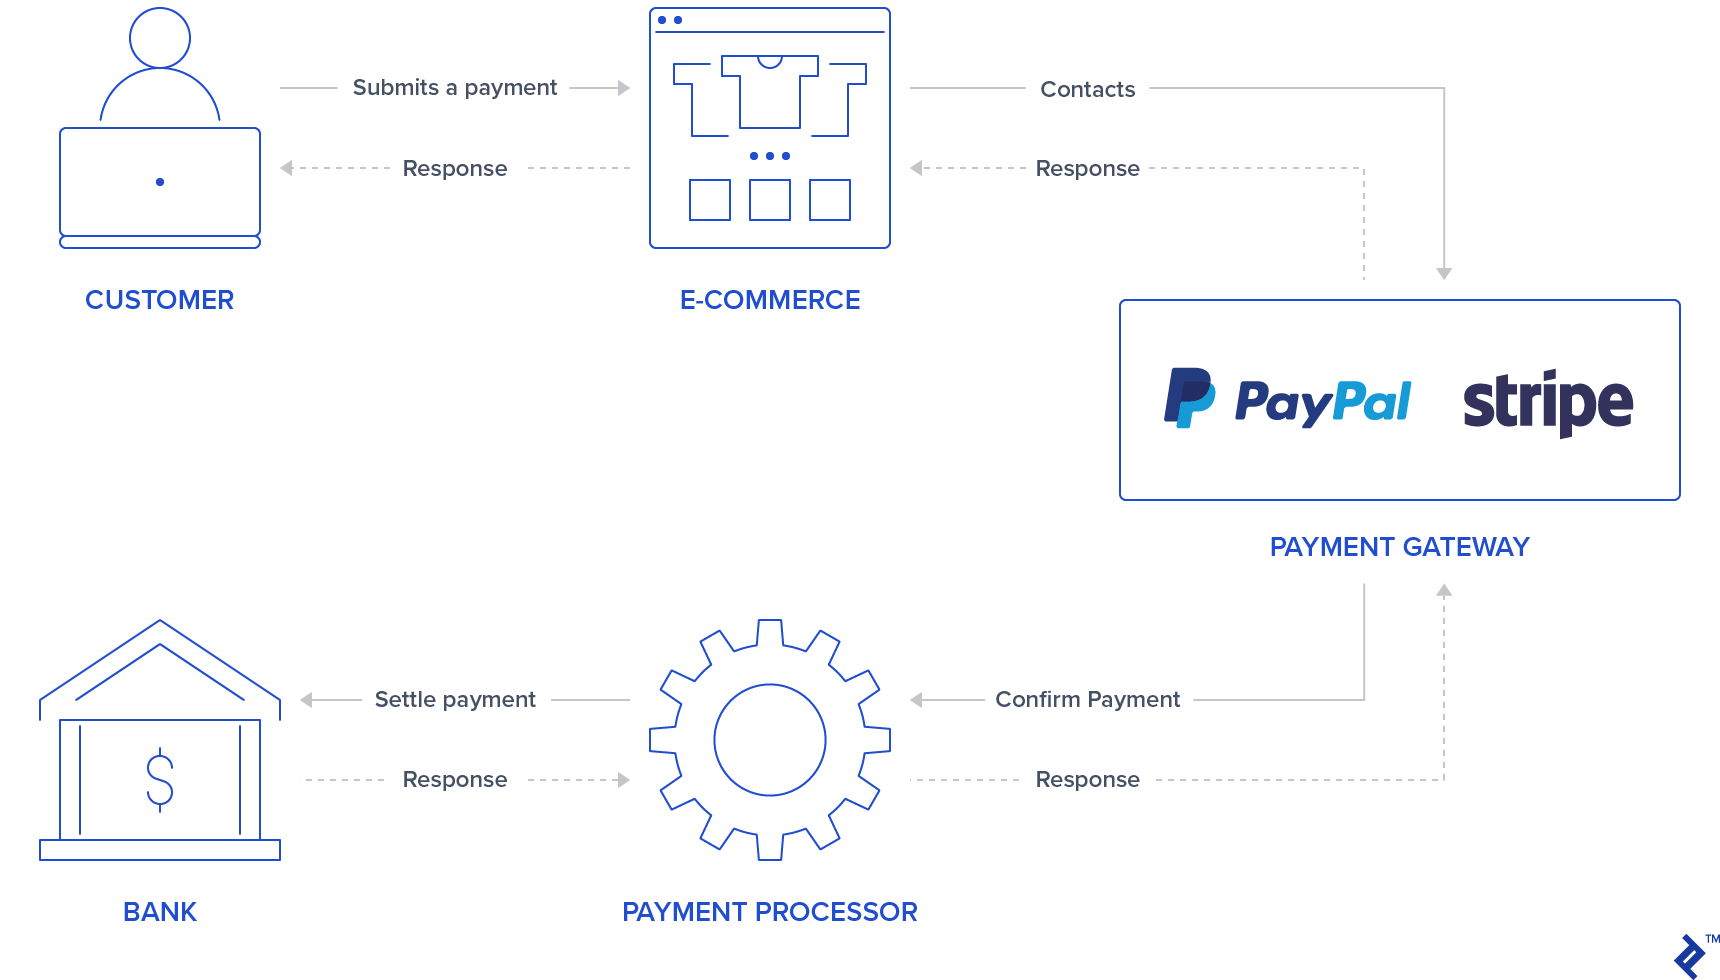
通常,您的应用程序中会有一个表单/按钮,用户可以在其中登录/插入信用卡数据。 PayPal 和 Stripe 已经通过使用iframe表单或popups使这一步更加安全,这些表单或弹出窗口会阻止您的应用程序存储敏感的用户信用卡信息,因为它们将返回代表此交易的令牌。 一些用户可能已经因为知道第三方服务正在处理交易过程而对处理付款更有信心,因此这也可能对您的应用程序有吸引力。
在验证用户信息后,支付网关将通过联系支付处理器来确认支付,该支付处理器与银行通信以结算支付。 这可确保交易正确借记/贷记。
Stripe 使用信用卡表格询问信用卡号、cvv 和到期日期。 因此,用户必须在安全的 Stripe 输入中填写信用卡信息。 提供此信息后,您的应用程序后端会通过令牌处理此付款。
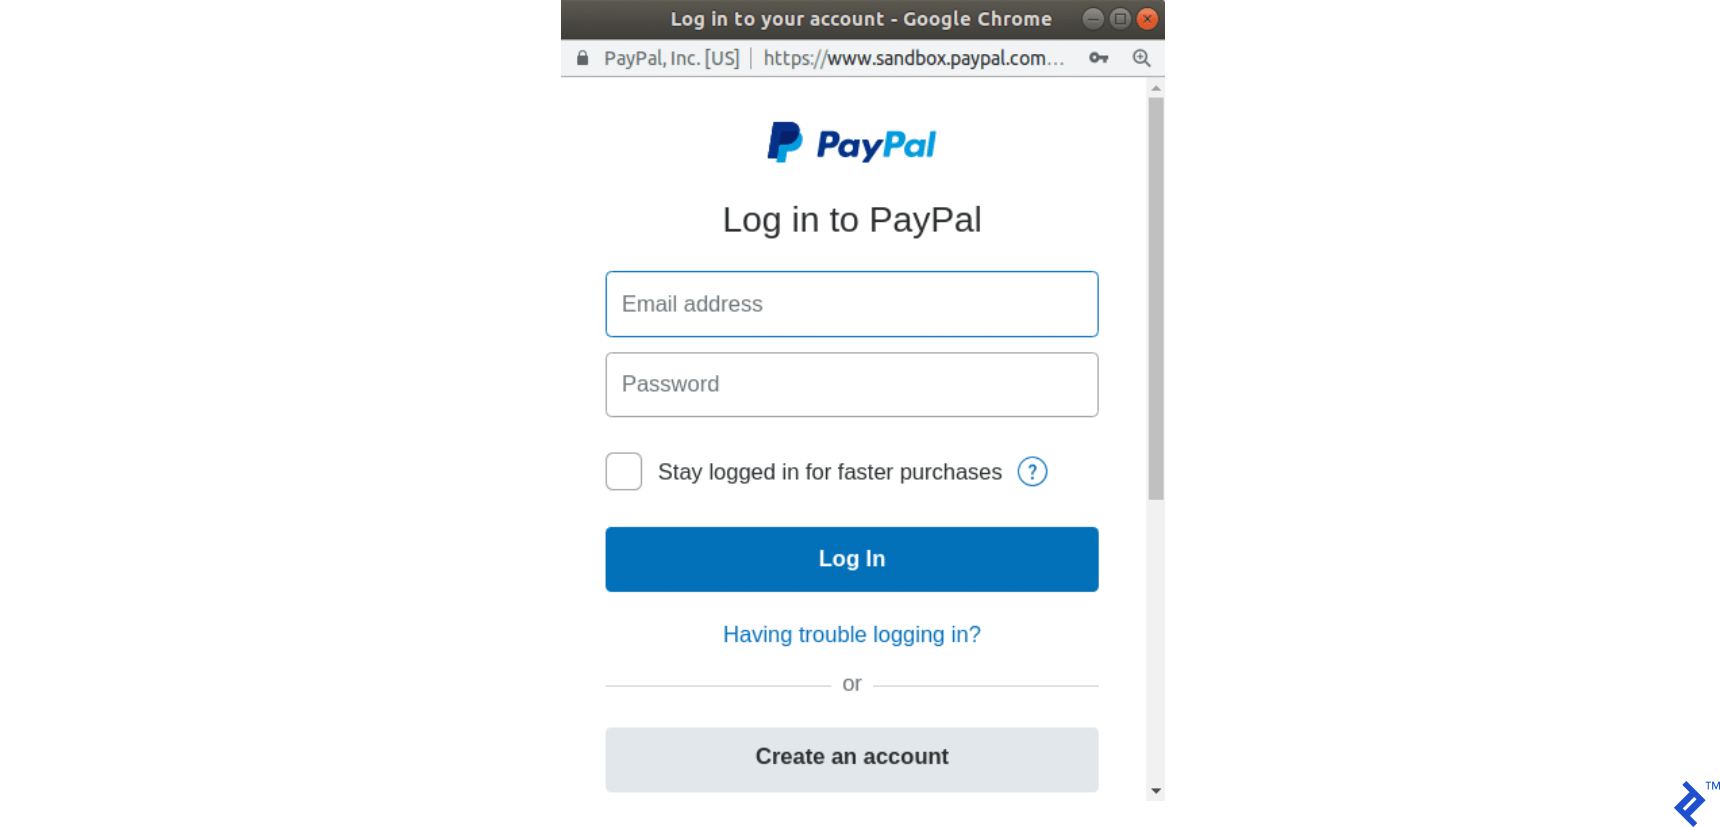
与 Stripe 不同,PayPal 将用户重定向到 PayPal 登录页面。 用户通过 PayPal 授权并选择付款方式,同样,您的后端将处理令牌而不是用户敏感数据。
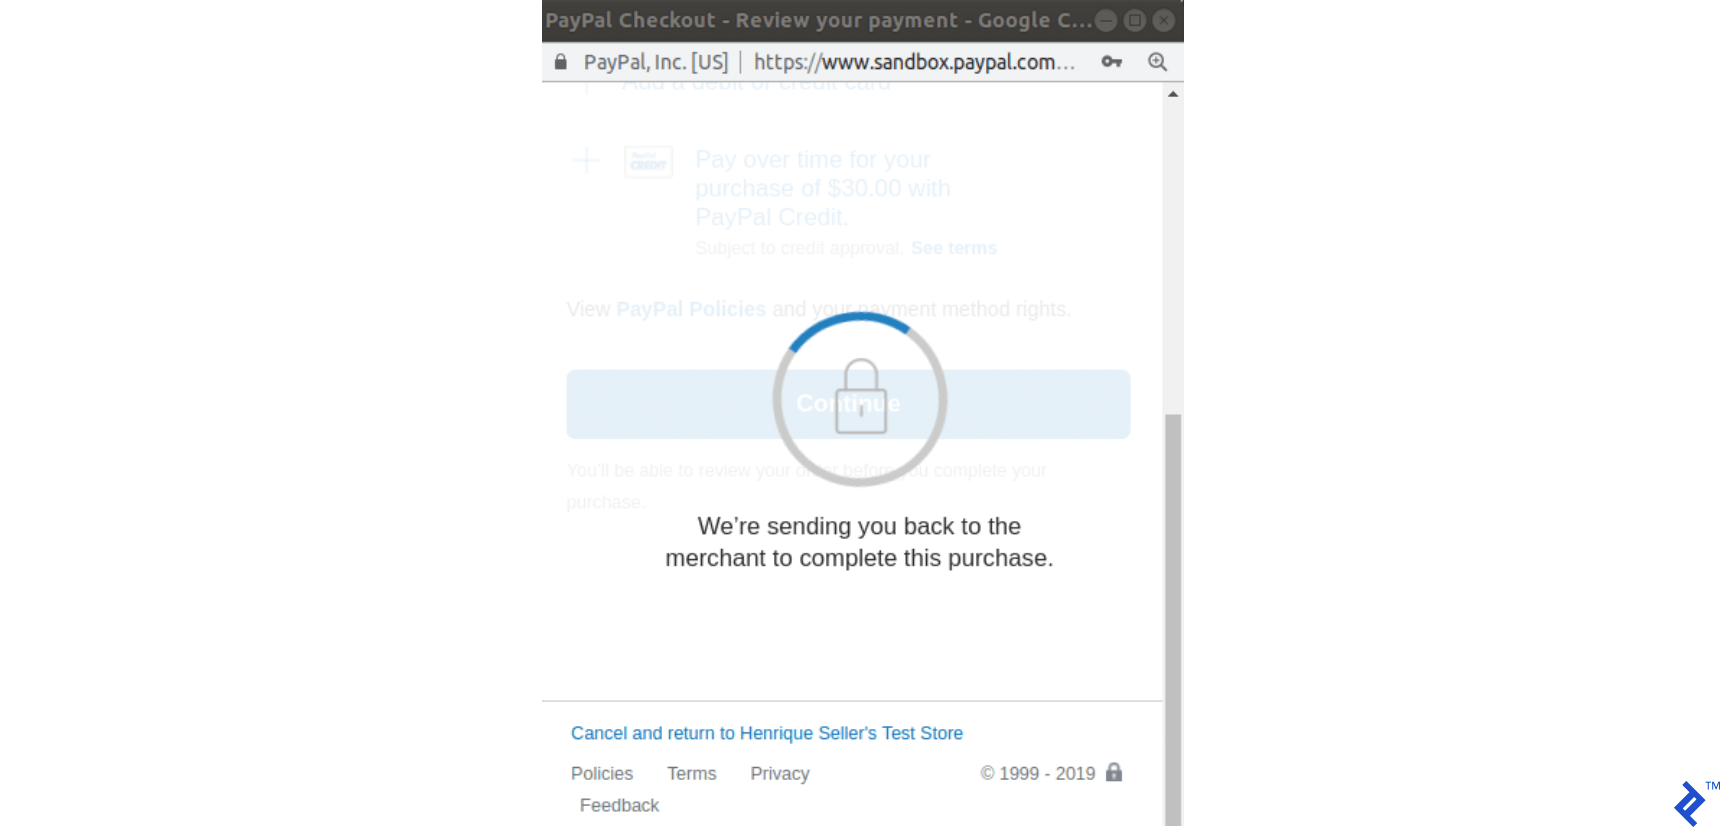
值得一提的是,对于这两个支付网关,您的后端应要求通过 Stripe 或 PayPal API 进行交易执行,这将给出 OK/NOK 响应,因此您的应用程序应相应地将用户重定向到成功或错误页面。
本文的目的是提供将这两个支付网关集成到单个应用程序中的快速指南。 对于所有测试,我们将使用 Stripe 和 PayPal 提供的沙盒和测试帐户来模拟付款。
设置
在集成支付网关之前,我们将通过添加 gem、数据库表和索引页面来进行初始化应用程序的设置。 该项目是使用 Rails 版本 5.2.3 和 Ruby 2.6.3 创建的。
注意:您可以在我们最近的文章中查看 Rails 6 的新功能。
第 1 步:初始化 Rails 应用程序。
通过使用您的应用名称使用rails命令运行项目初始化来初始化项目:
rails new YOUR_APP_NAME 并cd在您的应用程序文件夹中。
第 2 步:安装 gem。
除了 Stripe 和 PayPal gems,还添加了一些其他的 gems:
-
devise: 用于用户认证和授权 haml: 用于渲染用户页面的模板工具jquery-rails: 用于前端脚本中的jquery-
money-rails:用于显示格式化的货币值
添加到您的Gemfile :
gem "devise", ">= 4.7.1" gem "haml" gem "jquery-rails" gem "money-rails"添加后在您的 CLI 中运行:
bundle install第 3 步:初始化 gem。
除了通过bundle安装之外,其中一些 gem 还需要初始化。
安装装置:
rails g devise:install 初始化money-rails :
rails g money_rails:initializer 通过将以下内容附加到app/assets/javascripts/application.js的底部来初始化jquery-rails :
//= require jquery //= require jquery_ujs第 4 步:表和迁移
本项目中将使用三个表Users 、 Products和Orders 。
-
Users:将通过设计生成 Products栏目:-
name -
price_cents -
Stripe_plan_name:表示在 Stripe 中创建的订阅计划的 ID,因此用户可以订阅它。 只有与 Stripe 计划关联的产品才需要此字段。 -
paypal_plan_name:与stripe_plan_name相同,但适用于 PayPal
-
-
Orders栏:-
product_id -
user_id -
status:这将通知订单是否处于待处理、失败或已付款状态。 -
token:这是从 API(Stripe 或 PayPal)生成的令牌,用于初始化交易。 -
price_cents:与产品类似,但用于使该值在订单记录中持久化 payment_gateway:存储用于 PayPal 或 Stripe 订单的支付网关customer_id:这将用于 Stripe,以便为订阅存储 Stripe 客户,将在后面的部分中进行更详细的解释。
-
为了生成这些表,必须生成一些迁移:
用于创建用户表。 跑步:
rails g devise User用于创建Products 表。 通过运行生成迁移:
rails generate migration CreateProducts name:string stripe_plan_name:string paypal_plan_name:string 打开您创建的迁移文件,该文件应位于db/migrate/ ,并进行更改以使您的迁移看起来类似于以下内容:
class CreateProducts < ActiveRecord::Migration[5.2] def change create_table :products do |t| t.string :name t.string :stripe_plan_name t.string :paypal_plan_name end add_money :products, :price, currency: { present: true } end end用于创建Orders 表。 通过运行生成迁移:
rails generate migration CreateOrders product_id:integer user_id:integer status:integer token:string charge_id:string error_message:string customer_id:string payment_gateway:integer 再次,打开您创建的迁移文件,该文件应该位于db/migrate/并对该文件进行更改,以使其看起来类似于以下内容:
class CreateOrders < ActiveRecord::Migration[5.2] def change create_table :orders do |t| t.integer :product_id t.integer :user_id t.integer :status, default: 0 t.string :token t.string :charge_id t.string :error_message t.string :customer_id t.integer :payment_gateway t.timestamps end add_money :orders, :price, currency: { present: false } end end通过执行以下命令运行数据库迁移:
rails db:migrate第 5 步:创建模型。
用户模型已经从设计安装中创建,不需要对其进行任何更改。 除此之外,将为Product和Order创建两个模型。
产品。 添加一个新文件app/models/product.rb ,其中包含:
class Product < ActiveRecord::Base monetize :price_cents has_many :orders end 命令。 添加一个新文件app/models/order.rb ,其中包含:
class Order < ApplicationRecord enum status: { pending: 0, failed: 1, paid: 2, paypal_executed: 3} enum payment_gateway: { stripe: 0, paypal: 1 } belongs_to :product belongs_to :user scope :recently_created, -> { where(created_at: 1.minutes.ago..DateTime.now) } def set_paid self.status = Order.statuses[:paid] end def set_failed self.status = Order.statuses[:failed] end def set_paypal_executed self.status = Order.statuses[:paypal_executed] end end步骤 6:填充数据库。
将在控制台中创建一个用户和两个产品。 订单记录将根据付款测试创建。
- 运行
rails s - 在浏览器中,访问
http://localhost:3000 - 您将被重定向到注册页面。
- 通过填写用户的电子邮件地址和密码来注册用户。
- 在您的终端中,将提示以下日志,显示在您的数据库中创建了一个用户:
User Create (0.1ms) INSERT INTO "users" ("email", "encrypted_password", "created_at", "updated_at") VALUES (?, ?, ?, ?) …- 通过运行
rails c并添加以下内容来创建两个没有订阅的产品:-
Product.create(name: "Awesome T-Shirt", price_cents: 3000) -
Product.create(name: "Awesome Sneakers", price_cents: 5000)
-
第 7 步:创建索引页面
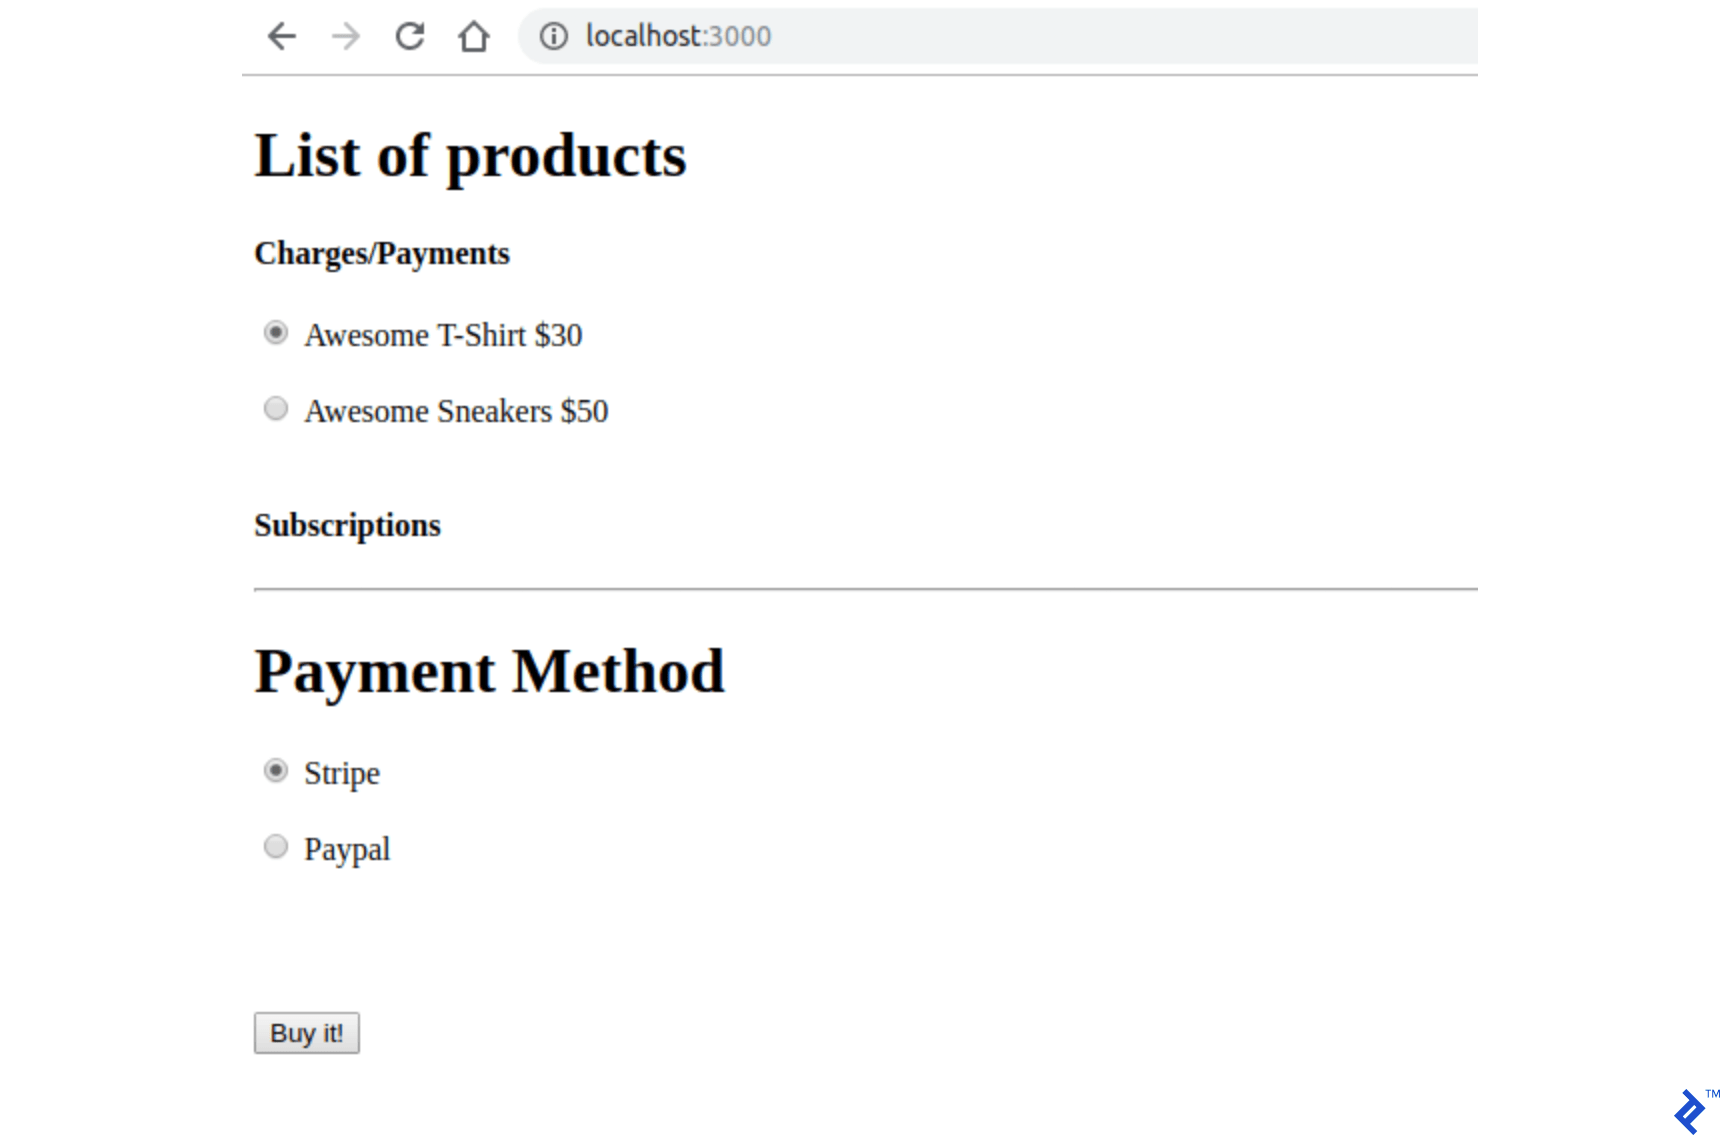
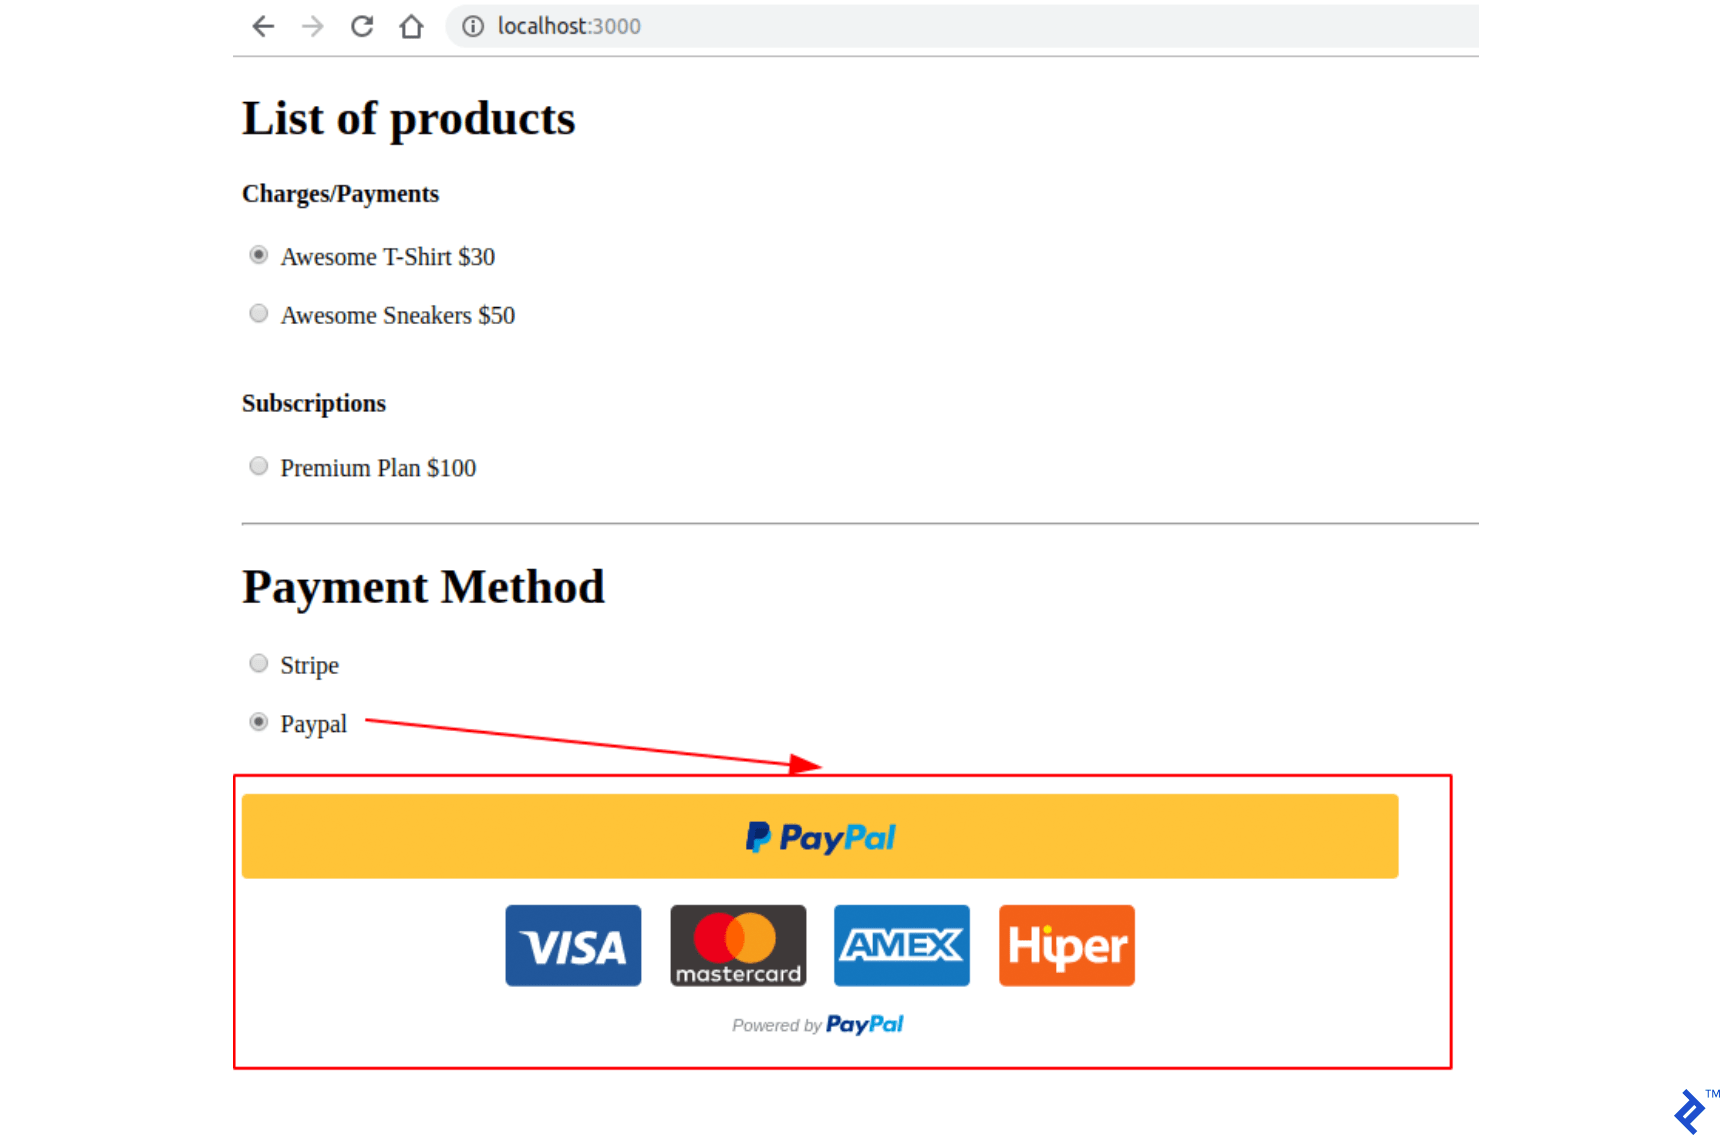
该项目的主页包括购买或订阅的产品选择。 此外,它还有一个用于选择付款方式(Stripe 或 PayPal)的部分。 提交按钮也用于每种支付网关类型,对于 PayPal,我们将通过其 JavaScript 库添加自己的按钮设计。
首先,为index创建路由并在config/routes.rb中submit 。
Rails.application.routes.draw do devise_for :users get '/', to: 'orders#index' post '/orders/submit', to: 'orders#submit' end 在订单控制器app/controllers/orders_controller.rb中创建和添加操作index并submit 。 orders#index操作存储两个要在前端使用的变量: @products_purchase包含没有计划的产品列表, @products_subscription products_subscription 包含同时具有 PayPal 和 Stripe 计划的产品。
class OrdersController < ApplicationController before_action :authenticate_user! def index products = Product.all @products_purchase = products.where(stripe_plan_name:nil, paypal_plan_name:nil) @products_subscription = products - @products_purchase end def submit end end 在app/views/orders/index.html.haml中创建一个文件。 该文件包含我们将通过提交方法发送到后端的所有输入,以及支付网关和产品选择的交互。 以下是一些输入名称属性:
-
Orders[product_id]存储产品 ID。 -
Orders[payment_gateway]包含带有 Stripe 或 PayPal 值的支付网关。
%div %h1 List of products = form_tag({:controller => "orders", :action => "submit" }, {:id => 'order-details'}) do %input{id:'order-type', :type=>"hidden", :value=>"stripe", :name=>'orders[payment_gateway]'} .form_row %h4 Charges/Payments - @products_purchase.each do |product| %div{'data-charges-and-payments-section': true} = radio_button_tag 'orders[product_id]', product.id, @products_purchase.first == product %span{id: "radioButtonName#{product.id}"} #{product.name} %span{id: "radioButtonPrice#{product.id}", :'data-price' => "#{product.price_cents}"} #{humanized_money_with_symbol product.price} %br %h4 Subscriptions - @products_subscription.each do |product| %div = radio_button_tag 'orders[product_id]', product.id, false %span{id: "radioButtonName#{product.id}"} #{product.name} %span{id: "radioButtonPrice#{product.id}", :'data-price' => "#{product.price_cents}"} #{humanized_money_with_symbol product.price} %br %hr %h1 Payment Method .form_row %div = radio_button_tag 'payment-selection', 'stripe', true, onclick: "changeTab();" %span Stripe %br %div = radio_button_tag 'payment-selection', 'paypal', false, onclick: "changeTab();" %span Paypal %br %br %div{id:'tab-stripe', class:'paymentSelectionTab active'} %div{id:'card-element'} %div{id:'card-errors', role:"alert"} %br %br = submit_tag "Buy it!", id: "submit-stripe" %div{id:'tab-paypal', class:'paymentSelectionTab'} %div{id: "submit-paypal"} %br %br %hr :javascript function changeTab() { var newActiveTabID = $('input[name="payment-selection"]:checked').val(); $('.paymentSelectionTab').removeClass('active'); $('#tab-' + newActiveTabID).addClass('active'); } :css #card-element { width:500px; } .paymentSelectionTab { display: none; } .paymentSelectionTab.active { display: block !important; } 如果您使用rails s运行您的应用程序并在http://localhost:3000中访问您的页面。 您应该能够看到如下页面:
支付网关凭证存储
PayPal 和 Stripe 密钥将存储在 Git 不跟踪的文件中。 对于每个支付网关,此文件中存储了两种类型的密钥,现在,我们将为它们使用一个虚拟值。 创建这些密钥的其他说明将在其他部分中介绍。
第 1 步:将其添加到.gitignore中。
/config/application.yml 第 2 步:在config/application.yml中使用您的凭据创建一个文件。 它应该包含用于访问这些 API 的所有 PayPal 和 Stripe 沙盒/测试密钥。
test: &default PAYPAL_ENV: sandbox PAYPAL_CLIENT_ID: YOUR_CREDENTIAL_HERE PAYPAL_CLIENT_SECRET: YOUR_CREDENTIAL_HERE STRIPE_PUBLISHABLE_KEY: YOUR_CREDENTIAL_HERE STRIPE_SECRET_KEY: YOUR_CREDENTIAL_HERE development: <<: *default 第 3 步:为了在应用程序启动时存储文件config/application.yml中的变量,请将这些行添加到Application类中的config/application.rb中,以便它们在ENV中可用。
config_file = Rails.application.config_for(:application) config_file.each do |key,value| ENV[key] = value end unless config_file.nil?条带配置
我们将添加一个使用 Stripe API 的 gem: stripe-rails 。 还需要创建一个 Stripe 帐户,以便处理费用和订阅。 如果需要,可以参考官方文档中 Stripe API 的 API 方法。
第 1 步:将 stripe-rails gem 添加到您的项目中。
stripe-rails gem 将为这个项目中使用的所有 API 请求提供一个接口。
在Gemfile中添加:
gem 'stripe-rails'跑步:
bundle install第 2 步:生成您的 API 密钥。
为了获得与 Stripe 通信的 API 密钥,您需要在 Stripe 中创建一个帐户。 测试应用程序可以使用测试模式,因此在创建Stripe帐户的过程中无需填写真实的业务信息。
- 如果您没有,请在 Stripe 中创建一个帐户 (https://dashboard.stripe.com/)。
- 虽然仍在 Stripe 仪表板中,但在登录后,打开查看测试数据。
- 在 https://dashboard.stripe.com/test/apikeys,将
YOUR_CREDENTIAL_HERE中的值STRIPE_PUBLISHABLE_KEY和STRIPE_SECRET_KEY的/config/application.yml替换为Publishable Key和Secret key中的内容。
第三步:初始化 Stripe 模块
除了替换键之外,我们还需要初始化 Stripe 模块,以便它使用已经在我们的ENV中设置的键。
在config/initializers/stripe.rb中创建一个文件:
Rails.application.configure do config.stripe.secret_key = ENV["STRIPE_SECRET_KEY"] config.stripe.publishable_key = ENV["STRIPE_PUBLISHABLE_KEY"] end第 4 步:在前端集成 Stripe。
我们将添加 Stripe JavaScript 库和发送代表用户信用卡信息的令牌的逻辑,并将在我们的后端进行处理。
在index.html.haml文件中,将其添加到文件的顶部。 这将使用 Stripe 模块(由 gem 提供)将 Stripe javascript 库添加到用户页面。
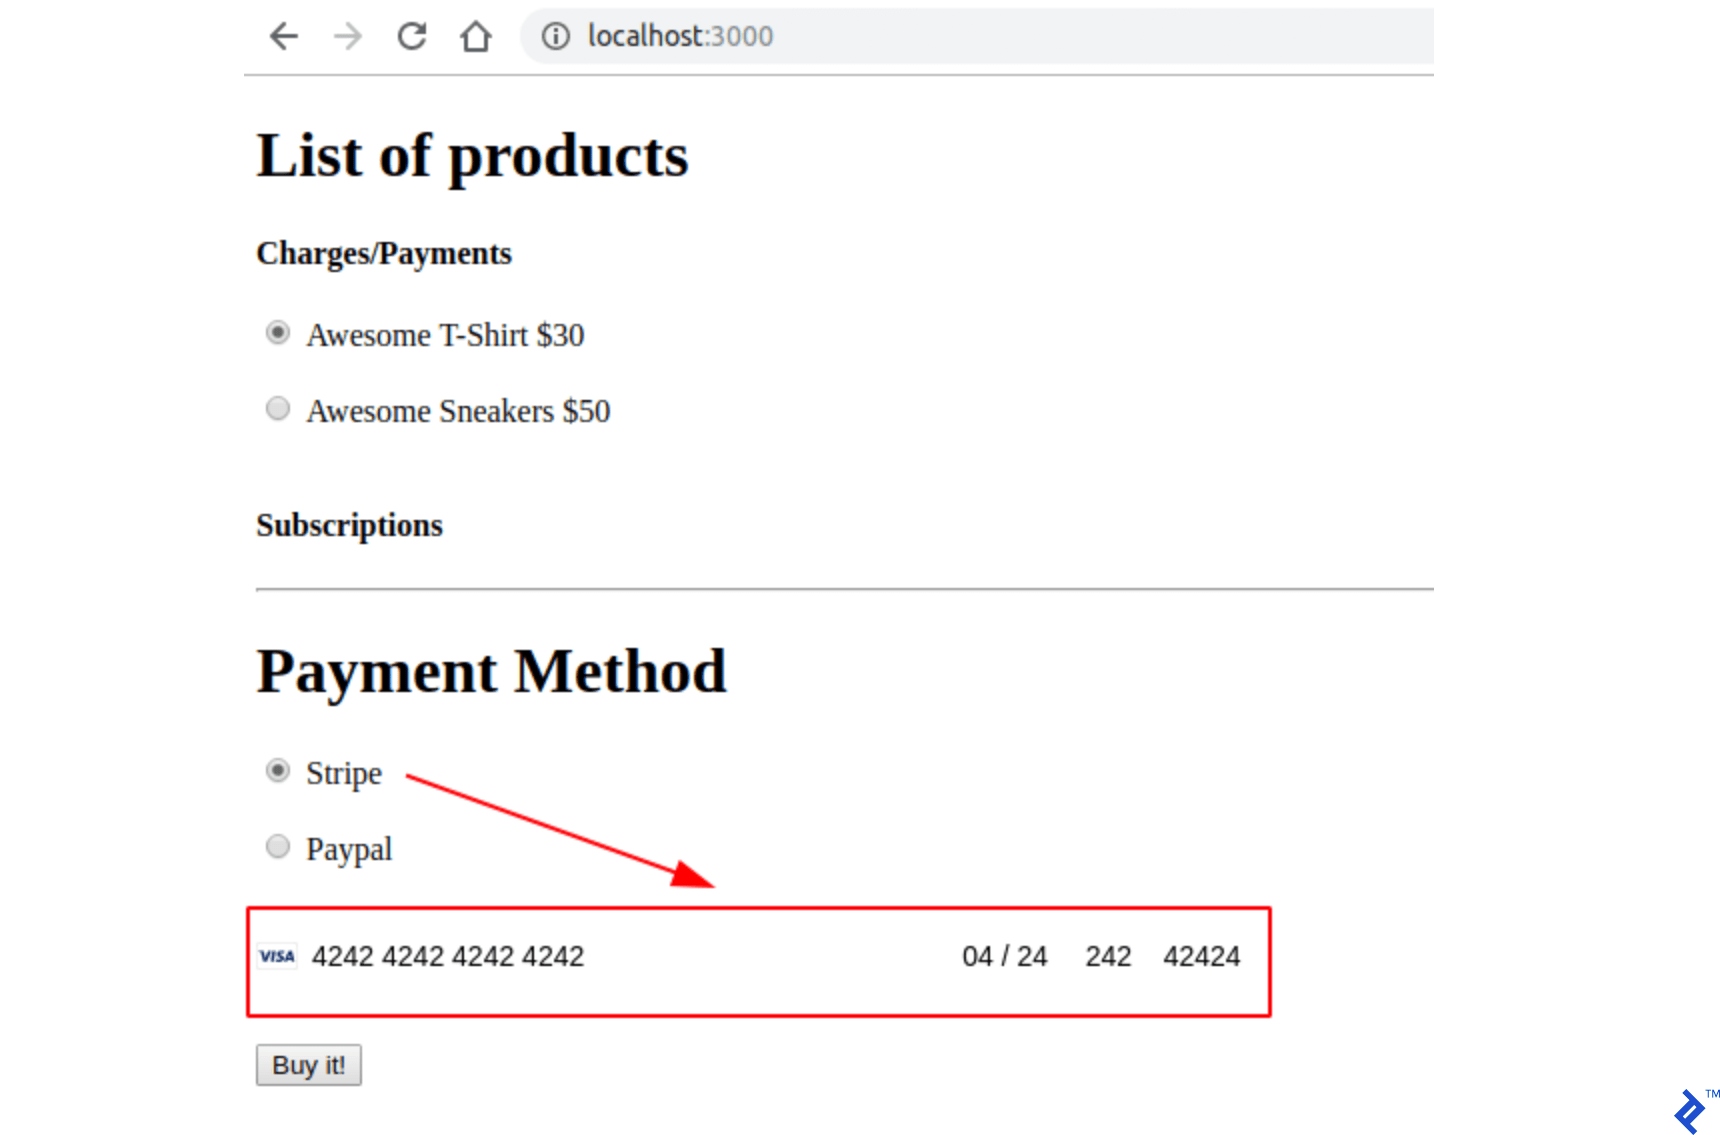
= stripe_javascript_tag Stripe 使用通过其 API 创建的安全输入字段。 由于它们是在通过此 API 创建的iframe中创建的,因此您不必担心处理用户信用卡信息时可能存在的漏洞。 此外,您的后端将无法处理/存储任何用户敏感数据,它只会收到代表此信息的令牌。
这些输入字段是通过调用stripe.elements().create('card') 。 之后,只需要使用mount()调用返回的对象,方法是将这些输入应该挂载到的 HTML 元素 id/class 作为参数传递。 更多信息可以在 Stripe 找到。
当用户使用 Stripe 支付方式点击提交按钮时,另一个返回 Promise 的 API 调用在创建的 Stripe 卡元素上执行:
stripe.createToken(card).then(function(result) 此函数的result变量,如果没有分配属性错误,将有一个令牌,可以通过访问属性result.token.id来检索。 该令牌将被发送到后端。
为了进行这些更改,请将注释代码// YOUR STRIPE AND PAYPAL CODE WILL BE HERE在index.html.haml中替换为:
(function setupStripe() { //Initialize stripe with publishable key var stripe = Stripe("#{ENV['STRIPE_PUBLISHABLE_KEY']}"); //Create Stripe credit card elements. var elements = stripe.elements(); var card = elements.create('card'); //Add a listener in order to check if card.addEventListener('change', function(event) { //the div card-errors contains error details if any var displayError = document.getElementById('card-errors'); document.getElementById('submit-stripe').disabled = false; if (event.error) { // Display error displayError.textContent = event.error.message; } else { // Clear error displayError.textContent = ''; } }); // Mount Stripe card element in the #card-element div. card.mount('#card-element'); var form = document.getElementById('order-details'); // This will be called when the #submit-stripe button is clicked by the user. form.addEventListener('submit', function(event) { $('#submit-stripe').prop('disabled', true); event.preventDefault(); stripe.createToken(card).then(function(result) { if (result.error) { // Inform that there was an error. var errorElement = document.getElementById('card-errors'); errorElement.textContent = result.error.message; } else { // Now we submit the form. We also add a hidden input storing // the token. So our back-end can consume it. var $form = $("#order-details"); // Add a hidden input orders[token] $form.append($('<input type="hidden" name="orders[token]"/>').val(result.token.id)); // Set order type $('#order-type').val('stripe'); $form.submit(); } }); return false; }); }()); //YOUR PAYPAL CODE WILL BE HERE如果您访问您的页面,它应该与新的 Stripe 安全输入字段如下所示:
第 5 步:测试您的应用程序。
使用测试卡 (https://stripe.com/docs/testing) 填写信用卡表格并提交页面。 检查是否使用服务器输出中的所有参数( product_id 、 payment_gateway和token )调用了submit操作。
条纹收费
条纹费用代表一次性交易。 因此,在 Stripe 收费交易之后,您将直接从客户那里收到钱。 这非常适合销售与计划无关的产品。 在后面的部分中,我将展示如何使用 PayPal 进行相同的交易类型,但 PayPal 对这种交易类型的名称是Payment 。
在本节中,我还将提供处理和提交订单的所有框架。 当 Stripe 表单被提交时,我们在submit动作中创建一个订单。 此订单最初将处于待处理状态,因此如果在处理此订单时出现任何问题,订单仍将处于待处理状态。
如果 Stripe API 调用出现任何错误,我们将订单设置为失败状态,如果收费成功完成,它将处于已付款状态。 用户也会根据 Stripe API 响应重定向,如下图所示:
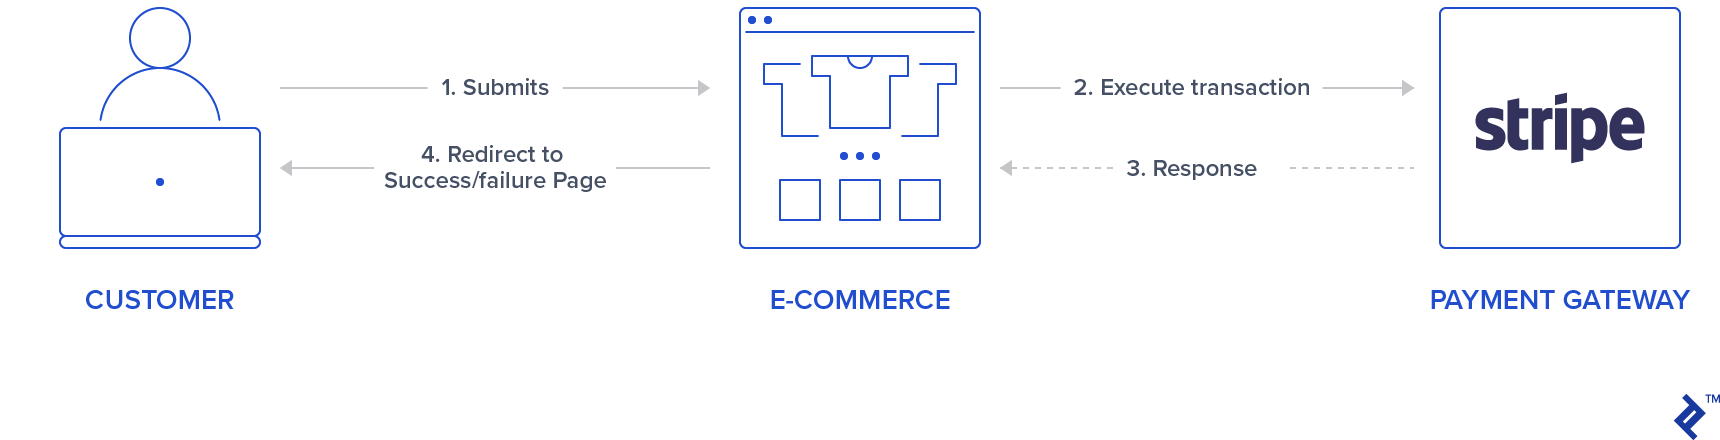
此外,在执行 Stripe 收费时,会返回一个 ID。 我们将存储此 ID,以便您以后可以在需要时在 Stripe 仪表板中查找它。 如果订单必须退款,也可以使用此 ID。 这样的事情,本文将不作探讨。
第 1 步:创建 Stripe 服务。
我们将使用一个单例类来表示使用 Stripe API 的 Stripe 操作。 为了创建费用,调用了Stripe::Charge.create方法,返回的对象 ID 属性将存储在订单记录charge_id中。 通过传递源自前端的令牌、订单价格和描述来调用此create函数。
因此,创建一个新文件夹app/services/orders并添加一个 Stripe 服务: app/services/orders/stripe.rb包含Orders::Stripe单例类,该类在方法execute中有一个条目。
class Orders::Stripe INVALID_STRIPE_OPERATION = 'Invalid Stripe Operation' def self.execute(order:, user:) product = order.product # Check if the order is a plan if product.stripe_plan_name.blank? charge = self.execute_charge(price_cents: product.price_cents, description: product.name, card_token: order.token) else #SUBSCRIPTIONS WILL BE HANDLED HERE end unless charge&.id.blank? # If there is a charge with id, set order paid. order.charge_id = charge.id order.set_paid end rescue Stripe::StripeError => e # If a Stripe error is raised from the API, # set status failed and an error message order.error_message = INVALID_STRIPE_OPERATION order.set_failed end private def self.execute_charge(price_cents:, description:, card_token:) Stripe::Charge.create({ amount: price_cents.to_s, currency: "usd", description: description, source: card_token }) end end第 2 步:实现提交操作并调用 Stripe 服务。
在orders_controller.rb中,在submit操作中添加以下内容,这基本上将调用服务Orders::Stripe.execute 。 请注意,还添加了两个新的私有函数: prepare_new_order和order_params 。
def submit @order = nil #Check which type of order it is if order_params[:payment_gateway] == "stripe" prepare_new_order Orders::Stripe.execute(order: @order, user: current_user) elsif order_params[:payment_gateway] == "paypal" #PAYPAL WILL BE HANDLED HERE end ensure if @order&.save if @order.paid? # Success is rendered when order is paid and saved return render html: SUCCESS_MESSAGE elsif @order.failed? && [email protected]_message.blank? # Render error only if order failed and there is an error_message return render html: @order.error_message end end render html: FAILURE_MESSAGE end private # Initialize a new order and and set its user, product and price. def prepare_new_order @order = Order.new(order_params) @order.user_id = current_user.id @product = Product.find(@order.product_id) @order.price_cents = @product.price_cents end def order_params params.require(:orders).permit(:product_id, :token, :payment_gateway, :charge_id) end第 3 步:测试您的应用程序。
检查提交操作是否在使用有效的测试卡调用时执行重定向到成功的消息。 此外,如果还显示了订单,请检查您的 Stripe 仪表板。
条纹订阅
可以为定期付款创建订阅或计划。 使用这种类型的产品,用户会根据计划配置自动按天、按周、按月或按年计费。 在本节中,我们将使用 product stripe_plan_name字段来存储计划 ID——实际上,我们可以选择 ID,我们将其称为premium-plan plan——将用于创建关系customer <-> subscription 。
我们还将为 users 表创建一个名为stripe_customer_id的新列,该列将填充 Stripe 客户对象的 id 属性。 调用Stripe::Customer.create函数时会创建一个 Stripe 客户,您还可以在 (https://dashboard.stripe.com/test/customers) 中查看创建并链接到您帐户的客户。 客户是通过传递一个source参数来创建的,在我们的例子中,它是在提交表单时发送的前端生成的令牌。
从最后提到的 Stripe API 调用中获得的客户对象也用于创建订阅,这是通过调用customer.subscriptions.create并将计划 ID 作为参数传递来完成的。
此外, stripe-rails gem 提供了从 Stripe 检索和更新客户的接口,这通过分别调用Stripe::Customer.retrieve和Stripe::Customer.update来完成。
因此,当用户记录已经有一个stripe_customer_id时,我们将调用Stripe::Customer.retrieve并传递stripe_customer_id作为参数,而不是使用Stripe::Customer.create创建一个新客户,然后是Stripe::Customer.update ,在这种情况下,将令牌传递给一个参数。
首先,我们将使用 Stripe API 创建一个计划,以便我们可以使用字段stripe_plan_name创建一个新的订阅产品。 之后,我们将对orders_controller和 Stripe 服务进行修改,以便处理 Stripe 订阅的创建和执行。
第 1 步:使用 Stripe API 创建计划。
使用命令rails c打开控制台。 使用以下命令为您的 Stripe 帐户创建订阅:
Stripe::Plan.create({ amount: 10000, interval: 'month', product: { name: 'Premium plan', }, currency: 'usd', id: 'premium-plan', })如果这一步返回的结果为真,则表示计划创建成功,您可以在 Stripe 仪表板中访问它。
第 2 步:在数据库中创建一个带有stripe_plan_name字段集的产品。
现在,在数据库中创建一个将stripe_plan_name设置为premium-plan的产品:
Product.create(price_cents: 10000, name: 'Premium Plan', stripe_plan_name: 'premium-plan') 第 3 步:生成迁移以在users表中添加列stripe_customer_id 。
在终端中运行以下命令:

rails generate migration AddStripeCustomerIdToUser stripe_customer_id:string rails db:migrate第 4 步:在 Stripe 服务类中实现订阅逻辑。
在app/services/orders/stripe.rb的私有方法中再添加两个函数: execute_subscription负责在客户对象中创建订阅。 函数find_or_create_customer负责返回已创建的客户或返回新创建的客户。
def self.execute_subscription(plan:, token:, customer:) customer.subscriptions.create({ plan: plan }) end def self.find_or_create_customer(card_token:, customer_id:, email:) if customer_id stripe_customer = Stripe::Customer.retrieve({ id: customer_id }) if stripe_customer stripe_customer = Stripe::Customer.update(stripe_customer.id, { source: card_token}) end else stripe_customer = Stripe::Customer.create({ email: email, source: card_token }) end stripe_customer end 最后,在同一文件 ( app/services/orders/stripe.rb ) 中的execute函数中,我们将首先调用find_or_create_customer ,然后通过传递先前检索/创建的客户调用execute_subscription来执行订阅。 因此,将execute方法中的注释#SUBSCRIPTIONS WILL BE HANDLED HERE替换为以下代码:
customer = self.find_or_create_customer(card_token: order.token, customer_id: user.stripe_customer_id, email: user.email) if customer user.update(stripe_customer_id: customer.id) order.customer_id = customer.id charge = self.execute_subscription(plan: product.stripe_plan_name, customer: customer)第 5 步:测试您的应用程序。
访问您的网站,选择订阅产品Premium Plan ,并填写有效的测试卡。 提交后,它应该将您重定向到一个成功的页面。 此外,如果订阅创建成功,请检查您的 Stripe 仪表板。
贝宝配置
正如我们在 Stripe 中所做的那样,我们还将添加一个用于使用 PayPal API 的 gem: paypal-sdk-rest ,并且还需要创建一个 PayPal 帐户。 可以在官方 PayPal API 文档中查阅使用此 gem 的 PayPal 描述性工作流程。
第 1 步:将paypal-sdk-rest gem 添加到您的项目中。
在Gemfile中添加:
gem 'paypal-sdk-rest'跑步:
bundle install第 2 步:生成您的 API 密钥。
为了获得与 PayPal 通信的 API 密钥,您需要创建一个 PayPal 帐户。 所以:
- 在 https://developer.paypal.com/ 创建一个帐户(或使用您的 PayPal 帐户)。
- 仍然登录您的帐户,在 https://developer.paypal.com/developer/accounts/ 创建两个沙盒帐户:
- 个人(买方帐户)– 这将用于您的付款和订阅测试。
- 商业(商家帐户)– 这将链接到应用程序,该应用程序将具有我们正在寻找的 API 密钥。 除此之外,所有交易都可以在这个账户中进行。
- 使用以前的业务沙盒帐户在 https://developer.paypal.com/developer/applications 创建一个应用程序。
- 完成此步骤后,您将收到两个 PayPal 密钥:
Client ID和Secret。 - 在
config/application.yml中,将YOUR_CREDENTIAL_HERE和PAYPAL_CLIENT_SECRET中的PAYPAL_CLIENT_ID替换为您刚刚收到的密钥。
第 3 步:初始化 PayPal 模块。
与 Stripe 类似,除了替换application.yml中的键之外,我们还需要初始化 PayPal 模块,以便它可以使用已经在我们的ENV变量中设置的键。 为此,在config/initializers/paypal.rb中创建一个文件:
PayPal::SDK.configure( mode: ENV['PAYPAL_ENV'], client_id: ENV['PAYPAL_CLIENT_ID'], client_secret: ENV['PAYPAL_CLIENT_SECRET'], ) PayPal::SDK.logger.level = Logger::INFO第 4 步:在前端集成 PayPal。
在index.html.haml中将其添加到文件顶部:
%script(src="https://www.paypal.com/sdk/js?client-id=#{ENV['PAYPAL_CLIENT_ID']}") 与 Stripe 不同,PayPal 仅使用一个按钮,单击该按钮会打开一个安全弹出窗口,用户可以在其中登录并继续付款/订阅。 这个按钮可以通过调用方法paypal.Button(PARAM1).render(PARAM2)来呈现。
-
PARAM1是一个具有环境配置和两个回调函数作为属性的对象:createOrder和onApprove。 -
PARAM2指示应附加 PayPal 按钮的 HTML 元素标识符。
因此,仍然在同一个文件中,将YOUR PAYPAL CODE WILL BE HERE的注释代码替换为:
(function setupPaypal() { function isPayment() { return $('[data-charges-and-payments-section] input[name="orders[product_id]"]:checked').length } function submitOrderPaypal(chargeID) { var $form = $("#order-details"); // Add a hidden input orders[charge_id] $form.append($('<input type="hidden" name="orders[charge_id]"/>').val(chargeID)); // Set order type $('#order-type').val('paypal'); $form.submit(); } paypal.Buttons({ env: "#{ENV['PAYPAL_ENV']}", createOrder: function() { }, onApprove: function(data) { } }).render('#submit-paypal'); }());第 5 步:测试您的应用程序。
访问您的页面并检查当您选择 PayPal 作为付款方式时是否呈现 PayPal 按钮。
贝宝交易
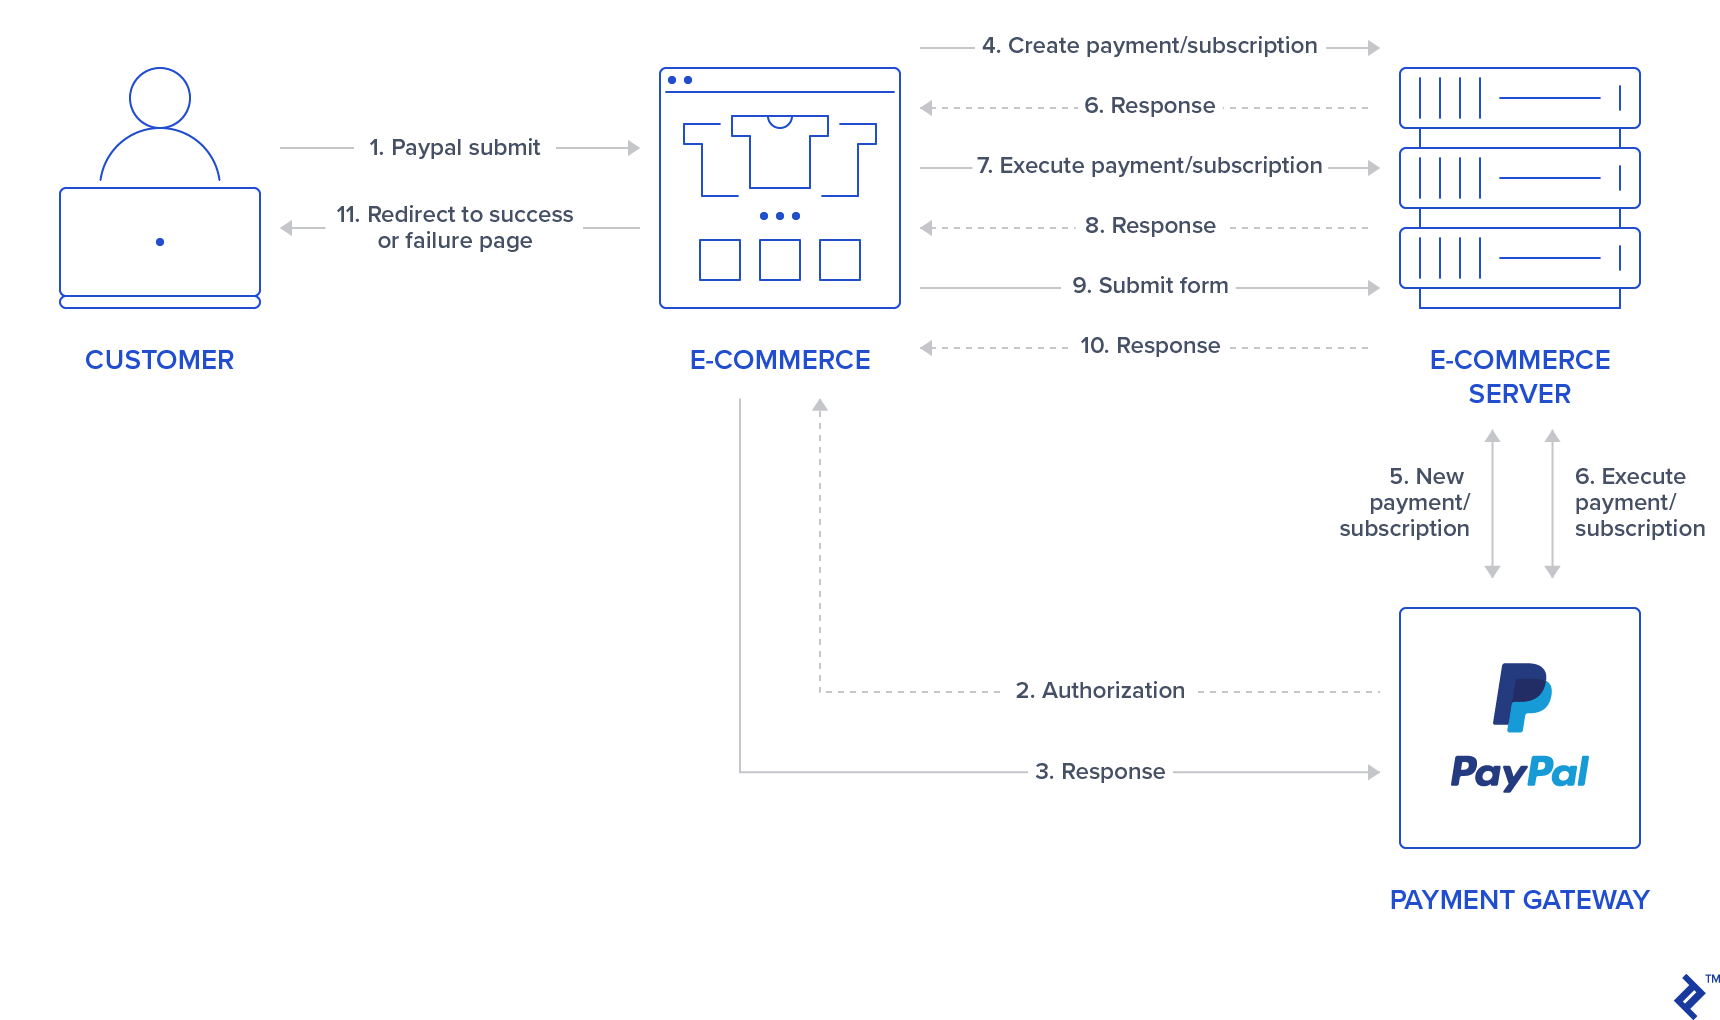
与 Stripe 不同,PayPal 交易的逻辑要复杂一些,因为它涉及更多来自前端到后端的请求。 这就是本节存在的原因。 我将或多或少地(没有任何代码)解释createOrder和onApprove方法中描述的功能将如何实现以及后端流程中的预期内容。
第 1 步:当用户单击 PayPal 提交按钮时,会打开一个询问用户凭据的 PayPal 弹出窗口,但处于加载状态。 调用函数回调createOrder 。
第 2 步:在此函数中,我们将向后端执行请求,该请求将创建支付/订阅。 这是交易的开始,还不会收取任何费用,因此交易实际上处于待处理状态。 我们的后端应该返回一个令牌,它将使用 PayPal 模块(通过paypal-rest-sdk gem 提供)生成。
第 3 步:仍然在createOrder回调中,我们返回在后端生成的这个令牌,如果一切正常,PayPal 弹出窗口将呈现以下内容,询问用户凭据:
第 4 步:用户登录并选择付款方式后,弹出窗口将其状态更改为以下内容:
第 5 步:现在调用onApprove函数回调。 我们将其定义如下: onApprove: function(data) 。 data对象将具有支付信息以便执行它。 在这个回调中,这次将执行对我们后端函数的另一个请求,传递数据对象以执行 PayPal 订单。
第 6 步:我们的后端执行此事务并返回 200(如果成功)。
第 7 步:当我们的后端返回时,我们提交表单。 这是我们向后端提出的第三个请求。
请注意,与 Stripe 不同的是,在此过程中向我们的后端发出了三个请求。 我们将相应地保持我们的订单记录状态同步:
-
createOrder回调:创建交易,同时创建订单记录; 因此,它默认处于挂起状态。 -
onApprove回调:交易被执行,我们的订单将被设置为paypal_executed 。 - 订单页面已提交:交易已经执行,所以没有任何变化。 订单记录将其状态更改为已付款。
下图描述了整个过程:
贝宝付款
PayPal 支付遵循与 Stripe Charges 相同的逻辑,因此它们代表一次性交易,但如上一节所述,它们具有不同的流程逻辑。 以下是处理 PayPal 付款需要执行的更改:
第 1 步:为 PayPal 创建新路线并执行付款。
在config/routes.rb中添加以下路由:
post 'orders/paypal/create_payment' => 'orders#paypal_create_payment', as: :paypal_create_payment post 'orders/paypal/execute_payment' => 'orders#paypal_execute_payment', as: :paypal_execute_payment This will create two new routes for creating and executing payments which will be handled in the paypal_create_payment and paypal_execute_payment orders controller methods.
Step 2: Create the PayPal service.
Add the singleton class Orders::Paypal at: app/services/orders/paypal.rb .
This service will initially have three responsibilities:
- The
create_paymentmethod creates a payment by callingPayPal::SDK::REST::Payment.new. A token is generated and returned to the front-end. - The
execute_paymentmethod executes the payment by first finding the previous created payment object throughPayPal::SDK::REST::Payment.find(payment_id)which uses the payment_id as an argument which has the same value as the charge_id stored in the previous step in the order object. After that, we callexecutein the payment object with a given payer as the parameter. This payer is given by the front end after the user has provided credentials and selected a payment method in the popup. - The
finishmethod finds an order by a specific charge_id querying for recently created orders in the paypal_executed state. If a record is found, it is marked as paid.
class Orders::Paypal def self.finish(charge_id) order = Order.paypal_executed.recently_created.find_by(charge_id: charge_id) return nil if order.nil? order.set_paid order end def self.create_payment(order:, product:) payment_price = (product.price_cents/100.0).to_s currency = "USD" payment = PayPal::SDK::REST::Payment.new({ intent: "sale", payer: { payment_method: "paypal" }, redirect_urls: { return_url: "/", cancel_url: "/" }, transactions: [{ item_list: { items: [{ name: product.name, sku: product.name, price: payment_price, currency: currency, quantity: 1 } ] }, amount: { total: payment_price, currency: currency }, description: "Payment for: #{product.name}" }] }) if payment.create order.token = payment.token order.charge_id = payment.id return payment.token if order.save end end def self.execute_payment(payment_id:, payer_id:) order = Order.recently_created.find_by(charge_id: payment_id) return false unless order payment = PayPal::SDK::REST::Payment.find(payment_id) if payment.execute( payer_id: payer_id ) order.set_paypal_executed return order.save end endStep 3: Call the PayPal service in the controller in the submit action.
Add a callback for prepare_new_order before the action paypal_create_payment (which will be added in the next step) is requested by adding the following in the file app/controllers/orders_controller.rb :
class OrdersController < ApplicationController before_action :authenticate_user! before_action :prepare_new_order, only: [:paypal_create_payment] ... Again, in the same file, call PayPal service in the submit action by replacing the commented code #PAYPAL WILL BE HANDLED HERE. with the following:
... elsif order_params[:payment_gateway] == "paypal" @order = Orders::Paypal.finish(order_params[:token]) end ...Step 4: Create the actions for handling requests.
Still, in the app/controllers/orders_controller.rb file, create two new actions (which should be public) for handling requests to paypal_create_payment and paypal_execute_payment routes:
- The
paypal_create_paymentmethod: Will call our service methodcreate_payment. If that returns successfully, it will return the order token created byOrders::Paypal.create_payment. - The
paypal_execute_paymentmethod: Will call our service methodexecute_payment(which executes our payments). If the payment is performed successfully, it returns 200.
... def paypal_create_payment result = Orders::Paypal.create_payment(order: @order, product: @product) if result render json: { token: result }, status: :ok else render json: {error: FAILURE_MESSAGE}, status: :unprocessable_entity end end def paypal_execute_payment if Orders::Paypal.execute_payment(payment_id: params[:paymentID], payer_id: params[:payerID]) render json: {}, status: :ok else render json: {error: FAILURE_MESSAGE}, status: :unprocessable_entity end end ... Step 5: Implement the front-end callback functions for createOrder and onApprove .
Make your paypal.Button.render call look like this:
paypal.Buttons({ env: "#{ENV['PAYPAL_ENV']}", createOrder: function() { $('#order-type').val("paypal"); if (isPayment()) { return $.post("#{paypal_create_payment_url}", $('#order-details').serialize()).then(function(data) { return data.token; }); } else { } }, onApprove: function(data) { if (isPayment()) { return $.post("#{paypal_execute_payment_url}", { paymentID: data.paymentID, payerID: data.payerID }).then(function() { submitOrderPaypal(data.paymentID) }); } else { } } }).render('#submit-paypal'); As mentioned in the previous section, we call paypal_create_payment_url for the createOrder callback and paypal_execute_payment_url for the onApprove callback. Notice that if the last request returns success, we submit the order, which is the third request made to the server.
In the createOrder function handler, we return a token (obtained from the back end). In the onApprove callback, we have two properties passed down to our back-end paymentID and payerID . These will be used in order to execute the payment.
Finally, notice that we have two empty else clauses as I'm leaving room for the next section where we will be adding PayPal subscriptions.
If you visit your page after integrating the front-end JavaScript section and select PayPal as the payment method, it should look like the following:
Step 6: Test your application.
- 访问索引页面。
- 选择付款/收费产品和 PayPal 作为付款方式。
- 单击提交 PayPal 按钮。
- 在 PayPal 弹出窗口中:
- 使用您创建的买家帐户的凭据。
- 登录并确认您的订单。
- 弹出窗口应该关闭。
- 检查您是否被重定向到成功页面。
- 最后,通过在 https://www.sandbox.paypal.com/signin 使用您的企业帐户登录并检查仪表板 https://www.sandbox.paypal.com/listing 来检查订单是否在 PayPal 帐户中执行/交易。
贝宝订阅
PayPal 计划/协议/订阅遵循与 Stripe 订阅相同的逻辑,并且是为定期付款而创建的。 使用这种类型的产品,用户会根据其配置自动按日、周、月或年收费。
我们将使用产品paypal_plan_name的字段,以存储 PayPal 提供的计划 ID。 在这种情况下,与 Stripe 不同的是,我们不选择 ID,并且 PayPal 返回此值,该值将用于更新我们数据库中创建的最后一个产品。
对于创建订阅,任何步骤都不需要customer信息,因为onApprove方法可能会在其底层实现中处理此链接。 所以我们的桌子将保持不变。
第 1 步:使用 PayPal API 创建计划。
使用命令rails c打开控制台。 使用以下方式为您的 PayPal 帐户创建订阅:
plan = PayPal::SDK::REST::Plan.new({ name: 'Premium Plan', description: 'Premium Plan', type: 'fixed', payment_definitions: [{ name: 'Premium Plan', type: 'REGULAR', frequency_interval: '1', frequency: 'MONTH', cycles: '12', amount: { currency: 'USD', value: '100.00' } }], merchant_preferences: { cancel_url: 'http://localhost:3000/', return_url: 'http://localhost:3000/', max_fail_attempts: '0', auto_bill_amount: 'YES', initial_fail_amount_action: 'CONTINUE' } }) plan.create plan_update = { op: 'replace', path: '/', value: { state: 'ACTIVE' } } plan.update(plan_update) 第 2 步:使用返回的plan.id更新数据库paypal_plan_name中的最后一个产品。
跑步:
Product.last.update(paypal_plan_name: plan.id)第 3 步:为 PayPal 订阅添加路由。
在config/routes.rb中添加两条新路由:
post 'orders/paypal/create_subscription' => 'orders#paypal_create_subscription', as: :paypal_create_subscription post 'orders/paypal/execute_subscription' => 'orders#paypal_execute_subscription', as: :paypal_execute_subscription第 4 步:在 PayPal 服务中处理创建和执行。
在app/services/orders/paypal.rb的Orders::Paypal中添加另外两个用于创建和执行订阅的函数:
def self.create_subscription(order:, product:) agreement = PayPal::SDK::REST::Agreement.new({ name: product.name, description: "Subscription for: #{product.name}", start_date: (Time.now.utc + 1.minute).iso8601, payer: { payment_method: "paypal" }, plan: { id: product.paypal_plan_name } }) if agreement.create order.token = agreement.token return agreement.token if order.save end end def self.execute_subscription(token:) order = Order.recently_created.find_by(token: token) return false unless order agreement = PayPal::SDK::REST::Agreement.new agreement.token = token if agreement.execute order.charge_id = agreement.id order.set_paypal_executed return order.charge_id if order.save end end 在create_subscription中,我们通过调用方法PayPal::SDK::REST::Agreement.new并将product.paypal_plan_name作为其属性之一来初始化协议。 之后,我们创建它,现在将为最后一个对象设置一个令牌。 我们还将令牌返回到前端。
在execute_subscription中,我们找到了在之前调用中创建的order记录。 之后,我们初始化一个新的协议,我们设置这个先前对象的令牌并执行它。 如果最后一步成功执行,订单状态将设置为paypal_executed 。 现在我们将协议 ID 返回到前端,该协议 ID 也存储在order.chager_id中。
第 5 步:在orders_controller中添加创建和执行订阅的操作。
更改app/controllers/orders_controller.rb 。 在类的顶部,首先,然后更新回调prepare_new_order以在调用paypal_create_subscription之前执行:
class OrdersController < ApplicationController before_action :authenticate_user! before_action :prepare_new_order, only: [:paypal_create_payment, :paypal_create_subscription] 此外,在同一个文件中添加两个公共函数,以便它们调用Orders::Paypal服务,其流程与我们在 PayPal 支付中已有的流程相似:
... def paypal_create_subscription result = Orders::Paypal.create_subscription(order: @order, product: @product) if result render json: { token: result }, status: :ok else render json: {error: FAILURE_MESSAGE}, status: :unprocessable_entity end end def paypal_execute_subscription result = Orders::Paypal.execute_subscription(token: params[:subscriptionToken]) if result render json: { id: result}, status: :ok else render json: {error: FAILURE_MESSAGE}, status: :unprocessable_entity end end ... 第 6 步:在前端为createOrder和onApprove回调添加订阅处理程序。
最后,在index.html.haml中,将paypal.Buttons函数替换为以下内容,这将填充我们之前的两个空else :
paypal.Buttons({ env: "#{ENV['PAYPAL_ENV']}", createOrder: function() { $('#order-type').val("paypal"); if (isPayment()) { return $.post("#{paypal_create_payment_url}", $('#order-details').serialize()).then(function(data) { return data.token; }); } else { return $.post("#{paypal_create_subscription_url}", $('#order-details').serialize()).then(function(data) { return data.token; }); } }, onApprove: function(data) { if (isPayment()) { return $.post("#{paypal_execute_payment_url}", { paymentID: data.paymentID, payerID: data.payerID }).then(function() { submitOrderPaypal(data.paymentID) }); } else { return $.post("#{paypal_execute_subscription_url}", { subscriptionToken: data.orderID }).then(function(executeData) { submitOrderPaypal(executeData.id) }); } } }).render('#submit-paypal'); 订阅的创建和执行具有与支付类似的逻辑。 一个区别是,在执行支付时,来自回调函数onApprove的数据已经有一个paymentID代表charge_id以通过submitOrderPaypal(data.paymentID)提交表单。 对于订阅,我们只有在通过paypal_execute_subscription_url上的POST请求执行它之后才能获得charge_id ,因此我们可以调用submitOrderPaypal(executeData.id) 。
第 7 步:测试您的应用程序。
- 访问索引页面。
- 选择订阅产品和 PayPal 作为付款方式。
- 单击提交 PayPal 按钮。
- 在 PayPal 弹出窗口中:
- 使用您创建的买家帐户的凭据。
- 登录并确认您的订单。
- 弹出窗口应该关闭。
- 检查您是否被重定向到成功页面。
- 最后,通过在 https://www.sandbox.paypal.com/signin 使用您的企业帐户登录并检查仪表板 https://www.sandbox.paypal.com/listing/,检查订单是否在 PayPal 帐户中执行交易。
结论
阅读本文后,您应该能够在 Rails 应用程序中集成 PayPal 和 Stripe 的付款/收费以及订阅交易。 有很多可以改进的地方,为了简洁起见,我没有在本文中添加。 我根据难度假设组织了所有内容:
- 更轻松:
- 使用传输层安全性 (TLS),以便您的请求使用 HTTPS。
- 为 PayPal 和 Stripe 实施生产环境配置。
- 添加一个新页面,以便用户可以访问以前订单的历史记录。
- 中等的:
- 退款或取消订阅。
- 提供非注册用户支付解决方案。
- 更难:
- 如果用户希望回来,请提供一种删除帐户并保留其令牌和customer_id的方法。 但是在一定天数之后,删除这些数据,以便您的应用程序更符合 PCI。
- 迁移到服务器端的 PayPal 版本 2 API (https://developer.paypal.com/docs/api/payments/v2/) 我们在本教程中使用的 gem paypal-sdk-rest ,只有一个 beta 版本的版本2,所以可以谨慎使用(https://github.com/paypal/PayPal-Ruby-SDK/tree/2.0-beta)。
- 包括幂等请求。
- 条纹:https://stripe.com/docs/api/idempotent_requests
- 贝宝:https://developer.paypal.com/docs/api-basics/#api-idempotency
我还推荐阅读 Stripe Checkout 元素,这是在前端集成 Stripe 的另一种方式。 与我们在本教程中使用的 Stripe Elements 不同,Stripe Checkout 在单击按钮(类似于 PayPal)后会打开一个弹出窗口,用户可以在其中填写信用卡信息或选择使用 Google Pay/Apple Pay https://stripe.com /文档/网络。
第二个阅读建议是两个支付网关的安全页面。
- 对于条纹
- 对于贝宝
最后,感谢您阅读本文! 您还可以查看我用于此项目示例的 GitHub 项目。 在那里,我在开发时也添加了rspec测试。