
Ruby on Rails에서 Stripe 및 PayPal 결제 방법 통합
게시 됨: 2022-03-11AliExpress, Ebay 및 Amazon과 같은 거대한 전자 상거래 회사의 핵심 기능은 비즈니스에 필수적인 안전한 지불 처리 방법입니다. 이 기능이 실패하면 그 결과는 치명적입니다. 이는 전자상거래 앱에서 작업하는 업계 리더와 Ruby on Rails 개발자에게 적용됩니다.
사이버 보안은 공격을 방지하는 데 필수적이며 거래 프로세스를 보다 안전하게 만드는 방법은 타사 서비스에 처리를 요청하는 것입니다. 애플리케이션에 지불 게이트웨이를 포함하는 것은 사용자 권한 부여, 데이터 암호화 및 대시보드를 제공하므로 이 목표를 달성하는 방법이므로 거래 상태를 즉석에서 추적할 수 있습니다.
웹에는 다양한 지불 게이트웨이 서비스가 있지만 이 기사에서는 Stripe와 PayPal을 Rails 애플리케이션에 통합하는 데 중점을 둘 것입니다. Amazon Payments, Square, SecurePay, WorldPay, Authorize.Net, 2Checkout.com, Braintree, Amazon 또는 BlueSnap과 같은 몇 가지 다른 회사를 언급합니다.
지불 게이트웨이 통합 작동 방식
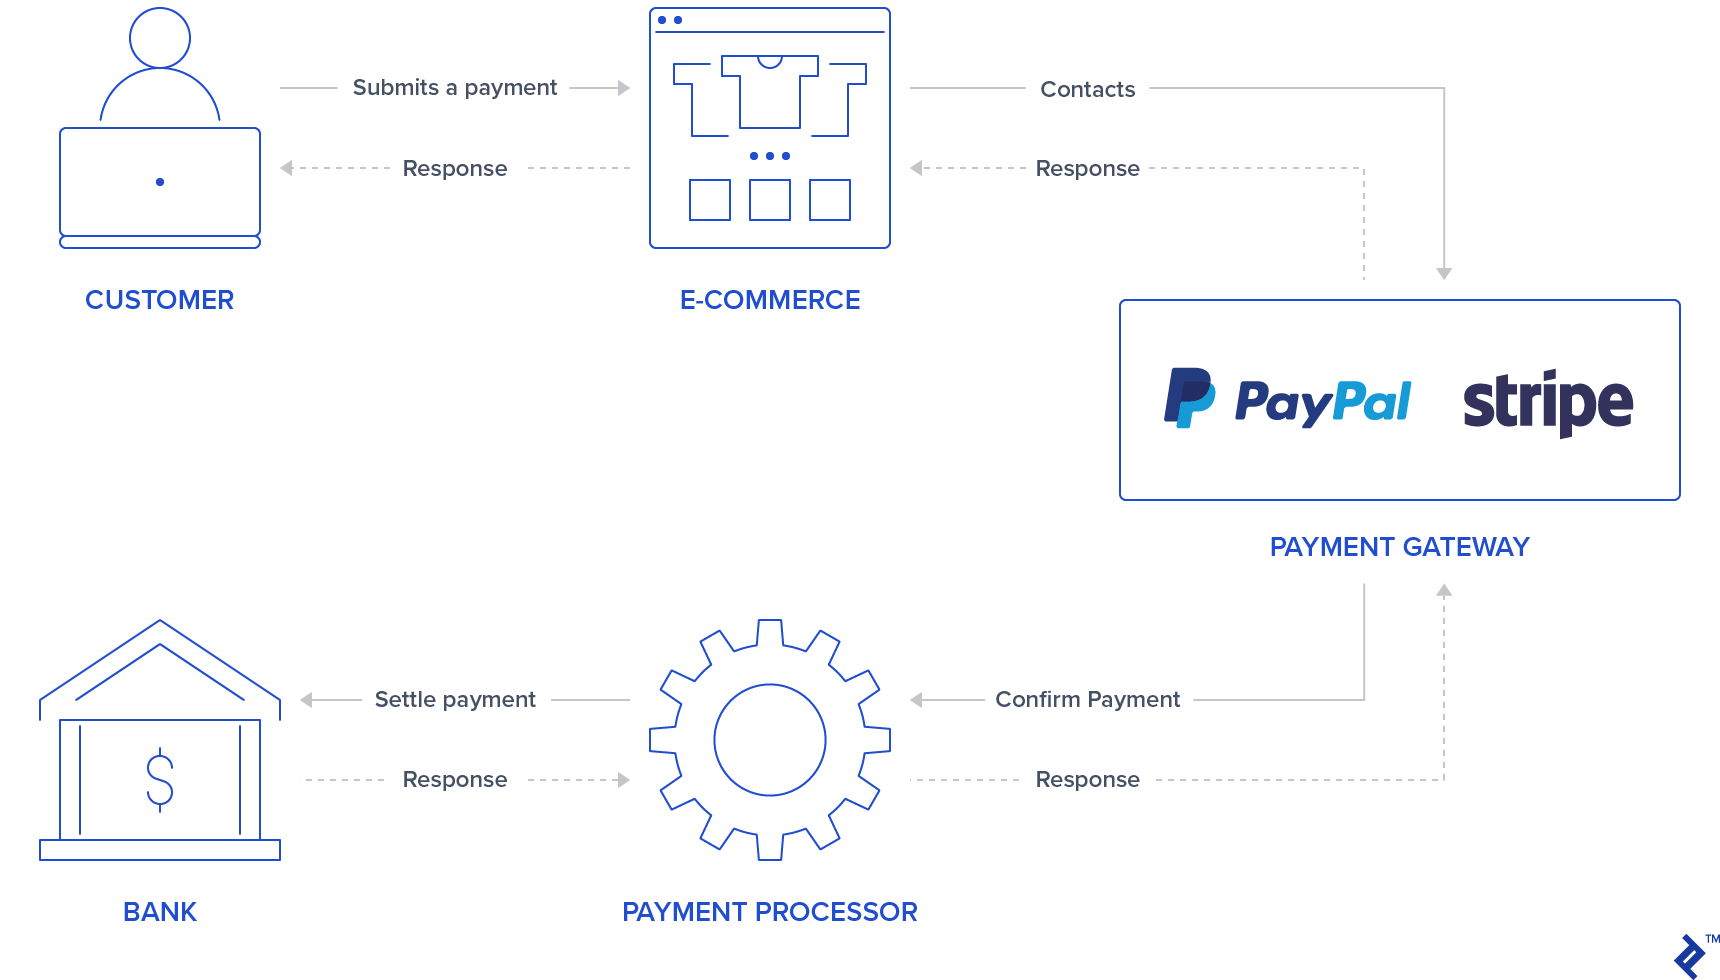
일반적으로 사용자가 로그인/신용 카드 데이터를 삽입할 수 있는 양식/버튼이 애플리케이션에 있습니다. PayPal과 Stripe은 이미 iframe 양식 또는 popups 을 사용하여 이 첫 번째 단계를 더 안전하게 하여 애플리케이션이 이 거래를 나타내는 토큰을 반환할 때 민감한 사용자 신용 카드 정보를 저장하지 못하도록 합니다. 일부 사용자는 제3자 서비스가 거래 프로세스를 처리하고 있다는 사실을 알고 이미 결제를 처리하는 데 더 자신감을 가질 수 있으므로 이것이 애플리케이션의 매력이 될 수도 있습니다.
사용자 정보를 인증한 후, 지불 게이트웨이는 지불을 정산하기 위해 은행과 통신하는 지불 프로세서에 연락하여 지불을 확인합니다. 이렇게 하면 거래가 적절하게 차변/대변에 기입됩니다.
Stripe은 신용 카드 번호, 이력서 및 만료 날짜를 묻는 신용 카드 양식을 사용합니다. 따라서 사용자는 보안 Stripe 입력에 신용 카드 정보를 입력해야 합니다. 이 정보를 제공한 후 애플리케이션 백엔드는 토큰을 통해 이 지불을 처리합니다.
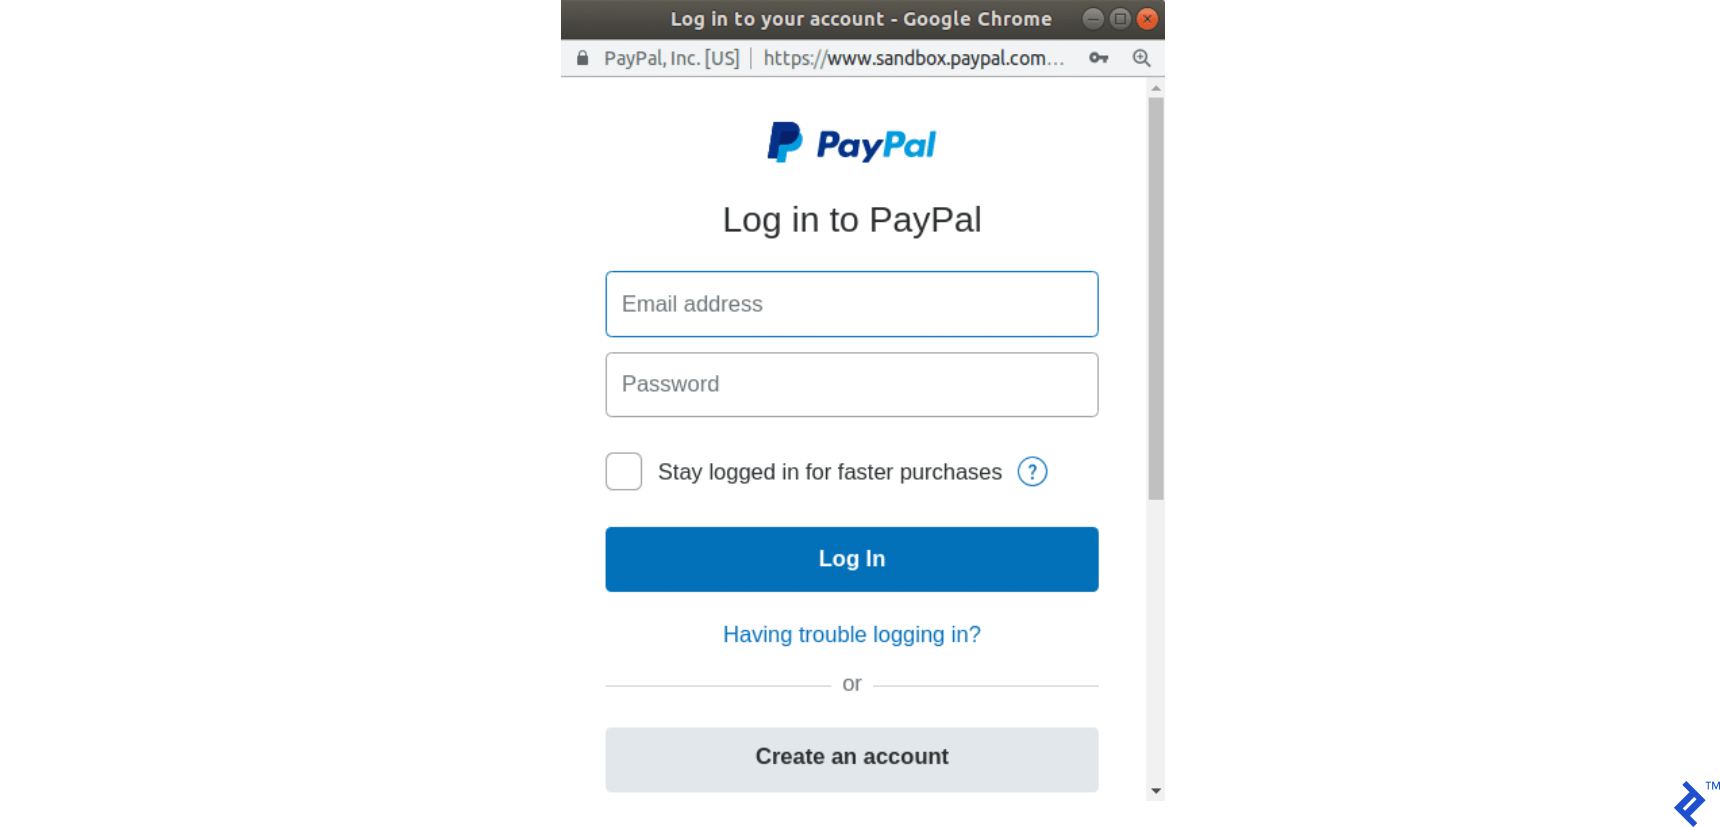
Stripe와 달리 PayPal은 사용자를 PayPal 로그인 페이지로 리디렉션합니다. 사용자는 PayPal을 통해 결제 방법을 승인하고 선택하며, 다시 백엔드에서 사용자의 민감한 데이터 대신 토큰을 처리합니다.
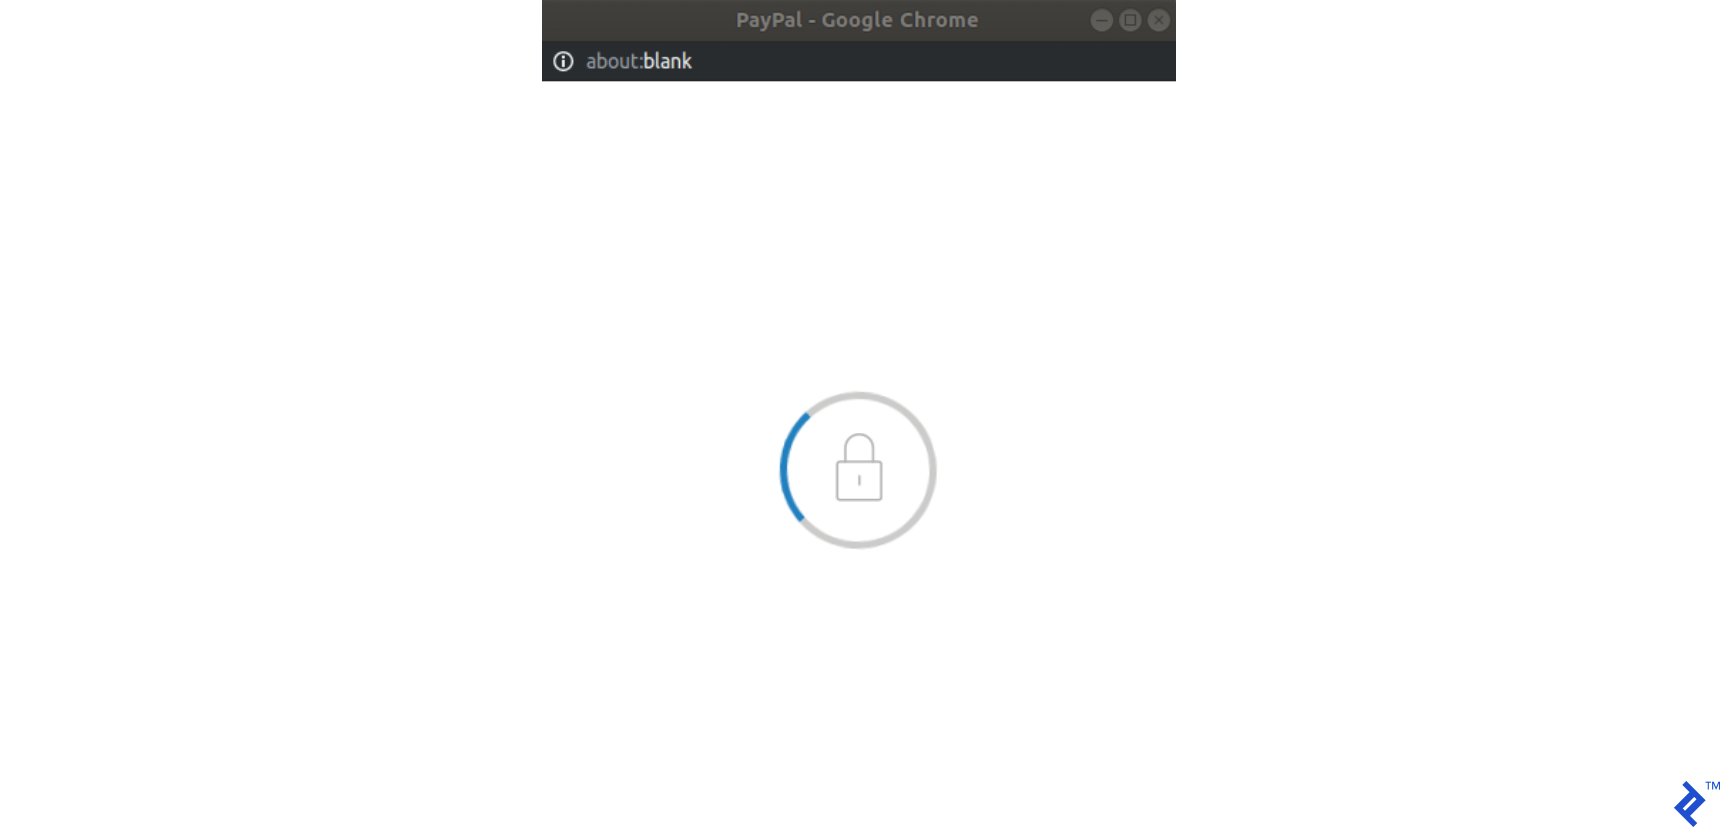
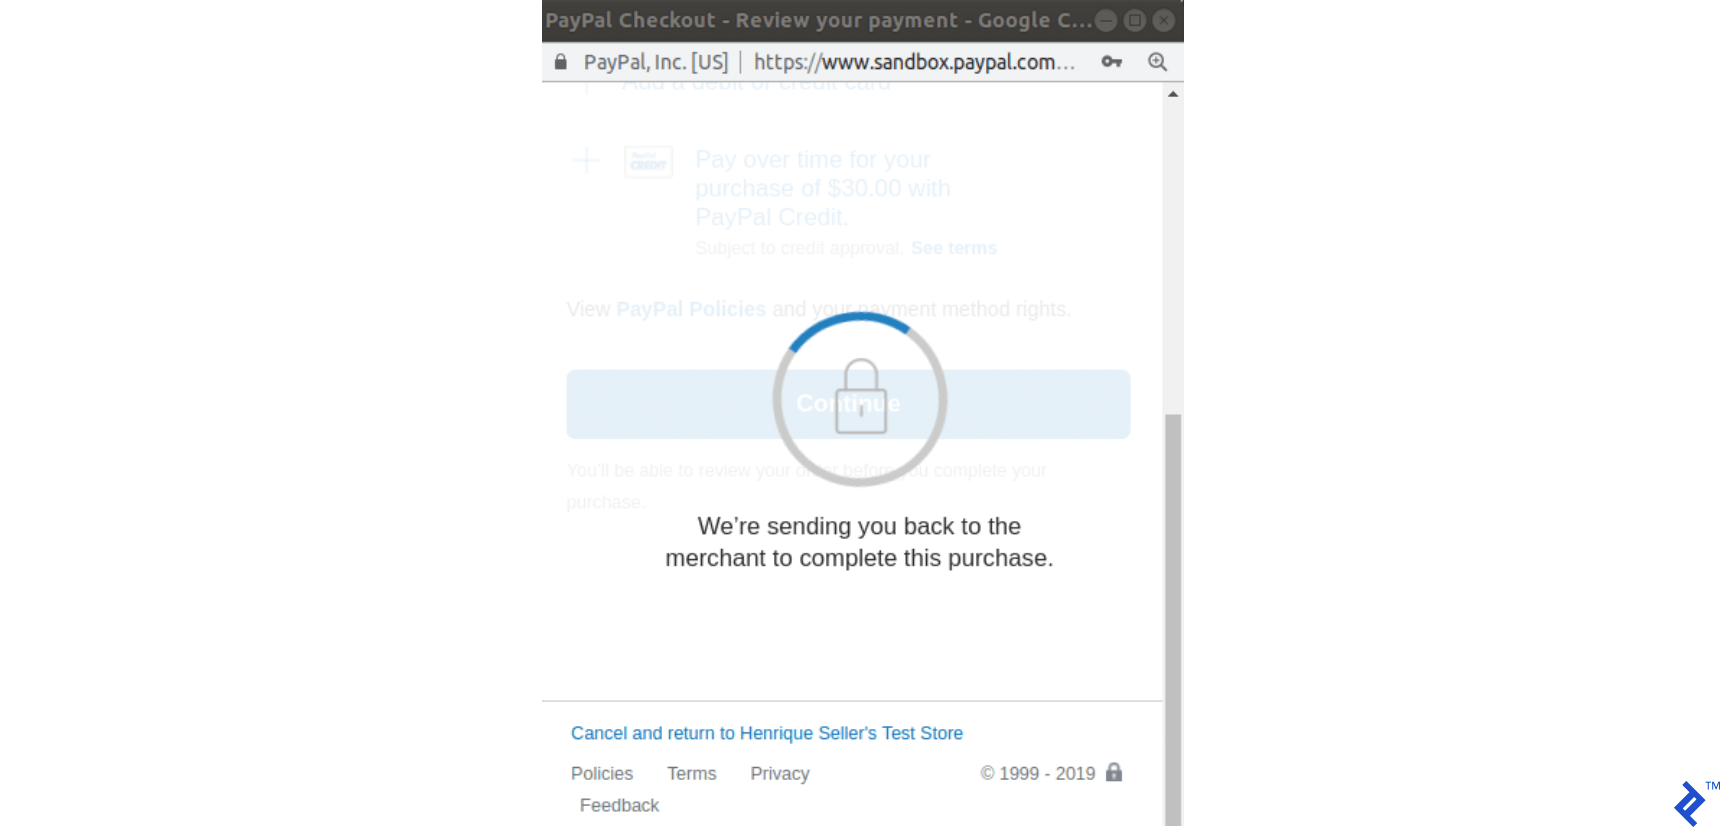
이 두 가지 지불 게이트웨이의 경우 백엔드는 OK/NOK 응답을 제공하는 Stripe 또는 PayPal API를 통해 트랜잭션 실행을 진행하도록 요청해야 하므로 애플리케이션은 그에 따라 사용자를 성공 또는 오류 페이지로 리디렉션해야 합니다.
이 기사의 목적은 이러한 두 지불 게이트웨이를 단일 애플리케이션에 통합하기 위한 빠른 가이드를 제공하는 것입니다. 모든 테스트에서 결제를 시뮬레이션하기 위해 Stripe 및 PayPal에서 제공하는 샌드박스 및 테스트 계정을 사용할 것입니다.
설정
결제 게이트웨이를 통합하기 전에 gem, 데이터베이스 테이블 및 인덱스 페이지를 추가하여 애플리케이션을 초기화하기 위한 설정을 수행합니다. 이 프로젝트는 Rails 버전 5.2.3 및 Ruby 2.6.3을 사용하여 생성되었습니다.
참고: 최근 기사에서 새로운 Rails 6 기능을 확인할 수 있습니다.
1단계: Rails 애플리케이션을 초기화합니다.
앱 이름과 함께 rails 명령으로 프로젝트 초기화를 실행하여 프로젝트를 초기화합니다.
rails new YOUR_APP_NAME 그리고 응용 프로그램 폴더에 cd .
2단계: 보석을 설치합니다.
Stripe 및 PayPal 보석 외에도 몇 가지 다른 보석이 추가되었습니다.
-
devise: 사용자 인증 및 권한 부여에 사용 -
haml: 사용자 페이지를 렌더링하기 위한 템플릿 도구 -
jquery-rails: 프론트엔드 스크립트의jquery용 -
money-rails: 형식화된 돈 값을 표시하기 위해
Gemfile 에 추가:
gem "devise", ">= 4.7.1" gem "haml" gem "jquery-rails" gem "money-rails"추가한 후 CLI에서 실행:
bundle install3단계: 보석을 초기화합니다.
이러한 gem 중 일부는 bundle 을 통해 설치하는 것 외에 초기화가 필요합니다.
장치 설치:
rails g devise:install money-rails 초기화 :
rails g money_rails:initializer app/assets/javascripts/application.js 하단에 다음을 추가하여 jquery-rails 를 초기화합니다.
//= require jquery //= require jquery_ujs4단계: 테이블 및 마이그레이션
이 프로젝트에서는 세 개의 테이블이 사용됩니다. Users , Products 및 Orders .
-
Users: 장치를 통해 생성됩니다. -
Products열:-
name -
price_cents -
Stripe_plan_name: 사용자가 구독할 수 있도록 Stripe에서 생성된 구독 계획을 나타내는 ID입니다. 이 필드는 Stripe 플랜과 연결된 제품에만 필요합니다. -
paypal_plan_name:stripe_plan_name과 동일하지만 PayPal의 경우
-
-
Orders열:-
product_id -
user_id -
status: 주문이 보류, 실패 또는 지불되었는지 알려줍니다. -
token: 트랜잭션을 초기화하기 위해 API(Stripe 또는 PayPal)에서 생성된 토큰입니다. -
price_cents: 제품과 유사하지만 이 값을 주문 레코드에 영구적으로 유지하기 위해 사용됩니다. -
payment_gateway: PayPal 또는 Stripe 주문에 사용되는 결제 게이트웨이를 저장합니다. -
customer_id: Stripe에서 구독을 위해 Stripe 고객을 저장하기 위해 사용하는 항목으로, 이후 섹션에서 자세히 설명합니다.
-
이러한 테이블을 생성하려면 몇 가지 마이그레이션을 생성해야 합니다.
사용자 테이블 생성용. 달리다:
rails g devise UserProducts 테이블 생성용 . 다음을 실행하여 마이그레이션을 생성합니다.
rails generate migration CreateProducts name:string stripe_plan_name:string paypal_plan_name:string db/migrate/ 에 있어야 하는 생성된 마이그레이션 파일을 열고 마이그레이션이 다음과 유사하게 보이도록 변경합니다.
class CreateProducts < ActiveRecord::Migration[5.2] def change create_table :products do |t| t.string :name t.string :stripe_plan_name t.string :paypal_plan_name end add_money :products, :price, currency: { present: true } end endOrders 테이블 생성용. 다음을 실행하여 마이그레이션을 생성합니다.
rails generate migration CreateOrders product_id:integer user_id:integer status:integer token:string charge_id:string error_message:string customer_id:string payment_gateway:integer 다시 db/migrate/ 에 있어야 하는 생성된 마이그레이션 파일을 열고 다음과 유사하게 보이도록 해당 파일을 변경합니다.
class CreateOrders < ActiveRecord::Migration[5.2] def change create_table :orders do |t| t.integer :product_id t.integer :user_id t.integer :status, default: 0 t.string :token t.string :charge_id t.string :error_message t.string :customer_id t.integer :payment_gateway t.timestamps end add_money :orders, :price, currency: { present: false } end end다음을 실행하여 데이터베이스 마이그레이션을 실행합니다.
rails db:migrate5단계: 모델을 만듭니다.
사용자 모델은 장치 설치에서 이미 생성되었으며 변경이 필요하지 않습니다. 그 외에도 Product 및 Order 에 대해 두 가지 모델이 생성됩니다.
제품. 다음을 사용하여 새 파일 app/models/product.rb 를 추가합니다.
class Product < ActiveRecord::Base monetize :price_cents has_many :orders end 주문하다. 다음을 사용하여 새 파일 app/models/order.rb 를 추가합니다.
class Order < ApplicationRecord enum status: { pending: 0, failed: 1, paid: 2, paypal_executed: 3} enum payment_gateway: { stripe: 0, paypal: 1 } belongs_to :product belongs_to :user scope :recently_created, -> { where(created_at: 1.minutes.ago..DateTime.now) } def set_paid self.status = Order.statuses[:paid] end def set_failed self.status = Order.statuses[:failed] end def set_paypal_executed self.status = Order.statuses[:paypal_executed] end end6단계: 데이터베이스를 채웁니다.
사용자와 두 개의 제품이 콘솔에 생성됩니다. 결제 테스트에 따라 주문 기록이 생성됩니다.
- 런
rails s - 브라우저에서
http://localhost:3000을 방문하십시오. - 가입 페이지로 리디렉션됩니다.
- 이메일 주소와 비밀번호를 입력하여 사용자를 등록합니다.
- 터미널에서 사용자가 데이터베이스에서 생성되었음을 보여주는 다음 로그가 표시됩니다.
User Create (0.1ms) INSERT INTO "users" ("email", "encrypted_password", "created_at", "updated_at") VALUES (?, ?, ?, ?) …-
rails c를 실행하고 다음을 추가하여 구독 없이 두 개의 제품을 만듭니다.-
Product.create(name: "Awesome T-Shirt", price_cents: 3000) -
Product.create(name: "Awesome Sneakers", price_cents: 5000)
-
7단계: 인덱스 페이지 만들기
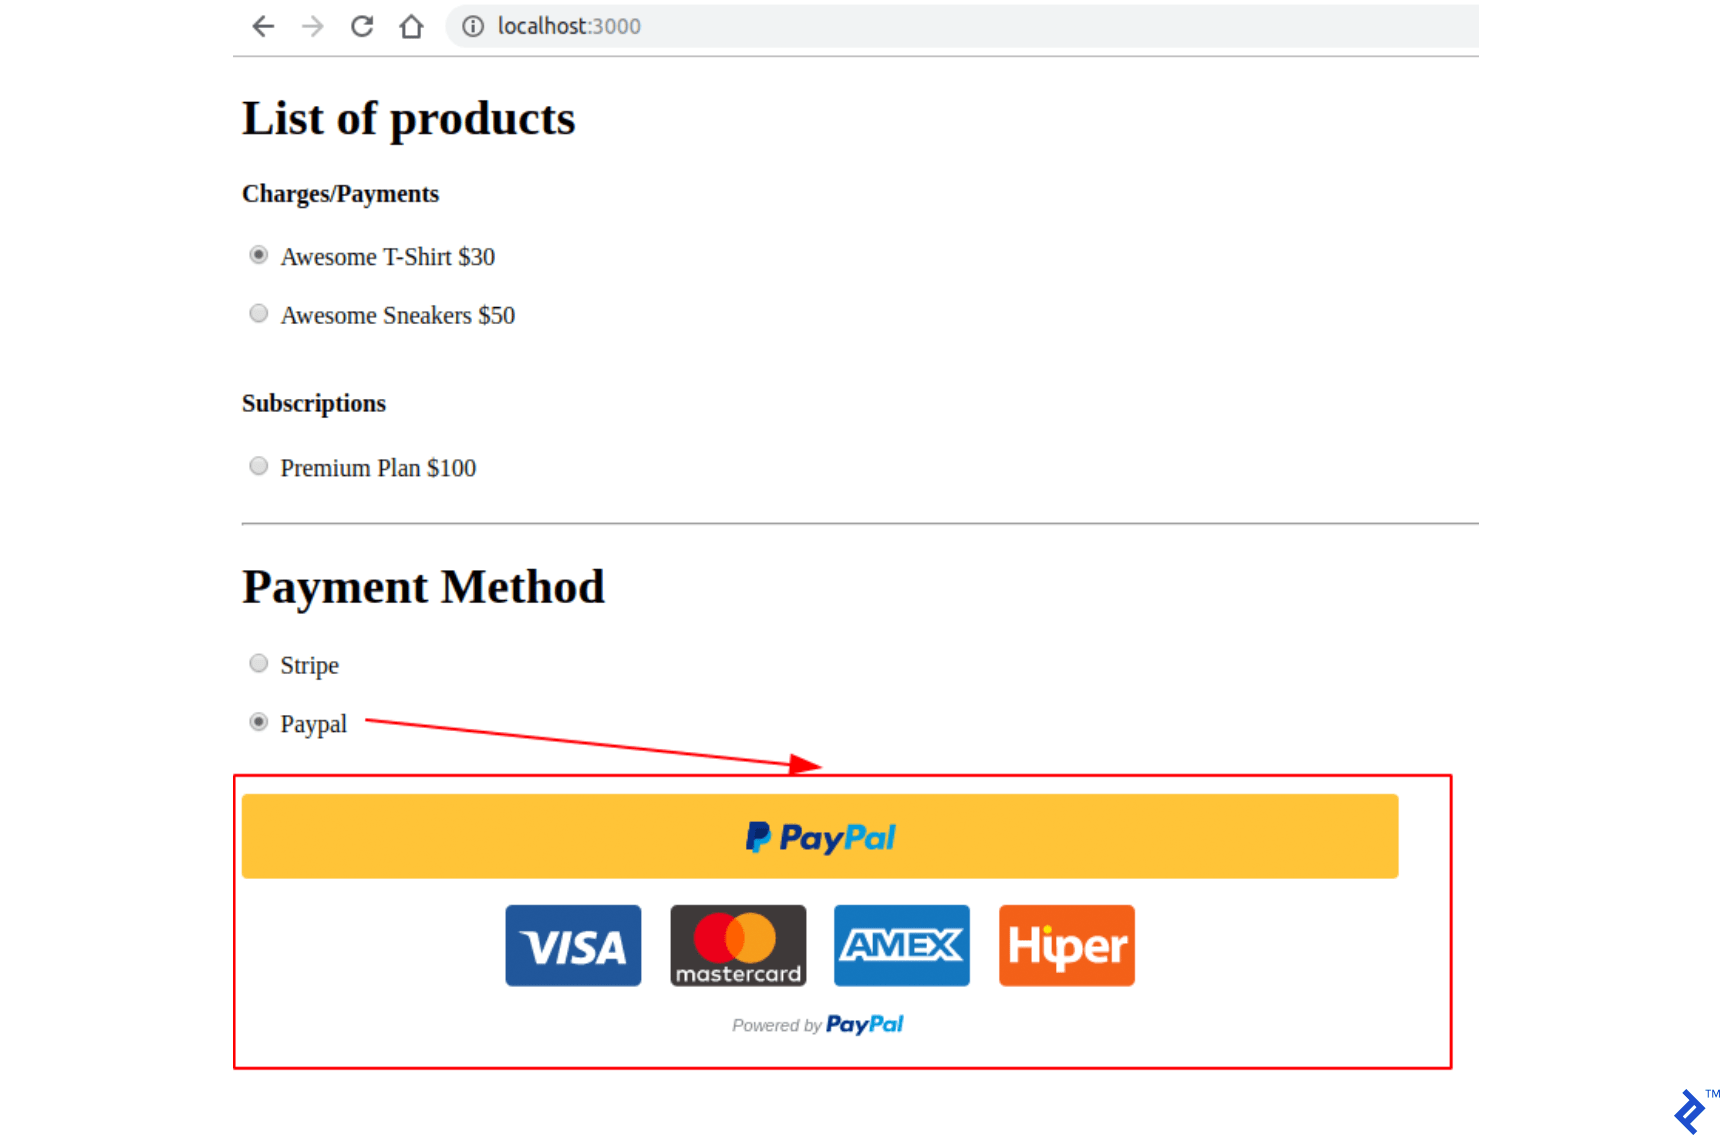
프로젝트의 기본 페이지에는 구매 또는 구독을 위한 제품 선택이 포함됩니다. 또한 지불 방법 선택(Stripe 또는 PayPal) 섹션도 있습니다. 제출 버튼은 PayPal의 경우 JavaScript 라이브러리를 통해 자체 버튼 디자인을 추가하므로 각 지불 게이트웨이 유형에도 사용됩니다.
먼저 index 에 대한 경로를 만들고 config/routes.rb 에 submit 합니다.
Rails.application.routes.draw do devise_for :users get '/', to: 'orders#index' post '/orders/submit', to: 'orders#submit' end 작업 index 를 생성 및 추가하고 주문 컨트롤러 app/controllers/orders_controller.rb 에서 submit 합니다. orders#index 작업은 프론트엔드에서 소비할 두 개의 변수를 저장합니다. @products_purchase 는 계획이 없는 제품 목록이 있고 @products_subscription 은 PayPal과 Stripe 계획이 있는 제품이 있습니다.
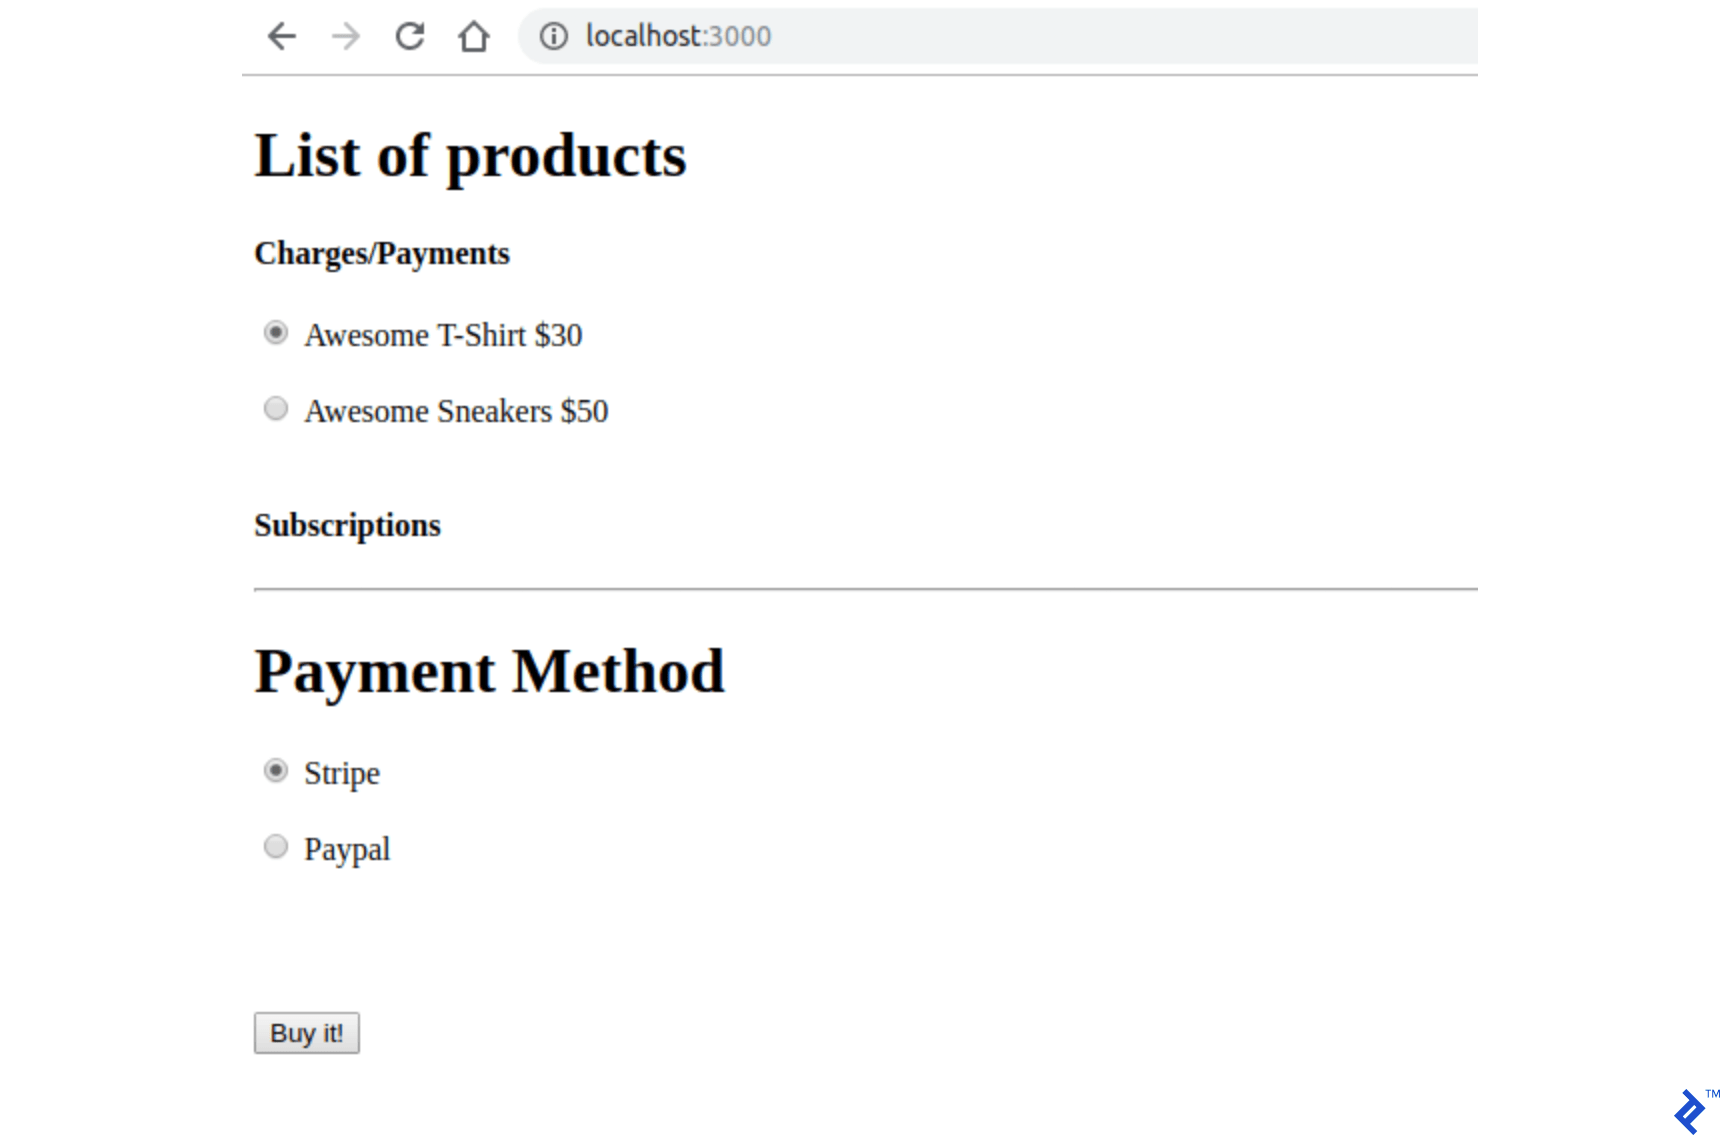
class OrdersController < ApplicationController before_action :authenticate_user! def index products = Product.all @products_purchase = products.where(stripe_plan_name:nil, paypal_plan_name:nil) @products_subscription = products - @products_purchase end def submit end end app/views/orders/index.html.haml 에 파일을 만듭니다. 이 파일에는 제출 방법을 통해 백엔드로 보낼 모든 입력과 지불 게이트웨이 및 제품 선택을 위한 상호 작용이 포함되어 있습니다. 다음은 몇 가지 입력 이름 속성입니다.
-
Orders[product_id]는 제품 ID를 저장합니다. -
Orders[payment_gateway]에는 다른 하나에 대해 Stripe 또는 PayPal 값이 있는 지불 게이트웨이가 포함되어 있습니다.
%div %h1 List of products = form_tag({:controller => "orders", :action => "submit" }, {:id => 'order-details'}) do %input{id:'order-type', :type=>"hidden", :value=>"stripe", :name=>'orders[payment_gateway]'} .form_row %h4 Charges/Payments - @products_purchase.each do |product| %div{'data-charges-and-payments-section': true} = radio_button_tag 'orders[product_id]', product.id, @products_purchase.first == product %span{id: "radioButtonName#{product.id}"} #{product.name} %span{id: "radioButtonPrice#{product.id}", :'data-price' => "#{product.price_cents}"} #{humanized_money_with_symbol product.price} %br %h4 Subscriptions - @products_subscription.each do |product| %div = radio_button_tag 'orders[product_id]', product.id, false %span{id: "radioButtonName#{product.id}"} #{product.name} %span{id: "radioButtonPrice#{product.id}", :'data-price' => "#{product.price_cents}"} #{humanized_money_with_symbol product.price} %br %hr %h1 Payment Method .form_row %div = radio_button_tag 'payment-selection', 'stripe', true, onclick: "changeTab();" %span Stripe %br %div = radio_button_tag 'payment-selection', 'paypal', false, onclick: "changeTab();" %span Paypal %br %br %div{id:'tab-stripe', class:'paymentSelectionTab active'} %div{id:'card-element'} %div{id:'card-errors', role:"alert"} %br %br = submit_tag "Buy it!", id: "submit-stripe" %div{id:'tab-paypal', class:'paymentSelectionTab'} %div{id: "submit-paypal"} %br %br %hr :javascript function changeTab() { var newActiveTabID = $('input[name="payment-selection"]:checked').val(); $('.paymentSelectionTab').removeClass('active'); $('#tab-' + newActiveTabID).addClass('active'); } :css #card-element { width:500px; } .paymentSelectionTab { display: none; } .paymentSelectionTab.active { display: block !important; } rails s 를 사용하여 애플리케이션을 실행하고 http://localhost:3000 에 있는 페이지를 방문하는 경우 다음과 같은 페이지를 볼 수 있어야 합니다.
지불 게이트웨이 자격 증명 저장소
PayPal 및 Stripe 키는 Git에서 추적하지 않는 파일에 저장됩니다. 이 파일에는 각 지불 게이트웨이에 대해 두 가지 유형의 키가 저장되어 있으며 지금은 더미 값을 사용할 것입니다. 이러한 키를 만드는 추가 지침은 다음 섹션에 나와 있습니다.
1단계: .gitignore 에 추가합니다.
/config/application.yml 2단계: config/application.yml 에서 자격 증명을 사용하여 파일을 만듭니다. 여기에는 이러한 API에 액세스하기 위한 모든 PayPal 및 Stripe 샌드박스/테스트 키가 포함되어야 합니다.
test: &default PAYPAL_ENV: sandbox PAYPAL_CLIENT_ID: YOUR_CREDENTIAL_HERE PAYPAL_CLIENT_SECRET: YOUR_CREDENTIAL_HERE STRIPE_PUBLISHABLE_KEY: YOUR_CREDENTIAL_HERE STRIPE_SECRET_KEY: YOUR_CREDENTIAL_HERE development: <<: *default 3단계: 응용 프로그램이 시작될 때 config/application.yml 파일의 변수를 저장하려면 Application 클래스 내부의 config/application.rb 에 이러한 줄을 추가하여 ENV 에서 사용할 수 있도록 합니다.
config_file = Rails.application.config_for(:application) config_file.each do |key,value| ENV[key] = value end unless config_file.nil?스트라이프 구성
Stripe API를 사용하기 위한 gem을 추가할 것입니다: stripe-rails . 요금 및 구독을 처리하려면 Stripe 계정을 만들어야 합니다. 필요한 경우 공식 문서에서 Stripe API용 API 메소드를 참조할 수 있습니다.
1단계: 프로젝트에 stripe-rails gem을 추가합니다.
stripe-rails gem은 이 프로젝트에서 사용되는 모든 API 요청에 대한 인터페이스를 제공합니다.
다음을 Gemfile 에 추가하십시오.
gem 'stripe-rails'달리다:
bundle install2단계: API 키를 생성합니다.
Stripe와 통신하기 위한 API 키를 가지려면 Stripe에서 계정을 생성해야 합니다. 응용 프로그램을 테스트하기 위해 테스트 모드를 사용할 수 있으므로 Stripe 계정 생성 과정에서 실제 비즈니스 정보를 입력할 필요가 없습니다.
- 계정이 없는 경우 Stripe에서 계정을 만드십시오(https://dashboard.stripe.com/).
- Stripe 대시보드에 있는 동안 로그인 후 테스트 데이터 보기 를 켜십시오.
- https://dashboard.stripe.com/test/apikeys에서
/config/application.yml의STRIPE_PUBLISHABLE_KEY및YOUR_CREDENTIAL_HERE값에 대한 YOUR_CREDENTIAL_HERE를STRIPE_SECRET_KEYPublishable Key및Secret key의 콘텐츠로 바꿉니다.
3단계: Stripe 모듈 초기화
키를 교체하는 것 외에도 Stripe 모듈을 초기화하여 ENV 에 이미 설정된 키를 사용하도록 해야 합니다.
다음을 사용하여 config/initializers/stripe.rb 에 파일을 만듭니다.
Rails.application.configure do config.stripe.secret_key = ENV["STRIPE_SECRET_KEY"] config.stripe.publishable_key = ENV["STRIPE_PUBLISHABLE_KEY"] end4단계: 프런트 엔드에 Stripe를 통합합니다.
우리는 Stripe JavaScript 라이브러리와 사용자 신용 카드 정보를 나타내는 토큰을 보내기 위한 로직을 추가할 것이며 백엔드에서 처리될 것입니다.
index.html.haml 파일에서 이것을 파일 맨 위에 추가하십시오. 이것은 Stripe 모듈(젬에서 제공)을 사용하여 Stripe 자바스크립트 라이브러리를 사용자 페이지에 추가합니다.
= stripe_javascript_tag Stripe는 API를 통해 생성된 보안 입력 필드를 사용합니다. 이 API를 통해 생성된 iframe 에서 생성되기 때문에 사용자 신용카드 정보를 처리하는 취약점에 대해 걱정할 필요가 없습니다. 또한 백엔드는 사용자의 민감한 데이터를 처리/저장할 수 없으며 이 정보를 나타내는 토큰만 받습니다.
이러한 입력 필드는 stripe.elements().create('card') 를 호출하여 생성됩니다. 그런 다음에는 이러한 입력이 마운트되어야 하는 HTML 요소 ID/클래스를 인수로 전달하여 mount() 로 반환된 객체를 호출하기만 하면 됩니다. 자세한 내용은 스트라이프에서 확인할 수 있습니다.
사용자가 Stripe 결제 수단으로 제출 버튼을 누르면 생성된 Stripe 카드 요소에서 약속을 반환하는 또 다른 API 호출이 수행됩니다.
stripe.createToken(card).then(function(result) 속성 오류가 할당되지 않은 경우 이 함수의 result 변수에는 result.token.id 속성에 액세스하여 검색할 수 있는 토큰이 있습니다. 이 토큰은 백엔드로 전송됩니다.
이러한 변경을 수행하려면 index.html.haml에 있는 주석 코드 // YOUR STRIPE AND PAYPAL CODE WILL BE HERE in index.html.haml 을 다음으로 교체하십시오.
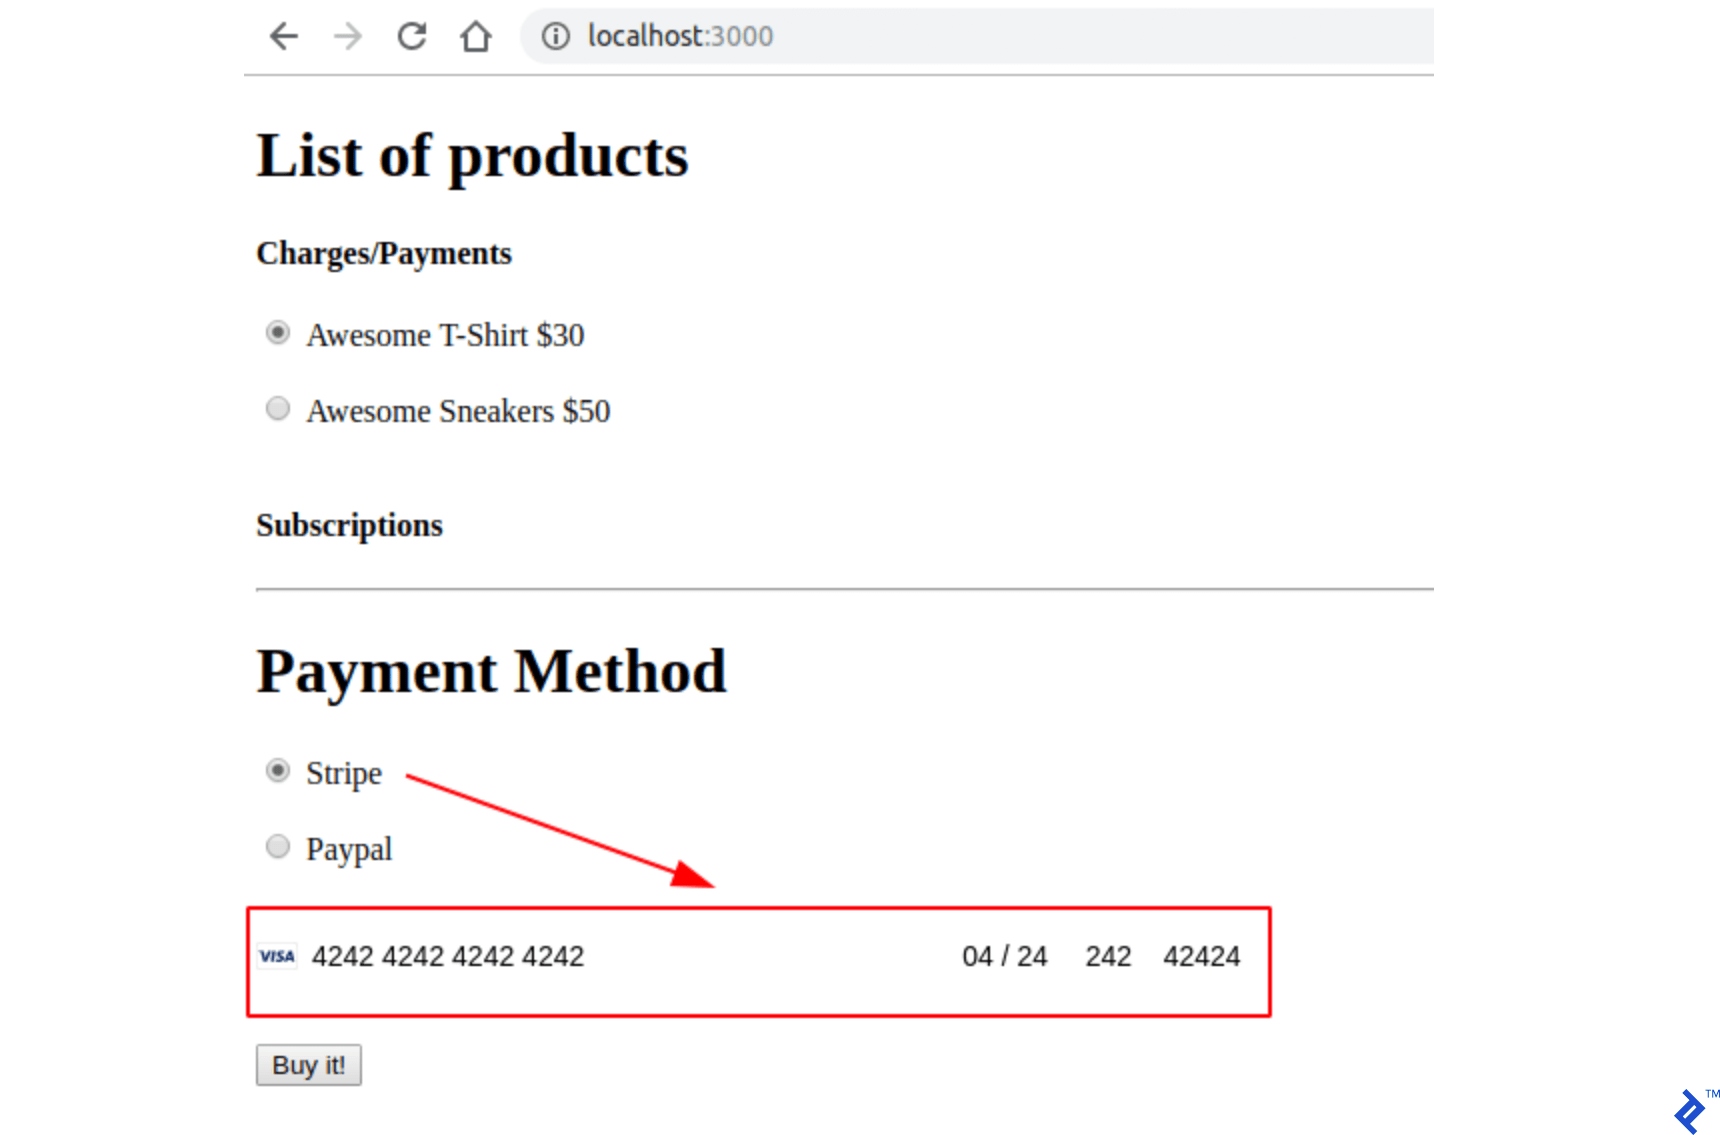
(function setupStripe() { //Initialize stripe with publishable key var stripe = Stripe("#{ENV['STRIPE_PUBLISHABLE_KEY']}"); //Create Stripe credit card elements. var elements = stripe.elements(); var card = elements.create('card'); //Add a listener in order to check if card.addEventListener('change', function(event) { //the div card-errors contains error details if any var displayError = document.getElementById('card-errors'); document.getElementById('submit-stripe').disabled = false; if (event.error) { // Display error displayError.textContent = event.error.message; } else { // Clear error displayError.textContent = ''; } }); // Mount Stripe card element in the #card-element div. card.mount('#card-element'); var form = document.getElementById('order-details'); // This will be called when the #submit-stripe button is clicked by the user. form.addEventListener('submit', function(event) { $('#submit-stripe').prop('disabled', true); event.preventDefault(); stripe.createToken(card).then(function(result) { if (result.error) { // Inform that there was an error. var errorElement = document.getElementById('card-errors'); errorElement.textContent = result.error.message; } else { // Now we submit the form. We also add a hidden input storing // the token. So our back-end can consume it. var $form = $("#order-details"); // Add a hidden input orders[token] $form.append($('<input type="hidden" name="orders[token]"/>').val(result.token.id)); // Set order type $('#order-type').val('stripe'); $form.submit(); } }); return false; }); }()); //YOUR PAYPAL CODE WILL BE HERE페이지를 방문하면 새로운 Stripe 보안 입력 필드가 있는 다음과 같이 표시되어야 합니다.
5단계: 애플리케이션을 테스트합니다.
신용카드 양식을 테스트 카드(https://stripe.com/docs/testing)로 채우고 페이지를 제출합니다. 서버 출력의 모든 매개변수( product_id , payment_gateway 및 token )를 사용하여 submit 작업이 호출되었는지 확인합니다.
스트라이프 차지
스트라이프 요금은 일회성 거래를 나타냅니다. 따라서 Stripe Charge 거래 후에는 클라이언트로부터 직접 돈을 받게 됩니다. 이것은 계획과 연관되지 않은 제품을 판매하는 데 이상적입니다. 이후 섹션에서 PayPal과 동일한 거래 유형을 수행하는 방법을 보여주지만 이러한 유형의 거래에 대한 PayPal의 이름은 Payment 입니다.
이 섹션에서는 주문 처리 및 제출을 위한 모든 스켈레톤도 제공합니다. Stripe 양식이 제출되면 submit 작업에서 주문을 생성합니다. 이 주문은 처음에는 보류 상태이므로 이 주문을 처리하는 동안 문제가 발생하더라도 주문은 계속 보류 상태 가 됩니다.
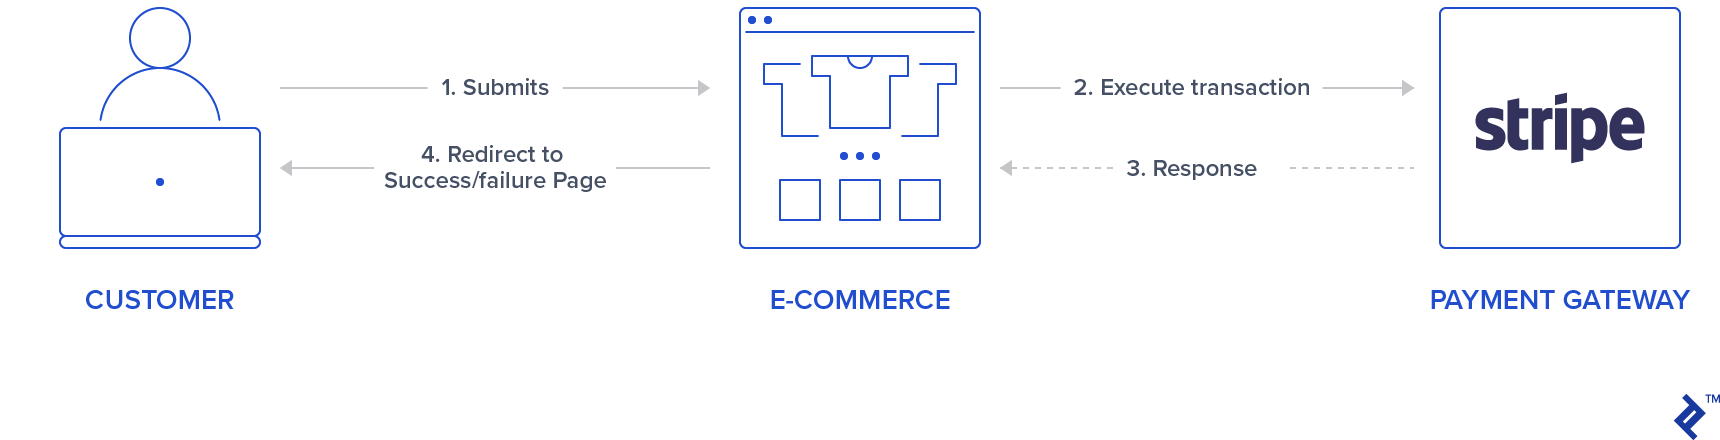
Stripe API 호출에서 오류가 발생하면 주문을 실패 상태로 설정하고, 성공적으로 충전이 완료되면 유료 상태가 됩니다. 사용자는 다음 그래프와 같이 Stripe API 응답에 따라 리디렉션됩니다.
또한 Stripe 충전 시 ID가 반환됩니다. 필요한 경우 나중에 Stripe 대시보드에서 찾을 수 있도록 이 ID를 저장합니다. 이 ID는 주문을 환불해야 하는 경우에도 사용할 수 있습니다. 그러한 것은 이 기사에서 다루지 않을 것입니다.
1단계: Stripe 서비스를 생성합니다.
Stripe API를 사용하여 Stripe 작업을 나타내기 위해 싱글톤 클래스를 사용할 것입니다. 요금을 생성하기 위해 Stripe::Charge.create 메소드가 호출되고 반환된 객체 ID 속성은 주문 레코드 charge_id 에 저장됩니다. 이 create 함수는 프런트 엔드에서 발생한 토큰, 주문 가격 및 설명을 전달하여 호출됩니다.
따라서 새 폴더 app/services/orders 를 만들고 메서드 execute 항목이 있는 Orders::Stripe 싱글톤 클래스를 포함하는 Stripe 서비스 app/services/orders/stripe.rb 를 추가합니다.
class Orders::Stripe INVALID_STRIPE_OPERATION = 'Invalid Stripe Operation' def self.execute(order:, user:) product = order.product # Check if the order is a plan if product.stripe_plan_name.blank? charge = self.execute_charge(price_cents: product.price_cents, description: product.name, card_token: order.token) else #SUBSCRIPTIONS WILL BE HANDLED HERE end unless charge&.id.blank? # If there is a charge with id, set order paid. order.charge_id = charge.id order.set_paid end rescue Stripe::StripeError => e # If a Stripe error is raised from the API, # set status failed and an error message order.error_message = INVALID_STRIPE_OPERATION order.set_failed end private def self.execute_charge(price_cents:, description:, card_token:) Stripe::Charge.create({ amount: price_cents.to_s, currency: "usd", description: description, source: card_token }) end end2단계: 제출 작업을 구현하고 Stripe 서비스를 호출합니다.
orders_controller.rb 에서 submit 작업에 다음을 추가합니다. 기본적으로 Orders::Stripe.execute 서비스를 호출합니다. 두 개의 새로운 개인 기능이 추가되었습니다: prepare_new_order 및 order_params .
def submit @order = nil #Check which type of order it is if order_params[:payment_gateway] == "stripe" prepare_new_order Orders::Stripe.execute(order: @order, user: current_user) elsif order_params[:payment_gateway] == "paypal" #PAYPAL WILL BE HANDLED HERE end ensure if @order&.save if @order.paid? # Success is rendered when order is paid and saved return render html: SUCCESS_MESSAGE elsif @order.failed? && [email protected]_message.blank? # Render error only if order failed and there is an error_message return render html: @order.error_message end end render html: FAILURE_MESSAGE end private # Initialize a new order and and set its user, product and price. def prepare_new_order @order = Order.new(order_params) @order.user_id = current_user.id @product = Product.find(@order.product_id) @order.price_cents = @product.price_cents end def order_params params.require(:orders).permit(:product_id, :token, :payment_gateway, :charge_id) end3단계: 애플리케이션을 테스트합니다.
유효한 테스트 카드로 호출할 때 제출 작업이 성공적인 메시지로 리디렉션되는지 확인합니다. 또한 주문이 표시되는 경우 Stripe 대시보드에서 확인하십시오.
스트라이프 구독
정기 결제를 위해 구독 또는 계획을 만들 수 있습니다. 이 유형의 제품을 사용하면 계획 구성에 따라 사용자에게 매일, 매주, 매월 또는 매년 자동으로 요금이 청구됩니다. 이 섹션에서는 계획 ID를 저장하기 위해 제품 stripe_plan_name 에 대한 필드를 사용할 것입니다. 실제로 ID를 선택할 수 있으며 이를 premium-plan 이라고 부를 것입니다. 관계 customer <-> subscription .
또한 Stripe 고객 개체의 id 속성으로 채워질 stripe_customer_id 라는 사용자 테이블에 대한 새 열을 생성합니다. Stripe::Customer.create 함수 호출 시 Stripe 고객이 생성되며, (https://dashboard.stripe.com/test/customers)에서 생성되어 계정에 연결된 고객을 확인할 수도 있습니다. 고객은 우리의 경우 양식이 제출될 때 전송되는 프런트 엔드에서 생성된 토큰인 source 매개변수를 전달하여 생성됩니다.
마지막으로 언급된 Stripe API 호출에서 얻은 고객 개체는 customer.subscriptions.create 를 호출하고 계획 ID를 매개변수로 전달하여 수행되는 구독을 생성하는 데에도 사용됩니다.
또한, stripe-rails gem은 Stripe::Customer.retrieve 및 Stripe::Customer.update 를 각각 호출하여 Stripe에서 고객을 검색하고 업데이트하는 인터페이스를 제공합니다.
따라서 사용자 레코드에 이미 stripe_customer_id 가 있는 경우 Stripe::Customer.create 를 호출하여 stripe_customer_id 를 매개변수로 전달한 다음 Stripe::Customer.update Stripe::Customer.retrieve 를 전달합니다. , 그리고 이 경우 토큰에 매개변수를 전달합니다.
먼저 stripe_plan_name 필드를 사용하여 새 구독 제품을 만들 수 있도록 Stripe API를 사용하여 계획을 만들 것입니다. 그런 다음 Stripe 구독 생성 및 실행이 처리되도록 orders_controller 및 Stripe 서비스를 수정합니다.
1단계: Stripe API를 사용하여 계획을 만듭니다.
명령 rails c . 다음을 사용하여 Stripe 계정에 대한 구독을 생성하십시오.
Stripe::Plan.create({ amount: 10000, interval: 'month', product: { name: 'Premium plan', }, currency: 'usd', id: 'premium-plan', })이 단계에서 반환된 결과가 true이면 계획이 성공적으로 생성되었음을 의미하며 Stripe 대시보드에서 액세스할 수 있습니다.
2단계: stripe_plan_name 필드 세트를 사용하여 데이터베이스에 제품을 생성합니다.

이제 데이터베이스에서 stripe_plan_name 이 premium-plan 으로 설정된 제품을 생성합니다.
Product.create(price_cents: 10000, name: 'Premium Plan', stripe_plan_name: 'premium-plan') 3단계: users 테이블에 stripe_customer_id 열을 추가하기 위한 마이그레이션을 생성합니다.
터미널에서 다음을 실행합니다.
rails generate migration AddStripeCustomerIdToUser stripe_customer_id:string rails db:migrate4단계: Stripe 서비스 클래스에서 구독 로직을 구현합니다.
app/services/orders/stripe.rb 의 private 메소드에 두 가지 기능을 더 추가 execute_subscription . find_or_create_customer 함수는 이미 생성된 고객을 반환하거나 새로 생성된 고객을 반환하는 역할을 합니다.
def self.execute_subscription(plan:, token:, customer:) customer.subscriptions.create({ plan: plan }) end def self.find_or_create_customer(card_token:, customer_id:, email:) if customer_id stripe_customer = Stripe::Customer.retrieve({ id: customer_id }) if stripe_customer stripe_customer = Stripe::Customer.update(stripe_customer.id, { source: card_token}) end else stripe_customer = Stripe::Customer.create({ email: email, source: card_token }) end stripe_customer end 마지막으로 같은 파일의 execute 함수( app/services/orders/stripe.rb )에서 먼저 find_or_create_customer 를 호출한 다음 이전에 검색/생성된 고객을 전달하여 execute_subscription 을 호출하여 구독을 실행합니다. 따라서 execute 메소드에서 #SUBSCRIPTIONS WILL BE HANDLED HERE 주석을 다음 코드로 교체하십시오.
customer = self.find_or_create_customer(card_token: order.token, customer_id: user.stripe_customer_id, email: user.email) if customer user.update(stripe_customer_id: customer.id) order.customer_id = customer.id charge = self.execute_subscription(plan: product.stripe_plan_name, customer: customer)5단계: 애플리케이션을 테스트합니다.
웹사이트를 방문하여 구독 제품 Premium Plan 을 선택하고 유효한 테스트 카드를 작성하십시오. 제출 후 성공적인 페이지로 리디렉션됩니다. 또한 구독이 성공적으로 생성되었는지 Stripe 대시보드에서 확인하십시오.
페이팔 구성
Stripe에서 했던 것처럼 PayPal API를 사용하기 위한 보석( paypal-sdk-rest )도 추가할 예정이며 PayPal 계정 생성도 필요합니다. 이 gem을 사용하는 PayPal에 대한 설명 워크플로는 공식 PayPal API 문서에서 참조할 수 있습니다.
1단계: 프로젝트에 paypal-sdk-rest gem을 추가합니다.
다음을 Gemfile 에 추가하십시오.
gem 'paypal-sdk-rest'달리다:
bundle install2단계: API 키를 생성합니다.
PayPal과 통신하기 위한 API 키를 얻으려면 PayPal 계정을 만들어야 합니다. 그래서:
- https://developer.paypal.com/에서 계정을 만드십시오(또는 PayPal 계정 사용).
- 계정에 로그인한 상태에서 https://developer.paypal.com/developer/accounts/에서 두 개의 샌드박스 계정을 만듭니다.
- 개인(구매자 계정) – 결제 및 구독 테스트에 사용됩니다.
- 비즈니스(판매자 계정) – 이것은 우리가 찾고 있는 API 키가 있는 애플리케이션에 연결됩니다. 그 외에도 이 계정에서 모든 거래를 추적할 수 있습니다.
- 이전 비즈니스 샌드박스 계정을 사용하여 https://developer.paypal.com/developer/applications에서 앱을 만듭니다.
- 이 단계가 끝나면 PayPal용 두 개의 키인
Client ID와Secret을 받게 됩니다. -
config/application.yml에서PAYPAL_CLIENT_ID및YOUR_CREDENTIAL_HERE의PAYPAL_CLIENT_SECRET를 방금 받은 키로 바꾸십시오.
3단계: PayPal 모듈을 초기화합니다.
Stripe와 유사하게 application.yml 의 키를 교체하는 것 외에도 PayPal 모듈을 초기화해야 ENV 변수에 이미 설정된 키를 사용할 수 있습니다. 이를 위해 다음을 사용하여 config/initializers/paypal.rb 에 파일을 만듭니다.
PayPal::SDK.configure( mode: ENV['PAYPAL_ENV'], client_id: ENV['PAYPAL_CLIENT_ID'], client_secret: ENV['PAYPAL_CLIENT_SECRET'], ) PayPal::SDK.logger.level = Logger::INFO4단계: 프런트 엔드에서 PayPal을 통합합니다.
index.html.haml 에서 파일 맨 위에 다음을 추가합니다.
%script(src="https://www.paypal.com/sdk/js?client-id=#{ENV['PAYPAL_CLIENT_ID']}") Stripe와 달리 PayPal은 클릭 시 사용자가 로그인하여 결제/구독을 진행할 수 있는 보안 팝업을 여는 버튼만 사용합니다. 이 버튼은 paypal.Button(PARAM1).render(PARAM2) 메서드를 호출하여 렌더링할 수 있습니다.
-
PARAM1은 환경 구성과 속성으로 두 개의 콜백 함수인createOrder및onApprove가 있는 객체입니다. -
PARAM2는 PayPal 버튼이 첨부되어야 하는 HTML 요소 식별자를 나타냅니다.
따라서 여전히 동일한 파일에서 주석 처리된 코드 YOUR PAYPAL CODE WILL BE HERE 를 다음으로 바꾸십시오.
(function setupPaypal() { function isPayment() { return $('[data-charges-and-payments-section] input[name="orders[product_id]"]:checked').length } function submitOrderPaypal(chargeID) { var $form = $("#order-details"); // Add a hidden input orders[charge_id] $form.append($('<input type="hidden" name="orders[charge_id]"/>').val(chargeID)); // Set order type $('#order-type').val('paypal'); $form.submit(); } paypal.Buttons({ env: "#{ENV['PAYPAL_ENV']}", createOrder: function() { }, onApprove: function(data) { } }).render('#submit-paypal'); }());5단계: 애플리케이션을 테스트합니다.
페이지를 방문하여 PayPal을 결제 수단으로 선택할 때 PayPal 버튼이 렌더링되는지 확인합니다.
페이팔 거래
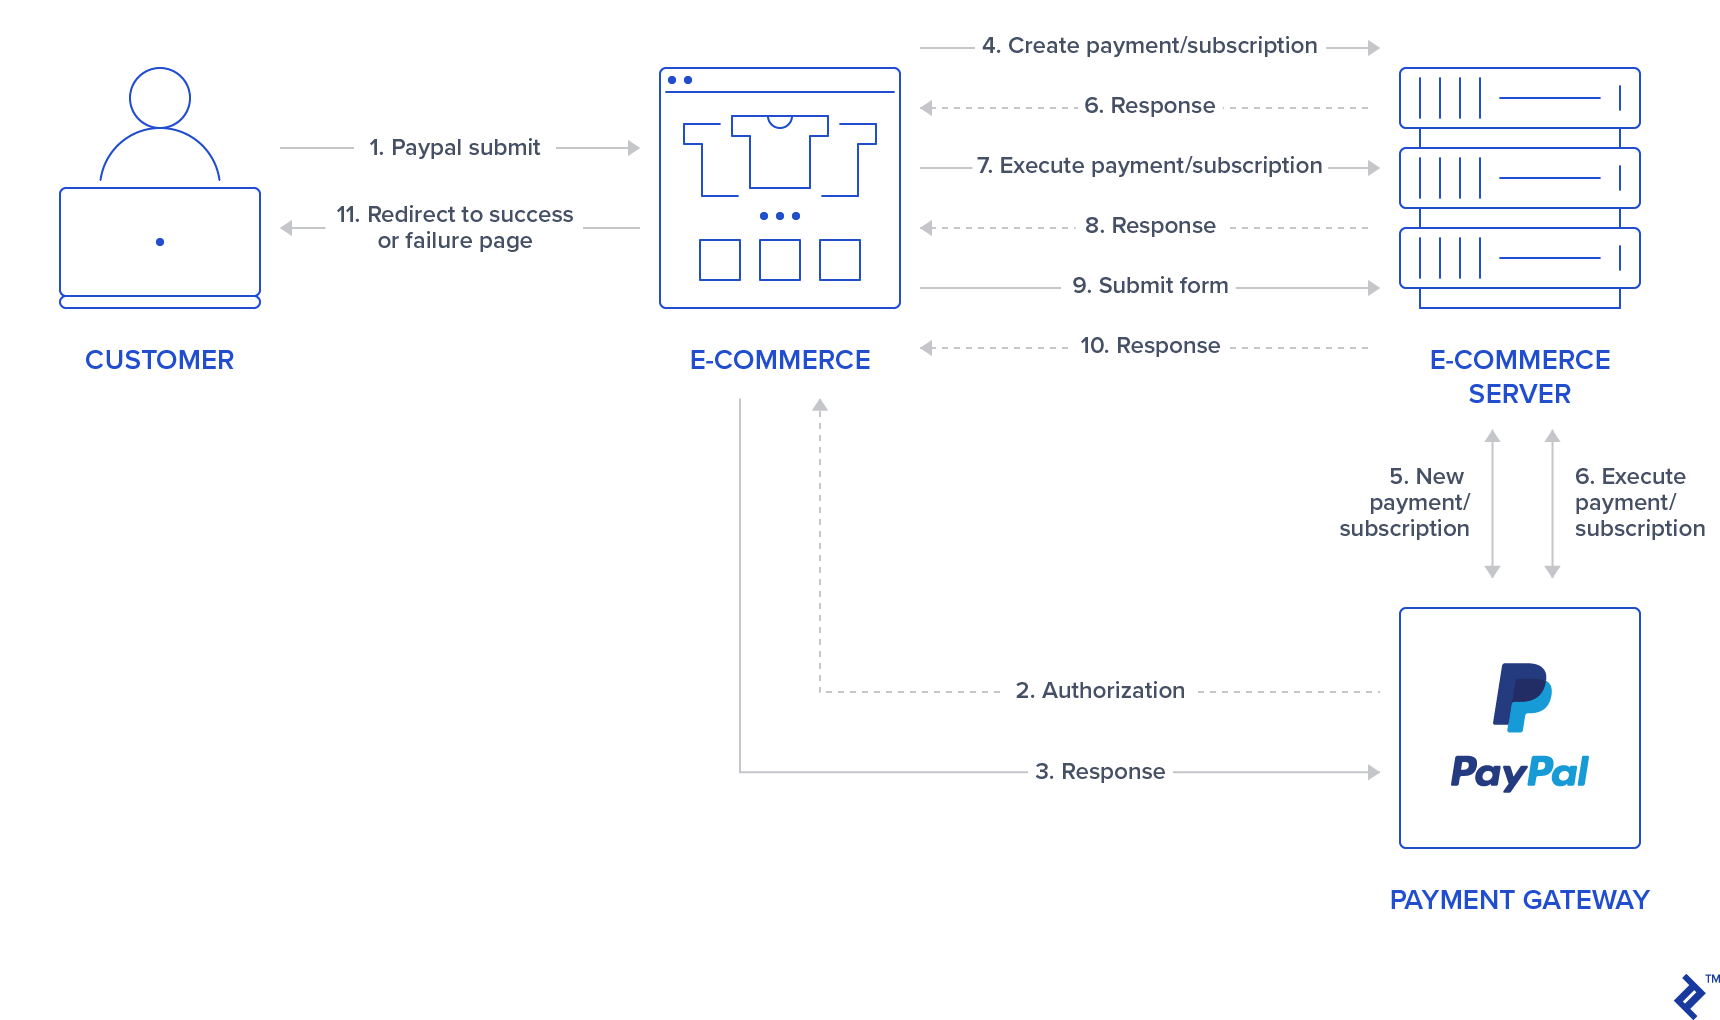
Stripe와 달리 PayPal 거래의 논리는 프런트 엔드에서 백 엔드로 시작된 더 많은 요청을 포함하기 때문에 조금 더 복잡합니다. 그래서 이 섹션이 존재합니다. createOrder 및 onApprove 메소드에 설명된 기능이 구현되는 방식과 백엔드 프로세스에서도 예상되는 사항에 대해 (코드 없이) 설명하겠습니다.
1단계: 사용자가 PayPal 제출 버튼을 클릭하면 사용자 자격 증명을 요청하는 PayPal 팝업이 열려 있지만 로드 상태입니다. 함수 콜백 createOrder 가 호출됩니다.
2단계: 이 기능에서는 백엔드에 대한 요청을 수행하여 결제/구독을 생성합니다. 이것은 거래의 맨 처음이며 아직 요금이 부과되지 않으므로 거래는 실제로 보류 상태입니다. 백엔드는 PayPal 모듈( paypal-rest-sdk gem을 통해 제공)을 사용하여 생성될 토큰을 반환해야 합니다.
3단계: 여전히 createOrder 콜백에서 백엔드에서 생성된 이 토큰을 반환하고 모든 것이 정상이면 PayPal 팝업이 다음을 렌더링하여 사용자 자격 증명을 요청합니다.
4단계: 사용자가 로그인하고 결제 수단을 선택하면 팝업 상태가 다음과 같이 변경됩니다.
5단계: 이제 onApprove 함수 콜백이 호출됩니다. 우리는 그것을 다음과 같이 정의했습니다: onApprove: function(data) . data 객체는 그것을 실행하기 위한 지불 정보를 가질 것입니다. 이 콜백에서 백엔드 기능에 대한 또 다른 요청이 이번에는 PayPal 주문을 실행하기 위해 데이터 개체를 전달하여 수행됩니다.
6단계: 백엔드는 이 트랜잭션을 실행하고 200을 반환합니다(성공한 경우).
7단계: 백엔드가 반환되면 양식을 제출합니다. 이것은 백엔드에 대한 세 번째 요청입니다.
Stripe과 달리 이 프로세스에서 백엔드에 세 가지 요청이 있음을 유의하십시오. 그리고 그에 따라 동기화된 주문 기록 상태를 유지합니다.
-
createOrder콜백: 트랜잭션이 생성되고 주문 레코드도 생성됩니다. 따라서 기본적으로 보류 상태에 있습니다. -
onApprove콜백: 트랜잭션이 실행되고 주문이 paypal_executed 로 설정됩니다. - 주문 페이지가 제출됨: 트랜잭션이 이미 실행되었으므로 아무 것도 변경되지 않습니다. 주문 레코드의 상태가 지불 됨 으로 변경됩니다.
이 전체 프로세스는 다음 그래프에 설명되어 있습니다.
페이팔 결제
PayPal 결제는 Stripe Charges와 동일한 논리를 따르므로 일회성 거래를 나타내지만 이전 섹션에서 언급했듯이 흐름 논리가 다릅니다. 다음은 PayPal 결제를 처리하기 위해 수행해야 하는 변경 사항입니다.
1단계: PayPal에 대한 새 경로를 만들고 결제를 실행합니다.
Add the following routes in config/routes.rb :
post 'orders/paypal/create_payment' => 'orders#paypal_create_payment', as: :paypal_create_payment post 'orders/paypal/execute_payment' => 'orders#paypal_execute_payment', as: :paypal_execute_payment This will create two new routes for creating and executing payments which will be handled in the paypal_create_payment and paypal_execute_payment orders controller methods.
Step 2: Create the PayPal service.
Add the singleton class Orders::Paypal at: app/services/orders/paypal.rb .
This service will initially have three responsibilities:
- The
create_paymentmethod creates a payment by callingPayPal::SDK::REST::Payment.new. A token is generated and returned to the front-end. - The
execute_paymentmethod executes the payment by first finding the previous created payment object throughPayPal::SDK::REST::Payment.find(payment_id)which uses the payment_id as an argument which has the same value as the charge_id stored in the previous step in the order object. After that, we callexecutein the payment object with a given payer as the parameter. This payer is given by the front end after the user has provided credentials and selected a payment method in the popup. - The
finishmethod finds an order by a specific charge_id querying for recently created orders in the paypal_executed state. If a record is found, it is marked as paid.
class Orders::Paypal def self.finish(charge_id) order = Order.paypal_executed.recently_created.find_by(charge_id: charge_id) return nil if order.nil? order.set_paid order end def self.create_payment(order:, product:) payment_price = (product.price_cents/100.0).to_s currency = "USD" payment = PayPal::SDK::REST::Payment.new({ intent: "sale", payer: { payment_method: "paypal" }, redirect_urls: { return_url: "/", cancel_url: "/" }, transactions: [{ item_list: { items: [{ name: product.name, sku: product.name, price: payment_price, currency: currency, quantity: 1 } ] }, amount: { total: payment_price, currency: currency }, description: "Payment for: #{product.name}" }] }) if payment.create order.token = payment.token order.charge_id = payment.id return payment.token if order.save end end def self.execute_payment(payment_id:, payer_id:) order = Order.recently_created.find_by(charge_id: payment_id) return false unless order payment = PayPal::SDK::REST::Payment.find(payment_id) if payment.execute( payer_id: payer_id ) order.set_paypal_executed return order.save end endStep 3: Call the PayPal service in the controller in the submit action.
Add a callback for prepare_new_order before the action paypal_create_payment (which will be added in the next step) is requested by adding the following in the file app/controllers/orders_controller.rb :
class OrdersController < ApplicationController before_action :authenticate_user! before_action :prepare_new_order, only: [:paypal_create_payment] ... Again, in the same file, call PayPal service in the submit action by replacing the commented code #PAYPAL WILL BE HANDLED HERE. 다음과 함께:
... elsif order_params[:payment_gateway] == "paypal" @order = Orders::Paypal.finish(order_params[:token]) end ...Step 4: Create the actions for handling requests.
Still, in the app/controllers/orders_controller.rb file, create two new actions (which should be public) for handling requests to paypal_create_payment and paypal_execute_payment routes:
- The
paypal_create_paymentmethod: Will call our service methodcreate_payment. If that returns successfully, it will return the order token created byOrders::Paypal.create_payment. - The
paypal_execute_paymentmethod: Will call our service methodexecute_payment(which executes our payments). If the payment is performed successfully, it returns 200.
... def paypal_create_payment result = Orders::Paypal.create_payment(order: @order, product: @product) if result render json: { token: result }, status: :ok else render json: {error: FAILURE_MESSAGE}, status: :unprocessable_entity end end def paypal_execute_payment if Orders::Paypal.execute_payment(payment_id: params[:paymentID], payer_id: params[:payerID]) render json: {}, status: :ok else render json: {error: FAILURE_MESSAGE}, status: :unprocessable_entity end end ... Step 5: Implement the front-end callback functions for createOrder and onApprove .
Make your paypal.Button.render call look like this:
paypal.Buttons({ env: "#{ENV['PAYPAL_ENV']}", createOrder: function() { $('#order-type').val("paypal"); if (isPayment()) { return $.post("#{paypal_create_payment_url}", $('#order-details').serialize()).then(function(data) { return data.token; }); } else { } }, onApprove: function(data) { if (isPayment()) { return $.post("#{paypal_execute_payment_url}", { paymentID: data.paymentID, payerID: data.payerID }).then(function() { submitOrderPaypal(data.paymentID) }); } else { } } }).render('#submit-paypal'); As mentioned in the previous section, we call paypal_create_payment_url for the createOrder callback and paypal_execute_payment_url for the onApprove callback. Notice that if the last request returns success, we submit the order, which is the third request made to the server.
In the createOrder function handler, we return a token (obtained from the back end). In the onApprove callback, we have two properties passed down to our back-end paymentID and payerID . These will be used in order to execute the payment.
Finally, notice that we have two empty else clauses as I'm leaving room for the next section where we will be adding PayPal subscriptions.
If you visit your page after integrating the front-end JavaScript section and select PayPal as the payment method, it should look like the following:
Step 6: Test your application.
- 색인 페이지를 방문하십시오.
- 결제/청구 상품을 선택하고 결제 수단으로 PayPal을 선택합니다.
- PayPal 제출 버튼을 클릭합니다.
- PayPal 팝업에서:
- 생성한 구매자 계정의 자격 증명을 사용합니다.
- 로그인하고 주문을 확인합니다.
- 팝업이 닫혀야 합니다.
- 성공 페이지로 리디렉션되는지 확인합니다.
- 마지막으로 https://www.sandbox.paypal.com/signin에서 비즈니스 계정으로 로그인하고 대시보드 https://www.sandbox.paypal.com/listing을 확인하여 PayPal 계정에서 주문이 수행되었는지 확인합니다. /업무.
페이팔 구독
PayPal 계획/계약/구독은 Stripe 구독과 동일한 논리를 따르며 반복 결제를 위해 생성됩니다. 이 유형의 제품을 사용하면 구성에 따라 사용자에게 매일, 매주, 매월 또는 매년 자동으로 요금이 청구됩니다.
PayPal에서 제공한 플랜 ID를 저장하기 위해 제품 paypal_plan_name 필드를 사용할 것입니다. 이 경우 Stripe와 달리 ID를 선택하지 않으며 PayPal은 이 값을 반환하여 데이터베이스에서 생성된 마지막 제품을 업데이트하는 데 사용됩니다.
구독 생성의 경우 onApprove 메소드가 기본 구현에서 이 연결을 처리할 수 있으므로 모든 단계에서 customer 정보가 필요하지 않습니다. 따라서 우리의 테이블은 동일하게 유지됩니다.
1단계: PayPal API를 사용하여 계획을 만듭니다.
명령 rails c . 다음을 사용하여 PayPal 계정에 대한 구독을 만듭니다.
plan = PayPal::SDK::REST::Plan.new({ name: 'Premium Plan', description: 'Premium Plan', type: 'fixed', payment_definitions: [{ name: 'Premium Plan', type: 'REGULAR', frequency_interval: '1', frequency: 'MONTH', cycles: '12', amount: { currency: 'USD', value: '100.00' } }], merchant_preferences: { cancel_url: 'http://localhost:3000/', return_url: 'http://localhost:3000/', max_fail_attempts: '0', auto_bill_amount: 'YES', initial_fail_amount_action: 'CONTINUE' } }) plan.create plan_update = { op: 'replace', path: '/', value: { state: 'ACTIVE' } } plan.update(plan_update) 2단계: paypal_plan_name 데이터베이스의 마지막 제품을 반환 plan.id 로 업데이트합니다.
달리다:
Product.last.update(paypal_plan_name: plan.id)3단계: PayPal 구독 경로를 추가합니다.
config/routes.rb 에 두 개의 새 경로를 추가합니다.
post 'orders/paypal/create_subscription' => 'orders#paypal_create_subscription', as: :paypal_create_subscription post 'orders/paypal/execute_subscription' => 'orders#paypal_execute_subscription', as: :paypal_execute_subscription4단계: PayPal 서비스에서 생성 및 실행을 처리합니다.
app/services/orders/paypal.rb 의 Orders::Paypal 에서 구독 생성 및 실행을 위한 두 가지 함수를 더 추가합니다.
def self.create_subscription(order:, product:) agreement = PayPal::SDK::REST::Agreement.new({ name: product.name, description: "Subscription for: #{product.name}", start_date: (Time.now.utc + 1.minute).iso8601, payer: { payment_method: "paypal" }, plan: { id: product.paypal_plan_name } }) if agreement.create order.token = agreement.token return agreement.token if order.save end end def self.execute_subscription(token:) order = Order.recently_created.find_by(token: token) return false unless order agreement = PayPal::SDK::REST::Agreement.new agreement.token = token if agreement.execute order.charge_id = agreement.id order.set_paypal_executed return order.charge_id if order.save end end create_subscription 에서 PayPal::SDK::REST::Agreement.new 메서드를 호출하고 product.paypal_plan_name 을 속성 중 하나로 전달하여 계약을 초기화합니다. 그런 다음 생성하고 이제 이 마지막 개체에 대한 토큰이 설정됩니다. 또한 토큰을 프런트 엔드로 반환합니다.
execute_subscription 에서 이전 호출에서 생성된 order 레코드를 찾습니다. 그런 다음 새 계약을 초기화하고 이전 개체의 토큰을 설정하고 실행합니다. 이 마지막 단계가 성공적으로 수행되면 주문 상태가 paypal_executed 로 설정됩니다. 이제 order.chager_id 에도 저장되어 있는 계약 ID로 프론트 엔드로 돌아갑니다.
5단계: orders_controller 에서 구독 생성 및 실행을 위한 작업을 추가합니다.
app/controllers/orders_controller.rb 를 변경하십시오. 클래스 상단에서 먼저 paypal_create_subscription 이 호출되기 전에 실행되도록 prepare_new_order 콜백을 업데이트합니다.
class OrdersController < ApplicationController before_action :authenticate_user! before_action :prepare_new_order, only: [:paypal_create_payment, :paypal_create_subscription] 또한 동일한 파일에 두 개의 공용 기능을 추가하여 이미 PayPal 결제에서와 유사한 흐름으로 Orders::Paypal 서비스를 호출합니다.
... def paypal_create_subscription result = Orders::Paypal.create_subscription(order: @order, product: @product) if result render json: { token: result }, status: :ok else render json: {error: FAILURE_MESSAGE}, status: :unprocessable_entity end end def paypal_execute_subscription result = Orders::Paypal.execute_subscription(token: params[:subscriptionToken]) if result render json: { id: result}, status: :ok else render json: {error: FAILURE_MESSAGE}, status: :unprocessable_entity end end ... 6단계: 프런트 엔드에서 createOrder 및 onApprove 콜백에 대한 구독 처리기 추가
마지막으로 index.html.haml 에서 paypal.Buttons 함수를 다음으로 교체합니다. 그러면 이전에 있던 두 개의 비어 있는 else 이 채워집니다.
paypal.Buttons({ env: "#{ENV['PAYPAL_ENV']}", createOrder: function() { $('#order-type').val("paypal"); if (isPayment()) { return $.post("#{paypal_create_payment_url}", $('#order-details').serialize()).then(function(data) { return data.token; }); } else { return $.post("#{paypal_create_subscription_url}", $('#order-details').serialize()).then(function(data) { return data.token; }); } }, onApprove: function(data) { if (isPayment()) { return $.post("#{paypal_execute_payment_url}", { paymentID: data.paymentID, payerID: data.payerID }).then(function() { submitOrderPaypal(data.paymentID) }); } else { return $.post("#{paypal_execute_subscription_url}", { subscriptionToken: data.orderID }).then(function(executeData) { submitOrderPaypal(executeData.id) }); } } }).render('#submit-paypal'); 구독 생성 및 실행은 결제에 사용되는 것과 유사한 논리를 갖습니다. 한 가지 차이점은 결제를 실행할 때 onApprove 콜백 함수의 데이터에 이미 paymentID 를 나타내는 charge_id 가 있어 submitOrderPaypal(data.paymentID) 를 통해 양식을 제출할 수 있다는 것입니다. 구독의 경우 paypal_execute_subscription_url 에 대한 POST 를 요청하여 실행한 후에만 charge_id 를 얻습니다. 따라서 submitOrderPaypal(executeData.id) 을 호출할 수 있습니다.
7단계: 애플리케이션을 테스트합니다.
- 색인 페이지를 방문하십시오.
- 구독 상품을 선택하고 결제 수단으로 PayPal을 선택합니다.
- PayPal 제출 버튼을 클릭합니다.
- PayPal 팝업에서:
- 생성한 구매자 계정의 자격 증명을 사용합니다.
- 로그인하고 주문을 확인합니다.
- 팝업이 닫혀야 합니다.
- 성공 페이지로 리디렉션되는지 확인합니다.
- 마지막으로 https://www.sandbox.paypal.com/signin에서 비즈니스 계정으로 로그인하고 대시보드 https://www.sandbox.paypal.com/listing/을 확인하여 PayPal 계정에서 주문이 수행되었는지 확인합니다. 업무.
결론
이 기사를 읽은 후에는 Rails 애플리케이션에서 PayPal 및 Stripe에 대한 결제/요금 및 구독 거래를 통합할 수 있을 것입니다. 간결함을 위해 이 기사에서 추가하지 않은 개선할 수 있는 많은 점이 있습니다. 나는 어려움을 가정하여 모든 것을 정리했습니다.
- 더 쉽게:
- 요청이 HTTPS를 사용하도록 TLS(전송 계층 보안)를 사용합니다.
- PayPal 및 Stripe 모두에 대한 프로덕션 환경 구성을 구현합니다.
- 사용자가 이전 주문 내역에 액세스할 수 있도록 새 페이지를 추가합니다.
- 중간:
- 구독을 환불하거나 취소합니다.
- 미등록 사용자 결제 솔루션을 제공합니다.
- 더 열심히:
- 사용자가 돌아오길 원하는 경우 계정을 제거하고 토큰 과 customer_id 를 유지하는 방법을 제공합니다. 그러나 일정 기간이 지나면 이 데이터를 제거하여 애플리케이션이 PCI를 더 잘 준수하도록 하십시오.
- 서버 측에서 PayPal 버전 2 API로 이동(https://developer.paypal.com/docs/api/payments/v2/) 이 튜토리얼에서 사용한 gem은 paypal-sdk-rest 버전에 대한 베타 버전만 있습니다. 2이므로 신중하게 사용할 수 있습니다(https://github.com/paypal/PayPal-Ruby-SDK/tree/2.0-beta).
- 멱등원 요청을 포함합니다.
- 스트라이프: https://stripe.com/docs/api/idempotent_requests
- 페이팔: https://developer.paypal.com/docs/api-basics/#api-idempotency
또한 스트라이프를 프런트 엔드에 통합하는 또 다른 방법인 Stripe Checkout 요소에 대해 읽는 것이 좋습니다. 이 튜토리얼에서 사용한 Stripe Elements와 달리 Stripe Checkout은 사용자가 신용 카드 정보를 입력하거나 Google Pay/Apple Pay https://stripe.com으로 결제하도록 선택하는 버튼(PayPal과 유사)을 클릭한 후 팝업을 엽니다. /문서/웹.
두 번째 권장 사항은 두 지불 게이트웨이에 대한 보안 페이지입니다.
- 스트라이프용
- 페이팔의 경우
마지막으로 이 글을 읽어주셔서 감사합니다! 이 프로젝트 샘플에 사용된 내 GitHub 프로젝트를 확인할 수도 있습니다. 거기에 개발하는 동안 rspec 테스트도 추가했습니다.