
RubyonRailsでのStripeとPayPalの支払い方法の統合
公開: 2022-03-11AliExpress、Ebay、Amazonなどの巨大なeコマース企業にとって重要な機能は、支払いを安全に処理する方法であり、これは彼らのビジネスに不可欠です。 この機能が失敗した場合、その結果は壊滅的なものになります。 これは、eコマースアプリに取り組んでいる業界リーダーとRubyonRails開発者に適用されます。
サイバーセキュリティは攻撃を防ぐために不可欠であり、トランザクションプロセスをより安全にする方法は、サードパーティのサービスにそれを処理するように依頼することです。 アプリケーションに支払いゲートウェイを含めることは、ユーザー承認、データ暗号化、およびダッシュボードを提供するため、この目標を達成する方法であり、その場でトランザクションステータスを追跡できます。
Webにはさまざまな支払いゲートウェイサービスがありますが、この記事では、StripeとPayPalをRailsアプリケーションに統合することに焦点を当てます。 他にもいくつか言及すると、Amazon Payments、Square、SecurePay、WorldPay、Authorize.Net、2Checkout.com、Braintree、Amazon、BlueSnapなどです。
ペイメントゲートウェイ統合の仕組み
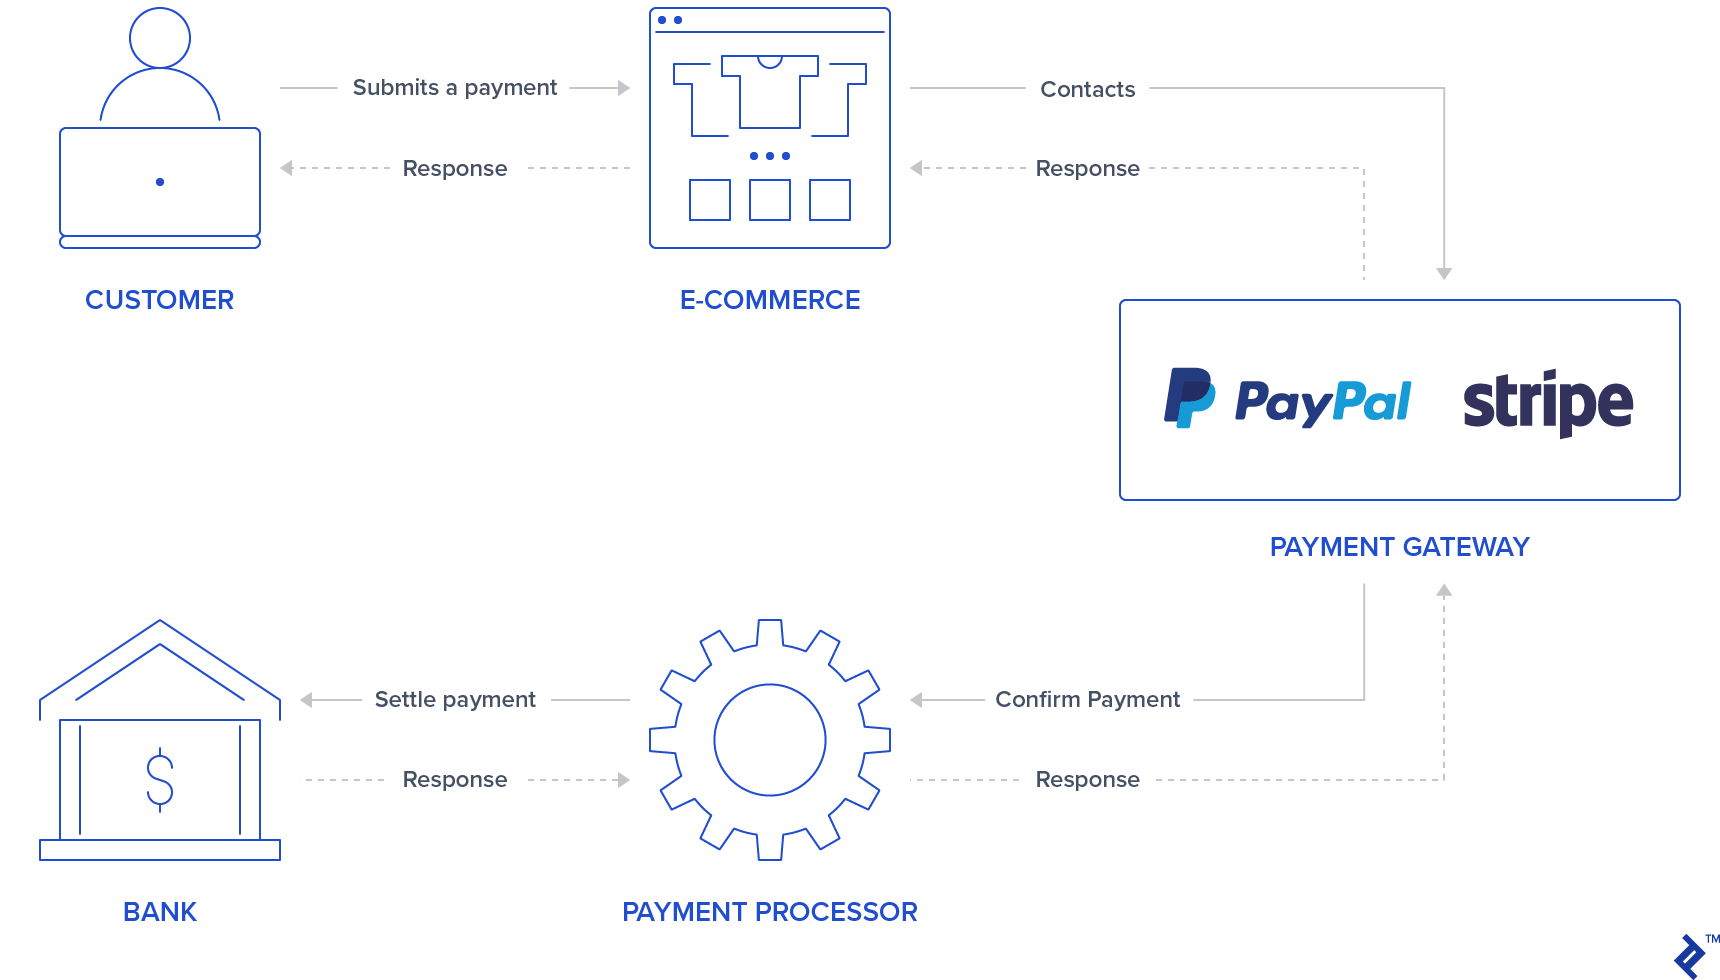
一般に、ユーザーがログイン/クレジットカードデータを挿入できるフォーム/ボタンがアプリケーションにあります。 PayPalとStripeは、 iframeフォームまたはpopupsを使用して、このトランザクションを表すトークンを返すため、アプリケーションが機密性の高いユーザークレジットカード情報を保存できないようにすることで、この最初のステップをより安全にします。 一部のユーザーは、サードパーティのサービスがトランザクションプロセスを処理していることを知っていることで、支払いを処理することにすでに自信を持っているかもしれません。そのため、これもアプリケーションの魅力になる可能性があります。
ユーザー情報を認証した後、支払いゲートウェイは、支払いを決済するために銀行と通信する支払い処理業者に連絡することによって支払いを確認します。 これにより、トランザクションが適切に借方/貸方に記入されます。
Stripeは、クレジットカード番号、cvv、および有効期限を尋ねるクレジットカードフォームを使用します。 したがって、ユーザーはセキュリティで保護されたStripe入力にクレジットカード情報を入力する必要があります。 この情報を提供した後、アプリケーションのバックエンドはトークンを介してこの支払いを処理します。
Stripeとは異なり、PayPalはユーザーをPayPalログインページにリダイレクトします。 ユーザーはPayPalを介して支払い方法を承認および選択します。この場合も、バックエンドはユーザーの機密データではなくトークンを処理します。
これらの2つの支払いゲートウェイの場合、バックエンドはStripeまたはPayPal APIを介してトランザクションの実行を続行するように要求する必要があるため、アプリケーションはそれに応じてユーザーを成功ページまたはエラーページにリダイレクトする必要があることに注意してください。
この記事の目的は、これら2つの支払いゲートウェイを単一のアプリケーションに統合するためのクイックガイドを提供することです。 すべてのテストで、支払いをシミュレートするために、StripeとPayPalが提供するサンドボックスとテストアカウントを使用します。
設定
支払いゲートウェイを統合する前に、gem、データベーステーブル、およびインデックスページを追加してアプリケーションを初期化するためのセットアップを行います。 このプロジェクトは、Railsバージョン5.2.3とRuby2.6.3を使用して作成されました。
注:最近の記事でRails6の新機能を確認できます。
ステップ1: Railsアプリケーションを初期化します。
アプリ名を指定してrailsコマンドを使用してプロジェクトの初期化を実行し、プロジェクトを初期化します。
rails new YOUR_APP_NAME そして、アプリケーションフォルダにcdします。
ステップ2: gemをインストールします。
StripeとPayPalの宝石に加えて、他のいくつかの宝石が追加されました。
-
devise:ユーザーの認証と承認に使用されます haml:ユーザーページをレンダリングするためのテンプレートツールjquery-rails:フロントエンドスクリプトのjquery用money-rails:フォーマットされたマネー値を表示するため
Gemfileに追加します:
gem "devise", ">= 4.7.1" gem "haml" gem "jquery-rails" gem "money-rails"追加した後、CLIで実行します。
bundle installステップ3: gemを初期化します。
これらのgemの一部は、 bundleを介してインストールする以外に、初期化が必要になります。
deviseのインストール:
rails g devise:install money-rails初期化:
rails g money_rails:initializer app/assets/javascripts/application.jsの下部に以下を追加して、 jquery-railsを初期化します。
//= require jquery //= require jquery_ujsステップ4:テーブルと移行
このプロジェクトでは、 Users 、 Products 、およびOrdersの3つのテーブルが使用されます。
-
Users:デバイスによって生成されます Productsの列:-
name -
price_cents -
Stripe_plan_name:ユーザーがサブスクライブできるようにStripeで作成されたサブスクリプションプランを表すID。 このフィールドは、Stripeプランに関連付けられている製品にのみ必要です。 -
paypal_plan_name:stripe_plan_nameと同じですが、PayPal用です
-
Orders列:-
product_id -
user_id -
status:注文が保留中、失敗、または支払い済みの場合に通知されます。 -
token:これは、トランザクションを初期化するためにAPI(StripeまたはPayPal)から生成されたトークンです。 -
price_cents:製品と似ていますが、この値を注文レコードに永続化するために使用されます payment_gateway:PayPalまたはStripeの注文に使用されている支払いゲートウェイを格納しますcustomer_id:これは、サブスクリプション用にStripeの顧客を保存するためにStripeに使用されます。これについては、後のセクションで詳しく説明します。
-
これらのテーブルを生成するには、いくつかの移行を生成する必要があります。
Usersテーブルを作成します。 走る:
rails g devise UserProductsテーブルを作成します。 以下を実行して移行を生成します。
rails generate migration CreateProducts name:string stripe_plan_name:string paypal_plan_name:string 作成した移行ファイルを開きます。このファイルはdb/migrate/にあり、移行が次のようになるように変更を加えます。
class CreateProducts < ActiveRecord::Migration[5.2] def change create_table :products do |t| t.string :name t.string :stripe_plan_name t.string :paypal_plan_name end add_money :products, :price, currency: { present: true } end endOrdersテーブルを作成します。 以下を実行して移行を生成します。
rails generate migration CreateOrders product_id:integer user_id:integer status:integer token:string charge_id:string error_message:string customer_id:string payment_gateway:integer ここでも、 db/migrate/にある作成済みの移行ファイルを開き、次のように見えるようにそのファイルに変更を加えます。
class CreateOrders < ActiveRecord::Migration[5.2] def change create_table :orders do |t| t.integer :product_id t.integer :user_id t.integer :status, default: 0 t.string :token t.string :charge_id t.string :error_message t.string :customer_id t.integer :payment_gateway t.timestamps end add_money :orders, :price, currency: { present: false } end end次のコマンドを実行して、データベースの移行を実行します。
rails db:migrateステップ5:モデルを作成します。
ユーザーモデルはデバイスのインストールからすでに作成されており、変更する必要はありません。 さらに、 ProductとOrderの2つのモデルが作成されます。
製品。 新しいファイルapp/models/product.rbを次のように追加します:
class Product < ActiveRecord::Base monetize :price_cents has_many :orders end 注文。 新しいファイルapp/models/order.rbを次のように追加します。
class Order < ApplicationRecord enum status: { pending: 0, failed: 1, paid: 2, paypal_executed: 3} enum payment_gateway: { stripe: 0, paypal: 1 } belongs_to :product belongs_to :user scope :recently_created, -> { where(created_at: 1.minutes.ago..DateTime.now) } def set_paid self.status = Order.statuses[:paid] end def set_failed self.status = Order.statuses[:failed] end def set_paypal_executed self.status = Order.statuses[:paypal_executed] end endステップ6:データベースにデータを入力します。
ユーザーと2つの製品がコンソールに作成されます。 注文記録は、支払いテストに従って作成されます。
-
rails s - ブラウザで、
http://localhost:3000にアクセスします - サインアップページにリダイレクトされます。
- メールアドレスとパスワードを入力してユーザーを登録します。
- ターミナルでは、データベースにユーザーが作成されたことを示す次のログが表示されます。
User Create (0.1ms) INSERT INTO "users" ("email", "encrypted_password", "created_at", "updated_at") VALUES (?, ?, ?, ?) …-
rails cを実行し、以下を追加して、サブスクリプションなしで2つの製品を作成します。-
Product.create(name: "Awesome T-Shirt", price_cents: 3000) -
Product.create(name: "Awesome Sneakers", price_cents: 5000)
-
ステップ7:インデックスページを作成する
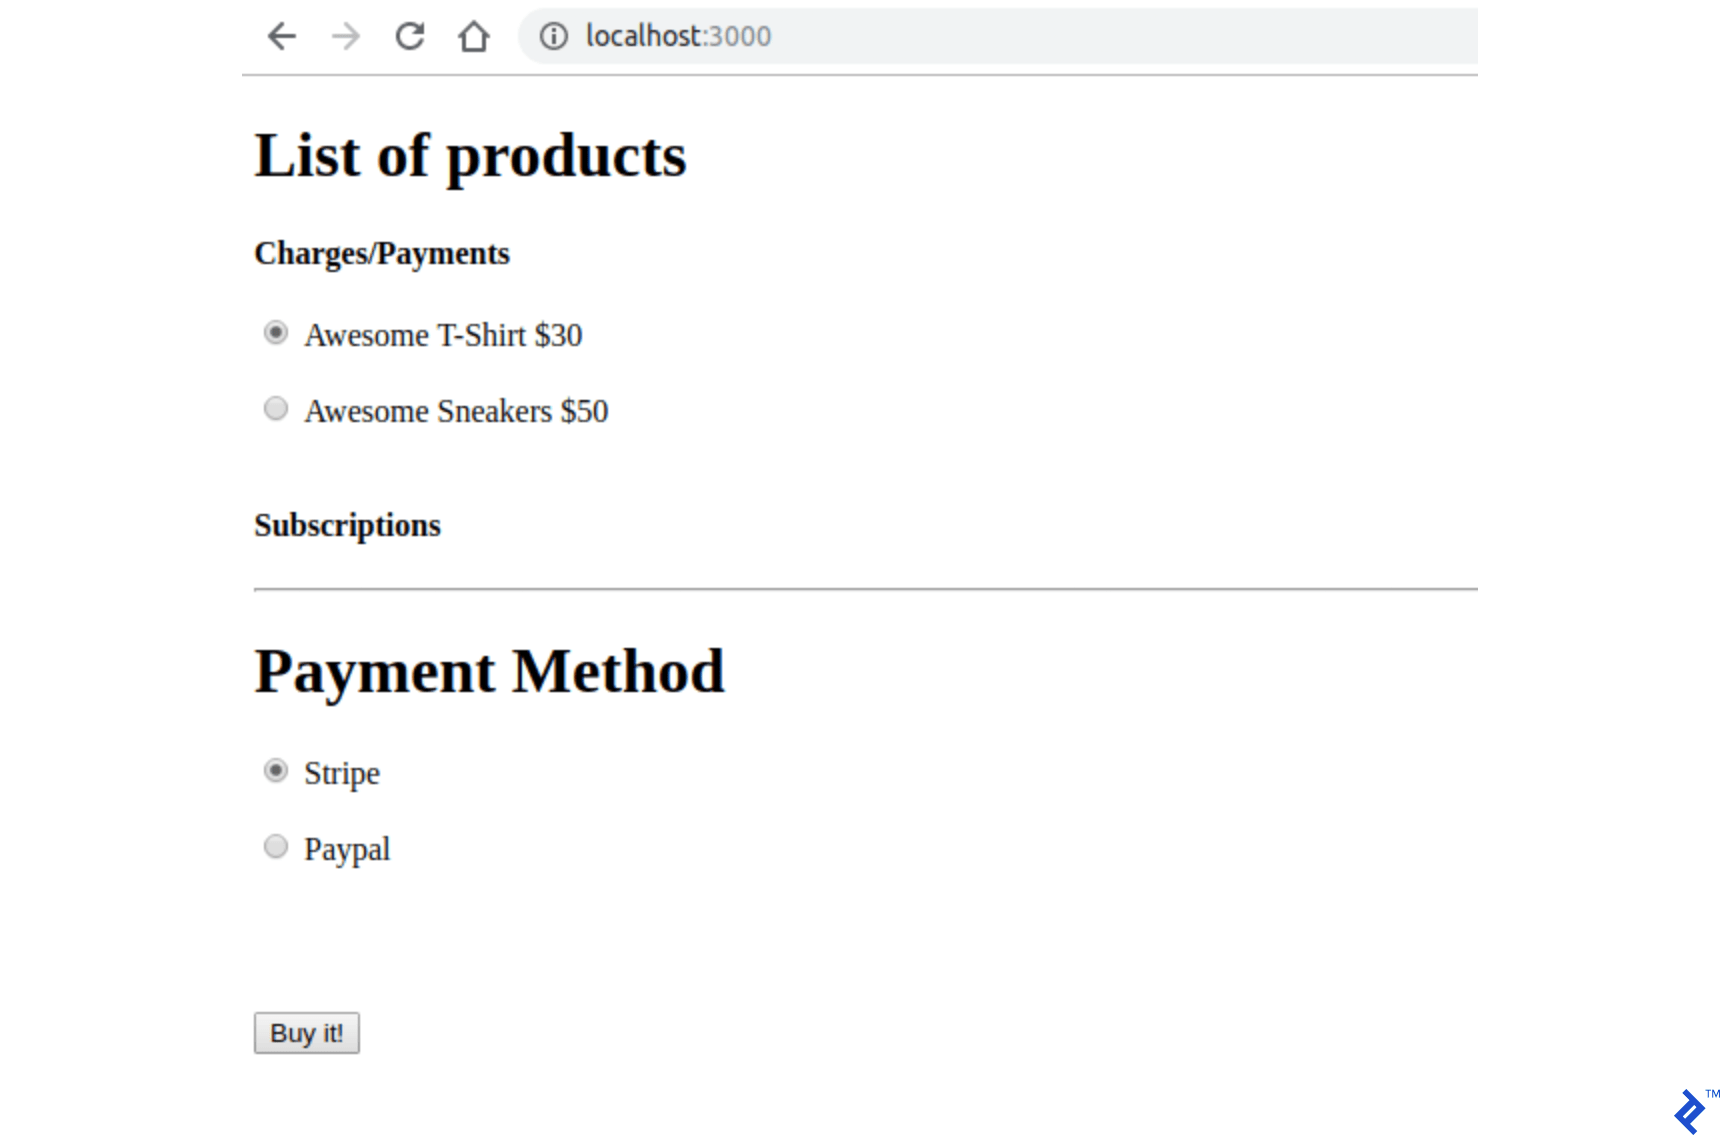
プロジェクトのメインページには、購入またはサブスクリプションの製品選択が含まれています。 さらに、支払い方法の選択(StripeまたはPayPal)のセクションもあります。 送信ボタンは、支払いゲートウェイの種類ごとにも使用されます。PayPalの場合は、JavaScriptライブラリを介して独自のボタンデザインを追加します。
まず、 indexのルートを作成し、 config/routes.rbにsubmitします。
Rails.application.routes.draw do devise_for :users get '/', to: 'orders#index' post '/orders/submit', to: 'orders#submit' end アクションindexを作成して追加し、ordersコントローラーapp/controllers/orders_controller.rbにsubmitします。 orders#indexアクションは、フロントエンドで消費される2つの変数を格納します。 @products_purchaseにはプランのない商品のリストがあり、 @products_subscription products_subscriptionにはPayPalとStripeの両方のプランのある商品があります。
class OrdersController < ApplicationController before_action :authenticate_user! def index products = Product.all @products_purchase = products.where(stripe_plan_name:nil, paypal_plan_name:nil) @products_subscription = products - @products_purchase end def submit end end app/views/orders/index.html.hamlにファイルを作成します。 このファイルには、送信メソッドを介してバックエンドに送信するすべての入力と、支払いゲートウェイと製品選択の相互作用が含まれています。 入力名の属性は次のとおりです。
-
Orders[product_id]は商品IDを保存します。 -
Orders[payment_gateway]には、StripeまたはPayPalのいずれかの値を持つ支払いゲートウェイが含まれています。
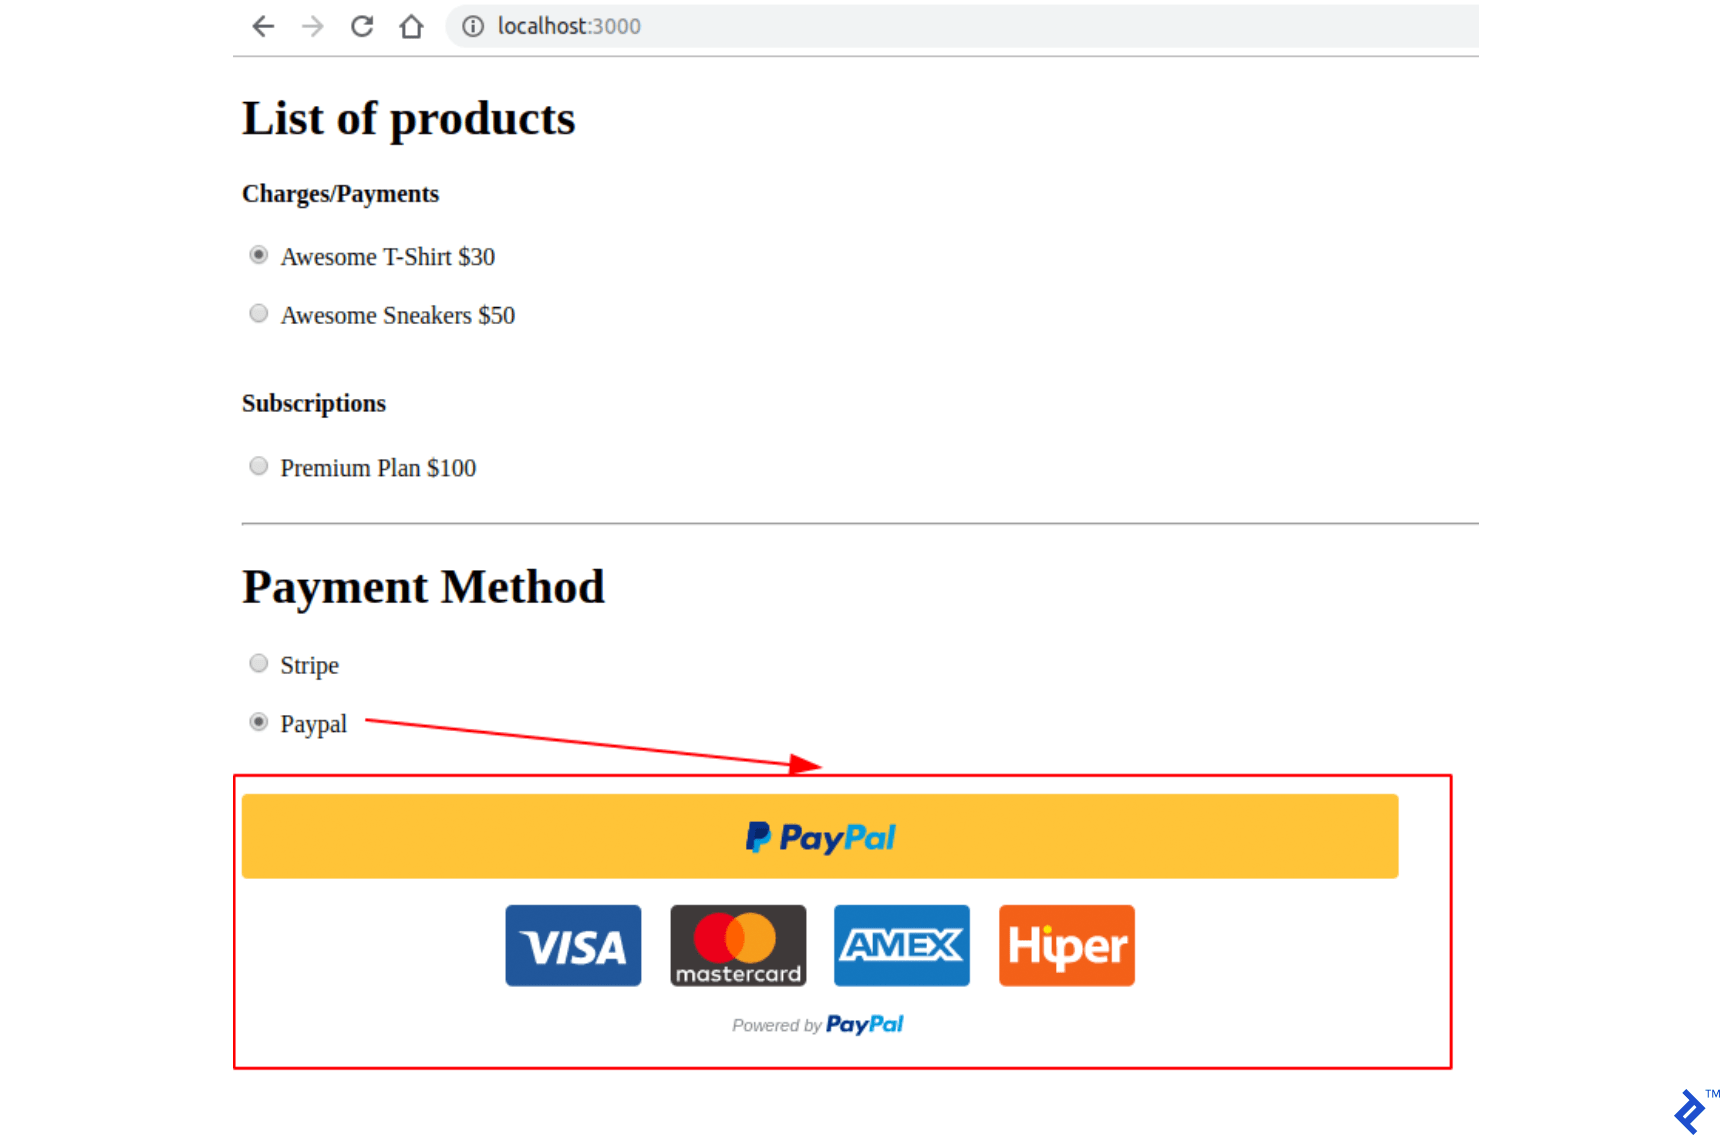
%div %h1 List of products = form_tag({:controller => "orders", :action => "submit" }, {:id => 'order-details'}) do %input{id:'order-type', :type=>"hidden", :value=>"stripe", :name=>'orders[payment_gateway]'} .form_row %h4 Charges/Payments - @products_purchase.each do |product| %div{'data-charges-and-payments-section': true} = radio_button_tag 'orders[product_id]', product.id, @products_purchase.first == product %span{id: "radioButtonName#{product.id}"} #{product.name} %span{id: "radioButtonPrice#{product.id}", :'data-price' => "#{product.price_cents}"} #{humanized_money_with_symbol product.price} %br %h4 Subscriptions - @products_subscription.each do |product| %div = radio_button_tag 'orders[product_id]', product.id, false %span{id: "radioButtonName#{product.id}"} #{product.name} %span{id: "radioButtonPrice#{product.id}", :'data-price' => "#{product.price_cents}"} #{humanized_money_with_symbol product.price} %br %hr %h1 Payment Method .form_row %div = radio_button_tag 'payment-selection', 'stripe', true, onclick: "changeTab();" %span Stripe %br %div = radio_button_tag 'payment-selection', 'paypal', false, onclick: "changeTab();" %span Paypal %br %br %div{id:'tab-stripe', class:'paymentSelectionTab active'} %div{id:'card-element'} %div{id:'card-errors', role:"alert"} %br %br = submit_tag "Buy it!", id: "submit-stripe" %div{id:'tab-paypal', class:'paymentSelectionTab'} %div{id: "submit-paypal"} %br %br %hr :javascript function changeTab() { var newActiveTabID = $('input[name="payment-selection"]:checked').val(); $('.paymentSelectionTab').removeClass('active'); $('#tab-' + newActiveTabID).addClass('active'); } :css #card-element { width:500px; } .paymentSelectionTab { display: none; } .paymentSelectionTab.active { display: block !important; } rails sを使用してアプリケーションを実行し、 http://localhost:3000のページにアクセスする場合。 次のようにページが表示されるはずです。
ペイメントゲートウェイクレデンシャルストレージ
PayPalとStripeのキーは、Gitによって追跡されないファイルに保存されます。 このファイルには、ペイメントゲートウェイごとに2種類のキーが保存されています。ここでは、それらにダミー値を使用します。 これらのキーを作成するための追加の指示は、以降のセクションに示されています。
ステップ1:これを.gitignoreに追加します。
/config/application.yml ステップ2: config/application.ymlにクレデンシャルを使用してファイルを作成します。 これらのAPIにアクセスするためのすべてのPayPalおよびStripeサンドボックス/テストキーが含まれている必要があります。
test: &default PAYPAL_ENV: sandbox PAYPAL_CLIENT_ID: YOUR_CREDENTIAL_HERE PAYPAL_CLIENT_SECRET: YOUR_CREDENTIAL_HERE STRIPE_PUBLISHABLE_KEY: YOUR_CREDENTIAL_HERE STRIPE_SECRET_KEY: YOUR_CREDENTIAL_HERE development: <<: *default ステップ3:アプリケーションの起動時にファイルconfig/application.ymlの変数を保存するには、これらの行をApplicationクラス内のconfig/application.rbに追加して、 ENVで使用できるようにします。
config_file = Rails.application.config_for(:application) config_file.each do |key,value| ENV[key] = value end unless config_file.nil?ストライプ構成
Stripe APIを使用するためのgem: stripe-railsを追加します。 料金とサブスクリプションを処理できるように、Stripeアカウントを作成することも必要です。 必要に応じて、公式ドキュメントでStripeAPIのAPIメソッドを参照できます。
ステップ1:ストライプレールジェムをプロジェクトに追加します。
ストライプレールgemは、このプロジェクトで使用されるすべてのAPIリクエストのインターフェースを提供します。
これをGemfileに追加します:
gem 'stripe-rails'走る:
bundle installステップ2: APIキーを生成します。
Stripeと通信するためのAPIキーを取得するには、Stripeでアカウントを作成する必要があります。 アプリケーションをテストするには、テストモードを使用できるため、Stripeアカウントの作成プロセスで実際のビジネス情報を入力する必要はありません。
- アカウントをお持ちでない場合は、Stripeでアカウントを作成してください(https://dashboard.stripe.com/)。
- Stripeダッシュボードにいる間に、ログインした後、 [テストデータの表示]をオンに切り替えます。
- https://dashboard.stripe.com/test/apikeysで、/ config / application.ymlの値
STRIPE_PUBLISHABLE_KEYとSTRIPE_SECRET_KEYのYOUR_CREDENTIAL_HEREを、/config/application.ymlPublishable KeyとSecret keyのコンテンツに置き換えます。
ステップ3: Stripeモジュールを初期化する
キーを置き換えるだけでなく、Stripeモジュールを初期化して、 ENVにすでに設定されているキーを使用するようにする必要があります。
config/initializers/stripe.rbに次のファイルを作成します。
Rails.application.configure do config.stripe.secret_key = ENV["STRIPE_SECRET_KEY"] config.stripe.publishable_key = ENV["STRIPE_PUBLISHABLE_KEY"] endステップ4:フロントエンドにStripeを統合します。
Stripe JavaScriptライブラリと、ユーザーのクレジットカード情報を表し、バックエンドで処理されるトークンを送信するためのロジックを追加します。
index.html.hamlファイルで、これをファイルの先頭に追加します。 これは、Stripeモジュール(gemによって提供される)を使用して、Stripejavascriptライブラリをユーザーのページに追加します。
= stripe_javascript_tag Stripeは、APIを介して作成された安全な入力フィールドを使用します。 これらはこのAPIを介して作成されたiframeで作成されるため、ユーザーのクレジットカード情報を処理する可能性のある脆弱性について心配する必要はありません。 さらに、バックエンドはユーザーの機密データを処理/保存できず、この情報を表すトークンのみを受け取ります。
これらの入力フィールドは、 stripe.elements().create('card')を呼び出すことによって作成されます。 その後、これらの入力をマウントするHTML要素id / classを引数として渡すことにより、 mount()を使用して返されたオブジェクトを呼び出す必要があります。 詳細については、Stripeをご覧ください。
ユーザーがStripe支払い方法で送信ボタンを押すと、作成されたStripeカード要素に対してpromiseを返す別のAPI呼び出しが実行されます。
stripe.createToken(card).then(function(result) この関数のresult変数には、プロパティエラーが割り当てられていない場合、属性result.token.idにアクセスすることで取得できるトークンが含まれます。 このトークンはバックエンドに送信されます。
これらの変更を行うには、コメント付きのコードを置き換え// YOUR STRIPE AND PAYPAL CODE WILL BE HEREのコードはindex.html.hamlにあります。
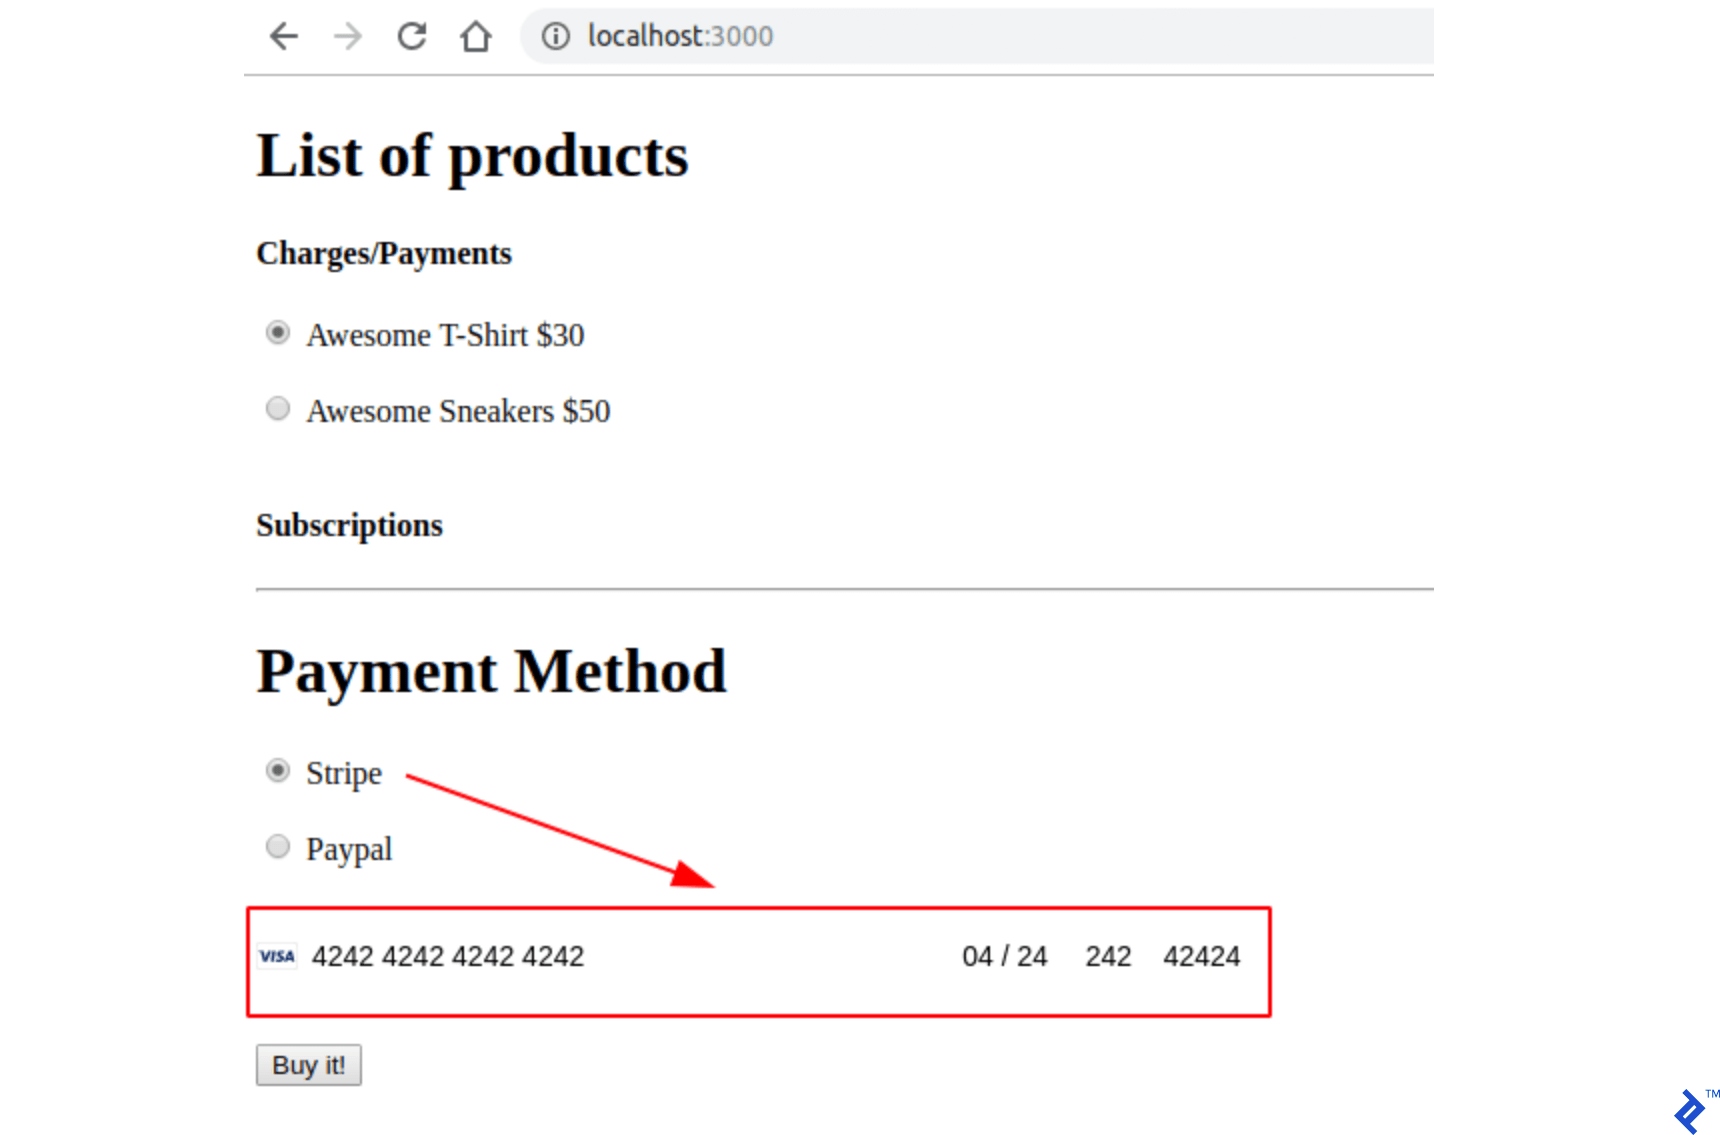
(function setupStripe() { //Initialize stripe with publishable key var stripe = Stripe("#{ENV['STRIPE_PUBLISHABLE_KEY']}"); //Create Stripe credit card elements. var elements = stripe.elements(); var card = elements.create('card'); //Add a listener in order to check if card.addEventListener('change', function(event) { //the div card-errors contains error details if any var displayError = document.getElementById('card-errors'); document.getElementById('submit-stripe').disabled = false; if (event.error) { // Display error displayError.textContent = event.error.message; } else { // Clear error displayError.textContent = ''; } }); // Mount Stripe card element in the #card-element div. card.mount('#card-element'); var form = document.getElementById('order-details'); // This will be called when the #submit-stripe button is clicked by the user. form.addEventListener('submit', function(event) { $('#submit-stripe').prop('disabled', true); event.preventDefault(); stripe.createToken(card).then(function(result) { if (result.error) { // Inform that there was an error. var errorElement = document.getElementById('card-errors'); errorElement.textContent = result.error.message; } else { // Now we submit the form. We also add a hidden input storing // the token. So our back-end can consume it. var $form = $("#order-details"); // Add a hidden input orders[token] $form.append($('<input type="hidden" name="orders[token]"/>').val(result.token.id)); // Set order type $('#order-type').val('stripe'); $form.submit(); } }); return false; }); }()); //YOUR PAYPAL CODE WILL BE HEREページにアクセスすると、新しいStripeセキュア入力フィールドが次のように表示されます。
ステップ5:アプリケーションをテストします。
クレジットカードフォームにテストカード(https://stripe.com/docs/testing)を記入し、ページを送信します。 サーバー出力のすべてのパラメーター( product_id 、 payment_gateway 、 token )を使用してsubmitアクションが呼び出されているかどうかを確認します。
ストライプチャージ
ストライプ料金は1回限りのトランザクションを表します。 したがって、Stripeの請求トランザクションの後、クライアントから直接お金を受け取ることになります。 これは、プランに関連付けられていない製品を販売するのに理想的です。 後のセクションで、PayPalで同じトランザクションタイプを実行する方法を示しますが、このタイプのトランザクションのPayPalの名前はPaymentです。
このセクションでは、注文を処理および送信するためのすべてのスケルトンも提供します。 Stripeフォームが送信されるときに、 submitアクションで注文を作成します。 この注文は最初は保留中のステータスになるため、この注文の処理中に問題が発生した場合でも、注文は保留中のままになります。
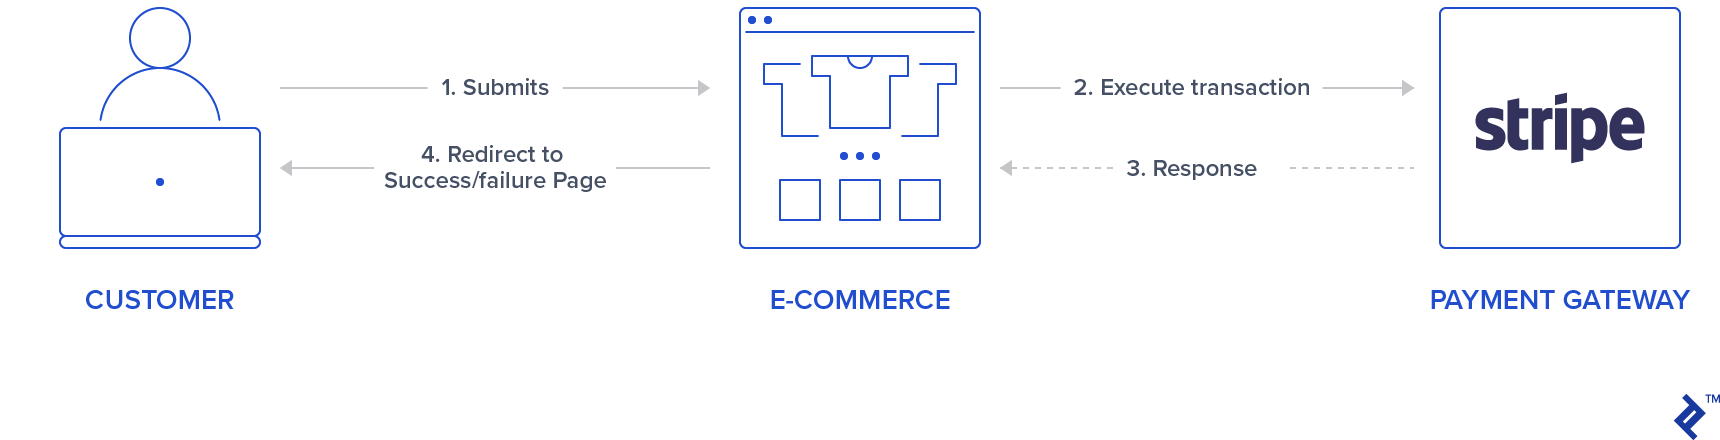
Stripe APIの呼び出しでエラーが発生した場合は、注文を失敗状態に設定し、請求が正常に完了すると、支払い済みの状態になります。 次のグラフに示すように、ユーザーはStripeAPIの応答に従ってリダイレクトされます。
また、ストライプチャージを行うとIDが返されます。 このIDは、後で必要に応じてStripeダッシュボードで検索できるように保存されます。 このIDは、注文の払い戻しが必要な場合にも使用できます。 この記事では、そのようなことについては説明しません。
手順1: Stripeサービスを作成します。
Stripe APIを使用してStripe操作を表すために、シングルトンクラスを使用します。 料金を作成するために、メソッドStripe::Charge.createが呼び出され、返されたオブジェクトID属性が注文レコードcharge_idに保存されます。 このcreate関数は、フロントエンドで発生したトークン、注文価格、および説明を渡すことによって呼び出されます。
したがって、新しいフォルダapp/services/ordersを作成し、メソッドexecuteにエントリを持つOrders::Stripeシングルトンクラスを含むStripeサービスapp/services/orders/stripe.rbを追加します。
class Orders::Stripe INVALID_STRIPE_OPERATION = 'Invalid Stripe Operation' def self.execute(order:, user:) product = order.product # Check if the order is a plan if product.stripe_plan_name.blank? charge = self.execute_charge(price_cents: product.price_cents, description: product.name, card_token: order.token) else #SUBSCRIPTIONS WILL BE HANDLED HERE end unless charge&.id.blank? # If there is a charge with id, set order paid. order.charge_id = charge.id order.set_paid end rescue Stripe::StripeError => e # If a Stripe error is raised from the API, # set status failed and an error message order.error_message = INVALID_STRIPE_OPERATION order.set_failed end private def self.execute_charge(price_cents:, description:, card_token:) Stripe::Charge.create({ amount: price_cents.to_s, currency: "usd", description: description, source: card_token }) end endステップ2:送信アクションを実装し、Stripeサービスを呼び出します。
orders_controller.rbで、 submitアクションに以下を追加します。これにより、基本的にサービスOrders::Stripe.executeが呼び出されます。 2つの新しいプライベート関数prepare_new_orderとorder_paramsも追加されたことに注意してください。
def submit @order = nil #Check which type of order it is if order_params[:payment_gateway] == "stripe" prepare_new_order Orders::Stripe.execute(order: @order, user: current_user) elsif order_params[:payment_gateway] == "paypal" #PAYPAL WILL BE HANDLED HERE end ensure if @order&.save if @order.paid? # Success is rendered when order is paid and saved return render html: SUCCESS_MESSAGE elsif @order.failed? && [email protected]_message.blank? # Render error only if order failed and there is an error_message return render html: @order.error_message end end render html: FAILURE_MESSAGE end private # Initialize a new order and and set its user, product and price. def prepare_new_order @order = Order.new(order_params) @order.user_id = current_user.id @product = Product.find(@order.product_id) @order.price_cents = @product.price_cents end def order_params params.require(:orders).permit(:product_id, :token, :payment_gateway, :charge_id) endステップ3:アプリケーションをテストします。
有効なテストカードを使用して送信アクションが呼び出されたときに、成功したメッセージへのリダイレクトを実行するかどうかを確認します。 さらに、注文も表示されているかどうかをStripeダッシュボードで確認してください。
ストライプサブスクリプション
定期支払いのサブスクリプションまたはプランを作成できます。 このタイプの製品では、プランの構成に応じて、ユーザーに毎日、毎週、毎月、または毎年自動的に課金されます。 このセクションでは、プランIDを格納するためにproduct stripe_plan_nameのフィールドを使用します。実際には、IDを選択することができ、 premium-planと呼びます。これは、プランIDを作成するために使用されます。関係customer <-> subscription 。
また、Stripe顧客オブジェクトのidプロパティで埋められるstripe_customer_idというユーザーテーブルの新しい列を作成します。 Stripeの顧客は、関数Stripe::Customer.createが呼び出されたときに作成されます。また、作成され、アカウントにリンクされている顧客を(https://dashboard.stripe.com/test/customers)で確認することもできます。 顧客は、フォームが送信されたときに送信されるフロントエンドで生成されたトークンであるsourceパラメータを渡すことによって作成されます。
最後に述べたStripeAPI呼び出しから取得したcustomerオブジェクトは、 customer.subscriptions.createを呼び出し、プランIDをパラメーターとして渡すことによって実行されるサブスクリプションの作成にも使用されます。
さらに、 stripe-rails gemは、 Stripe::Customer.retrieveおよびStripe::Customer.updateをそれぞれ呼び出すことによって、Stripeから顧客を取得および更新するためのインターフェースを提供します。
したがって、ユーザーレコードにすでにstripe_customer_idがある場合、 Stripe::Customer.createを呼び出して、 stripe_customer_idをパラメーターとして渡し、その後にStripe::Customer.update Stripe::Customer.retrieveを渡します。 、この場合、トークンにパラメータを渡します。
まず、Stripe APIを使用してプランを作成し、フィールドstripe_plan_nameを使用して新しいサブスクリプション製品を作成できるようにします。 その後、 orders_controllerとStripeサービスに変更を加えて、Stripeサブスクリプションの作成と実行が処理されるようにします。
ステップ1: StripeAPIを使用してプランを作成します。
コマンドrails c 。 次のコマンドを使用して、Stripeアカウントのサブスクリプションを作成します。
Stripe::Plan.create({ amount: 10000, interval: 'month', product: { name: 'Premium plan', }, currency: 'usd', id: 'premium-plan', })このステップで返された結果がtrueの場合、プランが正常に作成されたことを意味し、Stripedasboardでアクセスできます。
ステップ2: stripe_plan_nameフィールドが設定されたデータベースに製品を作成します。
次に、データベースでstripe_plan_nameをpremium-planとして設定した製品を作成します。

Product.create(price_cents: 10000, name: 'Premium Plan', stripe_plan_name: 'premium-plan') ステップ3: usersテーブルに列stripe_customer_idを追加するための移行を生成します。
ターミナルで以下を実行します。
rails generate migration AddStripeCustomerIdToUser stripe_customer_id:string rails db:migrateステップ4: Stripeサービスクラスにサブスクリプションロジックを実装します。
app/services/orders/stripe.rbのプライベートメソッドにさらに2つの関数を追加しますexecute_subscriptionは、顧客のオブジェクトにサブスクリプションを作成する役割を果たします。 関数find_or_create_customerは、すでに作成された顧客を返すか、新しく作成された顧客を返す責任があります。
def self.execute_subscription(plan:, token:, customer:) customer.subscriptions.create({ plan: plan }) end def self.find_or_create_customer(card_token:, customer_id:, email:) if customer_id stripe_customer = Stripe::Customer.retrieve({ id: customer_id }) if stripe_customer stripe_customer = Stripe::Customer.update(stripe_customer.id, { source: card_token}) end else stripe_customer = Stripe::Customer.create({ email: email, source: card_token }) end stripe_customer end 最後に、同じファイル( app/services/orders/stripe.rb )のexecute関数で、最初にfind_or_create_customerを呼び出し、次に、前に取得/作成した顧客を渡してexecute_subscriptionを呼び出してサブスクリプションを実行します。 したがって、 executeメソッドのコメント#SUBSCRIPTIONS WILL BE HANDLED HEREを次のコードに置き換えます。
customer = self.find_or_create_customer(card_token: order.token, customer_id: user.stripe_customer_id, email: user.email) if customer user.update(stripe_customer_id: customer.id) order.customer_id = customer.id charge = self.execute_subscription(plan: product.stripe_plan_name, customer: customer)ステップ5:アプリケーションをテストします。
Webサイトにアクセスし、サブスクリプション製品のPremium Planを選択して、有効なテストカードに記入します。 送信後、成功したページにリダイレクトされます。 さらに、サブスクリプションが正常に作成されたかどうかをStripeダッシュボードで確認します。
PayPalの設定
Stripeで行ったように、PayPal APIを使用するためのgem: paypal-sdk-restも追加します。また、PayPalアカウントの作成も必要です。 このgemを使用したPayPalの説明的なワークフローは、公式のPayPalAPIドキュメントで参照できます。
ステップ1: paypal-sdk-restをプロジェクトに追加します。
これをGemfileに追加します:
gem 'paypal-sdk-rest'走る:
bundle installステップ2: APIキーを生成します。
PayPalと通信するためのAPIキーを取得するには、PayPalアカウントを作成する必要があります。 それで:
- https://developer.paypal.com/でアカウントを作成します(またはPayPalアカウントを使用します)。
- アカウントにログインしたまま、https://developer.paypal.com/developer/accounts/で2つのサンドボックスアカウントを作成します。
- 個人(購入者アカウント)–これは、支払いとサブスクリプションを行うためのテストで使用されます。
- ビジネス(マーチャントアカウント)–これは、探しているAPIキーを持つアプリケーションにリンクされます。 それ以外に、このアカウントではすべてのトランザクションを追跡できます。
- 以前のビジネスサンドボックスアカウントを使用して、https://developer.paypal.com/developer/applicationsでアプリを作成します。
- この手順の後、PayPalの2つのキー(
Client IDとSecret)を受け取ります。 -
config/application.ymlで、PAYPAL_CLIENT_IDおよびYOUR_CREDENTIAL_HEREのPAYPAL_CLIENT_SECRETを、受け取ったばかりのキーに置き換えます。
ステップ3: PayPalモジュールを初期化します。
Stripeと同様に、 application.ymlのキーを置き換える以外に、PayPalモジュールを初期化して、 ENV変数にすでに設定されているキーを使用できるようにする必要があります。 この目的のために、 config/initializers/paypal.rbに次のファイルを作成します。
PayPal::SDK.configure( mode: ENV['PAYPAL_ENV'], client_id: ENV['PAYPAL_CLIENT_ID'], client_secret: ENV['PAYPAL_CLIENT_SECRET'], ) PayPal::SDK.logger.level = Logger::INFOステップ4: PayPalをフロントエンドに統合します。
index.html.hamlで、これをファイルの先頭に追加します。
%script(src="https://www.paypal.com/sdk/js?client-id=#{ENV['PAYPAL_CLIENT_ID']}") Stripeとは異なり、PayPalはボタンのみを使用します。このボタンをクリックすると、ユーザーがログインして支払い/サブスクリプションに進むことができる安全なポップアップが開きます。 このボタンは、メソッドpaypal.Button(PARAM1).render(PARAM2)を呼び出すことでレンダリングできます。
-
PARAM1は、環境構成と、プロパティとして2つのコールバック関数createOrderとonApproveを持つオブジェクトです。 -
PARAM2は、PayPalボタンを付加する必要のあるHTML要素識別子を示します。
したがって、同じファイル内で、コメントされたコードを置き換えます。あなたのYOUR PAYPAL CODE WILL BE HEREはここにあります:
(function setupPaypal() { function isPayment() { return $('[data-charges-and-payments-section] input[name="orders[product_id]"]:checked').length } function submitOrderPaypal(chargeID) { var $form = $("#order-details"); // Add a hidden input orders[charge_id] $form.append($('<input type="hidden" name="orders[charge_id]"/>').val(chargeID)); // Set order type $('#order-type').val('paypal'); $form.submit(); } paypal.Buttons({ env: "#{ENV['PAYPAL_ENV']}", createOrder: function() { }, onApprove: function(data) { } }).render('#submit-paypal'); }());ステップ5:アプリケーションをテストします。
ページにアクセスして、支払い方法としてPayPalを選択したときにPayPalボタンが表示されるかどうかを確認します。
PayPalトランザクション
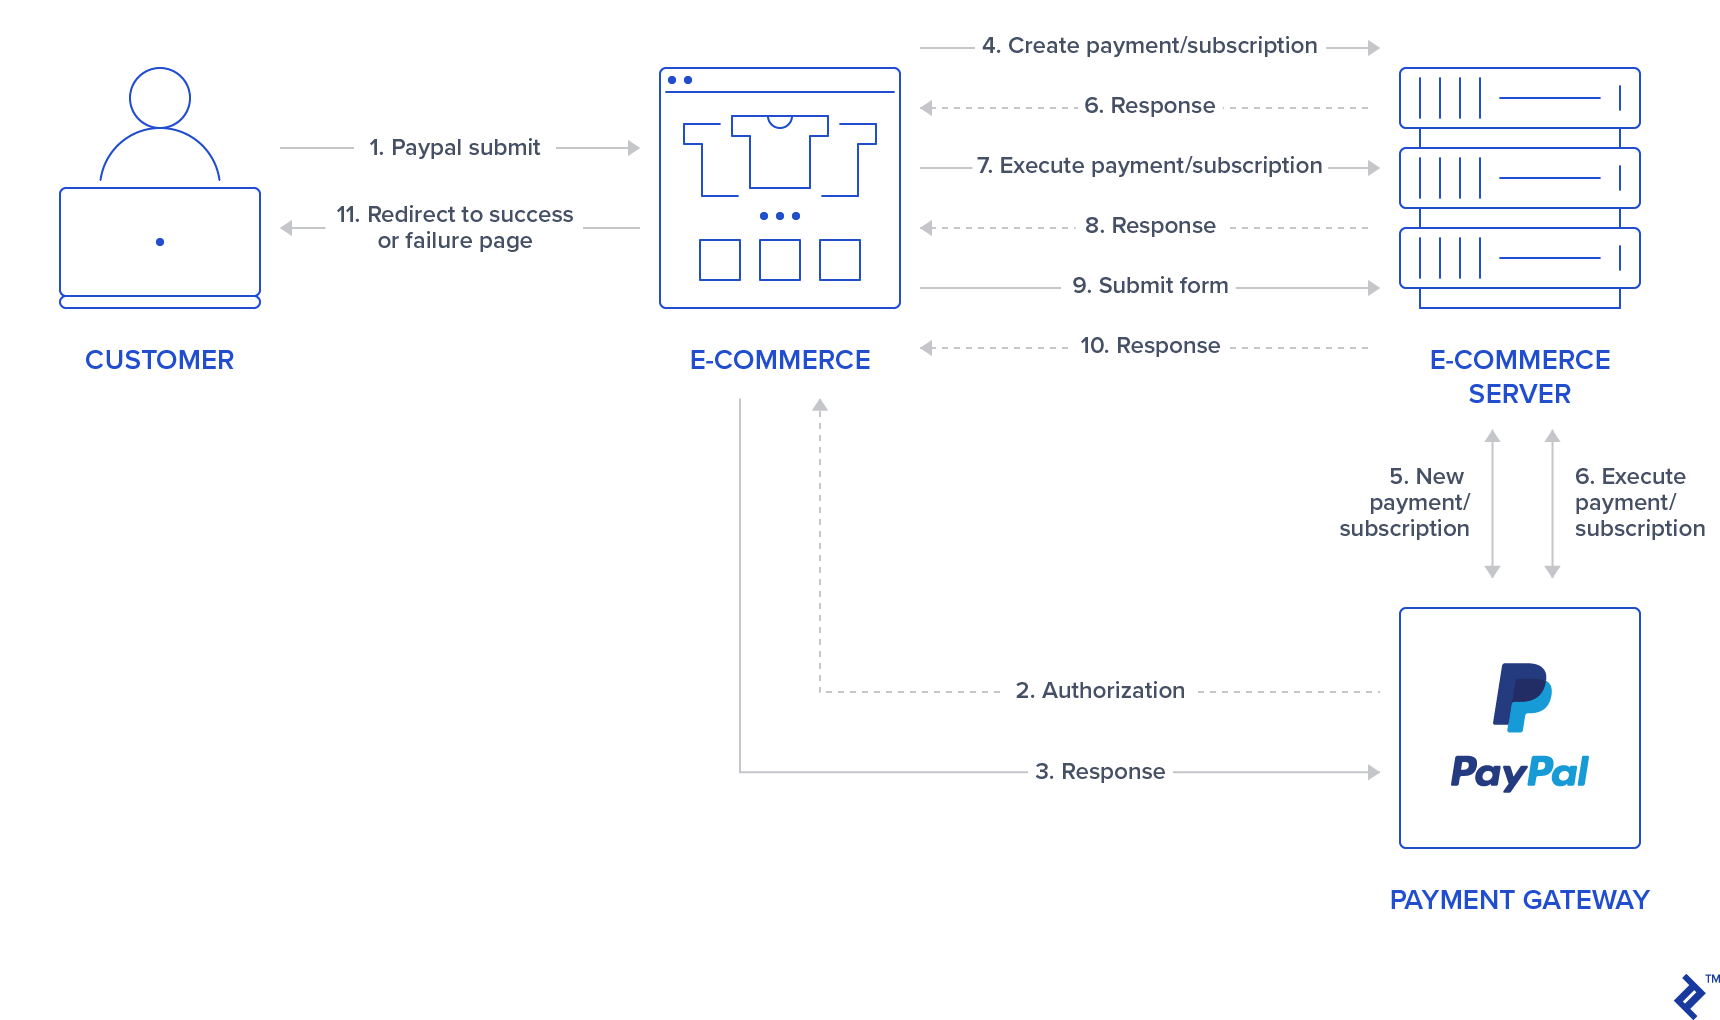
Stripeとは異なり、PayPalトランザクションのロジックは、フロントエンドからバックエンドに発信されるリクエストが増えるため、少し複雑になります。 そのため、このセクションが存在します。 onApprove createOrderで説明されている関数がどのように実装されるか、およびバックエンドプロセスでも何が期待されるかについて、多かれ少なかれ(コードなしで)説明します。
ステップ1:ユーザーがPayPal送信ボタンをクリックすると、ユーザーの資格情報を要求するPayPalポップアップが開きますが、読み込み状態です。 関数コールバックcreateOrderが呼び出されます。
ステップ2:この関数では、支払い/サブスクリプションを作成するバックエンドへのリクエストを実行します。 これはトランザクションの最初の段階であり、料金はまだ適用されないため、トランザクションは実際には保留状態になっています。 バックエンドは、PayPalモジュール( paypal-rest-sdk gemから提供)を使用して生成されるトークンを返す必要があります。
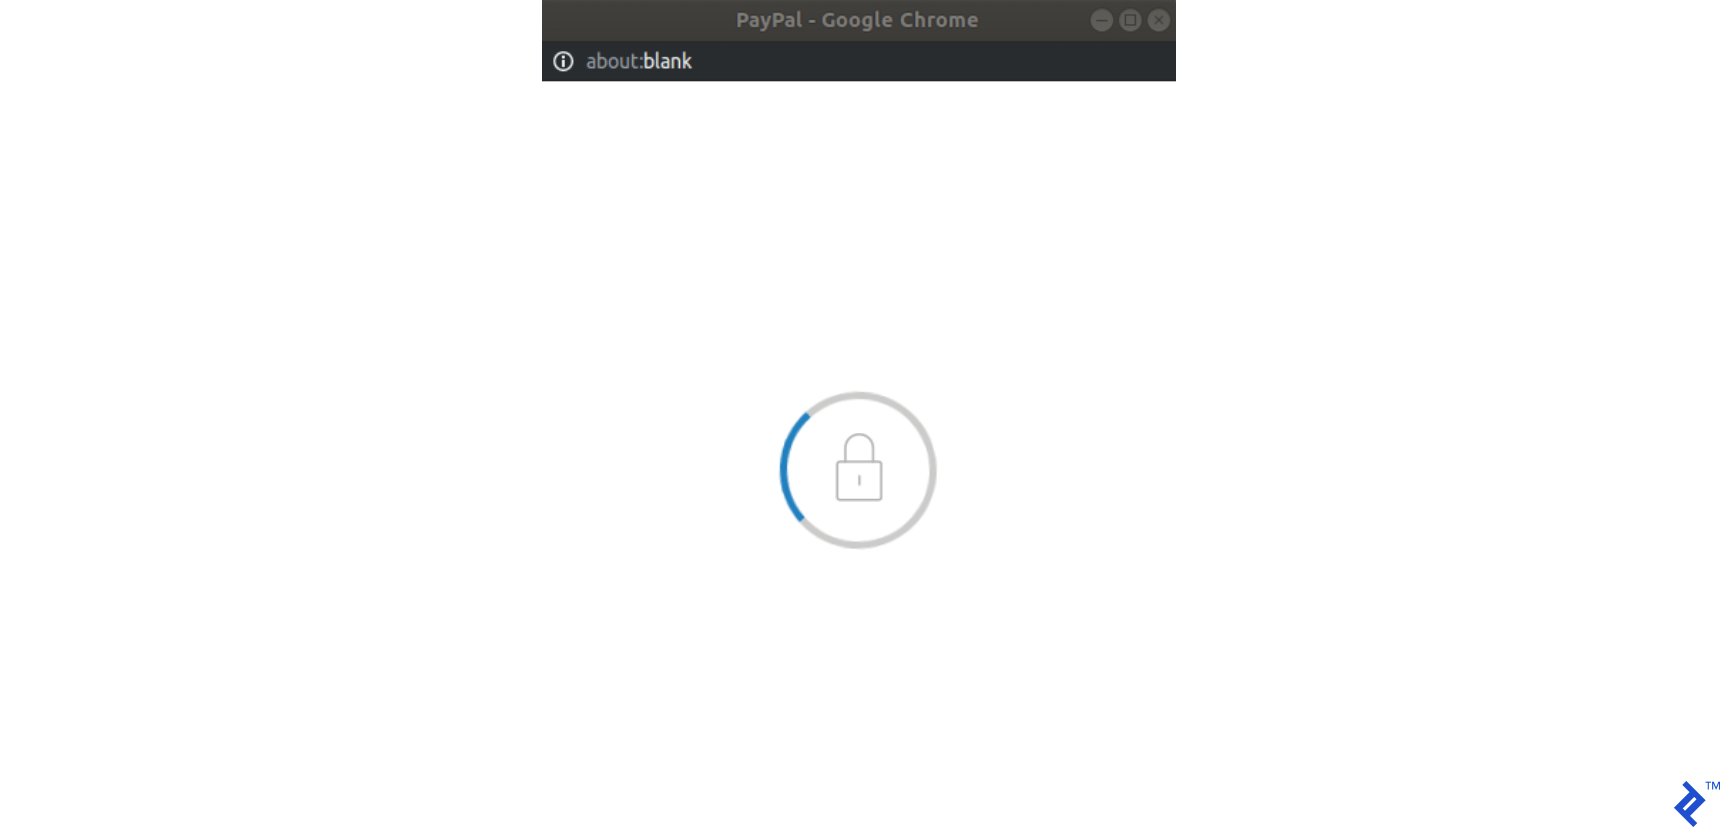
ステップ3:まだcreateOrderコールバックで、バックエンドで生成されたこのトークンを返します。すべてが正常な場合、PayPalポップアップは次のようにレンダリングし、ユーザーの資格情報を要求します。
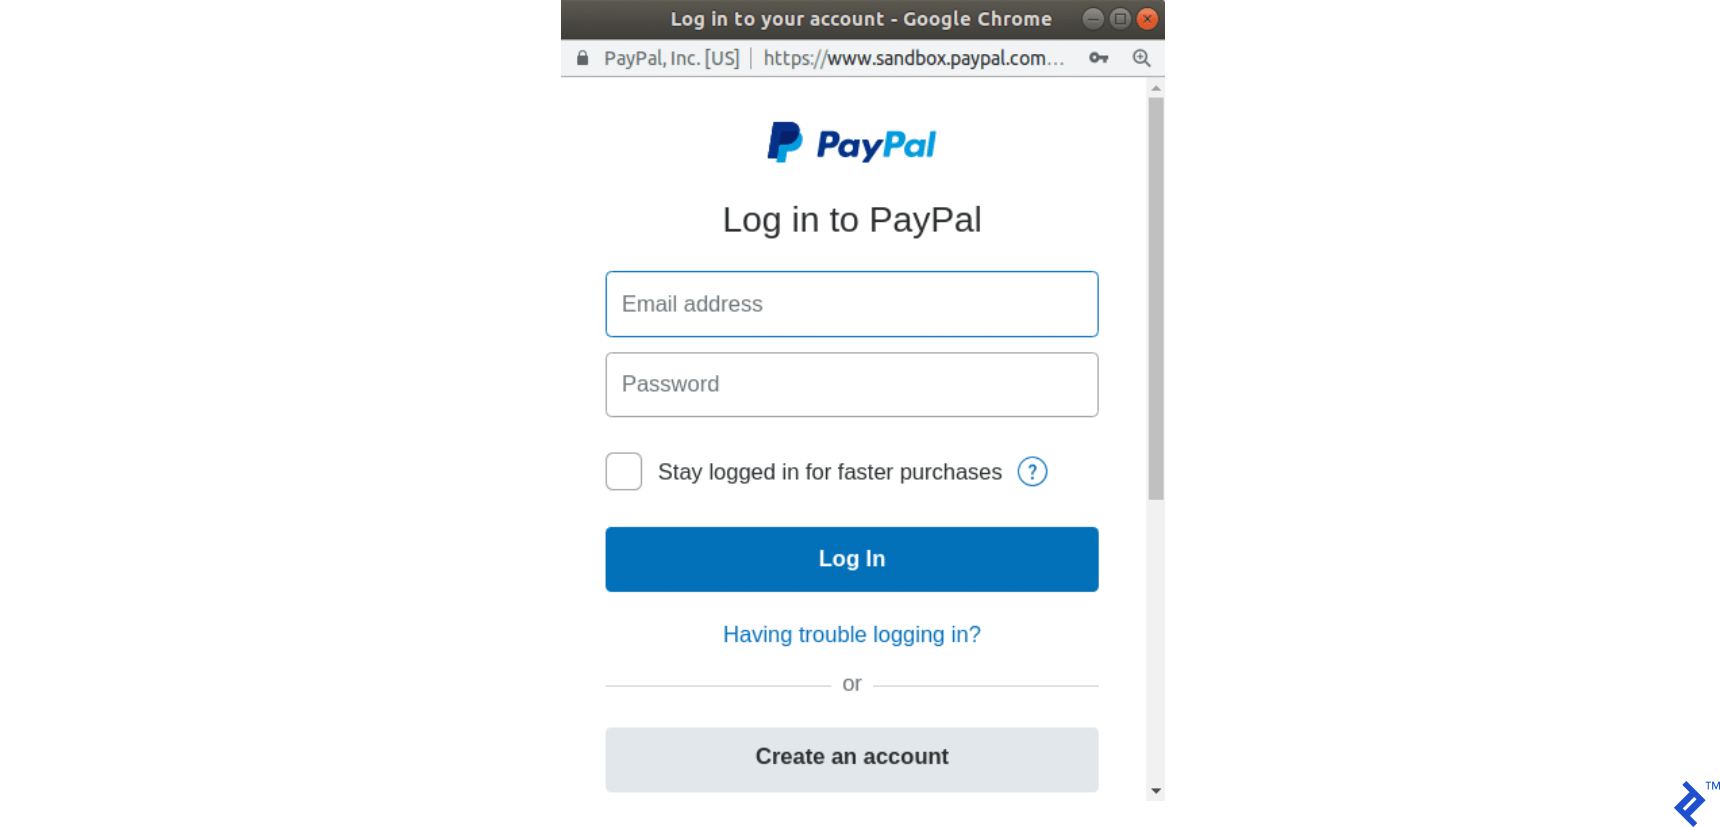
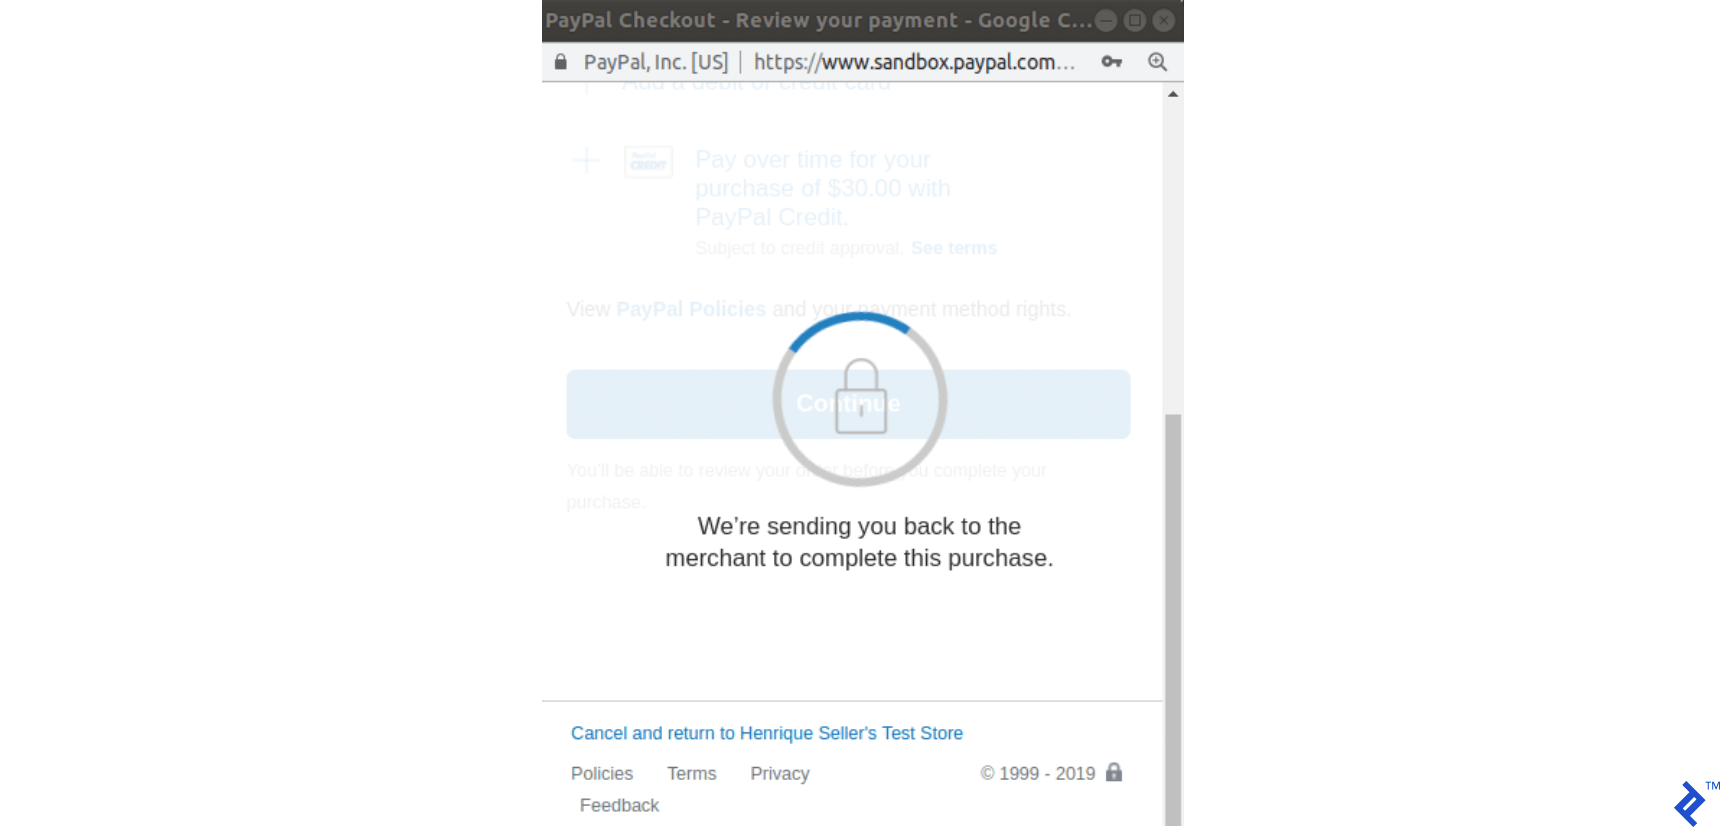
ステップ4:ユーザーがログインして支払い方法を選択すると、ポップアップの状態が次のように変わります。
ステップ5: onApprove関数のコールバックが呼び出されます。 これを次のように定義しました: onApprove: function(data) 。 dataオブジェクトには、それを実行するための支払い情報が含まれます。 このコールバックでは、PayPal注文を実行するために、今回はバックエンド関数への別のリクエストが実行され、データオブジェクトが渡されます。
ステップ6:バックエンドがこのトランザクションを実行し、200を返します(成功した場合)。
ステップ7:バックエンドが戻ったら、フォームを送信します。 これは、バックエンドに対して行う3番目のリクエストです。
Stripeとは異なり、このプロセスではバックエンドに対して3つのリクエストが行われることに注意してください。 また、それに応じて注文レコードのステータスを同期させます。
-
createOrderコールバック:トランザクションが作成され、注文レコードも作成されます。 したがって、デフォルトでは保留状態になっています。 -
onApproveコールバック:トランザクションが実行され、注文はpaypal_executedとして設定されます。 - 注文ページが送信されます:トランザクションはすでに実行されているため、何も変更されません。 注文レコードの状態が有料に変わります。
このプロセス全体を次のグラフで説明します。
PayPal支払い
PayPalの支払いは、Stripe Chargesと同じロジックに従うため、1回限りのトランザクションを表しますが、前のセクションで説明したように、フローロジックが異なります。 これらは、PayPal支払いを処理するために実行する必要がある変更です。
ステップ1: PayPalの新しいルートを作成し、支払いを実行します。
Add the following routes in config/routes.rb :
post 'orders/paypal/create_payment' => 'orders#paypal_create_payment', as: :paypal_create_payment post 'orders/paypal/execute_payment' => 'orders#paypal_execute_payment', as: :paypal_execute_payment This will create two new routes for creating and executing payments which will be handled in the paypal_create_payment and paypal_execute_payment orders controller methods.
Step 2: Create the PayPal service.
Add the singleton class Orders::Paypal at: app/services/orders/paypal.rb .
This service will initially have three responsibilities:
- The
create_paymentmethod creates a payment by callingPayPal::SDK::REST::Payment.new. A token is generated and returned to the front-end. - The
execute_paymentmethod executes the payment by first finding the previous created payment object throughPayPal::SDK::REST::Payment.find(payment_id)which uses the payment_id as an argument which has the same value as the charge_id stored in the previous step in the order object. After that, we callexecutein the payment object with a given payer as the parameter. This payer is given by the front end after the user has provided credentials and selected a payment method in the popup. - The
finishmethod finds an order by a specific charge_id querying for recently created orders in the paypal_executed state. If a record is found, it is marked as paid.
class Orders::Paypal def self.finish(charge_id) order = Order.paypal_executed.recently_created.find_by(charge_id: charge_id) return nil if order.nil? order.set_paid order end def self.create_payment(order:, product:) payment_price = (product.price_cents/100.0).to_s currency = "USD" payment = PayPal::SDK::REST::Payment.new({ intent: "sale", payer: { payment_method: "paypal" }, redirect_urls: { return_url: "/", cancel_url: "/" }, transactions: [{ item_list: { items: [{ name: product.name, sku: product.name, price: payment_price, currency: currency, quantity: 1 } ] }, amount: { total: payment_price, currency: currency }, description: "Payment for: #{product.name}" }] }) if payment.create order.token = payment.token order.charge_id = payment.id return payment.token if order.save end end def self.execute_payment(payment_id:, payer_id:) order = Order.recently_created.find_by(charge_id: payment_id) return false unless order payment = PayPal::SDK::REST::Payment.find(payment_id) if payment.execute( payer_id: payer_id ) order.set_paypal_executed return order.save end endStep 3: Call the PayPal service in the controller in the submit action.
Add a callback for prepare_new_order before the action paypal_create_payment (which will be added in the next step) is requested by adding the following in the file app/controllers/orders_controller.rb :
class OrdersController < ApplicationController before_action :authenticate_user! before_action :prepare_new_order, only: [:paypal_create_payment] ... Again, in the same file, call PayPal service in the submit action by replacing the commented code #PAYPAL WILL BE HANDLED HERE. with the following:
... elsif order_params[:payment_gateway] == "paypal" @order = Orders::Paypal.finish(order_params[:token]) end ...Step 4: Create the actions for handling requests.
Still, in the app/controllers/orders_controller.rb file, create two new actions (which should be public) for handling requests to paypal_create_payment and paypal_execute_payment routes:
- The
paypal_create_paymentmethod: Will call our service methodcreate_payment. If that returns successfully, it will return the order token created byOrders::Paypal.create_payment. - The
paypal_execute_paymentmethod: Will call our service methodexecute_payment(which executes our payments). If the payment is performed successfully, it returns 200.
... def paypal_create_payment result = Orders::Paypal.create_payment(order: @order, product: @product) if result render json: { token: result }, status: :ok else render json: {error: FAILURE_MESSAGE}, status: :unprocessable_entity end end def paypal_execute_payment if Orders::Paypal.execute_payment(payment_id: params[:paymentID], payer_id: params[:payerID]) render json: {}, status: :ok else render json: {error: FAILURE_MESSAGE}, status: :unprocessable_entity end end ... Step 5: Implement the front-end callback functions for createOrder and onApprove .
Make your paypal.Button.render call look like this:
paypal.Buttons({ env: "#{ENV['PAYPAL_ENV']}", createOrder: function() { $('#order-type').val("paypal"); if (isPayment()) { return $.post("#{paypal_create_payment_url}", $('#order-details').serialize()).then(function(data) { return data.token; }); } else { } }, onApprove: function(data) { if (isPayment()) { return $.post("#{paypal_execute_payment_url}", { paymentID: data.paymentID, payerID: data.payerID }).then(function() { submitOrderPaypal(data.paymentID) }); } else { } } }).render('#submit-paypal'); As mentioned in the previous section, we call paypal_create_payment_url for the createOrder callback and paypal_execute_payment_url for the onApprove callback. Notice that if the last request returns success, we submit the order, which is the third request made to the server.
In the createOrder function handler, we return a token (obtained from the back end). In the onApprove callback, we have two properties passed down to our back-end paymentID and payerID . These will be used in order to execute the payment.
Finally, notice that we have two empty else clauses as I'm leaving room for the next section where we will be adding PayPal subscriptions.
If you visit your page after integrating the front-end JavaScript section and select PayPal as the payment method, it should look like the following:
Step 6: Test your application.
- インデックスページにアクセスしてください。
- 支払い方法として、支払い/請求商品とPayPalを選択します。
- [PayPal送信]ボタンをクリックします。
- PayPalポップアップの場合:
- 作成したバイヤーアカウントのクレデンシャルを使用します。
- ログインして注文を確認します。
- ポップアップが閉じます。
- 成功ページにリダイレクトされるかどうかを確認します。
- 最後に、https://www.sandbox.paypal.com/signinでビジネスアカウントでサインインし、ダッシュボードhttps://www.sandbox.paypal.com/listingを確認して、PayPalアカウントで注文が実行されたかどうかを確認します。 /transactions。
PayPalサブスクリプション
PayPalのプラン/契約/サブスクリプションは、Stripeサブスクリプションと同じロジックに従い、定期的な支払いのために作成されます。 このタイプの製品では、ユーザーはその構成に応じて、毎日、毎週、毎月、または毎年自動的に課金されます。
PayPalから提供されたプランIDを保存するために、商品paypal_plan_nameのフィールドを使用します。 この場合、Stripeとは異なり、IDは選択せず、PayPalはこの値を返します。この値は、データベースで作成された最後の製品を更新するために使用されます。
サブスクリプションを作成する場合、メソッドonApproveがその基盤となる実装でこのリンケージを処理する可能性があるため、どのステップでもcustomer情報は必要ありません。 したがって、テーブルは同じままです。
ステップ1: PayPalAPIを使用してプランを作成します。
コマンドrails c 。 次のコマンドでPayPalアカウントのサブスクリプションを作成します。
plan = PayPal::SDK::REST::Plan.new({ name: 'Premium Plan', description: 'Premium Plan', type: 'fixed', payment_definitions: [{ name: 'Premium Plan', type: 'REGULAR', frequency_interval: '1', frequency: 'MONTH', cycles: '12', amount: { currency: 'USD', value: '100.00' } }], merchant_preferences: { cancel_url: 'http://localhost:3000/', return_url: 'http://localhost:3000/', max_fail_attempts: '0', auto_bill_amount: 'YES', initial_fail_amount_action: 'CONTINUE' } }) plan.create plan_update = { op: 'replace', path: '/', value: { state: 'ACTIVE' } } plan.update(plan_update) ステップ2:データベースpaypal_plan_nameの最後の商品を返されたplan.idで更新します。
走る:
Product.last.update(paypal_plan_name: plan.id)ステップ3: PayPalサブスクリプションのルートを追加します。
config/routes.rbに2つの新しいルートを追加します。
post 'orders/paypal/create_subscription' => 'orders#paypal_create_subscription', as: :paypal_create_subscription post 'orders/paypal/execute_subscription' => 'orders#paypal_execute_subscription', as: :paypal_execute_subscriptionステップ4: PayPalサービスで作成と実行を処理します。
Orders::Paypal of app/services/orders/paypal.rbでサブスクリプションを作成および実行するための2つの関数を追加します:
def self.create_subscription(order:, product:) agreement = PayPal::SDK::REST::Agreement.new({ name: product.name, description: "Subscription for: #{product.name}", start_date: (Time.now.utc + 1.minute).iso8601, payer: { payment_method: "paypal" }, plan: { id: product.paypal_plan_name } }) if agreement.create order.token = agreement.token return agreement.token if order.save end end def self.execute_subscription(token:) order = Order.recently_created.find_by(token: token) return false unless order agreement = PayPal::SDK::REST::Agreement.new agreement.token = token if agreement.execute order.charge_id = agreement.id order.set_paypal_executed return order.charge_id if order.save end end create_subscriptionでは、メソッドPayPal::SDK::REST::Agreement.newを呼び出し、その属性の1つとしてproduct.paypal_plan_nameを渡すことにより、契約を初期化します。 その後、それを作成し、この最後のオブジェクトにトークンが設定されます。 また、トークンをフロントエンドに返します。
execute_subscriptionには、前の呼び出しで作成されたorderレコードがあります。 その後、新しい契約を初期化し、この前のオブジェクトのトークンを設定して実行します。 この最後のステップが正常に実行されると、注文ステータスはpaypal_executedに設定されます。 次に、 order.chager_idにも保存されている契約IDをフロントエンドに戻します。
ステップ5: orders_controllerにサブスクリプションを作成および実行するためのアクションを追加します。
app/controllers/orders_controller.rb変更します。 クラスの最上位で、最初に、次にコールバックprepare_new_orderを更新して、 paypal_create_subscriptionが呼び出される前にも実行されるようにします。
class OrdersController < ApplicationController before_action :authenticate_user! before_action :prepare_new_order, only: [:paypal_create_payment, :paypal_create_subscription] また、同じファイルに2つのパブリック関数を追加して、PayPal支払いですでに行っているのと同様のフローでOrders::Paypalサービスを呼び出すようにします。
... def paypal_create_subscription result = Orders::Paypal.create_subscription(order: @order, product: @product) if result render json: { token: result }, status: :ok else render json: {error: FAILURE_MESSAGE}, status: :unprocessable_entity end end def paypal_execute_subscription result = Orders::Paypal.execute_subscription(token: params[:subscriptionToken]) if result render json: { id: result}, status: :ok else render json: {error: FAILURE_MESSAGE}, status: :unprocessable_entity end end ... ステップ6:フロントエンドでcreateOrderおよびonApproveコールバックのサブスクリプションハンドラーを追加します。
最後に、 index.html.hamlで、 paypal.Buttons関数を次のように置き換えます。これにより、以前にあった2つの空が埋められelse 。
paypal.Buttons({ env: "#{ENV['PAYPAL_ENV']}", createOrder: function() { $('#order-type').val("paypal"); if (isPayment()) { return $.post("#{paypal_create_payment_url}", $('#order-details').serialize()).then(function(data) { return data.token; }); } else { return $.post("#{paypal_create_subscription_url}", $('#order-details').serialize()).then(function(data) { return data.token; }); } }, onApprove: function(data) { if (isPayment()) { return $.post("#{paypal_execute_payment_url}", { paymentID: data.paymentID, payerID: data.payerID }).then(function() { submitOrderPaypal(data.paymentID) }); } else { return $.post("#{paypal_execute_subscription_url}", { subscriptionToken: data.orderID }).then(function(executeData) { submitOrderPaypal(executeData.id) }); } } }).render('#submit-paypal'); サブスクリプションの作成と実行には、支払いに使用されるのと同様のロジックがあります。 1つの違いは、支払いを実行するときに、コールバック関数onApproveからのデータには、 submitOrderPaypal(data.paymentID)を介してフォームを送信するためのpaymentIDを表すcharge_idがすでに含まれていることです。 サブスクリプションの場合、 paypal_execute_subscription_urlでPOSTをリクエストして実行した後にのみ、 charge_idを取得するため、 submitOrderPaypal(executeData.id)を呼び出すことができます。
ステップ7:アプリケーションをテストします。
- インデックスページにアクセスしてください。
- サブスクリプション製品とPayPalを支払い方法として選択します。
- [PayPal送信]ボタンをクリックします。
- PayPalポップアップの場合:
- 作成したバイヤーアカウントのクレデンシャルを使用します。
- ログインして注文を確認します。
- ポップアップが閉じます。
- 成功ページにリダイレクトされるかどうかを確認します。
- 最後に、https://www.sandbox.paypal.com/signinでビジネスアカウントでサインインし、ダッシュボードhttps://www.sandbox.paypal.com/listing/を確認して、PayPalアカウントで注文が実行されたかどうかを確認します。トランザクション。
結論
この記事を読むと、PayPalとStripeの支払い/請求とサブスクリプショントランザクションをRailsアプリケーションに統合できるようになります。 簡潔にするために、この記事では追加しなかった、改善できる点がたくさんあります。 私は難易度の仮定に基づいてすべてを整理しました:
- より簡単に:
- リクエストがHTTPSを使用するように、トランスポート層セキュリティ(TLS)を使用します。
- PayPalとStripeの両方の本番環境構成を実装します。
- ユーザーが以前の注文の履歴にアクセスできるように、新しいページを追加します。
- 中くらい:
- サブスクリプションの払い戻しまたはキャンセル。
- 未登録のユーザー支払いのソリューションを提供します。
- もっと強く:
- ユーザーが戻ってきたい場合は、アカウントを削除し、トークンとcustomer_idを保持する方法を提供します。 ただし、一定の日数が経過したら、このデータを削除して、アプリケーションがPCIに準拠するようにします。
- サーバー側でPayPalバージョン2APIに移動します(https://developer.paypal.com/docs/api/payments/v2/)このチュートリアルpaypal-sdk-restで使用したgemには、バージョンのベータバージョンのみがあります2、慎重に使用できるように(https://github.com/paypal/PayPal-Ruby-SDK/tree/2.0-beta)。
- べき等の要求を含めます。
- ストライプ:https://stripe.com/docs/api/idempotent_requests
- PayPal:https://developer.paypal.com/docs/api-basics/#api-idempotency
また、Stripeをフロントエンドに統合するもう1つの方法であるStripeCheckout要素について読むことをお勧めします。 このチュートリアルで使用したStripeElementsとは異なり、Stripe Checkoutは、ユーザーがクレジットカード情報を入力するか、Google Pay / Apple Pay https://stripe.comで支払うことを選択するボタン(PayPalと同様)をクリックするとポップアップを開きます。 / docs/web。
2つ目の推奨事項は、両方のペイメントゲートウェイのセキュリティページです。
- ストライプ用
- PayPalの場合
最後に、この記事を読んでくれてありがとう! このプロジェクトサンプルで使用したGitHubプロジェクトを確認することもできます。 そこで、開発中にrspecテストも追加しました。