
การรวม Stripe และวิธีการชำระเงิน PayPal ใน Ruby on Rails
เผยแพร่แล้ว: 2022-03-11คุณลักษณะสำคัญสำหรับบริษัทอีคอมเมิร์ซขนาดใหญ่ เช่น AliExpress, Ebay และ Amazon เป็นวิธีการจัดการการชำระเงินที่ปลอดภัย ซึ่งเป็นสิ่งจำเป็นสำหรับธุรกิจของพวกเขา หากคุณสมบัตินี้ล้มเหลว ผลที่ตามมาจะร้ายแรง สิ่งนี้ใช้กับผู้นำในอุตสาหกรรมและนักพัฒนา Ruby on Rails ที่ทำงานเกี่ยวกับแอพอีคอมเมิร์ซ
การรักษาความปลอดภัยทางไซเบอร์เป็นสิ่งจำเป็นในการป้องกันการโจมตี และวิธีที่จะทำให้กระบวนการธุรกรรมมีความปลอดภัยมากขึ้นคือการขอให้บริการของบุคคลที่สามจัดการเรื่องนี้ การรวมเกตเวย์การชำระเงินในแอปพลิเคชันของคุณเป็นวิธีที่จะบรรลุเป้าหมายนี้ เนื่องจากมีการให้สิทธิ์ผู้ใช้ การเข้ารหัสข้อมูล และแดชบอร์ด คุณจึงสามารถติดตามสถานะธุรกรรมได้ทันที
มีบริการเกตเวย์การชำระเงินที่หลากหลายบนเว็บ แต่ในบทความนี้ ผมจะเน้นที่การรวม Stripe และ PayPal เข้ากับแอปพลิเคชัน Rails หากต้องการพูดถึงเรื่องอื่นๆ: Amazon Payments, Square, SecurePay, WorldPay, Authorize.Net, 2Checkout.com, Braintree, Amazon หรือ BlueSnap
วิธีการทำงานของการรวมเกตเวย์การชำระเงิน
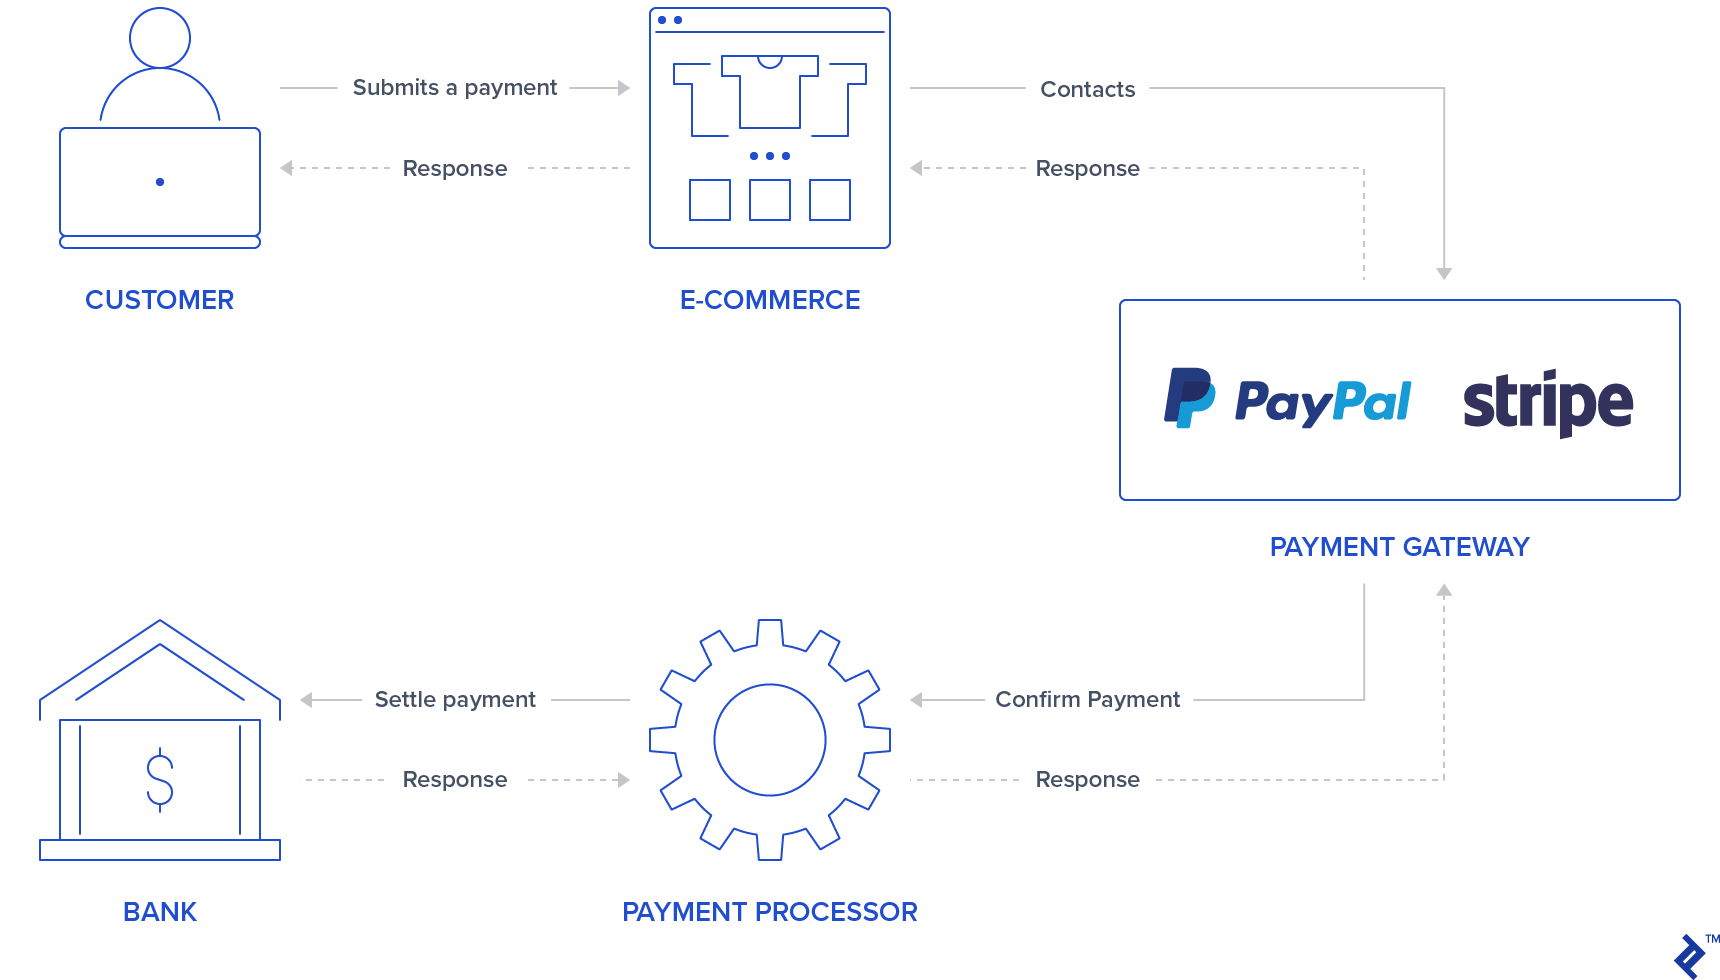
โดยทั่วไปจะมีแบบฟอร์ม/ปุ่มในใบสมัครของคุณซึ่งผู้ใช้สามารถเข้าสู่ระบบ/ใส่ข้อมูลบัตรเครดิตได้ PayPal และ Stripe ทำให้ขั้นตอนแรกนี้มีความปลอดภัยมากขึ้นแล้วโดยใช้แบบฟอร์ม iframe หรือ popups ซึ่งป้องกันไม่ให้แอปพลิเคชันของคุณจัดเก็บข้อมูลบัตรเครดิตที่ละเอียดอ่อนของผู้ใช้ เนื่องจากพวกเขาจะส่งคืนโทเค็นที่แสดงถึงธุรกรรมนี้ ผู้ใช้บางรายอาจรู้สึกมั่นใจมากขึ้นในการประมวลผลการชำระเงินโดยรู้ว่าบริการของบุคคลที่สามกำลังจัดการขั้นตอนธุรกรรม ดังนั้นนี่อาจเป็นสิ่งดึงดูดสำหรับแอปพลิเคชันของคุณ
หลังจากตรวจสอบข้อมูลผู้ใช้แล้ว เกตเวย์การชำระเงินจะยืนยันการชำระเงินโดยติดต่อผู้ประมวลผลการชำระเงินซึ่งสื่อสารกับธนาคารเพื่อชำระเงิน สิ่งนี้ทำให้มั่นใจได้ว่าธุรกรรมจะถูกเดบิต/เครดิตอย่างถูกต้อง
Stripe ใช้แบบฟอร์มบัตรเครดิตเพื่อขอหมายเลขบัตรเครดิต cvv และวันหมดอายุ ดังนั้นผู้ใช้จึงต้องกรอกข้อมูลบัตรเครดิตในอินพุต Stripe ที่ปลอดภัย หลังจากที่ให้ข้อมูลนี้ แอปพลิเคชันแบ็คเอนด์ของคุณจะประมวลผลการชำระเงินนี้ผ่านโทเค็น
ต่างจาก Stripe ตรงที่ PayPal เปลี่ยนเส้นทางผู้ใช้ไปยังหน้าเข้าสู่ระบบ PayPal ผู้ใช้อนุญาตและเลือกวิธีการชำระเงินผ่าน PayPal และอีกครั้ง แบ็คเอนด์ของคุณจะจัดการโทเค็นแทนข้อมูลที่ละเอียดอ่อนของผู้ใช้
สิ่งสำคัญที่ต้องกล่าวถึงสำหรับเกตเวย์การชำระเงินทั้งสองนี้ แบ็คเอนด์ของคุณควรขอให้ดำเนินการธุรกรรมผ่าน Stripe หรือ PayPal API ซึ่งจะให้การตอบสนอง OK/NOK ดังนั้นแอปพลิเคชันของคุณควรเปลี่ยนเส้นทางผู้ใช้ไปยังหน้าสำเร็จหรือหน้าข้อผิดพลาดตามลำดับ
จุดประสงค์ของบทความนี้คือการจัดทำคู่มือฉบับย่อสำหรับการรวมเกตเวย์การชำระเงินทั้งสองนี้ในแอปพลิเคชันเดียว สำหรับการทดสอบทั้งหมด เราจะใช้แซนด์บ็อกซ์และบัญชีทดสอบที่ Stripe และ PayPal จัดเตรียมไว้ให้เพื่อจำลองการชำระเงิน
ติดตั้ง
ก่อนที่จะรวมเกตเวย์การชำระเงิน เราจะทำการตั้งค่าสำหรับการเริ่มต้นแอปพลิเคชันโดยเพิ่มอัญมณี ตารางฐานข้อมูล และหน้าดัชนี โครงการนี้สร้างขึ้นโดยใช้ Rails เวอร์ชัน 5.2.3 และ Ruby 2.6.3
หมายเหตุ: คุณสามารถตรวจสอบคุณสมบัติใหม่ของ Rails 6 ได้ในบทความล่าสุดของเรา
ขั้นตอนที่ 1: เริ่มต้นแอปพลิเคชัน Rails
เริ่มต้นโปรเจ็กต์โดยรันการเริ่มต้นโปรเจ็กต์ด้วยคำสั่ง rails ด้วยชื่อแอปของคุณ:
rails new YOUR_APP_NAME และ cd ในโฟลเดอร์แอปพลิเคชันของคุณ
ขั้นตอนที่ 2: ติดตั้งอัญมณี
นอกจากอัญมณี Stripe และ PayPal แล้ว ยังมีการเพิ่มอัญมณีอื่นๆ อีกสองสามอย่าง:
-
devise: ใช้สำหรับการตรวจสอบผู้ใช้และการอนุญาต -
haml: เครื่องมือสร้างเทมเพลตสำหรับแสดงหน้าผู้ใช้ -
jquery-rails: สำหรับjqueryในสคริปต์ส่วนหน้า -
money-rails: สำหรับแสดงค่าเงินที่จัดรูปแบบ
เพิ่มใน Gemfile ของคุณ:
gem "devise", ">= 4.7.1" gem "haml" gem "jquery-rails" gem "money-rails"หลังจากเพิ่มแล้วให้รันใน CLI ของคุณ:
bundle installขั้นตอนที่ 3: เริ่มต้นอัญมณี
เจมเหล่านี้บางส่วนจะต้องมีการเริ่มต้นนอกเหนือจากการติดตั้งผ่าน bundle ล
การติดตั้งเครื่อง:
rails g devise:install การเริ่มต้น money-rails :
rails g money_rails:initializer เริ่มต้น jquery-rails โดยต่อท้าย app/assets/javascripts/application.js ต่อไปนี้:
//= require jquery //= require jquery_ujsขั้นตอนที่ 4: ตารางและการย้ายข้อมูล
จะใช้สามตารางในโครงการนี้ ผู้ใช้ ผลิตภัณฑ์ และ ใบสั่งซื้อ
-
Users: จะถูกสร้างขึ้นผ่าน devise - คอลัมน์
Products:-
name -
price_cents -
Stripe_plan_name: ID ที่แสดงถึงแผนการสมัครสมาชิกที่สร้างขึ้นใน Stripe เพื่อให้ผู้ใช้สามารถสมัครสมาชิกได้ ฟิลด์นี้จำเป็นสำหรับผลิตภัณฑ์ที่เกี่ยวข้องกับแผน Stripe เท่านั้น -
paypal_plan_name: เหมือนกับstripe_plan_nameแต่สำหรับ PayPal
-
- คอลัมน์
Orders:-
product_id -
user_id -
status: สิ่งนี้จะแจ้งให้ทราบว่าคำสั่งซื้อนั้นอยู่ระหว่างดำเนินการ ล้มเหลว หรือชำระเงินแล้ว -
token: นี่คือโทเค็นที่สร้างขึ้นจาก API (ทั้ง Stripe หรือ PayPal) เพื่อเริ่มต้นธุรกรรม -
price_cents: คล้ายกับผลิตภัณฑ์ แต่ใช้เพื่อทำให้ค่านี้คงอยู่ในบันทึกคำสั่งซื้อ -
payment_gateway: ร้านค้าที่ใช้เกตเวย์การชำระเงินสำหรับคำสั่งซื้อ PayPal หรือ Stripe -
customer_id: ข้อมูลนี้จะใช้สำหรับ Stripe เพื่อจัดเก็บลูกค้า Stripe สำหรับการสมัครสมาชิก และจะอธิบายพร้อมรายละเอียดเพิ่มเติมในส่วนถัดไป
-
ในการสร้างตารางเหล่านี้ ต้องสร้างการย้ายข้อมูลบางส่วน:
สำหรับการสร้าง ตารางผู้ใช้ วิ่ง:
rails g devise Userสำหรับการสร้าง ตารางผลิตภัณฑ์ สร้างการโยกย้ายโดยเรียกใช้:
rails generate migration CreateProducts name:string stripe_plan_name:string paypal_plan_name:string เปิดไฟล์การย้ายข้อมูลที่คุณสร้างขึ้น ซึ่งควรอยู่ที่ db/migrate/ และทำการเปลี่ยนแปลงเพื่อให้การย้ายข้อมูลของคุณมีลักษณะดังนี้:
class CreateProducts < ActiveRecord::Migration[5.2] def change create_table :products do |t| t.string :name t.string :stripe_plan_name t.string :paypal_plan_name end add_money :products, :price, currency: { present: true } end endสำหรับสร้าง ตารางใบสั่งซื้อ สร้างการโยกย้ายโดยเรียกใช้:
rails generate migration CreateOrders product_id:integer user_id:integer status:integer token:string charge_id:string error_message:string customer_id:string payment_gateway:integer อีกครั้ง เปิดไฟล์การโยกย้ายที่คุณสร้างขึ้นซึ่งควรอยู่ที่ db/migrate/ และทำการเปลี่ยนแปลงไฟล์นั้นเพื่อให้ดูเหมือนกับสิ่งนี้:
class CreateOrders < ActiveRecord::Migration[5.2] def change create_table :orders do |t| t.integer :product_id t.integer :user_id t.integer :status, default: 0 t.string :token t.string :charge_id t.string :error_message t.string :customer_id t.integer :payment_gateway t.timestamps end add_money :orders, :price, currency: { present: false } end endเรียกใช้การย้ายฐานข้อมูลโดยดำเนินการ:
rails db:migrateขั้นตอนที่ 5: สร้างแบบจำลอง
โมเดลผู้ใช้ถูกสร้างขึ้นแล้วจากการติดตั้งอุปกรณ์ และไม่จำเป็นต้องทำการเปลี่ยนแปลงใดๆ นอกจากนั้น จะมีการสร้างสองรุ่นสำหรับ Product และ Order
ผลิตภัณฑ์. เพิ่มไฟล์ใหม่ app/models/product.rb ด้วย:
class Product < ActiveRecord::Base monetize :price_cents has_many :orders end คำสั่ง. เพิ่มไฟล์ใหม่ app/models/order.rb ด้วย:
class Order < ApplicationRecord enum status: { pending: 0, failed: 1, paid: 2, paypal_executed: 3} enum payment_gateway: { stripe: 0, paypal: 1 } belongs_to :product belongs_to :user scope :recently_created, -> { where(created_at: 1.minutes.ago..DateTime.now) } def set_paid self.status = Order.statuses[:paid] end def set_failed self.status = Order.statuses[:failed] end def set_paypal_executed self.status = Order.statuses[:paypal_executed] end endขั้นตอนที่ 6: เติมฐานข้อมูล
ผู้ใช้และสองผลิตภัณฑ์จะถูกสร้างขึ้นในคอนโซล บันทึกคำสั่งซื้อจะถูกสร้างขึ้นตามการทดสอบการชำระเงิน
-
rails s - ในเบราว์เซอร์ของคุณ ไปที่
http://localhost:3000 - คุณจะถูกเปลี่ยนเส้นทางไปยังหน้าลงทะเบียน
- ลงทะเบียนผู้ใช้โดยกรอกที่อยู่อีเมลและรหัสผ่าน
- ในเทอร์มินัลของคุณ บันทึกต่อไปนี้จะได้รับแจ้งว่ามีการสร้างผู้ใช้ในฐานข้อมูลของคุณ:
User Create (0.1ms) INSERT INTO "users" ("email", "encrypted_password", "created_at", "updated_at") VALUES (?, ?, ?, ?) …- สร้างสองผลิตภัณฑ์โดยไม่ต้องสมัครสมาชิกโดยใช้
rails cและเพิ่ม:-
Product.create(name: "Awesome T-Shirt", price_cents: 3000) -
Product.create(name: "Awesome Sneakers", price_cents: 5000)
-
ขั้นตอนที่ 7: สร้างหน้าดัชนี
หน้าหลักสำหรับโครงการประกอบด้วยการเลือกผลิตภัณฑ์สำหรับการซื้อหรือการสมัครใช้งาน นอกจากนี้ยังมีส่วนสำหรับการเลือกวิธีการชำระเงิน (Stripe หรือ PayPal) ปุ่มส่งยังใช้สำหรับเกตเวย์การชำระเงินแต่ละประเภท สำหรับ PayPal เราจะเพิ่มการออกแบบปุ่มของตัวเองผ่านไลบรารี JavaScript
ขั้นแรก สร้างเส้นทางสำหรับ index และ submit ใน config/routes.rb
Rails.application.routes.draw do devise_for :users get '/', to: 'orders#index' post '/orders/submit', to: 'orders#submit' end สร้างและเพิ่ม index การดำเนินการและ submit ในคำสั่ง controller app/controllers/orders_controller.rb การดำเนินการ orders#index จัดเก็บตัวแปรสองตัวที่จะใช้ในส่วนหน้า: @products_purchase ซึ่งมีรายการผลิตภัณฑ์ที่ไม่มีแผน และ @products_subscription ซึ่งมีผลิตภัณฑ์ที่มีทั้งแผน PayPal และ Stripe
class OrdersController < ApplicationController before_action :authenticate_user! def index products = Product.all @products_purchase = products.where(stripe_plan_name:nil, paypal_plan_name:nil) @products_subscription = products - @products_purchase end def submit end end สร้างไฟล์ใน app/views/orders/index.html.haml ไฟล์นี้มีอินพุตทั้งหมดที่เราจะส่งไปยังแบ็กเอนด์ของเราผ่านวิธีการส่ง และการโต้ตอบสำหรับเกตเวย์การชำระเงินและการเลือกผลิตภัณฑ์ นี่คือแอตทริบิวต์ชื่ออินพุตบางส่วน:
-
Orders[product_id]เก็บรหัสผลิตภัณฑ์ -
Orders[payment_gateway]มีเกตเวย์การชำระเงินด้วยค่า Stripe หรือ PayPal สำหรับอีกค่าหนึ่ง
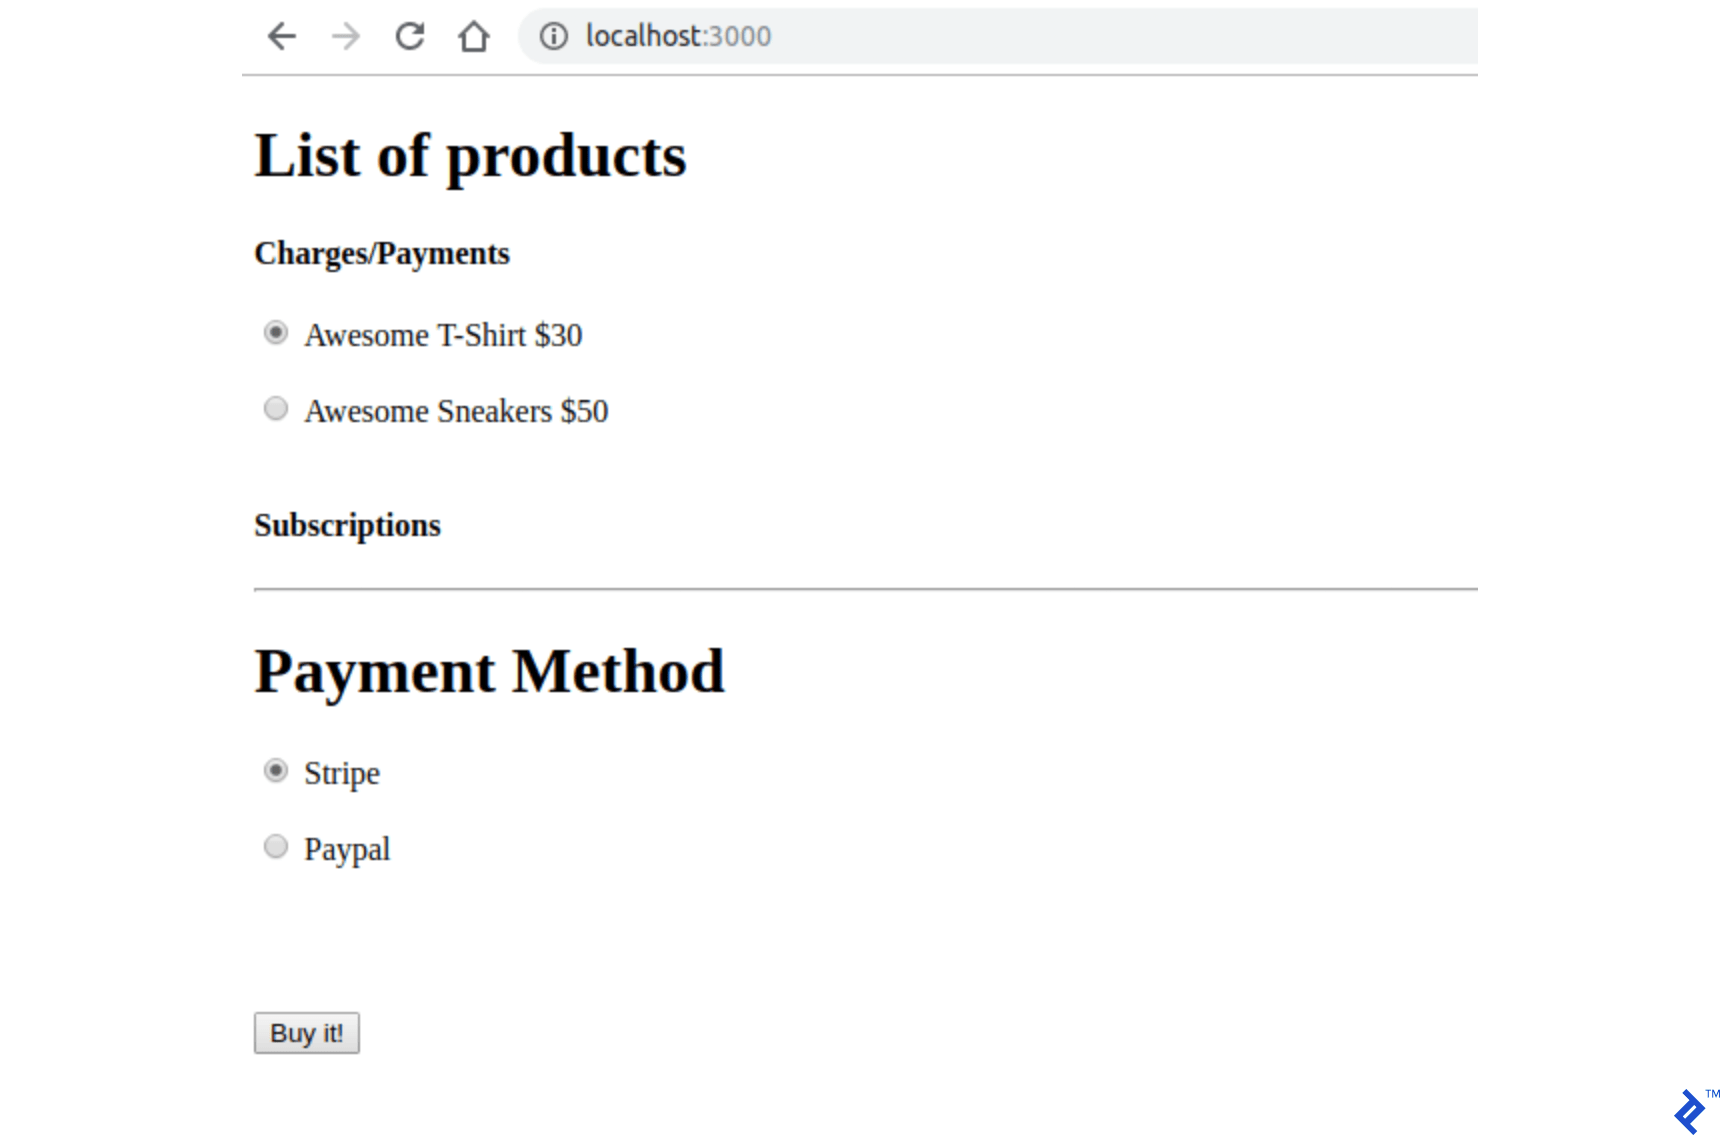
%div %h1 List of products = form_tag({:controller => "orders", :action => "submit" }, {:id => 'order-details'}) do %input{id:'order-type', :type=>"hidden", :value=>"stripe", :name=>'orders[payment_gateway]'} .form_row %h4 Charges/Payments - @products_purchase.each do |product| %div{'data-charges-and-payments-section': true} = radio_button_tag 'orders[product_id]', product.id, @products_purchase.first == product %span{id: "radioButtonName#{product.id}"} #{product.name} %span{id: "radioButtonPrice#{product.id}", :'data-price' => "#{product.price_cents}"} #{humanized_money_with_symbol product.price} %br %h4 Subscriptions - @products_subscription.each do |product| %div = radio_button_tag 'orders[product_id]', product.id, false %span{id: "radioButtonName#{product.id}"} #{product.name} %span{id: "radioButtonPrice#{product.id}", :'data-price' => "#{product.price_cents}"} #{humanized_money_with_symbol product.price} %br %hr %h1 Payment Method .form_row %div = radio_button_tag 'payment-selection', 'stripe', true, onclick: "changeTab();" %span Stripe %br %div = radio_button_tag 'payment-selection', 'paypal', false, onclick: "changeTab();" %span Paypal %br %br %div{id:'tab-stripe', class:'paymentSelectionTab active'} %div{id:'card-element'} %div{id:'card-errors', role:"alert"} %br %br = submit_tag "Buy it!", id: "submit-stripe" %div{id:'tab-paypal', class:'paymentSelectionTab'} %div{id: "submit-paypal"} %br %br %hr :javascript function changeTab() { var newActiveTabID = $('input[name="payment-selection"]:checked').val(); $('.paymentSelectionTab').removeClass('active'); $('#tab-' + newActiveTabID).addClass('active'); } :css #card-element { width:500px; } .paymentSelectionTab { display: none; } .paymentSelectionTab.active { display: block !important; } หากคุณเรียกใช้แอปพลิเคชันด้วย rails s หน้าเว็บของคุณใน http://localhost:3000 คุณควรจะสามารถเห็นหน้าดังต่อไปนี้:
การจัดเก็บข้อมูลรับรองเกตเวย์การชำระเงิน
คีย์ PayPal และ Stripe จะถูกเก็บไว้ในไฟล์ที่ไม่ได้ติดตามโดย Git มีคีย์สองประเภทที่จัดเก็บไว้ในไฟล์นี้สำหรับแต่ละเกตเวย์การชำระเงิน และสำหรับตอนนี้ เราจะใช้ค่าจำลองสำหรับคีย์เหล่านี้ คำแนะนำเพิ่มเติมสำหรับการสร้างคีย์เหล่านี้จะนำเสนอในส่วนเพิ่มเติม
ขั้นตอนที่ 1: เพิ่มสิ่งนี้ใน .gitignore
/config/application.yml ขั้นตอนที่ 2: สร้างไฟล์ด้วยข้อมูลประจำตัวของคุณใน config/application.yml ควรมีรหัสแซนด์บ็อกซ์/ทดสอบ PayPal และ Stripe ทั้งหมดของคุณเพื่อเข้าถึง API เหล่านี้
test: &default PAYPAL_ENV: sandbox PAYPAL_CLIENT_ID: YOUR_CREDENTIAL_HERE PAYPAL_CLIENT_SECRET: YOUR_CREDENTIAL_HERE STRIPE_PUBLISHABLE_KEY: YOUR_CREDENTIAL_HERE STRIPE_SECRET_KEY: YOUR_CREDENTIAL_HERE development: <<: *default ขั้นตอนที่ 3: ในการจัดเก็บตัวแปรจากไฟล์ config/application.yml เมื่อแอปพลิเคชันเริ่มทำงาน ให้เพิ่มบรรทัดเหล่านี้ใน config/application.rb ภายในคลาส Application เพื่อให้มีอยู่ใน ENV
config_file = Rails.application.config_for(:application) config_file.each do |key,value| ENV[key] = value end unless config_file.nil?การกำหนดค่าแถบ
เราจะเพิ่มอัญมณีสำหรับการใช้ Stripe API: stripe-rails จำเป็นต้องมีการสร้างบัญชี Stripe เพื่อให้สามารถดำเนินการกับการเรียกเก็บเงินและการสมัครสมาชิกได้ หากจำเป็น คุณสามารถศึกษาวิธี API สำหรับ Stripe API ได้ในเอกสารอย่างเป็นทางการ
ขั้นตอนที่ 1: เพิ่มอัญมณีรางแถบในโครงการของคุณ
stripe-rails gem จะจัดเตรียมอินเทอร์เฟซสำหรับคำขอ API ทั้งหมดที่ใช้ในโปรเจ็กต์นี้
เพิ่มสิ่งนี้ใน Gemfile :
gem 'stripe-rails'วิ่ง:
bundle installขั้นตอนที่ 2: สร้างคีย์ API ของคุณ
เพื่อให้มีคีย์ API สำหรับการสื่อสารกับ Stripe คุณจะต้องสร้างบัญชีใน Stripe ในการทดสอบแอปพลิเคชัน คุณสามารถใช้โหมดการทดสอบได้ ดังนั้นจึงไม่จำเป็นต้องกรอกข้อมูลทางธุรกิจจริงในกระบวนการสร้างบัญชี Stripe
- สร้างบัญชีใน Stripe หากคุณยังไม่มี (https://dashboard.stripe.com/)
- ขณะที่ยังคงอยู่ในแดชบอร์ด Stripe หลังจากลงชื่อเข้าใช้แล้ว ให้สลับเปิด ดูข้อมูลการทดสอบ
- ที่ https://dashboard.stripe.com/test/apikeys ให้แทนที่
YOUR_CREDENTIAL_HEREสำหรับค่าSTRIPE_PUBLISHABLE_KEYและSTRIPE_SECRET_KEYใน/config/application.ymlด้วยเนื้อหาจากPublishable KeyและSecret key
ขั้นตอนที่ 3: เริ่มต้นโมดูล Stripe
นอกจากการเปลี่ยนคีย์แล้ว เรายังต้องเริ่มต้นโมดูล Stripe เพื่อให้ใช้คีย์ที่ตั้งค่าไว้แล้วใน ENV ของเรา
สร้างไฟล์ใน config/initializers/stripe.rb ด้วย:
Rails.application.configure do config.stripe.secret_key = ENV["STRIPE_SECRET_KEY"] config.stripe.publishable_key = ENV["STRIPE_PUBLISHABLE_KEY"] endขั้นตอนที่ 4: รวม Stripe ที่ส่วนหน้า
เราจะเพิ่มไลบรารี Stripe JavaScript และตรรกะในการส่งโทเค็นซึ่งแสดงถึงข้อมูลบัตรเครดิตของผู้ใช้และจะได้รับการประมวลผลในส่วนหลังของเรา
ในไฟล์ index.html.haml ให้เพิ่มไฟล์นี้ที่ด้านบนสุดของไฟล์ สิ่งนี้จะใช้โมดูล Stripe (ที่จัดหาโดย gem) เพื่อเพิ่มไลบรารี JavaScript Stripe ในหน้าของผู้ใช้
= stripe_javascript_tag Stripe ใช้ช่องป้อนข้อมูลที่ปลอดภัยซึ่งสร้างขึ้นผ่าน API เนื่องจากสร้างขึ้นใน iframe ที่สร้างผ่าน API นี้ คุณจึงไม่ต้องกังวลกับช่องโหว่ที่อาจเกิดขึ้นในการจัดการข้อมูลบัตรเครดิตของผู้ใช้ นอกจากนี้ แบ็กเอนด์ของคุณจะไม่สามารถประมวลผล/จัดเก็บข้อมูลที่ละเอียดอ่อนของผู้ใช้ใดๆ ได้ และจะได้รับเพียงโทเค็นที่แสดงถึงข้อมูลนี้เท่านั้น
ฟิลด์อินพุตเหล่านี้สร้างขึ้นโดยการเรียก stripe.elements().create('card') หลังจากนั้นเพียงเรียกวัตถุที่ส่งคืนด้วย mount() โดยส่งผ่านอาร์กิวเมนต์ ID/คลาสองค์ประกอบ HTML ที่ควรติดตั้งอินพุตเหล่านี้ ดูข้อมูลเพิ่มเติมได้ที่ Stripe
เมื่อผู้ใช้กดปุ่มส่งด้วยวิธีการชำระเงิน Stripe การเรียก API อื่นที่ส่งคืนสัญญาจะดำเนินการในองค์ประกอบการ์ด Stripe ที่สร้างขึ้น:
stripe.createToken(card).then(function(result) ตัวแปร result ของฟังก์ชันนี้ หากไม่ได้กำหนดข้อผิดพลาดของคุณสมบัติ จะมีโทเค็นซึ่งสามารถเรียกค้นได้โดยการเข้าถึงแอตทริบิวต์ result.token.id โทเค็นนี้จะถูกส่งไปยังส่วนหลัง
เพื่อทำการเปลี่ยนแปลงเหล่านี้ ให้แทนที่โค้ดที่แสดงความคิดเห็น // YOUR STRIPE AND PAYPAL CODE WILL BE HERE ใน index.html.haml ด้วย:
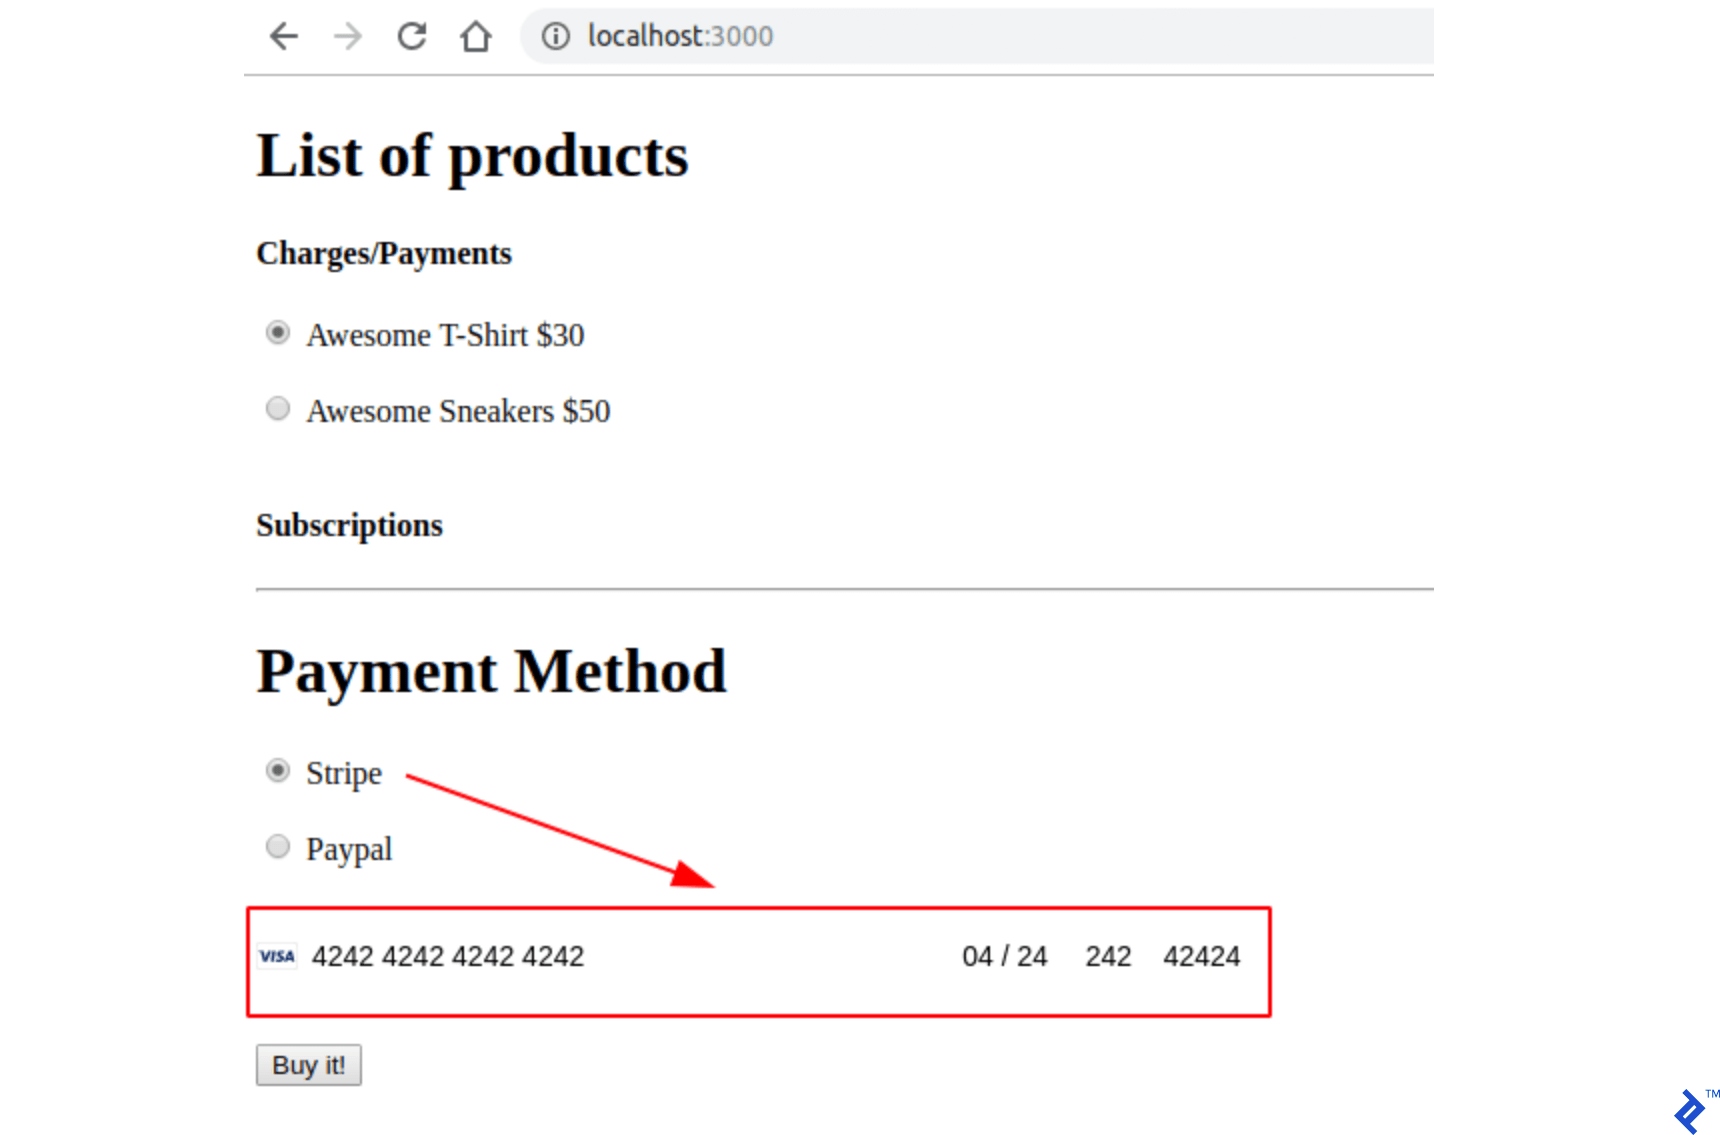
(function setupStripe() { //Initialize stripe with publishable key var stripe = Stripe("#{ENV['STRIPE_PUBLISHABLE_KEY']}"); //Create Stripe credit card elements. var elements = stripe.elements(); var card = elements.create('card'); //Add a listener in order to check if card.addEventListener('change', function(event) { //the div card-errors contains error details if any var displayError = document.getElementById('card-errors'); document.getElementById('submit-stripe').disabled = false; if (event.error) { // Display error displayError.textContent = event.error.message; } else { // Clear error displayError.textContent = ''; } }); // Mount Stripe card element in the #card-element div. card.mount('#card-element'); var form = document.getElementById('order-details'); // This will be called when the #submit-stripe button is clicked by the user. form.addEventListener('submit', function(event) { $('#submit-stripe').prop('disabled', true); event.preventDefault(); stripe.createToken(card).then(function(result) { if (result.error) { // Inform that there was an error. var errorElement = document.getElementById('card-errors'); errorElement.textContent = result.error.message; } else { // Now we submit the form. We also add a hidden input storing // the token. So our back-end can consume it. var $form = $("#order-details"); // Add a hidden input orders[token] $form.append($('<input type="hidden" name="orders[token]"/>').val(result.token.id)); // Set order type $('#order-type').val('stripe'); $form.submit(); } }); return false; }); }()); //YOUR PAYPAL CODE WILL BE HEREหากคุณเยี่ยมชมหน้าของคุณ หน้าควรมีลักษณะดังนี้กับช่องป้อนข้อมูลความปลอดภัย Stripe ใหม่:
ขั้นตอนที่ 5: ทดสอบใบสมัครของคุณ
กรอกแบบฟอร์มบัตรเครดิตด้วยบัตรทดสอบ (https://stripe.com/docs/testing) และส่งหน้า ตรวจสอบว่ามีการเรียกการดำเนินการ submit ด้วยพารามิเตอร์ทั้งหมด ( product_id , payment_gateway และ token ) ในเอาต์พุตเซิร์ฟเวอร์ของคุณ
ค่าใช้จ่ายลาย
ค่าบริการ Stripe แสดงถึงธุรกรรมแบบครั้งเดียว ดังนั้นหลังจากธุรกรรมการเรียกเก็บเงิน Stripe คุณจะได้รับเงินจากลูกค้าโดยตรง นี้เหมาะสำหรับการขายสินค้าที่ไม่เกี่ยวข้องกับแผน ในตอนต่อไป ฉันจะแสดงวิธีการทำธุรกรรมประเภทเดียวกันกับ PayPal แต่ชื่อของ PayPal สำหรับธุรกรรมประเภทนี้คือ Payment
ในส่วนนี้ ฉันจะจัดเตรียมโครงกระดูกทั้งหมดสำหรับการจัดการและส่งคำสั่งซื้อ เราสร้างคำสั่งซื้อในการดำเนินการ submit เมื่อส่งแบบฟอร์ม Stripe คำสั่งซื้อนี้ในขั้นต้นจะมีสถานะ รอดำเนิน การ ดังนั้นหากมีสิ่งใดผิดพลาดขณะดำเนินการกับคำสั่งซื้อนี้ คำสั่งซื้อนั้นจะยัง รอดำเนิน การ
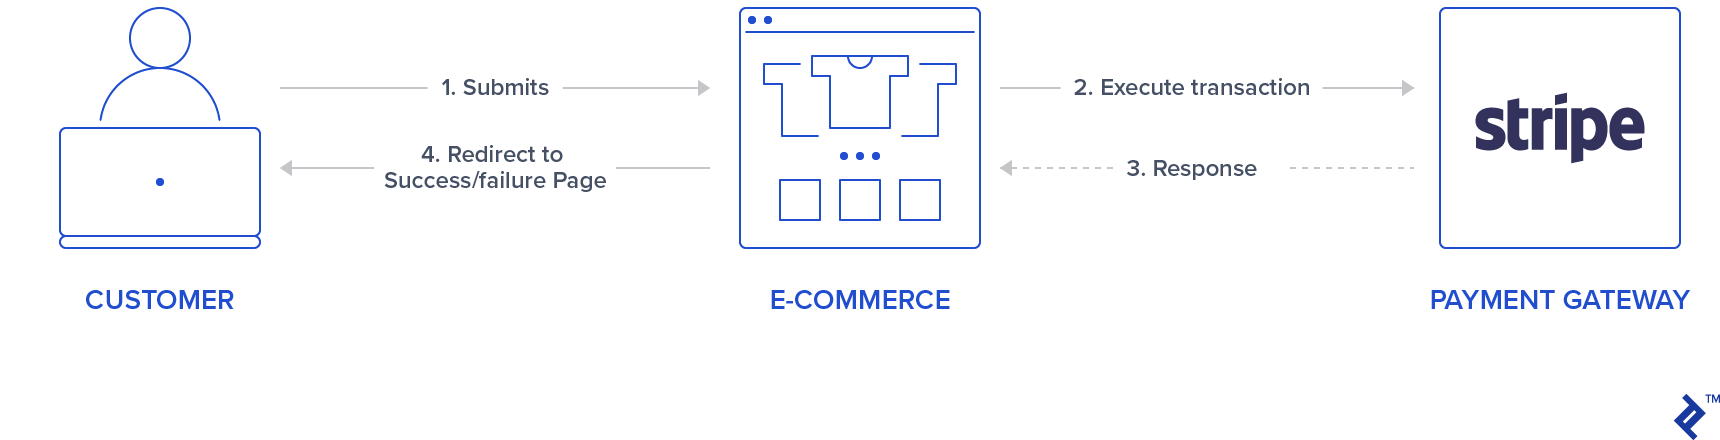
หากเกิดข้อผิดพลาดใด ๆ จากการเรียก Stripe API เราจะตั้งค่าคำสั่งซื้อในสถานะ ล้มเหลว และหากการเรียกเก็บเงินเสร็จสมบูรณ์ คำสั่งซื้อจะอยู่ในสถานะ ชำระเงิน ผู้ใช้จะถูกเปลี่ยนเส้นทางตามการตอบสนอง Stripe API ตามที่แสดงในกราฟต่อไปนี้:
นอกจากนี้ เมื่อมีการเรียกเก็บเงิน Stripe ID จะถูกส่งคืน เราจะจัดเก็บ ID นี้เพื่อให้คุณสามารถค้นหาได้ในภายหลังในแดชบอร์ด Stripe หากจำเป็น สามารถใช้ ID นี้ได้หากต้องคืนเงินคำสั่งซื้อ สิ่งนี้จะไม่ถูกสำรวจในบทความนี้
ขั้นตอนที่ 1: สร้างบริการ Stripe
เราจะใช้คลาสซิงเกิลตันเพื่อแสดงการดำเนินการของ Stripe โดยใช้ Stripe API ในการสร้างค่าธรรมเนียม จะมีการเรียกเมธอด Stripe::Charge.create และแอตทริบิวต์ ID อ็อบเจ็กต์ที่ส่งคืนจะถูกจัดเก็บไว้ในบันทึกการสั่งซื้อ charge_id ฟังก์ชันการ create นี้ถูกเรียกโดยการส่งโทเค็นที่มาจากส่วนหน้า ราคาคำสั่ง และคำอธิบาย
ดังนั้น สร้างโฟลเดอร์ใหม่ app/services/orders และเพิ่มบริการ Stripe: app/services/orders/stripe.rb ที่มีคลาส Orders::Stripe singleton ซึ่งมีรายการในเมธอด execute
class Orders::Stripe INVALID_STRIPE_OPERATION = 'Invalid Stripe Operation' def self.execute(order:, user:) product = order.product # Check if the order is a plan if product.stripe_plan_name.blank? charge = self.execute_charge(price_cents: product.price_cents, description: product.name, card_token: order.token) else #SUBSCRIPTIONS WILL BE HANDLED HERE end unless charge&.id.blank? # If there is a charge with id, set order paid. order.charge_id = charge.id order.set_paid end rescue Stripe::StripeError => e # If a Stripe error is raised from the API, # set status failed and an error message order.error_message = INVALID_STRIPE_OPERATION order.set_failed end private def self.execute_charge(price_cents:, description:, card_token:) Stripe::Charge.create({ amount: price_cents.to_s, currency: "usd", description: description, source: card_token }) end endขั้นตอนที่ 2: ดำเนินการส่งและโทรหาบริการ Stripe
ใน orders_controller.rb ให้เพิ่มสิ่งต่อไปนี้ในการดำเนินการ submit ซึ่งโดยทั่วไปจะเรียกใช้บริการ Orders::Stripe.execute โปรดทราบว่ามีการเพิ่มฟังก์ชั่นส่วนตัวใหม่สองรายการ: prepare_new_order และ order_params
def submit @order = nil #Check which type of order it is if order_params[:payment_gateway] == "stripe" prepare_new_order Orders::Stripe.execute(order: @order, user: current_user) elsif order_params[:payment_gateway] == "paypal" #PAYPAL WILL BE HANDLED HERE end ensure if @order&.save if @order.paid? # Success is rendered when order is paid and saved return render html: SUCCESS_MESSAGE elsif @order.failed? && [email protected]_message.blank? # Render error only if order failed and there is an error_message return render html: @order.error_message end end render html: FAILURE_MESSAGE end private # Initialize a new order and and set its user, product and price. def prepare_new_order @order = Order.new(order_params) @order.user_id = current_user.id @product = Product.find(@order.product_id) @order.price_cents = @product.price_cents end def order_params params.require(:orders).permit(:product_id, :token, :payment_gateway, :charge_id) endขั้นตอนที่ 3: ทดสอบใบสมัครของคุณ
ตรวจสอบว่าการส่งเมื่อถูกเรียกด้วยการ์ดทดสอบที่ถูกต้อง ดำเนินการเปลี่ยนเส้นทางไปยังข้อความที่สำเร็จหรือไม่ นอกจากนี้ ให้ตรวจสอบในแดชบอร์ด Stripe ของคุณหากมีการแสดงคำสั่งซื้อด้วย
สมัครสมาชิก Stripe
การสมัครหรือแผนสามารถสร้างขึ้นสำหรับการชำระเงินประจำ ด้วยผลิตภัณฑ์ประเภทนี้ ผู้ใช้จะถูกเรียกเก็บเงินรายวัน รายสัปดาห์ รายเดือน หรือรายปีโดยอัตโนมัติตามการกำหนดค่าแผน ในส่วนนี้ เราจะใช้ฟิลด์สำหรับ product stripe_plan_name เพื่อจัดเก็บ ID แผน—ที่จริงแล้ว เป็นไปได้สำหรับเราที่จะเลือก ID และเราจะเรียกมันว่า premium-plan plan—ซึ่งจะใช้เพื่อสร้าง customer <-> subscription
นอกจากนี้เรายังจะสร้างคอลัมน์ใหม่สำหรับผู้ใช้ตารางที่เรียกว่า stripe_customer_id ซึ่งจะเต็มไปด้วยคุณสมบัติ id ของวัตถุลูกค้า Stripe ลูกค้า Stripe จะถูกสร้างขึ้นเมื่อมีการเรียกใช้ฟังก์ชัน Stripe::Customer.create และคุณยังสามารถตรวจสอบลูกค้าที่สร้างและเชื่อมโยงกับบัญชีของคุณใน (https://dashboard.stripe.com/test/customers) ลูกค้าถูกสร้างขึ้นโดยส่งพารามิเตอร์ source ซึ่งในกรณีของเราคือโทเค็นที่สร้างขึ้นในส่วนหน้าซึ่งจะถูกส่งเมื่อส่งแบบฟอร์ม
ออบเจ็กต์ลูกค้าที่ได้รับจากการเรียก Stripe API ที่กล่าวถึงล่าสุด ยังใช้สำหรับสร้างการสมัครรับข้อมูลซึ่งทำได้โดยการเรียก customer.subscriptions.create และส่ง ID แผนเป็นพารามิเตอร์
นอกจากนี้ stripe-rails gem ยังมีอินเทอร์เฟซเพื่อดึงและอัปเดตลูกค้าจาก Stripe ซึ่งทำได้โดยการเรียก Stripe::Customer.retrieve และ Stripe::Customer.update ตามลำดับ
ดังนั้น เมื่อบันทึกผู้ใช้มี stripe_customer_id อยู่แล้ว แทนที่จะสร้างลูกค้าใหม่โดยใช้ Stripe::Customer.create เราจะเรียก Stripe::Customer.retrieve ว่าส่ง stripe_customer_id เป็นพารามิเตอร์ ตามด้วย Stripe::Customer.update และในกรณีนี้ จะส่งพารามิเตอร์ให้กับโทเค็น
อันดับแรก เราจะสร้างแผนโดยใช้ Stripe API เพื่อให้เราสามารถสร้างผลิตภัณฑ์การสมัครสมาชิกใหม่โดยใช้ฟิลด์ stripe_plan_name หลังจากนั้น เราจะทำการปรับเปลี่ยนในบริการ orders_controller และ Stripe เพื่อให้สามารถจัดการการสร้างและการดำเนินการของการสมัครรับข้อมูล Stripe
ขั้นตอนที่ 1: สร้างแผนโดยใช้ Stripe API
เปิดคอนโซลของคุณโดยใช้ rails c สร้างการสมัครสมาชิกสำหรับบัญชี Stripe ของคุณด้วย:

Stripe::Plan.create({ amount: 10000, interval: 'month', product: { name: 'Premium plan', }, currency: 'usd', id: 'premium-plan', })หากผลลัพธ์ที่ส่งคืนในขั้นตอนนี้เป็นจริง แสดงว่าสร้างแผนสำเร็จแล้ว และคุณสามารถเข้าถึงได้ในแดชบอร์ด Stripe ของคุณ
ขั้นตอนที่ 2: สร้างผลิตภัณฑ์ในฐานข้อมูลด้วยชุดฟิลด์ stripe_plan_name
ตอนนี้ สร้างผลิตภัณฑ์ที่มีชุด stripe_plan_name เป็น premium-plan ในฐานข้อมูล:
Product.create(price_cents: 10000, name: 'Premium Plan', stripe_plan_name: 'premium-plan') ขั้นตอนที่ 3: สร้างการย้ายข้อมูลเพื่อเพิ่มคอลัมน์ stripe_customer_id ในตาราง users
เรียกใช้สิ่งต่อไปนี้ในเทอร์มินัล:
rails generate migration AddStripeCustomerIdToUser stripe_customer_id:string rails db:migrateขั้นตอนที่ 4: ใช้ตรรกะการสมัครสมาชิกในคลาสบริการ Stripe
เพิ่มสองฟังก์ชันเพิ่มเติมในวิธีการส่วนตัวของ app/services/orders/stripe.rb : execute_subscription รับผิดชอบในการสร้างการสมัครรับข้อมูลในวัตถุของลูกค้า ฟังก์ชัน find_or_create_customer มีหน้าที่ส่งคืนลูกค้าที่สร้างไว้แล้วหรือส่งคืนลูกค้าที่สร้างขึ้นใหม่
def self.execute_subscription(plan:, token:, customer:) customer.subscriptions.create({ plan: plan }) end def self.find_or_create_customer(card_token:, customer_id:, email:) if customer_id stripe_customer = Stripe::Customer.retrieve({ id: customer_id }) if stripe_customer stripe_customer = Stripe::Customer.update(stripe_customer.id, { source: card_token}) end else stripe_customer = Stripe::Customer.create({ email: email, source: card_token }) end stripe_customer end สุดท้าย ในฟังก์ชัน execute การในไฟล์เดียวกัน ( app/services/orders/stripe.rb ) ก่อนอื่นเราจะเรียก find_or_create_customer จากนั้นดำเนินการสมัครรับข้อมูลโดยเรียก execute_subscription โดยส่งลูกค้าที่ดึงมา/สร้างมาก่อนหน้านี้ ดังนั้นแทนที่ความคิดเห็น #SUBSCRIPTIONS WILL BE HANDLED HERE ในวิธีการ execute การด้วยรหัสต่อไปนี้:
customer = self.find_or_create_customer(card_token: order.token, customer_id: user.stripe_customer_id, email: user.email) if customer user.update(stripe_customer_id: customer.id) order.customer_id = customer.id charge = self.execute_subscription(plan: product.stripe_plan_name, customer: customer)ขั้นตอนที่ 5: ทดสอบใบสมัครของคุณ
เยี่ยมชมเว็บไซต์ของคุณ เลือกผลิตภัณฑ์สมัครสมาชิก Premium Plan และกรอกการ์ดทดสอบที่ถูกต้อง หลังจากส่งแล้ว ระบบควรเปลี่ยนเส้นทางคุณไปยังหน้าที่สำเร็จ นอกจากนี้ ให้ตรวจสอบในแดชบอร์ด Stripe ของคุณหากสร้างการสมัครรับข้อมูลสำเร็จ
การกำหนดค่า PayPal
เช่นเดียวกับที่เราทำใน Stripe เราจะเพิ่มอัญมณีสำหรับการใช้ PayPal API: paypal-sdk-rest และจำเป็นต้องสร้างบัญชี PayPal ด้วย คุณสามารถดูเวิร์กโฟลว์เชิงพรรณนาสำหรับ PayPal โดยใช้ gem นี้ได้ในเอกสารอย่างเป็นทางการของ PayPal API
ขั้นตอนที่ 1: เพิ่มอัญมณี paypal-sdk-rest ในโครงการของคุณ
เพิ่มสิ่งนี้ใน Gemfile :
gem 'paypal-sdk-rest'วิ่ง:
bundle installขั้นตอนที่ 2: สร้างคีย์ API ของคุณ
เพื่อให้มีคีย์ API สำหรับการสื่อสารกับ PayPal คุณจะต้องสร้างบัญชี PayPal ดังนั้น:
- สร้างบัญชี (หรือใช้บัญชี PayPal ของคุณ) ที่ https://developer.paypal.com/
- ยังคงลงชื่อเข้าใช้บัญชีของคุณ สร้างบัญชีแซนด์บ็อกซ์สองบัญชีที่ https://developer.paypal.com/developer/accounts/:
- ส่วนบุคคล (บัญชีผู้ซื้อ) – จะใช้ในการทดสอบการชำระเงินและการสมัครรับข้อมูลของคุณ
- ธุรกิจ (บัญชีผู้ขาย) – จะเชื่อมโยงกับแอปพลิเคชันซึ่งจะมีคีย์ API ที่เรากำลังมองหา นอกจากนั้น ธุรกรรมทั้งหมดสามารถติดตามได้ในบัญชีนี้
- สร้างแอปที่ https://developer.paypal.com/developer/applications โดยใช้บัญชีแซนด์บ็อกซ์ธุรกิจก่อนหน้า
- หลังจากขั้นตอนนี้ คุณจะได้รับสองคีย์สำหรับ PayPal:
Client IDและSecret - ใน
config/application.ymlให้แทนที่YOUR_CREDENTIAL_HEREจากPAYPAL_CLIENT_IDและPAYPAL_CLIENT_SECRETด้วยคีย์ที่คุณเพิ่งได้รับ
ขั้นตอนที่ 3: เริ่มต้นโมดูล PayPal
เช่นเดียวกับ Stripe นอกเหนือจากการแทนที่คีย์ใน application.yml เรายังต้องเริ่มต้นโมดูล PayPal เพื่อให้สามารถใช้คีย์ที่ตั้งค่าไว้แล้วในตัวแปร ENV ของเราได้ เพื่อจุดประสงค์นี้ ให้สร้างไฟล์ใน config/initializers/paypal.rb ด้วย:
PayPal::SDK.configure( mode: ENV['PAYPAL_ENV'], client_id: ENV['PAYPAL_CLIENT_ID'], client_secret: ENV['PAYPAL_CLIENT_SECRET'], ) PayPal::SDK.logger.level = Logger::INFOขั้นตอนที่ 4: รวม PayPal ในส่วนหน้า
ใน index.html.haml ให้เพิ่มสิ่งนี้ที่ด้านบนของไฟล์:
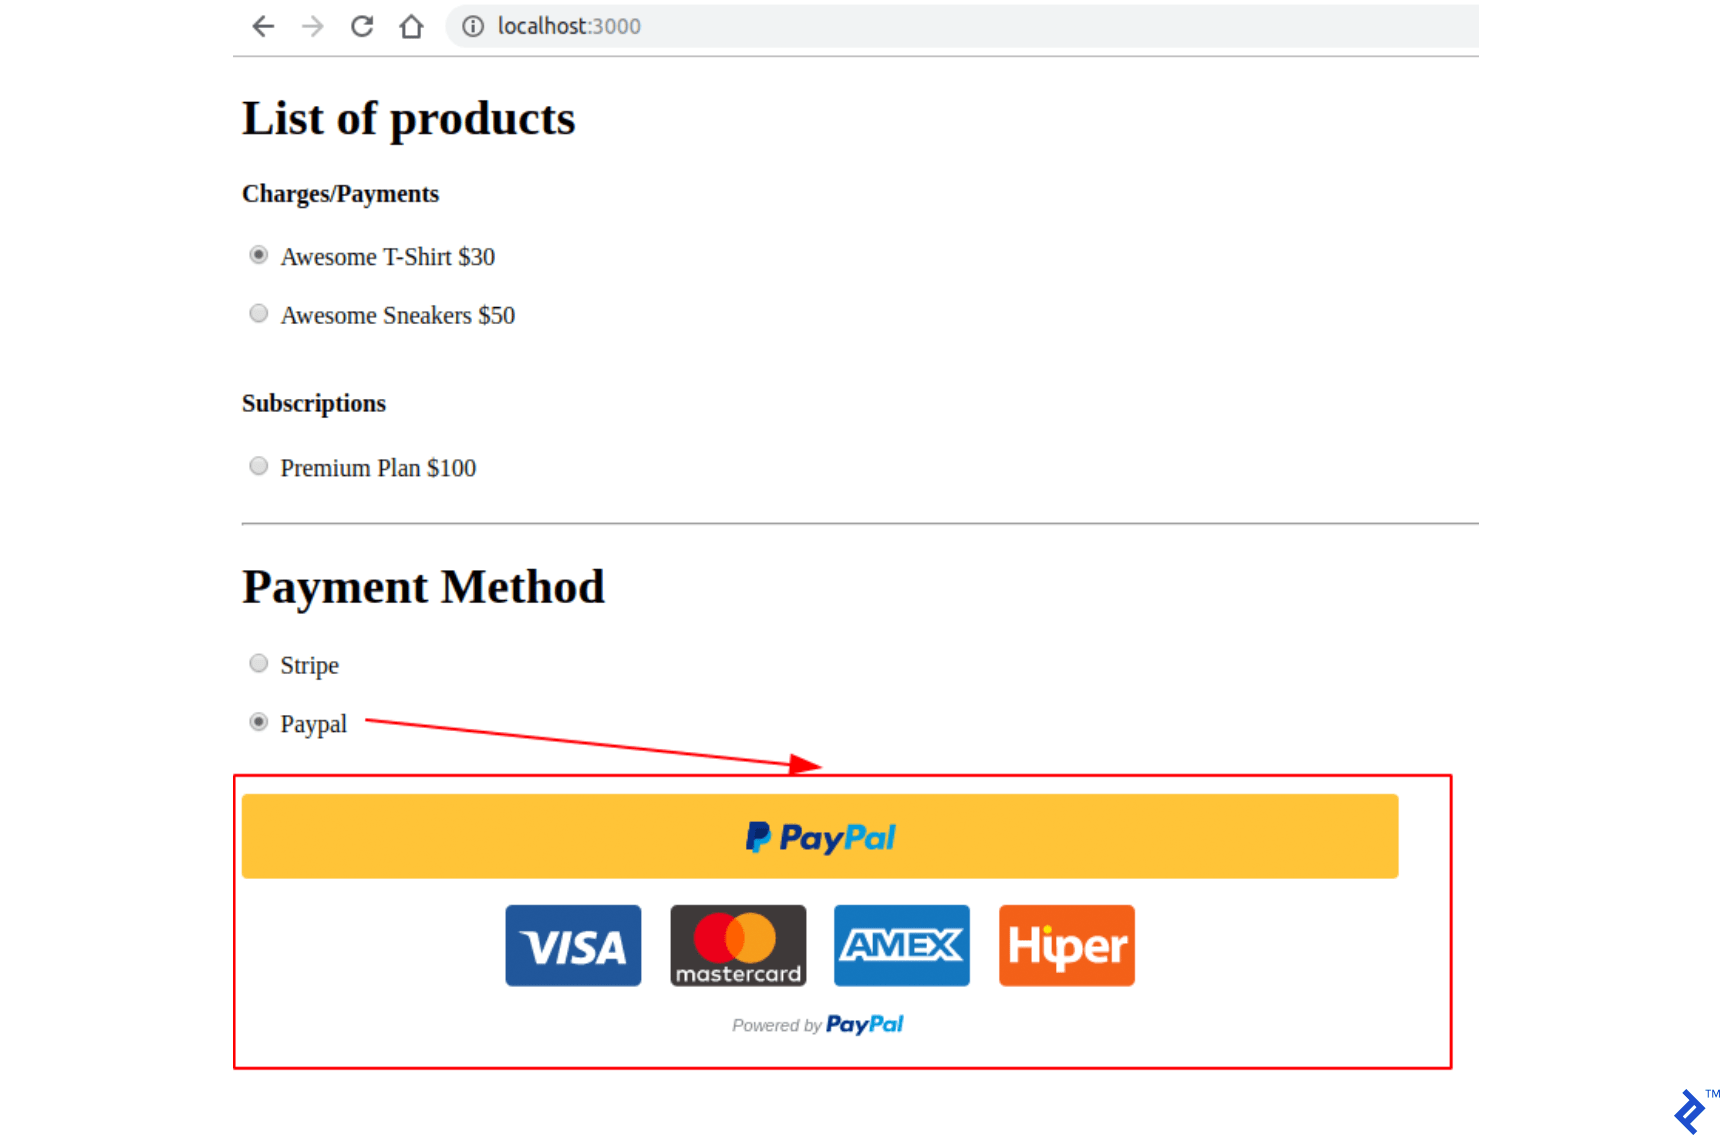
%script(src="https://www.paypal.com/sdk/js?client-id=#{ENV['PAYPAL_CLIENT_ID']}") ต่างจาก Stripe ตรงที่ PayPal ใช้เพียงปุ่มเดียว ซึ่งเมื่อคลิกแล้ว ป๊อปอัปจะเปิดขึ้นที่ปลอดภัย ซึ่งผู้ใช้สามารถเข้าสู่ระบบและดำเนินการชำระเงิน/สมัครสมาชิกได้ ปุ่มนี้สามารถแสดงผลได้โดยการเรียกวิธีการ paypal.Button(PARAM1).render(PARAM2)
-
PARAM1เป็นอ็อบเจ็กต์ที่มีการกำหนดค่าสภาพแวดล้อมและฟังก์ชันเรียกกลับสองฟังก์ชันเป็นคุณสมบัติ:createOrderและonApprove -
PARAM2ระบุตัวระบุองค์ประกอบ HTML ที่ควรแนบปุ่ม PayPal
ดังนั้น ยังคงอยู่ในไฟล์เดียวกัน แทนที่โค้ดความคิดเห็น รหัส YOUR PAYPAL CODE WILL BE HERE ด้วย:
(function setupPaypal() { function isPayment() { return $('[data-charges-and-payments-section] input[name="orders[product_id]"]:checked').length } function submitOrderPaypal(chargeID) { var $form = $("#order-details"); // Add a hidden input orders[charge_id] $form.append($('<input type="hidden" name="orders[charge_id]"/>').val(chargeID)); // Set order type $('#order-type').val('paypal'); $form.submit(); } paypal.Buttons({ env: "#{ENV['PAYPAL_ENV']}", createOrder: function() { }, onApprove: function(data) { } }).render('#submit-paypal'); }());ขั้นตอนที่ 5: ทดสอบใบสมัครของคุณ
เยี่ยมชมเพจของคุณและตรวจสอบว่าปุ่ม PayPal แสดงขึ้นหรือไม่เมื่อคุณเลือก PayPal เป็นวิธีการชำระเงิน
ธุรกรรม PayPal
ตรรกะสำหรับการทำธุรกรรมของ PayPal ซึ่งแตกต่างจาก Stripe นั้นซับซ้อนกว่าเล็กน้อยโดยเกี่ยวข้องกับคำขอที่มาจากส่วนหน้าถึงส่วนหลัง นั่นเป็นเหตุผลที่ส่วนนี้มีอยู่ ฉันจะอธิบายมากขึ้นหรือน้อยลง (โดยไม่มีรหัส) ว่าฟังก์ชันที่อธิบายไว้ใน createOrder และ onApprove จะถูกนำไปใช้อย่างไรและสิ่งที่คาดหวังในกระบวนการแบ็คเอนด์เช่นกัน
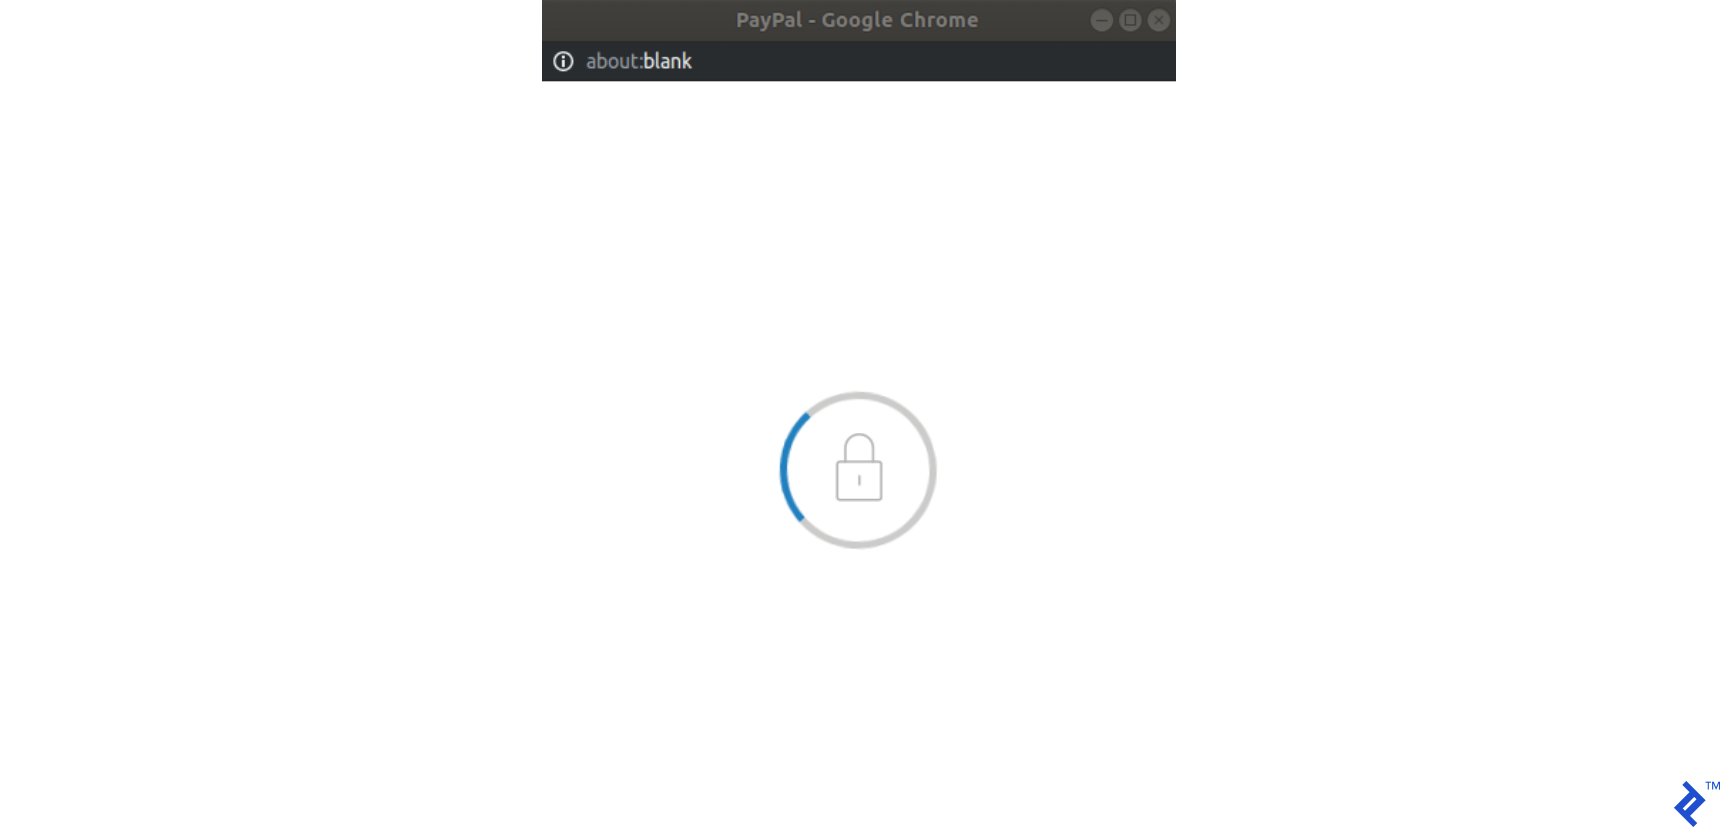
ขั้นตอนที่ 1: เมื่อผู้ใช้คลิกปุ่มส่ง PayPal ป๊อปอัป PayPal ที่ขอข้อมูลประจำตัวของผู้ใช้จะเปิดขึ้น แต่อยู่ในสถานะโหลด ฟังก์ชันเรียกกลับ createOrder ถูกเรียก
ขั้นตอนที่ 2: ในฟังก์ชันนี้ เราจะดำเนินการร้องขอไปยังส่วนหลังของเรา ซึ่งจะสร้างการชำระเงิน/การสมัครสมาชิก นี่เป็นจุดเริ่มต้นของธุรกรรม และจะไม่มีการคิดค่าธรรมเนียมใดๆ ดังนั้นธุรกรรมจึงอยู่ในสถานะ รอดำเนิน การ แบ็กเอนด์ของเราควรส่งคืนโทเค็นให้เรา ซึ่งจะถูกสร้างขึ้นโดยใช้โมดูล PayPal (จัดหาผ่าน paypal-rest-sdk gem)
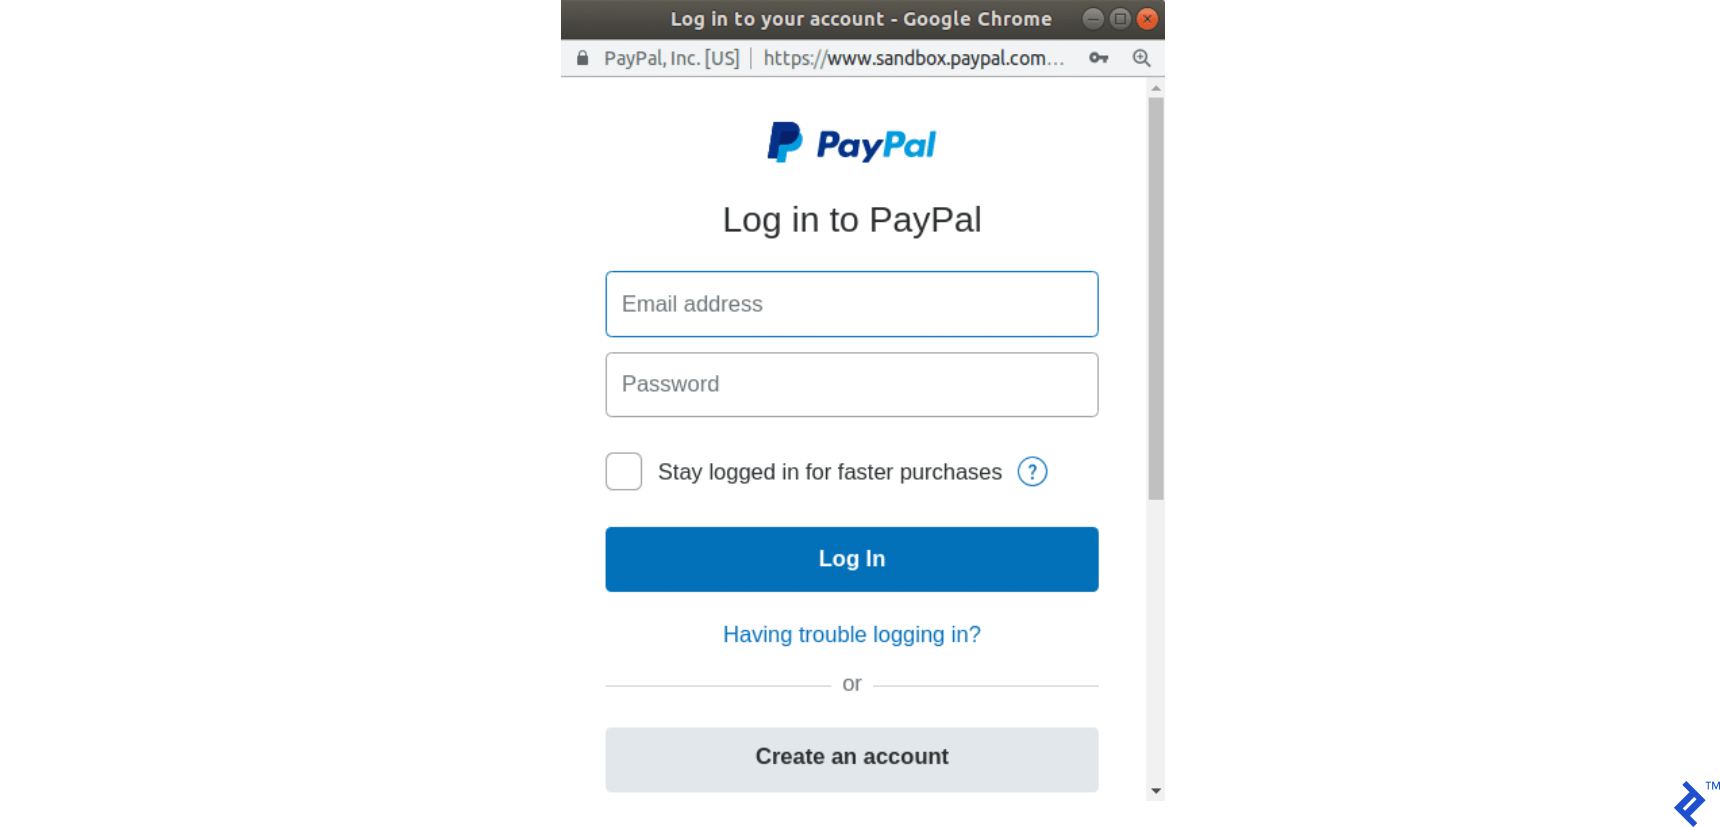
ขั้นตอนที่ 3: ยังอยู่ในการเรียกกลับ createOrder เราจะส่งคืนโทเค็นนี้ที่สร้างขึ้นในส่วนแบ็คเอนด์ของเรา และหากทุกอย่างเรียบร้อย ป๊อปอัป PayPal จะแสดงสิ่งต่อไปนี้โดยขอข้อมูลรับรองผู้ใช้:
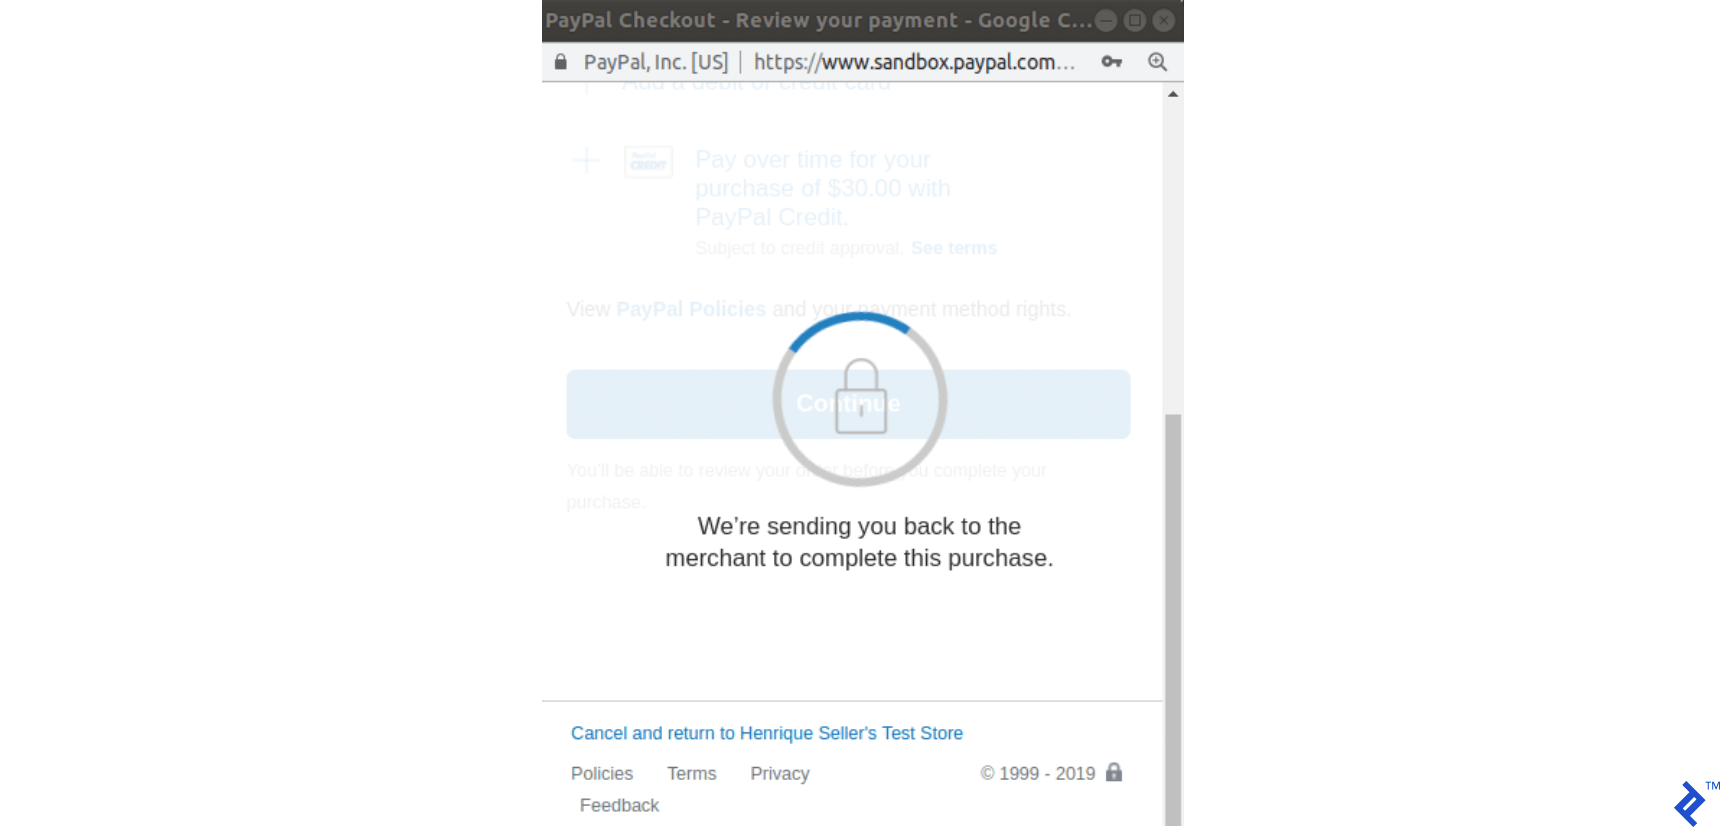
ขั้นตอนที่ 4: หลังจากที่ผู้ใช้เข้าสู่ระบบและเลือกวิธีการชำระเงินแล้ว ป๊อปอัปจะเปลี่ยนสถานะเป็นดังนี้:
ขั้นตอนที่ 5: ตอนนี้เรียกฟังก์ชันเรียกกลับของ onApprove เราได้กำหนดไว้ดังนี้: onApprove: function(data) วัตถุ data จะมีข้อมูลการชำระเงินเพื่อดำเนินการ ในการเรียกกลับนี้ คำขออื่นสำหรับฟังก์ชันแบ็คเอนด์ของเราจะดำเนินการในครั้งนี้ โดยส่งออบเจ็กต์ข้อมูลเพื่อดำเนินการตามคำสั่งของ PayPal
ขั้นตอนที่ 6: แบ็กเอนด์ของเราดำเนินการธุรกรรมนี้และส่งคืน 200 (หากสำเร็จ)
ขั้นตอนที่ 7: เมื่อส่วนหลังของเรากลับมา เราจะส่งแบบฟอร์ม นี่เป็นคำขอครั้งที่สามที่เราทำกับส่วนหลังของเรา
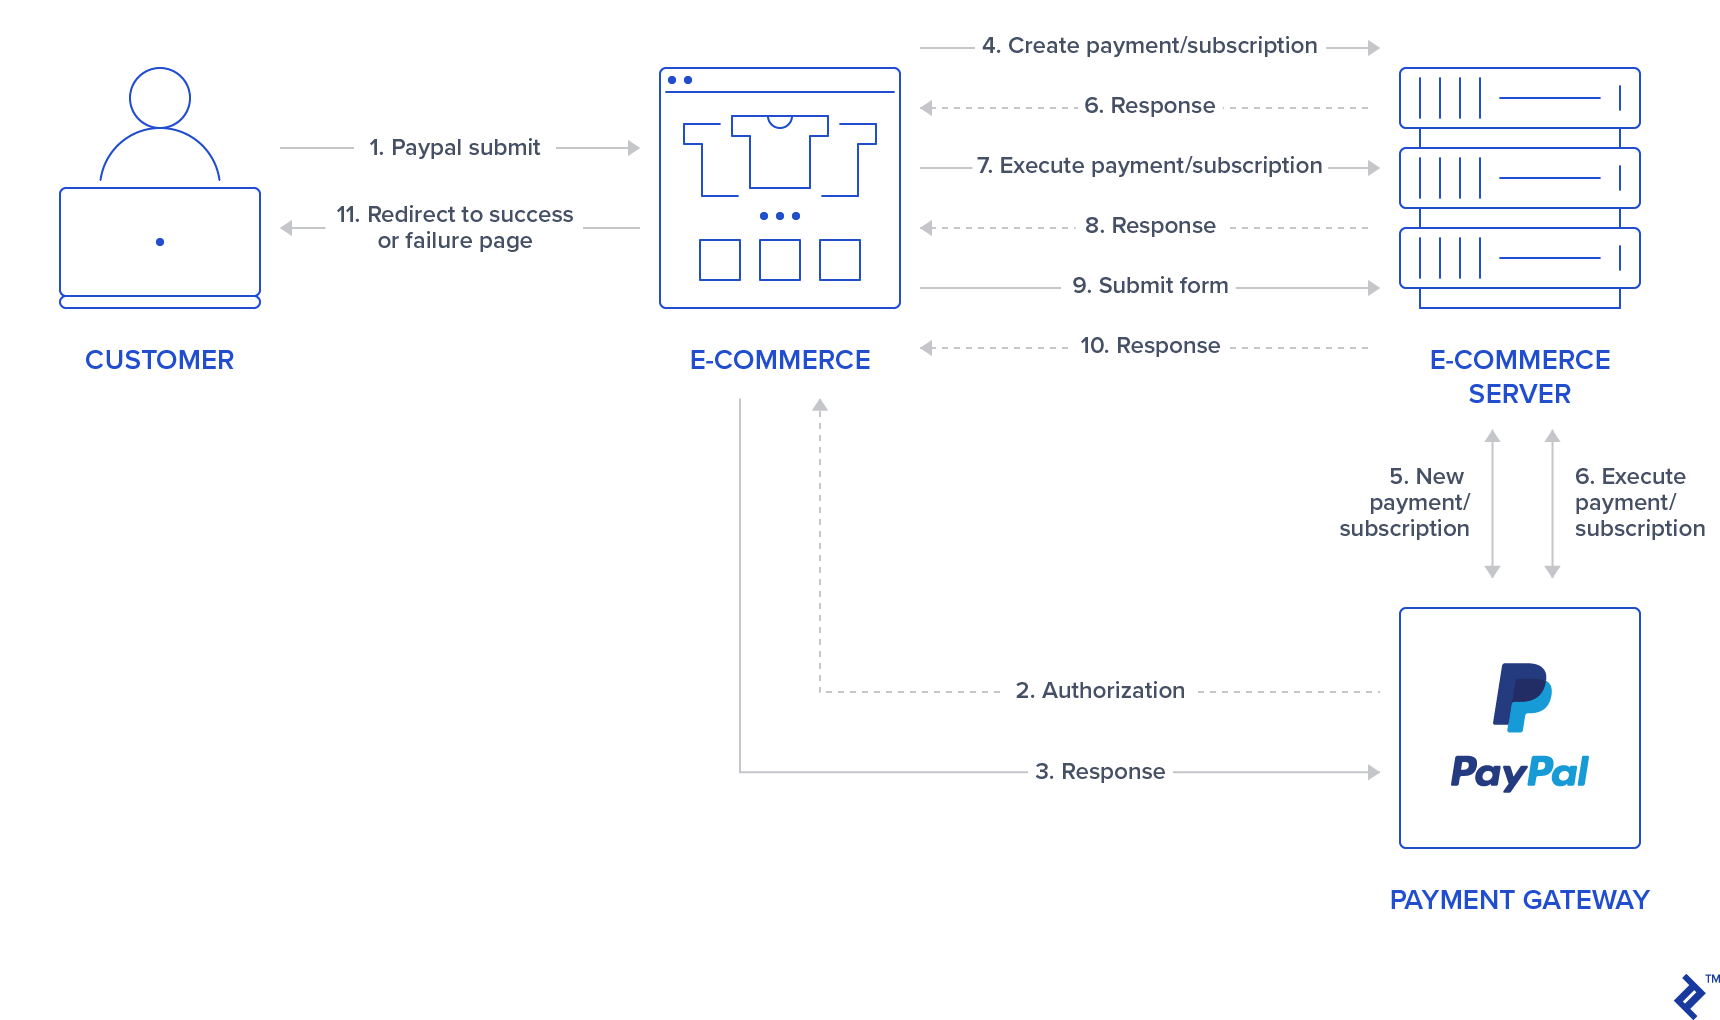
โปรดทราบว่าไม่เหมือนกับ Stripe มีคำขอสามรายการส่งไปยังแบ็กเอนด์ของเราในกระบวนการนี้ และเราจะรักษาสถานะบันทึกคำสั่งซื้อของเราให้ตรงกัน:
-
createOrdercallback: มีการสร้างธุรกรรมและบันทึกคำสั่งซื้อด้วย ดังนั้นจึงอยู่ในสถานะ รอดำเนิน การตามค่าเริ่มต้น -
onApprovecallback: ธุรกรรมถูกดำเนินการ และคำสั่งของเราจะถูกตั้งค่าเป็น paypal_executed - ส่งหน้าคำสั่งซื้อแล้ว: ธุรกรรมได้ดำเนินการไปแล้ว ดังนั้นจึงไม่มีอะไรเปลี่ยนแปลง บันทึกคำสั่งซื้อจะเปลี่ยนสถานะเป็น ชำระเงิน
กระบวนการทั้งหมดนี้อธิบายไว้ในกราฟต่อไปนี้:
การชำระเงินด้วย PayPal
การชำระเงินด้วย PayPal เป็นไปตามตรรกะเดียวกันกับ Stripe Charge ดังนั้นจึงแสดงธุรกรรมแบบครั้งเดียว แต่ดังที่กล่าวไว้ในส่วนก่อนหน้า การชำระเงินเหล่านี้มีตรรกะของโฟลว์ที่แตกต่างกัน การเปลี่ยนแปลงเหล่านี้จะต้องดำเนินการเพื่อจัดการกับการชำระเงินด้วย PayPal:
ขั้นตอนที่ 1: สร้างเส้นทางใหม่สำหรับ PayPal และดำเนินการชำระเงิน
Add the following routes in config/routes.rb :
post 'orders/paypal/create_payment' => 'orders#paypal_create_payment', as: :paypal_create_payment post 'orders/paypal/execute_payment' => 'orders#paypal_execute_payment', as: :paypal_execute_payment This will create two new routes for creating and executing payments which will be handled in the paypal_create_payment and paypal_execute_payment orders controller methods.
Step 2: Create the PayPal service.
Add the singleton class Orders::Paypal at: app/services/orders/paypal.rb .
This service will initially have three responsibilities:
- The
create_paymentmethod creates a payment by callingPayPal::SDK::REST::Payment.new. A token is generated and returned to the front-end. - The
execute_paymentmethod executes the payment by first finding the previous created payment object throughPayPal::SDK::REST::Payment.find(payment_id)which uses the payment_id as an argument which has the same value as the charge_id stored in the previous step in the order object. After that, we callexecutein the payment object with a given payer as the parameter. This payer is given by the front end after the user has provided credentials and selected a payment method in the popup. - The
finishmethod finds an order by a specific charge_id querying for recently created orders in the paypal_executed state. If a record is found, it is marked as paid.
class Orders::Paypal def self.finish(charge_id) order = Order.paypal_executed.recently_created.find_by(charge_id: charge_id) return nil if order.nil? order.set_paid order end def self.create_payment(order:, product:) payment_price = (product.price_cents/100.0).to_s currency = "USD" payment = PayPal::SDK::REST::Payment.new({ intent: "sale", payer: { payment_method: "paypal" }, redirect_urls: { return_url: "/", cancel_url: "/" }, transactions: [{ item_list: { items: [{ name: product.name, sku: product.name, price: payment_price, currency: currency, quantity: 1 } ] }, amount: { total: payment_price, currency: currency }, description: "Payment for: #{product.name}" }] }) if payment.create order.token = payment.token order.charge_id = payment.id return payment.token if order.save end end def self.execute_payment(payment_id:, payer_id:) order = Order.recently_created.find_by(charge_id: payment_id) return false unless order payment = PayPal::SDK::REST::Payment.find(payment_id) if payment.execute( payer_id: payer_id ) order.set_paypal_executed return order.save end endStep 3: Call the PayPal service in the controller in the submit action.
Add a callback for prepare_new_order before the action paypal_create_payment (which will be added in the next step) is requested by adding the following in the file app/controllers/orders_controller.rb :
class OrdersController < ApplicationController before_action :authenticate_user! before_action :prepare_new_order, only: [:paypal_create_payment] ... Again, in the same file, call PayPal service in the submit action by replacing the commented code #PAYPAL WILL BE HANDLED HERE. ด้วยสิ่งต่อไปนี้:
... elsif order_params[:payment_gateway] == "paypal" @order = Orders::Paypal.finish(order_params[:token]) end ...Step 4: Create the actions for handling requests.
Still, in the app/controllers/orders_controller.rb file, create two new actions (which should be public) for handling requests to paypal_create_payment and paypal_execute_payment routes:
- The
paypal_create_paymentmethod: Will call our service methodcreate_payment. If that returns successfully, it will return the order token created byOrders::Paypal.create_payment. - The
paypal_execute_paymentmethod: Will call our service methodexecute_payment(which executes our payments). If the payment is performed successfully, it returns 200.
... def paypal_create_payment result = Orders::Paypal.create_payment(order: @order, product: @product) if result render json: { token: result }, status: :ok else render json: {error: FAILURE_MESSAGE}, status: :unprocessable_entity end end def paypal_execute_payment if Orders::Paypal.execute_payment(payment_id: params[:paymentID], payer_id: params[:payerID]) render json: {}, status: :ok else render json: {error: FAILURE_MESSAGE}, status: :unprocessable_entity end end ... Step 5: Implement the front-end callback functions for createOrder and onApprove .
Make your paypal.Button.render call look like this:
paypal.Buttons({ env: "#{ENV['PAYPAL_ENV']}", createOrder: function() { $('#order-type').val("paypal"); if (isPayment()) { return $.post("#{paypal_create_payment_url}", $('#order-details').serialize()).then(function(data) { return data.token; }); } else { } }, onApprove: function(data) { if (isPayment()) { return $.post("#{paypal_execute_payment_url}", { paymentID: data.paymentID, payerID: data.payerID }).then(function() { submitOrderPaypal(data.paymentID) }); } else { } } }).render('#submit-paypal'); As mentioned in the previous section, we call paypal_create_payment_url for the createOrder callback and paypal_execute_payment_url for the onApprove callback. Notice that if the last request returns success, we submit the order, which is the third request made to the server.
In the createOrder function handler, we return a token (obtained from the back end). In the onApprove callback, we have two properties passed down to our back-end paymentID and payerID . These will be used in order to execute the payment.
Finally, notice that we have two empty else clauses as I'm leaving room for the next section where we will be adding PayPal subscriptions.
If you visit your page after integrating the front-end JavaScript section and select PayPal as the payment method, it should look like the following:
Step 6: Test your application.
- ไปที่หน้าดัชนี
- เลือกผลิตภัณฑ์การชำระเงิน/เรียกเก็บเงิน และ PayPal เป็นวิธีการชำระเงิน
- คลิกที่ปุ่มส่ง PayPal
- ในป๊อปอัป PayPal:
- ใช้ข้อมูลประจำตัวสำหรับบัญชีผู้ซื้อที่คุณสร้างขึ้น
- เข้าสู่ระบบและยืนยันการสั่งซื้อของคุณ
- ป๊อปอัปควรปิด
- ตรวจสอบว่าคุณถูกเปลี่ยนเส้นทางไปยังหน้าความสำเร็จหรือไม่
- สุดท้าย ตรวจสอบว่ามีการสั่งซื้อในบัญชี PayPal หรือไม่ โดยลงชื่อเข้าใช้ด้วยบัญชีธุรกิจของคุณที่ https://www.sandbox.paypal.com/signin และตรวจสอบแดชบอร์ด https://www.sandbox.paypal.com/listing /ธุรกรรม.
สมัครสมาชิก PayPal
แผน/ข้อตกลง/การสมัครรับข้อมูลของ PayPal เป็นไปตามตรรกะเดียวกับการสมัครสมาชิก Stripe และสร้างขึ้นสำหรับการชำระเงินแบบประจำ ด้วยผลิตภัณฑ์ประเภทนี้ ผู้ใช้จะถูกเรียกเก็บเงินรายวัน รายสัปดาห์ รายเดือน หรือรายปีโดยอัตโนมัติตามการกำหนดค่า
เราจะใช้ฟิลด์สำหรับผลิตภัณฑ์ paypal_plan_name เพื่อจัดเก็บ ID แผนให้บริการโดย PayPal ในกรณีนี้ เราไม่เลือก ID ต่างจาก Stripe และ PayPal คืนค่าที่จะใช้ในการอัปเดตผลิตภัณฑ์ล่าสุดที่สร้างในฐานข้อมูลของเรา
สำหรับการสร้างการสมัครรับข้อมูล ไม่จำเป็นต้องมีข้อมูล customer ในขั้นตอนใดๆ เนื่องจากวิธีการ onApprove อาจจัดการกับการเชื่อมโยงนี้ในการใช้งานพื้นฐาน ดังนั้นตารางของเราจะยังคงเหมือนเดิม
ขั้นตอนที่ 1: สร้างแผนโดยใช้ PayPal API
เปิดคอนโซลของคุณโดยใช้ rails c สร้างการสมัครสำหรับบัญชี PayPal ของคุณด้วย:
plan = PayPal::SDK::REST::Plan.new({ name: 'Premium Plan', description: 'Premium Plan', type: 'fixed', payment_definitions: [{ name: 'Premium Plan', type: 'REGULAR', frequency_interval: '1', frequency: 'MONTH', cycles: '12', amount: { currency: 'USD', value: '100.00' } }], merchant_preferences: { cancel_url: 'http://localhost:3000/', return_url: 'http://localhost:3000/', max_fail_attempts: '0', auto_bill_amount: 'YES', initial_fail_amount_action: 'CONTINUE' } }) plan.create plan_update = { op: 'replace', path: '/', value: { state: 'ACTIVE' } } plan.update(plan_update) ขั้นตอนที่ 2: อัพเดตผลิตภัณฑ์สุดท้ายในฐานข้อมูล paypal_plan_name ด้วย plan.id ที่ส่งคืน
วิ่ง:
Product.last.update(paypal_plan_name: plan.id)ขั้นตอนที่ 3: เพิ่มเส้นทางสำหรับการสมัครสมาชิก PayPal
เพิ่มสองเส้นทางใหม่ใน config/routes.rb :
post 'orders/paypal/create_subscription' => 'orders#paypal_create_subscription', as: :paypal_create_subscription post 'orders/paypal/execute_subscription' => 'orders#paypal_execute_subscription', as: :paypal_execute_subscriptionขั้นตอนที่ 4: จัดการการสร้างและดำเนินการในบริการ PayPal
เพิ่มสองฟังก์ชันเพิ่มเติมสำหรับการสร้างและดำเนินการสมัครรับข้อมูลใน Orders::Paypal of app/services/orders/paypal.rb :
def self.create_subscription(order:, product:) agreement = PayPal::SDK::REST::Agreement.new({ name: product.name, description: "Subscription for: #{product.name}", start_date: (Time.now.utc + 1.minute).iso8601, payer: { payment_method: "paypal" }, plan: { id: product.paypal_plan_name } }) if agreement.create order.token = agreement.token return agreement.token if order.save end end def self.execute_subscription(token:) order = Order.recently_created.find_by(token: token) return false unless order agreement = PayPal::SDK::REST::Agreement.new agreement.token = token if agreement.execute order.charge_id = agreement.id order.set_paypal_executed return order.charge_id if order.save end end ใน create_subscription เราเริ่มต้นข้อตกลงโดยเรียกเมธอด PayPal::SDK::REST::Agreement.new และส่ง product.paypal_plan_name เป็นหนึ่งในแอตทริบิวต์ หลังจากนั้น เราสร้างมันขึ้นมา และตอนนี้โทเค็นจะถูกตั้งค่าสำหรับวัตถุสุดท้ายนี้ เรายังส่งคืนโทเค็นไปที่ส่วนหน้า
ใน execute_subscription เราพบบันทึก order ที่สร้างขึ้นในการเรียกครั้งก่อน หลังจากนั้น เราเริ่มต้นข้อตกลงใหม่ เราตั้งค่าโทเค็นของวัตถุก่อนหน้านี้และดำเนินการตามนั้น หากขั้นตอนสุดท้ายนี้ดำเนินการสำเร็จ สถานะคำสั่งซื้อจะถูกตั้งค่าเป็น paypal_executed และตอนนี้เรากลับไปที่ส่วนหน้าของรหัสข้อตกลงซึ่งถูกเก็บไว้ใน order.chager_id
ขั้นตอนที่ 5: เพิ่มการดำเนินการสำหรับการสร้างและดำเนินการสมัครรับข้อมูลใน orders_controller
เปลี่ยน app/controllers/orders_controller.rb ที่ด้านบนสุดของคลาส ประการแรก แล้วอัปเดตการเรียกกลับ prepare_new_order เพื่อให้ดำเนินการก่อนที่จะเรียก paypal_create_subscription :
class OrdersController < ApplicationController before_action :authenticate_user! before_action :prepare_new_order, only: [:paypal_create_payment, :paypal_create_subscription] นอกจากนี้ ในไฟล์เดียวกัน ให้เพิ่มฟังก์ชันสาธารณะสองฟังก์ชันเพื่อเรียกบริการ Orders::Paypal ที่มีขั้นตอนการทำงานที่คล้ายคลึงกันดังที่เรามีในการชำระเงินด้วย PayPal:
... def paypal_create_subscription result = Orders::Paypal.create_subscription(order: @order, product: @product) if result render json: { token: result }, status: :ok else render json: {error: FAILURE_MESSAGE}, status: :unprocessable_entity end end def paypal_execute_subscription result = Orders::Paypal.execute_subscription(token: params[:subscriptionToken]) if result render json: { id: result}, status: :ok else render json: {error: FAILURE_MESSAGE}, status: :unprocessable_entity end end ... ขั้นตอนที่ 6: การเพิ่มตัวจัดการการสมัครรับข้อมูลสำหรับ createOrder และ onApprove callbacks ในส่วนหน้า
ในที่สุด ใน index.html.haml ให้แทนที่ฟังก์ชัน paypal.Buttons ด้วย else ต่อไปนี้ ซึ่งจะเติมช่องว่างสองอันที่เรามีก่อนหน้านี้:
paypal.Buttons({ env: "#{ENV['PAYPAL_ENV']}", createOrder: function() { $('#order-type').val("paypal"); if (isPayment()) { return $.post("#{paypal_create_payment_url}", $('#order-details').serialize()).then(function(data) { return data.token; }); } else { return $.post("#{paypal_create_subscription_url}", $('#order-details').serialize()).then(function(data) { return data.token; }); } }, onApprove: function(data) { if (isPayment()) { return $.post("#{paypal_execute_payment_url}", { paymentID: data.paymentID, payerID: data.payerID }).then(function() { submitOrderPaypal(data.paymentID) }); } else { return $.post("#{paypal_execute_subscription_url}", { subscriptionToken: data.orderID }).then(function(executeData) { submitOrderPaypal(executeData.id) }); } } }).render('#submit-paypal'); การสร้างและการดำเนินการสำหรับการสมัครรับข้อมูลมีตรรกะคล้ายกับที่ใช้สำหรับการชำระเงิน ข้อแตกต่างประการหนึ่งคือเมื่อดำเนินการชำระเงิน ข้อมูลจากฟังก์ชันเรียกกลับ onApprove มีรหัสการชำระเงินที่แสดงถึง paymentID อยู่ charge_id เพื่อส่งแบบฟอร์มผ่าน submitOrderPaypal(data.paymentID) สำหรับการสมัครสมาชิก เราได้รับ charge_id หลังจากดำเนินการโดยขอ POST บน paypal_execute_subscription_url เท่านั้น ดังนั้นเราจึงสามารถเรียก submitOrderPaypal(executeData.id)
ขั้นตอนที่ 7: ทดสอบใบสมัครของคุณ
- ไปที่หน้าดัชนี
- เลือกผลิตภัณฑ์สมัครสมาชิกและ PayPal เป็นวิธีการชำระเงิน
- คลิกที่ปุ่มส่ง PayPal
- ในป๊อปอัป PayPal:
- ใช้ข้อมูลประจำตัวสำหรับบัญชีผู้ซื้อที่คุณสร้างขึ้น
- เข้าสู่ระบบและยืนยันการสั่งซื้อของคุณ
- ป๊อปอัปควรปิด
- ตรวจสอบว่าคุณถูกเปลี่ยนเส้นทางไปยังหน้าความสำเร็จหรือไม่
- สุดท้าย ให้ตรวจสอบว่าคำสั่งซื้อดำเนินการในบัญชี PayPal หรือไม่ โดยลงชื่อเข้าใช้ด้วยบัญชีธุรกิจของคุณที่ https://www.sandbox.paypal.com/signin และตรวจสอบแดชบอร์ด https://www.sandbox.paypal.com/listing/ การทำธุรกรรม
บทสรุป
หลังจากอ่านบทความนี้แล้ว คุณควรจะสามารถรวมการชำระเงิน/ค่าใช้จ่ายตลอดจนธุรกรรมการสมัครรับข้อมูลสำหรับ PayPal และ Stripe ในแอปพลิเคชัน Rails ของคุณได้ มีจุดที่สามารถปรับปรุงได้มากมายซึ่งฉันไม่ได้เพิ่มในบทความนี้เพื่อความกระชับ ฉันจัดระเบียบทุกอย่างตามสมมติฐานของความยากลำบาก:
- ง่ายขึ้น:
- ใช้ Transport Layer Security (TLS) เพื่อให้คำขอของคุณใช้ HTTPS
- ใช้การกำหนดค่าสภาพแวดล้อมการผลิตสำหรับทั้ง PayPal และ Stripe
- เพิ่มหน้าใหม่เพื่อให้ผู้ใช้สามารถเข้าถึงประวัติการสั่งซื้อก่อนหน้า
- ปานกลาง:
- คืนเงินหรือยกเลิกการสมัครสมาชิก
- จัดเตรียมโซลูชันสำหรับการชำระเงินของผู้ใช้ที่ไม่ได้ลงทะเบียน
- ยากขึ้น:
- จัดเตรียมวิธีการลบบัญชีและเก็บ โทเค็น และรหัส ลูกค้า ไว้ หากผู้ใช้ต้องการกลับมา แต่หลังจากผ่านไประยะหนึ่ง ให้นำข้อมูลนี้ออกเพื่อให้แอปพลิเคชันของคุณสอดคล้องกับ PCI มากขึ้น
- ย้ายไปที่ API ของ PayPal เวอร์ชัน 2 ในฝั่งเซิร์ฟเวอร์ (https://developer.paypal.com/docs/api/payments/v2/) อัญมณีที่เราใช้ในบทช่วยสอนนี้ paypal-sdk-rest มีเฉพาะรุ่นเบต้าสำหรับเวอร์ชัน 2 เพื่อจะได้ใช้อย่างระมัดระวัง (https://github.com/paypal/PayPal-Ruby-SDK/tree/2.0-beta)
- รวมคำขอ idempotent
- แถบ: https://stripe.com/docs/api/idempotent_requests
- เพย์พาล: https://developer.paypal.com/docs/api-basics/#api-idempotency
ฉันยังแนะนำให้อ่านเกี่ยวกับองค์ประกอบ Stripe Checkout ซึ่งเป็นอีกวิธีหนึ่งในการรวม Stripe ที่ส่วนหน้า ต่างจาก Stripe Elements ที่เราใช้ในบทช่วยสอนนี้ Stripe Checkout จะเปิดป๊อปอัปหลังจากคลิกปุ่ม (คล้ายกับ PayPal) ซึ่งผู้ใช้กรอกข้อมูลบัตรเครดิต หรือเลือกชำระเงินด้วย Google Pay/Apple Pay https://stripe.com /docs/เว็บ.
คำแนะนำการอ่านครั้งที่สองคือหน้าความปลอดภัยสำหรับเกตเวย์การชำระเงินทั้งสอง
- สำหรับลาย
- สำหรับ PayPal
สุดท้ายนี้ ขอขอบคุณที่อ่านบทความนี้! คุณยังสามารถตรวจสอบโปรเจ็กต์ GitHub ของฉันที่ใช้สำหรับตัวอย่างโปรเจ็กต์นี้ ฉันได้เพิ่มการทดสอบ rspec ด้วยในขณะพัฒนา