
Como configurar o Amazon AWS CLI (Interface de linha de comando) no MacOS ou Linux?
Publicados: 2019-05-11
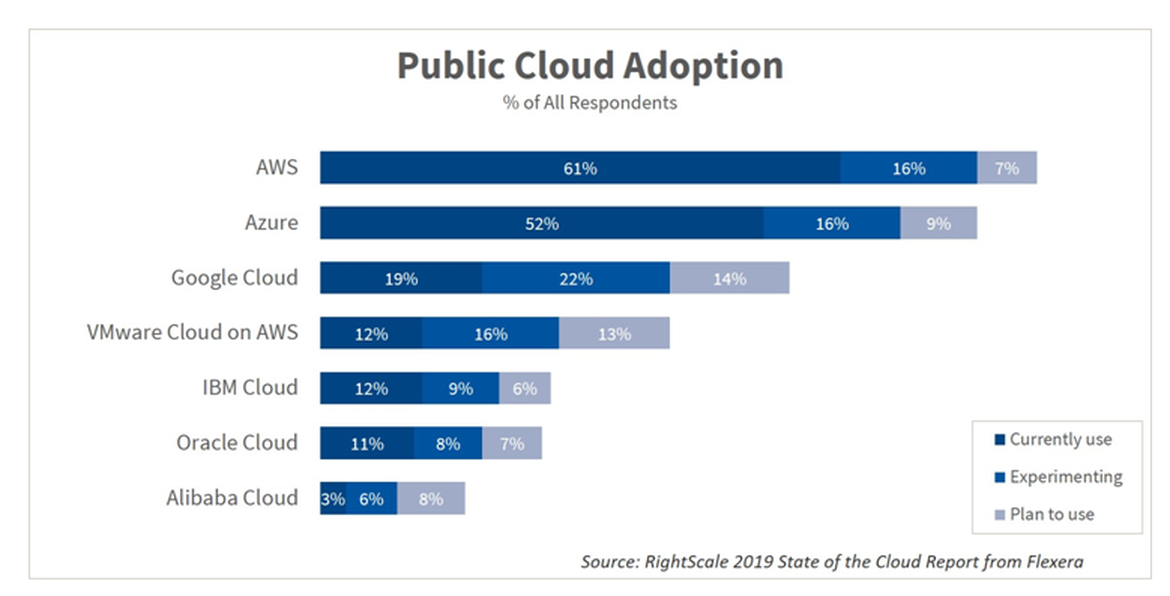
Não há dúvida de que a Amazon AWS é o maior provedor de nuvem pública do mercado. Eu pessoalmente comecei a jogar com a Amazon AWS para alguns clientes do Crunchify e devo dizer que a AWS é muito flexível.
Eu uso meu Macbook Pro para todas as minhas atividades de desenvolvimento. Se você decidir usar a nuvem Amazon AWS para seu projeto, a primeira coisa que você precisa é instalar o Amazon CLI (Command Line Interface) para começar a automatizar suas operações básicas do Amazon AWS.
Neste tutorial, veremos as etapas para instalar o Amazon CLI no macOS.
Se você tem alguma das perguntas abaixo, então você está no lugar certo:
- Instale amazon AWS cli no mac
- Conceitos básicos da AWS CLI – AWS Command Line Interface
- Instalar, atualizar e desinstalar a AWS CLI versão 1 ou 2 no macOS
- Interface de linha de comando da AWS – Amazon AWS
- Como instalar a AWS CLI no Macbook Pro?
- macOS instala a ferramenta de interface de linha de comando (CLI) da Amazon AWS
Vamos começar:
Há duas maneiras de configurar a Amazon AWS CLI no MacOS.
- Opção-1: Usando o comando
curl - Opção-2: Usando o comando
pipsimples do Python
Opção-1: Usando o comando curl
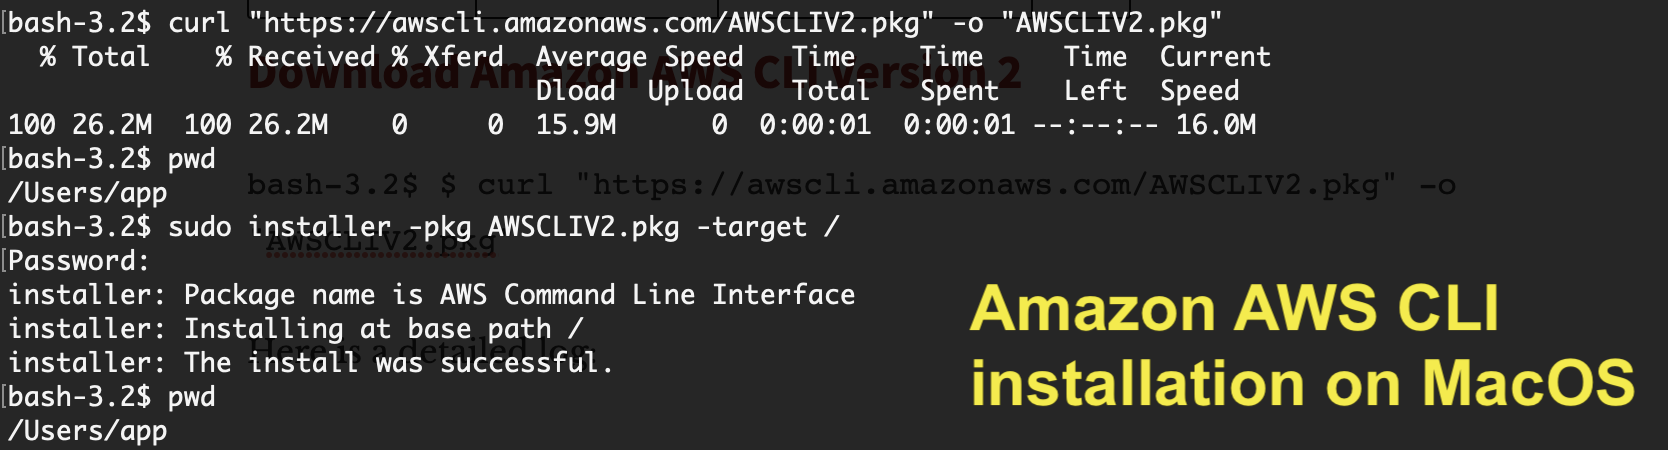
Baixar Amazon AWS CLI versão 2
|
1 |
bash - 3.2 $ $ curl "https://awscli.amazonaws.com/AWSCLIV2.pkg" - o "AWSCLIV2.pkg" |
Aqui está um registro detalhado:
|
1 2 3 4 5 6 |
bash - 3.2 $ $ curl "https://awscli.amazonaws.com/AWSCLIV2.pkg" - o "AWSCLIV2.pkg" bash : $ : command not found bash - 3.2 $ curl "https://awscli.amazonaws.com/AWSCLIV2.pkg" - o "AWSCLIV2.pkg" % Total % Received % Xferd Average Speed Time Time Time Current Dload Upload Total Spent Left Speed 100 26.2M 100 26.2M 0 0 15.9M 0 0 : 00 : 01 0 : 00 : 01 -- : -- : -- 16.0M |
Aqui está um comando para instalá-lo na pasta /
|
1 2 3 4 5 6 7 |
bash - 3.2 $ sudo installer - pkg AWSCLIV2 . pkg - target / Password : installer : Package name is AWS Command Line Interface installer : Installing at base path / installer : The install was successful . |
Verifique a versão da Amazon AWS:
|
1 2 3 |
bash - 3.2 $ aws -- version aws - cli / 2.4.16 Python / 3.8.8 Darwin / 21.4.0 exe / x86_64 prompt / off |
Essa é a maneira mais simples de instalar a Amazon AWS CLI no MacOS. Deixe-me saber se você enfrentar qualquer problema ao instalá-lo.
Opção-2: usando o comando pip do Python
Passo 1.
Verifique se você tem o python instalado em seu sistema.
|
1 2 |
bash - 3.2 $ python -- version Python 3.7.2 |
Se você não vir a versão mais recente do Python, basta instalar usando o comando abaixo:
|
1 |
bash - 3.2 $ brew install python |
Passo 2.
Faça download do pacote mais recente da Amazon AWS CLI.
|
1 2 3 4 |
bash - 3.2 $ curl "https://s3.amazonaws.com/aws-cli/awscli-bundle.zip" - o "awscli-bundle.zip" % Total % Received % Xferd Average Speed Time Time Time Current Dload Upload Total Spent Left Speed 100 11.1M 100 11.1M 0 0 5598k 0 0 : 00 : 02 0 : 00 : 02 -- : -- : -- 5600k |
Etapa 3.
Descompacte awscli-bundle.zip .
|
1 2 3 4 5 6 7 8 9 10 11 12 13 14 15 16 17 18 19 20 21 22 23 24 |
bash - 3.2 $ unzip awscli - bundle . zip Archive : awscli - bundle . zip replace awscli - bundle / install ? [ y ] es , [ n ] o , [ A ] ll , [ N ] one , [ r ] ename : A inflating : awscli - bundle / install inflating : awscli - bundle / packages / botocore - 1.12.145.tar.gz inflating : awscli - bundle / packages / futures - 3.2.0.tar.gz inflating : awscli - bundle / packages / docutils - 0.14.tar.gz inflating : awscli - bundle / packages / virtualenv - 15.1.0.tar.gz inflating : awscli - bundle / packages / urllib3 - 1.22.tar.gz inflating : awscli - bundle / packages / rsa - 3.4.2.tar.gz inflating : awscli - bundle / packages / urllib3 - 1.24.3.tar.gz inflating : awscli - bundle / packages / ordereddict - 1.1.tar.gz inflating : awscli - bundle / packages / simplejson - 3.3.0.tar.gz inflating : awscli - bundle / packages / s3transfer - 0.2.0.tar.gz inflating : awscli - bundle / packages / python - dateutil - 2.6.1.tar.gz inflating : awscli - bundle / packages / jmespath - 0.9.4.tar.gz inflating : awscli - bundle / packages / PyYAML - 3.13.tar.gz inflating : awscli - bundle / packages / argparse - 1.2.1.tar.gz inflating : awscli - bundle / packages / pyasn1 - 0.4.5.tar.gz inflating : awscli - bundle / packages / colorama - 0.3.9.tar.gz inflating : awscli - bundle / packages / python - dateutil - 2.8.0.tar.gz inflating : awscli - bundle / packages / awscli - 1.16.155.tar.gz inflating : awscli - bundle / packages / six - 1.12.0.tar.gz inflating : awscli - bundle / packages / setup / setuptools_scm - 1.15.7.tar.gz |
Passo 4.
Execute o instalador como um sudoer .
|
1 2 3 4 5 6 7 8 |
bash - 3.2 $ sudo . / awscli - bundle / install - i / usr / local / aws - b / usr / local / bin / aws Password : Running cmd : / usr / bin / python virtualenv . py -- no - download -- python / usr / bin / python / usr / local / aws Running cmd : / usr / local / aws / bin / pip install -- no - cache - dir -- no - index -- find - links file : ///Users/crunchify/Documents/ansible/awscli-bundle/packages/setup setuptools_scm-1.15.7.tar.gz Running cmd : / usr / local / aws / bin / pip install -- no - cache - dir -- no - index -- find - links file : ///Users/crunchify/Documents/ansible/awscli-bundle/packages awscli-1.16.155.tar.gz Symlink already exists : / usr / local / bin / aws Removing symlink . You can now run : / usr / local / bin / aws -- version |
Passo-5.
Verificar. Como verificar se o Amazon CLI foi instalado com sucesso?
|
1 2 |
bash - 3.2 $ aws -- version aws - cli / 1.16.155 Python / 2.7.10 Darwin / 18.5.0 botocore / 1.12.145 |
É isso. Estás pronto. Amazon CLI is successfully installed now .
Configure o Amazon AWS Console e AWS CLI:
- Acesse:
https://console.aws.amazon.com/iam/home?#/users - Criar usuário
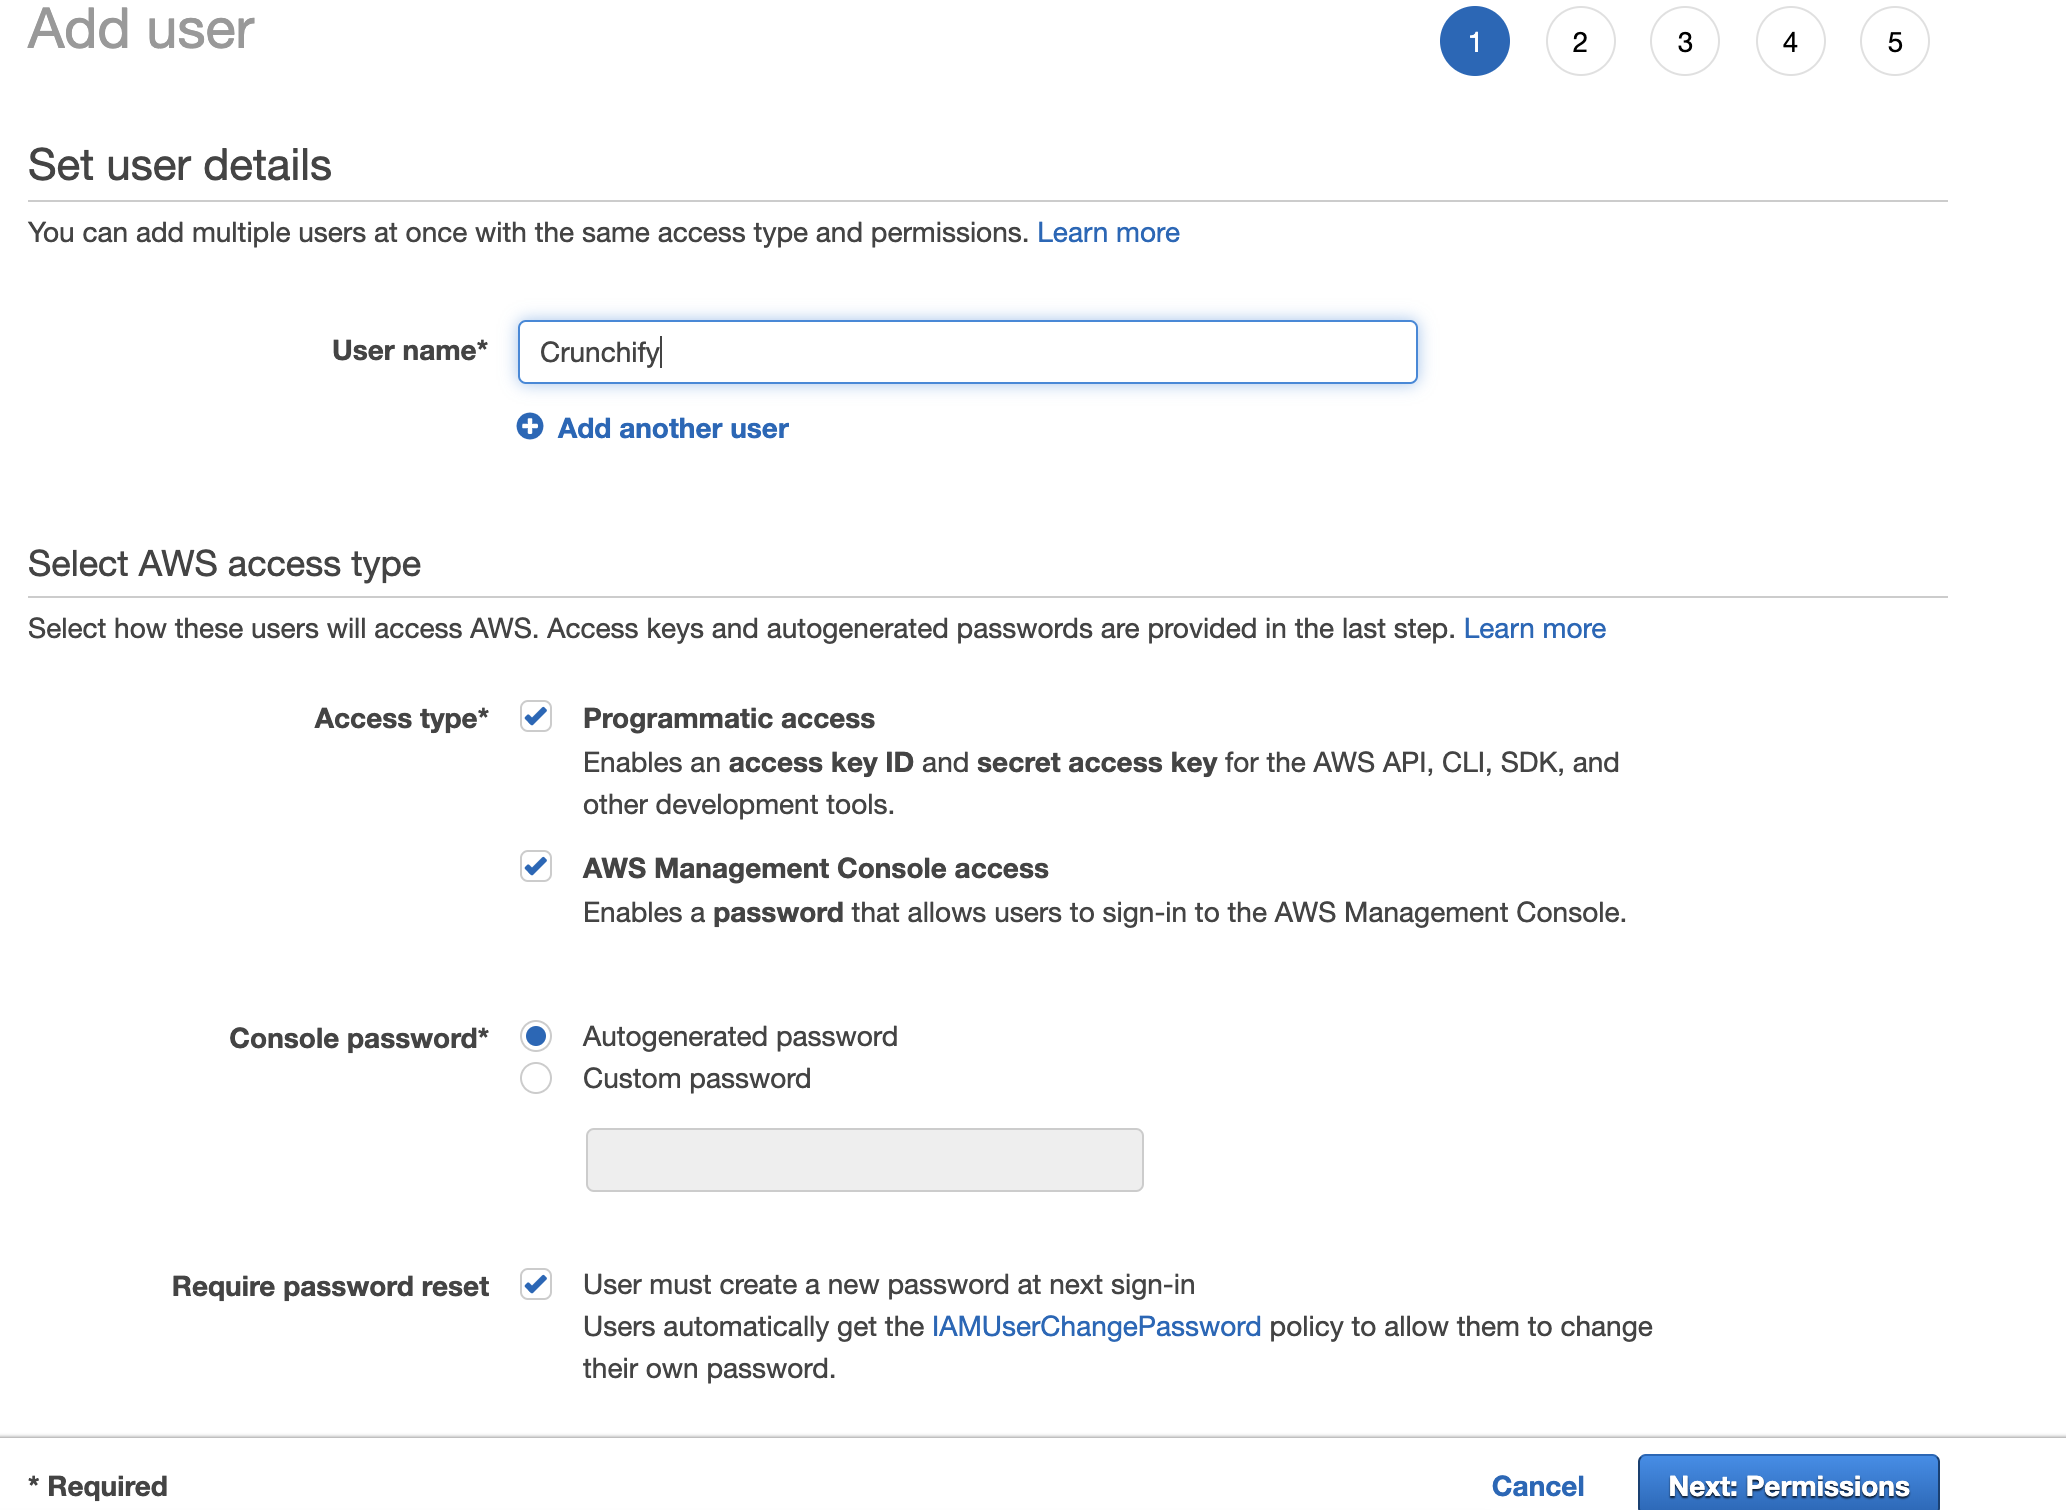
Definir permissões
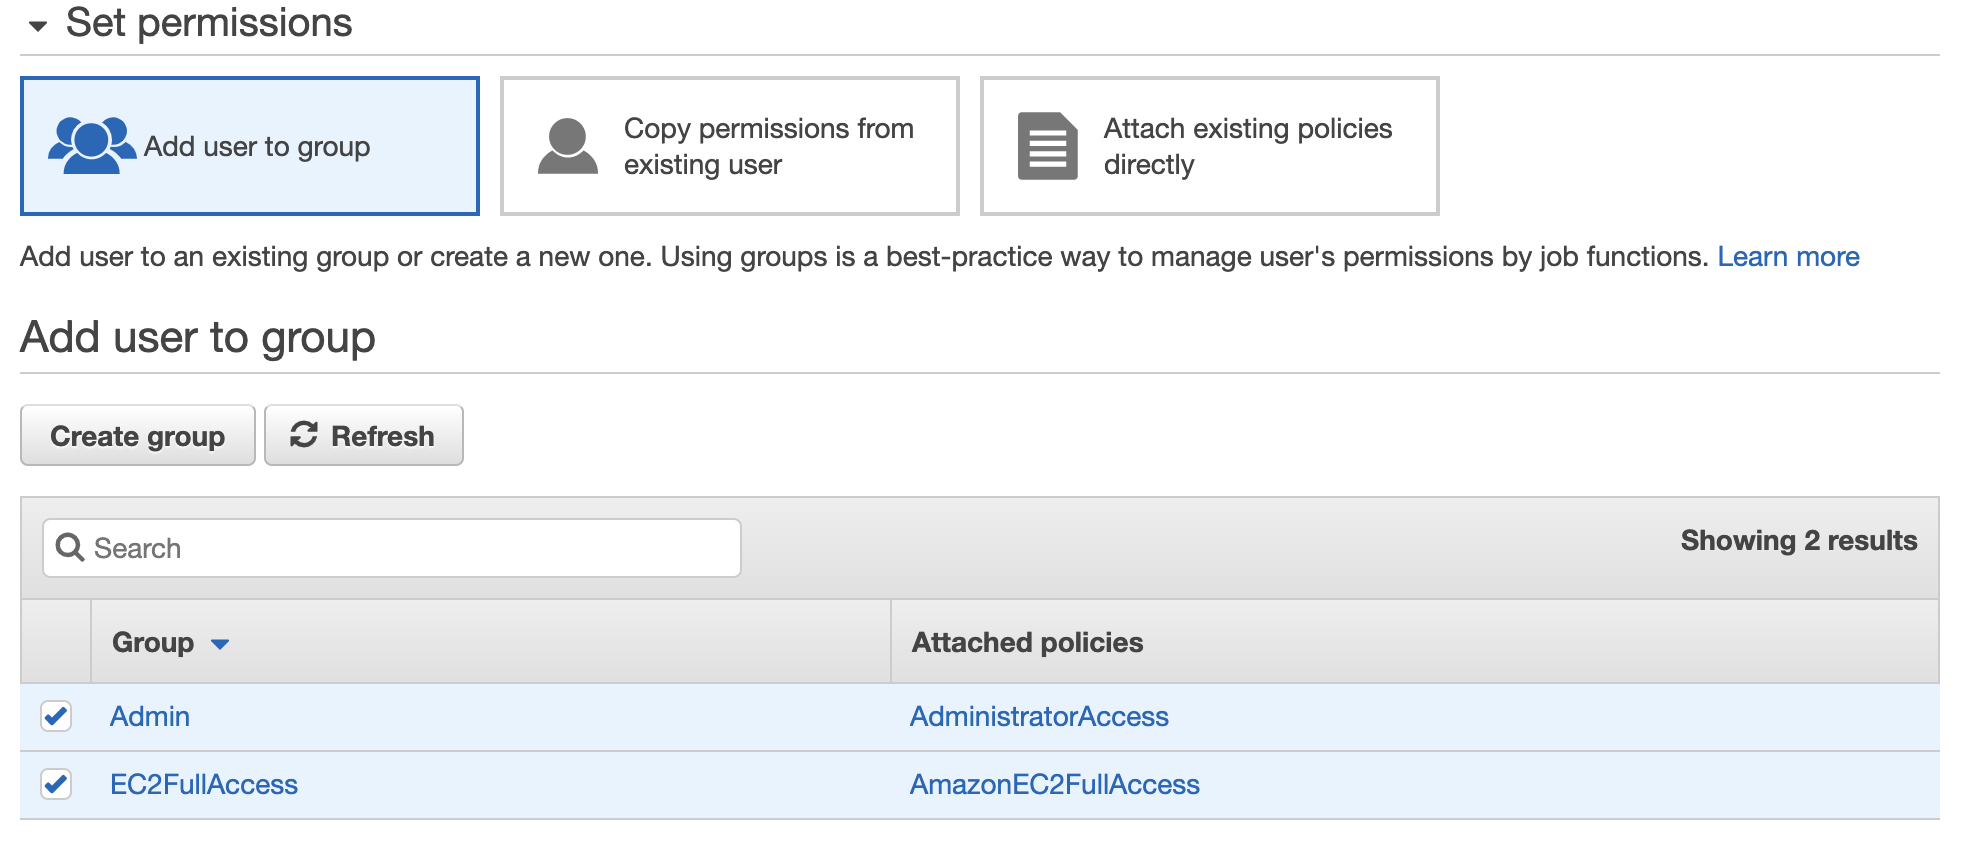
Faça download do ID da chave de acesso da Amazon AWS, chave de acesso secreta

Basta digitar o comando aws configure . Insira o ID da chave de acesso da Amazon e a chave de acesso secreta.
|
1 2 3 4 5 |
bash - 3.2 $ aws configure AWS Access Key ID [ **************** QTOR ] : AWS Secret Access Key [ **************** 4taa ] : Default region name [ us - east - 2 ] : Default output format [ json ] : |
E você está tudo pronto. Você configurou com êxito a Amazon AWS CLI.
Execute seu primeiro comando da Amazon AWS CLI:

Como você vê acima, eu tenho one Amazon EC2 instance em execução, use o comando describe-instances para obter todos os detalhes sobre a instância.
bash-3.2$ aws ec2 describe-instances
|
1 2 3 4 5 6 7 8 9 10 11 12 13 14 15 16 17 18 19 20 21 22 23 24 25 26 27 28 29 30 31 32 33 34 35 36 37 38 39 40 41 42 43 44 45 46 47 48 49 50 51 52 53 54 55 56 57 58 59 60 61 62 63 64 65 66 67 68 69 70 71 72 73 74 75 76 77 78 79 80 81 82 83 84 85 86 87 88 89 90 91 92 93 94 95 96 97 98 99 100 101 102 103 104 105 106 107 108 109 110 111 112 113 114 115 116 117 118 119 120 121 122 123 124 125 126 127 128 129 130 131 132 133 134 135 136 137 138 139 140 141 142 143 144 145 146 147 148 149 150 151 152 153 154 155 156 157 158 159 160 161 162 163 164 165 166 167 |
{ "Reservations" : [ { "Instances" : [ { "Monitoring" : { "State" : "disabled" } , "PublicDnsName" : "" , "StateReason" : { "Message" : "Client.UserInitiatedShutdown: User initiated shutdown" , "Code" : "Client.UserInitiatedShutdown" } , "State" : { "Code" : 48 , "Name" : "terminated" } , "EbsOptimized" : false , "LaunchTime" : "2019-05-09T12:33:20.000Z" , "ProductCodes" : [ ] , "CpuOptions" : { "CoreCount" : 1 , "ThreadsPerCore" : 1 } , "StateTransitionReason" : "User initiated (2019-05-10 15:33:23 GMT)" , "InstanceId" : "i-02f2a6661658d3ef2" , "EnaSupport" : true , "ImageId" : "ami-06088b0de148c2bac" , "PrivateDnsName" : "" , "KeyName" : "crunchify" , "SecurityGroups" : [ ] , "ClientToken" : "" , "InstanceType" : "t2.micro" , "CapacityReservationSpecification" : { "CapacityReservationPreference" : "open" } , "NetworkInterfaces" : [ ] , "Placement" : { "Tenancy" : "default" , "GroupName" : "" , "AvailabilityZone" : "us-east-2a" } , "Hypervisor" : "xen" , "BlockDeviceMappings" : [ ] , "Architecture" : "x86_64" , "RootDeviceType" : "ebs" , "RootDeviceName" : "/dev/sda1" , "VirtualizationType" : "hvm" , "Tags" : [ { "Value" : "worker" , "Key" : "Name" } ] , "HibernationOptions" : { "Configured" : false } , "AmiLaunchIndex" : 0 } , { "Monitoring" : { "State" : "disabled" } , "PublicDnsName" : "ec2-18-188-240-188.us-east-2.compute.amazonaws.com" , "State" : { "Code" : 16 , "Name" : "running" } , "EbsOptimized" : false , "LaunchTime" : "2019-05-09T12:33:20.000Z" , "PublicIpAddress" : "18.188.240.188" , "PrivateIpAddress" : "172.31.1.223" , "ProductCodes" : [ ] , "VpcId" : "vpc-8b4655e3" , "CpuOptions" : { "CoreCount" : 1 , "ThreadsPerCore" : 1 } , "StateTransitionReason" : "" , "InstanceId" : "i-0e19bc4bb04173c6a" , "EnaSupport" : true , "ImageId" : "ami-06088b0de148c2bac" , "PrivateDnsName" : "ip-172-31-1-223.us-east-2.compute.internal" , "KeyName" : "crunchify" , "SecurityGroups" : [ { "GroupName" : "launch-wizard-4" , "GroupId" : "sg-06bd2ee5d14e38797" } ] , "ClientToken" : "" , "SubnetId" : "subnet-c2447faa" , "InstanceType" : "t2.micro" , "CapacityReservationSpecification" : { "CapacityReservationPreference" : "open" } , "NetworkInterfaces" : [ { "Status" : "in-use" , "MacAddress" : "02:e4:a8:93:ad:56" , "SourceDestCheck" : true , "VpcId" : "vpc-8b4655e3" , "Description" : "" , "NetworkInterfaceId" : "eni-0b57a08339236e849" , "PrivateIpAddresses" : [ { "PrivateDnsName" : "ip-172-31-1-223.us-east-2.compute.internal" , "PrivateIpAddress" : "172.31.1.223" , "Primary" : true , "Association" : { "PublicIp" : "18.188.240.188" , "PublicDnsName" : "ec2-18-188-240-188.us-east-2.compute.amazonaws.com" , "IpOwnerId" : "amazon" } } ] , "PrivateDnsName" : "ip-172-31-1-223.us-east-2.compute.internal" , "InterfaceType" : "interface" , "Attachment" : { "Status" : "attached" , "DeviceIndex" : 0 , "DeleteOnTermination" : true , "AttachmentId" : "eni-attach-06cb447cd085d5818" , "AttachTime" : "2019-05-09T12:33:20.000Z" } , "Groups" : [ { "GroupName" : "launch-wizard-4" , "GroupId" : "sg-06bd2ee5d14e38797" } ] , "Ipv6Addresses" : [ ] , "OwnerId" : "600038600370" , "PrivateIpAddress" : "172.31.1.223" , "SubnetId" : "subnet-c2447faa" , "Association" : { "PublicIp" : "18.188.240.188" , "PublicDnsName" : "ec2-18-188-240-188.us-east-2.compute.amazonaws.com" , "IpOwnerId" : "amazon" } } ] , "SourceDestCheck" : true , "Placement" : { "Tenancy" : "default" , "GroupName" : "" , "AvailabilityZone" : "us-east-2a" } , "Hypervisor" : "xen" , "BlockDeviceMappings" : [ { "DeviceName" : "/dev/sda1" , "Ebs" : { "Status" : "attached" , "DeleteOnTermination" : true , "VolumeId" : "vol-077e7eb58ca59daea" , "AttachTime" : "2019-05-09T12:33:20.000Z" } } ] , "Architecture" : "x86_64" , "RootDeviceType" : "ebs" , "RootDeviceName" : "/dev/sda1" , "VirtualizationType" : "hvm" , "Tags" : [ { "Value" : "Crunchify" , "Key" : "Name" } ] , "HibernationOptions" : { "Configured" : false } , "AmiLaunchIndex" : 1 } ] , "ReservationId" : "r-00163c475d0a29a3d" , "Groups" : [ ] , "OwnerId" : "600038600370" } ] } |
E é isso. Estás pronto. Você executou com sucesso todas as tarefas abaixo:

- Instalar Amazon AWS CLI
- Configurar Amazon AWS CLI
- Executou seu 1º comando e obteve resultado
Deixe-me saber se você enfrentar algum problema ao executar o comando AWS AWS CLI.