
MacOSまたはLinuxでAmazonAWS CLI(コマンドラインインターフェイス)をセットアップする方法は?
公開: 2019-05-11
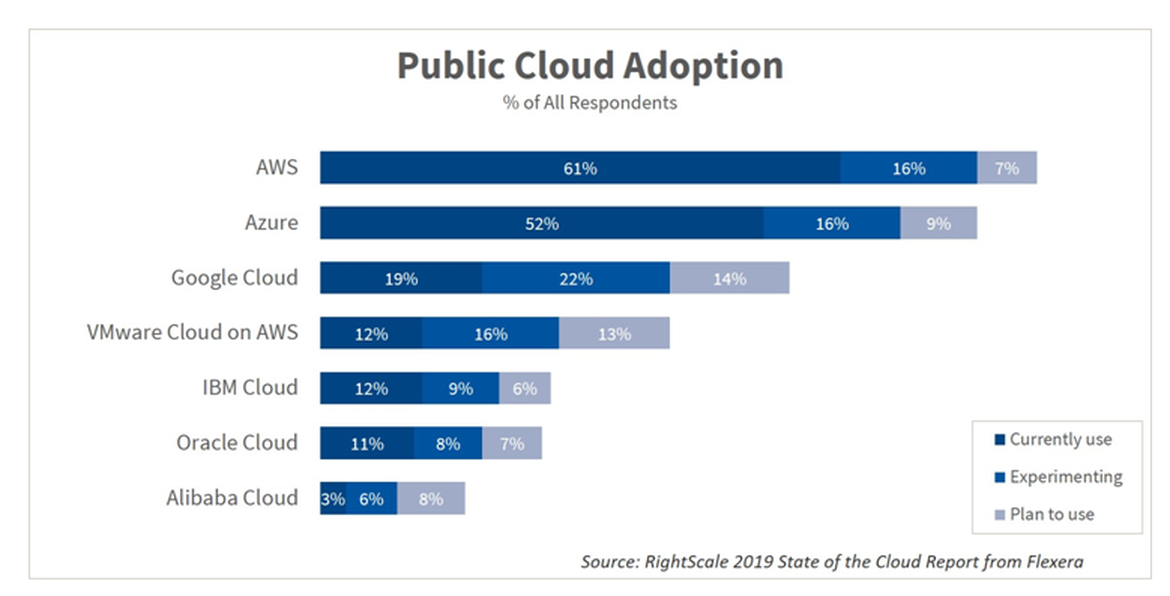
Amazon AWSが世界最大のパブリッククラウドプロバイダーであることは間違いありません。 私は個人的にCrunchifyのクライアントのいくつかのためにAmazonAWSで遊び始めました、そして私はAWSがとても柔軟であると言わなければなりません。
私はすべての開発活動にMacbook Proを使用しています。 プロジェクトにAmazonAWSクラウドを使用する場合、最初に必要なのは、Amazon CLI(コマンドラインインターフェイス)をインストールして、基本的なAmazonAWS操作の自動化を開始することです。
このチュートリアルでは、macOSにAmazon CLIをインストールする手順について説明します。
以下の質問のいずれかがある場合は、適切な場所にいます。
- Amazon AWSCLIをMacにインストールする
- AWS CLI –AWSコマンドラインインターフェースの使用を開始する
- macOSでのAWSCLIバージョン1または2のインストール、更新、およびアンインストール
- AWSコマンドラインインターフェース– Amazon AWS
- MacbookProにAWSCLIをインストールするにはどうすればよいですか?
- macOSインストールAmazonAWSコマンドラインインターフェイス(CLI)ツール
始めましょう:
MacOSでAmazonAWSCLIをセットアップする方法は2つあります。
- オプション-1:
curlコマンドを使用する - オプション2:単純な
pipコマンドを使用する
オプション-1:curlコマンドを使用する
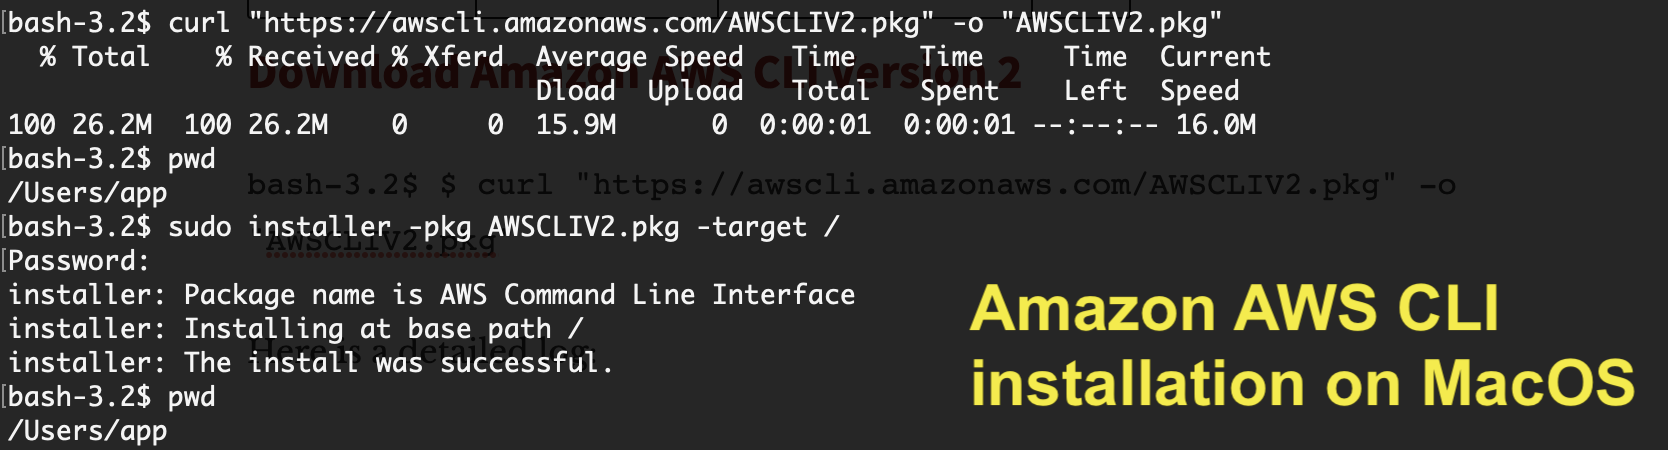
Amazon AWSCLIバージョン2をダウンロードする
|
1 |
bash - 3.2 $ $ curl "https://awscli.amazonaws.com/AWSCLIV2.pkg" - o "AWSCLIV2.pkg" |
詳細なログは次のとおりです。
|
1 2 3 4 5 6 |
bash - 3.2 $ $ curl "https://awscli.amazonaws.com/AWSCLIV2.pkg" - o "AWSCLIV2.pkg" bash : $ : command not found bash - 3.2 $ curl "https://awscli.amazonaws.com/AWSCLIV2.pkg" - o "AWSCLIV2.pkg" % Total % Received % Xferd Average Speed Time Time Time Current Dload Upload Total Spent Left Speed 100 26.2M 100 26.2M 0 0 15.9M 0 0 : 00 : 01 0 : 00 : 01 -- : -- : -- 16.0M |
これは、フォルダ/の下にインストールするコマンドです。
|
1 2 3 4 5 6 7 |
bash - 3.2 $ sudo installer - pkg AWSCLIV2 . pkg - target / Password : installer : Package name is AWS Command Line Interface installer : Installing at base path / installer : The install was successful . |
AmazonAWSのバージョンを確認します。
|
1 2 3 |
bash - 3.2 $ aws -- version aws - cli / 2.4.16 Python / 3.8.8 Darwin / 21.4.0 exe / x86_64 prompt / off |
これは、MacOSにAmazon AWSCLIをインストールする最も簡単な方法です。 インストールで問題が発生した場合はお知らせください。
オプション2:Pythonpipコマンドを使用する
ステップ1。
システムにPythonがインストールされていることを確認してください。
|
1 2 |
bash - 3.2 $ python -- version Python 3.7.2 |
Pythonの最新バージョンが表示されない場合は、以下のコマンドを使用してインストールしてください。
|
1 |
bash - 3.2 $ brew install python |
ステップ2。
最新のAmazonAWSCLIバンドルをダウンロードします。
|
1 2 3 4 |
bash - 3.2 $ curl "https://s3.amazonaws.com/aws-cli/awscli-bundle.zip" - o "awscli-bundle.zip" % Total % Received % Xferd Average Speed Time Time Time Current Dload Upload Total Spent Left Speed 100 11.1M 100 11.1M 0 0 5598k 0 0 : 00 : 02 0 : 00 : 02 -- : -- : -- 5600k |
ステップ-3。
awscli-bundle.zipを解凍します。
|
1 2 3 4 5 6 7 8 9 10 11 12 13 14 15 16 17 18 19 20 21 22 23 24 |
bash - 3.2 $ unzip awscli - bundle . zip Archive : awscli - bundle . zip replace awscli - bundle / install ? [ y ] es , [ n ] o , [ A ] ll , [ N ] one , [ r ] ename : A inflating : awscli - bundle / install inflating : awscli - bundle / packages / botocore - 1.12.145.tar.gz inflating : awscli - bundle / packages / futures - 3.2.0.tar.gz inflating : awscli - bundle / packages / docutils - 0.14.tar.gz inflating : awscli - bundle / packages / virtualenv - 15.1.0.tar.gz inflating : awscli - bundle / packages / urllib3 - 1.22.tar.gz inflating : awscli - bundle / packages / rsa - 3.4.2.tar.gz inflating : awscli - bundle / packages / urllib3 - 1.24.3.tar.gz inflating : awscli - bundle / packages / ordereddict - 1.1.tar.gz inflating : awscli - bundle / packages / simplejson - 3.3.0.tar.gz inflating : awscli - bundle / packages / s3transfer - 0.2.0.tar.gz inflating : awscli - bundle / packages / python - dateutil - 2.6.1.tar.gz inflating : awscli - bundle / packages / jmespath - 0.9.4.tar.gz inflating : awscli - bundle / packages / PyYAML - 3.13.tar.gz inflating : awscli - bundle / packages / argparse - 1.2.1.tar.gz inflating : awscli - bundle / packages / pyasn1 - 0.4.5.tar.gz inflating : awscli - bundle / packages / colorama - 0.3.9.tar.gz inflating : awscli - bundle / packages / python - dateutil - 2.8.0.tar.gz inflating : awscli - bundle / packages / awscli - 1.16.155.tar.gz inflating : awscli - bundle / packages / six - 1.12.0.tar.gz inflating : awscli - bundle / packages / setup / setuptools_scm - 1.15.7.tar.gz |
ステップ-4。
インストーラーをsudoerとして実行します。
|
1 2 3 4 5 6 7 8 |
bash - 3.2 $ sudo . / awscli - bundle / install - i / usr / local / aws - b / usr / local / bin / aws Password : Running cmd : / usr / bin / python virtualenv . py -- no - download -- python / usr / bin / python / usr / local / aws Running cmd : / usr / local / aws / bin / pip install -- no - cache - dir -- no - index -- find - links file : ///Users/crunchify/Documents/ansible/awscli-bundle/packages/setup setuptools_scm-1.15.7.tar.gz Running cmd : / usr / local / aws / bin / pip install -- no - cache - dir -- no - index -- find - links file : ///Users/crunchify/Documents/ansible/awscli-bundle/packages awscli-1.16.155.tar.gz Symlink already exists : / usr / local / bin / aws Removing symlink . You can now run : / usr / local / bin / aws -- version |
ステップ-5。
確認。 Amazon CLIが正常にインストールされているかどうかを確認するにはどうすればよいですか?
|
1 2 |
bash - 3.2 $ aws -- version aws - cli / 1.16.155 Python / 2.7.10 Darwin / 18.5.0 botocore / 1.12.145 |
それでおしまい。 準備万端です。 Amazon CLI is successfully installed nowた。
AmazonAWSコンソールとAWSCLIのセットアップ:
-
https://console.aws.amazon.com/iam/home?#/usersにアクセスします - ユーザーを作成
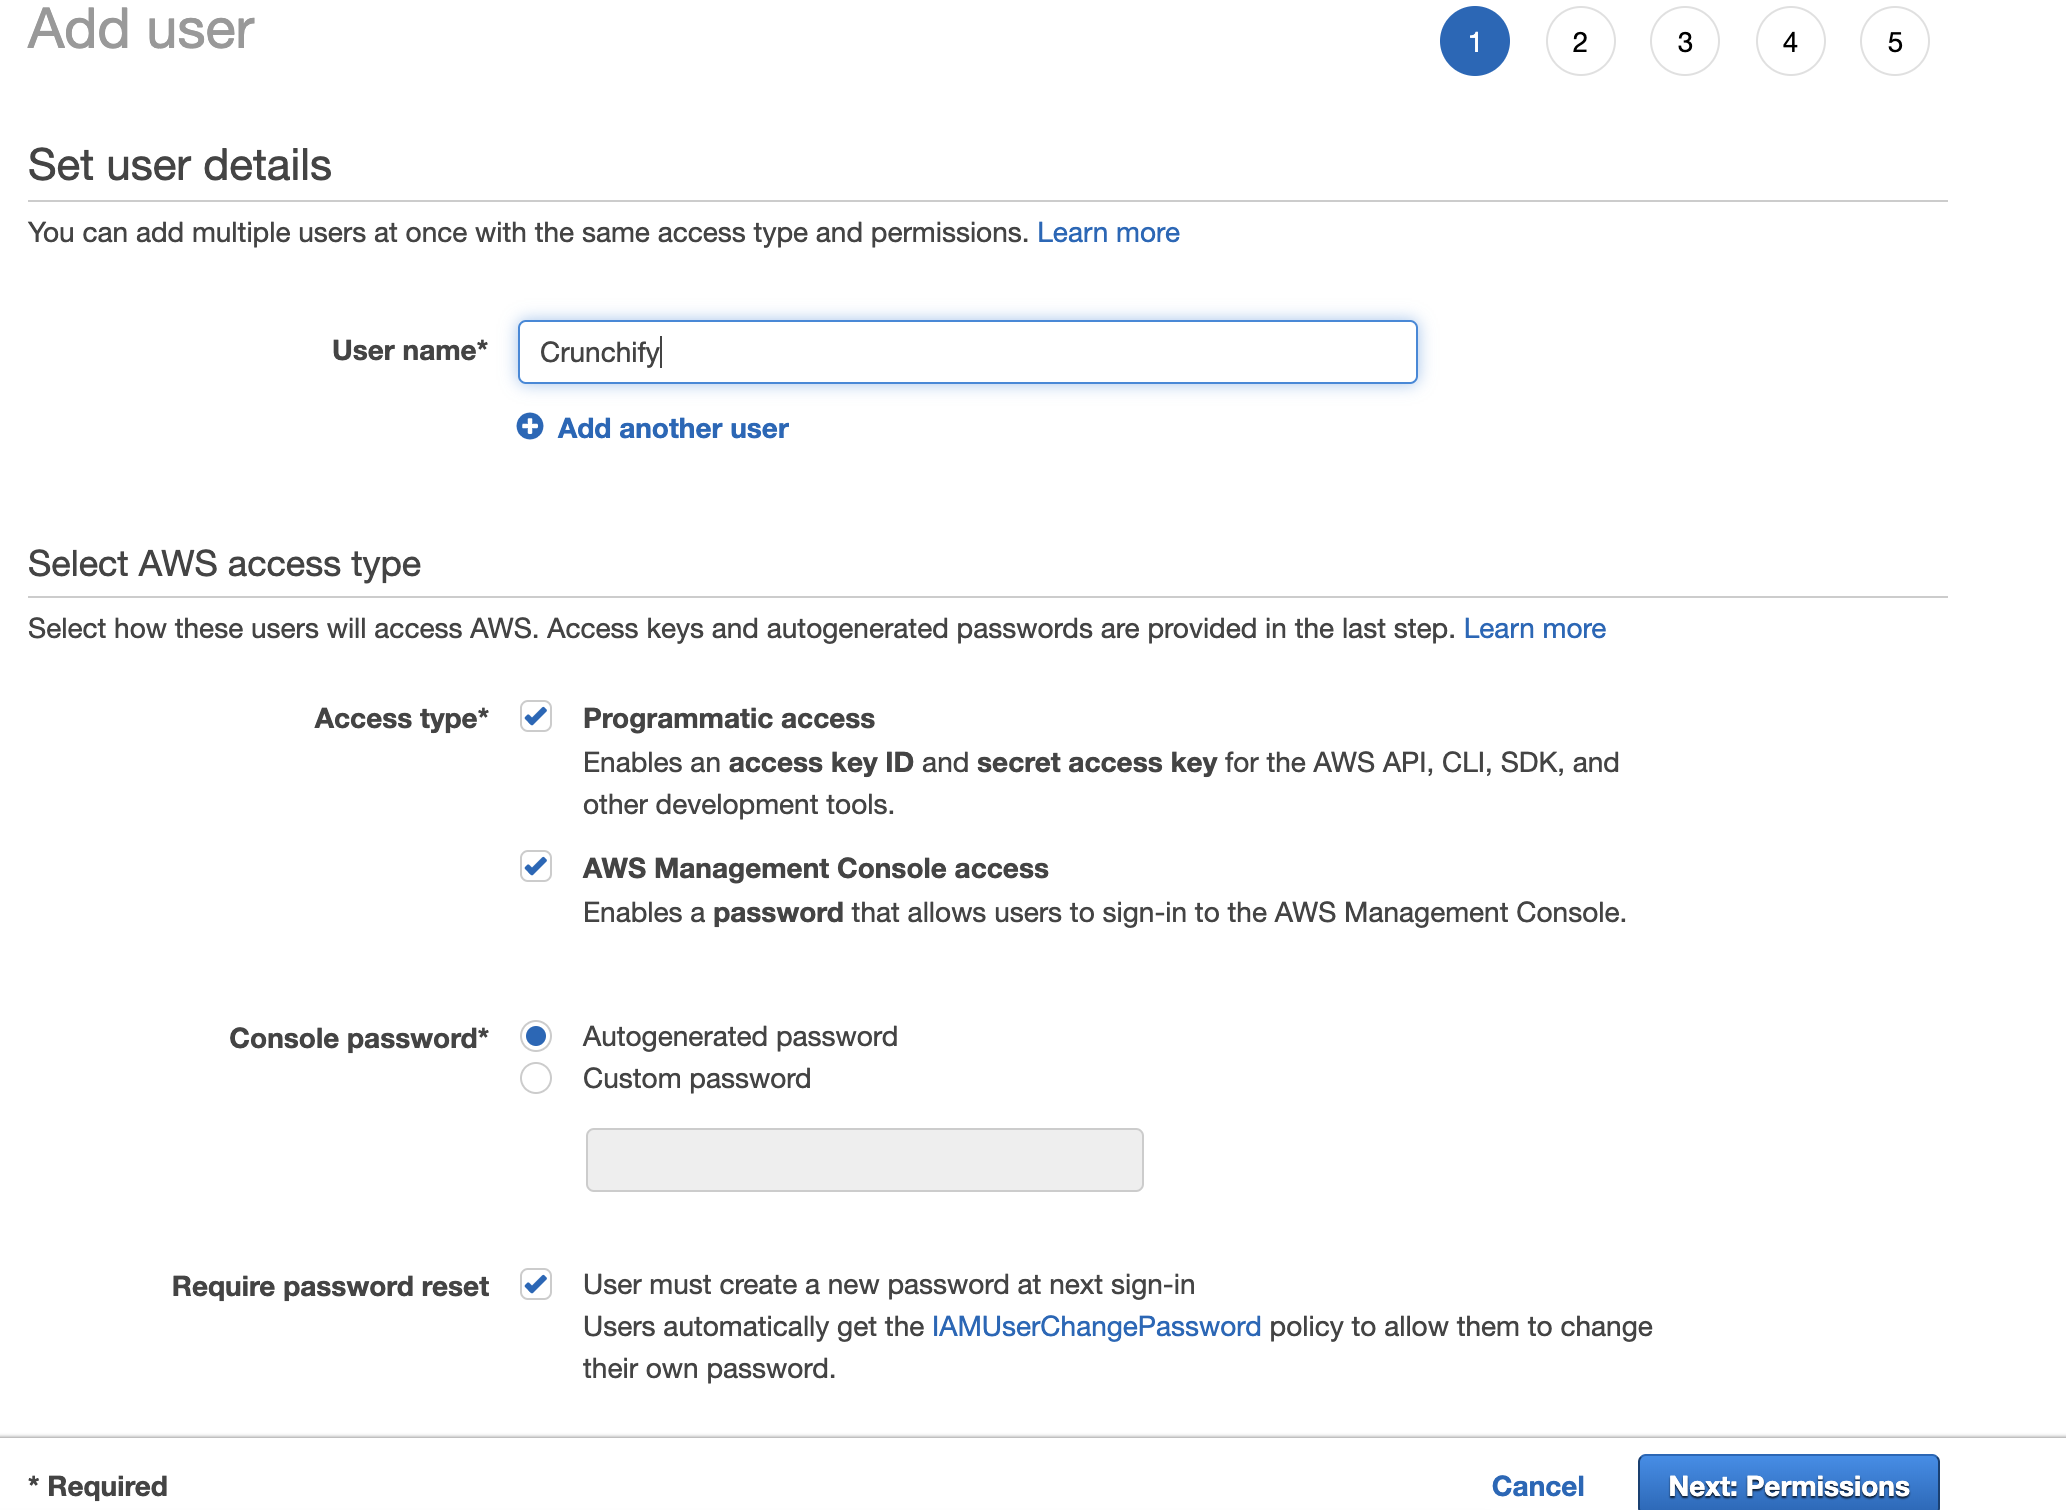
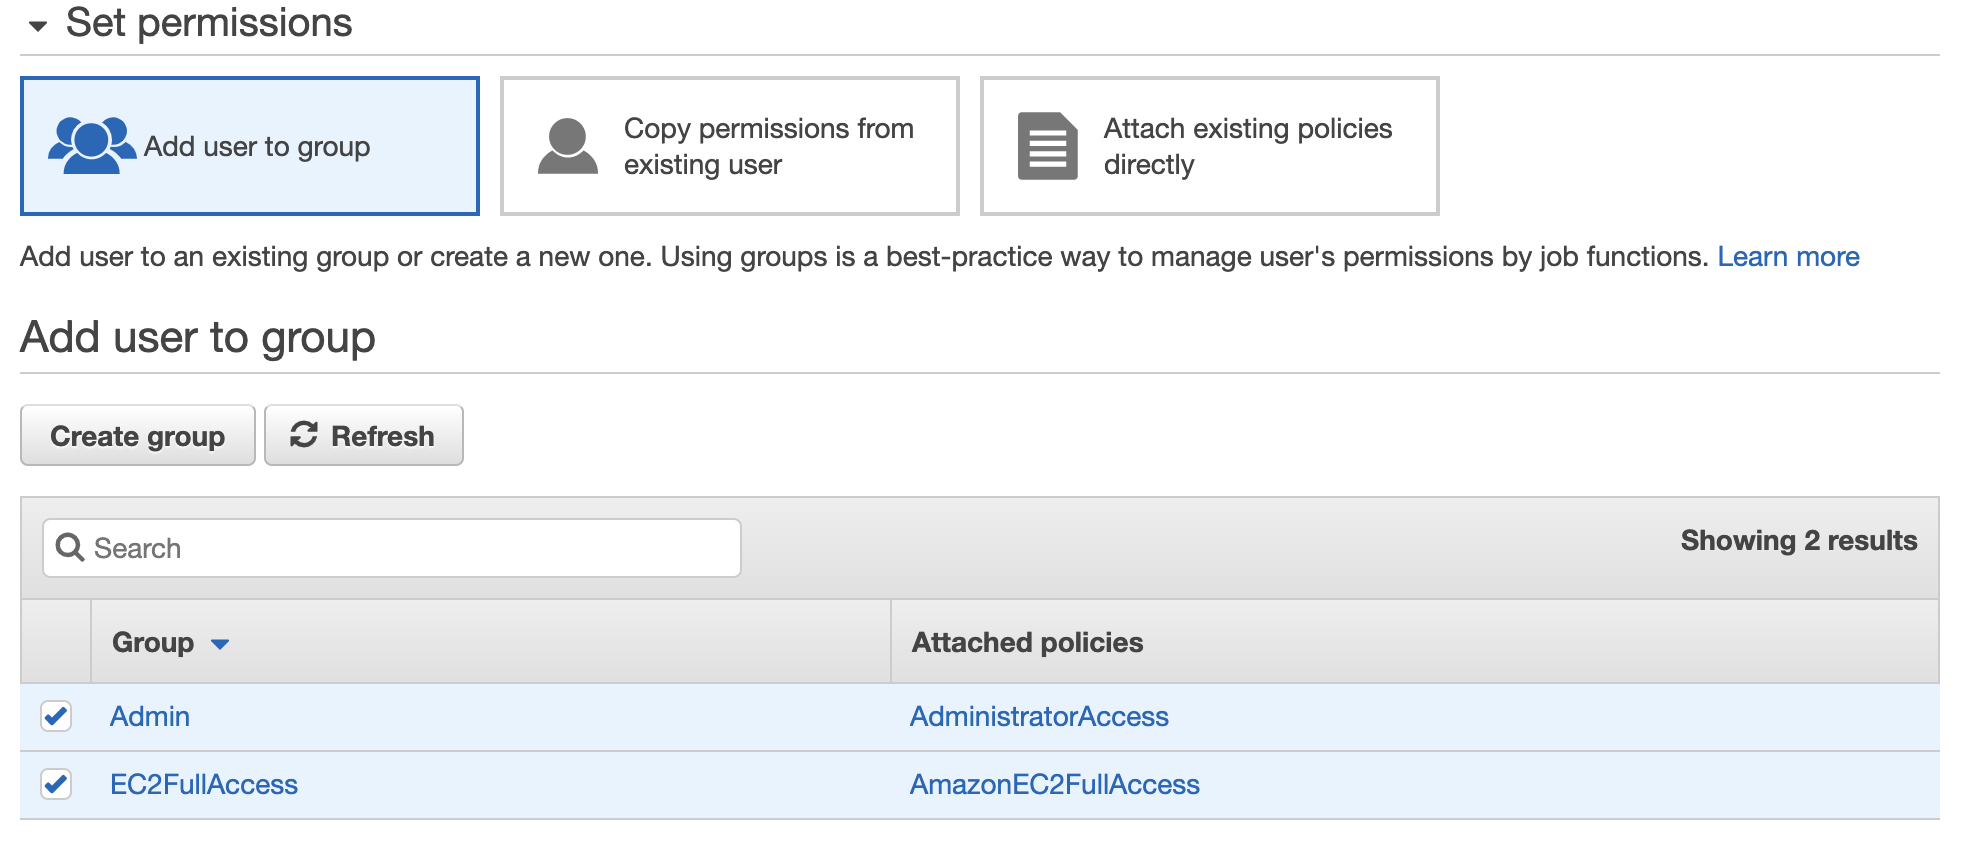
権限を設定する
Amazon AWSアクセスキーID、シークレットアクセスキーをダウンロードします

aws configureコマンドを入力するだけです。 AmazonアクセスキーIDとシークレットアクセスキーを入力します。
|
1 2 3 4 5 |
bash - 3.2 $ aws configure AWS Access Key ID [ **************** QTOR ] : AWS Secret Access Key [ **************** 4taa ] : Default region name [ us - east - 2 ] : Default output format [ json ] : |
そして、あなたはすべて準備ができています。 これで、Amazon AWSCLIが正常にセットアップされました。
最初のAmazonAWSCLIコマンドを実行します。

上記のように、 one Amazon EC2 instanceが稼働しています。describe describe-instancesコマンドを使用して、インスタンスに関するすべての詳細を取得します。
bash-3.2$ aws ec2 describe-instances
|
1 2 3 4 5 6 7 8 9 10 11 12 13 14 15 16 17 18 19 20 21 22 23 24 25 26 27 28 29 30 31 32 33 34 35 36 37 38 39 40 41 42 43 44 45 46 47 48 49 50 51 52 53 54 55 56 57 58 59 60 61 62 63 64 65 66 67 68 69 70 71 72 73 74 75 76 77 78 79 80 81 82 83 84 85 86 87 88 89 90 91 92 93 94 95 96 97 98 99 100 101 102 103 104 105 106 107 108 109 110 111 112 113 114 115 116 117 118 119 120 121 122 123 124 125 126 127 128 129 130 131 132 133 134 135 136 137 138 139 140 141 142 143 144 145 146 147 148 149 150 151 152 153 154 155 156 157 158 159 160 161 162 163 164 165 166 167 |
{ "Reservations" : [ { "Instances" : [ { "Monitoring" : { "State" : "disabled" } , "PublicDnsName" : "" , "StateReason" : { "Message" : "Client.UserInitiatedShutdown: User initiated shutdown" , "Code" : "Client.UserInitiatedShutdown" } , "State" : { "Code" : 48 , "Name" : "terminated" } , "EbsOptimized" : false , "LaunchTime" : "2019-05-09T12:33:20.000Z" , "ProductCodes" : [ ] , "CpuOptions" : { "CoreCount" : 1 , "ThreadsPerCore" : 1 } , "StateTransitionReason" : "User initiated (2019-05-10 15:33:23 GMT)" , "InstanceId" : "i-02f2a6661658d3ef2" , "EnaSupport" : true , "ImageId" : "ami-06088b0de148c2bac" , "PrivateDnsName" : "" , "KeyName" : "crunchify" , "SecurityGroups" : [ ] , "ClientToken" : "" , "InstanceType" : "t2.micro" , "CapacityReservationSpecification" : { "CapacityReservationPreference" : "open" } , "NetworkInterfaces" : [ ] , "Placement" : { "Tenancy" : "default" , "GroupName" : "" , "AvailabilityZone" : "us-east-2a" } , "Hypervisor" : "xen" , "BlockDeviceMappings" : [ ] , "Architecture" : "x86_64" , "RootDeviceType" : "ebs" , "RootDeviceName" : "/dev/sda1" , "VirtualizationType" : "hvm" , "Tags" : [ { "Value" : "worker" , "Key" : "Name" } ] , "HibernationOptions" : { "Configured" : false } , "AmiLaunchIndex" : 0 } , { "Monitoring" : { "State" : "disabled" } , "PublicDnsName" : "ec2-18-188-240-188.us-east-2.compute.amazonaws.com" , "State" : { "Code" : 16 , "Name" : "running" } , "EbsOptimized" : false , "LaunchTime" : "2019-05-09T12:33:20.000Z" , "PublicIpAddress" : "18.188.240.188" , "PrivateIpAddress" : "172.31.1.223" , "ProductCodes" : [ ] , "VpcId" : "vpc-8b4655e3" , "CpuOptions" : { "CoreCount" : 1 , "ThreadsPerCore" : 1 } , "StateTransitionReason" : "" , "InstanceId" : "i-0e19bc4bb04173c6a" , "EnaSupport" : true , "ImageId" : "ami-06088b0de148c2bac" , "PrivateDnsName" : "ip-172-31-1-223.us-east-2.compute.internal" , "KeyName" : "crunchify" , "SecurityGroups" : [ { "GroupName" : "launch-wizard-4" , "GroupId" : "sg-06bd2ee5d14e38797" } ] , "ClientToken" : "" , "SubnetId" : "subnet-c2447faa" , "InstanceType" : "t2.micro" , "CapacityReservationSpecification" : { "CapacityReservationPreference" : "open" } , "NetworkInterfaces" : [ { "Status" : "in-use" , "MacAddress" : "02:e4:a8:93:ad:56" , "SourceDestCheck" : true , "VpcId" : "vpc-8b4655e3" , "Description" : "" , "NetworkInterfaceId" : "eni-0b57a08339236e849" , "PrivateIpAddresses" : [ { "PrivateDnsName" : "ip-172-31-1-223.us-east-2.compute.internal" , "PrivateIpAddress" : "172.31.1.223" , "Primary" : true , "Association" : { "PublicIp" : "18.188.240.188" , "PublicDnsName" : "ec2-18-188-240-188.us-east-2.compute.amazonaws.com" , "IpOwnerId" : "amazon" } } ] , "PrivateDnsName" : "ip-172-31-1-223.us-east-2.compute.internal" , "InterfaceType" : "interface" , "Attachment" : { "Status" : "attached" , "DeviceIndex" : 0 , "DeleteOnTermination" : true , "AttachmentId" : "eni-attach-06cb447cd085d5818" , "AttachTime" : "2019-05-09T12:33:20.000Z" } , "Groups" : [ { "GroupName" : "launch-wizard-4" , "GroupId" : "sg-06bd2ee5d14e38797" } ] , "Ipv6Addresses" : [ ] , "OwnerId" : "600038600370" , "PrivateIpAddress" : "172.31.1.223" , "SubnetId" : "subnet-c2447faa" , "Association" : { "PublicIp" : "18.188.240.188" , "PublicDnsName" : "ec2-18-188-240-188.us-east-2.compute.amazonaws.com" , "IpOwnerId" : "amazon" } } ] , "SourceDestCheck" : true , "Placement" : { "Tenancy" : "default" , "GroupName" : "" , "AvailabilityZone" : "us-east-2a" } , "Hypervisor" : "xen" , "BlockDeviceMappings" : [ { "DeviceName" : "/dev/sda1" , "Ebs" : { "Status" : "attached" , "DeleteOnTermination" : true , "VolumeId" : "vol-077e7eb58ca59daea" , "AttachTime" : "2019-05-09T12:33:20.000Z" } } ] , "Architecture" : "x86_64" , "RootDeviceType" : "ebs" , "RootDeviceName" : "/dev/sda1" , "VirtualizationType" : "hvm" , "Tags" : [ { "Value" : "Crunchify" , "Key" : "Name" } ] , "HibernationOptions" : { "Configured" : false } , "AmiLaunchIndex" : 1 } ] , "ReservationId" : "r-00163c475d0a29a3d" , "Groups" : [ ] , "OwnerId" : "600038600370" } ] } |
以上です。 準備万端です。 以下のすべてのタスクを正常に実行しました。

- Amazon AWSCLIをインストールします
- Amazon AWSCLIをセットアップする
- 最初のコマンドを実行して結果を取得しました
AWS AWSCLIコマンドの実行で問題が発生した場合はお知らせください。